
Saeco Via Venenzia - Kaffeemaschine PHILIPS - Kostenlose Bedienungsanleitung
Finden Sie kostenlos die Bedienungsanleitung des Geräts Saeco Via Venenzia PHILIPS als PDF.


| Produkttyp | Espressomaschine mit integrierter Kaffeemühle |
| Höhe | 35 cm |
| Breite | 28 cm |
| Tiefe | 42 cm |
| Gewicht | 9,5 kg |
| Energieversorgung | 220-240 V, 50 Hz |
| Leistungsaufnahme | 1450 W |
| Wassertankfüllmenge | 1,8 L |
| Kaffeebohnenbehälter | 250 g |
| Pumpendruck | 15 bar |
| Heizsystem | Thermoblock |
| Funktionen | Mahlgrad einstellbar, Heißwasserfunktion, Milchaufschäumsystem (Pannarello), Ein- und Zweitassenmodus, Abschaltautomatik, Brühgruppe herausnehmbar |
| Wartung & Reinigung | Entnehmbare Brühgruppe, Reinigungsprogramm für Milchsystem, Entkalkungsprogramm |
| Sicherheit | Automatische Abschaltung nach 30 Minuten Inaktivität, Kindersicherung über Tastensperre |
| Ersatzteile & Reparierbarkeit | Philips Original-Ersatzteile verfügbar: Brühgruppe, Dichtungen, Siebträger, Pannarello-Aufsatz, Wassertank |
| Herstellergarantie | 2 Jahre |
| Besonderheiten | Patentiertes Brühsystem für optimale Extraktion, Keramikmahlwerk |
Häufig gestellte Fragen - Saeco Via Venenzia PHILIPS
Benutzerfragen zu Saeco Via Venenzia PHILIPS
0 Frage zu diesem Gerät. Beantworten Sie die, die Sie kennen, oder stellen Sie Ihre eigene.
Eine neue Frage zu diesem Gerät stellen
Laden Sie die Anleitung für Ihr Kaffeemaschine kostenlos im PDF-Format! Finden Sie Ihr Handbuch Saeco Via Venenzia - PHILIPS und nehmen Sie Ihr elektronisches Gerät wieder in die Hand. Auf dieser Seite sind alle Dokumente veröffentlicht, die für die Verwendung Ihres Geräts notwendig sind. Saeco Via Venenzia von der Marke PHILIPS.
BEDIENUNGSANLEITUNG Saeco Via Venenzia PHILIPS
3
ABBILDUNGEN ZUM TEXT ILLUSTRATIONS REFERENCES DANS LE TEXTE ILLUSTRAZIONI CORRISPONDENTI AL TESTO
PICTURES CORRESPOND TO THE TEXT ILUSTRACIONES CORRESPONDIENTES AL TEXTO


natural_image
Technical line drawing of a mechanical assembly with no visible text or symbols
natural_image
Simple line drawing of a mechanical component with no visible text or symbols
natural_image
Line drawing of a coffee machine with a cup on a tray (no text or symbols)
natural_image
Illustration of hands holding a small object with a dark circular element, no text or symbols present
natural_image
Simple line drawing of a coffee maker using a straw to lift a cup (no text or symbols)
natural_image
Simple line drawing of a coffee machine with two cups on a grater (no text or symbols)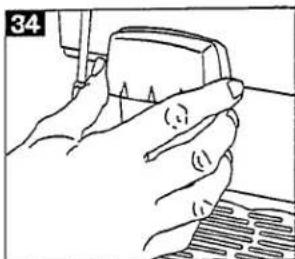
natural_image
Hand pressing a button on a surface, no text or symbols visible
natural_image
Abstract black-and-white graphic symbol resembling a stylized letter or symbol (no text or symbols present)

natural_image
Hand using a screwdriver to adjust or install a mechanical component (no text or symbols visible)
Saeco
40
FOR AN EASIER READING
For an easier reading

The warning triangle indicates all important instructions for the user's safety. These indications must be strictly followed in order to avoid serious injuries!
B
The reference to illustrations, components of the machine or commands, etc., is indicated by numbers or letters; in this case reference is made to illustration B.

The illustrations referred to in the text shall be found in the jacket-flap. Keep this page open when reading the instructions for use.
How to use these instructions
These instructions for use cannot take into account any possible use of the bar group. For further information, or in case of any problem which is not described into detail or dealt with in these instructions, please contact the closest Selling Service Centre.
Keep these instructions for use in a safe place and next to the bar group in case another person should use it.
Table of contents
Page
41 Technical data
42 Safety norms
44 List of components and commands
44 Unpacking/Positioning
44 Power connection
45 Operation and use
46 Suggestions/Remarks
Page
47 Preparation
48 Integrated safety devices
49 Cleaning/Storage/Maintenance
- Troubleshooting
51 Disposal
41
TECHNICAL DATA
| Voltage rating | 230 Volt/50 Hz - 120 Volt/60 Hz |
| Rated output | 1150 - 1350 W |
| Dimensions (w x h x d) | ca. 29 x 42 x 38 cm |
| Body material | ABS synthetic material/metal |
| Weight | ca. 14 kg |
| Cable length | ca. 1.2 m |
| System | free-flow thermal blockwith alternative pump |
| Command panel | on the front side |
| Temperature control | fully automatic |
| Grinding adjustment | microadjustment, with notches |
| Coffee-grounds disposal | automatic |
| Control of grinding timeand of pump suction power | electronic |
| Water proportioning | with continuous electronic control |
| Water tank | removable, transparent |
| Steam/hot water nozzle | revolving, adjustable |
| Steam/coffee preparation | immediate switching |
| Heating time | ca. 2 min |
| Coffee preparation | 1 or 2 cups at the time |
| Coffee preparation time | ca. 20 sec./cup |
| Coffee consumption | ca. 7-7.5 g/cup |
| Capacity - water tank | 2.5 l for ca. 20-30 cups of coffee |
| - coffee bean hopper | ca 250 g |
| - coffee grounds | ca 30 grounds |
| Parasitic suppression | + |
| Protection isolation | class I |
| Approved by ASE | + |
| Complying with EN norm | 60335 |
| Guarantee | 1 year |
Accessories
Drip tray with grid
Measure for the second coffee blend
Key for central unit
Cleaning brush
Subject to construction and execution changes due to the technological progress:
42
B

natural_image
Black-and-white illustration of a crossed bar with a broken piece of wood, no text or symbols present.

natural_image
Simple line drawing of a stove with electrical circuit lines and a power outlet (no text or symbols)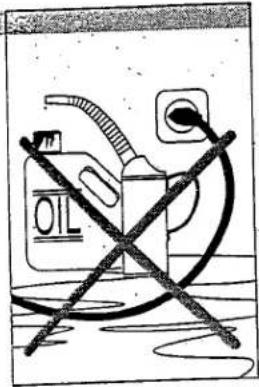


43
SAFETY NORMS
Danger!

Electric power can be lethal! The elettroconductive components must never come into contact with water: short-circuit danger! Steam and hot water can cause burnings! Never direct the steam or hot water jet onto body parts and handle the nozzle with caution: danger of burnings!
Adequate use
The bar-group is intended exclusively for private use. It is strictly forbidden to perform any technical change or use it for inappropriate aims due to dangers which may be thereby caused!
■ Unauthorized users
The persons who are not familiar with the instructions for use, children and people under the effect of alcohol or drugs are not authorized to use the bar group.
■ Protection of third parties
As a user of the bar group, make sure that children do not have the possibility to play with the machine. Children are not able to recognize the dangers which may derive by the use of an electric appliance.
A Electric power
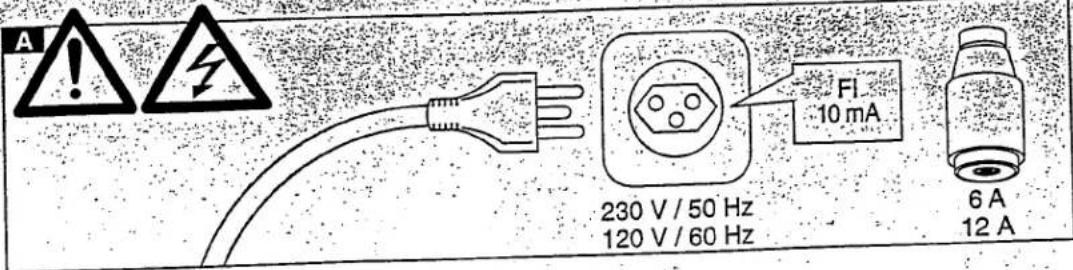
Never touch the electroconductive parts. They can cause electric discharges with danger of serious injuries, or even death. Connect the bar group to alternate power only with voltage equal to 230 V/50 Hz - 120 V/60 Hz. The socket fuse with delayed action must be minimum 6 A for Europe and minimum 12 A for the USA.
B Power cable
Never operate the bar group if the cable is damaged: have it replaced by a Saeco after-sale service centre. Do not pass the cable on corners and sharp edges and never block it. Do not place it on hot objects and keep it away from oil. Do not unplug the machine by pulling the cable or with wet hands.
C Positioning
Position the bar group in a safe place and on a stable surface to prevent it from falling and thus causing injuries. To prevent the machine body from melting or being damaged, do not place it on hot surfaces or close to open flames.
D Hands protection
When preparing coffee, never touch the central unit with your hands: danger of injuries. During coffee preparation, the central unit moves and the fingers may get stuck into it.
E Cleaning
Before cleaning the bar group, unplug the machine. Never place the machine into water (damages to the machine)!
Repairs/Maintenance
The bar group has already been set in the factory and accurately checked. In case of malfunction, defective machine and suspect of damage after a fall, immediately unplug the machine. Repair works must be performed exclusively by a Saeco after-sale service centre. No responsibility is undertaken in case of damages caused by repairs made by unskilled personnel.
44
LIST OF COMPONENTS AND COMMANDS
1 Coffee grounds bin
2 Drip tray
3 Grid
4 Steam/hot water nozzle
5 Steam/hot water knob
6 Water tank
7 Water level indicator
8 Water tank cover
9 Water proportioning knob
10 Main switch
11 Power cable
12 On/off switch
13 Temperature control light.
14 Coffee bean hopper control light.
15 Water tank control light
16 Programme selector
17 Coffee bean hopper cover
18 Coffee bean hopper
19 Grinding adjustment scale
20 Service door
21 Central unit
22 Funnel
23 Lock lever
24 Coffee powder box
25 Bin with cover for second coffee blend
26 Coffee dispensing system (removable)
Unpacking / Positioning
The original packing is of robust execution in order to allow a safe mail delivery. Keep the packing for any subsequent delivery to a SAECO after-sale service centre.
For the machine positioning, comply with the following safety norms.
Place the bar group on a stable surface.

Make sure that children cannot play with the machine.

Do not place the bar group on hot surfaces or next to open flames.
The bar group is ready for use.
Power connection

Attention: the inappropriate use of power may have lethal consequences.
Connect the bar group to alternate power only with voltage equal to 230 V/50 Hz - 120 V/60 Hz. The socket fuse with delayed action must be minimum 6 A for Europe and minimum 12 A for the USA.
Never operate the bar group if the cable is damaged: have it replaced.
by a SAECO after-sale service centre.

Saeco
45
OPERATION AND USE

Use extensions only if in a perfect state
The extension must have a minimum section of 1 mm 2 and be equipped with a tripolar plug.
Operation and use
Danger!

Electric power can have lethal consequences!
The elettroconductive components must never come into contact with water: short-circuit danger! Steam and hot water can cause burnings! Never direct the steam or hot water jet onto body parts and handle the nozzle with caution: danger of burnings! For personal and third party's safety strictly follow the safety norms indicated on pages 30/31.

Never operate the bar group without water and without coffee beans.
Take the measure, the cleaning brush and the key of the central unit from the coffee grounds bin (1) and keep them within reach.
27 The coffee bean hopper (18) is firmly fixed with a screw and has been set on the medium value "8" of the grinding adjustment scale (19). Check that during transportation this adjustment has not been shifted and correct it if necessary. Fill in with fresh coffee beans and place the cover (17).

Never introduce other substances into the coffee bean hopper (damages to
the. machine)

Before filling the coffee bean hopper, check that the bin for the second
coffee blend (25) is closed in order to prevent coffee beans from falling into it by accident (damages to the machine).
28 Remove the water tank (6) and take the underlying power cable (11) in the desired length. Leave the rest of the cable winded in the cable winder.

Do not plug the machine yet!
Fill the tank with ca. 2.5 l fresh water. Water dispensing is controlled by a valve placed on the tank bottom:
29 Replace the cover on the water tank. In this way, the valve automatically opens. Close with the cover (8). Plug the machine.
Set the programme selector (16) on the desired position: pos. 1▼ or pos. 2▼
Press the main switch (10). The red control light next to the switch immediately illuminates.
By pressing the main switch the integrated electronic system automatically controls the correct functioning. The production of noise is quite normal (the pump automatically starts). This self-check of the machine is automatically performed whenever the main switch is pressed (if the machine is connected).
Air evacuation
Evacuate the air from the machine (programme selector on pos. 1▼ or pos. 2▼). Place one cup or a container under the steam/hot water nozzle (4) and start the jet by rotating the knob (5) anticlockwise. Wait until a regular water jet flows out of the nozzle. Then stop it with the knob. The air is now evacuated. After about 2 minutes from the machine connection, the temperature control light (13) turns green. The bar group is ready for use.

Saeco
Suggestions/Remarks
Functioning test
Out of hygienic reasons, it is advisable to repeat the functioning test after long intervals of non-operation of the machine in order to thoroughly wash the system.
Place a cup under the steam/hot water nozzle and open the jet by rotating the steam/hot water knob (5). Fill ca. three cups with hot water.
Cup preheating
Especially for the first cup of coffee and after long intervals of non-operation, it is advisable to heat the cup. To this purpose, wash the cup by means of the steam/hot water nozzle.
Temperature control light (13)
By connecting the bar group, the control light turns green after about two minutes. The machine is ready for use. During functioning, it is normal that the light illuminates and extinguishes from time to time. This doesn't affect in any way the coffee quality.
Coffee bean hopper control light (14)
When this LED illuminates, the coffee grinder is disconnected. Fill the coffee bean hopper and reconnect the bar group by pressing the on/off switch (12).
Water tank control light (1.5)
When the tank is empty, the programme is automatically disconnected. Fill the water tank and evacuate the air before another coffee preparation. If the air has not been evacuated, the programme cannot be started again. To operate the bar group, the red light of the water level must be off.
Grinding
If the coffee flows out too quickly (too coarse grinding), or too slowly (too fine grinding), it means that the grinding has not been adjusted correctly and thus has to be corrected.
TOO COARSE GRINDING: select a lower grinding adjustment value (i.e. change from 10 to 6).
TOO FINE GRINDING: select a higher adjustment value (i.e. change from 6 to 10).
To avoid damages to the coffee grinder, adjust the grinding only coffee grinder is functioning.
Coffee
Use fresh coffee and select a dark roasting, such as blends for espresso. Keep the coffee in a fresh place. Coffee can also be frozen and ground when still cold or even frozen.
Water quality
In order to prepare the traditional espresso, it is necessary not only to use the proper coffee blend; but also to select the right grinding adjustment, the right water temperature and a good-quality water.
Operation time
The bar group may remain connected during the whole day. However, if during the day the machine is not used for a long time, it is suggested to turn it off. To operate the bar group again, the heating time is only two minutes.
Disconnecting the main switch
.Disconnect the main switch only when the coffee automatic preparation has been completed.
Preparation
Coffee beans
The bar group freshly grinds the coffee quantity required for each cup, always providing a coffee of very high quality.
Rotate the coffee bean hopper (18) on the desired grinding adjustment. At first set the hopper on the average value "8".

To avoid damages to the coffee grinder, adjust the grinding degree in the coffee-grinder is functioning.
With the water proportioning knob (9), set the desired water quantity. The selected level, that is the quantity of desired water, depends on the cup size. For example:
level 7 = coffee with milk
level 2 = espresso
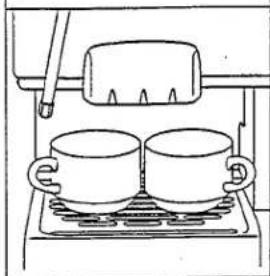
30 Set the programme selector (16):
pos.1 for 1 cup
pos.2 for 2 cups
Place the cup/s on the grid of the drip tray in correspondence to the mark for the cup.
Press the on/off switch (12). The coffee is automatically prepared. The process can be interrupted by pressing the off switch, for instance when an excessive water quantity has been selected.
Second coffee blend (ground coffee)
If you occasionally prefer to prepare the coffee with another blend, for example caffeine-free coffee, use the bin for the second coffee blend (25).

Attention: use only ground coffee (average grinding adjustment).

Pour the ground coffee into the bin just before coffee preparation. The coffee, indeed, quickly alters and looses
its flavour
31 Dose the coffee with the provided measure (max: three full measures) and pour the ground coffee into the bin.

Never press the ground coffee, otherwise the optimal coffee quantity may not be provided.
If only water, instead of coffee, comes out, it means that the ground coffee poured into the bin, or that it was too missed. In this case, fill the ground coffee press the coffee less.
With the water proportioning knob (9), set the desired water quantity: level 9 = one cup of about 1.25 dl.
Set the programme selector (16) on position Ⓟ, place a cup on the grid of the drip tray in correspondence to the mark for the cup. In this case, only one cup at the time may be prepared.
Press the on/off switch (12). The coffee is automatically prepared. The process can be interrupted by pressing the off switch, for instance when an excessive water quantity has been selected.
Steam
It is used to heat milk or other drinks.
After use, immediately clean the steam/hot water nozzle with a wet milk residues, for example, are hard inated.

After steam dispensing, evacuate the air from the machine. If the air is not d or insufficiently evacuated, the pro-or coffee preparation is automatically because of the high temperature.
If the programme selector is set on the steam position, the coffee preparatically stopped.
48
INTEGRATED SAFETY DEVICES
Set the programme selector (16) on the steam position and wait until the temperature control green light (13) illuminates. The waiting time amounts to about 50 seconds.
Orientate the steam/hot water nozzle (4) towards the grid (3) and slightly rotate the steam/hot water knob (5) anticlockwise.
Wait until the residual water flows out of the nozzle. Then move the nozzle outwards and deeply plunge it into the drink to be heated.
Slightly rotate the steam/hot water knob until it's blocked and heat the drink, by rotating and at the same time moving the container downwards.
After heating the drink, rotate the steam/hot water knob clockwise and immediately clean the nozzle with a wet cloth. Attention: the nozzle is very hot. Danger of burnings!
If steam dispensing is no longer necessary, push the nozzle towards the inside of the bar group, orientate it onto the grid and set the programme selector on pos.1▼, or pos.2▼.
Rotate the steam/hot water knob anticlockwise and evacuate the air (the pump automatically functions) until a regular water jet flows out of the nozzle (see also "Air evacuation" in chapter "Operation" page 33).
Rotate the steam/hot water knob clockwise. The bar group is ready to prepare coffee again.
Foam for cappuccino
Fill a cup with cold milk up to 1/3 and place the steam/hot water nozzle just under the milk surface. Rotate the cup until a nice dense foam is formed. Deeply plunge the steam/hot water nozzle only when the milk is warm.
Hot water
It is used to prepare tea, broths, etc. The hot water function is independent from the coffee preparation system. In this way, the hot water doesn't take the coffee flavour.
32 Place a cup or a glass under the steam/hot water nozzle (4). The programme selector must be set on position 1, 2 or P.
Slowly rotate the steam/hot water knob (5) anticlockwise. Hot water automatically flows out of the nozzle. Upon completion, rotate the knob again.
Integrated safety devices
No possible use
If the service door is open and/or the central unit is not inserted, the machine is automatically disconnected and cannot be used.
Electronic control of grinding time
When the coffee bean hopper is empty, the grinding process is automatically stopped after about 15 seconds.
Automatic temperature control
This device allows for a correct temperature control to prepare coffee, hot water or steam. If the water temperature is too low or too high, the coffee preparation is automatically stopped. With safety thermostat and protection against overheating:
Electronic control of the pump suction power
When the water tank is empty, the bar group is automatically disconnected.
49
CLEANING/STORAGE/MAINTENANCE
Cleaning/Storage/Maintenance
Cleaning
By keeping the bar group always clean, the coffee quality will always be very good and the machine will last for a long time.

Before cleaning the bar group, unplug the machine.

Never plunge the bar group into water (damages to the machine)!

Do not wash any component in the washing-machine!

Always dry the different components manually and never in the oven!
Coffee grounds bin/Water tank/Machine
In order to keep the service door and the central unit (21) clean, it is recommended to daily empty the coffee grounds bin in accordance with use.
Regularly wash the water tank (6), the drip tray (2), the grid (3), the coffee dispensing system (26) and the coffee grounds bin (1) with a non-abrasive detergent and dry them.
From time to time clean the machine with a wet cloth and dry it.
Central unit
The central unit (21) must be cleaned every time you fill the coffee bean hopper, but at least once or twice a week.
Disconnect the main switch (10). Unplug the machine and open the service door (20).
33 Remove the central unit (21) by pushing the lock lever (23) downwards on position 3. This operation may be performed only when the central unit is set on the basic position 8.
Wash the central unit with warm water and detergent in order to remove coffee residues from the openings of both chrome steel filters. To thoroughly wash it, the upper chrome steel filter can be disassembled by unscrewing the thumbscrew. It is recommended to perform this operation after a prolonged use of the machine and when the filter is very dirty.
Accurately dry the central unit and, in particular, the funnel (22) before repositioning them.
Clean the service door with a wet cloth and dry it.
Reinsert the central unit in its place by pressing and blocking the lock lever downwards.
Close the service door.
Before connecting the machine again, check that the central unit is positioned (in pos.8).
If not, turn the central unit clockwise by means of the provided key until the basic position is reached.
Coffee dispensing system
34 The coffee dispensing system (26) can be removed for cleaning. If it's very dirty, wash it with a delicate detergent and place it in its position again.
Coffee grinder
The coffee grinder has a self-cleaning system with high-speed rotating disks
Saeco
50
TROUBLESHOOTING

Never pour water into the coffee grinder, because the rotating disks
could be damaged
Bin for the second coffee blend
From time to time clean the bin for the second coffee blend (25) with the provided brush.
Decalcification
According to the calcareous content of the water, the machine must be decalcified every three or four months. In regions where water hardness is very high, it is better to decalcify the machine more frequently.
For this purpose use a decalcifying product for alimentary use to be diluted in water, or a special product for coffee-machines.
After turning off the machine, pour about 1.5 liter decalcifying solution in quantities as specified on the product.
Turn the machine on again.
Turn the steam/hot water knob (5) and place a container under the steam/hot water nozzle (4), let the decalcifying solution flow out of the nozzle (4) for about 30 sec.
Turn the steam knob (5) again
Disconnect the machine by means of the main switch (10) and let the solution act for about 5 minutes. Repeat the procedure twice or three times up to exhaustion of the solution contained in the tank. Rinse the tank (6) thoroughly and fill it with fresh drinkable water.
Reconnect the machine and accurately rinse the internal system by turning the steam/hot water knob (5) to let all the water flow out of the steam/hot water nozzle (4). At this point the calcareous deposits as well as any residue of the decalcifying product have been eliminated.
The machine is now ready for a normal functioning cycle.
Storage

Keep the bar group always unplugged and away from children.
If the machine remains unused for a long time, protect it from dust and dirt.
Maintenance
Besides a regular functioning check, the bar group should be regularly cleaned as indicated on pages 37/38.
Troubleshooting

In case of malfunction, defective machine and suspect of damage I, immediately unplug the machine.
If the defect cannot be repaired as indicated in the table hereinbelow, please contact the closest SAECO after-sale service centre.
| Trouble | Possible causes | Remedy |
| The control lightsdo not illuminate | The machine is not under voltage | Check the plug and the fuse. |
| The service door is open | Close the door | |
| The machine is overheated | Turn off themachine and let it cool down for ca. 10-15 min. If the trouble recurs, have the machine checked by a SAECO after-sale service centre. |

Saeco
TROUBLESHOOTING
| Trouble | Possible causes | Remedy |
| The automatic coffee preparation doesn't start | The central unit is not correctly positioned, or is not fixed | Replace the central unit in the right position and fix it |
| The programme selector is set on the steam position. | Reset the programme selector on pos. 1 or 2 and evacuate air (see page 33) | |
| 36 The control lights of the tank or coffee grinder illuminate | After filling, restart the programme with the on switch. If the tank control light illuminates again, evacuate the air again. When the light extinguishes, the programme can be restarted. | |
| After steam dispensing, air has either not been evacuated or insufficiently evacuated. | Evacuate the air again as indicated on page 33. | |
| Instead of coffee only water comes out | The programme selector is set on the second coffee blend and in the bin there is no ground coffee | Fill in the ground coffee in the bin (25). |
| Water or coffee doesn't flow out | 36 The tank is empty, or the tank control light (15) illuminates | Fill the tank and evacuate the air as indicated on page 33 |
| The hole of the steam/hot water nozzle (4) is blocked (milk residues) | 37 Clear the blocked hole with a thin needle | |
| 36 The coffee bean hopper (18) is empty, or its control light illuminates | Fill the hopper and start the programme again with the on switch. Remove any coffee residue from the ring of the adjustment scale (see page 37/38) | |
| The coffee flows out too quickly | The coffee grinding is too coarse | Select a lower grinding adjustment by turning clockwise (i.e. from 10 to 7) |
| The coffee flows out too slowly | The coffee grinding is too fine | Select a higher grinding adjustment by turning anticlockwise (i.e. from 4 to 7) |
| The coffee is not hot enough | The cup has not been preheated | Preheat the cup with hot water |
| The temperature control light (13) is not on yet | Wait until the light illuminates | |
| The machine presents a lower performance, the heating time is longer, the circulating water quantity is insufficient | The machine has calcareous deposits | Decalcify the machine as indicated on page 38. |
| The coffee is not creamy | The coffee blend is inadequate. The coffee is not fresh. The coffee grinding is too coarse or too fine. | |
| The central unit cannot be removed | The central is not placed in the correct basic position | Move the lock lever (23) to position <2> (see page 37) and close the door. Connect the main switch and let the programme finish |
Repair works must be performed exclusively by a Saeco after-sale service centre. Inadequate repairs may cause serious dangers to the user. No responsibility is undertaken in case of damages caused by repairs made by unskilled personnel. In this case the guarantee does not apply.
Disposal
To make the no longer used machine disposable. Unplug the machine and remove the electric cable. Deliver the out-of-service machines
to a proper collection centre. At least once a year, the most part of cities provide for the collection of cumbersome wastes.
Saeco


- ABBILDUNGEN ZUM TEXT ILLUSTRATIONS REFERENCES DANS LE TEXTE ILLUSTRAZIONI CORRISPONDENTI AL TESTO
- 40
- FOR AN EASIER READING
- B
- How to use these instructions
- Table of contents
- 41
- TECHNICAL DATA
- Accessories
- 43
- SAFETY NORMS
- Danger!
- Adequate use
- ■ Unauthorized users
- ■ Protection of third parties
- A Electric power
- B Power cable
- C Positioning
- D Hands protection
- E Cleaning
- Repairs/Maintenance
- 44
- LIST OF COMPONENTS AND COMMANDS
- Unpacking / Positioning
- Power connection
- 45
- OPERATION AND USE
- Air evacuation
- Suggestions/Remarks
- Functioning test
- Cup preheating
- Temperature control light (13)
- Coffee bean hopper control light (14)
- Water tank control light (1.5)
- Grinding
- Coffee
- Water quality
- Operation time
- Disconnecting the main switch
- Preparation
- Coffee beans
- Second coffee blend (ground coffee)
- Steam
- 48
- INTEGRATED SAFETY DEVICES
- Foam for cappuccino
- No possible use
- Electronic control of grinding time
- Automatic temperature control
- Electronic control of the pump suction power
- 49
- CLEANING/STORAGE/MAINTENANCE
- Cleaning
- Coffee grounds bin/Water tank/Machine
- Central unit
- Coffee dispensing system
- Coffee grinder
- 50
- TROUBLESHOOTING
- Bin for the second coffee blend
- Decalcification
- Storage
- Maintenance
- Disposal
Marke : PHILIPS
Modell : Saeco Via Venenzia
Kategorie : Kaffeemaschine