
JXFLM2BB - Ukategoriseret GE - Gratis brugsanvisning og manual
Find enhedens vejledning gratis JXFLM2BB GE i PDF-format.


Brugerspørgsmål om JXFLM2BB GE
0 spørgsmål om dette apparat. Besvar dem du kender, eller stil dit eget.
Stil et nyt spørgsmål om dette apparat
Download vejledningen til din Ukategoriseret i PDF-format gratis! Find din vejledning JXFLM2BB - GE og tag din elektroniske enhed tilbage i hånden. På denne side er alle dokumenter nødvendige for brugen af din enhed offentliggjort. JXFLM2BB af mærket GE.
BRUGSANVISNING JXFLM2BB GE
COOKTOP INLAY KIT INSTRUCTION
Before you begin-Read these instructions completely and carefully IMPORTANT-Save these instructions for local inspector's use IMPORTANT-OBSERVE ALL GOVERNING CODES AND ORDINANCES Note to Installer-Be sure to leave these instructions with the Consumer Note-This appliance must be properly grounded
FOR YOUR SAFETY
Review all Safety, Power Requirements, Dimensions and Clearances, and Preparation of the Cutout opening Instructions in the Installation instructions included with your cooktop.
NOTICE: Read all instructions thoroughly, PRIOR to beginning any work.
WARNING: To avoid the risk of property damage, the cutout should be made by a professional cabinet installer.
WARNING: Do not attempt to flush mount any cooktop counter unit that requires a downdraft ventilation system.
KIT INCLUDES
- Template
• Installation Instructions
• (1) Tube of High Temperature Sealant
• 3/8" Wide One-Sided Foam Tape - 2" Wide Metal Reflective Tape
TOOLS YOU WILL NEED
- 3/4" Carbide Tipped Straight Cutter Router Bit
- 1-1/2" HP Router (minimum)
INSTALLATION
- Build jig for the cutout and router dimensions if desired.
- Using the carbide tipped straight cutter router bit and template, set router guides to cut along the solid line of the template (corresponding to the appropriate cooktop size and curved or straight front edge). Make the countertop cutout per the Installation Instructions.
NOTICE: To allow for routing, when possible the countertop backsplash should be installed after installing the cooktop.
NOTICE: For Ceramic Tile Countertops, routing is not required. Tile can be installed 1/16" from the edge of the cooktop after making the cutout. If tile is already in place, it should be cut to the router dimension using a ceramic tile cutter.
- Using a 3/4" diameter router bit set to 7/32" depth, rout the edge of the cooktop cutout. When installing into a countertop with a backsplash, a laminate trimmer can be used to rout areas near backsplash.
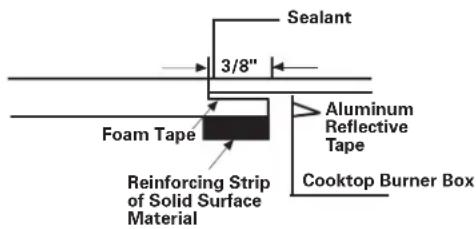
- IMPORTANT: To ensure sufficient support for cooktop when cooking, reinforcing strips of wood must be secured in place below the edge of the cutout. Wood strips must also be secured underneath the perimeter of the cooktop. (See Side View)
For an island or peninsula installation, strips must be secured on all sides of the cutout.
For a normal countertop
text_image
Sealant 3/8" Foam Tape Reinforcing Strip of Solid Surface Material Aluminum Reflective Tape Cooktop Burner Boxwith cabinet installation, strips must be secured only on the sides. Standard countertops are supported in the front and rear by the cabinet.
WARNING: Failure to provide adequate countertop reinforcement for cooktop may result in damage to counter unit when weight is added to cooktop during cooking.
- Vacuum dust and particles from the cooktop opening.
- Place metal reflective tape around the bottom inside edge of the cooktop cutout.
- Apply foam tape, provided in the kit, to the underside of the cooktop glass, flush with the edge of the cooktop frame. The foam tape will keep the RTV sealant from seeping between the countertop and the underside of the cooktop.
- Place cooktop into the prepared opening. The cooktop surface should be 1/16"-1/32" higher than the countertop surface to prevent hot cookware from contacting countertop.
- Align cooktop in opening with equal clearance on all sides.
- Using masking tape, place a border around the edge of the cooktop cutout. This will prevent the sealant from sticking to the countertop.
WARNING: Do not allow sealant to come into contact with counter unit ceramic glass cooktop.
- Ensure the area is well ventilated when applying sealant. Apply high temperature sealant into the opening between the countertop and edge of the cooktop frame, one side at a time. It is important to wipe away excess sealant immediately as the sealant will begin to form a skin within 5 minutes. Use only the sealant provided.
- Do not touch sealant, move or use the cooktop for 24 hours. Protect the area from dust for at least 2 hours.
- After 24 hours, clean excess sealant on cooktop with razor blade and on countertop with a spatula.
229C4053P590
31-10616
02-05 JR
Printed in the United States