
JRNU18GL5G4 - Aircondition LG - Gratis brugsanvisning og manual
Find enhedens vejledning gratis JRNU18GL5G4 LG i PDF-format.

Brugerspørgsmål om JRNU18GL5G4 LG
0 spørgsmål om dette apparat. Besvar dem du kender, eller stil dit eget.
Stil et nyt spørgsmål om dette apparat
Download vejledningen til din Aircondition i PDF-format gratis! Find din vejledning JRNU18GL5G4 - LG og tag din elektroniske enhed tilbage i hånden. På denne side er alle dokumenter nødvendige for brugen af din enhed offentliggjort. JRNU18GL5G4 af mærket LG.
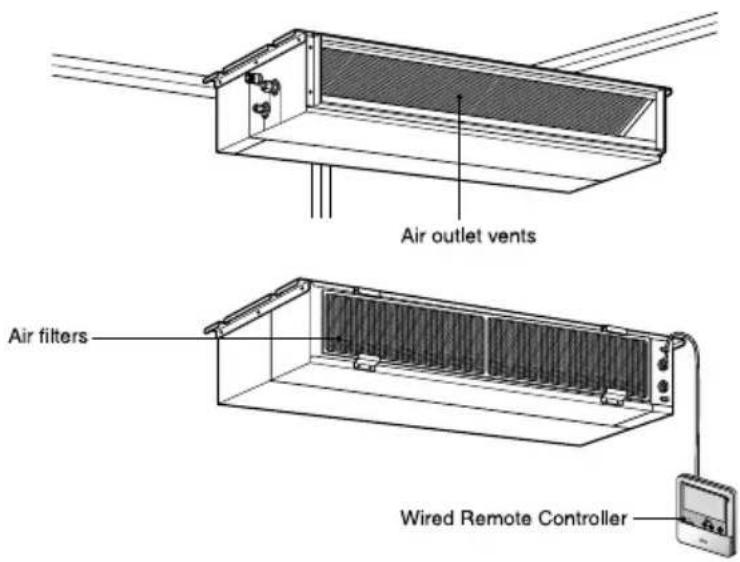
BRUGSANVISNING JRNU18GL5G4 LG
INSTALLATION MANUAL
AIR
CONDITIONER
Please read this installation manual completely before installing the product. Installation work must be performed in accordance with the national wiring standards by authorized personnel only. Please retain this installation manual for future reference after reading it thoroughly.
TYPE : LOW STATIC CEILING DUCT TYPE AIR CONDITIONER
For MULTI V™ LOW-Static Duct Models
P/No.MFL62183402
Copyright © 2019 LG Electronics Inc. All Rights Reserved
LG CUSTOMER CARE

1800-180-3575 (Toll Free)
12×7 (9:00 AM-9:00 PM)

www.lg.com/in/support
cac.service@lgepartner.com
To know more about LG, visit www.lg.com
For Corporate/Institutional enquiries,
please write to enquiries@lgindia.com
TABLE OF CONTENTS
Installation Requirements
Safety Precautions ....3
Introduction 6
Installation
Selection of the best location 7
Ceiling opening dimension and hanging bolt location .....8
Indoor Unit Installation......9
Wiring Connection....9
Part name and functions .....10
Checking the Drainage.....11
Installation of Wired Remote Controller....15
Optional Operation of Wired Remote Controller ....17
How to Set E.S.P?......18
Required Parts
☐ Four type "A" screws
□ Connecting cable
□Pipes: Gas side
Liquid side
(Refer to Product Data)
□Insulation materials
□ Additional drain pipe
Required Tools
□Level gauge
□ Screw driver
□ Electric drill
□Hole core drill
□ Flaring tool set
□ Specified torque wrenches (different depending on model No.)
□Spanner.....Half union
□A glass of water
□ Screw driver
□Hexagonal wrench
□Gas-leak detector
□Vacuum pump
□ Gauge manifold
□Owner's manual
□ Thermometer
Safety Precautions
To prevent injury to the user or other people and property damage, the following instructions must be followed.
■ Be sure to read before installing the air conditioner.
■ Be sure to observe the cautions specified here as they include important items related to safety.
■ Incorrect operation due to ignoring instruction will cause harm or damage. The seriousness is classified by the following indications.
WARNING
This symbol indicates the possibility of death or serious injury.
CAUTION
This symbol indicates the possibility of injury or damage to properties only.
■ Meanings of symbols used in this manual are as shown below.
| Be sure not to do. | |
| Be sure to follow the instruction. |
WARNING
■ Installation
Do not use a defective or underrated circuit breaker. Use this appliance on a dedicated circuit.
• There is risk of fire or electric shock.
For electrical work, contact the dealer, seller, a qualified electrician, or an Authorized Service Center.
- Do not disassemble or repair the product. There is risk of fire or electric shock.
Always ground the product.
• There is risk of fire or electric shock.
Install the panel and the cover of control box securely.
• There is risk of fire or electric shock.
Always install a dedicated circuit and breaker.
- Improper wiring or installation may cause fire or electric shock.
Use the correctly rated break-er or fuse.
• There is risk of fire or electric shock.
| Do not modify or extend the power cable. | Do not let the air conditioner run for a long time when the humidity is very high and a door or a window is left open. | Be cautious when unpacking and installing the product. |
| • There is risk of fire or electric shock. | • Moisture may condense and wet or damage furniture. | • Sharp edges could cause injury. Be especially careful of the case edges and the fins on the condenser and evaporator. |
| For installation, always contact the dealer or an Authorized Service Center. | Do not install the product on a defective installation stand. | Be sure the installation area does not deteriorate with age. |
| • There is risk of fire, electric shock, explosion, or injury. | • It may cause injury, accident, or damage to the product. | • If the base collapses, the air conditioner could fall with it, causing property damage, product failure, and personal injury. |
■ Operation
Do not store or use flammable gas or combustibles near the product.
• There is risk of fire or failure of product.

CAUTION
■ Installation
Always check for gas (refrigerant) leakage after installation or repair of product.
- Low refrigerant levels may cause failure of product.
Install the drain hose to ensure that water is drained away properly.
• A bad connection may cause water leakage.
Keep level even when installing the product.
• To avoid vibration or water leakage.
Do not install the product where the noise or hot air from the outdoor unit could damage the neighborhoods.
- It may cause a problem for your neighbors.
Use two or more people to lift and transport the product.
- Avoid personal injury.
Do not install the product where it will be exposed to sea wind (salt spray) directly.
- It may cause corrosion on the product. Corrosion, particularly on the condenser and evaporator fins, could cause product malfunction or inefficient operation.
If you eat the liquid from the batteries, brush your teeth and see doctor. Do not use the remote if the batteries have leaked.
• The chemicals in batteries could cause burns or other health hazards.
Introduction
Symbols Used in this Manual

This symbol alerts you to the risk of electric shock.

This symbol alerts you to hazards that could cause harm to the air conditioner.
NOTICE
This symbol indicates special notes.
Features
Low static Duct type
Installation
Selection of the best location
Indoor unit
Install the air conditioner in the location that satisfies the following conditions.
- The place shall easily bear a load exceeding four times the indoor unit's weight.
• The place shall be able to inspect the unit as the figure.
• The place where the unit shall be leveled.
• The place shall easily connect with the outdoor unit. - The place where the unit is not affected by an electrical noise.
• The place where air circulation in the room will be good. - There should not be any heat source or steam near the unit
Confirm the positional relationship between the unit and suspension bolts.
• Installation the ceiling opening to clean the filter or service under the product.
(Length: mm)
| Capacity(Btu/h) | A | B |
| 9,12,15,18 (L5) | 600 | 1000 |
| 24 (L6) | 600 | 1200 |
Low static Duct type
[Inspection Hole Standard]
| Number of Inspection hole | Distance between False ceiling & Actual ceiling | Remarks |
| 1 | More than 100cm | Sufficient space in the ceiling for servicing. |
| 2 | 20cm to 100cm | Insufficient space. Difficult for servicing |
| Hole size should be more than the size of IDU. | Less than 20cm | Minimum height for motor replacement. |
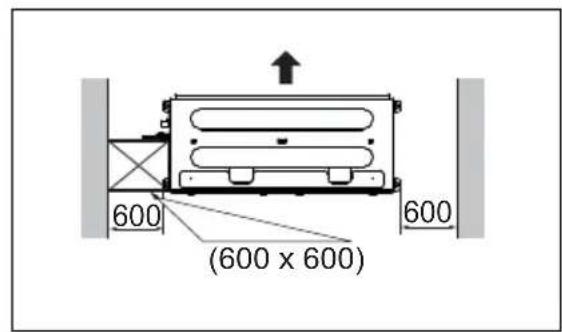
Ceiling dimension and hanging bolt location
Installation of Unit
Install the unit above the ceiling correctly.
CASE 1
POSITION OF SUSPENSION BOLT
- Apply a joint-canvas between the unit and duct to absorb unnecessary vibration.
- Apply a filter Accessory at air return hole.
(Unit:mm)
| Capacity\Dimension | A | B | C | D | E | F | G | H | I | J |
| 9121518 (L5) | 933 | 972 | 388 | 460 | 36 | 190 | 20 860 | 148 | 900 | |
| 24 (L6) | 1133 | 1172 | 388 | 460 | 36 | 190 | 20 1060 | 148 | 1100 |
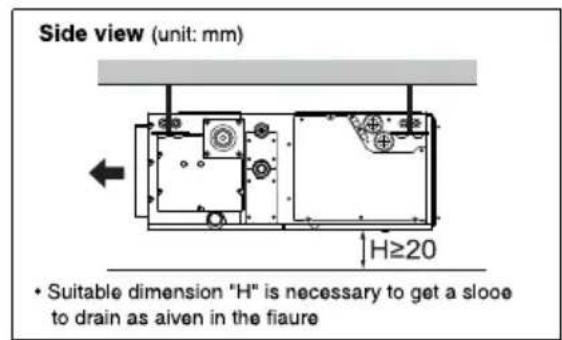
CASE 2
• Install the unit leaning to a drainage hole side as a figure for easy water drainage.
POSITION OF CONSOLE BOLT
- A place where the unit will be leveled and that can support the weight of the unit.
- A place where the unit can withstand its vibration.
- A place where service can be easily performed.
Indoor Unit Installation
- Select and mark the position for fixing bolts.
- Drill the hole for set anchor on the face of ceiling.

natural_image
Illustration of a hand holding a spray gun with a pointed tip, extending into a rectangular frame (no text or symbols)
CAUTION : Tighten the nut and bolt to prevent unit falling.
- Insert the set anchor and washer onto the suspension bolts for locking the suspension bolts on the ceiling.
- Mount the suspension bolts to the set anchor firmly.
- Secure the installation plates onto the suspension bolts (adjust level roughly) using nuts, washers and spring washers.
flowchart
graph TD
    A["Old building"] --> B["Set anchor"]
    A --> C["Plate washer"]
    A --> D["Spring washer"]
    A --> E["Nut"]
    A --> F["Suspension bolts"]
    G["New building"] --> H["New building"]
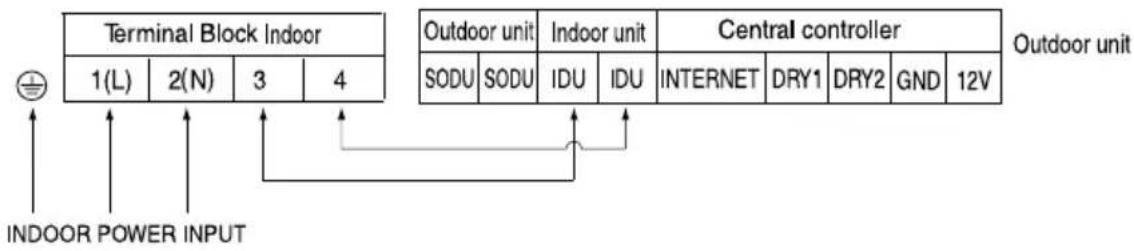
Wiring Connection
Connect the wires to the terminals on the control board individually according to the outdoor unit connection.
- Ensure that the color of the wires of outdoor unit and the terminal No. are the same as those of indoor unit respectively.
L5/L6 Series
flowchart
graph TD
    A["INDOOR POWER INPUT"] --> B["Terminal Block Indoor"]
    B --> C["1(L)"]
    B --> D["2(N)"]
    B --> E["3"]
    B --> F["4"]
    G["Outdoor unit"] --> H["SODU"]
    G --> I["SODU"]
    J["Indoor unit"] --> K["IDU"]
    J --> L["IDU"]
    M["Central controller"] --> N["INTERNET"]
    M --> O["DRY1"]
    M --> P["DRY2"]
    M --> Q["GND"]
    M --> R["12V"]
    S["Outdoor unit"] --> T["Outdoor unit"]

WARNING : Make sure that the screws of the terminal are free from looseness.
Part name and functions
- Low static duct type in case of suction from back side.
- Low static duct type in case of suction from bottom side.
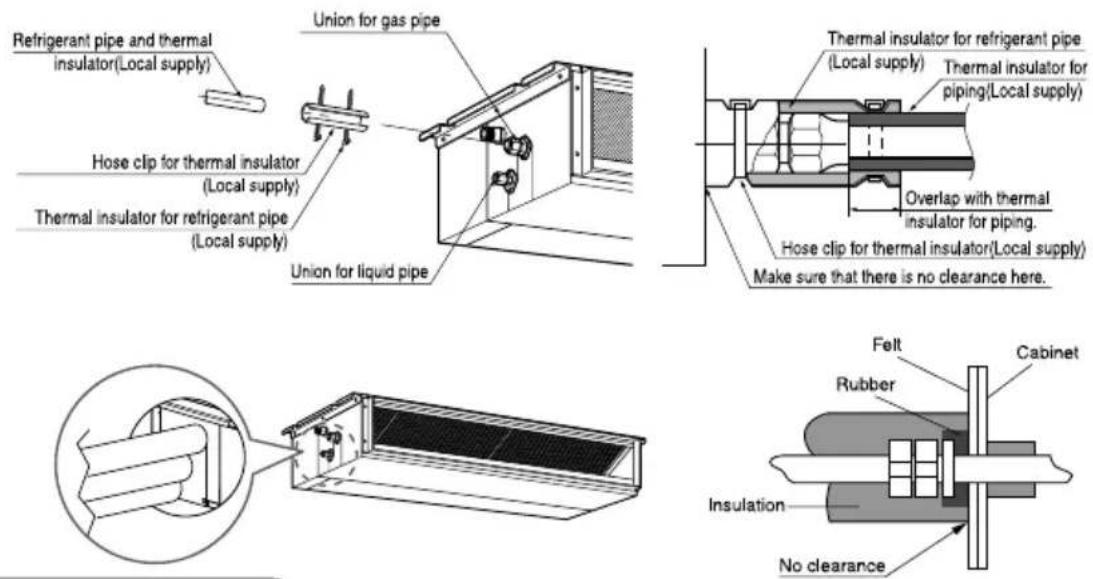
INSULATION, OTHERS
Insulate the joint and tubes completely.
THERMAL INSULATION
All thermal insulation must comply with local requirement.
INDOOR UNIT
TEST AND CHECK
■ After all workings are finished, check the working and operation.
• Air distribution .... Is the air circulation good?
- Drain .... Is the drainage smoothly and no sweating?
• Gas leakage .... Is the piping connection correctly?
- Wiring Is the wiring connection correctly?
- Lock-bolt .... Is the lock-bolt of compressor loosened?
• Insulation Is the unit fully insulated?
• Ground Is the unit safely grounded?
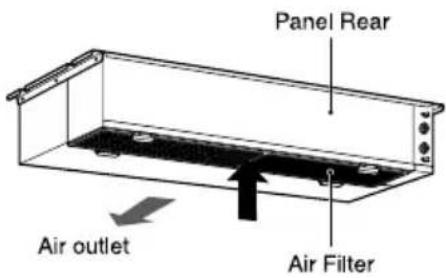
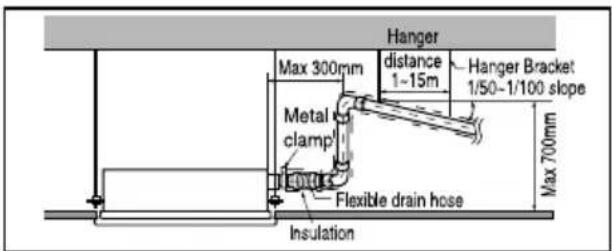
Checking the Drainage
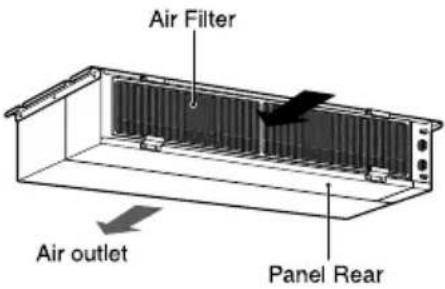
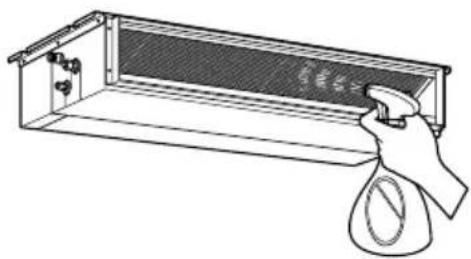
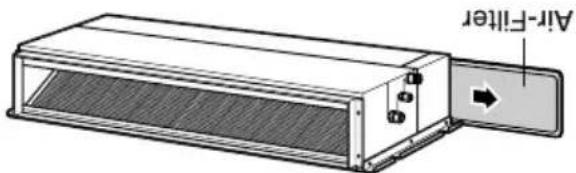
1. Remove the Air Filter.
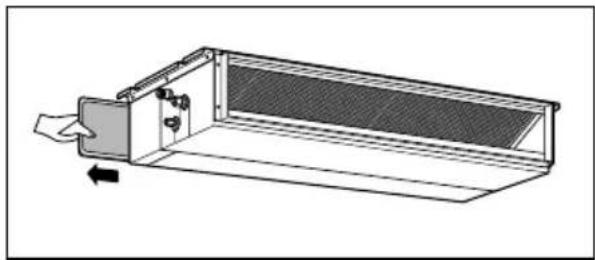
2. Check the drainage.
- Spray one or two glasses of water upon the evaporator.
- Ensure that water flows drain hose of indoor unit without any leakage.
natural_image
Line drawing of a hand holding a spray bottle over a rectangular container with a grid pattern (no text or symbols)CAUTION
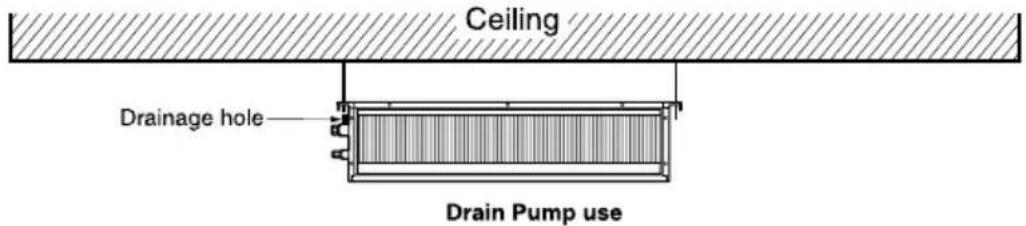
- Install declination of the indoor unit is very important for the drain of the duct type air conditioner.
- Minimum thickness of the insulation for the connecting pipe shall be 19mm.
Front of view
- The unit must be horizontal or declined to the drain hose connected when finished installation.
Drain Piping
- Drain piping must have down-slope (1/50 to 1/100): be sure not to provide up-and-down slope to prevent reversal flow.
- During drain piping connection, be careful not to exert extra force on the drain port on the indoor unit.
- The outside diameter of the drain connection on the indoor unit is 32mm.
Piping material: Polyvinyl chloride pipe VP-25 and pipe fittings
- Be sure to install heat insulation on the drain piping.
Heat insulation material: Polyethylene foam with thickness more than 8 mm.

Drain test
The air conditioner uses a drain pump to drain water. Use the following procedure to test the drain pump operation:
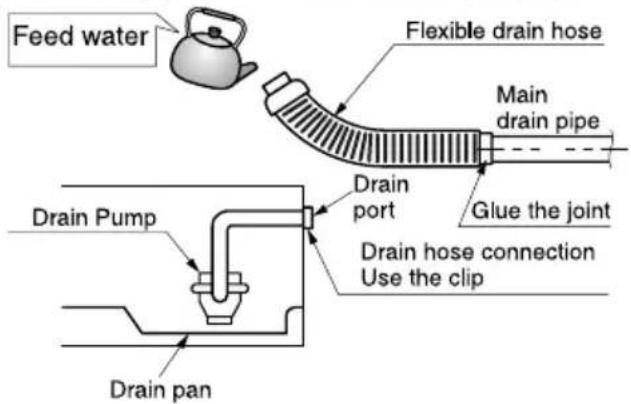
- Connect the main drain pipe to the exterior and leave it provisionally until the test comes to an end.
- Feed water to the flexible drain hose and check the piping for leakage.
- Be sure to check the drain pump for normal operating and noise when electrical wiring is complete.
- When the test is complete, connect the flexible drain hose to the drain port on the indoor unit.

CAUTION : The supplied flexible drain hose should not be curved, neither screwed. The curved or screwed hose may cause a leakage of water.

CAUTION:
After the confirmation of the above conditions, prepare the wiring as follows:
1) Never fail to have an individual power specialized for the air conditioner. As for the method of wiring, be guided by the circuit diagram posted on the inside of control box cover.
2) Provide a circuit breaker switch between power source and the unit.
3) The screws which fasten the wiring in the casing of electrical fittings are liable to come loose from vibrations to which the unit is subjected during the course of transportation. Check them and make sure that they are all tightly fastened. (If they are loose, it could give rise to burn-out of the wires.)
4) Specification of power source
5) Confirm that electrical capacity is sufficient.
6) Be sure that the starting voltage is maintained at more than 90 percent of the rated voltage marked on the name plate.
7) Confirm that the cable thickness is as specified in the power sources specification. (Particularly note the relation between cable length and thickness.)
8) Never fail to equip a leakage breaker where it is wet or moist.
9) The following troubles would be caused by voltage drop-down.
- Vibration of a magnetic switch, damage on the contact point, fuse breaking, disturbance by the normal function of an overload protection device.
• Proper starting power is not given to the compressor.
HAND OVER
Teach the customer the operation and maintenance procedures, using the operation manual. (air filter cleaning, temperature control, etc.)
Standard Accessories
| Name | Drain hose | Clamp metal | Washer for hanging backet | Clamp (Tie Wrap) | Insulation for fitting | (Other) |
| Quantity | 1 EA | 2 EA | 8 EA | 4 EA | 1 SET | |
| Shape | 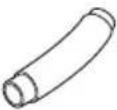 | 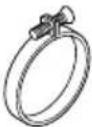 |  |  for gas pipe for gas pipe for liquid pipe for liquid pipe | Owner's manualInstallation manual |
WIERED REMOTE CONTROLLER INSTALLATION
- Since the room temperature sensor is in the remote controller, the remote controller box should be installed in a place away from direct sunlight, high humidity and direct supply of cold air to maintain proper space temperature. Install the remote controller about 5ft(1.5m) above the floor in an area with good air circulation at an average temperature.
Do not install the remote controller where it can be affected by:
- Drafts, or dead spots behind doors and in corners.
- Hot or cold air from ducts.
- Radiant heat from sun or appliances.
- Concealed pipes and chimneys.
- Uncontrolled areas such as an outside wall behind the remote controller.
- This remote controller is equipped with a seven segment LED. display. For proper display of the remote controller LED's, the remote controller should be installed properly as shown in Fig.1. (The standard height is 1.2–1.5 m from floor level.)
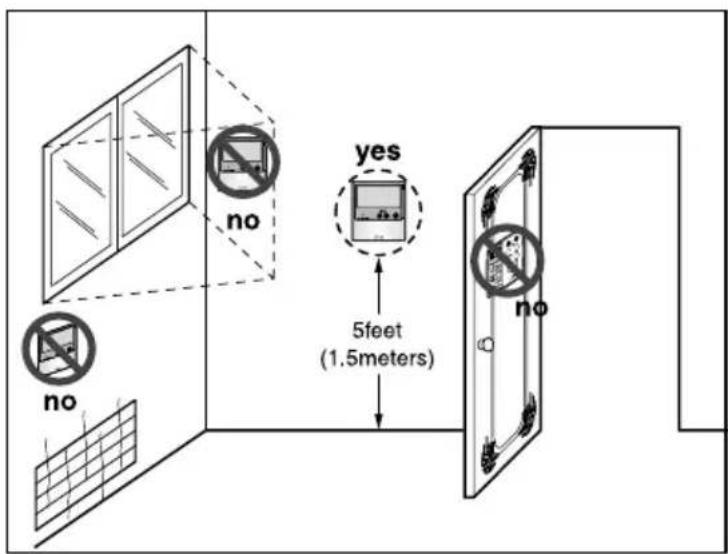
Fig.1 Typical locations for remote controller
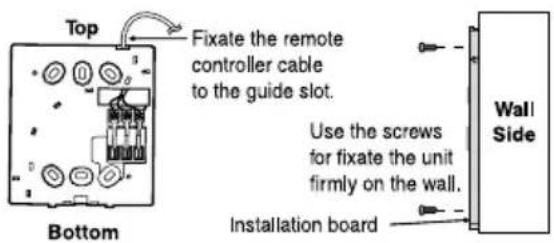
Installation of Wired Remote Controller
- Connect the wired remote controller cable to the wired remote controller installation board as shown in the right picture.
| 12V | Red wire |
| SIG | Yellow wire |
| GND | Black wire |
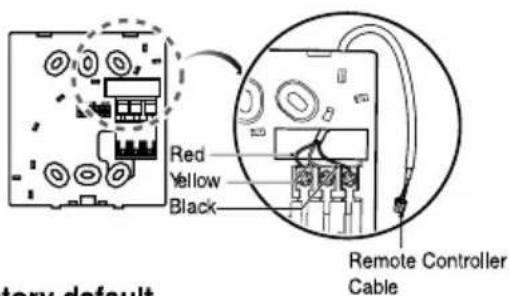
* The wired remote controller cable is connected as factory default.
- After fixing the cable to the guide slot, attach the wired remote controller installation board at the desired location.
- Before fixing the wired remote controller cable to the guide slot, remove any clogged part of the case in the direction to install before the installation.

- After locating the wired remote controller installation board at the desired location, screw the unit firmly. (When there is a buried box, install the wired remote controller board to fit the buried box.)
- Use the screw provided.
- After fixing the top part of the wired remote controller to the installation board as shown in beside picture, press the bottom part to assemble the controller to its board.
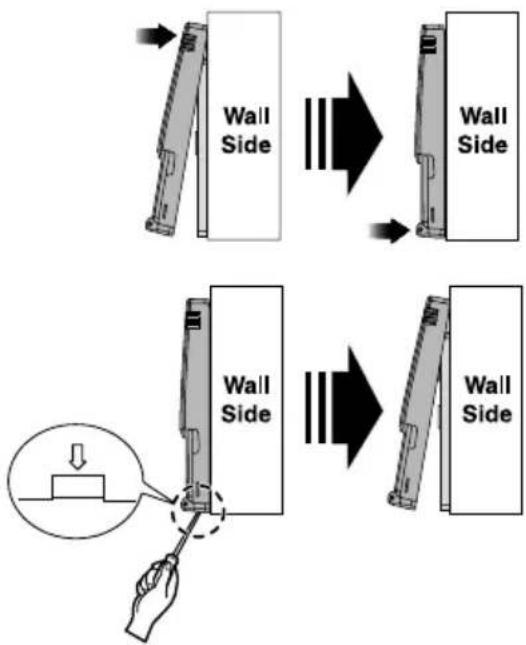
When disassemble the wired remote controller from the installation board, use the driver as shown in the right picture and insert it into the hole with the arrow. And when you pull the driver in the front direction, the wired remote controller will be separated.
- Use the connecting cable to connect the indoor unit and the wired remote controller.
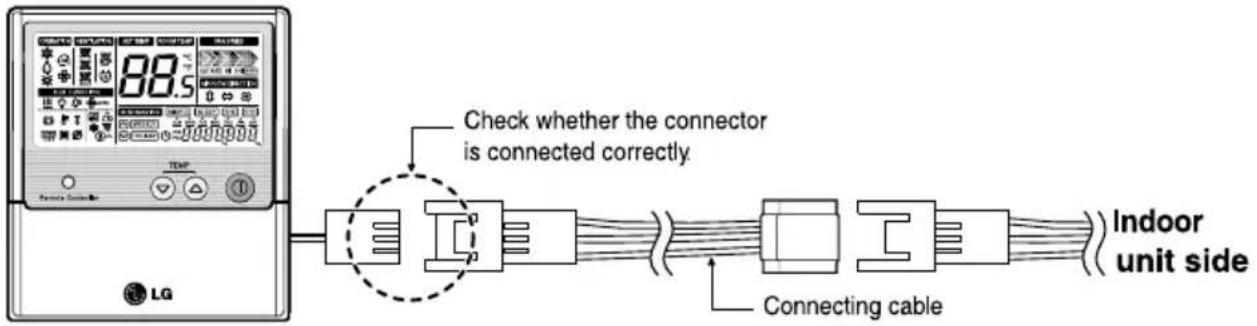
- When the distance between the wired remote controller and the indoor unit is 10m and above, use the extension cable.

CAUTION
When installing the wired remote controller, do not bury it in the wall.
(It can cause damage in the temperature sensor.)
Do not install the cable to be 50m or above.
(It can cause communication error.)
- When installing the extension cable, check the connecting direction of the connector of the remote controller side and the product side for correct installation.
- If you install the extension cable in the opposite direction, the connector will not be connected.
- Specification of extension cable: 2547 1007 22# 2 core 3 shield 5 or above.
Optional Operation of Wired Remote Controller
Two Thermistor System
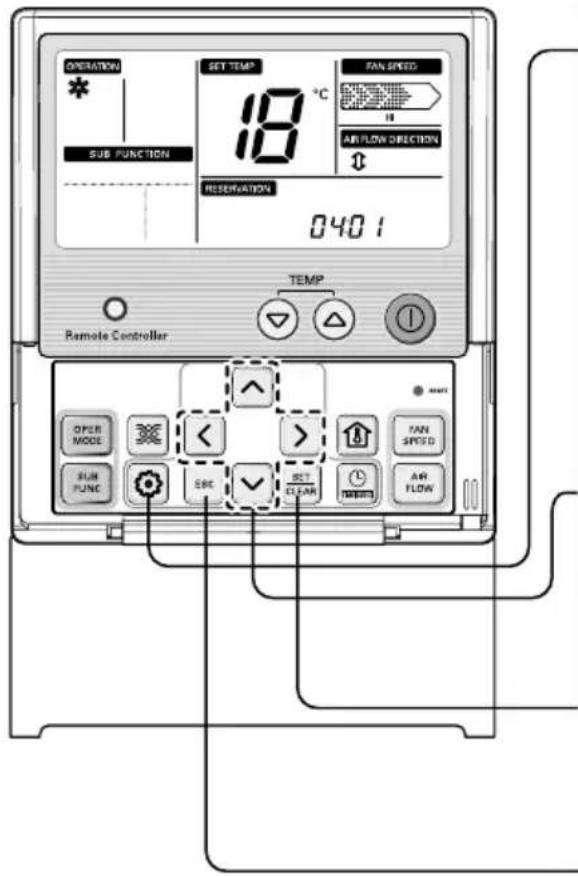
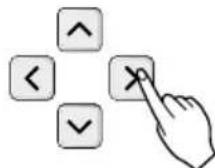
- Press Ⓧ button for 4 seconds to enter the installer setting mode until timer segment display "01:01".
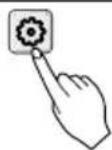
- Repeat pressing 📧 button to select Function code 04.
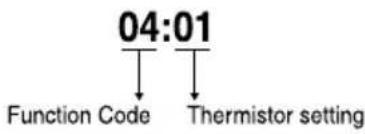
flowchart
graph TD
    A["04:01"] --> B["Function Code"]
    A --> C["Thermistor setting"]
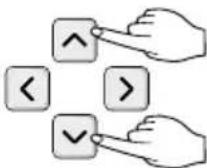
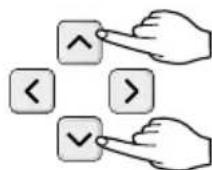
- Set Thermistor mode by pressing
^ √ button
(01: Remote Controller, 02: Indoor, 03: 2TH)
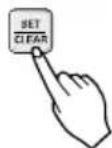
- Press 📄 button to save or release
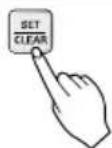
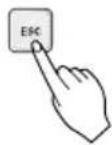
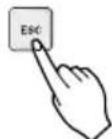
- Press ☐ button to exit or system will automatically exit after 25 seconds without any input.
* Therefore system will use value that sensed from indoor unit or remote controller
| Temperature sensor location | Function | |
| 01 | Remote controller | Operation in remote controller Temperature sensor |
| 02 | Indoor unit | Operation in indoor unit temperature sensor |
| 03 | 2-Thermistor | Operation in lower temperature after comparing the temperature between the indoor unit and remote controller |
* If you want to know more Optional Operation, please refer to Wired Remote Controller Manual.
How to Set E.S.P?
What is an E.S.P function?
This is the function that decides the strength of the wind for each wind level and because this function is to make the installation easier, please do not use this function when using the remote controller.

CAUTION
If you set ESP incorrectly, the air conditioner may malfunction.
This setting must be carried out by a certificated-technician.
This function is using for only Duct product
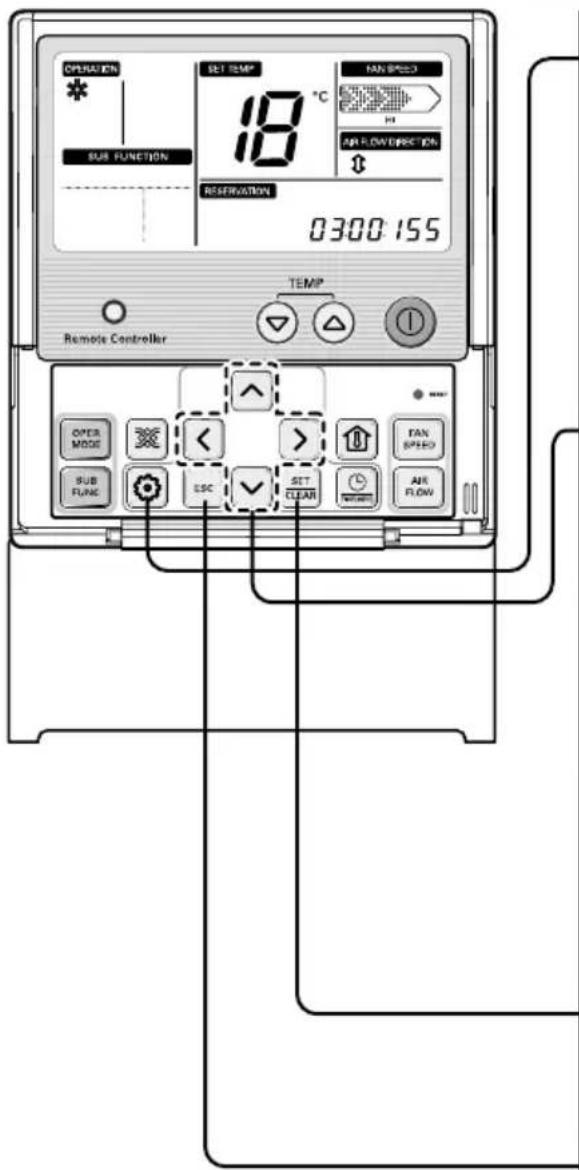
- Press button for 4 seconds to enter the installer setting mode until timer segment display "01:01".
- Repeat pressing Function Setting key to select Function code 03.
flowchart
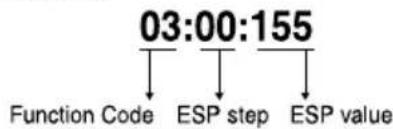
graph TD
    A["03:00:155"] --> B["Function Code"]
    A --> C["ESP step"]
    A --> D["ESP value"]
- Set ESP step by pressing ▲ √ button (01: very low, 02: low, 03: medium, 04: high, 05: power).

- Move to ESP setting by pressing ▶ button.
- Press ⬇ button to select ESP value(0\~255).
- Press button to save or release
- Press button to exit or the system will automatically exit after 25 seconds without any input
* Weak and Power setting is not available for some products.
※ Because the ESP value is already appropriately set when manufactured from the factory, it is recommended that you do not change the ESP value.
JRNU09GL5G4, JRNU12GL5G4, JRNU15GL5G4, JRNU18GL5G4
(Unit : CMM)
| Setting Value | Static Pressure(mmAq(Pa)) | |||||
| 0 (0) | 1 (10) | 2 (20) | 3 (29) | 4 (39) | 5 (49) | |
| 75 | 6.50 | - | - | - | - | - |
| 80 | 7.34 | 6.70 | - | - | - | - |
| 85 | 8.20 | 7.55 | 6.69 | - | - | - |
| 90 | 9.07 | 8.43 | 7.56 | 6.47 | - | - |
| 95 | 9.96 | 9.32 | 8.45 | 7.36 | - | - |
| 100 | 10.87 | 10.22 | 9.36 | 8.27 | 6.96 | - |
| 105 | 11.79 | 11.15 | 10.28 | 9.19 | 7.89 | 6.35 |
| 110 | 12.73 | 12.09 | 11.22 | 10.14 | 8.83 | 7.30 |
| 115 | 13.69 | 13.05 | 12.18 | 11.09 | 9.78 | 8.25 |
| 120 | 15.00 | 14.02 | 13.16 | 12.07 | 10.76 | 9.23 |
| 125 | 15.66 | 15.01 | 14.15 | 13.06 | 11.75 | 10.22 |
| 130 | 16.67 | 16.02 | 15.16 | 14.07 | 12.76 | 11.23 |
| 135 | - | - | 16.18 | 15.10 | 13.79 | 12.26 |
| 140 | - | - | - | 16.14 | 14.83 | 13.30 |
| 145 | - | - | - | - | 15.89 | 14.36 |
JRNU24GL6G4
(Unit : CMM)
| Setting Value | Static Pressure(mmAq(Pa)) | |||||
| 0 (0) | 1 (10) | 2 (20) | 3 (29) | 4 (39) | 5 (49) | |
| 85 | 10.19 | - | - | - | - | - |
| 90 | 12.18 | 10.71 | 11.09 | - | - | - |
| 95 | 13.81 | 12.34 | 12.19 | - | - | - |
| 100 | 15.16 | 13.69 | 13.38 | 10.71 | - | - |
| 105 | 16.30 | 14.83 | 14.36 | 11.85 | - | - |
| 110 | 17.31 | 15.85 | 15.23 | 12.86 | 10.97 | - |
| 115 | 18.27 | 16.80 | 16.07 | 13.82 | 11.93 | - |
| 120 | 19.26 | 17.79 | 16.93 | 14.80 | 12.91 | 10.49 |
| 125 | 20.34 | 18.87 | 17.89 | 15.88 | 13.99 | 11.57 |
| 130 | 21.60 | 20.13 | 19.01 | 17.14 | 15.25 | 12.83 |
| 135 | - | 21.64 | 20.36 | 18.66 | 16.76 | 14.35 |
| 140 | - | - | 22.01 | 20.50 | 18.61 | 16.19 |
Note :
- The above table shows the correlation between the air rates and E.S.P.
- Please refer wired remote controller manual for E.S.P setting procedure.

LG
Life's Good
Lifte's Good

WATER RESISTANT: The outdoor side of this appliance is WATER RESISTANT. The indoor side is not water resistant and should not be exposed to excess water.
NOTICE
| The air conditionerdoes not operate. | The room has a peculiar odor. | It seems that condensation is leaking from the air conditioner. |
| Have you made a mistake in timer operation?Has the fuse blown or has the circuit breaker been tripled?Does not cool or heat effectively. | Check that this is not a damp smell exuded by the walls, carpet, furniture or cloth items in the room. | • Condensation occurs when the airflow from the air conditioner cooks the warm room air. |
| Does not cool or heat effectively. | The air conditioner operation is noisy. | Crack sound is heard. |
| Are the batteries depleted?Are the batteries inserted in the opposite (+) and (-) directions? | • This is the protector of the mechanism. • Wait about three minutes and operation will begin. | • Condensation occurs when the airflow from the air conditioner cooks the warm room air. |
| Remote control display is tangent, or no display at all. | • This sound is generated by the expansion/constriction of the front panel, etc. due to changes of temperature. | • This sound is generated by the expansion/constriction of the front panel, etc. due to changes of temperature. |
| • Is the air filter dirty?See air filter cleaning instructions. • The room may have been very hot when the room air conditioner was first turned on. Allow time for it to cool down. • Are the indoor units air inlet or outlet vents obstructed? | • For a noise that sounds like waterflowing. -This is the sound of throwFlowing inside the air conditioner unit. • For a noise that sounds like the compressed air atmosphere. -This is the sound of water being inside the dehydration water being water being water being inside the same time for 3 sec. | • Cleaning the filter, press the Timer button and ▶ button of wired remote controller at the same time for 3 sec. |
Please contact your dealer. Check the following points before requesting repairs or service.... If the malfunction persists,
Troublechooting Tips! Save time and money!

Before you call for service...
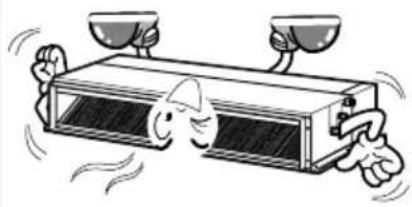
natural_image
Cartoon illustration of a refrigerant box with two cups above it and two fingers below, showing motion lines (no text or symbols)room.
Avoid opening doors and windows as much as possible to keep the cool air in the
Make sure that the doors and windows are shut tight.
Since windows are kept closed, it is a good idea to open them and ventilate the room now and then.
Ventilate the room occasionally.
Do not let direct sunshine enter the room when the air conditioner is in operation.
Keep blinds or curtains closed.
every two weeks.
Blockages in the air filter reduce the airflow and lower cooling and dehumidifying effects. Clean at least once
Clean the air filter regularly.
This is not good for the health and wastes electricity.
Do not overcool the room.
Operation Tips
The air filters and your electric bill. If the air filters become clamped with dust, the cooling capacity will drop, and 6% of the electricity used to operate the air conditioner will be wasted.
Helpful information
■ Check that the air inlet and outlet of the indoor/outdoor unit are not blocked.
When the air conditioner is to be used again.
Turn off the circuit breaker when the air conditioner is not going to be used for a long time. Dirt may collect and may cause a fire.
CAUTION

Turn off the circuit breaker.

- This will dry out the internal parts.
Operate the air conditioner on Air circulation mode for 2 to 3 hours.

When it is not going to be used for a long time.
When the air conditioner is not going to be used for a long time.
- Re-install the air filter.
shade.
- After washing with water, dry well in the
filter may be deformed.
- If hot water (50°C or more) is used.
detergent in lukewarm water.
- If very dirty, wash with a solution of
water.
- Clean the filter with a vacuum or warm, soapy
conditioner.
Could damage the surfaces of the air
• Volatile substances
discoloration.
Could cause deformation and/or
• Water hotter than 40°C
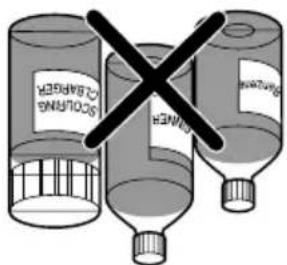
□ Never use any of the followings:
every 2 weeks or more often if necessary.
(the suction side) should be checked and cleaned once
The air filters behind indoor unit
Air Filter
cleaning the indoor unit.
Supply power must be disconnected before
NOTICE
☐ Turn the system off before cleaning. To clean, wipe with a soft, dry cloth. Do not use bleach or abrasives.
Grille, Case, and Remote Control
the system.
CAUTION:

CAUTION: Before performing any maintenance, turn off the main power to
Maintenance and Service
flowchart
graph TD
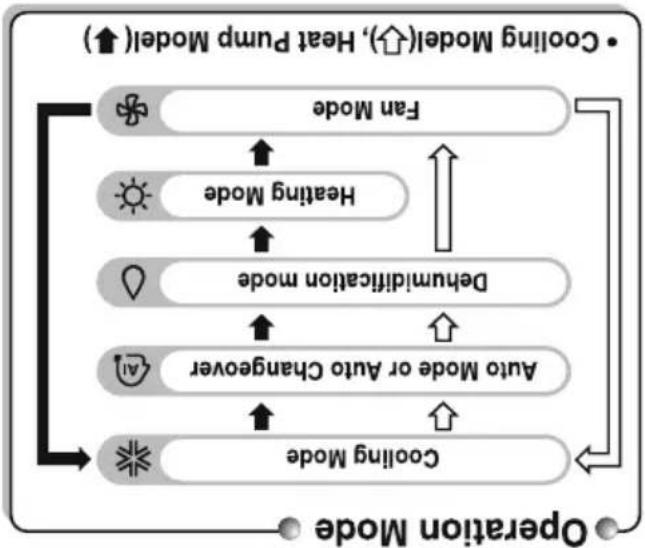
A["• Cooling Model(↑), Heat Pump Model(↑)"] --> B["Fan Mode"]
B --> C["Heating Mode"]
C --> D["Dehumidification mode"]
D --> E["Auto Mode or Auto Changaner"]
E --> F["Cooling Mode"]
F --> G["Operation Mode"]
style A fill:#f9f,stroke:#333
style G fill:#f9f,stroke:#333
POWRHDFO (Heat pump)
POWRCDFO (Cooling only)
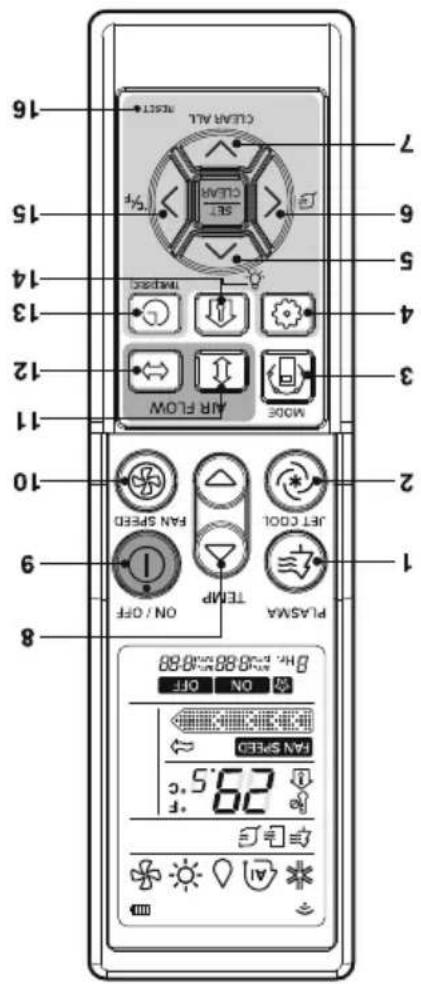
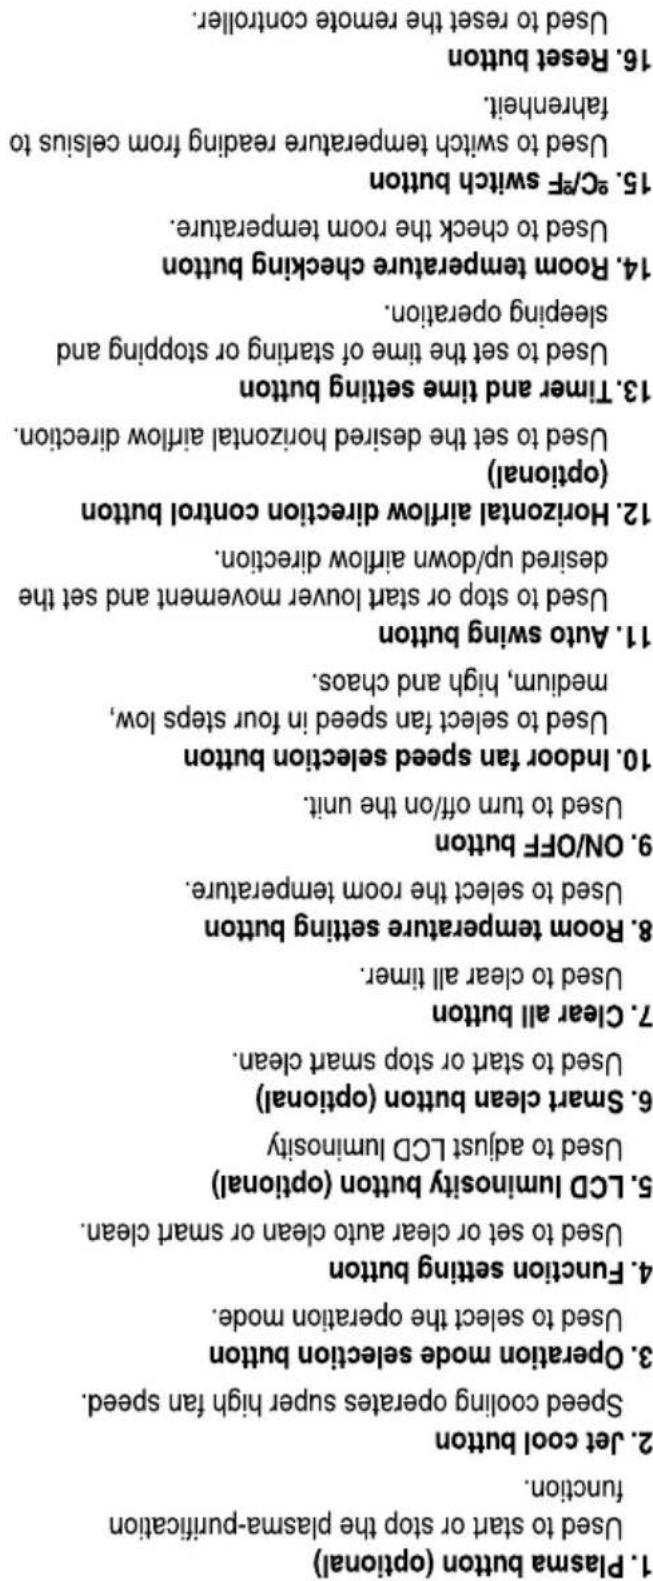
Name and function of wired remote controller(Optional)
- Room temperature button
- Fan speed button
- Air flow button
- Reservation/Time setting button
- Setting/ Cancel button
-
UP, Down, Left, Right
-
On/ Off button
-
Exit button
-
Function setting button
-
Sub-function button
-
Operation mode selection button
-
Ventilation button
wireless signal.
• Some kind of product could not receive
-
Wireless remote controller Receiver
-
Set temperature button
-
Operation indication screen
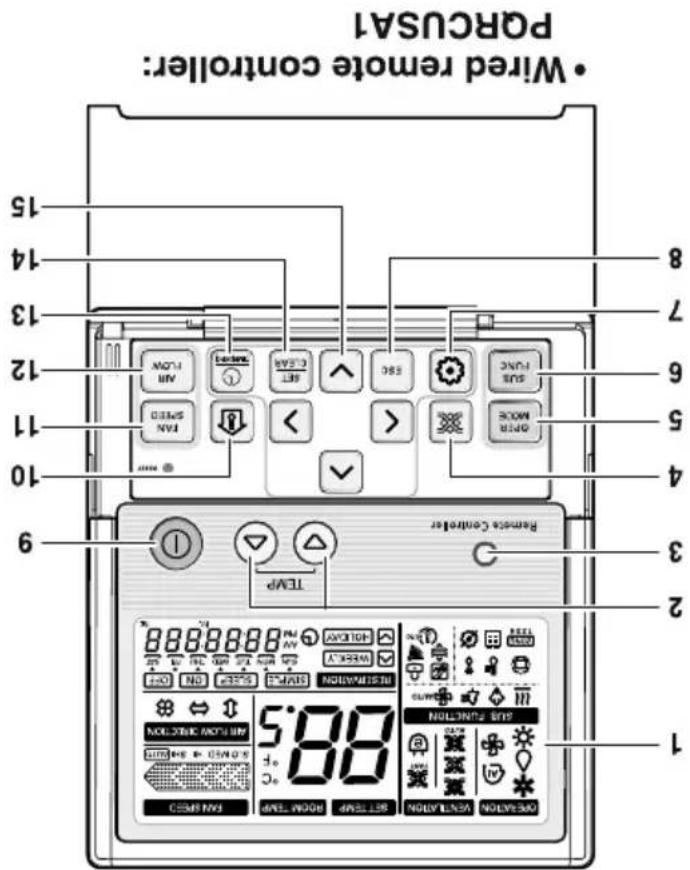
Name and function of wired remote controller(Optional)
Operating Instructions
紅花紅花 - http://www.igc.com/in
in the case that we have to be called as what they are in a way to get the case of the case, and then you can get the case of the case. The case of the case is the case of the case of the case of the case of the case of the case of the case of the case of the case of the case of the case of the case of the case of the case of the case of the case of the case of the case of the case of the case of the case of the case of the case of the case of the case of the case of the case of the case of the case of the case of the case of the case of the case of the case of
-
-
-
-
-
-
-
-
-
-
-
-
-
-
-
-
-
-
-
-
-
-
-
-
-
-
-
-
-
-
-
-
-
-
-
-
- 400.
-
-
-
-
-
-
-
-
-
-
-
-
-
-
-
-
-
-
-
-
-
-
-
-
-
-
-
-
-
-
-
-
-
-
-
الله مكتوبات مربعة في تأسيح ورطع مربعة في تأسيح ورطع مربعة في تأسيح ورطع مربعة في تأسيح ورطع مربعة في تأسيح ورطع مربعة في تأسيح ورطع مربعة في تأسيح ورطع مربعة في تأسيح ورطع مربعة في تأسيح ورطع مربعة.
-
2507-2611
-
2017-2018, 2019, 2020, 2021, 2022, 2023, 2024, 2025, 2026, 2027, 2028, 2029, 2030, 2031, 2032, 2033, 2034, 2035, 2036, 2037, 2038, 2039, 2040, 2041, 2042, 2043, 2044, 2045, 2046, 2047, 2048, 2049, 2050, 2051, 2052, 2053, 2054, 2055, 2056, 2057, 2058, 2059, 2060, 2061, 2062, 2063, 2064, 2065, 2066, 2067, 2068, 2069, 2070, 2071, 2072, 2073, 2074, 2075, 2076, 2077, 2078, 2079, 2080, 2081, 2082, 2083, 2084, 2085, 2086, 2087, 2088, 2089, 2090, 2091, 2092, 2093, 2094, 2095, 2096, 2097, 2098, 2099, 2100
-
300000000000000000000000000000000000000
-
如 J_2H 的 J_2H 的 J_2H 的 J_2H 的 J_2H 的 J_2H 的 J_2H 的 J_2 H 的 J_2 H 的 J_2 H 的 J_2 H 的 J_2 H 的 J_2 H 的 J_2 H 的 J_3 H 的 J_3 H 的 J_3 H 的 J_3 H 的 J_3 H 的 J_3 H 的 J_3 H 的 1
-
-
-
-
-
-
-
-
-
-
-
-
-
-
-
-
-
-
-
-
-
-
-
-
-
-
-
-
-
-
-
-
-
-
-
-
-
-
-
-
-
-
-
-
-
-
-
-
-
-
-
-
-
-
-
-
-
-
-
-
-
-
-
-
-
-
-
-
-
-
-
-
-
-
-
-
-
-
- 80.
-
-
-
-
-
-
-
-
-
-
-
-
-
-
-
-
-
-
-
-
-
-
-
-
-
-
-
-
-
-
-
-
-
-
-
-
-
-
-
-
-
-
-
-
-
-
-
-
-
-
-
-
-
-
-
-
-
-
-
-
-
-
-
-
-
-
-
-
-
-
-
-
-
-
-
-
-
-
2014年,美国国家的经济贸易与贸易关系。
-独上
-
-
-
-
-
-
-
-
-
-
-
-
-
-
-
-
-
-
-
-
-
-
-
-
-
-
-
-
-
-
-
-
-
-
-
-
-
-
-
-
-
-
-
-
-
-
-
-
-
-
-
-
-
-
-
-
-
-
-
-
-
-
-
-
-
-
-
-
-
-
-
-
-
-
-
-
-
-
-
-
-
-
-
-
-
-
-
-
-
-
-
-
-
-
-
-
-
- 99.
-
-
-
-
-
-
-
-
-
-
-
-
-
-
-
-
-
-
-
-
-
-
-
-
-
-
-
-
-
-
-
-
-
-
-
-
-
-
-
-
-
-
-
-
-
-
-
-
-
-
-
-
-
-
-
-
-
-
-
-
-
-
-
-
-
-
-
-
-
-
-
-
-
-
-
-
-
-
-
-
-
-
-
-
-
-
-
-
-
-
-
-
-
-
-
-
م. كُسْرَهَا عَلَّةِ فَيْرَهُ أَنْعَدَّةٍ وَلَّة: مِدْلَانَةٍ وَفَالْكَالِيُ عَلَّةٍ لِيْتَّاً لِيْتَّاً وَفَالْكَالِيُ عَلَّةٍ لِيْتَّاً لِيْتَّاً وَفَالْكَالِيُ عَلَّةٍ لِيْتَّاً لِيْتَّاً لِيْتَّاً لِيْتَّاً لِيْتَّاً لِيْتَّاً لِيْتَّاً لِيْتَّاً لِيْتَّاً لِيْتَّاً لِيْتَّاً لِيْتَّاً лِيْتَّاً لِيْتَّاً لِيْتَّاً لِيْتَّاً لِيْتَّاً لِيْتَّاً لِيْتَّاً لِيْتَّاً لِيْتَّاً لِيْتَّاً لِيْتَّاً لُيْتَّاً لِيْتَّاً لِيْتَّاً لِيْتَّاً لِيْتَّاً لِيْتَّاً لِيْتَّاً لِيْتَّاً لِيْتَّاً لِيْتَّاً لِيْتَّاً لِi
[Unreadable]
- 100, 100, 100, 100, 100, 100, 100, 100, 100, 100, 100, 100, 100, 100, 100, 100, 100, 100, 100, 100, 100

الله بُمْرَةٍ أَلْفَهِدٍ
Merely as a facilitator. For more detailed information, please visit: http://www.igc.com
- To locate a nearest collection centre or call for pickup ((limited area only) for disposal of this appliance, please contact Toll Free No. 1800-315-9999 / 1800-180-9999 for details. All collection centre and pick up facilities are done by third parties with LG Electronics India Pvt. Ltd.
8 Handling) Rules, 2011.
- This product is compiled with the requirement of Hazards Substances as specified under Rule 13 (1) & (2) of the E-Waste (Management and heart irregularities.
b. The refrigerant used can be combustible at low pressure. The potential health effect of over exposure is dizziness, headache
can cause blast and release toxic gases which may be harmful for health.
and chemicals found in batteries can mix into soil which may be hazardous to humans, plants and animals. If thrown in fire, they
a. If batteries are disposed incorrectly, it can greatly harm the environment. The chemical byproducts are hazards. The metals
-
Hazards of improper handling or accidental breakage.
-
Any disposal through unauthorized agencies/person will attack action under Environment (Protection) Act 1986.
d. Do not keep any replaced spare part(s) from the product in exposed area.
c. The product is not meant for mixing into household waste stream.
b. The product is not meant for re-sale to any unauthorized aqueous/scrp dealer / kabanwalah.
a. The product should not be opened by the user himself/herself, but only by authorized service personnel.
Don't
b. Keep the product in isolated area, after it becomes non-functional/unreparable so as to prevent its accidental breakage.
a. The product is required to be handed over only to the authorized recycler for disposal.
- Do's
disposed off.
- When this crossed out wheeled bin symbol is depicted on the product and its operators manual, it means the product is covered by the e-waste Management and Handling Rules, 2011, and are meant to be recycled, distinguished, refurbished or

Disposal of your old appliance
For repair and maintenance, contact your authorized service dealer.
Service
- Do not touch the metal parts of the unit when removing the filter. Injuries can occur when handling sharp metal edges.
- Do not use water to clean inside the air conditioner. Exposure to water can destroy the insulation, leading to possible electric shock.
- When cleaning the unit, first make sure that the power and breaker are turned off. The tan rotates at a very high speed during operation. There is a possibility of injury if the unit's power is accidentally triggered on while cleaning inner parts of the unit.
Cleaning and maintenance
- Being exposed to direct airflow for an extended period of time could be hazardous to your health.
- Due to the possibility of oxygen deficiency, ventilate the room when used together with stoves or other heating devices.
- Do not use this air conditioner for non-specific special purposes (e.g. preserving precision devices, food, pets, plants, and air objects). Such usage could damage the items.
usage
- Use a dedicated circuit.
- Contact an installation specialist for installation.
Preparing for operation
Prior to Operation
| • The chemicals in batteries could cause burns or other health hazards. | • The chemicals in batteries could cause burns or other health hazards. |
| If you eat the liquid from the batteries, brush your teeth and see doctor. Do not use the remote if the batteries have leaked. | • The chemicals in batteries could cause burns or other health hazards. |
| Do not expose the skin directly to cool air for long periods of time. (Don't sit in the dart). | Do not use the product for special purposes, such as preserving foods, works of art, etc. It is a consumer air conditioner, not a precision refrigeration system. | Do not block the inlet or outlet of air flow. |
| • This could harm to your health. | • There is risk of damage or loss of property. | • It may cause product failure. |
| • There is risk of fire, electric shock, or damage to the plastic parts of the product. | • There is risk of personal injury. | • There is risk of personal injury and failure of product. |
| • There is risk of fire, electric shock, or damage to the plastic parts of the product. | • There is risk of personal injury. | • There is risk of personal injury and failure of product. |
| • Always insert the filter securely. Clean the filter every two weeks or more often if necessary. | Do not insert hands or other objects through the air inlet or outlet while the product is operated. | Do not drink the water drained from the product. |
| • A dirty filter reduces the efficiency of the air conditioner and could cause product malfunction or damage. | • There are sharp and moving parts that could cause personal injury. | • It is not sanitary and could cause serous health issues. |
| Use a firm stool or ladder when cleaning or maintaining the product. | Replace the all batteries in the remote control with new ones of the same type. Do not mix old and new batteries or different types of batteries. | Do not recharge or disassemble the batteries. Do not dispose of batteries in a fire. |
Operation

- If may cause corrosion on the product. Corrosion, particularly on the condenser and evaporator fins, could cause product malfunction or inefficient operation.
• To avoid vibration or water leakage. Do not install the product where it will be exposed to sea wind (salt spray) directly.
Keep level even when installing the product.
• Avoid personal injury.
• A bad convection may cause water leakage. Use two or more people to lift and transport the product.
Install the drain hose to ensure that water is drained away properly.
neighbors.
- It may cause a problem for your
Low refrigerant levels may cause failure of product. Do not install the product where the noise or hot air from the outdoor unit could damage the neighborhoods.
Always check for gas (refrigerant) leakage after installation or repair of product.
installation
i CAVITION
夫 This could result in personal injury and product damage.
Take care to ensure that nobody could step on or fall onto the outdoor unit.
• There is risk of electric shock.
Turn the main power off when cleaning or maintaining the product.
unintended operation.
• There is risk of product damage or failure, or
breaker.
When the product is not be used for a long time, disconnect the power supply plug or turn off the
• There is risk of fire or electric shock.
Ventilate the product from time to time when operating it together with a stove, etc.
• There is risk of fire, electric shock, or product damage.
Be cautions that water could not enter the product.
• There is risk of property damage, failure of product, or electric shock.
Stop operation and close the window in storm or hurricane. If possible, remove the product from the window before the hurricane arrives.
• Oxygen deficiency could occur.
Do not use the product in a tightly closed space for a long time.
• There is risk of fire and electric shock.
Do not place a heater or other appliances near the power cable.
• There is risk of fire or electric shock.
Do not place anything on the power cable.
• There is risk of fire or electric shock.
When the product is soaked (looded or submerged), contact an Authorized Service Center.
• There is risk of electric shock or fire.
If strange sounds, or smell or smoke comes from product. Turn the breaker off or discount the power supply cable.
• There is risk of fire or failure of product.
Do not store or use flammable gas or combustibles near the product.
• There is risk of fire or electrical shock.
Do not touch (operate) the product with wet hands.
• There is risk of fire or electric shock.
Take care to ensure that power cable could not be pulled out or damaged during operation.
• There is risk of physical injury, electric shock, or product failure.
Do not open the Intel grill of the product during operation. (Do not touch the electrostatic filter, if the unit is so equipped.)
• Do not use the telephone or turn switches on or off. There is risk of explosion or fire
When flammable gas leaks, turn off the gas and open a window for ventilation before turn the product on.
- It may cause There is risk of fire failure of the product, or electric shock.
Do not allow water to run into electric parts.
• There is risk of fire or electric shock.
Do not plug or unplug the power supply plug during operation.
• Moisture may condense and wet or damage furniture.
Do not let the air conditioner run for a long time when the humidity is very high and a door or a window is left open.
Operation
| Do not use a detective or underrated circuit breaker. Use this appliance on a dedicated circuit. | For electrical work, contact the dealer, seller, a qualified electrician, or an Authorized Service Center. | Always ground the product. |
| • There is risk of fire or electric shock. | Do not disassemble or repair the product. There is risk of fire or electric shock. | • There is risk of fire or electric shock. |
| • There is risk of fire or electric shock. | • Improper winding or installation may cause fire or electric shock or fuse. | Use the correctly rated breaker shock. |
| • There is risk of fire or electric shock. | • Improper winding or installation may cause fire or electric shock or fuse. | • There is risk of fire or electric shock. |
| • There is risk of fire and the cover of control box securely. | Always install a dedicated circuit and breaker. | • There is risk of fire or electric shock. |
| • There is risk of fire or electric shock. | • Improper winding or installation may cause fire or electric shock or fuse. | • There is risk of fire or electric shock. |
| • There is risk of fire or electric shock. | • Improper winding or installation may cause fire or electric shock or fuse. | • There is risk of fire or electric shock. |
| • There is risk of fire or electric shock. | • Improper winding or installation may cause fire or electric shock or fuse. | • There is risk of fire or electric shock. |
| • There is risk or electric shock. | • Improper winding or installation may cause fire or electric shock or fuse. | • There is risk of fire or electric shock. |
| • There is risk of fire or electric shock. | • Improper winding or installation may cause fire or electric shock or fuse. | • There is risk of fire or electric shock. |
| • There is risk of fire or electric shock. | • Improper winding or installation may cause fire or electric shock or fuse, and installation may cause fire or electric shock. | • There is risk of fire or electric shock. |
| • There is risk of fire or electric shock. | • Improper winding or installation may cause fire or electric shock or fuse, and installation may cause fire or electric shock. | • There is risk of fire or electric shock. |
| • There is risk of fire or electric shock. | • Improper winding or installation may cause fire or electric shock or fuse, and installation may cause fire or electric shock. | |
| • There is risk of fire or electric shock. | • Improper winding or installation may cause fire or electric shock or fuse, and installation may cause fire or electric shock. | |
| • There is risk of fire or electric shock. | • Improper winding or installation may cause fire or electric shock or fuse, and installation may cause fire or electric shock. | |
| • There is risk of fire or electric shock. | • Improper winding or installation may caused fire or electric shock or fuse, and installation may caused fire or electric shock. | |
| • There is risk of fire or electric shock. | • Improper winding or installation may caused fire or electric shock or fuse, and installation may caused fire or electric shock. | |
| • There is risk of fire or electric shock. | • Improper winding or installation may caused fire or electric shock or fuse, and installation may caused fire or electric shock. | |
| • There is risk of fire or electric shock. | • The risks of fire or electric shock. |
installation
WARNING
| Be sure not to do. | [33] | |
| Be sure to follow the instruction. |  |
Meanings of symbols used in this manual are as shown below.
| WARNING | This symbol indicates the possibility of death or serious injury. |
| CAUTION |
by the following indications.
Incorrect operation due to ignoring instruction will cause harm or damage. The serousness is classified
followed.
To prevent injury to the user or other people and property damage, the following instructions must be
Safety Precuations

natural_image
Simple line drawing of a bowl with fish and food items, no text or symbols present- Contact the authorized service technician for repair or maintenance of this unit. - The air conditioner is not intended for use by young children or invalids without supervision. - Young children should be supervised to ensure that they do not play with the air conditioner. - When the power cord is to be replaced, replacement work shall be performed by authorized personnel only using only genuine replacement parts. - Installation work must be performed in accordance with the National Electric Code by qualified and authorized personnel only.
PRECAUTION

for service at all.
Troubleshooting Tips first, you may not need to call
You'll find many answers to common problems in the chair of troubleshooting tips. If you review our chair of
Inside you will find many helpful hints on how to use and maintain your air conditioner property. Just a little preventive care on your part can save you a great deal of time and money over the life of your air conditioner.
READ THIS MANUAL
■ Staple your receipt to this page in the event you need to prove date of purchase or to issue warranty.
Date Purchased
Dealer's Name
You can find them on a label on the side of each unit.
Serial #
Model #
Write the model and serial numbers here:
FOR YOUR RECORDS
Service 12
Before you Call for
Maintenance and Service ..... 10
Controller.....8
Name and Function of Remote
Operating Instructions.....8
Prior to Operation ....6
Safety Precultions....3
Page No.
Copyright © 2019 LG Electronics Inc. All Rights Reserved
P/No.MF62183402
For MULTI V. Low-State Duct Models
TYPE: LOW STATIC CEILING DUCT TYPE AIR CONDITIONER
Please read this manual carefully before operating your set and retain it for future reference.
AIR CONDITIONER
OWNERS MANUAL
- INSTALLATION MANUAL
- AIR
- CONDITIONER
- TABLE OF CONTENTS
- Installation Requirements
- Installation
- Required Parts
- Required Tools
- Safety Precautions
- WARNING
- CAUTION
- ■ Installation
- ■ Operation
- Introduction
- Symbols Used in this Manual
- Features
- Selection of the best location
- Indoor unit
- Ceiling dimension and hanging bolt location
- Installation of Unit
- CASE 1
- POSITION OF SUSPENSION BOLT
- CASE 2
- POSITION OF CONSOLE BOLT
- Indoor Unit Installation
- Wiring Connection
- L5/L6 Series
- Part name and functions
- INSULATION, OTHERS
- THERMAL INSULATION
- TEST AND CHECK
- ■ After all workings are finished, check the working and operation.
- Checking the Drainage
- Remove the Air Filter.
- Check the drainage.
- Front of view
- Drain Piping
- Drain test
- CAUTION:
- HAND OVER
- WIERED REMOTE CONTROLLER INSTALLATION
- Do not install the remote controller where it can be affected by:
- Installation of Wired Remote Controller
- Optional Operation of Wired Remote Controller
- Two Thermistor System
- How to Set E.S.P?
- What is an E.S.P function?
- Note :
- LG
- Service
- Cleaning and maintenance
- usage
- Preparing for operation
- Prior to Operation
- Operation
- PRECAUTION
- READ THIS MANUAL
- FOR YOUR RECORDS
- AIR CONDITIONER
Mærke : LG
Model : JRNU18GL5G4
Kategori : Aircondition