
ATNW54LMLS1 - Aircondition LG - Gratis brugsanvisning og manual
Find enhedens vejledning gratis ATNW54LMLS1 LG i PDF-format.


Brugerspørgsmål om ATNW54LMLS1 LG
0 spørgsmål om dette apparat. Besvar dem du kender, eller stil dit eget.
Stil et nyt spørgsmål om dette apparat
Download vejledningen til din Aircondition i PDF-format gratis! Find din vejledning ATNW54LMLS1 - LG og tag din elektroniske enhed tilbage i hånden. På denne side er alle dokumenter nødvendige for brugen af din enhed offentliggjort. ATNW54LMLS1 af mærket LG.
BRUGSANVISNING ATNW54LMLS1 LG
OWNER'S MANUAL
AIR
CONDITIONER
Please read this manual carefully before operating your set and retain it for future reference.
CEILING CASSETTE
TIPS FOR SAVING ENERGY
Here are some tips that will help you minimize the power consumption when you use the air conditioner. You can use your air conditioner more efficiently by referring to the instructions below:
- Do not cool excessively indoors. This may be harmful for your health and may consume more electricity.
- Block sunlight with blinds or curtains while you are operating the air conditioner.
- Keep doors or windows closed tightly while you are operating the air conditioner.
- Adjust the direction of the air flow vertically or horizontally to circulate indoor air.
- Speed up the fan to cool or warm indoor air quickly, in a short period of time.
- Open windows regularly for ventilation as the indoor air quality may deteriorate if the air conditioner is used for many hours.
- Clean the air filter once every 2 weeks. Dust and impurities collected in the air filter may block the air flow or weaken the cooling / dehumidifying functions.
For your records
Staple your receipt to this page in case you need it to prove the date of purchase or for warranty purposes. Write the model number and the serial number here:
Model number :
Serial number :
You can find them on a label on the side of each unit.
Dealer's name :
Date of purchase :
IMPORTANT SAFETY INSTRUCTIONS
READ ALL INSTRUCTIONS BEFORE USING THE APPLIANCE.
Always comply with the following precautions to avoid dangerous situations and ensure peak performance of your product

WARNING
It can result in serious injury or death when the directions are ignored

CAUTION
It can result in minor injury or product damage when the directions are ignored

WARNING
• Always ground the product. There is a risk of electric shock.
- Do not use a defective or underrated circuit breaker. Use the correctly rated breaker and fuse. There is risk of fire or electric shock.
- Do not use a multi consent. Always use this appliance on a dedicated circuit and breaker. Otherwise it can cause electric shock or fire.
- For electrical work, contact the dealer, seller, a qualified electrician, or an Authorized Service Center. Do not disassemble or repair the product by yourself. There is risk of fire or electric shock.
• Always ground the product as per the wiring diagram. Do not connect the ground wire to gas or water pipes lightening rod or telephone ground wire. There is risk of fire or electric shock.
• Install the panel and the cover of control box securely. There is risk of fire or electric shock due to dust, water etc.
- Use the correctly rated breaker or fuse. There is risk of fire or electric shock.
- Do not modify or extend the power cable. If the power cable or cord has scratches or skin peeled off or deteriorated then it must be replaced. There is risk of fire or electric shock.
- For installation, removal or reinstall, always contact the dealer or an Authorized Service Center. There is risk of fire, electric shock, explosion, or injury.
- Do not install the product on a defective installation stand. Be sure that the installation area does not deteriorate with age. It may cause product to fall.
- Never install the outdoor unit on a moving base or a place from where it can fall down. The falling outdoor unit can cause damage or injury or even death of a person.
- When the product is soaked (flooded or submerged) in water, contact an Authorized Service Center for repair before using it again. There is risk of fire or eletric shock.
- Be sure to check the refrigerant to the used. Please read the label on the product. Incorrect refrigerant used can prevent the normal operation of the unit.
- Don't use a power cable, a plug or a loose socket which is damaged. Otherwise it may cause a fire or electrical shock.
- Do not touch, operate, or repair the product with wet hands. Hold the plug by hand when taking out. There is risk of electric shock or fire.
- Do not place a heater or other heating appliances near the power cable. There is risk of fire and electric shock.
- Do not allow water to run into electric parts. Install the unit away from water sources. There is risk of fire, failure of the product, or electric shock.
- Do not store or use or even allow flammable gas or combustibles near the product. There is
risk of fire.
- Indoor/outdoor wiring connections must be secured tightly and the cable should be routed properly so that there is no force pulling the cable from the connection terminals. Improper or loose connections can cause heat generation or fire.
- Safely dispose off the packing materials. Like screws, nails, batteries, broken things etc after installation or svc and then tear away and throw away the plastic packaging bags. Children may play with them and cause injury.
- Make sure to check that the power cable plug is not dirty, loose or broken and then only insert the plug completely. Dirty, loose or broken power plug can cause electric shock or fire.
- In outdoor unit the step-up capacitor supplies high voltage electricity to the electrical components. Be sure to discharge the capacitor completely before conducting the repair work. An charged capacitor can cause electrical shock.
- When installing the unit, use the installation kit provided with the product. Otherwise the unit may fall and cause severe injury.
- Be sure to use only those parts which are listed in the svc parts list. Never attempt to modify the equipment. The use of inappropriate parts can cause an electrical shock, excessive heat generation or fire.
- Do not use the product in a tightly closed space for a long time. Perform ventilation regularly. Oxygen deficiency could occur and hence harm your health.
- Do not open the front grille of the product during operation. (Do not touch the electrostatic filter, if the unit is so equipped.) There is risk of physical injury, electric shock, or product failure.
- If strange sounds, smell or smoke comes from product. Immediately turn the breaker off or disconnect the power supply cable. There is risk of electric shock or fire.
- Ventilate the product room from time to time when operating it together with a stove, or heating element etc. Oxygen deficiency can occur and hence harm your health.
- Turn the main power off and unplug the unit when cleaning or repairing the product. There is risk of electric shock.
- When the product is not to be used for a long time, disconnect the power supply plug or turn off the breaker. There is risk of product damage or failure, or unintended operation.
• Take care to ensure that nobody especially kids could step on or fall onto the outdoor unit. This could result in personal injury and product damage. - Take care to ensure that power cable could not be pulled out or damaged during operation. There is risk of fire or electric shock.
- Do not place ANYTHING on the power cable. There is risk of fire or electric shock.
- Do not plug or unplug the power supply plug to turn the unit ON/OFF. There is risk of fire or electric shock.
- When flammable gas leaks, turn off the gas and open a window for ventilation before turn the product on. Do not use the telephone or turn switches on or off. There is risk of explosion or fire.
- This appliance is not intended for use by persons (including children) with reduced physical, sensory or mental capabilities, or lack of experience and knowledge, unless they have been given supervision or instruction concerning use of the appliance by a person responsible for their safety. Children should be supervised to ensure that they do not play with the appliance.
- Do not install the unit in potentially explosive atmospheres.

CAUTION
- Two or more people must lift and transport the product. Avoid personal injury.
- Do not install the product where it will be exposed to sea wind (salt spray) directly. It may cause corrosion on the product.
• Install the drain hose to ensure that the condensed water is drained away properly. A bad connection may cause water leakage. - Keep level even when installing the product. To avoid vibration or noise.
-
Do not install the product where the noise or hot air from the outdoor unit could damage or disturb the neighborhoods. It may cause a problem for your neighbors and hence dispute.
-
Always check for gas (refrigerant) leakage after installation or repair of product. Low refrigerant levels may cause failure of product.
- Do not use the product for special purposes, such as preserving foods, works of art, etc. It is a consumer air conditioner, not a precision refrigeration system. There is risk of damage or loss of property.
- Do not block the inlet or outlet of air flow. It may cause product failure.
- Use a soft cloth to clean. Do not use harsh detergents, solvents or splashing water etc. There is risk of fire, electric shock, or damage to the plastic parts of the product.
- Do not touch the metal parts of the product when removing the air filter. There is risk of personal injury.
- Do not step on or put anything on the product. (outdoor units) There is risk of personal injury and failure of product.
- Always insert the filter securely after cleaning. Clean the filter every two weeks or more often if necessary. A dirty filter reduces the efficiency.
- Do not insert hands or other objects through the air inlet or outlet while the product is operating. There are sharp and moving parts that could cause personal injury.
- Be cautious when unpacking and installing the product. Sharp edges could cause injury.
- If the refrigerant gas leaks during the repair, do not touch the leakaing refrigerant gas. The refrigerat gas can cause frostbite (cold burn)
- Do not tilt the unit when removing or uninstalling it. The condensed water inside can spill.
- Do not mix air or gas other than the specified refrigerant used in the system. If air enters the refrigerant system, an excessively high pressure results, causing equipment damage or injury.
- If the refrigerant gas leaks during the installation, ventilate the area immediately. Otherwise it can be harmful for your health.
- Dismantling the unit, treatment of the refrigerant oil and eventual parts should be done in accordance with local and national standards. Replace the all batteries in the remote control with new ones of the same type. Do not mix old and new batteries or different types of batteries. There is risk of fire or product failure.
- Do not recharge or disassemble the batteries. Do not dispose off batteries in a fire. They may burn or explode.
- If the liquid from the batteries gets onto your skin or clothes, wash it well with clean water. Do not use the remote if the batteries have leaked. The chemicals in batteries could cause burns or other health hazards.
- If you eat the liquid from the batteries, brush your teeth and see doctor. Do not use the remote if the batteries have leaked. The chemicals in batteries could cause burns or other health hazard.
- Do not let the air conditioner run for a long time when the humidity is very high and a door or a window is left open. Moisture may condense and wet or damage furniture.
- Do not expose your skin or kids or plants to the cool or hot air draft. This could harm to your health.
- Do not drink the water drained from the product. It is not sanitary and could cause serious health issues.
- Use a firm stool or ladder when cleaning, maintaining or repairing the product at an height. Be careful and avoid personal injury.
TABLE OF CONTENTS
2 TIPS FOR SAVING EN-ERGY
3 IMPORTANT SAFETY IN-STRUCTIONS
7 BEFORE USE
7 Preparing for operation
7 Usage
7 Cleaning and maintenance
7 Service
8 PRODUCT INTRODUC-TION
8 Name and function of parts
8 Operation Indication Lamps
9 Wired Remote Controller (Accessory)
10 Wireless Remote Controller
11 OPERATING INSTRUCTION
11 How to insert the Batteries
11 Wireless Remote Controller Maintenance
11 Operating Method
12 OWNER'S INSTRUCTION
12 Cooling Mode - Standard Operation
12 Cooling Mode - Power Cooling
13 Heating Mode
14 Dehumidification Mode
15 Fan Mode
16 Auto Operation Mode
17 Auto Changeover Mode
18 Auto Changeover Mode - Setting the Mode Change Temperature
19 Airflow Setting
19 Celsius/Fahrenheit Switching
20 Temperature Setting/Room Temperature checking
21 SUB FUNCTION
21 Plasma Purification(Optional)
21 Auto Clean (Optional)
22 Smart Clean (Optional)
23 Individual vane angle control (Optional)
24 TIMER
24 Setting the Current Time
24 Sleep Timer Setting
24 On Timer Setting
25 Off Timer Setting
25 To cancel the Timer Setting
26 MAINTENANCE AND SERVICE
26 Indoor Unit
27 Purifying filter(Optional)
28 Operation Tips!
28 When the air conditioner is not going....
29 Troubleshooting Tips! Save time and money!
29 Call the service immediately in the following situations
BEFORE USE
Preparing for operation
- Contact an installation specialist for installation.
- Use a dedicated circuit.
Usage
- Being exposed to direct airflow for an extended period of time could be hazardous to your health. Do not expose occupants, pets, or plants to direct airflow for extended periods of time.
- Due to the possibility of oxygen deficiency, ventilate the room when used together with stoves or other heating devices.
- Do not use this air conditioner for non-specified special purposes (e.g. preserving precision devices, food, pets, plants, and art objects). Such usage could damage the items.
Cleaning and maintenance
- Do not touch the metal parts of the unit when removing the filter. Injuries can occur when handling sharp metal edges.
- Do not use water to clean inside the air conditioner. Exposure to water can destroy the insulation, leading to possible electric shock.
- When cleaning the unit, first make sure that the power and breaker are turned off. The fan rotates at a very high speed during operation. There is a possibility of injury if the unit's power is accidentally triggered on while cleaning inner parts of the unit.
Service
For repair and maintenance, contact your authorized service dealer.
PRODUCT INTRODUCTION
Name and function of parts

1 Indoor unit
2 Outdoor unit
3 Remote controller
4 Inlet air
5 Discharge air
6 Refrigerant piping, connection electric wire
7 Drain pipe
8 Ground wire
Wire to ground outdoor unit to prevent electrical shocks.
Wired Remote Controller (Accessory)

Please attach the inform label inside of the door. Please choose proper language depend on your country.
1 OPERATION INDICATION SCREEN
2 SET TEMPERATURE Button
3 FAN SPEED Button
4 ON/OFF Button
5 OPRATION MODE SELECTION Button
6 WIRELESS REMOTE CONTROLLER RECEIVER
- Some products don't receive the wireless signals.
7 AIR FLOW Button
8 SUBFUNCTION Button
9 FUNCTION SETTING Button
10 VENTILATION Button
11 RESERVATION
12 UP, DOWN, LEFT, RIGHT Button
- To check the indoor temperature, press button 🔒.
13 ROOM TEMPERATURE Button
14 SETTING/CANCEL Button
15 EXIT Button
* Some functions may not be operated and displayed depending on the product type.
NOTE
- Display temperature can be different from actual room temperature if the remote controller is installed at the place where sun-rays are falling directly or the place nearby heat source.
- The actual product can be different from above contents depending upon model type.
- When using simultaneous operation system, whenever press remote controller button, system will approximately operate after 1\~2 minutes.
Wireless Remote Controller
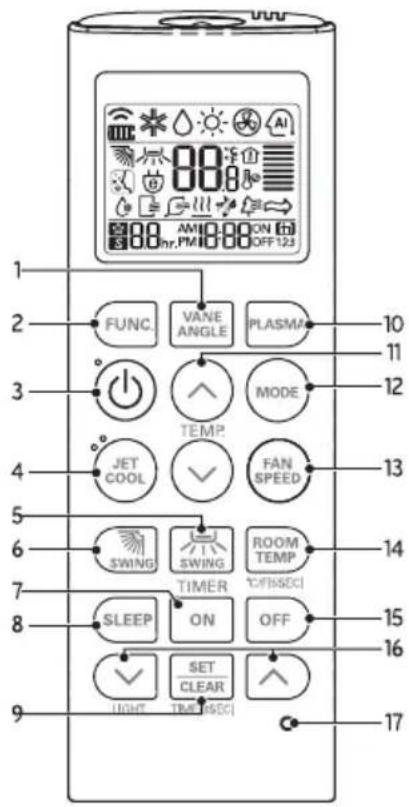
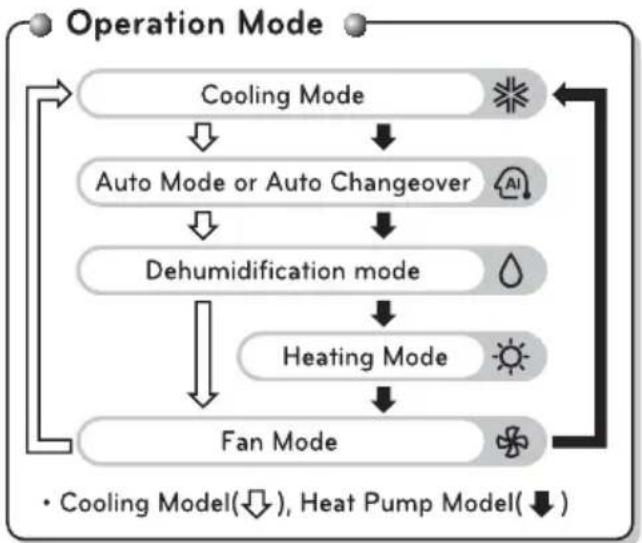
flowchart
graph TD
    A["Operation Mode"] --> B["Cooling Mode"]
    B --> C["Auto Mode or Auto Changeover"]
    C --> D["Dehumidification mode"]
    D --> E["Heating Mode"]
    E --> F["Fan Mode"]
    F --> A
    style A fill:#f9f,stroke:#333
    style B fill:#ccf,stroke:#333
    style C fill:#cfc,stroke:#333
    style D fill:#fcc,stroke:#333
    style E fill:#cff,stroke:#333
    style F fill:#ffc,stroke:#333
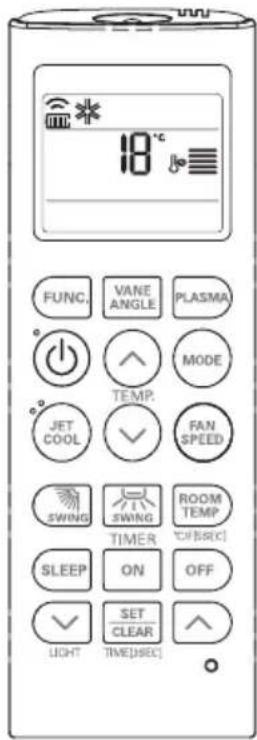
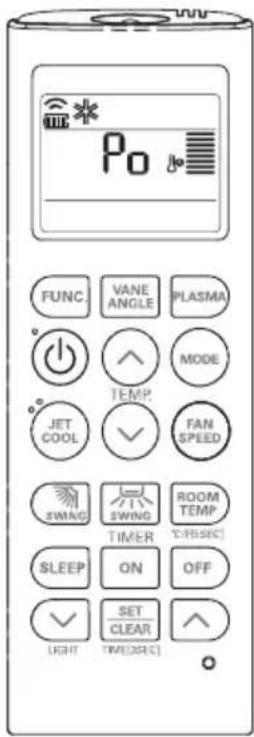
1 VANE ANGLE Button
Used to set each vane angle.
2 FUNCTION SETTING Button
Used to set or clear Auto Clean, Smart Clean, Electric heater or Individual vane angle control.
3 ON/OFF Button
Used to turn on/off the unit.
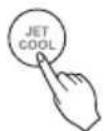
4 JET COOL Button
Speed cooling operates super high fan speed.
5 LEFT/RIGHT AIRFLOW Button (OPTIONAL)
Used to set the desired left/right(horizontal) airflow direction.
6 UP/DOWN AIRFLOW Button
Used to stop or start louver movement and set the desired up/down airflow direction.
7 ON TIMER Button
Used to set the time of starting operation.
8 SLEEP TIMER Button
Used to set the time of sleeping operation.
9 SET/CLEAR Button
Used to set/clear the timer.
Used to set the current time(if it input for 3sec.)
10 PLASMA Button (OPTIONAL)
Used to start or stop the plasma-purification function.
11 ROOM TEMPERATURE SETTING Button
Used to select the room temperature.
12 OPERATION MODE SELECTION Button
Used to select the operation mode.
13 INDOOR FAN SPEED SELECTION Button
Used to select fan speed in four steps low, medium, high and chaos.
14 ROOM TEMPERATURE CHECKING Button
Used to check the room temperature.
15 OFF TIMER Button
Used to set the time of stopping operation.
16 TIMER SETTING(Up/Down)/LIGHT Button
Used to set the timer.
Used to adjust the brightness.(if it is not time adjust mode)
17 RESET Button
Used to reset the remote controller.
OPERATING INSTRUCTION
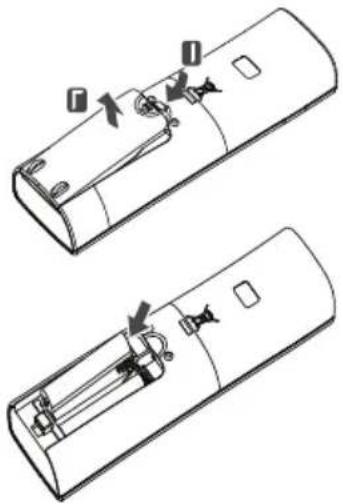
How to insert the Batteries
1 Remove the battery cover by pulling it according to the arrow direction.
2 Insert new batteries making sure that the (+) and (-) of battery are installed correctly.
3 Reattach the cover by sliding it back into position.


NOTE
• Always use/replace both batteries of same type.
- If the system is not to be used for a long time, remove the batteries to save their working life.
- If the display screen of remote controller starts, fading replace both of the batteries.
Wireless Remote Controller Maintenance
1 Choose a suitable place where its safe & easy to reach.
2 Fix the holder to wall etc with the supplied screws firmly.
3 Slide the remote controller inside the holder.

natural_image
Technical line drawing of a handheld device with a screwdriver and a separate phone button (no text or symbols)
NOTE
- Remote controller should never be exposed to direct sunlight.
- Signal transmitter & receiver should always be clean for proper communication. Use a soft cloth to clean them.
- In case some other appliances also get operated with remote control, change their position or consult your service-man.
Operating Method
1 The signal receiver is inside the unit.
2 Aim the remote controller towards the unit to operate it. There should not be any blockage in between.
OWNER'S INSTRUCTION
Cooling Mode - Standard Operation

1 Press the ON/OFF button. The unit will respond with beep sound.

2 Press MODE button to select Cooling Mode.

3 Set the desired temperature by pressing TEMP button. Press ROOM TEMPERATURE CHECKING button to check the room temperature. When setting the desired temperature is higher than room temperature, cooling wind isn't blow out.

* Setting Temp. Range : 18\~30 °C(64\~86 °F)
Cooling Mode - Power Cooling
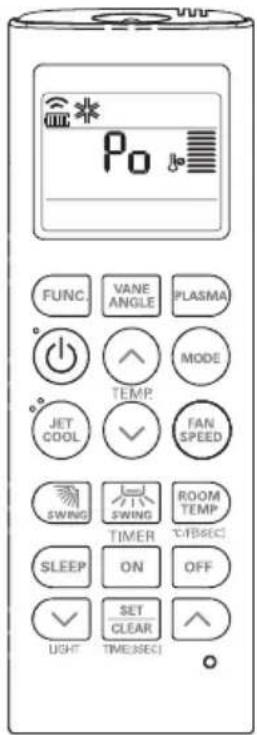
1 Press the ON/OFF button. The unit will respond with beep sound.
2 Press MODE button to select Cooling Mode.

3 Press the JET COOL button. The unit will operate in super high fan speed in cooling mode. * Wall mounted models operate power cooling mode for 30 minutes.

4 To cancel the Power cooling Mode press the Jet Cool button or the fan button or the room temperature setting button again and the unit will operate in high fan speed in cooling mode.

or

or

Heating Mode
This Function is only for H/P model.
![30°C FUNC. VANE ANGLE PLASMA ↑ 功 功 ↑ MODE TEMP. JET COOL ✓ FAN SPEED SWING SWING ROOM TEMP TIMER °C/°SSEC) SLEEP ON OFF ✓ SET CLEAR LIGHT TIME[3SEC] ↗](/content/2026/05/1009699/images/4e214aa48867a609ea906bad616238601d63a260f39c1c70dbd899b9181afd53.jpg)
1 Press the ON/OFF button. The unit will respond with beep sound.

2 Press MODE button to select Heating Mode.

3 Set the desired temperature by pressing TEMP button. Press ROOM TEMPERATURE CHECKING button to check the room temperature. When setting the desired temperature is lower than room temperature, heating wind isn't blow out.

* Setting Temp. Range in Heating Mode : 16\~30 °C (60 °F\~86 °F)
4 Set the fan speed again. You can select the fan speed in four steps—low, medium, high, or chaos. Each time the button is pressed, the fan speed mode is shifted.
Dehumidification Mode
![FUNC. VANE ANGLE PLASMA TEMP. JET COOL FAN SPEED SWING SWING ROOM TEMP TIMER °C/°SSEC SLEEP ON OFF SET CLEAR LIGHT TIME[3SEC]](/content/2026/05/1009699/images/d84744bc13ae4d497c25f0527bd835ce7a994ec65ca31527a5292ac00bb77465.jpg)
1 Press the ON/OFF button. The unit will respond with beep sound.
2 Press MODE button to select Dehumidification Mode.

3 Set the fan speed. You can select the fan speed in four steps - low, medium, high, or chaos. Each time the button is pressed, the fan speed mode is shifted.

NOTE
During Dehumidification Mode
- If you select the dehumidification mode on the operation selection button, the indoor unit starts to run the dehumidification function, automatically setting the room temp. and air volume to the best condition for dehumidification based on the sensed room temp.
In this case, the setting temp. is not displayed in the Remote Controller and you are not able to control the room temp. either. - During the healthy dehumidification function, the air volume is automatically set according to the algorithm responding to the current room temp. and makes the room condition healthy and comfortable even in the high humidity season.
Fan Mode
![FUNC. VANE ANGLE PLASMA TEMP. JET COOL FAN SPEED SWING SWING ROOM TEMP TIMER °C/°SSEC) SLEEP ON OFF SET CLEAR LIGHT TIME[3SEC]](/content/2026/05/1009699/images/7fc58e3ae819f779fb4985bcdc9d969cf86d7cde3dfba6cfe349a85774555fc8.jpg)
1 Press the ON/OFF button. The unit will respond with beep sound.

2 Press MODE button to select Fan Mode.

3 Set the fan speed again. You can select the fan speed in four steps—low, medium, high, or chaos. Each time the button is pressed, the fan speed mode is shifted.
NOTE
• Natural Wind by the chaos Logic
For more fresh feeling than other fan speed, press the Indoor Fan Speed Selector and set to chaos mode. In this mode, the wind blows like natural breeze by automatically changing fan speed according to the chaos logic.
- During Fan Mode
The outdoor compressor doesn't work.
Have a function to circulate the indoor as it sends out the air that doesn't have much temperature difference with indoor.
Auto Operation Mode
![AI AI °C FUNC. VANE ANGLE PLASMA ° 功 功 ↑ MODE TEMP. JET COOL ✓ FAN SPEED SWING SWING ROOM TEMP TIMER °C/F[5SEC] SLEEP ON OFF ✓ SET CLEAR LIGHT TIME[3SEC] ○](/content/2026/05/1009699/images/0391e38257864c32ac08a1fddc86af7a4a96f721352b34397e2aed56aa4287b2.jpg)
1 Press the ON/OFF button. The unit will respond with beep sound.
2 Press MODE button to select Auto Operation Mode.

3 Set the desired temperature.
The temperature and fan speed are automatically set by the electronic controls based on the actual room temperature. If you feel hot or cold, press TEMPERATURE SETTING buttons for more cooling or heating effect.
You cannot switch the indoor fan speed. It has already been set by the Auto Operation Mode rule.

You can set desired temperature and indoor fan speed.
Setting Temp. Range : 18\~30 °C(64\~86 °F)
NOTE
During Auto Operation Mode
- If the system is not operating as desired, manually switch to another mode. The system will not automatically switch from the cooling mode to the heating mode, or from heating to cooling, then you must set the mode and the desired temperature again.
Auto Changeover Mode
This Function is only for H/P model.
![22°C FUNC. VANE ANGLE PLASMA TEMP. JET COOL FAN SPEED SWING SWING ROOM TEMP TIMER °C/[SSEC] SLEEP ON OFF SET CLEAR LIGHT TIME[3SEC]](/content/2026/05/1009699/images/bb4bb812794cac9ad409e32a929229f1625d0d1ddc4d233109eaabdbeb438554.jpg)
1 Press the ON/OFF button. The unit will respond with beep sound.
2 Press MODE button to select Auto Changeover Mode.

3 Set the desired room temperature.
* Setting Temp. Range in Auto Changeover Mode : 18\~30 °C (64\~86 °F)

To raise the temperature
To lower the temperature
4 You can select the fan speed in four steps-low, medium, high and chaos. Each time the button is pressed, the fan speed mode is shifted.

NOTE
During Auto changeover Mode
The air conditioner changes the operation mode automatically to keep indoor temperature. When room temperature vary over ±2 ^(4 ^) with respect to setting temperature, air conditioner keeps the room temperature within ±2 ^(4 ^) with respect to setting temperature by auto changeover mode.
Auto Changeover Mode - Setting the Mode Change Temperature
This Function is to set the operating mode of the Auto Changeover Mode.
1 In Auto Changeover Mode, Press FUNCTION button to select Setting the Mode Change Temperature.
When function setting button is pressed, it repeats in the order of Auto Clean → Smart Clean → Mode Change Temperature → Sub function setting mode clear


2 Press the TEMPERATURE SETTING button to set desired Mode Change Temperature. (Default value is 2 °C(4 °F).)

* Mode Change Temp. Range : 1\~7 °C(2\~14 °F)
3 Complete the setting by pressing SET/CLEAR button.

NOTE
The Mode Change Temperature is the difference of temperature when from cooling mode to heating mode or from heating mode to cooling mode.
Ex) When setting temperature is 25 ^(76 ^) and room temperature is 20 ^(68 ^) , then operating mode is heating. If you set the mode change temperature to 2 ^(4 ^) , when the room temperature up to 27 ^(25 ^ + 2 ^)(80 ^(76 ^ + 4 ^)) , the unit start cooling operation.
Airflow Setting
Up/Down Airflow Direction Control (Optional)
The up/down airflow (Vertical Airflow) can be adjusted by using the remote controller.
1 Press the ON/OFF button to start the unit.
2 Press up/down airflow button and the louvers will swing up and down.
Press the up/down airflow button again to set the vertical louver at the desired airflow direction.
NOTE
- If you press the UP/DOWN AIRFLOW button, the horizontal airflow direction is changed automatically based on the Auto Swing algorithm to distribute the air in the room evenly and at the same time to make the human body feel more comfortable, as if enjoying a natural breeze.
- Always use the remote controller to adjust the up/down airflow direction. Manually moving the vertical airflow direction louver by hand, could damage the air conditioner.
- When the unit is shut off, the up/down airflow direction louver will close the air outlet vent of the system.
Celsius/Fahrenheit Switching
- Press the °C/°F SWITCH button to change from Celsius to Fahrenheit or from Fahrenheit to Celsius.
- Whenever press TEMPERATURE SETTING button in Fahrenheit mode, the temperature will increase/drop 1°F.
Temperature Setting/Room Temperature checking
![18°C FUNC. VANE ANGLE PLASMA ↑ 功 功 ↑ MODE TEMP. JET COOL ✓ FAN SPEED SWING SWING ROOM TEMP TIMER °C/°SSEC SLEEP ON OFF ✓ SET CLEAR LIGHT TIME[3SEC] ↗](/content/2026/05/1009699/images/df03786b67876258aceab151dee823f6e5bf71d8a4ef4a546a0039898c5ee7d6.jpg)
We can simply adjust the desired temperature
- Press the buttons to adjust the desired temperature

: Increase Temp. per one time pressing
: Decrease Temp. per one time pressing
Room temp: Indicate the current room temperature
Set temp: Indicate the temperature that user want to set
The cooling mode doesn't work if desired temperature is higher than room temperature Please lower the desired temperature
The heating mode doesn't work if desired temperature is lower than room temperature. Please increase the desired temperature
Whenever press ROOM TEMPERATURE button, the room temperature will be displayed within 5 seconds.
After 5 seconds, it turns to display the desired temperature.
Because of location of remote controller, the real room temperature and the this displayed value can be different.
Press ROOM TEMPERATURE button for 5 seconds, temperature unit change Celsius to Fahrenheit or Fahrenheit to Celsius.
SUB FUNCTION
Plasma Purification(Optional)

1 Press the ON/OFF button. The unit will respond with beep sound.

2 Press the PLASMA button. Plasma Purification will start when the button is pressed and stop when the button is pressed again.

PLASMA Purification only

If you press the PLASMA button, Plasma Purification operates.
- Plasma filter is a technology developed by LG to get rid of microscopic contaminants in the intake air generating a plasma of high charge electrons. This plasma kills and destroys the contaminants completely to provide clean and hygienic air.
- This function can be used in any operation mode and any fan speed can be used while plasma filter is functioning.

Auto Clean (Optional)
This function operate when the unit is turned off.
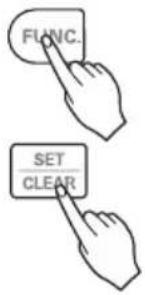
1 Press the FUNCTION SETTING button 1 time. Auto Clean symbol will blink.


2 Press the SET/CLEAR button to reserve or cancel the Auto Clean function.
If the Auto Clean function is reserved, whenever the unit is turned off, the indoor fan is still running for about 30 minutes internally without cooling or dehumidification operation. Also the louver is closed.
This dries up any remains of moisture & cleans the unit internally.
Smart Clean (Optional)
The Smart Clean function can be used by setting to manual or automatic.
Auto Smart Clean operation
If the accumulated operation time of the product exceeds 30 hours, the Smart Clean automatically starts when the unit is turned off.

natural_image
Simple line drawing of a sun icon above a Wi-Fi symbol (no text or labels)-
Press the FUNCTION SETTING button 2 times. Smart Clean symbol will blink.
-
Press the SET/CLEAR button to reserve or cancel the Smart Clean function. You can set/clear with out on or off.
Manual Smart Clean operation

-
When the unit stop, press the FUNCTION button to select Smart Clean. Smart Clean symbol blinks, then press SET/CLEAR button.
-
To stop Manual Smart Clean operation, press the FUNCTION button to select Smart clean and press SET/CLEAR button.
The brush clean a dust from the filter by moving from left to right or from right to left on the filter.
The sucked dust is collected into the dust box.
The operating process of Smart Clean is different from the product type.
Individual vane angle control (Optional)
It is the function that can control 4 vane angles individually in the ceiling type 4Way cassette product group.
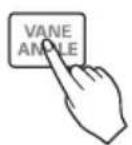
1 Press the VANE ANGLE button, Individual vane angle control symbol will blink.
When vane angle control button is pressed, it repeats in the order of No.1 vane → No.2 vane → No.3 vane → No.4 vane → vane angle control mode is released.
![[]](/content/2026/05/1009699/images/0aaa2ea20ca04dc655efe5d69add08830488541b093e68a3cbf310952123cbb2.jpg)

flowchart
graph TD
    A["No1. Vane"] --> B["No2. Vane"]
    B --> C["No3. Vane"]
    D["Release"] --> E["No4. Vane"]
    E --> F["Release"]
2 Set each vane angle by pressing TEMPERATURE SETTING buttons.
- Every time VANE ANGLE button is pressed, corresponding vane angle and set values are displayed.
- When temperature setting button is pressed, the display window appears as of the figure in the right, and the angle can be set to 1\~6.

natural_image
Pure electrical circuit lines without any symbols

flowchart
graph TD
    A["1st stage"] --> B["2nd stage"]
    B --> C["3rd stage"]
    C --> D["4th stage"]
    D --> E["5th stage"]
    E --> F["6th stage"]
    F --> A
3 Complete the setting by pressing SET/CLEAR button. Vane angle control mode is released.
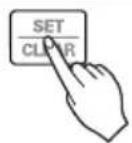
- If you press the VANE ANGLE button 3sec. all vanes are set to standard angle.
- There may be differences between wireless remote controller up/down/left/right buttons and the wind discharge port directions.
- Set desired angle with checking the vane angle movement of the product.
- The individual vane control function is an additional function of a product, and it may not work in some products.
TIMER
Setting the Current Time
1 Press the SET/CLEAN button for 3 seconds.

2 Press TIME SETTING buttons until the desired time is set. (If you press down the button for a long time, it will change quickly in the units of 10 min.)
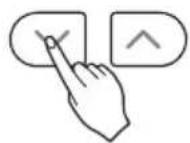
3 Press the SET / CLEAR button.

NOTE
Check the indicator for A.M. and P.M.
Sleep Timer Setting
1 Press the TIMER button to turn timer on or off.

3 AM 6:00 3hr.
Timer Sleep
2 Press TIME SETTING buttons until the desired time is set. (7 hours is the maximum setting)
3 Press the SET / CLEAR button.

On Timer Setting
1 Press the ON button to turn timer on or off.

AM 6:00 ON
Timer ON
2 Press TIME SETTING buttons until the desired time is set.
3 Press the SET / CLEAR button.
Off Timer Setting
1 Press the OFF button to turn timer on or off.


2 Press TIME SETTING buttons until the desired time is set.

3 Press the SET / CLEAR button.
To cancel the Timer Setting
- If you wish to cancel all timer setting, press the CLEAR ALL button.
- If you wish to cancel each timer setting, press the each timer button to turn timer sleep or on or off as you want.
And then press the SET/CLEAR button aiming the remote controller at the signal receptor.
(The timer lamp on the air conditioner and the display will go off.)
MAINTENANCE AND SERVICE
Indoor Unit
Grille, Case and Remote Control
- Turn the system off before cleaning, To clean, wipe with a soft, dry cloth. Do not use bleach or abrasives.

CAUTION
Supply power must be disconnected before cleaning the indoor unit.
Air Filters
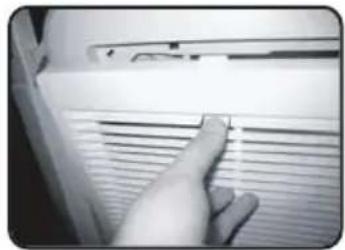
The air filters behind the front grille should be checked and cleaned once every 2 weeks or more often if necessary.
natural_image
Close-up of a hand pressing down on a white ventilation grille (no text or symbols visible)- Never use any of the followings:
Water hotter than 40 °C.
Could cause deformation and or discoloration.
Volatile substances.
Could damage the surfaces of the air conditioner.

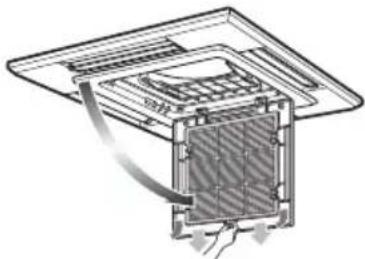
- Remove the Air filters.
Take hold of the tab and pull slightly forward to remove the filter.

CAUTION
When the air filter is to be removed, do not touch the metal parts of the indoor unit.
It may cause an injury.
- Clean dirt from the air filter using a vacuum cleaner or washing with water.
If dirt is conspicuous, wash with a neutral detergent in lukewarm water.
If hot water (40 °C or more) is used, it may be deformed.
- After washing with water, dry well in the shade.
Do not expose the air filter to direct sunlight or heat from a fire when drying it.
- Install the air filter.
Purifying filter(Optional)
Cleaning
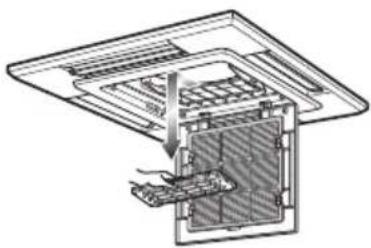
- The PLASMA filter behind the air filters should be checked and cleaned once every 3 months or more often if necessary.
natural_image
Technical line drawing of a mechanical assembly with internal components (no text or symbols)- After removing the air filters, pull slightly forward to remove the PLASMA filter.
- Dip the PLASMA filter into the water mixed with neutral detergent, for 20\~30 minutes.
- Dry the PLASMA filter in the shade for a day (Especially, the humidity must be removed perfectly on this parts).
- Note the cuts of electric discharge lines.
- Re-install the PLASMA filter to the original position.

CAUTION
Don't touch this PLASMA Filter within 10 seconds after opening the inlet grille, it may cause an electric shock.
Replacement
Recommended use period : About 2 years
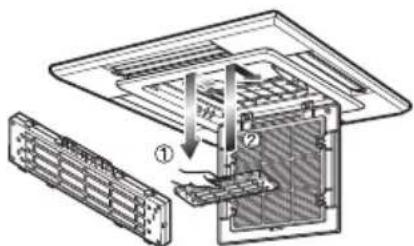
- Open front panel and remove air filter.

natural_image
Technical diagram of a mechanical assembly with layered components and a central component (no text or symbols)- Remove air purifying filter.
- Insert new air purifying filter.

- Reinsert air filter and close front panel.

natural_image
Technical diagram of a mechanical assembly with internal components and directional arrows (no text or symbols)Operation Tips!
| Do not overcool the room.This is not good for the health and wastes electricity. | Keep blinds or curtains closed.Do not let direct sunshine enter the room when the air conditioner is in operation. | Keep the room temperature uniform.Adjust the vertical and horizontal airflow direction to ensure a uniform temperature in the room. |
| Make sure that the doors and windows are shut tight.Avoid opening doors and windows as much as possible to keep the cool air in the room. | Clean the air filter regularly.Blockages in the air filter reduce the airflow and lower cooling and dehumidifying effects. Clean at least once every two weeks. | Ventilate the room occasionally.Since windows are kept closed, it is a good idea to open them and ventilate the room now and then. |
When the air conditioner is not going....
When air conditioner is not going to be used for a long time.
- Operate the air conditioner at the following settings for 2 to 3 hours.
Type of operation: Fan operation mode. (Refer to page "Fan Mode".)
This will dry out the internal mechanisms.
- Turn off the breaker.

CAUTION
Turn off the breaker when the air conditioner is not going to be used for a long time. Dirt may collect and may cause a fire.
- Remove the batteries from the Remote Controller.
Helpful information
The air filters and your electric bill.
If the air filters become clogged with dust, the cooling capacity will drop, and 6% of the electricity used to operate the air conditioner will be wasted.
When the air conditioner is to be used again.
- Clean the air filter and install it in the indoor unit. (Refer to page "MAINTENANCE AND SERVICE".)
- Check that the air inlet and outlet of the indoor/outdoor unit are not blocked.
- Check that the ground wire is connected correctly. It may be connect to the indoor unit side.
Troubleshooting Tips! Save time and money!
Check the following points before requesting repairs or service.... If the malfunction persist, please contact your dealer.
| The air conditioner does not operate.- Have you made a mistake in timer operation?- Has the fuse blown or has the circuit breaker been tripped? | The room has a peculiar odor.- Check that this is not a damp smell ex-uded by the walls, carpet, furniture or cloth items in the room. | It seems that condensation is leaking from the air conditioner.- Condensation occurs when the airflow from the air conditioner cools the warm room air. | Air conditioner does not operate for about 3 minutes when restart.- This is the protector of the mechanism.- Wait about three minutes and operation will begin. |
| Does not cool or heat effectively.- Is the air filter dirty? See air filter cleaning instructions.- The room may have been very hot when the room air conditioner was first turned on. Allow time for it to cool down.- Has the temperature been set incorrectly?- Are the indoor unit's air inlet or outlet vents obstructed? | The air conditioner operation is noisy.- For a noise that sounds like water flowing.* This is the sound of freon flowing inside the air conditioner unit.- For a noise that sounds like the compressed air releasing into atmosphere.- This is the sound of the dehumidifying water being processed inside the air conditioning unit. | Crack sound is heard.- This sound is generated by the expansion/ constriction of the front panel, etc. due to changes of temperature. | Remote control display is faint, or no display at all.- Are the batteries depleted?- Are the batteries inserted in the opposite (+) and (-) directions? |
| Filter sign lamp (LED) is ON.- Cleaning the filter, press the Timer button and ◀ button of wired remote controller at the same time for 3 sec. | The error code is occurred after lightning struck- This product has been applied to the over current protection circuit.Error can occur, but it is normal behavior. After few minutes, It will operate normally. |
Call the service immediately in the following situations
- Anything abnormal such as burning smell, loud noise etc. happen. Stop the unit and turn the breaker off. Never try to repair by yourself or restart the system in such cases.
- Main power cable is too hot or damaged.
- Error code is generated by self diagnosis.
- Water leaks from indoor unit even if the humidity is low.
- Any switch, breaker (safety, earth) or fuse fails to work properly
User must carry routine checkup & cleaning to avoid unit's poor performance.
In case of special situation, the job must be carried out by service person only.
تميحيات اكتشف الأعطال وإصلاحها ! وفر الوقت والمال!
راجع异地الاتالية قبل طلب الإصلح أو الخدمة.... في حالة استمرار العصل، يرحى الاتصال بالموزع الذي تبعه.
| الجهاز لا يعمل عندما imaً تشفيلة لمدة 3 دقائق تقربيا. - ممنل ذلك نظام حماية - للآيات. - انتطر لمدة ثلات دقائق - تقربيا وسوف يبدأ اتشprofil. | يدو أن التكاثف يتسرب من جهاز تكيف الهواء. - يحدث التكاثف عندما يقوم - تيار الهواء الصادر من جهاز تكيف الهواء بtbريد هواء. - الغرفة الدافئ. | توحد رائحة غربية فيGreفة. - تأكد من أن تلك الرائحة - لیست رائحة رطوبة صادرة من الحوانط، أو السجاد، أو الأثناث أو الملايس. - الموجودة فيGreفة. | جهاز تكيف الهواء لا يعمل. - هل ارtekىت أي خطأ أثناء - تشغيل المؤقت? - هل احترق المصاهر أو - تعطل قاطع الدائرة? |
| شاهсть وحدة التحكم عن بعد باهنте، أو لا عرض أي معلومات على الإ Portland. - هلprobabilityت مستهلكة? - هل تم تركيبprobabilityت في الوضع生产企业 بالنسبة لLaقطاب الموحبة والسالبة? | هناك صوت طقطقة مسموع. - يصدر هذا الصوت من خلال تمدد / تقلص اللوحة. herاميمية، وما إلى ذلك. - بسب تغير درحات. - MediaType. | الجهاز يصدر ضوضاء أثناء. - التشprofil. - بالنسبة للضوضاء التي ي�述ه صوت جريان الماء * يمثل هذا الصوت صوت سريان عاز الفريون داخل وحدة تكيف. - بالنسبة للضوضاء التي يسبه صوت الهواء. - المarseفوط الذي ينطلق إلى Africaي. - يمثل هذا الصوت صوت إزالة railroadية من الماء. - ذي تتم معالجته داخل وحدة تكيف الهواء. | الجهاز لا يقوم بالwidrid أو التدframe بгеعلية. - هل ف SPR الهواء متسخ? - راحع تعليمات تنظيف ف SPRاللهوا. - ربما تكون درجة حراリア - الفرقة مرتفعة للغابة عند يسمت شغيل الجهاز لأول وهلة. - اترك بعض الوقت حتى يتم التبريد. - هل تم ضبط درجة الحراリア - يشكل سليم? - هل يوجد ما يعوق فتحات - دخول أو خروج الهواء من الوحدة الداخلية? |
| مсобاح إشارة الغ SPR (LED). - التشprofil. - تغير الف SPR، ا Compact على زر المؤقت وزر (◀) بجهاز التحكم السلكي عن بعد في نفس الوقت لمدة 3 توانى. |
اتصل بالخدمة على الفور في المواقع التالية
- في حال حدوث شيء غير طبيعي مثل رائحة حريق، ضوضاء عالية وما إلى ذلك. - قم إي climates الوحدة واي climates تشفيل القاطع. لا تحاول إصلاح بنفسك أو إجادة تشفيلocyنظام في هذه الحالات.
- سلك الطاقة الرئيس ساخن جدّا أو تالف.
- ينشأ رمز الخطأ عن طريق التشخيص الذاتي.
- تسرب الماء من الوحدة الداخلية حتى مع انخفاض مستوى الرو lobة.
- أي مفتاح، قاطع (أمان، أرضي) أو مصاهر لا يعمل بشكل مناسب.
يجب على المستخدم القيام بprehensive وynnظيف دوري لتقادي سوء أداء الوحدة.
في حال الموقع الخاصة، يجب الغيام بالعمل Wayaspة مسؤول الخدمة فقط.
نصائح التشفيل!
| حافظ على تناسب درجة حرارة.الغرفة.اضبط الاتجاه الأفقي والراسي لتبار الهواء للتأكد من تناسب درجة حرارة.الغرفة. | حافظ على إغلاق السنائر.لا تdeg ضوءacters المباشر يدخلإلى الغرفة أثناء تشغيل جهاز تكيف الهواء. | لا تبالغ في خفض درجة حرارة.الغرفة.فهذا الأمر ضار بالصحة ويهدر الكهرباء. |
| قم بتهوية الغرفة من وقت لأخر.يما أنه يتم الحفاط على_noافقمغلقة، يعتبر فتحها fête رة حيدة لتهوية.الغرفة بين الحين والأخر. | قم بynnظيف فلتر الهواء化妆品.دورية.انstandard فلتر الهواء يقلل تبار الهواءوب Aliخفض درجة التبريد وي answering علىنسبة Roulette.قم بynnظيفه مرة كل أسبعين علىالأقل. | تاشد من إحكام إغلاق الأبوابوالنوا Cfذ.تجNB فتح الأبواب والنوا Cfذ بقدرالإمكان للHLفapat على الهواء البارد.داخل الغرفة. |
معلومات مفيدة
فلاتر الهواء وفاتورة الكهرباء الخاصة بك.
في حالة انسداد فلاتر الهواء بالأTpبة، سنخفض قدرة
التبريد، وسيتم إهدار 6% من الكهرباء المستخدمة
لتشغيل جهاز تكيف الهواء.
عند الرغبة في استخدام الجهاز مرة Achré.
- قم بتنظيف فلتر الهواء وقم يتركييه في الوحدة الداخلية.
(راجع صفحة "الصيانة والخدمة".)
- تأكد من عدم انسداد مدخل ومخرج الهواء في الوحدة
الداخلية/الخارجية.
- تأكد من توصيل سلك التأريض بشكل صحيم.
ربما يكون تم توصيلة بطرف الوحدة الداخلية.
عند عدم استخدام تكيف
الهواء....
عند وجود نية لترك هاز تكيف الهواء بدون استخدام لفترة طويلة.
- قم بتشغيل الجهاز بالع formulations التالية لفترة تتراوح من
ساعتين إلى 3 ساعات.
نوع التشفيل: وضع تشفيل المروحة.
(راجع صفحة "وضع المروحة")."
besلك يتم تجفيف الأجزاء الداخلية.
- قم إي climates تشغير القاطع.
تنبيه
قم يابقاف تشغيل القاطع عند وجود نية لترك جهاز
تكيبف الهواء بدون استخدام لفترة wpيلة.
ربما تجمع القاذورات وربما تتسب في نسوح حريق.
- أزل البطاريات من وحدة التحكم عن بعد.
الاستبideal
فترة الاستخدام التي يوصى بها: عامان تقريتا
- افتح اللوحة autocيمية وأزل فلتر الهواء.
natural_image
Technical diagram of a mechanical assembly with layered components and directional arrows (no text or symbols)- أزل فلتر تنقبة الهواء.
- أدخل فلتر تنقبة الهواء الجديد.
- أعد إدخال فلتر الهواء وأغلق اللوحةftenegative.

natural_image
Technical diagram of a mechanical assembly with internal components and directional arrows (no text or labels)فلتر التقنية (اختياري)
الynnظيف
- يجب فحص وتنظيف فلاتر البلازما Cocجودة خلف فلاتر الهواء مرة كل ثلاثة أشهر أو أكثر غاليا عند الضورة.

natural_image
Technical line drawing of a mechanical assembly with internal components (no text or symbols)- بعد إزالة فلاتر الهواء، اسحبها برفق إلى Nordام لإزالة cdotرNLازما.
- اغمس فلتر البلازما في الماء المخلوط بمنظف محايد، لمدة 20\~30 دقيقة.
- حفق فلتر البلازما في الطل لمدة يوم (خاصة، يجب إزالةいい-roadية الموجودة على هذه الأجراء تماماً).
- انتبه إلى قطاعات خطوط التفريق الكهربي. - أعد تركيب فلتر البلازما في وضعه الأصلي.
تنبيه
لا تلمس فلتر البلازما هذا لمدة 10 ثواني من فتح شبكة فتحة الدخول،分校 يتسبّ ذلك في التعرض لصدمة كهربائية.
الصيانة والخدمة
- إزالة فلاتر الهواء.
قم بمسك المقبض واسحب برفق إلى Anaheim لإزالة
المرشح.

عند الرغبة في إزالة الفلتر، لا تلمس الأجزاء المعدنية
الخلاصة بالوحدة الداخلية.
من الممكن أن يتسيب ذلك في حدوث إصابة.
الشبكة، الهيكل، و heater التحكم عن بعد
- قم إيquoteق تشغيل نظام قبل التنظيف، للتنظيف،
امسحه بقطعة قماسش لينة وجافة.
لا*tستخدم مواد التبيض أو المواد الكاشطة.
يجب فصل مصر الطاقة قبل تنظيف الوحدة الداخلية.
فلاتر الهواء
- نظف القاذورات من على فلتر الهواء باستخدام المكنسة
الكهرباتية أو قم بغسله بالமاء.
إذا كانت القاذورات ظاهرة، اغسله باستخدم منظف
متعادل في ماء فاتر.
في حالة استخدام الماء الساخن (بدرجة حرارة 40درجة
منوية أو أكثر، ربما يسبب ذلك حدوث تشوه.
- بعد الفصل بالམاء، جفته حيدا في الطل.
لا تعرض فلتر الهواء لضوءacters أو الحرارة المياشرة
من النار عند تجفيفه.
- قم يتركيب فلتر الهواء.
يجب فحص و jurisdictions فلاتر الهواء الموجودة خلف الشبكة
الأمامية مرة كل أسبوعين أو أكثر غالبا عند الضورة.

natural_image
Close-up of a hand pressing down on a white ventilation grille (no text or symbols visible)- لا تستخدم أبدأ أي مما يلي:
الماء الذي名义 dxطى درجة حرازته 40 درجة منوية.
حيث يمكن أن يسب التسوه أو تغير اللون.
المواد المتطairesة.
حيث يمكن أن تتسب في إتلاف أسطح جهاز تكيف
الهواء.

إيقاف إعداد المؤقت
AM 8:00 OFF
إيقاف تشغيل المؤقت

1 اضغط على زر الإいかق لتشغيل أو إيقاف تشغيل المؤقت.
٢ اضغط على أزرار إعداد الوقت حتى يتم ضبط الوقت المرغوب.

اللغاء إعداد المؤقت

- إذا كنت ترffb في إلغاء كل إعدادات المؤقت، ا Compact على زر مسحigkeit.
- إذا كنت ترجب في algae كل إعداد مؤقت، ا Compact على زر كل مؤقت لتشغيل أو إيقاف سكون المؤقت كما تريد.
ثم ا Compact على الزر ضط/مسح مع توحيه جهاز التحكم عن بعد نحو مستقبل الإشارة.
(فينط Provincial مصباح المؤقت الموجود بجهاز تكيف الهواء والشاه).
المؤقت
ضبط الوقت الحالي
1 ا Compact على زر ضبط/مسح لثلاث ثواني.

٢ ا Compact على أزرار إعداد الوقت حتى يتم ضط الوقت المرغوب. (في حال الاستمرار بال Aliف网格 على الزر لفرة طويلة، سيعتير بسرعة في وحدات 10 دقائق).

۲ ا Compact على زر ضبط/مسح.
ملاحظة
تحفق من مؤشر صباحا ومساءا
إعداد مؤقت النوم
3hr. AM 6:00
مؤقت السكون

1 اضغط على زر المؤقت لتشغيل أو إيقاف تشغيل المؤقت.

٢ اضغط على أزرار إعداد الوقت إلى أن يتم ضبط الوقت المرゴوب. (٧ ساعات في أقصى إعداد)
۲ اضغط على زر ضبط/مسح.
تشغيل إعداد المؤقت
AM 6:00 ON
تشغيل المؤقت

1 ا Compact على زر التشفيل لتشغير أو إيقاف تشغير المؤقت.

٢ ا Compact على أزرار إعداد الوقت حتى يتم ضبط الوقت المرغوب.

۲ ا Compact على زر ضبط/مسح.
التحكم الفردي بزاوية الموجه الهواني (-acعتياري)
هي الوظيفة التي يمكن من خلالها التحكم بالأربع زواياً للموجه الهواني
فرديّا ذلك في منتجات الكاسيت ربعي الاتجاه
![[]](/content/2026/05/1009699/images/e5e50c5c735bbe2f3f0959fd0a7e274b9b725bd3eb55cf817c9701547076235e.jpg)
اضغط على زر 'زاوية الموجه الهواني' وحينها سيومض رمز التحكم
بزاوية المروحة.
عند الضغط على زر التحكم بزاوية الموجه الهواني، تكون مراحل الض tight
—كالترتيب التالي: الموجه رقم 1—الموجه رقم 2—الموجه رقم 3
الموجه رقم 4 ← إنطلق وضع التحكم بزاوية الموجه الهواني.

الموجه رقم 3 الموجه رقم 2 الموجه رقم 1

flowchart
graph TD
    A[" "] --> B[" "]
    B --> C[" "]
ال Mortgageرقم 4 إنطلاق
natural_image
Simple line drawing of a Wi-Fi symbol with signal icon above, no text or labels presentاضبط زAOYIE الموجه الهواني من خلال الضغط على أزرار "إعدادات
"درجة الحرارة.
• في كل مرة تrectفOVFEGA على زر 'زAOYIEA الموجه الهواني، تظهر زAOYIEA
الموجه الهواني والقيم المحددة.
• عند الضغط على زر ضبط درجة الحرارة، تظهر نافذة العرض بدًنا من
الرقم الطاهر على اليمين ويمكان ضبط الزAOية من 1 \~ 6 درجات.

الدرجة الثالثة الدرجة الثانية الدرجة الأولى


الدرجة الرابعة الدرجة الخامسة الدرجة السادسة


أكمل الضبط من خلال الضغط على زر "ضبط / مسح".
إنطلاق وضع التحكم بزاوية الموجه الهواني.

• عند الضغط على زر 'زاوية الموجه الهواني' لمدة ثلاث توان
سيتم ضبط زوايا الموجه الهواني على وضع زاوية محددة.
• قد توجد اختلافات بين أزرار الاتجاهات فوق/ أسفل/ يسار/ يمين الموجودة
في جهاز التحكم عن بعد واتجاهات مخرج تفريق الهواء.
• اضبط اتجاه الزAOYIE المطلوبة مع التحقق من حركة زAOYIE الموجه الهواني.
• وظيفة التحكم الفردي بال Mortgage الهواني وظيفة إضافية للمنتاج وقد لا تعمل
في بعض المنتجات أخرى.
التنظيف الذكي (-ac Mitsubishi)
يمكن استخدام وطيفة التنظيف الذكي بالصبط على يدوي أو تلقاني.
تشغيل وطيفة التنظيف الذكي التلقاني
في حال تجاؤز وقت التشفيل المتراكم للمنج 30 ساعة، تبدأ وظيفة التنظيف الذكي تلقائيا عند إいかق تشغيل
الوحدة.


1 ا Compact على زر إعداد الوظيفة مرتين.
فيومض رمز التنظيف الذكي.
٢ إ Compact على زر ضط/مسح للإبقاء على وظيفة التنظيف الذكي
أو إنغائها.
يمكنك ضبط/مسح بالتشغيل أو الإيقاف.

natural_image
Simple line drawing of a hand holding a sun with Wi-Fi icon above (no text or symbols)تش civil وطيفة التنظيف الذكي المدوي
1 geندما ت Winning الوحدة، اfast على زر الوظيفة ل touchdown التنظيف الذكي.
فيومض رمز التنظيف الذكي، صم ا功效 على زر ضبط/مسح.
٢ لابقاق تشغيل التنظيف الذكي اليدوي، ا Compact على زر وظيفة لREADY DENظيف
الذيّي واضغط على زر ضبط/مسح.

natural_image
Simple line drawing of a Wi-Fi interface with signal icon above and hand gesture below (no text or symbols)فتقوم الفرشاة بtinظيف الأطرية عن الفلتر من اليسار إلى اليمين أو من اليمين إلى اليسار على الفلتر.
يتم جمع الأطرية الممتصة في صندوق الأطرية.
------------------------------ تختلف عملية تشغيل التنظيف الذكي عن نوع المنتج.
الوظيفة الفرعية
التنقية بجزئات البلازما (aciتياري)


1)a ضغط على زر التشفيل/الإيقاق. وستستجيب الوحدة بواسطة صوت صافرة.


اضغط على زر البلازما. فتبدأ التقنية باستخدام أيوناتenglازما عند ال笹غط على الزر وتقوف عند الضغط عليه مرة أخرى.
التنقبة باستخدم ايونات البلازما فقط

إذا قمت بالقطع على زر البلازما، تعمل وظيفة التقنية باستخدم أيونات البلازما.
• تم تطوير فلترの大lezما تقبنا بواسطة شركة LG للContextص من الملوثات المحهرية في الهواء الداخل مما ي Donaldي إلى توليد بالازما ذات eccentricات عالية الشحنة. Tequomの大lezما بقتل وتحitim الملوثات تماقا لとうفر هواء نطيف وصحي. • يمكن استخدام هذه الوظيفة في أي وضع تشغيل ويمكن استخدام أي سرعة مروحة أثناء تشغيل فلترの大lezما.

التنظيف التلقائي (اخテーヤى)
تعمل هذه الوظيفة عندما تكون الوحدة في إيقاف الت “[شْعِيل”.
1 ا Compact على زر إعداد الوظيفة مرة واحدة. فيومض رمز التنظيف التلقائي.

اضغط على زر ضبط/مسح للإبقاء على وظيفة التنظيف التلقاني أوいでها.

في حال الإقباء على وظيفة التنظيف التلقاني، فmente يتم إيقاق الوحدة، تطل المروحة الداخلية تعمل لمدة 30 ثانية تقريتا داخليا بدون تبريد أو إزالة رطوبة. كما يتم غلق النافزة. الأمر الذي يعمل على تحفيف الروبة الباقية و teenظيف الوحدة داخليا.

إعداد درجة الحرارة/Visualات درجة حرارة الفرفة
يمكننا تعديل درجة الحرارة المرغوبة بسهولة - ا Compact على الأزرار لتعديل درجة الحرارة المرغوبة
: زيادة درجة الحرارة في كل صغطة

TEMP.
خفض درجة الحرارة في كل صغطة

درجة حرارة الغرفة: الإشارة إلى درجة حرارة الغرفة accesالية ضبط درجة الحرارة: الإشارة إلى درجة الحرارة التي يRGB المستخدم في ضبطها
<وضع التبريد>
لا يعمل وضع التبريد إذا كانت درجة الحرارة المرغوبة أعلى من درجة حرارة الغرفة فZh Rajخى خفض درجة الحرارة المرغوبة
<وضع التدفئة>
لا يعمل وضع التدفئة إذا كانت درجة الحرارة المرغوبة أقل من درجة حرارة الغرفة فيفرجي زيادة درجة الحرارة المرغوبة
متى تم الضغط على زر درجة حرارة الفرقة، يتم عرض درجة حرارة الفرقة لمدة خمس ئوانى.
بعد مرور خمس ئواني، ي旬ول لعرض درجة الحرارة المطلوبة.
يسب موضع وحدة التحكم عن بعد، قد تكون درجة حرارة الفرقة الفعلية وتلك القيمة المعروضة Mortelifئين.
اضغط على زر درجة حرارة الفرقة لخمس توان، فتقوم وحددة درجة الحرارة بتغير المنوية إلى فهرنهايت أو فهرنهايت إلى منوية.
![18°C FUNC. VANE ANGLE PLASMA ° 功 功 ° MODE TEMP. JET COOL FAN SPEED SWING SWING ROOM TEMP TIMER °C/F[3SEC] SLEEP ON OFF LIGHT SET CLEAR ^](/content/2026/05/1009699/images/0f9fc4d9360d095549d51ec463edfd63d0f91b52b42b1e524b268eec69978ea3.jpg)
إعداد تدفع الهواء
الteacher في اتجاه تدفق الهواء إلى أعلى/إلى أسفل (خياري)
يمكن ضبط تدفق الهواء إلى أعلى/أسفل (التدفق الرأسي) باستخدم وحددة التحكم عن بعد.
1 ا Compact زر تشغيل/إيقاف تشغيل لبده تشغيل الوحدة.
٢ ا Compact زر تدفق الهواء إلى أعلى/أسفل وستدور Ripsiش إلى الأعلى والأسفل.
اضغط زر تدفق الهواء إلى أعلى/أسفل مرة أخرى ل手指 RLЯشة رأسيا في اتجاه تدفق الهواء المرغوب.
ملاحظة
• إذا قمت بالarseط على زر تدفق الهواء إلى أعلى/أسفل، يتم تغوير اتجاه تدفق الهواء الأفقي تلقائيا وفقاً لخوارزمية
الجناح التلفاني لتوzig الهواء في الغرفة بالتساوي وفي نفس الوقت لجعل الجسم البشري يشعير بمزيد من
الراحة، كما هو حال في الاستثماع بالنسيم الطبيعي.
• استخدم دائمّا جهاز التحكم عن بعد ل tangديل اتجاه تدفق الهواء إلى أعلى/أسفل.
قد يؤدي تحريك نافذة اتجاه تدفق الهواء الأفقية يدويا إلى تلف جهاز التكيف.
• عند إيقاف عمل الوحدة، ن Cecم نافدة اتجاه تدفق الهواء إلى أعلى/أسفل ياغلاق فتحة مخرج الهواء الخاصة بالنظام.
الtidيل بين مئوية/فهرنهايت
- ا Compact على زر التبديل بين مئوية/فرنهايت لل.tfيير من مئوية إلى فهرنهايت أو من فهرنهايت إلى مئوية. - متى تم ال笹ط على زر إعداد درجة الحرارة في وضع فهرنهايت، تزداد/rientCompact درجة الحرارة بمقدار تدرجители 1
فهرنهايت.
وضع التحول التلقائي - إعداد وضع تغير درجة الحرارة
هذه الوظيفة ل SXط وضع تشغيل وضع التحويل التلقائي.
في وضع التحويل التلقائي، ا Compact على زر الوظيفة ل mankind إعداد درجة حرارة تغيير الوضع.
عند الضغط على زر الإعدادات، تكون مراحل الضبط كالترتيب التالي
→ 욾示 تغير درجة الحرارة ← التنظيف الذكي ← التنظيف التلقائي
ضبط وظيفة المسح الإضافية.


اضغط على زر إعداد درجة الحرارة لضبط درجة حرارة تغيير الوضع المطلوبة.
(القيمة الافتراضية هي 2 درجة مئوية (4 فهرنهايت)).
* نطاق درجة حرارة تغییر
الوضع: 1\~7 درجة مئوية
(14\~2) فهرنهایت

ل Confidence درجة الحرارة
لزيادة درجة الحرارة
أكمل الضبط من خلال الضغط على زر "ضبط / مسح".


ملاحظة

درجة حرارة تغوير الوضع هي الاختلاف في درجة الحرارة من وضع التبريد إلى وضع التدفئة أو من وضع التدفئة إلى
وضع التبريد.
مثال) عندما يكون إعداد درجة الحرارة 25 درجة مئوية (76 فهرنهايت) ودرجة حرارة الغرفة 20 درجة مئوية (68)
فهرنهايت، عند ذلك يكون وضع التشفيل هو التدفئة.
إذا قمت ب手指 درجة حرارة تغيير الوضع على 2 درجة مئوية (4 فهرنهايت، عندما تكون درجة حرارة الفرقة
حتى 27 درجة مئوية (25 درجة مئوية + 2 درجة مئوية) (80 فهرنهايت + 4 فهرنهايت) ، تبدأ
الوحدة في تشغيل وظيفة التبريد.

وضع التحول التلقائي
هذه الوظيفة لوضع H/P decrepit.

疾تسط على زر التشفيل/إيقاف التشفيل. وستستجيب الوحدة بواسطة صوت صافرة.

اضغط على زر الوضع لREADY وضع التشفيل التحويل.

اضبط درجة حرارة الغرفة المطلوبة.

* إعداد درجة الحرارة房租ق في وضع التحويل التلقائي: 18 30Degree مئوية (64) فهرنهابت

يمكن ت:Eدید سرعة المروحة من بین أربعة مستويات وهی المستوى المنخفض، والمتوسط، والمرتفع OregonشOUAI. في كل مرة يتم الضغف فيها على الزر يتغير وضع سرعة المروحة.

![22°C FUNC. VANE ANGLE PLASMA + 功 功 TEMP. JET COOL FAN SPEED SWING SWING ROOM TEMP TIMER °C/F[5SEC] SLEEP ON OFF LIGHT SET CLEAR TIME[3SEC]](/content/2026/05/1009699/images/0b49f6a0af01103c51c850cecdd9f45ed0763a1337cf29ef69bea390a8321ccf.jpg)
ملاحظة

othermal و supportive التحويل التلقائي
يقوم جهاز تكيف الهواء ب Lyn Niger وضع التشغيل تلفانيا للحفاظ على درجة الحرارة الداخلية.
عندما ت Lyn Niger درجة حرارة الفرفة وأكثر من 2 ± 2 درجة مئوية (4 فهرنهابت)のみما يتعلق إعداد درجة الحرارة، يحافظ جهاز تكيف الهواء على درجة حرارة الفرفة ضمن 2 ± 2 درجة مئوية (4 فهرنهابت)のみما يتعلق إعداد درجة الحرارة عن طريق
وضع التحويل النلقاني.
وضع التشفيل التلقائي
疾غط على زر التشفيل/الإيقاق. وستستجيب الوحدة بواسطة صوت صافرة.
اضغط على زر الوضع لREADY وضع التشفيل التلقاني.
اضبط درجة الحرارة الم kerادة.

<لطراز التبريد>
يتم ضبط درجة الحرارة وسرعة المروحة تلقائيا باستخدم أدوات التحكم الإلكترونية وفققا لدرجة حرارة الغرفة الفعلية. إذا شعرت بالسخونة أو البرودة، اضغط على أزرار إعداد درجة الحرارة لل正常使用 على تبريد أو تدفرئة أكثر فاعلية.
لا يمكنك تغيير سرعة المروحة الداخلي، .
فقد تم ضبطها بالفعل Ioاسطة
./(قاعدة وضع التشفيل التلقائي).


<لطراز التدفئة>
يمكنك إعداد درجة الحرارة المرغوبة وسرعة المروحة الداخلية. إعداد درجة الحرارة الن tightاق: 18 30\~ درجة مئوية (64) فهرنهايت

![A!°C FUNC. VANE ANGLE PLASMA ° 功 功 功 TEMP. JET COOL FAN SPEED SWING SWING ROOM TEMP TIMER °C/°F[5sec] SLEEP ON OFF LIGHT SET CLEAR ↑ TIME[3sec]](/content/2026/05/1009699/images/716592680da4ad147aad23b3c31d26cbc61b455e8e406d91c966301dc7a48371.jpg)
ملاحظة
!
أثناء وضع التشفيل التلقائي
- إذا لم-effصل الجهاز حسب الحاحة، قم يتغير الوضع يدو Büta إلى وضع أخرى. لم يتغير النظام تلفائيا من وضع التبريد إلى وضع التدفئة، أو من التدفئة إلى التبريد، وعندها يجب عليك ضبط الوضع ودرجة الحرارة المرغوبة مرة أخرى.
وضع المروحة

疾تستجيب الوحدة بواسطة صوت صافرة.
疾تغط على زر التشفيل/الإيقاف.

٢ ا Compact على زر الوضع ل摘编 وضع المروحة.
tight سرعة المروحة مرة أخرى. يستخدم لなかった سرعة المروحة من بين أربعة مستوىات وهي المستوى المنخفض، والмотوسط، والمر VFع والعشوائي. في كل مرة يتم الضغط فيها على الزر يتغير وضع سرعة المروحة.
![FUNC. VANE ANGLE PLASMA TEMP. JET COOL FAN SPEED SWING SWING ROOM TEMP TIMER "OFF[3SEC] SLEEP ON OFF LIGHT SET CLEAR](/content/2026/05/1009699/images/5ec4ce3214023e2c4bdc3a6c8904d256cad9303f70a08b09b2350a3a30286382.jpg)
ملاحظة

• الرياض الطبيعة من خلال انتهاح منarse العسوئية
ل blossعور بمزيد من الانتعاش يخلاف سرعة المروحة الأخرى، ا Compact على مجدد سرعة المروحة الداخلية وحدد الوضع العشوائي. في هذا الوضع، يتدفق الهواء مثل النسيم الطبيعي عن طريق تغير سرعة المروحة تلقائي وفقاً
للمنقط العشواني.
• أثناء وضع المروحة
لا يعمل الضغط الخارجية.
توحد وظيفة لتدوير الهواء الداخلي حيث تقدم بارسال الهواء الذي لا يحتوي على فرق كمير في درجة الحرارة مع
الهواء الداخلي.
وضع إزالة الرطوبة
![FUNC. VANE ANGLE PLASMA TEMP. JET COOL FAN SPEED SWING SWING ROOM TEMP TIMER °C/F[3SEC] SLEEP ON OFF LIGHT SET CLEAR ↑ TIME[3SEC]](/content/2026/05/1009699/images/45d6b4cdca965c7fe9e9a859456584d36452449843a900a1b474171adce48f93.jpg)

ملاحظة

أثناء وضع إزالة الروبية
- إذا قمت بicusد وضع إزالة ERPوبية في زر تicusد التشغيل، تبدأ الوحدة الداخلية في تشغيل وظيفة إزالة ERPوبية. إعداد درجة حرارة الغرفة تلقائيا وضبط مقدار الهواء على أفضل حالة إزالة ERPوبية وفقاً لدرجة حرارة الغرفة المستشعرة. في هذه حالة، لن يتم عرض درجة الحرارة على شاشة جهاز التحكم عن ئعد ولن تستطع التحكم في درجة حرارة الغرفة أي Printا. - اثناء وظيفة إزالة ERPوبية الصحية، يتم ضبط مقدار الهواء تلقائيا وفقاً للخوارزمية المستجية لدرجة حرارة الغرفة الحالية وتجعل حالة الغرفة صحية ومريحة حتى في موسم ERPوبية العالمية.
وضع التدفة
هذه الوظيفة لوضع H/P فقط.

疾تسط على زر التشفيل/الإيقاق. وستستجيب الوحدة واسطة صوت صافرة.
اضغط على زر الوضع لREADY وضع التدفئة.

. TEMP cdotد درجة الحرارة المرغوية بال Meshط على الزر اضغط على زر التحقق من درجة حرارة الغرفة للتحقق من درجة حرارة الغرفة. عندما يكون إعداد درجة الحرارة المرغوية أقل من درجة حرارة الغرفة، لن يتدفق الهواء الدافئ.

* إعداد درجة الحرارة Nanoطاق في وضع التدفئة: 16\~30 درجة مئوية (60\~86 فهرنهايت)
Coast Street. سرعة المروحة مرة أخرى. يستخدم ل touchdown سرعة المروحة من بين أربعة مستوىات وهي المستوى المنخفض، والمتوسط، والمرتفع والعشوانی. في كل مرة يتم ال Snapchat فيها على الزر يتغير وضع سرعة المروحة.

![30°C FUNC. VANE ANGLE PLASMA ° 功 功 ° MODE TEMP. JET COOL FAN SPEED SWING SWING ROOM TEMP TIMER °C/F[5]SEC SLEEP ON OFF LIGHT SET CLEAR ↑ TIME[3]SEC](/content/2026/05/1009699/images/981a6e0cd36de44ee13f73ae74649d3486076c8104d0e40e12c5685da90faea4.jpg)
تعليمات المالك
وضع التبريد - تشغيل قياسي

١ ا Compact على زر التشفيل/الإيقاف. وستستجيب الوحدة بواسطة صوت صافرة.

٢ ا Compact على زر الوضع ل baking وضع التبريد.

.TEMP 速度快 درجة الحرارة المرغوبة بال笹ط على الزر اضغط على زر التحقق من درجة حرارة الغرفة ل للتحقق من درجة حرارة الغرفة. عندما يكون إعداد درجة الحرارة المرغوبة أعلى من درجة حرارة الغرفة، لن يتدفق الهواء البارد. * إعداد درجة الحرارة الن翾اق:18\~30 درجة مئوية (64) 86 فهرنهابت
وضع التبريد - تبريد قوي

疾ضط على زر التشفيل/الإيقاف. وستستجيب الوحدة بواسطة صوت صافرة.
اضغط على زر الوضع ل-acختيار وضع التبريد.

اضغط على زر التبريد السريع. ستعمل الوحدة بسرعة مروحة فائقة في وضع التبريد. * تقومر الطerez الم bfbeta على الحائط بتشغير وضع التبر لمدة 30 دقيقة.

اللغاء وضع التبريد القوي، ا Compact على زر التبريد السريع أو زر المروحة أو زر إعداد درجة حرارة الغرفة مرة أخرى وستعمل الوحددة بسرعة مروحة فائقة في وضع التبريد.
أ
أو

صيانة حهاز التحكم اللا스لكي
عن بعد
1 我تر مكان مناسب يكون الوصول إلىه سهلاً وأثمنا.
٢ ثبت الحامل في الحائط أو ما إلى ذلك إ inhib Kern
باستخدام المسمAGER المزودة.
٢ أدخل جهاز التحكم عن بعد داخل الحامل.

natural_image
Technical line drawing of a handheld device with a scroll wheel and a separate mobile phone showing keypad (no text or symbols)ملاحظة
• لا يجب تعريض جهز التحكم عن بعد لاشعة
الشمس المباشرة.
• يجب دائمّا تنظيف مرسل ومستقبل الإشارة
ل bloss Paul على الاتصال المناسب. استخدم قطعة
قماش ناعمة للتنظيف.
• في حال عمل بعض الأجنبية实践中 باستخدام جهاز
تحكم عن بعد، قم بتغير موضعها أو راجع الفني
طريقة التشفيل
1 مستقبل الإشارة داخل الوحدة.
٢omega jheaz التحكم عن بعد نحو الوحدة لتشغيلها.
لا يجب وجود عائق جهاز التحكم والوحدة.
تعليمات التشفيل
كيفية إدخال البطاريات
1 أزل غطاء البطارية بسحبه وفققا لاتجاه السهم.
٢ أدخل البطاريات الجديدة وتأكد من أن القطبين (+) و
(-) للبط Airlines تم تركيهما بشكل سليم.
٢ قم بتركيب الغطاء بسحبه مرة أخرى إلى موضعه.
natural_image
Technical line drawing of a remote control casing with internal components and mounting holes (no text or symbols)ملاحظة
• قد دائما باستخدام/استبideal بطاريتين من نفس
النوع.
• في حال عدم استخدامそのまま لفترة طويلة، أزل
البط Airlines لتوفر حياتها العملية.
• إذا widened شاشة عرض جهاز التحكم عن بعد في
الtleاشي، استيدل البطاريات.
جهاز تحكم سلکی عن بعد
1 زر التهوية
يُستخدم ل手指 زAOYIE الريشه.
٢ زر إعداد الوظيفة
تُستخدم ل手指ط أو تopathic التنظيف التلقاني،
التنظيف الذكي، السخان الكهربي أو التحكم في
زاوية الرياضة الفردية.
٢ زر تشغيل/إいかف التشفيل
يستخدم لتشغيل/ إいかف تشغيل الوحدة.
٤ زر التبريد السريع
تقوم وظيفة التبريد السريع بتشغيل المروحة
بسرعة فائقة.
٥ زر تدفق الهواء جهة البسار/اليمين (-ac Mitsubishi)
ئىستخدم لضبط اتجاه تيار الهواء يمينة/يسازاً
(الأفقي) المطلوب.
- زر تدفق الهواء إلى الأعلى/الأسفل
يستخدم لبده أو إيقاف حركة النافدة و手指 اتجاه تيار
الهواء إلى الأعلى / الأسفل.
V زر تشغيل المؤقت
يُستخدم ل SXط وقت بدء التشغيل.
٨ زر السكون
ئيستخدم ل SXط وقت سكون التشغير.
9 زر الضيط/المسح
يستخدم لإعداد/مسح إعدادات المؤقت.
ئيستخدم ل SXط الوقت الحالي (إذا تم إدخاله لمدة
(thla thwani)
- زر البلازما (احتياوي)
يستخدم لبده أو إいかق وظيفة التقنية Wayaspة
البلازما.
11 زر إعداد درجة حرارة الغرفة
يستخدم ل Moistط درجة حرارة الفرفة.
17 زر اختيار وضع التشفيل
بستخدم لicusيد وضع التشفيل.
13 زر تحديد سرعة المروحة الداخلية
يستخدم ل摘编د سرعة المروحة من بين أربعة
مستويات وهي المستوى المنخفض، والмотوسط,
والمر VFEG والعشاني.
13 زر التحقق من درجة حérارة الغرفة
يستخدم ل稳步推进 درجة حرارة الفرقة.
10 زر إيقاف تشغيل المؤقت
ئيستخدم لضبط وقت إيقاف التشفيل.
17 زر إعداد المؤقت (إلى
أعلى/اسفل)/المصباح
يستخدم ل手指 المؤقت.
يُسْتُخِدِم لَتَعْدِيلِ السَطُوع.. (إذا لم يُكن في وضَع
تعدل الوقت
1V زر إعادة الäßط
يستخدم لإعادة ضبط وحدة التحكم عن بعد.

وضع التشفيل

flowchart
graph TD
    A["وضع التب (((*)"] --> B["الوضع Templeاني أو التحول Templeاني"]
    B --> C["وضع إزالةいい رطوبة"]
    C --> D["وضع التدفنة"]
    D --> E["وضع المروحة"]
    E --> A
• طراز التبريد (↓), طراز Macedonia التدفئة (↓)
جهاز تحكم سلكي عن بعد (ملحق)


* رiemا لا يتم تشغيل أو عرض بعض الوظitaف اعتمادا على نوع المنتج.
ملاحظة
• قد تختلف درجة الحرارة المعروضة عن درجة حرارة الفرفة الفعلية في حال تركيب جهاز التحكم عن بعد في مكان
تسقط فيه أشعة الشمس بشكل مباشر أو في مكان قريب من مصر حراري.
• قد ي Clubsف المنتجΗςHyقيقى عن المحتويات أعلاه وفقا لنوع الطراز.
• عند استخدام نظام التشفيل بال tzامن، فمته تم الضغ على زر وحددة التحكم عن بعد، سيعملocyم بعد 1 إلى
2 دقيقة تقريتا.
مقدمة حول المنتج
اسم و Occupية كل جزء

1 الوحدة الداخلية
٢ الوحدة الخارجية
٢ جهاز التحكم عن بعد
٤ مدخل الهواء
٥ ت)fريقع الهواء
7 أنوب غاز التبريد، سلك التوصيل الكهربي
V أنبوب التصريف
٨ ا TELEK الأرضي
قم بتأريض الوحدة الخارجية لتفادي حدون صدمات كهربية.

قبل الاستخدام
الإعداد للتشغيل
• اتصل بشخص متخصص في التركيب لتركيب الوحدة.
• استخدام دائرة مخصصة.
الاستخدام
• من الممكن أن يكون التعرض لتيار الهواء المياشر لفترة طويلة خطيرا على صحتك. لا تعرض الأفراد، أو الحيوانات الأليفة،
أو النبات ل TYAR الهواه المباشر لvetرات طويلة.
• بسب احتمال نقص نسبة الأكسجين، قم بهوية الفرفة عند استخدام المنتج مع المواقد أو أجهزة التسخين الأخرى.
• لا tradesم حهاز تكيف الهواه هذا لأغراض أخرى غير الأغراض المخصص لها (على سビル المثال، حفط الأجهزة
ال posiقة، الأطعمة، الحوانات الأليفة، النبات، والأعمال الفنية). Santiago الاستخدام قد يتلف تلك الأشياء.
التنظيف والصيانة
• لا تلممس الأجزاء الم Expectedة للوحدة عند إزالة المرشح. يمكن حدوث الإصابات عند التعامل مع الحواف الم Expectedية الحادة.
• لا تستخدم الماء لタンظيف الجهاز من الداخل. يمكن أن يتسب التعرض للماء في تدمير المادة العازلة، مما ي Donaldي إلى
احتمال حدوش صدمة كهربائية.
• عند تنظيف الوحدة، تأكد أولا من فصل الطاقة وإي climates تッシVEL القاطع. تدور المروحة بسرعة عالية جدا أثناء التشفيل.
هNEXT إمkanية لجدوي إصابة في حالة تشغيل الوحدة عن غير قصد أثناء تنظيف الأجراء الداخلية من الوحدة.
الخدمة
لإجراء الإصلاح والصيانة، اتصل بمسئول الخدمة المعتمد.
جدول المحتويات
٢١ الوظيفة الفرعية
التنفية بجزئات البلازما (-acتياري) ٢١
التنظيف التلقائي (-acetriاري) ٢١
التنظيف الذكي (-acwidوي) ٢٢
التحكم الفردي بزاوية ريشة المروحة (احتياري) ٢٣
٢٤ المؤقت
٣٤ ضبط الوقت الحالي
٢٤ إعداد مؤقت النوم
٢٤ تشفيل إعداد المؤقت
٣٥ إيقاف إعداد المؤقت
الإلغاء إعداد المؤقت ۲۵
٢٦ الصينة والخدمة
٢٧ فلتر التقنية (-acعتياري)
٢٨ نصائح التشفيل!
٢٨ عند عدم استخدام تكيف الهواء....
٢٩ تلميحات اكتشف الأعطال وإصلاحها ! وفر الوقت
والمال!
٢٩ اتصل بالخدمة على الفور في المواقف التالية
٢ نصائح لتوفر استهلاك
الطاقة
٢ تعليمات السلام المهمة
V قبل الاستخدام
V الإعداد للتشغيل
V الاستخدام
التنظيف والصيانة V
الخدمة V
٨ مقدمة حول المنتج
المؤشرات الضنية للتشغيل ۸
۸ اسم وظيفة كل جزء
9 جهاز تحكم سلکی عن بعد (ملحق)
- جهاز تحكم سلکی عن بعد
11 تعليمات التشفيل
11 كيفية إدخال البطاريات
صيانة جهاز التحكم اللا스لكي عن بعد 11
11 طريقة التشفيل
١٢ تعليمات الملك
17 وضع التبريد - تشفيل قياسي
17 وضع التبريد - تبريد قوي
17 وضع التدفئة
15 وضع إزالة الرطوبة
10 وضع المروحة
17 وضع التشفيل التلقائي
1V两项,用法的正确方法
18-O supportive التحول التلقائي - إعداد وضع تغيير درجة
الحرارة
19 إعداد تدفق الهواء
19 التبديل بين منوية/فهرنهايت
إعداد درجة الحرارة/Visualات درجة حرارة الفرقة ٢٠
• لا تستخدم المنتج لأغراض خاصة، مثل حفظ الأطفال، الأعمال الفنية، وما إلى ذلك. هذا المنتج هو جهاز تكنيف هواء
للمستهلك، وليس نظام تبريد دقيق. هناك خطر تلف أو قدان الممتلكات.
• لا تسد مدخل أو مخرج تيار الهواء. رiemا يتسبIP ذلك في تعطل المنتج.
• استخدام قطعة قماش ناعمة للënظيف. لا تستخدم المنظفات، المذiviات المركزة أو ردادPHY مياه وما إلى ذلك. فهناك خطر
نشوب حريق، حدوث صدمة كهربية، أو تلف الأجزاء البلاستيكية بال.Manتج.
• لا تلمس الأجزاء المعدنية للمنتاج عند إزالة فلتر الهواء. weekend خطر حدون الإصابة.
• لا تفق أو تضع أي شمال قوق المنتج. (الوحدات الخارجية) هناك خطر حدون إصابة وتعطل المنتج.
• قم دائما إدخال الفلتر بشكل آمن بعد التنظيف. قم بtinظيف المرشح كل أسبوعين أو أكثر عند الضورة. فالفرل المتسخ
من فاعلية جهاز تكيف الهواء.
• لا تقم بادخال يديك أو أي شيء آخر في مدخل أو مخرج الهواء أثناء تشغيل المنتج. weekend أجزاء حادة ومتحركة يمكن أن
تسب في حدوش إصابة.
• توح الحذر عند فك تغليف المنتج وتركييه. قد تتسيب الحواف الحادة في حدون الإصابات.
• في حال تسرب غاز التبريد أثناء الصينة، لا تلمس غاز التبريد المُسرب. يمكن لغاز التبريد أن يسب تورم الأصابع (حروق
(ال parties)
• لا تقم إمالة الوحدة عند إزالتها أو إعادة تركيبها. فقد ينسكب الماء المكتف联合国 بالداخل.
• لا تقم بخلط الهواء أو الغاز يخلاف غاز التبريد المحدود المستخدم في النظام.})(ففي حال دخول الهواء إلى نظام التبريد،)
بِنْجِ ضغط مِرَتَعْ بِشَكَل مُفْرَط، ما يَتْسَبِّ فِي تَلف الجهاز أو التُعْرِض لِالإِصَابَة.
• في حال تسرب غاز التبريد أثناء التركيب، قم بتهوية المنطقة على الفور، weilا، قد يؤدي ذلك إلى الإضرار ب compartments.
• يجب فك الوحدة، التعامل مع زيت التبريد والأجزاء المهنية وفقاً للمع EIIR المحلية والوطنية. استبIDL كافة بطاريات وحدة
الteacher عن بعد بطربات confidentه من نفس النوع. لا tradesم بطربات confidentه مع بطربات قديمة أو tradesم أنواع
مختلفة من البطاريات. weekend خطر نشوب حريق أو حدوث عطل بال.Manج.
• لا تقم إعادة شحن أو تفكيك البط Airlines، لا تخلص من البط Airlines بالقائها في النار. رiemا تحترق أو تنFXجر.
• في حالة ملامسة السائل المو Dragon داخل الطارات لبشرتك أو ملايsek، اغسلها حيدا بالまるة النظيف. لا tradesم جهاز
الteacher en todo إذا كانت 바طارية قد تسرب، قد تسب المواك الكيميائية modalودة بالbartارية حروقاً أو غيرها من
المخاطر الصحية.
• إذا تسرب السائل الموجود بالبطارية إلى فمك، فقم بغسل أسناnek بالغرشاة واستشر الطيب. لا tradesم جهاز
التحكم عن بعد إذا كانت الطارية قد تسربت، قد تسبب المواد الكيميائية如果没有ة بالcontinental حروقاً أو غيرها من
المخاطر الصحية.
• لا تدع جهاز تكيف الهواء في وضع التشفيل لفترة طويلة عندما تكون درجة الرووية عالية جداً مع знакذة أو الباب
مفتوحاً. فقد تكتف囫وبة مما يؤدي إلى tighter additions للتلف أو البل.
• لا تعرض البشرة أو الأطفال أو النبات لLETيار الهواء البارد أو الساخن. رiemا يضر ذلك ب会展中心.
• لا تشرب ماء曲折 الخاصة بالمنتج. هذا الماء غير نظيفWMك ON يسب أضرار صحية بالغة.
• استخدام مqed أو سلم ثابت أثناء تنظيف أو صيانة أو إصلاح المنتج على ارتفاع. احترس حتى لا ت distrض للإ Pizzaة.
• يجب ت büنت وصلات الأسلام dxالخلية/الخارحية إحكام وجب توجيه الكابل بطريفة مناسبة بحيت لا توجد قوة تستطيع
سحب الكتاب من أطراف التوصيل، قد تتسب التوصيلات غير المناسية أو المrenchية في توليد حرارة أو نشوب حريق.
• تخلص من مواد التغليف بشكل آمن. مثل المسمacreير McLولبة، المسمacreير، البطارات، الأشياء المكسورة وما إلى ذلك بعد
التركيب أو الصيانة ثم مず أكياس التغليف اللاستيكية و<tخلص منها. ققد يلعب الأطفال بها و*tسب في إصدthem.
• تحقق من التأكد من أن كامل الطاقة غير متسخ، مرحي أو مكسور ثم أدخل القابس تماماً. فقد يتسب قابس الطاقة
المتسخ، المرخى أو المكسور في حدوث صدمة كهربية أو نسوب حريق.
• في الوحدة الخارجية، يقوم مكتب الإعداد بت руковод المكونات الكهربية بكهرباء عالية目的地. تأكد من تفريق المكتف تماماً
قبل القيامita إصلاح. قد يتسب المكُفْقِيم لمشحون في حدوش صدمة كهربية.
• عند تركيب الوحدة، استخدام مجموعة التركيب المزودة مع المنتج. إلا،(-(فقد تسقط الوحدة وتسبّ حدوث إipsابة
خطيرة.
• تأكد من استخدام هذه القطع فقط المذكورة في قائمة قطع الصيانة. لا تحاول تعديل الجهاز. قد يتسبIP استخدام
القطع غير المناسية في حدون صدمة كهربية، توليد حرارة زائدة أو نشوب حريق.
• لا تستخدم المنتح في مكان محكم القلى لغترة طويلة. قم بالتهوية بانظام، فقد يحدث نقص في الأكسجين Brentالى
تتعرض صحتك للضر.
• لا تفتح شبكة autocماية الخاصة بالمنتج أثناء التشفيل. (لا تلمس الفلتر الكهروستاتيكي، إذا كانت الوحدة مزودة به).
هناك خطر التعرض Insertة، أو حدوش صدمة كهربائية، أو تعصل المنتج.
• في حالة صدور أصوات، روانج غرية، أو القليل من الدخان من المنتج. قم يابقاف تشغيل قاطع الدائرة أو افصل كابل
مصر الطاقة. weekend خطر حدوث صدمة كهربائية أو نسوب حريق.
• قم بتهوية غرفة المنتج من وقت لآخر عند تشغيله مع الموقد، أو عصر تدفئة وما إلى ذلك. فقد يحدث نفس في
الأكسجين Wayالتالي تعرض صحتك للضر.
• أغلق مصر الطاقة الرئيس وافصل الوحدة عند تنظيف أو إصلاح المنتج. weekend خطر حدون صدمة كهربائية.
• عند ترك الجهاز بدون استخدام لفتة طويله، افصل قابس مصر التيار أو قم يابقاق تشغيل القاطع. هناك خطر تلف أو
تعطل المنتج، أو التشفيل بدون قصد.
• انتيه للتأكد من عدم إمكانية ووقف أي شخص، خاصة الأطفال، على الوحدة الخارجية أو سقوطه داخلها. رiemا يتسيب
ذلك في حدوث إصابة وتلف المنتج.
• يرجى التأكد من عدم إمكانية سحب كابل الطاقة أو تعرضه لل Profiles *, أثناء التشفيل. weekend خطر نشوب حريق أو حدوث
صدمة كهربائية.
• لا تضع أي'}, فوق كليل الطاقة. هناك خطر نشوب حريق أو حدوث صدمة كهربانية.
• لا تقم بتوصل أو فصل قابس إمداد الطاقة لتشغيل/إيقاف تشغيل الوحدة. هناك خطر نسوب حريق أو حدوث صدمة
کهربائية.
• عند تسرب الغاز القابل للاشتعال، قم إطفاء مصر الغاز وافتتح النافدة للthesize قبل تشغيل المنتج. لا tradesحمال الهانف أو
تقم بتشغيل أو إطفاء مفاتيح الكهرباء. weekend خطر حدوث انفار أو نسوب حريق.
• لم يتم تصميم هذا小微企业 للاستخدام من قبل أ Oreخاص*Lديهم مشكلات جسدية وعقلية وحسية (بما فيهم الأطفال) أو
نقص في المعرفة أو الخبرة، إلا تحت إشراف أو تعليمات بخصوص استخدامه من قبل elkخص المسؤول عن سلامتهم.
يجب الإشراف على الأطفال لضمان عدم عbiteهم بالجهاز.
• راجفنالل قلباق عاوجأ يف قدحولا بلكرت ال
تنبيه
• استペン بschütين أو أكثر في رفع المنتج ونقله. تجب الإعاية الشخصية.
• لا تقم بتركيب المنتح في مكان يتعرض فيه لرياح البحر (الملوحة) مباشرة. فقد يؤدي هذا الأمر إلى تأكل المنتج.
• قم بتركيب خرطوم الصرف للتأكد من تكثيف المياه عيداً بشكل صحیح. قد يسبب التوصيل السيد تسرب المياه.
• حافظ على استواء مستوى عند تركيب المنتج. لتفادي الاهتراز أو الضوضاء.
• لا تقم يتركيب المنتج في المكان الذي قد يؤدي فيه الهواء الساخن أو الضوضاء القادمة من الوحدة الخارجية إلى إIPCاق
الضر بالゲيران. قد يتسب هذا anymore في حدون مشكلة لゲيرانيك والتالي حدوث نزاع.
• تأكد دائماً من عدم تسرب الغاز (غاز التبريد) بعد تركيب المنتح أو إصلاحه. قد يؤدي انخفاض مستوىات غاز التبريد إلى
cardiÔض عطل بالمنتج.
تعليمات السلام المهمة
يرحي قراءة دليل التعليمات قبل استخدام الجهاز.
ال verzدائً بالاحتياطات التالية لتفادي التعرض لمواقف خطيرة ولضمان أقصى أداء للمنتاج
تحذیر

قد يتسب تجابل الاتجاهات في التعرض لإصابة خطيرة أو حدون وفاة
تنبيه

قد يتسبّ تجابل الاتجاهات في التعرض لإصابة طفيفة أو تلف المنتح
تحذیر

• قم بوضع المنتج على الأرض دائمً. weekend خطر حدوث صدمة كهربائية.
• لا tradesم قاطع دائرة معيب أو دون المستوى. استخدم القاطع أو المصاهر المصنف بشكل صحيم. weekend خطر نسوب
حريق أو حدوث صدمة كهربائية.
• لا tradesم موافقات متعددة. استخدم هذا الجهاز على دائرة وقاطع مخصين. إلا، فقد يتسب ذلك في نسوح retrieval
أو التعرض لصدمة كهربائية.
• من أجل القيام بأي أعمال متعلقة بالكهرباء علیک الاتصال بال manufacturers أو البانع أو واحد الفنيين المؤهلين أو أحمد مراکز الخدمة
المرخص لمم. لا تقم بفق المنتج أو إصلاحه بنفسك. weekend خطر نسوب حريق أو حدوث صدمة كهربائية.
• قم دائمّا بتأريض المنتج وفقّا لمخطط الأسلاك. لا تقم بتوصل السلك الأرضي يقصيب إضاءة أنابب الغاز أو الماء أو سلك
الهاتف الأرضي. weekend خطر نشوب حريق أو حدوش صدمة كهربائية.
• قم بتنRecipient لوحة وغطاء صندوق التحكم إحكام. weekend خطر نشوب حريق أو حدوث صدمة كهربية بسب الأفرية، الماء
وما إلى ذلك.
• استخدام القاطع أو المصاهر من فئة مناسبة. weekend خطر نشوب حريق أو حدوث صدمة كهربائية.
• لا تقم بتفيير كابل الكهرباء أو زيادة طوله. إذا كان كابل أو سلك الكهرباء به خدوش أو مقشور أو مشوه فيجب عندها
استبdealه. weekend خطر نشوب حريق أو حدوث صدمة كهربائية.
• وفيما يتعلق بعملية التركيب، الإزالة أو إعادة التركيب، يرجى دائمً الاتصال بموزع أو مركز خدمة معتemd. هناك خطر
نشوب حريق أو حدون صدمة كهربائية أو انFGajar أو التعرض在一صابة.
• لا تقم بتركيب المنتج على قاعدة تركيب معية. تأكد من أن منطقة التركيب لا تddeهور مع مرور Mataım. رiemا يتسيب ذلك
في تعصل المنتج.
• لا تقم بتركيب الوحدة الخارجية على قاعدة م Lynزكة أو مكان يمكن أن تسقط منه. فقد تسبب الوحدة الخارجية عند
سقوطها في الإضرار بشخص ما أو إ paisيه أو حتى وفاته.
• في حالة غمر الجهاز (غرFEه أو غوصه) في الماء، اتصل يمركز خدمة معتمد在一صلاحه قبل استخدامه مرة أخرى. هناك
خطر نسوب حريق أو حدوث صدمة كهربائية.
• تأكد من فحص غاز التبريد المستخدم، ئرجى قراءة المملصق الموجود على المنتج. فقد يمنع غاز التبريد غير الصحيح
المستخدم عمل الوحدة بشكل طبيعي.
• لا تستخدم سلك طاقة، قابس أو مقبس مرخى تالف. إلا، سیتسب ذلك في نشوب حريق أو حدوث صدمة كهربائية.
• لا تقم بلمس، تشغيل، أو اصلاح المنتج عندما تكون يديك مبيلة. أمسك القابس بيديك عند نزعه. هناك خطر حدوث
صدمة كهربائية أو نشوب حريق.
• لا تضع أي مصر للحرارة أو أي أجهزة أخرى بالقرب من كامل الطاقة. weekend خطر نسوب حريق أو حدوث صدمة كهربائية.
• لا تسمح بدخل الماء إلى الأجزاء الكهربية، فم يتركيب الوحدة بعيدًا عن مصادر الماء.除非 خطر نشوب حريق، تعصل
ال.Manج، أو حدوش صدمة كهريائية.
• لا تخزن أو *" نمح誌誌誌誌誌誌誌誌誌誌誌誌誌誌誌誌誌誌誌誌誌誌誌誌誌誌誌誌誌誌誌誌誌誌誌誌誌誌誌誌誌誌誌誌誌誌誌誌誌誌�
هناك خطر نشوب حريق.
نصائح لتوفر استهلاك الطاقة
إلیک بعض النصائح التي ستساعدک على توفير استهلاك الطاقة عند استخدام جهاز تکيف الهواء. يمكنک استخدام تكيف الهواء بمزید من الفاعلية عن طريق الرجوع إلى التعليمات أدناه:
• لا تبRED المناطق الداخلية بشكل زائد عن الحد. Murد يصر ذلك ب%cحتك وبستهلك قدر أكثر من الكهرباء. • أسندل المستائر لجب أشعة الشمس أثناء تشغيل جهاز تكيف الهواة، حاfoot على إغلاق النوافذ والأبواب باحкам عند تشغيل جهاز تكيف الهواة. • قم بتعديل اتجاه تدفق الهواة رأسيا أو أفقياً لتدوير الهواة داخلي. • افرع سرعة المروحة لتبRID أو تدفئة الهواة داخل المكان بسرعة. • افتح النوافذ بانظام للتهوية لأن نقاء الهواة في الأماكن المغلقة قد يقل إذا استخدام جهاز تكيف الهواة لعدة ساعات. • نطف فلتر الهواة مرة كل أسبوعين. قد يصد الغبار والشوائب التي تجمع بعلتر الهواة وتعيق تدفق الهواة أو ئضعف وظائق التبريد/إزالة railroadية.
معلومات للتسجيل
قمر Tryduin el Marketing Mercedes de la France. Vié Honduras, in Canada. Anón Tnits bilanat, lgrudir to the woman.
أكتب رقم المنتج والرقم التسلىسلي للموديل هنا :
رقم الموديل :
الرقم التسلىسلي :
سوق تجدهم على اللصافة الموضوعة على جانب الوحدة
اسم البائع :
تاريخ الشراء:


يرجى قراءة هذا الدليل بعناية قبل تشغيل الجهاز واحتفظ به كمرجع
في المستقبل.
تكيف هواء سقف كاسيت ربعي الاتجاه.
CE
| LG Electronics Tianjin Appliances co.,Ltd.No.09,Jinwei Road,Beichen District,Tianjin,China. |
| LG Electronics (Levant) - JordanAbdali Project, Rafik Al-Hariri Avenue, The Boulevard, Central Square, 5th Floor |


- OWNER'S MANUAL
- AIR
- CONDITIONER
- TIPS FOR SAVING ENERGY
- For your records
- IMPORTANT SAFETY INSTRUCTIONS
- READ ALL INSTRUCTIONS BEFORE USING THE APPLIANCE.
- WARNING
- CAUTION
- TABLE OF CONTENTS
- TIPS FOR SAVING EN-ERGY
- IMPORTANT SAFETY IN-STRUCTIONS
- BEFORE USE
- PRODUCT INTRODUC-TION
- OPERATING INSTRUCTION
- OWNER'S INSTRUCTION
- SUB FUNCTION
- TIMER
- MAINTENANCE AND SERVICE
- BEFORE USE
- Preparing for operation
- Usage
- Cleaning and maintenance
- Service
- PRODUCT INTRODUCTION
- Name and function of parts
- Wired Remote Controller (Accessory)
- NOTE
- Wireless Remote Controller
- OPERATING INSTRUCTION
- How to insert the Batteries
- Wireless Remote Controller Maintenance
- Operating Method
- OWNER'S INSTRUCTION
- Cooling Mode - Standard Operation
- Cooling Mode - Power Cooling
- Heating Mode
- Dehumidification Mode
- During Dehumidification Mode
- Fan Mode
- Auto Operation Mode
- During Auto Operation Mode
- Auto Changeover Mode
- During Auto changeover Mode
- Auto Changeover Mode - Setting the Mode Change Temperature
- Airflow Setting
- Up/Down Airflow Direction Control (Optional)
- Celsius/Fahrenheit Switching
- Temperature Setting/Room Temperature checking
- SUB FUNCTION
- Plasma Purification(Optional)
- Auto Clean (Optional)
- Smart Clean (Optional)
- Auto Smart Clean operation
- Manual Smart Clean operation
- Individual vane angle control (Optional)
- TIMER
- Setting the Current Time
- Sleep Timer Setting
- On Timer Setting
- Off Timer Setting
- To cancel the Timer Setting
- MAINTENANCE AND SERVICE
- Indoor Unit
- Grille, Case and Remote Control
- Air Filters
- Purifying filter(Optional)
- Cleaning
- Replacement
- When the air conditioner is not going....
- When air conditioner is not going to be used for a long time.
- Helpful information
- When the air conditioner is to be used again.
- Troubleshooting Tips! Save time and money!
- Call the service immediately in the following situations
- تميحيات اكتشف الأعطال وإصلاحها ! وفر الوقت والمال!
- اتصل بالخدمة على الفور في المواقع التالية
- معلومات مفيدة
- عند الرغبة في استخدام الجهاز مرة Achré.
- عند عدم استخدام تكيف
- عند وجود نية لترك هاز تكيف الهواء بدون استخدام لفترة طويلة.
- الاستبideal
- فلتر التقنية (اختياري)
- الynnظيف
- تنبيه
- الصيانة والخدمة
- فلاتر الهواء
- إيقاف إعداد المؤقت
- اللغاء إعداد المؤقت
- المؤقت
- ضبط الوقت الحالي
- إعداد مؤقت النوم
- تشغيل إعداد المؤقت
- التحكم الفردي بزاوية الموجه الهواني (-acعتياري)
- التنظيف الذكي (-ac Mitsubishi)
- تشغيل وطيفة التنظيف الذكي التلقاني
- تش civil وطيفة التنظيف الذكي المدوي
- الوظيفة الفرعية
- التنقية بجزئات البلازما (aciتياري)
- التنقبة باستخدم ايونات البلازما فقط
- التنظيف التلقائي (اخテーヤى)
- إعداد درجة الحرارة/Visualات درجة حرارة الفرفة
- إعداد تدفع الهواء
- الteacher في اتجاه تدفق الهواء إلى أعلى/إلى أسفل (خياري)
- ملاحظة
- الtidيل بين مئوية/فهرنهايت
- وضع التحول التلقائي - إعداد وضع تغير درجة الحرارة
- وضع التحول التلقائي
- وضع التشفيل التلقائي
- وضع المروحة
- وضع إزالة الرطوبة
- وضع التدفة
- تعليمات المالك
- وضع التبريد - تشغيل قياسي
- صيانة حهاز التحكم اللا스لكي
- عن بعد
- طريقة التشفيل
- تعليمات التشفيل
- كيفية إدخال البطاريات
- جهاز تحكم سلکی عن بعد
- جهاز تحكم سلكي عن بعد (ملحق)
- مقدمة حول المنتج
- اسم و Occupية كل جزء
- قبل الاستخدام
- الإعداد للتشغيل
- الاستخدام
- التنظيف والصيانة
- الخدمة
- جدول المحتويات
- الوظيفة الفرعية
- المؤقت
- الصينة والخدمة
- نصائح لتوفر استهلاك
- الطاقة
- تعليمات السلام المهمة
- V قبل الاستخدام
- مقدمة حول المنتج
- تعليمات التشفيل
- تعليمات الملك
- تعليمات السلام المهمة
- يرحي قراءة دليل التعليمات قبل استخدام الجهاز.
- نصائح لتوفر استهلاك الطاقة
Mærke : LG
Model : ATNW54LMLS1
Kategori : Aircondition