
Memphis 440BT - Hi-Fi System BLAUPUNKT - Gratis brugsanvisning og manual
Find enhedens vejledning gratis Memphis 440BT BLAUPUNKT i PDF-format.

Brugerspørgsmål om Memphis 440BT BLAUPUNKT
0 spørgsmål om dette apparat. Besvar dem du kender, eller stil dit eget.
Stil et nyt spørgsmål om dette apparat
Download vejledningen til din Hi-Fi System i PDF-format gratis! Find din vejledning Memphis 440BT - BLAUPUNKT og tag din elektroniske enhed tilbage i hånden. På denne side er alle dokumenter nødvendige for brugen af din enhed offentliggjort. Memphis 440BT af mærket BLAUPUNKT.
BRUGSANVISNING Memphis 440BT BLAUPUNKT

BLAUPUNKT
Shaghal Ltd. 2231 Colby Ave, Los Angeles, California 90064
©2016 BLAUPUNKT. All Rights Reserved. The Bluetooth word mark and logos are trademarks owned by the Bluetooth SIG, Inc. and are used under license by Shaghal Ltd. This device complies with part 15 of the FCC Rules. Operation is subject to the following two conditions: (1) this device may not cause harmful interference, and (2) this device must accept any interference received, including interference that my cause undesired operation. WARNING: This product contains a chemical known to the State of California to cause cancer and reproductive toxicity.

BLAUPUNKT
MMP440
6.2" In Dash Touch Screen DVD Receiver Instruction Manual

Enjoy it.
NOTE: This equipment has been tested and found to comply with the limits for a Class B digital device, pursuant to Part 15 of the FCC Rules. These limits are designed to provide reasonable protection harmful interference in a residential installation. This equipment generates, uses and can radiate radio frequency energy and, if not installed and used in accordance with the instructions, maybe cause harmful interference to radio communications. However, there is no guarantee that interference will not occur in a particular installation. If this equipment does cause harmful interference to radio or television reception, which can be determined by turning the equipment off and on, the user is encouraged to try to correct the interference by one or more of the following measures:
- Reorient or relocate the receiving antenna.
- increase the separation between the equipment and receiver.
- Connect the equipment into an outlet on a circuit different from that to which the receiver is connected.
- Consult the dealer or an experienced radio/TV technician for help.
6.2" In Dash Touch Screen DVD Receiver Instruction Manual
IMPORTANT NOTICE & PRECAUTIONS
Thank you for buying a BLAUPUKT product. To operate the unit correctly, please read the operation manual carefully before using. Keep this operation manual for future reference.
The unit designed only for DV 12V negative ground operation system. Make sure your vehicle is connect to DC 12V negative ground operation system. Be sure to connect the speaker (-) leads to the speaker (-) terminal. Never connect the left and right channel speaker wires together or to the vehicle body.
The normal temperature for operation is between -20 and +60 degree Fahrenheit. Do not operate in extreme high or low temperature and lock vents or radiator panels of the unit, blocking them will cause heat to build up inside the unit and may cause damage or fire.
This unit can play the following discs (4.72 in) and media files: DVD±R/RW/ RMVB MPEG4/ AVI/ SVCD/ VCD/ MP3/ WMA/ CD-R/RW/ JPEG.
This operation manual shows the full version of this unit. GPS navigation system, dynamic multi-colour illumination; back USB connection; iPod connection, digital TV tuner; analog TV tuner; Bluetooth and AM radio are optional features of the software and may not be included. Please refer to the exact functions & features that equipped with this unit for operation.
INSTALLATION
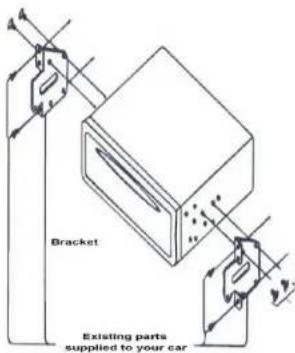
Notes:
- Installation varies on type of cars and supplied parts
- Store small articles in places not accessible to children
- Install only with the supplied screws
- Installation of the unit by a professional technician is strongly recommended
Remarks:
Mounting brackets and screws are the parts that supplied in your car and not provided in this unit.
WIRING CONNECTION
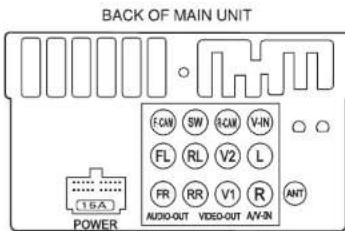
Remarks:
This drawing shows the full version of the unit and may not be available for connection on some versions. Refer to the exact functions and features of the unit for proper connection.
Due to the law of some countries, video playback is not allowed during driving. To allow video playback during driving, the brown wire (brake) should be connected to ground (B-) of the car battery.
SIMPLE TROUBLE SHOOTING
| PROBLEMS, CAUSES & SOLUTIONS |
| No power- Check and make sure the connecting wires are connected correctly- Check whether the fuse is blown. Replace with the proper value fuse if necessary. |
| No sound- Check and make sure the speaker wires are connected correctly. |
| No picture- Check whether the video wire is connected to the video device. |
| Unit hang-up- Press the RESET button to reset the unit to its default stage. |
| No function when pressing the buttons or TFT screen- Press the RESET button to reset the unit to its default stage. |
| Poor effect or unable to receive radio / TV- Check whether the radio / TV antenna is inserted or properly connected.- Antenna may not be the proper length. Make sure the antenna is fully extended.- Antenna may be poorly grounded. Check and make sure the antenna is properly grounded. |
| Stereo cannot be received under radio mode- Tune the radio frequency accurately.- The broadcasting signal is too weak, set the mode to MONO. |
| Disc inserted but cannot play- Check whether the disc inserted upside down.- Check whether the disc is dirty or badly cracked.- Lens is dirty. Clean lens by using the lens clean disc. |
| Picture without colour or no sound under disc / TV mode- Improper setting of colour system. Set again to "PAL", "SECAM" or "NTSC".- The disc is dirty or damaged. Wipe the disc with a dry soft cloth or replace a new disc. |
| Abnormal moving, skipping or sound during playback- The disc is dirty or damaged. Wipe the disc with a dry soft cloth or replace with a new disc. |
| Remote handset does not work- Replace with a new battery of the remote handset.- Point the remote handset directly at the remote sensor of the main unit.- Clean the surface of the remote sensor. |
| BLUETOOTH not operated- Check to make sure the devices are linked up correctly. |
Note
After attempting the above efforts, if the unit still cannot operate normally, consult your service dealer. Never attempt to disassemble the unit by yourself. No service part inside the unit.
SPECIFICATIONS
GENERAL
| Power Requirement: | DC 12 Volts, negative ground4 Ohms | |||
| Load Impedance: | ||||
| Maximum Power Output: | 40 watts x 4 channels | |||
| RADIO SECTION | ||||
| Frequency Range: | AM Section | FM Section | ||
| Area: | Frequency | Stepping | Frequency | Stepping |
| Europe | 522 -1620 KHz | 9 KHz | 87.5 – 108 MHz | 50 KHz |
| OIRT | 522 – 1620 KHz | 9 KHz | 65 – 74 MHz | 30 KHz |
| Australia | 522 – 1710 KHz | 9 KHz | 87.5 – 108 MHz | 100 KHz |
| Middle East | 531 – 1602 KHz | 9 KHz | 87.5 – 108 MHz | 100 KHz |
| America 1 | 530 – 1620 KHz | 10 KHz | 87.5 – 108 MHz | 50 KHz |
| America 2 | 530 – 1620 KHz | 10 KHz | 87.5 – 107.9 MHz | 100 KHz |
| America 3 | 530 – 1710 KHz | 10 KHz | 87.5 – 107.9 MHz | 100 KHz |
| America 4 | 530 – 1710 KHz | 10 KHz | 87.5 – 108 MHz | 50 KHz |
| Japan | 522 – 1629KHz | 9 KHz | 76 – 90 MHz | 50 KHz |
| Brazil | 520 – 1710 KHz | 10 KHz | 87.5 – 108 MHz | 100 KHz |
| China | 522 – 1620 KHz | 9 KHz | 87.5 – 108 MHz | 50 KHz |
| IF: | 450 KHz | 10.7 MHz | ||
DISC SECTION
| Disc PlayMounting Angle | DVD / VCD / MP3 / CD/MP5+/- 30° |
| VIDEO | |
| Video | PAL / SECAM / NTSC |
| Video Output Level: | 1.0Vp-p 75 Ohms |
| Horizontal Resolution: | 500 |
| BLUETOOTH SECTION | |
| Communication type: | V2.0 |
| Maximum Distance: | 5 meters |
| AUDIO SECTION | |
| Maximum Output Level: | 2 Vrms (+/-3 dB) |
| Frequency Response: | 20 Hz to 20 KHz |
| Signal to Noise Ratio: | 85 dB |
| Channel Separation: | 80 dB |
Note: Specification and design; functions and features; unit illumination; colour and display segment are subject to change without prior notice. Photos and drawings on gift box or operation manual might be varied from the exact unit. Depending on the input devices, operation might be varied from the operation manual described.
[30]
| Portion | Colour | Connection | |
| Connecting Socket | POWER | Red | Ignition switch (B+) |
| Black (Coarse) (Fine) | Ground (B-)Steering wheel control (Ground) | ||
| Yellow | Memory back up (B+) | ||
| WhiteWhite / Black | Front left speaker (+)Front left speaker (-) | ||
| GreyGrey / Black | Front right speaker (+)Front right speaker (-) | ||
| GreenGreen / Black | Rear left speaker (+)Rear left speaker (-) | ||
| PurplePurple / Black | Rear right speaker (+)Rear right speaker (-) | ||
| Blue / White | Auto antenna (B+) | ||
| Pink | Back sight (B+) | ||
| Pink / Black | Front camera (B+) | ||
| Grey | Steering wheel control (1) | ||
| Green | Steering wheel control (2) | ||
| Orange | Illuminate backlight (B+) | ||
| Blue | Amplifier control (B+) | ||
| Brown | Brake (B-) | ||
| ANT | Radio antenna | ||
| Audio output jack | SW | Green | Sub-woofer output |
| FL | White | Front left speaker output | |
| FR | Red | Front right speaker output | |
| RL | White | Rear left speaker output | |
| RR | Red | Rear right speaker output | |
| Audio input jack | L | White | Auxiliary left speaker input |
| R | Red | Auxiliary right speaker input | |
| Video output jack | V1 | Yellow | Video output |
| V2 | Yellow | Video output | |
| Video input jack | R-CAM | Yellow | Back sight camera input |
| V-IN | Yellow | Video input | |
| F-CAM | Brown | Front camera input | |
[3]
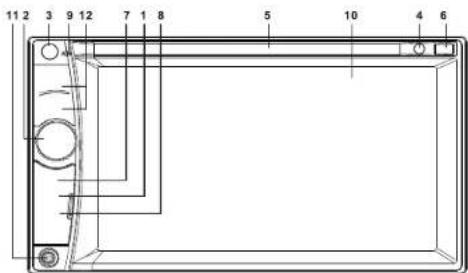
MAIN UNIT OPERATION
Symbol / Function Operation & Controls
- RES Press with a pointed object (such as a ball point) to reset the unit to its initial setting by the factory (default stage).
- ⏻/ POWER When the unit is turned off, press to turn on the unit.
When the unit is turned on, press & hold shortly to turn off the unit.
VOL+ / VOL- Rotate to adjust sound output level.
MUTE During unit operation, press to turn sound on or off. - M/N During unit operation, press to go to the MAIN MENU for other operation modes.
- IR Remote control sensor (for signal reception from remote handset).
- DISC SLOT Insert or remove disc from this disc slot.
- ▲/ EJECT Press to eject disc from the disc slot (when a disc has been inserted).
- USB Insert USB device to this slot for digital files playback. (Note: The USB slot is intended for data transfer only)
- MINI SD / Insert micro SD card to this port for digital files playback.
-
MIC For voice reception under BLUETOOTH operation.
-
Touch to activate or close the key board for phone book searching.
- Touch to input details for phone book searching.
- Touch to start / pause / resume music playback transmitted from the mobile phone.
- Touch to select upward or downward track for playback.
- Touch to turn off the screen. When the screen turned off, touch any portion of the screen to turn on the screen.
- Touch to activate audio & visual setting for various audio & visual setup.
- Touch to shift screen to MAIN MENU
ON SCREEN - AUXILIARY INPUT OPERATION
At MAIN MENU, touch "AV IN" icon on screen to shift to auxiliary input operation (provided an auxiliary video device had been connected). At auxiliary input operation, touch any portion of screen to activate AUX INPUT MENU for operation.
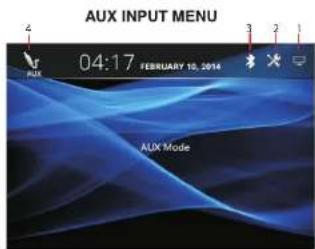
IMPORTATION NOTICE FOR ON SCREEN OPERATION
Interfaces, photos, images, icons & location as shown in this part of operation manual may be varied from the exact unit. However, all of them come with similar outlook of the same type and with the same operation method.
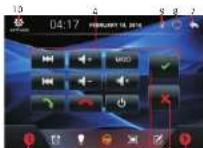
BT MUSIC MENU
-
Touch to shift to BT DEVICE MENU.
-
Touch to activate BT DIAL MENU
-
Touch to activate BT RECORD MENU.
-
Touch to activate BT PHONE BOOK MENU
-
Touch to activate BT MUSIC MENU.
-
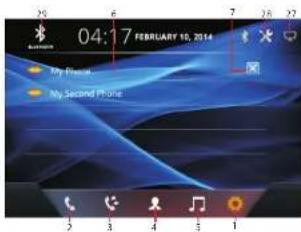
Touch to select the linked up device.
-
Touch to delete the linked up device
-
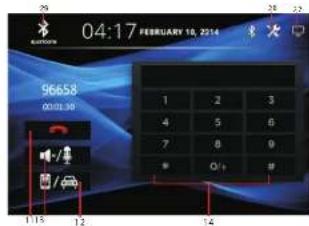
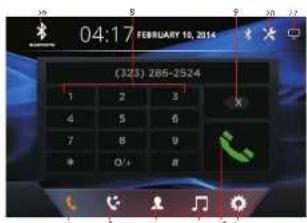
Touch to input phone number.
-
Touch to erase the digit input by error.
-
Touch to dial out.
-
Touch to hang up.
-
Touch to shift conversation between mobile phone & BLUETOOTH of the unit.
-
Touch to turn on or off of sound muting of the microphone.
-
Touch to input digit (for conversation that needs to input data).
-
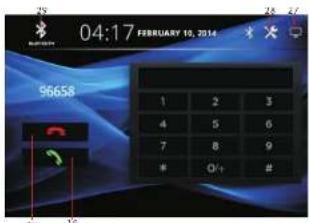
Touch to refuse an incoming call.
-
Touch to pick up an incoming call.
-
Touch to download incoming calls / dial out numbers / missing calls of the mobile phone to the unit.
-
Touch to show list of missed calls.
-
Touch to show list of outgoing number.
-
Touch to show list of incoming calls.
-
Touch to shift page up and down.
-
Touch to download the phone book of the mobile phone to the unit.
[28]
- TFT SCREEN
It shows the status of operation on the unit. This screen is also a touch display – soft touch the screen for different operations of unit (for details, refer to other parts of this operation manual).
- AUX
Insert an external device to this jack in order to have sound output of that external device through the unit.
- +▶▶| / |◀◀-
Radio Mode Press repeatedly to fine tune the radio frequency upward or downward. Press & hold shortly to tune the radio frequency to the upward or downward station for broadcasting.
Disc / USB / SD Input Mode / BLUETOOTH Mode
Press repeatedly to shift track upward or downward for playback.
Press & hold shortly to activate fast forward / rewind of track. At fast forward / rewind mode, press repeatedly for various fast forward / rewind speeds. (Note: Fast forward / rewind is not available at BLUETOOTH mode).
TV Mode
Press to choose TV channel upward or downward for broadcasting. Press & hold shortly to tune the TV frequency upward or downward and stop for broadcasting when a TV channel is received.
Note
The above mentioned operations are for various series of the same type and may not be available in the unit. Printing and symbols on the above may vary from the exact main unit. Refer to the main unit for exact functions and features that applied. User is highly recommended to use the touch screen control to operate. Most of the controls cannot be operated by the main unit.
REMOTE HANDSET - GENERAK OPERATION
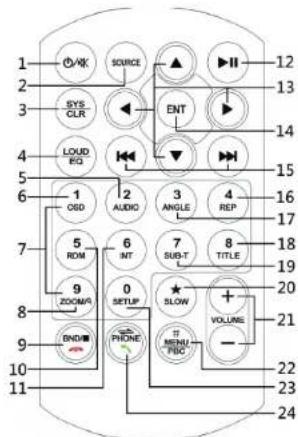
BATTERY REPLECEMENT
Refer to the back of remote handset for details on how to replace the battery.
NO. SYMBOL OPERATION & CONTROL MODE
- (1) When the unit is turned off, press to turn on the unit.
When the unit is on, press & hold shortly to turn off the unit.
[Unreadable] - SOURCE
- SYS / CLR In BLUETOOTH mode, press to erase the digit input by error.
- EQ Press repeatedly to select the desired preset equalization mode. LOUD Press & hold shortly to turn on or off loudness control.
- AUDIO At video and music playback mode, each time press & hold shortly to select different audio output channels. (Note: Available on input device or media files recorded with different output channels and not available under BLUETOOTH mode)
- OSD At media playback mode, press to display the contents of the playback details on screen. (Note: Not available at music playback mode)
[6]
BT CONVERSATION MENU BT RECORD MENU
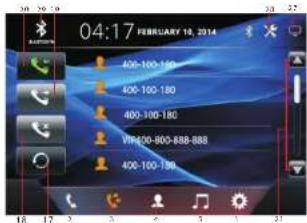
BT PHONE BOOK MENU BT PHONE BOOK MENU


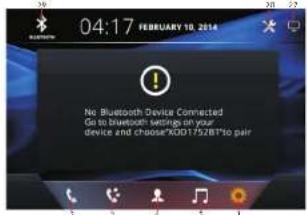
ON SCREEN - BLUETOOTH OPERATION
At MAIN MENU and at other operation modes, touch "BT" icon on screen to shift to BLUETOOTH operation.
LINK UP WITH MOBILE PHONE
To linkup BLUETOOTH connection with the mobile phone, take your phone and follow the steps: - set the mobile phone to BLUETOOTH state
- start to search for a new device
- after search, new device "CAR-KIT", "CAR BT" or similar device will appear
- input default code "0000" or "8888" in the mobile phone
- at the same time, BLUETOOTH icon & BT DEVICES MENU will appear on screen
- connection succeeded and you can start using BLUETOOTH function
BT DEVICE MENU (NO CONNECTION)
BT DIAL MENU
BT DEVICE MENU (CONNECTED)
BT INCOMING CALL MENU
[26]
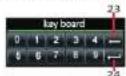
- 1 - 6

0-9
8. ZOOM
Q
9. BND
-
10. RDM
11. INT
12.
Radio Mode
Radio Mode
Press any one of the number keys1-6 to select a station that had been stored in the preset memory number key 1-6 for broadcasting.
Press & hold shortly the number key 1-6 to store the current broadcasting frequency or station into the respective preset memory key number 1-6.
Disc / USB / SD / iPod Input Mode
Press directly to input the number of track for playback.
BLUETOOTH Mode
Press directly to input the phone number for dial out.
TV Mode
Press directly to input the number of channels that have been memorized for broadcasting.
Disc / USB / SD Input Mode
At video & photo playback, each time press & hold shortly to select various zooming in and out of the screen for viewing.
Press to start scanning all the preset stations on memory and stop for a few seconds for broadcasting.
Press & hold shortly to start searching the frequency and storing the strongest signal stations into the preset memory stations (total 20 preset stations on each radio band). After storing the stations, the unit starts scanning all the preset stations on memory and stops for a few seconds for broadcasting.
TV Mode
Press to start scanning all the preset channels on memory and stop for a few seconds for broadcasting.
Radio Mode
Press repeatedly to select the desired radio band for broadcasting. Disc / USB / SD Input Mode
At video playback mode under disc input, press to stop playback.
At music / photo playback mode under disc input and playback mode under USB / SD input, touch to stop playback temporarily and will resume normal playback after a few seconds.
BLUETOOTH Mode
Press to hang up or refuse an incoming call.
At disc / USB / SD input playback mode, press & hold shortly to turn on or off of random playback of the input device
At music playback mode, press & hold shortly to turn on or off of intro playback of the input device. (Note: Not available at BLUETOOTH mode)
At disc / USB / SD / input & BLUETOOTH mode, press to pause, resume or start playback.
| 13. | ▲/▼/<? | DVD ModeAt DVD menu / title display mode, press to select the desired setting/setup and press ENT to confirm/enter.Folder / Playlist ModeDuring folder / playlist display at media playback mode, press to shift page up or down on playlist.Photo Playback ModePress to rotate photo position or show up-down, left-right mirror image. |
| 14. | ENT | DVD ModeAt DVD menu / title display mode, press ▲/▼/<? to select the desired setting/setup and press ENT to confirm/enter. |
| 15. | ▶◀/◀◀ | Radio ModePress repeatedly to fine tune radio frequency upward or downward.Press & hold shortly to tune radio frequency to the upward or downward station for broadcasting.Disc / USB / SD Input Mode(Playback Mode)Press repeatedly to shift track upward or downward for playback.Press & hold shortly to activate fast forward or fast rewind mode. At this mode, press repeatedly to select various speeds of fast forward or fast rewind. (Note: Not available for operate at photo playback mode)TV ModePress to shift TV channel upward or downward for broadcasting.Press & hold shortly to shift to the upward or downward channel for broadcasting.BLUETOOTH ModePress to shift track upward or downward for playback. |
| 16. | REP | At playback mode under disc / USB / SD input, each time press & hold shortly to activate various repeat playback setting. |
| 17. | ANGLE | At video playback mode, each time press & hold shortly to view angle changes in sequential order (available on media files recorded with this features). |
| 18. | TITLE | Radio ModePress to select stereo (ST) or mono mode at FM radio band. (Note: At stereo mode and when stereo signal received, stereo indicator appeared on screen whereas this is not indication for mono mode and mode signal received)DVD ModePress & hold shortly to display the on-screen menu of the entire disc and resume playback after a while. |
[8]
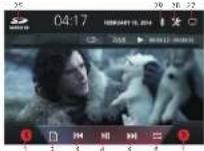
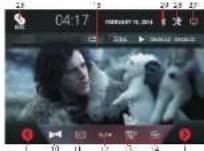
- At video playback mode under disc input, touch to stop playback. At music / photo playback mode under disc input and playback mode under USB / SD card input, touch to stop playback temporarily and resume normal playback after a few seconds.
- Touch repeatedly to select repeat playback mode.
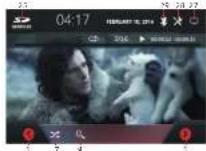
- Touch to turn on or off of random playback of the input device.
- At DVD playback mode, touch repeatedly to view the angle changes in sequential order (available for video recorded with multi-angle senses).
- At video & photo playback mode, touch repeatedly to zoom in and zoom out of the screen for viewing.
- Touch repeatedly to select the audio output channels that are recorded in the device.
- Touch repeatedly to select different sub-titles that are recorded in the device.
- Touch repeatedly to select different speeds of slow motion playback.
- At DVD playback mode, touch to show the on-screen the menu of the disc At VCD playback mode, touch to shift PBC on or off. At PBC on mode, touch to start the playback at the beginning in sequence order.
- Touch to activate KEY BOARD MENU to input track number directly for payback
- Hold & slide to select the position (time) for playback.
- Hold & slide to select the position (time) for playback.
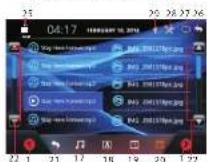
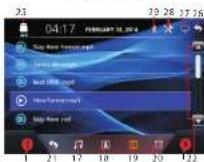
- Touch to shift to MUSIC FOLDER PLAYLIST / MUSIC PLAYLIST to select music playback (when the playback device recorded with music files).
- Touch to shift to PHOTO FOLDER PLAYLIST / PHOTO PLAYLIST to select photo playback (when the playback device recorded with photo files).
- Touch to shift to VIDEO FOLDER PLAYLIST / VIDEO PLAYLIST to select video playback (when the playback device recorded with video files).
- Touch to shift to FOLDER PLAYLIST / PLAYLIST to select desired folder / file for playback. To start playback, touch twice of the selected file.
- Touch to shift to previous FOLDER PLAYLIST / PLAYLIST
- Touch to shift page up / down.
- Touch to erase the input digit.
- Touch to confirm after input the number of track for playback.
- Touch to shift screen to MAIN MENU
- Touch to shift back to MUSIC PLAYBACK MENU
- Touch to turn off the screen. When the screen turned off, touch any portion of the screen to turn on the screen.
- Touch to activate audio & visual setting for various audio & visual setup.
- Touch to shift to BLUETOOTH mode for BLUETOOTH operation.
[25]
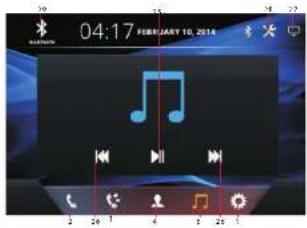
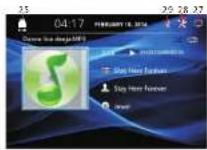
MUSIC PLAYBACK MENU
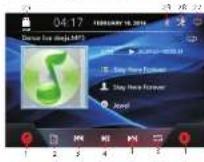
MUSIC PLAYBACK MENU
FOLDER PLAYLIST
MUSIC PLAYBACK MENU
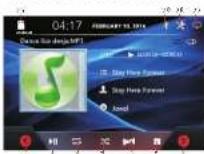
PHOTO PLAYBACK MENU
PLAYLIST
MUSIC PLAYBACK MENU
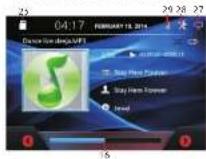
PHOTO PLAYBACK MENU
KEY BOARD MENU
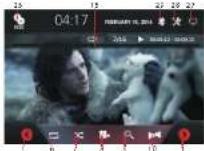
- Hold & slide to show the hidden operation icons for operation.
- At media playback, touch to activate PLAYLIST / FOLDER PLAYLIST (available for input device recorded with folder) to select folder / track for playback. At DVD playback mode, touch to show the menu of the disc. (Note: Depended on the DVD input, this function may not be operated) At VCD playback mode, touch to shift PBC on or off. At PBC on mode, touch to start the playback at the beginning in sequence order.
- Touch to shift to next / previous track for playback. At video playback mode, touch & hold shortly to activate fast forward / rewind mode. At this mode, touch repeatedly to select various speed of fast forward / rewind.
-
Touch to start, pause or resume playback.
-
SUB-T
Video Playback Mode
Each time press & hold shortly to select different sub-titles that recoded in the input device or media files. (Note: Available on input device or media files recorded with sub-titles)
Radio Mode
At FM radio band, press to select local setting for reception of strong signal stations and distant setting for reception of weak signal stations. (Note: LOC appears on screen on local setting whereas no indication for distant setting)
- SLOW
At video playback mode, press & hold shortly to select different speeds on slow motion playback.
- VOL + / VOL
Press repeatedly or press & hold to adjust sound output level.
- MENU / PBC
DVD Mode
Press & hold shortly to display on screen the menu of the entire disc & resume playback after a while.
VCD Mode
Press & hold shortly to turn on or off of PBC playback. At PBC on mode, this will start the sequence playback at the beginning.
- SETUP
During unit operation, press & hold shortly to activate setup menu on screen for various system setup. Press & hold shortly again to return to previous operation mode. (Note: System setup cannot be operated by remote handset. System setup can only be operated by touch screen – refer to ON SCREEN OPERATION for details)
24.
Bluetooth Mode
Press to pick up an incoming call; dial out after inputting a phone number; redial last dialed out number.
Press to shift conversation between main unit and mobile phone.
Remarks: Depending on the input devices & playback media files, operation may be varied or not available for operation.
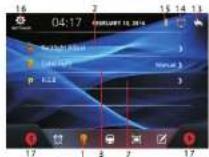
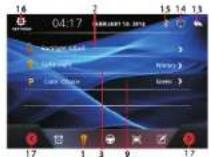
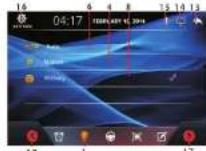
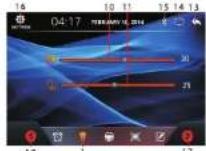
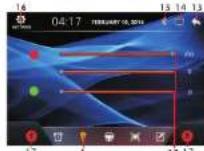
ON SCREEN - MAIN MENU OPERATION
MAIN MENU
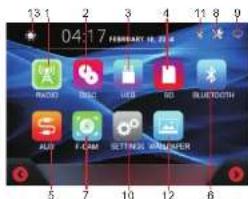
Touch the icon on the desired mode on screen and the unit will then enter into the mode that you selected for operation. Hold & slide on the lower portion of screen (input icons) to shift to other the MAIN MENU that shows the hidden input or operation icons.
- Touch to start radio operation.
- Touch to start disc input operation (when a disc inserted).
- Touch to start USB input operation (when a USB device inserted).
- Touch to start SD card input operation (when a micro SD card inserted).
- Touch to start auxiliary input operation (when an auxiliary device inserted).
- Touch to start BLUETOOTH operation (when connected to a mobile phone).
- Touch to activate front camera input (when the pink / black wires has been connected). When front camera input has been activated, front camera view will be displayed on screen and:
\~ audio output of current operation mode will be retained (for operation modes with audio output only)
\~ audio output of current operation mode will be broadcasted 10 seconds later (for operation modes with visual output)
\~ audio & visual output of current operation mode will be broadcasted 10 seconds later (for operation with video output connected)
- Touch to activate audio & visual setting for various audio & visual setup.
- Touch to turn off the screen. When the screen is turned off, touch any portion of the screen to turn on the screen.
- Touch to start various setting of the unit.
- Touch to start Bluetooth operation (icon appeared when connected with mobile phone).
- Touch repeatedly for default wallpaper (background colour) setting.
- Touch repeatedly to select brightness of screen or turn off the screen. When the screen is off, touch any portion of the screen to turn the screen on again. Following preset brightness modes can be selected:


At this brightness mode, the brightness of screen is set by the user (user setting).
[10]
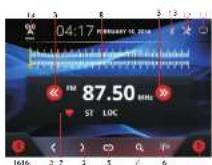
- Touch repeatedly to fine tune radio frequency upward or downward.
- Touch to tune the radio frequency to upward or downward station for broadcasting.
- Touch to start intro broadcasting of the preset memory stations for a few seconds. Touch again to stop this intro broadcasting.
- Touch to select stereo or mono mode at FM radio band. When stereo signal received, stereo indication will be appeared on screen and this is no indication for mono signal.
- Touch to select local (LOC) setting for reception of strong signal stations and a distant setting for reception of weak stations at FM radio band. When local (LOC) setting is selected, LOC will appear on screen and this is no indication for distant setting.
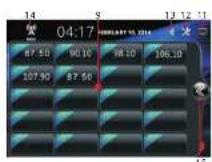
- Touch to activate the preset memory stations list on screen.
- Hold & slide to select the radio frequency for broadcasting.
- Touch the desired preset station number (any of 1-20) to start broadcasting of the selected station. Touch & hold shortly the preset station number can store the current broadcasting station (frequency) into that station number.
- Touch to select FM & AM radio band for broadcasting.
- Touch to turn off the screen. When the screen turned off, touch any portion of the screen to turn on the screen.
- Touch to activate audio & visual setting for various audio & visual setup
- Touch to shift to BLUETOOTH mode for BLUETOOTH operation.
- Touch to shift screen to MAIN MENU.
- Touch to close the preset memory stations list on screen.
- Hold & slide to show the hidden setup modes.
ON SCREEN - DISC / USB / SD CARD INPUT OPERATION
At MAIN MENU, touch "DISC" / "USB" / "CARD" icon on screen to shift to multi-media playback mode and playback will start automatically. Depending on the input device and playback media, the touch screen will show various playback menus for operation.
DVD (DISC) / VIDEO PLAYBACK MENU
DVD (DISC) / VIDEO PLAYBACK MENU
DVD (DISC) / VIDEO PLAYBACK MENU

[23]
VERSION OF UNIT
VERSION MENU
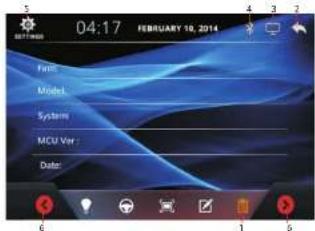
- Touch to shift to VERSION MENU to show the details of unit. This is not available for setting.
- Touch to shift to previous page, touch twice to shift to previous operation mode.
- Touch to turn off the screen. When the screen is turned off, touch any portion of the screen to turn on the screen.
- Touch to shift to BLUETOOTH mode for BLUETOOTH operation.
- Touch to shift screen to MAIN MENU.
- Hold & slide to show the hidden setup modes.
ON SCREEN - RADIO OPERATION
At MAIN MENU, touch "RADIO" icon to shift screen to RADIO MENU for radio operation.
RADIO MENU

RADIO MENU
RADIO MENU
- Touch to start searching the radio frequency & storing the strongest signal stations into memory. After one cycle searched, the unit starts intro broadcasting of the preset memory stations for a few seconds. Touch again to stop this intro broadcasting.
[22]
ON SCREEN - AUDIO & VISUAL SETTING

During operation, touch to activate audio & visual setting for various audio & visual setup.

Volume Control
- Touch to shift to next setting mode.
- Touch to turn on or off of sound mute control.
- Hold & slide to adjust sound output level.

Preset Equalization Control
- Touch to shift to next setting mode.
- Touch repeatedly to select the desired equalization mode.
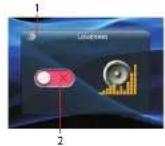
Loudness Control
- Touch to shift to next setting mode.
- Touch to adjust volume level.
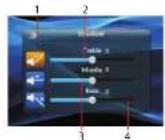
Bass & Treble Control
- Touch to shift to next setting mode.
- Hold & slide to adjust output level of treble.
- Hold & slide to adjust output level on middle range.
- Hold & slide to adjust output level on bass.
[11]
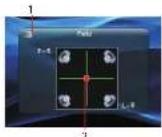
Balance & Fader Control
1. Touch to shift to next setting mode.
2. Hold & slide to set the output level on left / right / front / rear speaker.
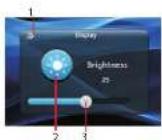
Visual Control
1. Touch to shift to next setting mode.
2. Touch repeatedly to select the desired setting mode on brightness, contrast, hue, saturation and sharpness.
3. At the desired setting mode, hold & slide to adjust the level.
ON SCREEN - SETUP OPERATION
At MAIN MENU, touch 'SETUP' icon on screen to shift screen to SETUP MENU for various system setup of unit.
SYSTEM SETUP
SYSTEM SETUP MENU
SYSTEM SETUP MENU
[12]
- Touch to turn off the screen. When the screen is turned off, touch any portion of the screen to turn on the screen.
- Touch to shift to BLUETOOTH mode for BLUETOOTH operation.
- Touch to shift screen to MAIN MENU.
- Hold & slide to show the hidden setup modes.
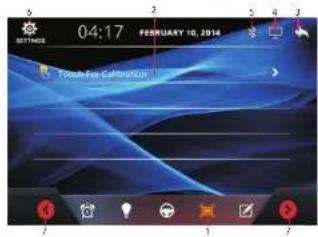
TOUCH SCREEN CALIBRATION SETUP CALIBRATION MENU
-
Hold & slide to show the hidden setup modes.
-
Touch to shift to CALIBRATION MENU
- Touch to activate the TOUCH MENU and start calibration of screen. Follow the instructions and touch on screen in order to complete the calibration.
- Touch to shift to previous page, touch twice to shift to previous operation mode.
- Touch to turn off the screen. When the screen is turned off, touch any portion of the screen to turn on the screen.
- Touch to shift to BLUETOOTH mode for BLUETOOTH operation.
- Touch to shift screen to MAIN MENU
EX-FACTORY SETUP (For ex-factory setting only & not available for user setup) EX-FACTORY SETUP MENU
- Touch to shift to EX-FACTORY SETUP MENU.
- Touch to shift to previous page, touch twice to shift to previous operation mode.
- Touch to turn off the screen. When the screen turned off, touch any portion of the screen to turn on the screen.
- Touch to shift to BLUETOOTH mode for BLUETOOTH operation.
- Touch to shift screen to MAIN MENU.
- Hold & slide to show the hidden setup modes.
[21]
- Touch to select AUTO MODE for automatic backlight change.
- When MANUAL MODE selected, touch to activate R.G.B. MENU for R/G/B adjustment.
- Touch to select PRIMARY MODE to select a single colour illumination.
- When PRIMARY MODE is selected, touch to activate COLOUR INTERFACE to select a single colour for illumination.
- Hold & slide to set brightness of screen when brightness of screen is set at USER MODE
- Hold & slide to set the headlamp brightness of the car (when the orange wire connected).
- At R.G.B. MENU, hold & slide to adjust the desired R / G / B colour.
- Touch to shift to previous page, touch twice to shift to previous operation mode.
- Touch to turn off the screen. When the screen turned off, touch any portion of the screen to turn on the screen.
- Touch to shift to BLUETOOTH mode for BLUETOOTH operation.
- Touch to shift screen to MAIN MENU.
- Hold & slide to show the hidden setup modes.

STEERING WHEEL CONTROL SETUP
STERING WHEEL CONTROL MENU
SWC SETTING MENU
-
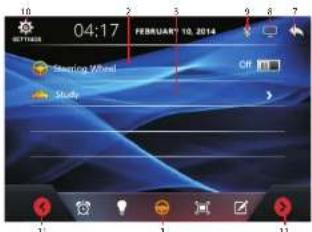
Touch to shift to STEERING WHEEL CONTROL MENU
-
Touch to turn on or off steering wheel control (when the steering wheel control wires – grey & green connected)
-
Touch to activate SWC SETTING MENU for setting up of steering wheel control.
-
Touch to select the function for setting.
-
Touch to erase the setting.
-
Touch to confirm the setting.
-
Touch to shift to previous page, touch twice to shift to previous operation mode.
[20]
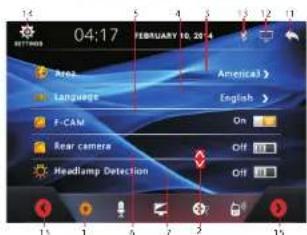
- Touch to shift screen to SYSTEM SETUP MENU for various system settings.
- Hold & slide to show the hidden setting modes.
- Touch to activate the AREA INTERFACE to select the country or area located (for the radio frequency that suits the country or area).
- Touch to activate the LANGUAGE INTERFACE to select the desired system language on screen.
- Touch to turn on or off of front camera input (when front camera and the pink/black wire connected):
- when the front camera input is turn on and the car is shifted from backward mode to forward mode, front camera input will be display for 10 seconds
- the default setting after first installation is off and at this moment, no front camera input will be displayed when the car is shifted from backward mode to forward mode
- Touch to turn on or off of rear camera input (when rear camera and the pink wire is connected).
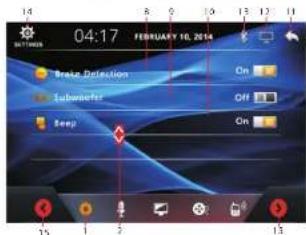
- Touch to turn on or off of headlamp detection of the car (when the orange wire is connected).
- Touch to turn on or off of allowing watching video during driving (when the brake – brown wire has not been connected).
- Touch to turn on or off of sub-woofer output (when a sub-woofer connected).
- Touch to turn on or off of beep sound when touching on screen for control.
- Touch to shift to previous operation mode.
- Touch to turn off the screen. When the screen is turned off, touch any portion of the screen to turn on the screen.
- Touch to shift to Bluetooth mode for operation (available when a mobile phone connected).
- Touch to shift screen to MAIN MENU.
- Hold & slide to show the hidden setup modes.
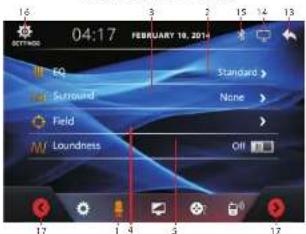
AUDIO SETUP
AUDIO SETUP MENU
[13]
- Touch to shift to AUDIO SETUP MENU.
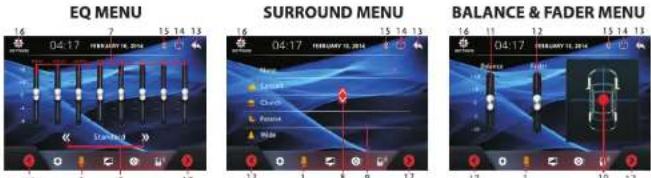
- Touch to activate EQ MENU for equalization setting.
- Touch to activate SURROUND MENU for surround setting.
- Touch to activate BALANCE & FADER MENU for sound output setting on balance & fader
- Touch to turn on or off volume control.
- Touch repeatedly to select the desired preset equalization mode.
- Touch to activate "custom" control mode. At this mode, hold & slide to set desired equalization level.
- Hold & slide to show the hidden setting modes.
- Touch to select the desired surround mode.
- Hold & slide to set the desired output level between left & right speaker as well as front & rear speaker.
- Hold & slide to adjust the output level between left & right speaker.
- Hold & slide to adjust the output level between front & rear speaker.
- Touch to shift to previous page, touch twice to shift to previous operation mode.
- Touch to turn off the screen. When the screen turned off, touch any portion of the screen to turn on the screen.
- Touch to shift to BLUETOOTH mode for BLUETOOTH operation.
- Touch to shift screen to MAIN MENU
-
Hold & slide to show the hidden setup modes.
-
Touch to turn off the screen. When the screen is turned off, touch any portion of the screen to turn on the screen.
- Touch to shift to previous page, touch twice to shift to previous operation mode.
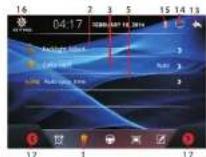
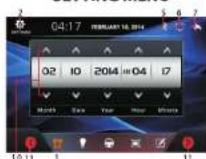
- Touch to set the clock in 12 hour format.
- Touch to set the clock in 24 hour format.
- Touch respectively to set for year, month, date, hour & minute.
- Hold & slide to show the hidden setup modes.
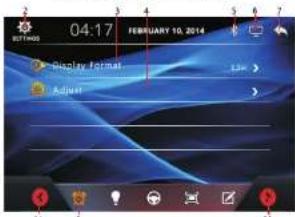
ILLUMINATION BACKLIGHT SETUP
AUTO MENU
MANUAL MENU
PRIMARY MENU
MODE MENU
ADJUST MENU
R.G.B. MENU
- Touch to shift to AUTO MENU / MANUAL MENU / PRIMARY MENU
- Touch to activate ADJUST MENU to adjust illumination backlight
- Touch to activate MODE MENU to select illumination mode (auto / manual / primary).
- Touch to select MANUAL MODE for R.G.B. colour setting.
-
When AUTO MODE selected, touch to activate AUTO CYCLE TIME INTERFACE to select the time for automatic backlight change.
-
Touch for spacing.
- Touch to confirm the input.
- Touch to shift to previous page, touch twice to shift to previous operation mode.
- Touch to turn off the screen. When the screen is turned off, touch any portion of the screen to turn on the screen.
- Touch to shift to BLUETOOTH mode for BLUETOOTH operation.
- Touch to shift screen to MAIN MENU.
- Hold & slide to show the hidden setup modes.
CALEDAR & CLOCK SETUP
CALENDAR SETUP MENU
TIME FORMAT MENU
SETTING MENU
- Touch to shift to CALENDAR SETUP MENU
- Touch to shift screen to MAIN MENU.
- Touch to activate TIME FORMAT MENU for time format setting.
- Touch to activate SETTING MENU for setting of calendar.
- Touch to shift to BLUETOOTH mode for BLUETOOTH operation.
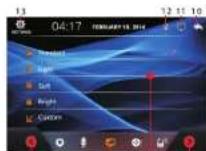
VISUAL SETUP
VISUAL SETUP MENU
PRESET VISUAL MENU
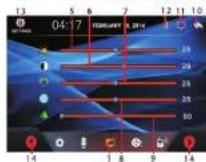
CUSTOM VISUAL MENU
- Touch to shift to VISUAL SETUP MENU.
- Touch to activate PRESET VISUAL MENU for preset visual setting.
- Touch to activate CUSTOM VISUAL MENU for visual setting.
- Touch to select the desired preset mode of screen.
- Hold & slide to adjust brightness of screen.
- Hold & slide to adjust contrast of screen.
- Hold & slide to adjust hue of screen.
- Hold & slide to adjust saturation of screen.
- Hold & slide to adjust sharpness of screen.
- Touch to shift to previous page, touch twice to shift to previous operation mode.
- Touch to turn off the screen. When the screen is turned off, touch any portion of the screen to turn on the screen.
- Touch to shift to BLUETOOTH mode for BLUETOOTH operation.
- Touch to shift screen to MAIN MENU.
- Hold & slide to show the hidden setup modes.
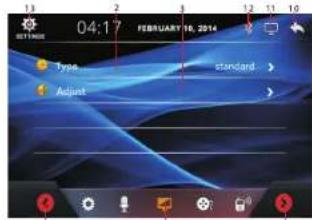
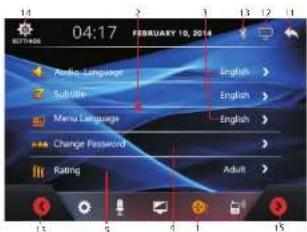
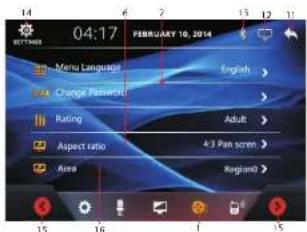
MEDIA SETUP
MEDIA SETUP MENU
MEDIA SETUP MENU
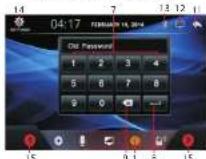
KEY BOARD MENU
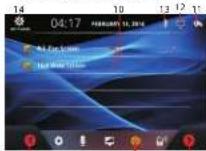
SCREEN RATIO MENU
- Touch to shift to MEDIA SETUP MENU
- Hold & slide to show the hidden setting modes.
- Before inserting a DVD for playback, touch to set the desired audio language, subtitle and menu language provided the DVD recorded with relative sources. (Note: Settings are not activated during DVD playback)
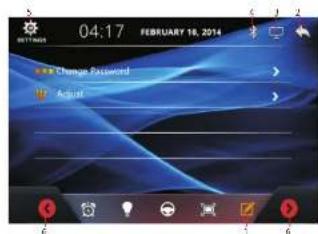
- Touch to activate KEY BOARD MENU for password changing. (Default password "0000" or "8888")
- Touch to activate KEY BOARD MENU to input password in order to select rating for video playback. (Default password "0000" or "8888")
- Touch to activate SCREEN RATIO MENU to select aspect ratio of screen for viewing.
- Touch to input number.
- Touch to confirm the number input.
- Touch to erase the digit input by error.
-
Touch to select aspect ratio of screen for viewing.
-
Touch to shift to previous page. Touch twice to shift to previous operation mode.
- Touch to turn off the screen. When the screen is turned off, touch any portion of the screen to turn on the screen.
- Touch to shift to BLUETOOTH mode for BLUETOOTH operation.
-
Touch to shift screen to MAIN MENU.
-
Hold & slide to show the hidden setup modes.
- Touch to activate KEYBOARD MENU to input password and enter to the REGION INTERFACE to set for the DVD area code. (Default password '0000' or "8888")
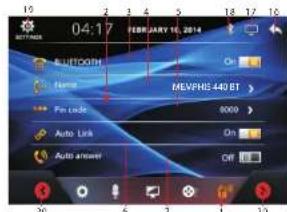
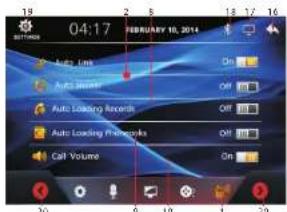
BLUETOOTH SETUP
BLUETOOTH SETUP MENU BLUETOOTH SETUP MENU
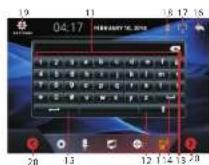
KEY BOARD MENU
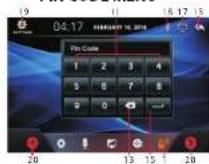
PIN CODE MENU
- Touch to shift to BLUETOOTH SETUP MENU.
- Hold & slide to show the hidden setting modes.
- Touch to turn on or off of BLUETOOTH operation mode.
- Touch to activate KEY BOARD MENU for renaming the device (default name "CAR-KIT"; "CAR BT" or similar).
- Touch to activate PIN CODE MENU for changing the pin code of the device (default password "0000").
- Touch to turn on or off auto linking between the car unit and mobile phone.
- Touch to turn on or off auto answer when receiving incoming call.
- Touch to turn on or off to allow recording of incoming calls / dial out calls / missing calls of the mobile phone to the car unit.
- Touch to turn on or off to allow loading phone book of the mobile phone to the car unit.
-
Touch to turn on or off the default ring tone level for incoming call.
-
Touch to input the new name of the device and change of new pin code.
- Touch to shift between uppercase or lowercase letters
- Touch to erase the digit / letter input by error.