
SA-SR3S - Soundbar SONY - Gratis brugsanvisning og manual
Find enhedens vejledning gratis SA-SR3S SONY i PDF-format.


Brugerspørgsmål om SA-SR3S SONY
0 spørgsmål om dette apparat. Besvar dem du kender, eller stil dit eget.
Stil et nyt spørgsmål om dette apparat
Download vejledningen til din Soundbar i PDF-format gratis! Find din vejledning SA-SR3S - SONY og tag din elektroniske enhed tilbage i hånden. På denne side er alle dokumenter nødvendige for brugen af din enhed offentliggjort. SA-SR3S af mærket SONY.
BRUGSANVISNING SA-SR3S SONY
SONY®
Rear Speaker

SA-RS3S
[NO TEXT]
5 2 8 1 1 * (1)
About compatible
models for the rear
speaker
The SA-RS3S rear speaker works only with the
specified model. For information about compatible models, visit Sony's website.
In these Operating Instructions, the operations are
described for speakers used with the compatible model HT-A7000.
Parts and Controls
Front

1 Power indicator
- Flashes slowly (green): The rear speaker is not connected to a compatible model.
connected to a compatible model. – Lights up (green): The rear speaker is connected
to a compatible model.
- Flashes twice repeatedly (green): The rear speaker is attempting to connect to a compatible
speaker is attempting to connect to a compatible model.
- Flashes/lights up (amber): The software is updating
- Lights up (red): The rear speaker is in standby
mode.
– Turns off; The rear speaker is turned off.
Note The b
The brightness of the power indicator synics with the DIMMER settings of a compatible model.
D
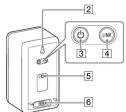
② Wall mount hole
③ (power) button
④ LINK button ⑤ Mounting hole for the general speaker stand
⑤ Mountain ⑥ AC inlet
5-011-528-11[1]
©2021 Sony Corporation Printed in Malaysia
Installation
Installing on the Floor
The following illustration is the installation example
to use the speakers with the compatib
HT-A7000 and an optional subwoofer.
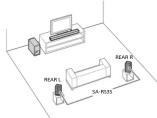
- Check the right and left rear speakers using the
- Check the right and left rear speakers using the label on the bottom of them.
"REAR R" is for the right, "REAR L" is for the left.
2 Install the speakers behind your listening
position. The following installations are recommended to
The following installations are recommended to enjoy the surround sound effectively.
- Align the height position of the speaker with
- Turn the speakers to your listening position.
Note
Lay the bottom (the face on which there is a label)
down to install the speaker. Installations other than
above are not supported.
Tip To obtain a good surround sound, set the speaker
distance from your listening position by using the
setup menu of a compatible model. For details, refers to the Operating Instructions
For details, refer to the operating instructions supplied with a compatible model.
Mounting on the Wall
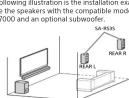
The following illustration is the installation example to use the speakers with the compatible model HT-A7000 and an optional subwoofer.
Note
- Have the installation done by a Sony dealer or licensed competitor and now special attention to
licensed contractor and pay special attention to safety during the installation.
- Sony shall not be held responsible for accidents or
damage caused by improper installation, insufficient wall strength, improper screw
installation or natural disaster, etc
1 Prepare a screw (not supplied) that is suitable for the wall mount hole on the rear of the
s w kers
A
4mm
More than 20 mm

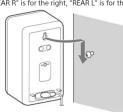
2 Decide the wall mounting position of the speaker and fasten the screw there.

3 Hang the wall mount hole on the screw.
Check the label on the bottom of the speakers. "REAR B" is for the right. "REAR I" is for the left
Note
Prepare screws (not supplied) that are suitable for
the wall material and strength. As a plasterboard wall is especially fragile, attach the screens securely in the
is especially magic, October the screws securely in the wall beam. Mount the speakers onto a reinforced
wall making sure that the heights of the right and left
speakers are equal.
Convection
Connection
11p K
You can connect the optional subwoofer with a compatible model in the following way when
ins
1 Turn on a compatible model.
?
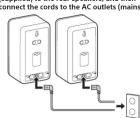
Connect the AC power cords (inatts leads) (supplied) to the rear speakers, and then
3
- In line sure that the power indicators on the speakers light in green.
When the power indicators light in green, the
connection between the speakers and a compatible model is established.
If the connection is not established, connect the
speakers to a compatible model manually. For details, see "If the Connection is not Established
details, see "if the connection is not established Automatically".

If the Connection is not Established
Automatically
If you cannot connect the speakers to a compatible
model automatically or you use multiple compatible models and want to specify the compatible model.
models and want to specify the compatible model for connecting the speakers, perform the manual
connection.
The following operation is described for speakers used with the compatible model HT-A7000. Use the
used with the compatible model 1400. Use the remote control supplied with the compatible model
HT-A7000 when performing this operation.
If you use other compatible models, refer to the Operating Instructions supplied with them.
- Press HOME
The home menu appears on the TV screen.
- SelectSetup] - [Advanced Settings] on the
- Home menu. (Advanced Settings) on the home menu.
3 Select [Speaker Settings] - [Wireless Speaker
Settings] - [Start manual linking].
The [Start manual linking] screen appears on the TV screen.
4 Press LINK on the speaker
The power indicator of the speaker that had LINK
pressed flashes twice repeatedly in green.
5 Select [Start].
The manual link starts.
The connecting process appears on the TV screen. To cancel the manual link, select [Cancel].
6 When [Rear Speaker (B)] and [Rear Speaker (L)]
- Which [near spot another (n)] and [near spot other (a)], display [Connected], select [Finish].
7 Press
The link is established and the power indicator of
the speakers lights in green.
Note 1. If you perform [Start manual linking] [Link mode]
- If you perform [Start manual linking], [Link mode] of [Wireless Speaker Settings] is set to [Manual]
automatically.
• Only the speakers for which [Connected] has been displayed in Step 6 connect to a compatible model
If the connection of the speakers cannot be
established, perform the manual connection again
1998.12.30
If Wireless Transmission is Unstable
If you use multiple wireless systems, such as a
wireless LAN, the wireless signals may become unstable. In this case, the transmission may be
orrstable. In this case, the transmission may be improved by changing the following setting.
The following operation is described for speakers
used with the compatible model HT-A7000. Use the remote control supplied with the compatible model
HT-A7000 when performing this operation.
If you use other compatible models, refer to the
Operating instructions supplied with them.
Press HOME. The home may appear on the TV/season
The home menu appears on the TV screen.
2 Select setup] - [Advanced Settings] on the home menu.
- Select [Speaker Settings] - Wireless
3 Select [Speaker Settings] - [Wireless Speaker Settings] - [RF Channel].
4 Select the setting you want.
• [On] (default setting): Normally select this. The
system automatically selects the better channel
for transmission. Stronger mode for wireless interference.
- [Off]: The system selects a channel from the
limited frequency band to prevent external wireless interference. If sound dropping occurs
wireless interference. If sound dropping occurs while [On] is selected, it may be improved by
selecting [Off].
Note
• If you change the [RF Channel] setting from [Off] to [On], it may take 1 minute to reconnect
• A compatible model may not meet this setting
depending on countries/regions where you purchase it
purchase it.
Troubleshooting
If you experience any of the following difficulties
while using the rear speakers, use this
troubleshooting guide to help remedy the problem before requesting repairs. Should any problem
persist, consult your nearest Sony dealer.
Be sure to bring all of your rear speakers, compatible model and optional subproofs.
compatible model and optional subwoofer (not supplied) even if it seems as though only one has a
problem, when you request to repair.
The following solutions are described for speakers used with the compatible model HT-A7000.
If you use other compatible models, refer to the
Operating Instructions supplied with them.
No sound is heard from the rear speakers. please refer to [Software License Information] under
→ Make sure the AC power cord (mains lead) of the smart speaker is connected properly. [Setup] - [Advanced Settings] - [System Settings] on the home menu
If the power indicator on the rear speaker does not. The square code for
light, try the following. The source code for the software used in this product is subject to the GPL and LGPL, and is available on
- Make sure the AC power cord (mains lead) of the rear speakers is connected properly.
- Press ⏻(power) of the rear speaker to turn on URL: http://oss.sony.net/Products/1.inux
the power.
If the power indicator on the rear speaker flashes slowly in green or lights in red, try the following. Please note that Sony cannot answer or respond to any inquiries regarding the content of this source.
- Move the rear speaker to a location near a code.
compatible model so that the power indicator on the power markets lights in euro. All other trademarks are trademarks of their
the rear speaker lights in green. – Follow the steps in "If the Connection is not respective owners.
Established Automatically."
- Check the wireless connection status. refer to the Operating Instructions sum
To be the operating instructions supplied with a compatible model. Do not install the speakers in a confined space, such
→ If the power indicator on the rear speaker flashes as a bookcase or built-in cabinet.
In red, press Ⓗ (power) of the rear speaker to turn off the power and check whether the ventilation. To reduce the risk of fire, do not cover the ventilation opening of the speaker with appearance.
holes of the rear speaker is blocked or not. Opening of the speakers with newspapers, tablecloths, curtains, etc.
→ Press REAR ≅ + on the remote control of a Do not expose the speakers to naked flame sources
compatible model to increase the volume of the rear speakers. (for example, lighted candles).
→ If you change the [RF Channel] setting of a To reduce the risk of fire or electric shock, do not
compatible model from [Off] to [On], it may take 1 minute for the sound to be output. Expose these speakers to dripping or splashing, and do not place objects filled with liquids, such as vases.
minute for the sound to be output. On the speakers. → If the power indicator flashes in red, disconnect
- If the power indicator hashes in red, disconnect the AC power cord (mains lead) of the rear speaker The speakers are not disconnected from the mains as
from the AC outlet (mains) and reconnect it again. long as they are connected to the AC outlets, even if
Sound skips or has noise. the speakers themselves have been turned off.
→ If there is a device nearby that generates electromagnetic waves, such as a wireless LAN or As the main plug is used to disconnect the speakers from the mains, connect the speakers to an early
electromagnetic waves, such as a wireless LAN or a microwave oven in use, locate the rear speakers from the mains, connect the speakers to an easily accessible AC outlet. Should you notice an
and a compatible model apart from that device. abnormality in the speakers, disconnect the main
If there is an obstacle between a compatible model and the rear sneakers, move or remove the plug from the AC outlet immediately.
Obstacle. Do not place this product close to medical
→ Locate a compatible model and the rear speakers devices
as close as possible. This product (including accessories) has magnet(s) Switch the network connection of the TV or Blu-ray which may interfere with paremakers, programmable
Switch the network connection of the TV of Bid-Tay Disc player from wireless to wired. which may interfere with subcutaneous, programised shunt valves for hydrocephalus treatment, or other
medical devices. Do not place this product close to persons who use such medical devices. Consult your
Specifications persons who use such medical devices. Consult your doctor before using this product if you use any such
Specifications medical device.
POWER OUTPUT (rated)
30 W + 30 W (at 6 ohms, 1 kHz, 1% THD) POWER OUTPUT (reference) For the sneakers
POWER OUTPUT (REFERENCE) 50 W (per channel at 6 ohms, 1 kHz) The nameplates are located on the bottom of the
Speaker system speakers.
2-way 2 speaker system For models with the CE marking or UKCA
Bass reflex marking located on the speakers
Speaker The validity of the CE marking is restricted to only
Wooter: 46 mm×54 mm cone type those countries where it is legally enforced, mainly in Tweeter: 16 mm dome type the countries EFA (European Economic Area) and
Power requirements Switzerland.
220 V - 240 V AC, 50 Hz/60 Hz The validity of the UKCA marking is restricted to only those countries where it is legally enforced, mainly in
Power consumption those countries where it is regularly chorced, mainly in the UK.
On: 11 W
Standby mode: 1 W or less Turned off: 0.5 W or less
Dimensions (w/d/d) / ar
100 mm × 187 mm × 100 mm (pro)
included)
Mass (approx.)
1.1 kg
Wireless transmitter/receiver section
Communication system
Wireless Sound Specification Version 4.0
Frequency band
5 GHz Modulation method
Modulation method OEDM
Radio
Radio Frequency Bands and Maximum Output Power
Freq
5150 - 5250 MHz < 18 dBm 5250 - 5350 MHz < 18 dBm 5470 - 5600 MHz < 18 dBm 5650 - 5725 MHz < 18 dBm 5725 - 5850 MHz < 13.98 dBm
Included items
- Rear speaker R (1), Rear speaker L (1)
• AC power cords (mains leads) • Operating Instructions (1)
(1) 3 (2)
Important information
on software
This product contains software that is subject to the
GNU General Public License ("GPL") or GNU Lesser General Public License ("LGPL"). These establish that
general Public License ("LGF"). These establish that customers have the right to acquire, modify, and
redistribute the source code of said software in
accordance with the terms of the GPL or the LGPL.
For the method to confirm the GPL, LGPL and other software licenses contained in the rear speakers.
software licenses contained in the real speakers, please refer to the Operating Instructions of a
compatible model.
When you use the compatible model HT-A7000, please refer to [Software License Information] under
[Setup] - [Advanced Settings] - [System Settings]
on the home menu.
The source code for the software used in this produc
is subject to the GPL and LGPL, and is available on the Web. To download, please access the following:
URL:
http://ass.sony.net/Products/Linux
Please note that Sony cannot answer or respond to
any inquiries regard code
All other trademarks are trademarks of the
All other trademarks respective owners.
(1) 2017年1月1日,公司与关联方发生的交易金额为人民币4,000万元。
WARNING
Do not install the speakers in a confined space, such
as a bookcase or built-in cabinet.
To reduce the risk of fire, do not cover the ventilation
opening of the speakers with newspapers, tablosloths, curtains, etc.
Do not expose the speakers to naked flame sources
(for example, lighted candles).
To reduce the risk of fire or electric shock, do not
expose these speakers to dripping or splashing, and do not place objects filled with liquids, such as vases
do not place objects lined with liquids, such as vases on the speakers.
The speakers are not disconnected from the mains a
long as they are connected to the AC outlets, even if
the speakers themselves have been turned off.
As the main plug is used to disconnect the speakers
from the mains, connect the speakers to an easily accessible AC outlet. Should you notice an
abnormality in the speakers, disconnect the main
plug from the AC outlet immediately.
Do not place this product close to medical
devices
This product (including accessories) has magnet(s) which may interfere with accessories, nor requires
which may interfere with pacemakers, programmable shunt valves for hydrocephalus treatment, or other
medical devices. Do not place this product close to
persons who use such medical devices. Consult your doctor before using this product if you use any such
Medical device.
Indoor use only
For the speakers
The nameplates are located on the bottom of the
speakers.
For models with the CE marking or UKCA
marking located on the speakers
The validity of the CE marking is restricted to only
those countries where it is legally enforced, mainly in the countries EFA (European Economic Area) and
the Beatrix 221 (European Business) and Switzerland.
The validity of the UKCA marking is restricted to only those countries where it is legally enforced, mainly in
those counties where it is legally honored, mainly in the UK.
For the customs
For the customers in Europe
Notice for customers: the following
information is only applicable to
equipment sold in countries applying EU diestives and/or UK applying relevant
directives and/or OK ap, statutory requirements
Statutory Requir
This product has been manufactured by or on behalf of Sony Corporation.
of Sony Corporation
EU and UK Importer: Sony Europe B.V.
Mærke : SONY
Model : SA-SR3S
Kategori : Soundbar