BPDW8913WR - Kamera BLAUPUNKT - Gratis brugsanvisning og manual
Find enhedens vejledning gratis BPDW8913WR BLAUPUNKT i PDF-format.

Brugerspørgsmål om BPDW8913WR BLAUPUNKT
0 spørgsmål om dette apparat. Besvar dem du kender, eller stil dit eget.
Stil et nyt spørgsmål om dette apparat
Download vejledningen til din Kamera i PDF-format gratis! Find din vejledning BPDW8913WR - BLAUPUNKT og tag din elektroniske enhed tilbage i hånden. På denne side er alle dokumenter nødvendige for brugen af din enhed offentliggjort. BPDW8913WR af mærket BLAUPUNKT.
BRUGSANVISNING BPDW8913WR BLAUPUNKT

BLAUPUNKT
BPDW8913WR
2.4GHz Digital Wireless Car Rearview System

Enjoy it.
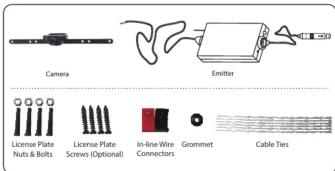
Packing List
Specifications
WIFI car rear view
| Items | GL8912 |
| Power Supply | 12V DC |
| Consumption Current | 150mA MAX |
| Video output | 0.9~1.2Vp-p 75Ω |
| Night Vision Range | >3m |
| Image Sensor | 1/4inch CMOS |
| Effective Pixels | 640×480 pixels |
| Video Format | NTSC/PAL |
| Electronic Exposure Time | 180s-12ms(NTSC) sec |
| 150s-12.5ms(PAL) sec | |
| Minimum illumination | <5 Lux |
| Horizontal View Angle | 80° |
| Operation Temperature | -10~+50°C |
| Storage Temperature | -20~+60°C |
| Operation Humidity | 15%~85%RH |
| Dimensions | 370 X 55 X 35MM |
| Weight | 140g |
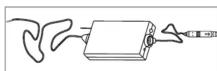
WIFI transmitter box
| Items | GT406B |
| Operation Voltage | 12V DC |
| Operation Current | 150mA(MAX) |
| Operation Frequency | 2400-2483.5MHz |
| Wireless Protocol | IEEE 802.11b, IEEE 802.11g, IEEE 802.n(171R Modes) |
| Encryption Mode | WPA2 |
| Modulation Mode | 802.11b : DSSS (CCK, DCPSK, DBPSK/802.11gm : OFDM(BPSK, QPSK, 16QAM, 64QAM) |
| Transmission Distance With No Obstacle | ≥slant 10m |
| Weight | 60z5g |
| Dimensions | 71 X 35.5 X 12.3MM |
| Operation Temperature | -10~+50°C |
| Storage Temperature | -20~+60°C |
| Operation Humidity | 20%~90%RH |
* All the specifications are subject to minor change without prior notice
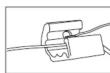
Installation
Installation instructions for the camera:
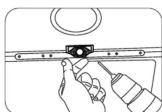
. In the proper position of rear license plate drill a hole for mounting screws
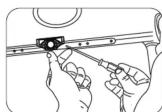
- Use a Screwdriver to ensure that the first screw is properly screwed into the drill hole
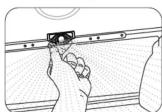
- Move the camera orientation to adjust the display effect
- After adjustment, drill a second hole, then mount and tighten to finish camera installation
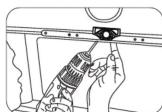
Installation instructions for the emitter:
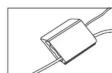


When the camera is fixed, put the lead-wire of the camera through the car trunk.
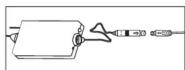
Notice
* The positive and negative pole of the emitter box's power cable are connected to the positive and negative pole of the rear lamp of the car.
* Never reverse the positive and negative pole. Reversing the poles
can damage the emitter box and camera, rendering them unusable.
* The antenna of the emitter box should not be placed near any metal part of the car.
This can negatively effect the emitting distance and image transmission
Operations for Android system client
Installation app Software
-
Turn on the Andriod Phone and enter the Google Play Store
-
Search "Sight Wifi" app.
-
Install the "Sight Wifi" a

◆ Connection WiFi:
-
Click on the "icon."
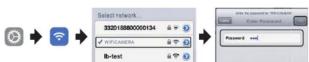
-
Click on "Wi-Fi", then select the camera to connect too. The initial SSID of the device is "WIFICAMERA". Then type in the password of the devices (Default password: 8888888)
(2.2.20, 2017)

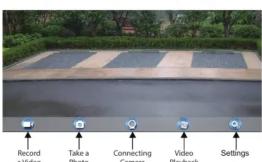
View the video:
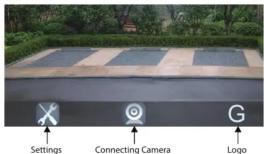
Open the 📄 APP, if the connection between the wifi tool and the mobile device is successful the app will be highlighted. Then the image would be transmitted from the camera to the 📄 app. As shown in the figure below, the camera is showning real-time monitoring in the app. The user would also be able to press 📄 icon to refresh the image
Notice
* When set WIFI signal to connect the mobile phone, please close the WIFI signal previously opened. * image display time is relate to the CPU, memory, software version, working software number of mobile phone. * when the background is black or the image is still, please exit the APP, and check whether the wifi connection is normal. then click again the APP icon to enter in the software interface.
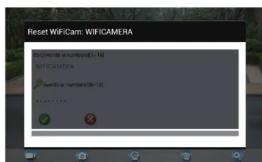
Settings:
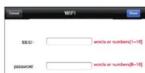
Press this 📄 icon to enter into the settings menu you can change the default factory SSID
and password of the wifi camera tool, and clicking √ will show whether the change is successful, and clicking ✗ to cancel the new SSID set.
Notice
* User could press the RESET button of the emitter to renew the default factory
SSID and password.
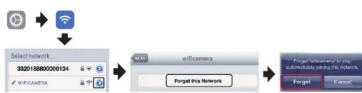
* When the user changes the SSID and password, the user shall forget the network in the
Settings, and then reconnect the new network. Otherwise login error will remain displayed.
The specific steps to clear network memory are as follows, and then follow the above WIFI connection method to reconnect the new network.

Operations for iOS Apple system client
Installation app Software
-
Turn on the iOS device and enter the App Store
-
Search "Sight Win" app.
-
Install the Sight Wih app
◆ Connection WiFi:
-
Click on the "icon in the main interface of the iOS device."
-
Click on "Wi-Fi", then select the camera to connect too. The initial SSID of the device is "WIFICAMERA". Then type in the password of the devices (Default password: 88888888).
View the video:
Open the 📊 APP, if the connection between the wifi tool and the mobile device is successful the app will be highlighted. Then the image would be transmitted from the camera to the 📊 app. As shown in the figure below, the camera is showning real-time monitoring in the app. The user would also be able to press 📊 icon to refresh the image
Notice
* When set WIFI signal to connect the mobile phone, please close the WIFI signal
previously opened.
* image display time is relate to the CPU, memory, software version, working software numbers of mobile phone.
software number of mobile phone.
when the background is black of the image is still, please exit the APP, and check whether the wifi connection is normal. then click again, the APP icon, to enter into
the software interface.
Settin


Press this icon to enter into the settings menu. You can change the default factory SSID and password of the wifi camera tool, and clicking will show whether the change is successful, and clicking to cancel the new SSID set.
Notice
* User could press the RESET button of the emitter to renew the default factory
SSID and password.
* When the user changes the SSID and password, the user shall forget the network in the
"Settings", and then reconnect the new network. Otherwise login error will remain displayed.
The specific steps to clear network memory are as follows. and then follow the above WIFI connection method to reconnect the new network.