Honor 8 Pro - Smartphone HUAWEI - Gratis brugsanvisning og manual
Find enhedens vejledning gratis Honor 8 Pro HUAWEI i PDF-format.


Brugerspørgsmål om Honor 8 Pro HUAWEI
0 spørgsmål om dette apparat. Besvar dem du kender, eller stil dit eget.
Stil et nyt spørgsmål om dette apparat
Download vejledningen til din Smartphone i PDF-format gratis! Find din vejledning Honor 8 Pro - HUAWEI og tag din elektroniske enhed tilbage i hånden. På denne side er alle dokumenter nødvendige for brugen af din enhed offentliggjort. Honor 8 Pro af mærket HUAWEI.
BRUGSANVISNING Honor 8 Pro HUAWEI
honor8Pro
User Guide
Contents
Foreword
Unboxing your Phone
Inserting a SIM card and microSD card 2
Charging your device 2
Quick charging 4
Viewing the battery status 5
Watch VR videos 5
Getting Started
Initial setup 7
Enabling or disabling a SIM card 7
Naming a SIM card 8
Selecting the default mobile data SIM 8
Setting the default SIM card 8
Connecting to the Internet 9
Transferring data from another device 10
Viewing recommended settings 11
Screen and Display
Home screen 12
Locking and unlocking the screen 21
Notification panel and status bar 23
Navigation bar 26
Themes 28
Global search 28
Screenshot 30
Screen recording 35
Split-screen mode 37
Using motion gestures 41
Eye comfort mode 42
Display settings 43
Network and Sharing
Mobile Internet 45
Wi-Fi 47
Bluetooth 49
NFC 50
Multi-screen 52
VPNs 53
HiSuite 54
Using Huawei Share to transfer files between two Huawei devices
Using a USB port to transfer data 55
Security and Backup
Fingerprint recognition 59
Multi-user accounts 60
Security settings 62
Backing up and restoring data 63
File management 65
Camera and Gallery
Camera options 70
Photos and video recordings 70
Object recognition and Pro camera mode 74
Wide aperture mode 75
Monochrome mode 76
Beauty mode 76
Perfect Selfie mode 76
Slow motion recording 77
Time-lapse mode 77
Adding watermarks to photos 77
Audio notes 78
Managing shooting modes 78
Configuring the camera settings 79
Viewing photos and videos 80
Organising albums 81
Sharing photos and videos 82
Editing a photo 82
Editing Videos 84
Configuring Gallery 85
Calls and Contacts
Making calls 87
Answering calls 89
Making a conference call 91
In-call options 92
Managing call logs 93
Call settings 94
Creating a contact card 96
Creating a new contact 97
Importing and exporting contacts 99
Managing contacts 100
Searching for contacts 102
Sharing contacts 103
Adding a contact to your favourites 103
Changing contact photos 104
Viewing call records for individual contacts 104
Assigning a ringtone to a contact 104
Contact groups 104
Messaging and Email
Sending a message 106
Replying to a message 106
Searching for messages 107
Deleting message threads 107
Managing messages 107
Returning to the top of the message list 107
Pinning messages to the top of the list 108
Marking messages as read 108
Blocking spam messages 108
Adding a message signature 108
Configuring the message ringtone 108
Identifying malicious URLs in text messages 109
Adding an email account 109
Sending emails 110
Replying to emails 110
Managing emails 110
Searching emails 111
Managing VIP contacts 111
Managing email accounts 112
Configuring Mail 112
Calendar and Notepad
Changing the calendar view 114
Viewing global holidays 114
Birthday reminders 114
Syncing events 115
Creating an event 115
Sharing events 115
Deleting an event 116
Searching for events 116
Sending event invitations 116
Creating a note 116
Managing notes 117
Backing up notes 118
Music and Video
Listening to music 119
Searching for music 119
Deleting songs 120
Creating a playlist 120
Playing a playlist 120
Playing a video 120
Phone Manager
Optimising performance 122
Enhancing speed 122
Managing data usage 122
Harassment filter 123
Battery management 124
Managing app permissions 125
Virus scanner 125
Encrypting apps 125
Setting apps to close automatically when the screen is locked 126
Configuring Phone Manager 126
Tools
Logging in to two social media accounts at the same time 127
Clock 127
Sound recorder 130
System Features and Settings
Power on and off timer 132
Restarting your device 132
Changing the system language 132
Changing the input method 132
Input method settings 133
Editing text 133
Airplane mode 134
Configuring the sound settings 134
One-hand mode 136
Gloves mode 137
Do not disturb mode 137
Setting up an account 138
Viewing memory and storage information 139
Setting the date and time 139
Enabling location access 139
Restoring factory settings 140
OTA updates 140
Viewing product information 141
Accessibility features 142
Obtaining help
Personal Information and Data Security
List of safety features
Legal Notice
Foreword
Read this guide carefully before using your device.
All pictures and illustrations in this document are for your reference only and may differ from the final product.
Some features in this guide may not be supported by certain devices or carriers.
Symbols and definitions
| i | Description | Highlights important information and tips, and provides additional information. |
| ! | Reminder | Indicates potential problems that may arise if proper care or attention is not given, such as device damage or data loss. |
| ∅ | Warning | Warns you about potential hazards that could cause serious injury. |
Unboxing your Phone
Inserting a SIM card and microSD card
Your phone features a 2-in-1 SIM card slot. You can insert two nano-SIM cards, or one nano-SIM card and one microSD card.
- The SIM card slot only supports nano-SIM cards. Contact your network provider for a new or replacement nano-SIM card.
- Only use standard nano-SIM cards to avoid damaging the SIM card tray.
- Ensure that the card is in the correct position and keep the card tray level when inserting it into your device.
- Be careful not to hurt yourself or damage your device when using the SIM eject pin.
- Store the SIM eject pin out of the reach of children to prevent accidental swallowing or injury.
- The SIM eject pin should only be used to eject the SIM card tray. Inserting the SIM eject pin into other holes may damage your device.
1 Touch and hold the power button and touch ⏻ to turn off your device.
2 To remove the card tray, insert the SIM eject pin included with your device into the small hole next to the card tray.

3 Insert a SIM card or microSD card into the card tray.
4 Insert the card tray back into your phone in the correct orientation.
Charging your device
Your device displays a low battery warning when the battery is nearly empty. Charge your device immediately to prevent it from switching off automatically.
Using a charger to charge your device
Connect your device to a socket using the factory-provided charger and USB cable.
You must use the charger and USB cable that came with your device for quicker charging speeds. Using other chargers or USB cables may cause your device to continuously restart or increase the charging time. It may also cause the charger to overheat, or even damage your device.
- If your device does not respond when you press the power button, the battery is probably empty. Charge your battery for at least 10 minutes (use the charger that came with your device), and then restart your device. - Your device automatically conducts a safety check when you connect it to a charger or other devices. If your device detects that the USB port is wet, it will automatically stop charging and display a safety message. If this message is displayed, unplug the USB cable from your device and allow the USB port to dry out completely to avoid damaging your device or battery.
Using a USB port to charge your device
If you do not have access to a charger, you can charge your device by connecting it to a computer with a USB cable.
1 When you use a USB cable to connect your device to a computer or another device, Allow access to device data? will be displayed in a popup dialog.
2 Touch No, charge only.
If another USB connection mode has been selected, swipe down from the status bar to open the notification panel. Touch File transfer via USB, and then select Charge only.
Using your USB Type-C port to charge other devices
USB Type-C connectors are reversible and can be inserted either way up. It is possible to use your device to charge another device with a USB Type-C cable.
1 Use a USB Type-C cable to connect your device to the other device.
2 On your device, swipe down from the status bar to open the notification panel, and then set the USB connection mode to Reverse charging.
3 On the other device, set the USB connection mode to Charge only.
To use another device to charge your device, set the USB connection mode to Charge only on your device, and then set the USB connection mode on the other device to Reverse charging.
Safety information
- Only use genuine Huawei batteries, chargers, and USB cables to charge your device. Third-party accessories are a potential safety hazard and may impair your device's performance.
-
You can recharge your battery many times, but all batteries have a limited lifespan. If you notice a significant deterioration in your device's battery life, purchase a genuine Huawei replacement battery. Do not attempt to remove built-in batteries. If your device has a built-in battery, contact an authorised Huawei service centre for a replacement. If the battery is removable, replace it with a genuine Huawei battery.
-
Your device may become warm after prolonged use or when exposed to high ambient temperatures. If your device becomes hot to the touch, stop charging it and disable unnecessary features. Place your device in a cool location and allow it to cool down to room temperature. Avoid touching the surface of your device for prolonged periods when it becomes hot.
- Charging times may vary depending on the ambient temperature and the remaining battery level.
- Avoid using your device when it is charging. Do not cover your device or the charger.
For more information on charging and battery care, visit http://consumer.huawei.com/ and search for your device's user guide.
Battery status information
The battery status is indicated by your device's indicator light and the battery icon in the status bar.
| Status indicator Battery icon Battery status | ||
| Blinking or steady red | Less than 4% remaining | |
| Red Charging, less than 10% remaining | ||
| Orange Charging, 10–90% remaining | ||
| Green Charging, at least 90% remaining. If 100% is displayed next to the battery icon in the status bar, or a charging complete message is displayed on the lock screen, this indicates that charging is complete. | ||
Quick charging
Your device supports quick charging technology. This allows your device to automatically adjust the charging voltage and current for shorter charging times.
You must use the charger and USB cable that came with your device to use the quick charge feature. Using other chargers or USB cables may cause your device to continuously restart or increase the charging time. It may also cause the charger to overheat or damage your device or battery.

natural_image
Pure electrical circuit lines without any symbolsViewing the battery status
You can view the battery status and configure the status bar to display the remaining battery percentage.
Viewing the battery status
The battery status is indicated by the battery icon in the status bar.
Open Phone Manager.Touch to view the remaining battery percentage and usage time.
Displaying the remaining battery percentage in the status bar
You can display the remaining battery percentage in the status bar in two ways:
- Open Phone Manager.Touch and switch on Remaining battery percentage.
- Open Settings. Touch Notification & status bar > Battery percentage. Select Next to icon or In icon to display the remaining battery percentage in the chosen location. Select Do not show if you do not want the remaining battery percentage to be displayed.
Watch VR videos
Use the box that came with your phone as a viewer to watch VR videos on your phone.
1 Insert the lenses into the cardboard viewer. The curved side of the lenses should face inwards.
2 Place your phone into the cardboard viewer, and then watch the video in the viewer.

flowchart
graph LR
    A["3D Box Closure"] --> B["3D Box Splitter"]
    B --> C["3D Box Pulling"]
    C --> D["3D Box Separation"]
    D --> E["3D Box Final Splitter"]
Getting Started
Initial setup
- Ensure that the SIM card is inserted correctly before using your phone for the first time. Read the Quick Start Guide for more information on how to set up your phone.
- Press and hold the power button to turn on your device. Follow the onscreen instructions to complete the initial setup.
1 Select your language and region and touch NEXT.
2 Read the content carefully, accept the user terms and conditions, and then touch AGREE > AGREE.
3 Read the app permission information. Select AGREE and touch NEXT.
4 Read the service policy. Select AGREE and touch NEXT.
5 Your device will automatically search for available Wi-Fi networks. Follow the onscreen instructions to connect to a network.
6 Read the Google terms and conditions and touch NEXT.
7 You can configure your device in two ways:
- Follow the onscreen instructions to restore a backup.
- Follow the onscreen instructions to copy data from another device, or touch SET UP AS NEW PHONE > OK to skip this step.
If you choose to skip this step, you can still import data from another device later by touching Settings > Advanced settings > Data transmission.
8 Your device has a fingerprint sensor. Follow the onscreen instructions to add your fingerprint. Before adding your fingerprint, you will be prompted to create a PIN or password which you can use to unlock the screen if fingerprint recognition fails.
9 Touch GET STARTED to complete the settings. Your device is now ready to use.
Enabling or disabling a SIM card
Enable or disable your SIM card for easier usage and management.
i This feature is only available on dual SIM phones.
1 Open Settings.
2 Touch Dual SIM settings.
3 Toggle the switch next to the SIM card you want to manage to enable or disable this SIM card.

i Disabled SIM cards cannot be used to make calls, send messages, or access the internet.
Naming a SIM card
By default, each SIM card is named after the network provider. You can rename your SIM card to make it easier to identify.
i • This feature is only available on dual SIM phones.
- Features may vary depending on your network provider.
1 Open Settings.
2 Touch Dual SIM settings
3 Select a SIM card. Enter a name and touch OK.
Selecting the default mobile data SIM
You can select a default SIM card for mobile data services.
i • This feature is only available on dual SIM phones.
- Features may vary depending on your network provider.
1 Open Settings.
2 Touch Dual SIM settings.
3 Toggle the switch Default mobile data next to the selected SIM card.
Setting the default SIM card
You can select a default SIM card for outgoing calls.
i This feature is only available on dual SIM phones.
1 Open Settings.
2 Touch Dual SIM settings.
3 Touch Default calling SIM and select your desired SIM card.
After you have selected the default SIM card, SIM 1 and SIM 2 will no longer be displayed on the dialler.
Connecting to the Internet
Connect to Wi-Fi networks effortlessly with your device.
Connecting to a Wi-Fi network
1 Swipe down from the status bar to open the notification panel.
2 Touch and hold 📤 to open the Wi-Fi settings screen.
3 Switch on Wi-Fi. Your device will list all available Wi-Fi networks at your location.
4 Select the Wi-Fi network you want to connect to. If you select an encrypted network, you will also need to enter the Wi-Fi password.

Connecting using mobile data
Before using mobile data, ensure that you have a data plan with your network provider to avoid incurring excessive data charges.
1 Swipe down from the status bar to open the notification panel.
2 Touch ^14 to enable mobile data.
i Disable mobile data when not required so as to save battery power and reduce data usage.
Transferring data from another device
Import data from another phone in a few simple steps.
Copying data to your new device

flowchart
graph TD
    A["Smartphone 2"] --> B["Message Icon 31"]
    C["Smartphone 2"] --> D["Message Icon 31"]
    E["Smartphone 2"] --> F["Message Icon 31"]
    G["Smartphone 2"] --> H["Message Icon 31"]
    I["Smartphone 2"] --> J["Message Icon 31"]
    K["Smartphone 2"] --> L["Message Icon 31"]
    M["Smartphone 2"] --> N["Message Icon 31"]
    O["Smartphone 2"] --> P["Message Icon 31"]
    Q["Smartphone 2"] --> R["Message Icon 31"]
    S["Smartphone 2"] --> T["Message Icon 31"]
    U["Smartphone 2"] --> V["Message Icon 31"]
    W["Smartphone 2"] --> X["Message Icon 31"]
    Y["Smartphone 2"] --> Z["Message Icon 31"]
    AA["Smartphone 2"] --> AB["Message Icon 31"]
    AC["Smartphone 2"] --> AD["Message Icon 31"]
    AE["Smartphone 2"] --> AF["Message Icon 31"]
    AG["Smartphone 2"] --> AH["Message Icon 31"]
    AI["Smartphone 2"] --> AJ["Message Icon 31"]
    AK["Smartphone 2"] --> AL["Message Icon 31"]
    AM["Smartphone 2"] --> AN["Message Icon 31"]
    AO["Smartphone 2"] --> AP["Message Icon 31"]
    AQ["Smartphone 2"] --> AR["Message Icon 31"]
    AS["Smartphone 2"] --> AT["Message Icon 31"]
    AU["Smartphone 2"] --> AV["Message Icon 31"]
    AW["Smartphone 2"] --> AX["Message Icon 31"]
    AY["Smartphone 2"] --> AZ["Message Icon 31"]
    BA["Smartphone 2"] --> BB["Message Icon 31"]
    BC["Smartphone 2"] --> BD["Message Icon 31"]
    BE["Smartphone 2"] --> BF["Message Icon 31"]
    BG["Smartphone 2"] --> BH["Message Icon 31"]
    BI["Smartphone 2"] --> BJ["Message Icon 31"]
    BK["Smartphone 2"] --> BL["Message Icon 31"]
    BM["Smartphone 2"] --> BN["Message Icon 31"]
    BO["Smartphone 2"] --> BP["Message Icon 31"]
    BQ["Smartphone 2"] --> BR["Message Icon 31"]
    BS["Smartphone 2"] --> BT["Message Icon 31"]
    BU["Smartphone 2"] --> BV["Message Icon 31"]
    BW["Smartphone 2"] --> BX["Message Icon 31"]
    BY["Smartphone 2"] --> BZ["Message Icon 31"]
    CA["Smartphone 2"] --> CB["Message Icon 31"]
    CC["Smartphone 2"] --> CD["Message Icon 31"]
    CE["Smartphone 2"] --> CF["Message Icon 31"]
    DG["Smartphone 2"] --> DH["Message Icon 31"]
    DI["Smartphone 2"] --> DJ["Message Icon 31"]
    DK["Smartphone 2"] --> DL["Message Icon 31"]
    DM["Smartphone 2"] --> DJ
    DB["Smartphone 2"] --> DC["Message Icon 31"]
    DD["Smartphone 2"] --> DC
    DX["Smartphone 2"] --> DX
    DX --> DX
    DX --> DX
    DX --> DX
    DX --> DX
    DX --> DX
    DX --> DX
    DX --> DX
    DX --> DX
    DX --> DX
    DX --> DX
    DX --> DX
    DX --> DX
    DX --> DX
    DX --> DX
    DX --> DX
    DX --> DX
    DX --> DX
    DX --> DX
    DX --> DX
    DX --> DX
    BX --> Y
    Y --> Z
    Z --> AA
    AA --> AB
    AB --> AC
    AC --> AD
    AD --> AE
    AE --> AF
    AF --> AG
    AG --> AH
    AH --> AI
    AI --> AJ
    AJ --> AK
    AK --> AL
    AL --> AM
    AM --> AN
    AN --> AO
    AO --> AP
    AP --> AQ
    AQ --> AR
    AR --> AS
    AS --> AT
    AT --> AU
    AU --> AV
    AV --> AW
    AW --> AX
    AX --> AY
    AY --> AZ
    AZ --> BA
    BA --> BB
    BB --> BC
    BC --> BD
    BD --> BE
    BE --> BF
    BF --> BG
    BG --> BH
    BH --> BI
    BI --> BJ
    BJ --> BK
    BK --> BL
    BL --> BM
    BM --> BN
    BN --> BO
    BO --> BP
    BP --> BPB
    BPB --> BPCC
    BPCC --> BPCCB
    BPCCB --> BPCCD
    BPCCD --> BPCCD
    BPCCD --> BPCCD
1 Open Settings.
2 Touch Advanced settings > Data transmission.
Using Phone Clone to import data
Phone Clone is an app developed by Huawei that allows you to transfer data between devices without a computer or Internet connection.
1 On your old device, install Phone Clone.
2 On your new device, open Settings.
3 Touch Advanced settings > Data transmission > From old phone (with Phone Clone).
4 Select the device from which you want to import data and touch Continue.
5 On your old device, open Phone Clone and touch send. Scan the QR code on the new device or manually connect to the new device's Wi-Fi hotspot.
To install Phone Clone on your old device, touch touch here to generate a QR code on your new device and scan the QR code.
6 Once connected, select the data you want to send on your old device and touch send.
Using HiSuite to import data
Use HiSuite to back up data on your old device to a computer and import it to your new device.
1 Install HiSuite on your computer.
2 Use a USB cable to connect your device to your computer. HiSuite will launch automatically.
3 Go to the backup screen in HiSuite. Select the data that you want to back up and follow the onscreen instructions to back up the data.
4 Connect your new device to your computer with a USB cable. Go to the data restore screen in HiSuite.
5 Choose which backup you want to restore and follow the onscreen instructions to restore the data.
Viewing recommended settings
After you have completed the initial setup process, your device will display a list of recommended settings.
Open Settings. Touch a recommended setting to configure it.
- Recommended settings include Screen lock, and Change wallpaper, and Add another email account.
- Touch next to a recommended setting to remove it from the list. Recommendations that have been removed from the list will no longer be displayed.
Screen and Display
Home screen
About the home screen
Use the home screen to access your apps and widgets.
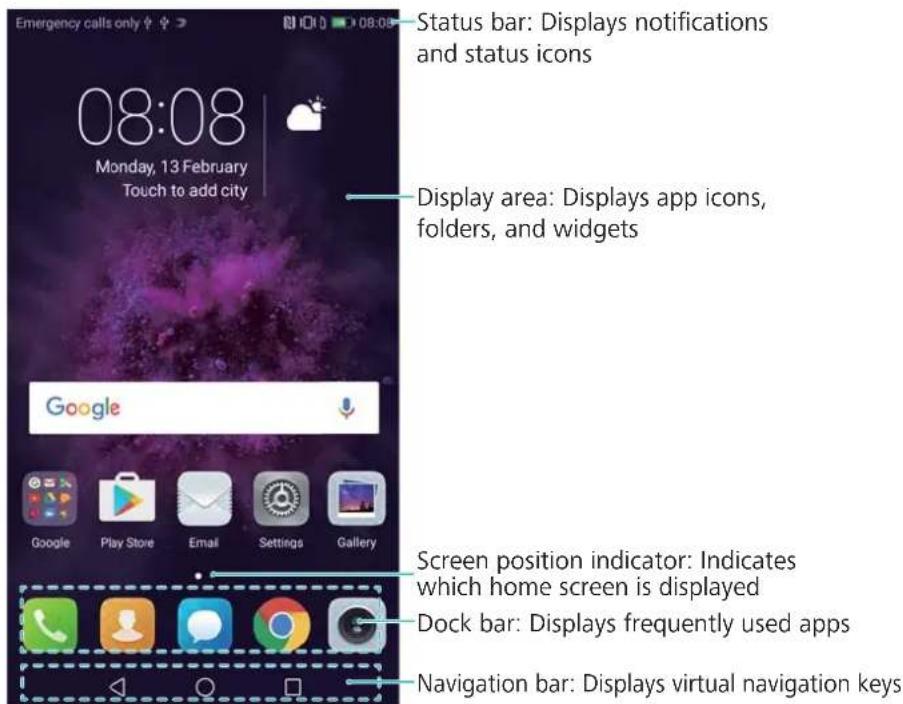
The navigation bar is disabled by default on devices with the front-facing fingerprint sensor navigation button. To enable the navigation bar, you can touch Settings > Navigation key > Virtual navigation bar . However, this will disable the navigation button, which means your device will not respond when you touch, hold, or swipe on the navigation button.
Basic screen gestures
Use simple touchscreen gestures to perform a variety of tasks, such as launch apps, scroll through lists, and enlarge images.

natural_image
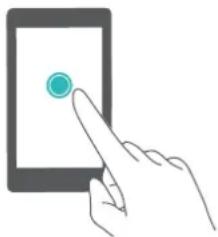
Hand holding a smartphone displaying a teal dot (no text or symbols visible)Touch: Touch an item once. For example, touch to select an option or open an app.

natural_image
Hand pointing at a tablet screen with a glowing button (no text or symbols)Double touch: Touch the target area of the screen twice in quick succession. For example, double touch an image in full screen mode to zoom in or out.
natural_image
Line drawing of a hand pointing at a smartphone screen with a teal button (no text or symbols)Touch and hold: Touch and hold the target area of the screen for at least 2 seconds. For example, touch and hold a blank area on the home screen to access the home screen editor.

natural_image
Illustration of a hand interacting with a tablet displaying a green arrow (no text or symbols)Swipe: Swipe your fingers on the screen. Swipe vertically or horizontally to browse other home screens, scroll through a document, and more.
natural_image
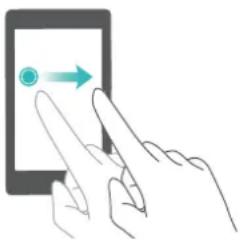
Illustration of a hand interacting with a smartphone displaying a circular icon and directional arrow (no text or symbols)Drag: Touch and hold an item, and then move it to another position. For example, use this gesture to rearrange apps and widgets on the home screen.

natural_image
Illustration of a hand interacting with a smartphone screen showing two finger icons (no text or symbols present)Spread fingers apart: Spread two fingers apart on the screen. For example, spread two fingers apart to zoom in on a picture or web page.

natural_image
Illustration of a hand interacting with a smartphone screen (no text or symbols)Pinch fingers together: Pinch two fingers together on the screen. For example, pinch two fingers together to zoom out on an image.
Enabling the Drawer home screen
Use the Drawer home screen to store app icons in a separate app drawer.
Enabling the Drawer home screen
1 Open Settings.
2 Touch Home screen style > Drawer.
Adding app shortcuts to the home screen
Add frequently used apps to the home screen for quick access.
1 On the home screen, touch ⏻ to view the list of apps.
2 Touch and hold an app icon until your device vibrates, and then drag the app icon to the desired location on the home screen.
You must have enough space on the home screen. If there is not enough space, add another home screen or free up some space.
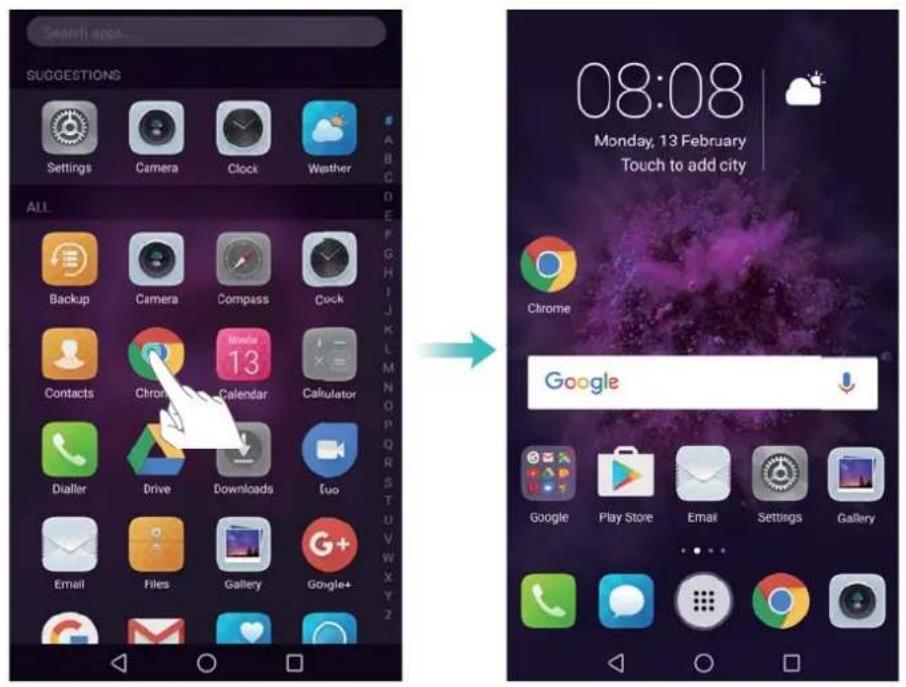
Reverting to the standard home screen
1 Open Settings.
2 Touch Home screen style > Standard.
Switching to simple home screen
Simple home screen uses a simple layout and large icons for easier use.
1 Open Settings.
2 Touch Advanced settings > Simple mode, and touch √.
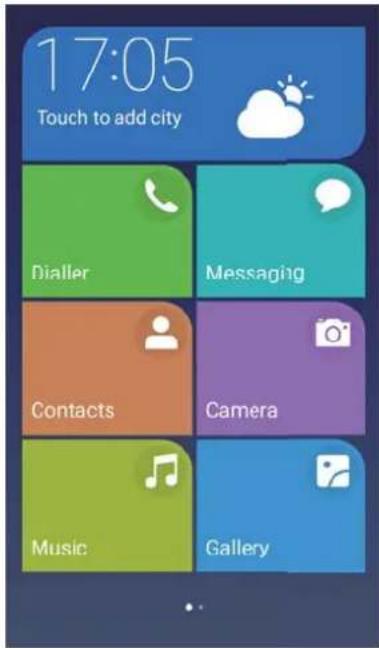
3 On the simple home screen, you can:
- Touch app icons or widgets to open them.
- Touch and hold an icon to enter the home screen editor mode. In this mode you can add or delete apps, or hold and drag an app icon to the desired place.
- Touch Others to open the app list and view or open more apps.
- Touch Standard mode to switch back to the standard home screen.
Displaying or hiding notification badges
Notification badges appear in the top-right corner of app icons. The badge number indicates the number of new notifications. Open the corresponding app to view notification details.

1 On the home screen, pinch two fingers together to open the home screen editor.
2 Touch Settings > Badge app icons.
3 Toggle the corresponding switch to enable or disable notification badges.
Setting the home screen wallpaper
Choose from a wide range of themes and wallpapers to personalise your device.
Changing the wallpaper
1 Open Settings.
2 Touch Display > Wallpaper > Set Wallpaper.
3 Select the desired wallpaper and follow the onscreen instructions to set it as the home screen or lock screen wallpaper (or both).
Changing the wallpaper automatically
1 Open Settings.
2 Touch Display > Wallpaper.
3 Switch Randomly change home screen wallpaper on or off.
When Randomly change of home screen wallpaper is enabled, you can configure the Interval and Album to display so that your wallpaper can change automatically at the specified interval.
Managing home screen icons
You can easily move or uninstall apps on the home screen.
Moving home screen icons
On the home screen, touch and hold an app icon or widget until your device vibrates. You can then drag the app icon or widget to the desired location.

Deleting apps from the home screen
On the home screen, touch and hold the app or widget you want to delete until 📄 is displayed at the top of the screen. Drag the unwanted app or widget to 📄 and follow the onscreen instructions.
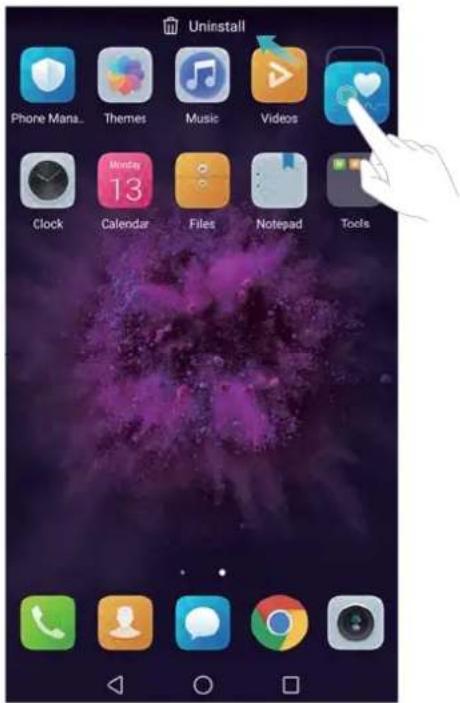
i Some pre-installed apps cannot be uninstalled for the proper running of the system.
Shaking your device to auto-align icons
Gaps may appear on the home screen after you uninstall apps or move them into folders. You may use the following feature to arrange apps neatly on the home screen.
1 On the home screen, pinch two fingers together to open the home screen editor.
2 Touch Settings and switch on Shake.
3 Return to the home screen and open the home screen editor again. Shake your device to rearrange apps so that gaps are filled.
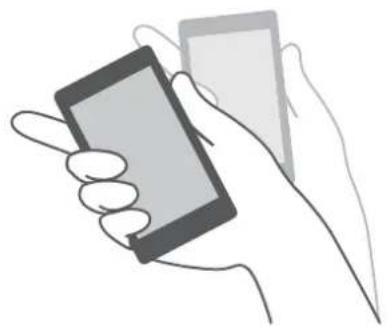
natural_image
Line drawing of a hand holding a smartphone and a card (no text or symbols)Managing home screens
You can customise home screens to your liking.
Adding home screens
1 On the home screen, pinch two fingers together to open the home screen editor.
2 Touch+ on the home screen furthest to the left or right to add a new screen.

Deleting home screens
1 On the home screen, pinch two fingers together to open the home screen editor.
2 Touch × on a blank screen to delete it.

i You cannot delete a home screen if it contains apps or widgets.
Moving home screens
1 On the home screen, pinch two fingers together to open the home screen editor.
2 Touch and hold the home screen you want to move and drag it to the desired location.
Setting the default home screen
1 On the home screen, pinch two fingers together to open the home screen editor.
2 Touch at the top of a home screen to set the chosen home screen as default.
Managing home screen widgets
Add, move, or delete widgets from the home screen.
Adding widgets
1 On the home screen, pinch two fingers together to open the home screen editor.
2 Touch Widgets. Select a widget and drag it to a blank area on the home screen.
You must have enough space on the home screen. If there is not enough space, add another home screen or free up some space.

Moving widgets
On the home screen, touch and hold a widget until your device vibrates, and then drag the widget to the desired location.
Deleting widgets
On the home screen, touch and hold a widget until your device vibrates, and then drag the widget to Remove at the top of the screen.
Managing home screen folders
Organise your apps into folders so that you can find them more easily.
Creating a folder
Group your apps into categorised folders to make them easier to find. For example, you could create a Social folder for your social media apps.
On the home screen, drag an icon onto another icon to create a folder containing both apps.
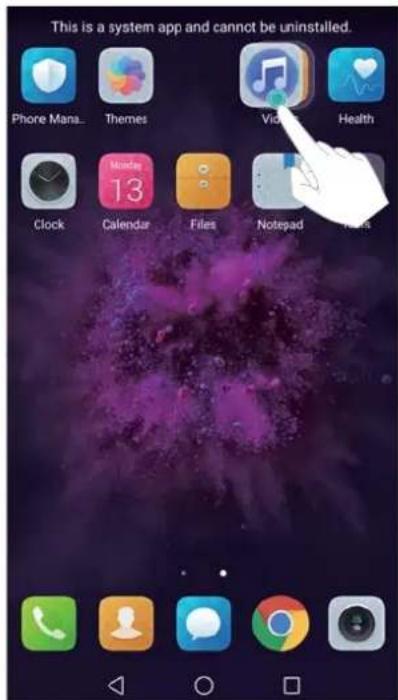
Renaming folders
To rename a folder, open it and touch the folder name.
Adding apps to a folder
1 Open the folder.
2 Touch+.
3 Select the apps you want to add and touch OK.
Removing apps from a folder
1 Open the folder.
2 Touch+.
3 Deselect the apps you want to remove and touch OK.
i You can also touch and hold an icon and drag it outside a folder to remove it.
Deleting folders
1 Open the folder.
2 Touch+.
3 Deselect all of the apps and touch OK. The folder will be deleted automatically.
If there are more than two apps inside a folder, it cannot be deleted.
Locking and unlocking the screen
Changing the lock screen style
Set a screen lock password to prevent unauthorised access to your device.
Changing the screen lock method
Magazine Unlock is set as the default lock screen style. To change the lock screen style, touch

Settings > Screen lock & passwords > Screen lock style and select a style.

For more information on Magazine Unlock, see Set and Manage Magazine Unlock.
Setting the screen lock password
1 Open Settings.
2 Touch Screen lock & passwords > Password
3 You can choose to unlock the screen with an unlock pattern, PIN, or password:
- Touch Pattern and connect at least four dots twice to create a screen unlock pattern.
- Touch PIN. Follow the onscreen instructions to create a PIN containing at least four digits, and then touch OK.
- Touch Password. Follow the onscreen instructions to create a password containing at least four characters, and then touch OK.
- You can also use your fingerprint to unlock the screen. Touch Enrol in the popup dialog to add your fingerprint. For more information on using your fingerprint to unlock the screen, see Set fingerprint.
- To remove the screen lock password, touch None and follow the onscreen instructions.
Locking the screen
Lock the screen to reduce power consumption and prevent unintended presses or unauthorised access to your data.
- Manual lock: Press the Power button to manually lock the screen.
- Automatic lock: The screen will lock automatically and enter sleep mode after the preset sleep time to reduce power consumption and prevent unintended operations.
To change the screen sleep time, touch Settings > Display > Sleep and select a time.
Unlocking the screen
1 Press the Power button to turn on the screen.
2 Swipe on the screen in any direction.
- If you have set a screen unlock pattern, PIN, or password, you will need to draw the unlock pattern or enter your PIN/password to unlock the screen.
- If your device has a fingerprint sensor, you can unlock the screen by placing your finger on the fingerprint sensor.
Configuring Magazine Unlock images
Configure Magazine Unlock to customise your lock screen wallpapers.
Adding online wallpapers to the viewing list
Swipe up from the bottom of the lock screen to display the Magazine Unlock options.
Touch 📋 Touch and select the wallpapers that you want to add to the viewing list.
Sharing Magazine Unlock wallpapers
Swipe up from the bottom of the lock screen to display the Magazine Unlock options, and then touch ⚙. Select how you want to share the wallpaper and follow the onscreen instructions.
Adding offline wallpapers to the viewing list
1 Swipe up from the bottom of the lock screen to display the Magazine Unlock options.
2 Touch to access the viewing list.
3 Touch Added by me and select +.
4 Select the desired images and touch √.
Updating Magazine Unlock covers
1 Open Settings.
2 Touch Screen lock & passwords > Magazine unlock.
3 Touch Subscriptions > Downloaded and select Update to manually update your Magazine Unlock wallpapers.
This feature requires an Internet connection. Connect to a Wi-Fi network to avoid incurring unnecessary data charges.
Accessing tools from the lock screen
Launch apps directly from the lock screen.
1 Swipe up from the bottom of the lock screen to display lock screen features and tools.
2 Touch the shortcut icon on the bottom of the screen to launch the app you want to access.
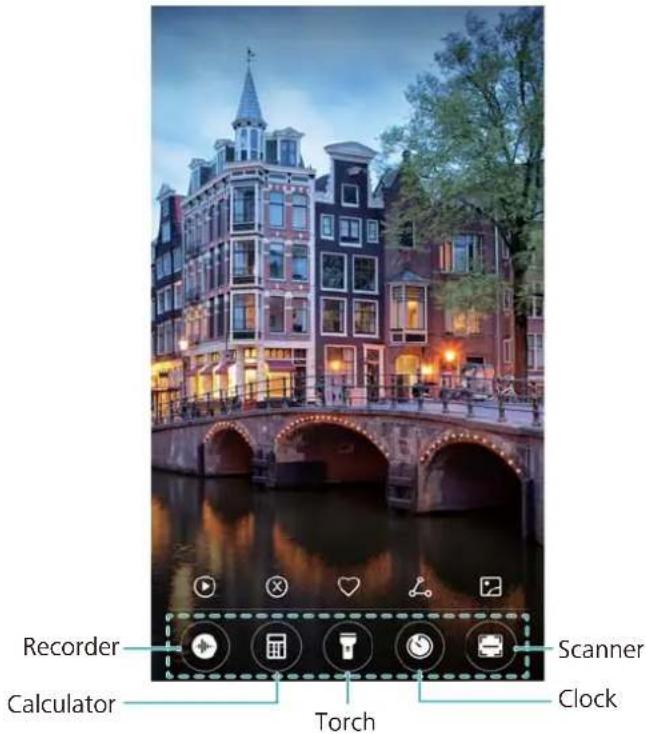
i Swipe up on the camera icon on the lock screen to directly open the camera.
Configuring your lock screen signature
Configure a lock screen signature to personalise your lock screen.
1 Open Settings.
2 Touch Screen lock & passwords > Lock screen signature.
3 Enter your lock screen signature and touch Save.
Your lock screen signature will be displayed on the lock screen.
Notification panel and status bar
About the status bar
Use the status bar to access the notification panel and check your device's status.
Opening the notification panel and status bar
Opening the notification panel and status bar from the lock screen
Turn on the screen and swipe down from the status bar to open the notification panel. Then you can switch on or off shortcut switches, or view notification messages.
Opening the notification panel and status par when the screen is unlocked
Swipe down from the status bar to open the notification panel. Then you can switch on or off shortcut switches, or view notification messages.
About notification and status icons
Status icons
Status icons are displayed on the right-hand side of the notification bar and tell you about your device's status, including network connections, signal strength, battery, and time.

Status icons may vary according to your region or carrier.
| ... | Signal strength No signal |
| 4G | Connected over 4G Connected over 3G |
| 2G | Connected over 2G Connected over HSPA |
| H^+ | Connected over HSPA+ Connected over LTE |
| HD | VoLTE enabled NFC enabled |
| R | Roaming Airplane mode enabled |
| * | Bluetooth enabled Connected over Wi-Fi |
| Wi-Fi network available Receiving location data from GPS | |
| 30 | Vibration mode enabled Silent mode enabled |
| Alarm enabled Charging | |
| Battery full Battery low | |
| Headset inserted No SIM card found |
Notification icons
Notification icons are displayed on the left-hand side of the status bar when you receive a new message, notification, or reminder.
  | Missed calls New emails |
 | Connected to a VPN New voicemail |
 | Downloading data Uploading data ↑ |
 | Upcoming events Device memory full |
 | Synchronising data Synchronisation failed |
Configuring notifications
You can configure the notification settings for each app.
1 Open Settings.
2 Touch Notification & status bar > Notifications management.
3 Select the app that you want to configure and enable or disable notifications as desired.
Configuring the screen to turn on when you receive a notification
Configure the screen to turn on when you receive a new notification to avoid missing important information.
1 Open Settings.
2 Touch Notification & status bar.
3 Toggle the Notifications turn on screen switch.
Configuring the status bar
Open Settings, touch Notification & status bar. Toggle the Display carrier name, Display network speed, or Battery percentage switches to configure which information is displayed in the status bar.
Using shortcut switches to access settings
Use shortcut switches to quickly enable or disable frequently-used features.
Accessing shortcut switches
Swipe down from the status bar to open the notification panel.
i Touch ∨ to display all of the shortcut switches.
Configuring shortcut switches
1 Swipe down from the status bar to open the notification panel.
2 Touch/. Touch and hold a switch and drag it to the desired position.
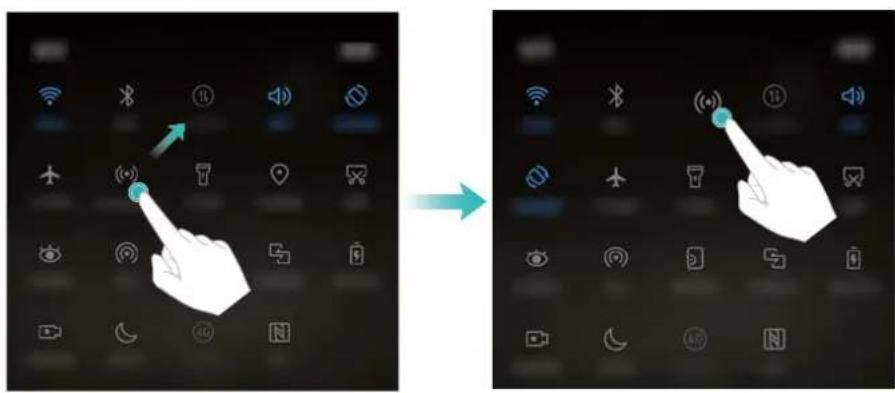
3 Touch a switch to enable the corresponding feature. If the switch supports touch and hold gestures, touch and hold the switch to access the settings for the corresponding feature.
i Some switches do not support touch and hold gestures.
Navigation bar
About the navigation bar
The navigation bar contains three virtual keys: Back, Home, and Recent.
- Back: Touch to return to the previous screen or close an app. When entering text, touch to close the onscreen keyboard.
• Home: Touch to return to the home screen. - Recent: Touch to display recently used apps.
The navigation bar is disabled by default on devices with the front-facing fingerprint sensor navigation button. To enable the navigation bar, you can touch Settings > Navigation key > Virtual navigation bar. However, this will disable the navigation button, which means your device will not respond when you touch, hold, or swipe on the navigation button.
Changing the navigation bar style
1 Open Settings.
2 Touch Navigation key.
When Off-screen navigation button mode is enabled on a device that supports fingerprint sensor navigation gestures, you cannot change the layout of the virtual navigation bar. To change the layout, select Virtual navigation bar mode and then try again.
3 Select the desired layout.
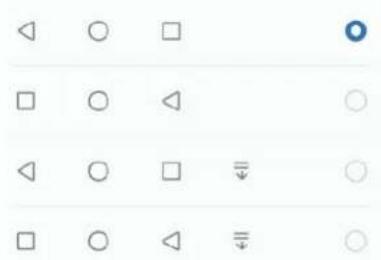
If you select a navigation bar containing , you can touch to pull down the notification panel.
Using the navigation bar
Opening the notification panel
If you select a navigation bar containing , you can touch to pull down the notification panel.
Accessing Google Search and split screen mode
- Touch and hold Home to access Google Search.
- Touch and hold □Recent to enable split screen mode.
Managing recent tasks
Viewing recent tasks
Touch □Recent to display recent tasks. Swipe up and down to browse them.
Switching between recent tasks
1 Touch □ Recent.
2 Swipe up or down to find the task you want to switch to and select it.
Ending recent tasks
1 Touch □ Recent.
2 To end a task, swipe it to the left or right or touch the ✗ icon in the top-right corner.


- Touch 📋 to end all tasks.
- To prevent a task from ending, touch the 🔊icon in the top-right corner. This will lock that task. To unlock a task, touch the 🔊icon in the top-right corner.
Themes
About themes
Themes help you to personalise your home screen by changing the wallpaper, app icons, and more.
Changing the theme
1 Open Themes.
2 You can:
- Select a theme and follow the onscreen instructions to configure the settings.
- Touch Customise to mix and match lock screen methods, wallpapers, app icons, and more.
Global search
About global search
Use global search to find apps, contacts and messages on your device.
Swipe down on the home screen to open the global search window, and then enter your search terms.

Searching for content on your device
Searching for contacts
1 Swipe down on the home screen to display the search bar.
2 Touch the search bar and enter the contact name, initials, phone number, email address, or other information. Matching results will be displayed underneath.
To improve the accuracy of search results, enter more than one keyword. Each keyword should be separated by a space (for example "John Smith New York").
Searching for SMS messages
1 Swipe down on the home screen to display the search bar.
2 Enter one or more keywords. The results will be displayed underneath the search bar.
Alternatively, open Messaging and enter one or more keywords in the search bar.
Searching for emails
1 Swipe down on the home screen to display the search bar.
2 Enter one or more keywords (such as the email subject). The results will be displayed underneath the search bar.
Searching for apps
1 Swipe down on the home screen to display the search bar.
2 Enter one or more keywords. The results will be displayed underneath the search bar.
- When using the Drawer home screen layout, you can also search for apps by touching and entering the app name in the search bar.
- If your device is connected to the Internet, matching apps in the HiApp store will also be displayed. Before searching, connect to a Wi-Fi network to reduce mobile data usage.
Searching for settings
1 Swipe down on the home screen to display the search bar.
2 Enter one or more keywords. Matching menu options from Settings will be displayed under the search bar.
Screenshot
Capturing the entire screen
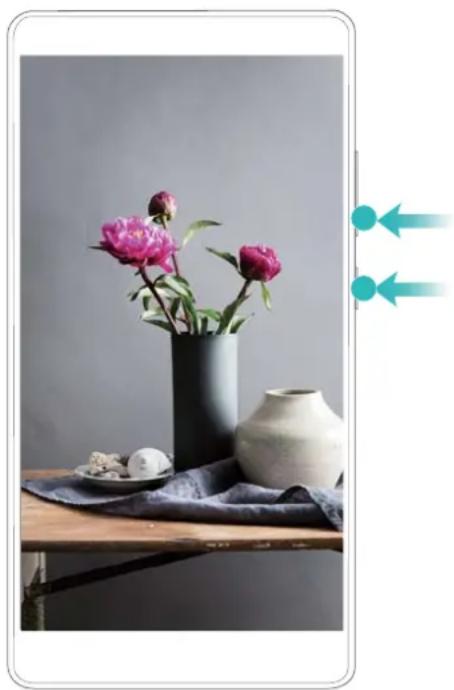
Taking a screenshot with the power and volume down buttons
Press the Power button and Volume down button to take a full screenshot.
natural_image
Still life photo of peony flowers in a black vase, white ceramic vase, and a plate with small items on a blue cloth (no text or symbols)Screenshot shortcut
Open the notification panel, and then touch ✗ in the Shortcuts tab to take a full screenshot.

Using your knuckle to take a screenshot
To take a screenshot of the whole screen, knock the screen twice with your knuckle.

natural_image
Illustration showing a hand gestureing on a smartphone and a close-up of a violin (no text or symbols)Capturing part of the screen
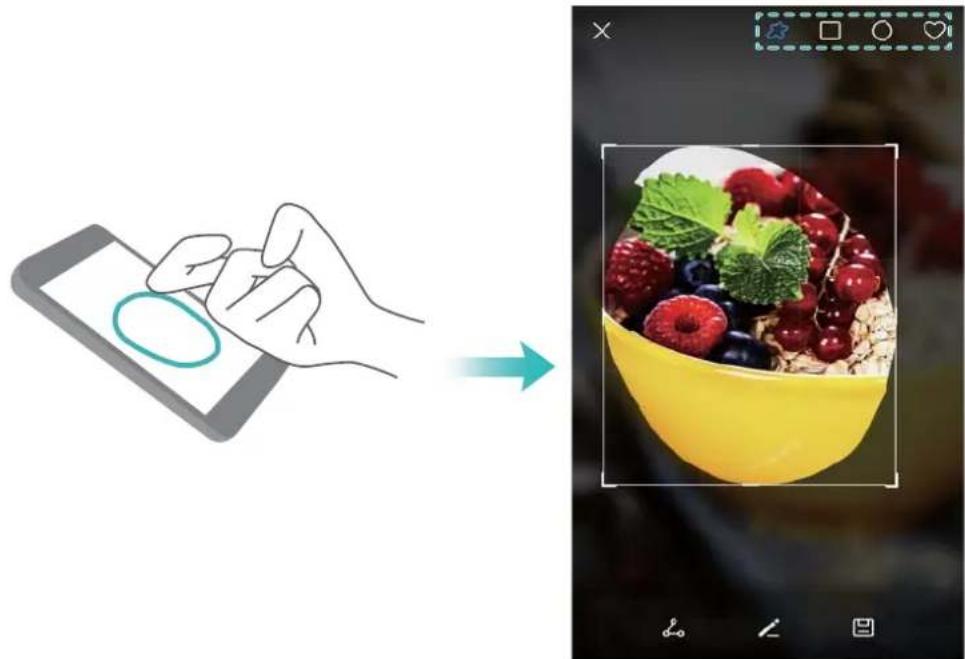
This feature allows you to capture part of the screen and save it as an image.
Knock the screen with your knuckle. Keep your knuckle on the screen and draw the area you want to capture. The area inside the blue line will be captured.
To use a predefined shape, select the screenshot box at the top of the screen, and then touch

to save the screenshot.
natural_image
Illustration showing a hand holding a smartphone and a side-by-side photo of a colorful dessert with berries and herbs (no text or symbols)By default, screenshots are stored in Gallery, within the Screenshots folder.
i Touch 📁 to share a screenshot.
Taking scrolling screenshots
Use knuckle gestures or scrolling screenshots to capture content that does not fit on the screen. This is useful for sharing chat conversations, web pages, or large images.
Using the shortcuts tab
1 Open the notification panel, and then touch ✗ to take a standard screenshot.
2 After taking the screenshot, touch □ to take a scrolling screenshot.
3 The screen will scroll down automatically as your device captures a screenshot.

natural_image
Close-up of a violin with visible fret and strings, no text or symbols presenti Ensure that you touch ☐ within 3 seconds of taking the screenshot.
Using your knuckle
Knock the screen with your knuckle and hold it down. Draw an "S" shape on the screen and lift your knuckle. The screen will scroll down automatically as your device captures a screenshot.

natural_image
Two views of a lighthouse with 'NAVAL' and 'FARO LA MARINA' inscriptions, showing structural change under blue sky (no text or symbols on the structures themselves)i Touch the screen to stop scrolling and capture the previous content.
Viewing, editing, deleting, and sharing screenshots
Viewing screenshots
1 Open Gallery.
2 On the Albums tab, touch Screenshots to view your screenshots.
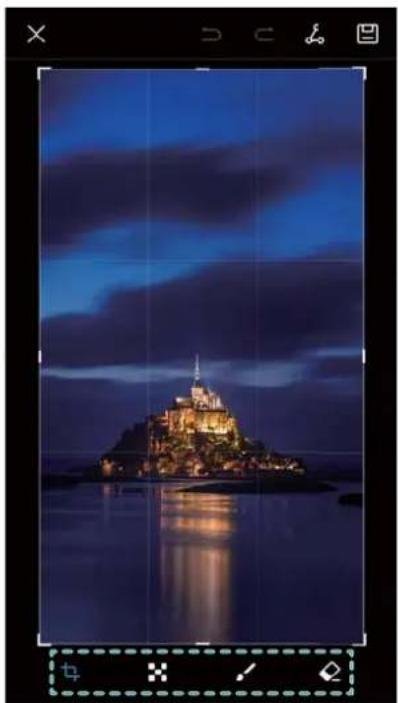
Editing a screenshot
1 After taking a screenshot, touch /-.
2 Choose the desired options to edit the image.
3 Touch☐ to save the changes.
natural_image
Night view of a illuminated island with dark blue sky and reflections on calm water (no text or symbols visible)Sharing a screenshot
1 Open Gallery.
2 On the Albums tab, touch Screenshots.
3 Select the screenshot you want to share and touch
4 Choose how you want to share the screenshot and follow the onscreen instructions.
Deleting a screenshot
1 Open Gallery.
2 On the Albums tab, touch Screenshots.
3 Select the screenshot you want to delete and touch 📄.
Screen recording
About screen recordings
Use the screen recording feature to record footage and share it with friends.
Screen recorder
Using the screen recorder shortcut switch
To start a screen recording, open the notification panel and touch 📷.

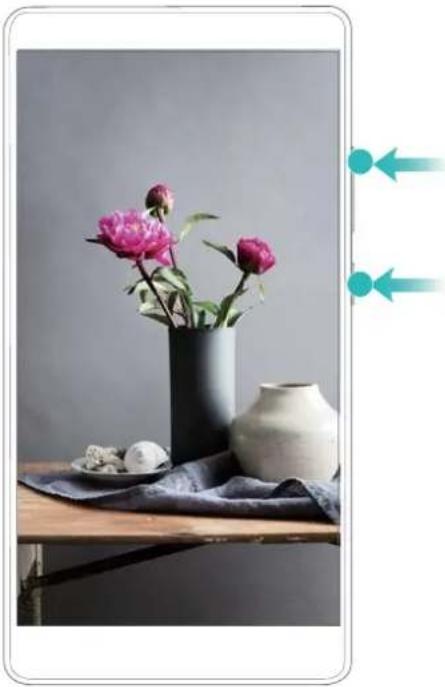
Pressing buttons to record
Press the Volume up button and Power button simultaneously.
natural_image
Still life photo of peony flowers in a black vase, white ceramic vase, and a plate with small items on a wooden table (no text or symbols)Using knuckle gestures to record
To start a screen recording, knock the screen twice with two knuckles.

natural_image
Still life photo of a vase with pink peonies and a hand gesture overlay (no text or symbols)- Audio will also be recorded, so make sure that you are in a quiet environment.
- Recording will stop automatically when you make or receive a call.
- When making a screen recording, you will not be able to use the recording feature in other applications.
- Longer recordings will take up more space on your device's internal storage, so ensure there is enough space before recording.
You can stop a screen recording in three ways:
- Knock the screen twice with two knuckles
- Press the volume up and power buttons simultaneously.
- Touch the screen recording icon in the upper left corner of the status bar.
Viewing, sharing, and deleting screen recordings
Viewing screen recordings
Open 📄 Gallery and go to Screenshots or Screen recordings to view your screen recordings.
Sharing screen recordings
1 Open Gallery.
2 On the Albums tab, touch Screenshots or Screen recordings.
3 Select the screen recording you want to share and touch.
4 Choose how you want to share the recording and follow the onscreen instructions.
Deleting screen recordings
1 Open Gallery.
2 On the Albums tab, touch Screenshots or Screen recordings.
3 Touch and hold the screen recording that you want to delete and select 📄.
4 Touch Delete.
Configuring the default storage location for screen recordings
i Not all devices support microSD cards.
1 Insert a microSD card into your device.
2 Open Settings.
3 Touch Memory & storage > Default location to set the default storage location to Internal storage or SD Card.
Split-screen mode
About split-screen mode
Use split-screen mode to use two apps at once.
Enabling split screen mode
Split screen mode is not available for all apps. Some apps may not function properly in split screen mode.
Using your knuckle to enable split screen mode
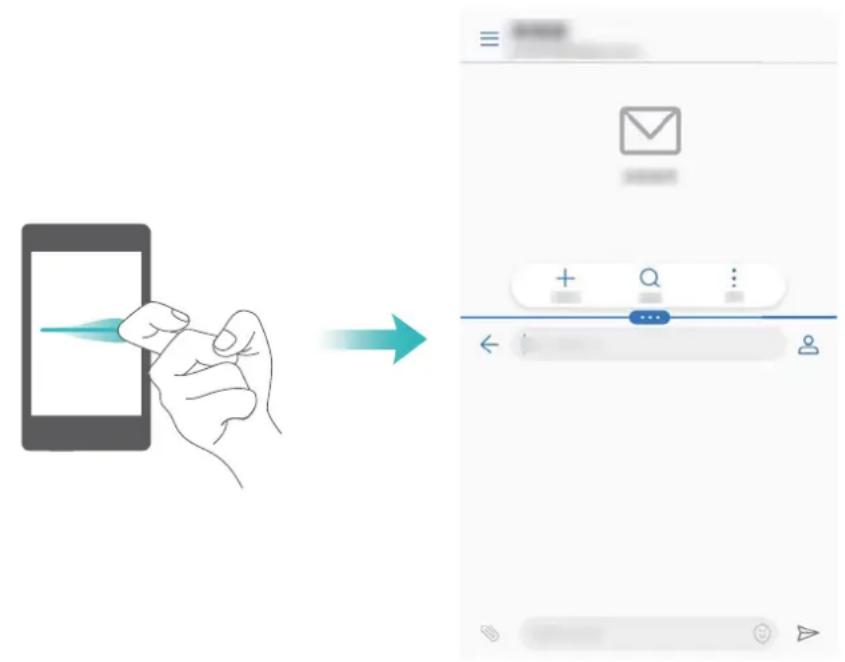
Open an app that supports split-screen mode and knock the screen with one knuckle. Hold down your knuckle and draw a line across the screen.
If the screen is in portrait view, draw a horizontal line; if the screen is in landscape view, draw a vertical line.
Using the Recent key to enable split screen mode
Open an app that supports split-screen mode, and then touch and hold ☐
The navigation bar is disabled by default on devices with the front-facing fingerprint sensor navigation button. To enable the navigation bar, you can touch Settings > Navigation key > Virtual navigation bar. However, this will disable the navigation button, which means your device will not respond when you touch, hold, or swipe on the navigation button.
Using swipe gestures to enable split screen mode
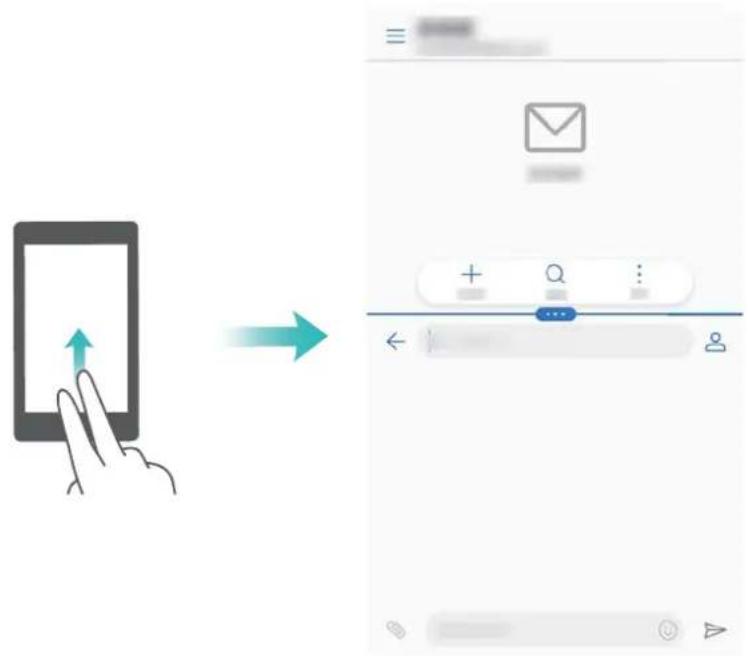
Open an app that supports split screen mode, and then swipe up from the bottom of the screen with two fingers.
Using split screen mode
Switching to full screen mode
In split screen mode, touch and hold ^*** and swipe up or down to switch to full screen mode.

Moving screens
In split screen mode, touch ⋯, and then touch ⬆ to switch the position of the screens.

Changing the screen orientation
Swipe down from the status bar to open the notification panel. Touch the switch to enable automatic screen rotation.

Accessing the home screen
In split screen mode, touch Ⓞ to access the home screen.
The navigation bar is disabled by default on devices with the front-facing fingerprint sensor navigation button. To enable the navigation bar, you can touch Settings > Navigation key > Virtual navigation bar. However, this will disable the navigation button, which means your device will not respond when you touch, hold, or swipe on the navigation button.
Exiting split-screen mode
To exit split-screen mode, touch and select


Using motion gestures
Motion gestures make it easier to control your device.
Open Settings. Touch Smart assistance > Motion control and select the motions you want to enable.
- Flip: Mute sounds and disable vibrations for incoming calls, alarms, and timers.

natural_image
Illustration of a hand holding a smartphone with a partially open screen, no text or symbols present- Pick up: Pick up your phone to reduce the ringtone volume for incoming calls, alarms, and timers.

natural_image
Illustration of two hands holding a smartphone, one with an arrow indicating rotation (no text or symbols)- Raise to ear: Hold the phone to your ear to answer an incoming call. When viewing call log details or contact details, hold the phone to your ear to call that contact. When calling in hands-free mode or with a Bluetooth headset, raise the phone to your ear to switch to earpiece mode.

natural_image
Illustration of a hand holding a small object with an arrow indicating motion (no text or symbols)Eye comfort mode
Eye comfort mode decreases the amount of blue light emitted from the screen to reduce eye strain.
Eye comfort mode
1 Open Settings.
2 Touch Display > Eye comfort and switch on Eye comfort.
When eye comfort mode is enabled, 📋 will be displayed in the status bar.
Adjusting the colour temperature
Eye comfort mode reduces the amount of blue light emitted from the screen, which may give the screen a slightly yellow hue. You can adjust the colour temperature to control the amount of blue light.
When Eye comfort is enabled, swipe left or right on the colour temperature slider to make the screen hue cooler or warmer.
Enabling and disabling eye comfort mode
You can use the shortcut switch in the notification panel to enable to disable eye comfort mode.
Swipe down from the status bar. Touch to display all shortcut switches, and then toggle the

switch.

Configuring the timer
Configure the timer to enable eye comfort mode automatically at a preset time, such as when you finish work or before you go to bed.
1 Open Settings.
2 Touch Display > Eye comfort.
3 Switch on Schedule and configure the Start time and End time.
Display settings
Changing the font size
1 Open Settings.
2 Touch Display > Font size and choose a font size.

Adjusting the screen brightness
Adjust the screen brightness to suit your needs.
1 Open Settings.
2 Touch Display > Brightness and switch on Automatic brightness.
When automatic screen brightness is enabled, the brightness of the screen will automatically adjust based on the light conditions.
i Adjust the screen brightness quickly: Swipe down from the status bar. Touch √.
Enable or disable automatic screen brightness. You can also manually adjust the screen brightness by dragging the slider. The screen brightness will not change in different lighting conditions if automatic mode is not enabled.
Configuring the screen rotation settings
When you rotate your device, some apps will automatically adjust the screen orientation to make them easier to use.
1 Open Settings.
2 Touch Display and switch on Auto-rotate screen.
i Quickly enable auto-rotation: Swipe down from the status bar and open the shortcut switches tab, and then touch

Network and Sharing
Mobile Internet
Using mobile data
Enabling mobile data
Before enabling mobile data, ensure that you have activated mobile data services with your network provider.
1 Open Settings.
2 Touch More > Mobile network.
3 Switch on Mobile data to enable mobile data.
i Disable mobile data when not required so as to save battery power and reduce data usage.
Enabling data roaming
Enable data roaming to access the Internet when you travel abroad.
You may incur roaming charges when data roaming is enabled. Contact your network provider for details.
1 Open Settings.
2 Touch More > Mobile network.
3 Switch on Data roaming.
Sharing your mobile Internet with other devices
Setting up a portable Wi-Fi hotspot

1 Open Settings.
2 Touch More > Tethering & portable hotspot.
3 Touch Portable Wi-Fi hotspot and switch on the hotspot.
4 Touch Configure Wi-Fi hotspot. Set the Wi-Fi hotspot name, encryption mode, and password, and then touch Save.
Limit the amount of data that other devices can use: Touch Data limit on the Settings screen, and then follow the onscreen instructions to set the data limit. Your device will automatically disable the Wi-Fi hotspot when connected devices exceed this limit.
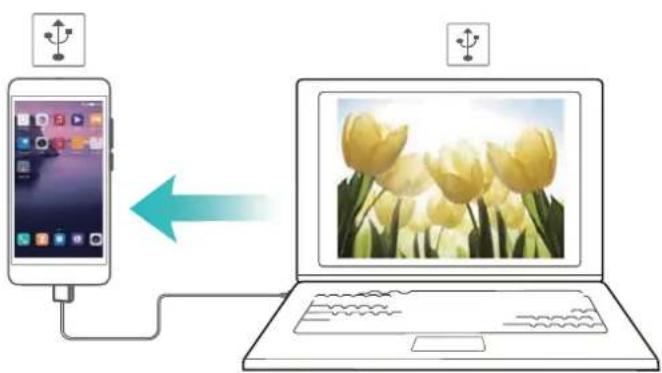
Using USB tethering
Depending on your computer's operating system, you may need to install drivers on the computer or establish a network connection in order to use USB tethering. Refer to your operating system instructions.
flowchart
graph LR
    A["Smartphone"] -->|Data Transfer| B["Laptop"]
    style A fill:#f9f,stroke:#333
    style B fill:#bbf,stroke:#333
1 Use a USB cable to connect your device to the computer.
2 Open Settings.
3 Touch More > Tethering & portable hotspot.
4 Switch on USB tethering to share your mobile Internet.
Using Bluetooth tethering

Before using Bluetooth tethering, pair your device with those that want to use your mobile data connection. For more information, refer to Connecting to other devices using Bluetooth.
1 Open Settings.
2 Touch More > Tethering & portable hotspot.
3 Switch on Bluetooth tethering to share your mobile data connection.
4 On the Bluetooth screen, touch ⓘ next to the paired device, and then switch on Internet access to share your mobile Internet.
Wi-Fi
About Wi-Fi
Connect to a Wi-Fi network to access the Internet on your device.
To prevent unauthorized access to your personal data and financial information, always exercise caution when connecting to public Wi-Fi networks.
Connecting to the Internet using Wi-Fi
Connecting to a Wi-Fi network
1 Go to Settings.
2 Touch Wi-Fi and turn on the Wi-Fi switch. Your device will display a list of available Wi-Fi networks.
- Refresh the list: Touch Scan to refresh the list of available Wi-Fi networks.
- Manually add a network: Swipe down to the bottom of the menu and touch Add network.... Follow the onscreen instructions to enter the network name and password manually.
3 Select the Wi-Fi network you want to connect to:
- If the Wi-Fi network does not require a password, your device will connect automatically.
- If the network is protected, enter the password when prompted and touch Connect.
Connecting to a Wi-Fi network using Wi-Fi Protected Setup (WPS)
WPS allows your device to connect to a WPS-enabled router without entering a password.
1 Go to Settings.
2 Touch Wi-Fi and switch on Wi-Fi.
3 Touch : > Advanced Wi-Fi settings. There are two options:
- Touch WPS connection and press the router's WPS button.
- Touch WPS PIN connection to generate a PIN, and then enter the PIN on the router.
Using Wi-Fi+
When Wi-Fi+ is enabled, your device will automatically enable or disable Wi-Fi and connect to the Wi-Fi network with the best signal.
You may incur additional data charges when downloading large files or watching online videos over mobile data. To avoid incurring excessive data charges, purchase a data plan. Contact your network provider for details.
1 Open Settings.
2 Touch Wi-Fi > Wi-Fi+ and turn on the Wi-Fi+ switch.
When Wi-Fi+ is enabled, your device will record your Wi-Fi connection history and monitor your signal strength and location. This information is then used to enable or disable Wi-Fi and connect to the Wi-Fi network with the strongest signal.
Using a QR code to share your Wi-Fi hotspot
Create a QR code to share your device's Wi-Fi hotspot with friends.
- QR codes can be generated for the following wireless encryption methods: WPA, WPA2, WEP, WPA-PSK, and WPA2-PSK. You cannot use a QR code to connect to Wi-Fi networks that are encrypted using the EAP protocol. - Ensure that the connecting device supports using QR codes to import Wi-Fi network credentials.
1 Go to Settings.
2 Select Wi-Fi and turn on the Wi-Fi switch.
3 Once connected, touch the name of the network to generate a QR code.
4 On the connecting device, touch the centre of the screen and swipe down. Touch☐, scan the QR code, and then follow the onscreen instructions to connect to the Wi-Fi hotspot.
Transferring data using Wi-Fi Direct
Wi-Fi Direct lets you transfer data directly between two Huawei devices without connecting to a Wi-Fi network. Wi-Fi Direct is similar to Bluetooth, but offers faster transfer speeds, making it suitable for sharing larger files.
Enabling or disabling Wi-Fi Direct
1 Go to Settings.
2 Touch Wi-Fi. Turn on the Wi-Fi switch and then touch
3 Your device will list available Wi-Fi Direct devices. Select the device you want to share files with and then follow the onscreen instructions to connect.
To disconnect from the receiving device, touch 📋 and go to the Wi-Fi Direct screen. Select the receiving device and touch OK.
Using Wi-Fi Direct to send and receive files
i First ensure that Wi-Fi Direct is enabled on both devices.
1 Go to Files and touch and hold the image that you want to share.
2 Touch More > Share > Wi-Fi Direct. Your device will list nearby Wi-Fi Direct devices. Select the receiving device.
3 On the receiving device, select Accept from the popup dialog to accept the file transfer request.
Open the notification panel to view file transfer progress.
By default, received files are saved to the Wi-Fi Direct folder in Files.
Bluetooth
Connecting to other devices using Bluetooth
Enabling Bluetooth and pairing with other devices
1 Go to Settings.
2 Touch Bluetooth and switch on Turn on.
i Ensure that the device you want to pair with is visible.
3 Select the device you want to pair with and follow the onscreen instructions.
Unpairing Bluetooth devices
1 Go to Settings.
2 Touch Bluetooth and switch on Turn on.
3 Touch the ⓘ icon next to the device name and select Unpair.
Transferring data using Bluetooth
Using Bluetooth to share files
i Ensure that Bluetooth is enabled on both devices and that both devices are visible.
1 Select the file(s) you want to share and touch Share > Bluetooth. Your device will search for available Bluetooth devices.
2 Select the receiving device.
3 On the receiving device, select Accept from the popup dialog to accept the file transfer request. Open the notification panel to view the file transfer progress.
i By default, received files are saved to the Bluetooth folder in Files.
Sharing photos and videos with Bluetooth
When viewing photos or videos in full screen, you can share content rapidly using Bluetooth.
i Ensure that Bluetooth is enabled on both devices and that both devices are visible.
1 Go to Gallery.
2 Select the photo or video you want to share and open it in full screen view. Touch Share > Transfer > Start to share the file. Your device will search for nearby available Bluetooth devices.
3 Select the receiving device.
4 On the receiving device, select Accept from the popup dialog to accept the file transfer request. Open the notification panel to view file transfer progress.
i By default, received files are saved to the Bluetooth folder in Files.
Bluetooth settings
Renaming your device
When you enable Bluetooth, your device model is used as the default device name. To make your device easier to identify, you can change the device name.
1 Go to Settings.
2 Touch Bluetooth > Device name.
3 Enter a new name, and then touch Save.
Making your device visible
1 Go to Settings.
2 Touch Bluetooth and then switch on Visibility to make your device visible to other Bluetooth devices.
3 Touch More > Visibility timeout and configure the visibility timeout.
After the visibility timeout elapses, Visibility is disabled automatically and your device will no longer be visible.
NFC
About NFC
NFC (Near Field Communication) lets you make fast, secure payments with your device and also allows convenient file sharing with other devices.
NFC-enabled devices support the following three modes:
- Card emulation: Emulate contactless smart cards (such as bank, transport, and access cards).
- Read/write: Scan NFC tags (in order to top up your transport card for example).
- Peer-to-peer: Transfer files between two NFC-enabled devices.
Enabling NFC
1 Open Settings.
2 Touch More > NFC.
3 Switch on NFC to enable NFC.
Using NFC to make payments
NFC lets you use your device to make contactless payments in shops or on public transport.
Using a SIM card to make payments
Before you can use the NFC feature, you must first request an NFC-enabled SIM card from your network provider.
1 Go to NFC.
2 Under Default payment app, select your network provider's payment app and follow the onscreen instructions to add a bank card and add credit.
To make payments, place your device against an NFC sensor at a payment terminal.
You can also make payments when your device is switched off. To do this, first ensure that NFC is enabled before you switch off your device.
Using card emulation to make payments
Use your device as a virtual bank card to make secure, contactless payments in stores and online.
Before using this feature, download your bank's mobile app and follow the onscreen instructions to add your card. For more details, contact your bank.
1 Go to NFC.
2 Under Default payment app, select the mobile app for your bank.
3 To make a payment, unlock your device and place it against the contactless symbol at a payment terminal.
Using NFC to transfer files
Place two NFC-enabled devices back-to-back for rapid file sharing.
Check that the screen is unlocked on both devices and ensure that NFC and Huawei Beam are both enabled.
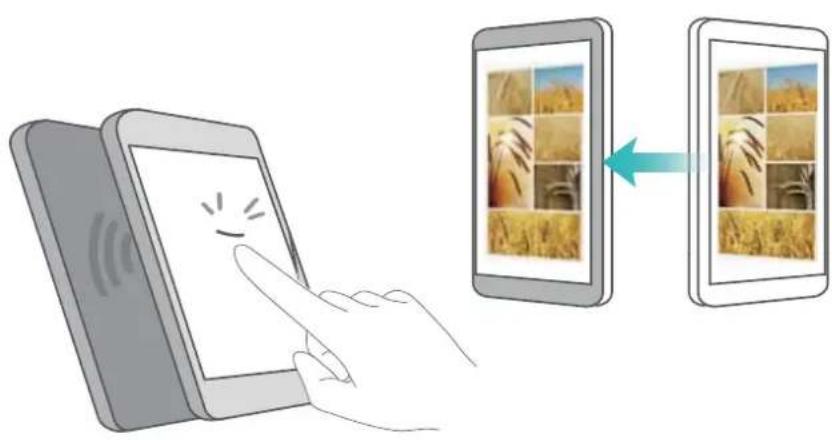
1 On the sending device, select the content that you want to beam (such as web pages, contacts, images, or videos). Touch Share > Huawei Beam.
2 Hold both devices back-to-back so that the NFC sensors on each device touch each other. A sound will be played and the sharing window will shrink on the screen.
3 Touch the screen on the sending device to transfer files to the receiving device. By default, received files are saved to the beam folder in Files.
Using NFC to pair two devices
You can use NFC to rapidly connect two devices over Bluetooth or Wi-Fi Direct, or to share a Wi-Fi or mobile data connection.
Check that the screen is unlocked on both devices and that NFC and Huawei Beam are both enabled.
1 Enable Bluetooth on both devices.
2 Hold your device and the receiving device back-to-back so that the NFC sensors on each device touch each other. A sound will be played and the sharing window will shrink on the screen.
3 Touch the screen on the sending device to connect to the receiving device.
The same method can be used to establish a Wi-Fi Direct connection, share a Wi-Fi hotspot, or share network credentials.
Multi-screen
Using multi-screen
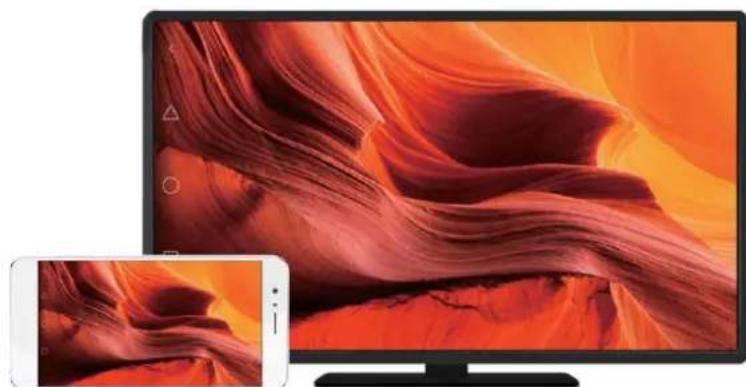
Use multi-screen to display your device's screen on a TV, projector, or other display.
To use multi-screen, your display device must support Miracast. If your display device does not support the above, you can buy an Android set-top box and connect it to your display device.
natural_image
Smartphone displaying a desert canyon landscape with a close-up smartphone showing its image (no text or symbols visible)Mirroring your screen to a display device
Mirror your screen to a larger display device when playing games or sharing content with others.
i Ensure that your device is connected to the same Wi-Fi network as your display device or set-top box.
1 Go to Settings.
2 Touch Smart assistance > MirrorShare. Select your display device or set-top box from those listed. Your device's screen will be mirrored to that device.
To use this feature, you must first enable the Miracast feature on your display device or set-top box. For more information, see the manual for your device.
To stop mirroring your screen, touch ➕ Disconnect.
VPNs
About VPNs
A VPN (virtual private network) is a secure connection that allows you to send and receive data across shared or public networks. You can use a VPN to connect to your company network and email server.
Connecting to a VPN
Use a virtual private network (VPN) for secure, remote access to company data and other network resources.
i Contact your VPN administrator to obtain the server information.
1 Open Settings.
2 Touch More > VPN.
3 Touch Add VPN network. When prompted, enter the server name, select the server type, and then enter the server address. Touch Save to save the server settings.
4 To connect to the VPN, touch the VPN name, enter your username and password, and then touch Connect.
i Contact your VPN administrator to obtain your username and password.
HiSuite
Using HiSuite
Use HiSuite to manage your phone's apps and data from your computer. Download and install apps with a single click and get the most out of your smartphone.
- Manage apps and data: Use HiSuite to manage contacts, messages, multimedia files, and to sync your calendar and contacts.
- Back up and restore data: Back up data from your phone to your computer, or restore data to any Huawei phone.
- Repair or update the system: If your phone won't turn on or boot properly, use HiSuite to perform a factory reset. You can also check for software updates and install them on your phone.
- Screen mirroring: Use HiSuite to display your phone screen on your computer and take screenshots.
Installing HiSuite
Visit http://consumer.huawei.com/minisite/HiSuite_en/index.html on your computer to download and install HiSuite. Check that your system meets the minimum requirements.
1 Use a USB cable to connect your device to the computer. HiSuite will launch automatically.
2 If the Allow access to device data? dialog appears on your device, touch Yes, allow access.
3 On your computer, follow the onscreen instructions to accept the connection request sent from the receiving device. Once the connection has been established, your device screen and model will be displayed on your computer.
If you can't establish a connection automatically, touch Settings > Security & privacy > Additional settings on your device and switch on Allow HiSuite to use HDB.
Using Huawei Share to transfer files between two Huawei devices
Huawei Share provides a quick and easy method to share files between two Huawei devices. It combines the convenience of Bluetooth sharing with the speed of Wi-Fi transfers.
Enabling Huawei Share
1 Swipe down from the status bar to open the notification panel.
2 Touch Huawei Share.
i • Touch the Huawei Share switch. This enables Wi-Fi and Bluetooth automatically.
- If you disable Wi-Fi or Bluetooth, the Huawei Share switch will turn off automatically.
Using Huawei Share to transfer files
i Ensure that Huawei Share is supported on both devices. Huawei Share must be enabled on the receiving device and the screen must be switched on.
1 On your device, select the file(s) you want to share. Touch Share.
2 Select the receiving device from those listed.
3 On the receiving device, select ACCEPT from the popup dialog to accept the file transfer request. Open the notification panel to view file transfer progress.
To cancel sending, touch the name of the receiving device on your device.
By default, received files are saved to the Huawei Share folder in Files.
Using a USB port to transfer data
Selecting the USB connection mode
1 When you use a USB cable to connect your phone to a computer or another device, Allow access to device data? will be displayed in a popup dialog.
2 Touch No, charge only.
3 Swipe down from the status bar to open the notification panel, and then touch Charging via USB. You can choose from the following USB connection modes:
- Charge only: Charge your phone only.
- Reverse charging: Use your phone to charge another device with a USB Type-C cable.
- Device file manager (MTP): Transfer files between your phone and a computer.
- Camera (PTP): Transfer images between your phone and a computer. If your phone does not support MTP, the PTP protocol will be used to transfer files and images between your phone and computer.
- MIDI: Use your phone as a MIDI input device and play MIDI files on your computer.
Transferring data between your phone and a computer
Use a USB cable to connect your phone to a computer and transfer data between the two devices.
Transfer files
MTP (media transfer protocol) is a protocol for transferring media files. You can use MTP to transfer files between your phone and a computer. Before using MTP, ensure that you have Windows Media Player 11 or later installed on your computer.
Swipe down from the status bar to open the notification panel, and then set the USB connection mode to Device file manager (MTP). Your computer will automatically install the necessary drivers. To view files stored on your phone, wait until the drivers have been installed, and then click the new drive icon that appears on your computer (the drive is named after your phone model). If you are using a Windows computer, use Windows Media Player to browse multimedia content on your phone.
Transferring images
PTP (picture transfer protocol) is an image transfer protocol. Use PTP to transfer images between your phone and a computer.
Swipe down from the status bar to open the notification panel, and then set the USB connection mode to Camera (PTP). Your computer will automatically install the necessary drivers. To view images stored on your phone, wait until the drivers have been installed, and then click the new drive icon that appears on your computer (the drive is named after your phone model).
Transferring MIDI data to your phone
MIDI (Musical Instrument Digital Interface) is a music technology protocol that allows digital music instruments to communicate with each other.
Swipe down from the status bar to open the notification panel, and then set the USB connection mode to MIDI. You can use your phone to receive or process MIDI data from other devices.
Transferring data between your phone and a USB storage device
USB OTG is designed to transfer data directly between two USB devices (such as phones, tablets, digital cameras, and printers) without the need for a computer. Use a USB On-The-Go (OTG) cable to connect your phone to a USB storage device and back up your files.
Transferring data between your phone and a microSD card
Use a USB OTG cable to access data on another phone's microSD card without using a computer.
- This feature is only available on phones that support USB OTG cables.
- If your phone has a USB Type-C port, purchase a micro USB to USB Type-C adapter, or use a USB OTG cable with a USB Type-C connector.
1 Connect to the other device using a USB OTG cable and a USB data cable.

2 On the other device, set the USB connection mode to USB flash drive or Device file manager (MTP).
3 Touch Files > Local > SD Card to browse data on the microSD card. You can select and copy data to a destination folder.
4 When you have finished browsing, touch Settings > Memory & storage > SD Card > Eject.
5 Disconnect the USB OTG and USB data cables from both devices.
Transferring data between your phone and a USB storage device
Your phone can access data on USB flash drives, card readers, and other storage devices using a USB OTG cable.
This feature is only available on phones that support USB OTG cables.
- If your phone has a USB Type-C port, purchase a micro USB to USB Type-C adapter, or use a USB OTG cable with a USB Type-C connector.
1 Connect your phone to a USB flash drive with a USB OTG cable.

2 Touch Files > Local > USB drive to browse data on the flash drive. You can select and copy data to a destination folder.
3 When you have finished browsing, touch Settings > Memory & storage > USB drive > Eject.
4 Disconnect the USB OTG cable from your phone and the USB flash drive.
Security and Backup
Fingerprint recognition
Adding a fingerprint for the first time
You can use a fingerprint to unlock your screen, access locked apps and the safe, and make secure payments.
To better protect your privacy, you can only use the fingerprint screen unlock feature when the unlock method is set to PIN or Password.
1 Touch Settings.
2 Touch Fingerprint ID > Fingerprint management > PIN or Password, and set an unlock password by following the on-screen instructions.
3 Once you have set a password, touch New fingerprint to add your fingerprint.
4 Place your fingertip on the fingerprint sensor. Press down lightly on the sensor until your device vibrates. Repeat this step using different parts of your fingertip.
5 Touch OK.
To unlock the screen, place your fingertip on the fingerprint sensor.
You will be asked to enter your backup PIN or password when you restart your device or if fingerprint recognition fails.
Adding, deleting, or renaming a fingerprint
You can add five fingerprints. You can also delete or rename fingerprints.
1 Touch Settings.
2 Touch Fingerprint ID > Fingerprint management.
3 Enter the screen lock password and touch Next.
4 In the Fingerprint list section, you can:
- Touch New fingerprint to add other fingerprints.
- Touch a previously added fingerprint to rename or delete it.
- Touch Fingerprint recognition to identify and highlight registered fingerprints.
Accessing Safe with your fingerprint
Use your fingerprint to access your Safe without entering the password.
1 Open Settings.
2 Touch Fingerprint ID > Fingerprint management.
3 Enter the screen lock password and touch Next.
4 Touch Access safe, and then follow the onscreen instructions to enter your Safe password and enable fingerprint recognition.
Once you have completed the settings, touch Files > Safe. You can now use your fingerprint to access your Safe.
Accessing App Lock with your fingerprint
Use your fingerprint for quick access to apps in your App Lock. You do not need to enter the App Lock password.
1 Open Settings.
2 Touch Fingerprint ID > Fingerprint management.
3 Enter the screen lock password and touch Next.
4 Touch Access app lock. Follow the onscreen instructions to enter your App Lock password and enable fingerprint recognition.
To view the App Lock status, touch Phone Manager > App lock once you have completed the settings, and then place your finger on the fingerprint sensor. To access a locked app from the home screen, touch the app icon and place your fingertip on the fingerprint sensor.
Multi-user accounts
About multi-user accounts
Create multiple user accounts to prevent others from viewing your confidential information, or to keep your work and personal life separate.
There are four different user types:
- Owner: Only the owner can log in to this account. As the owner, you can control all user permissions. For example, you can add or delete users and guests, or authorise other users calling and messaging permissions.
- Sub-user: Suitable for close family and friends. Sub-users can use most features, except for those that may affect the owner, such as restoring factory settings and enabling do not disturb mode.
- Guest: Guests only have limited access to your device's features.
- PrivateSpace: You can create a PrivateSpace to store information you do not want to share with others. After the space is created, you can install and use apps in this space and keep them away from the access of others.
Create user accounts
Create multiple user accounts to keep your work and personal life separate.
1 Open Settings.
2 Touch Advanced settings > Users.
3 Touch Add user. Enter a nickname, and then touch ADD.
4 Once you have added a user, switch to the new user account and follow the onscreen instructions to customise the user settings.
- You can also create a new user account from the lock screen. Under Lock screen settings, switch on Add users when device is locked, and then swipe down from the status bar on the lock screen.
- You can add up to three user accounts.

Deleting user accounts
Delete unused accounts to free up storage space.
Log in as the owner. You can delete a user account in two ways:
- Swipe down from the status bar and touch > More settings. Select the user that you want to delete and touch Delete user > Delete.
- Open Settings > Advanced settings > Users. Select the user that you want to delete and touch Delete user > Delete.
Switching between user accounts
Quickly switch between user accounts.
To switch to another user account, swipe down from the status bar, touch 🔒, and then select a profile picture or username.
Open Settings > Advanced settings > Users. Select the user that you want to switch to and touch Switch user.
Configuring usernames and profile pictures
You can change your username and profile picture at any time.
1 Open Settings.
2 Touch Advanced settings > Users.
3 Select the desired user.
4 Touch . You can:
- Select Take photo to take a photo and use it as your profile picture.
- Select Choose photo from Gallery to choose a profile picture from Gallery.
5 Enter a new name and touch OK.
Creating a guest account
Create a guest account so your friends can use your phone.
1 Open Settings.
2 Touch Advanced settings > Users.
3 Touch Add guest > ADD.
You can also create a guest account from the lock screen. Under Lock screen settings, switch on Add users when device is locked, and then swipe down from the status bar on the lock screen.
Deleting the guest account
Log in as the owner. You can delete the guest account in two ways:
- Swipe down from the status bar, touch > More settings, and then touch Guest > Delete guest.
- Open Settings > Advanced settings > Users and touch Guest > Delete guest.
Authorizing users to make calls and access the call log
You can authorise users to access your contacts, call log, and call and messaging features.
Log in as the owner. You can authorise a user or guest to make calls and access your contacts in two ways:
- Swipe down from the status bar and touch > More settings. Select a user, and then touch Allow calls and messages and sharing of communication history.
- Open Settings > Advanced settings > Users, select a user, and then touch Allow calls and messages and sharing of communication history.
Using PrivateSpace
Use PrivateSpace to prevent others from accessing your messages, photos, videos, and other files.
1 Open Settings.
2 Touch Advanced settings > Users.
3 Touch Add PrivateSpace. Enter a name for your PrivateSpace and touch ADD.
4 Follow the onscreen instructions to complete the settings.
5 Touch Switch to view your PrivateSpace.
Delete or exit your PrivateSpace: Go to your PrivateSpace. Touch Settings > Advanced settings > Users and select 📄 or 📄 as desired.
Security settings
Setting your SIM card PIN
Enable the SIM lock to prevent others from using your SIM card. You will need to enter your SIM card PIN each time you turn on your device or insert your SIM card into another device.
i Make sure you have received a SIM card PIN from your carrier before enabling the SIM lock.
1 Open Settings.
2 Touch Security & privacy > Additional settings and select card lock to access the SIM lock settings.
3 Switch on Lock SIM card. Enter your SIM card PIN and touch OK.
To change your SIM card PIN, touch Change SIM PIN1 and follow onscreen instructions.
- You will need to enter the PUK code if you exceed the maximum number of incorrect PIN attempts. The SIM card will be permanently locked if you enter the PUK code incorrectly too many times.
- For details about these limits, contact your network provider.
Setting microSD card password
Encrypt your microSD card to prevent unauthorised access to your data. You will be prompted to enter a password when the microSD card is inserted into another device.
- Not all microSD cards can be encrypted. An error message may be displayed when you attempt to encrypt or unlock unsupported cards. Remember to back up important data before encrypting your microSD card.
- Encrypted microSD cards will not be recognised by devices that do not support microSD card encryption.
- If you forget the microSD card password, you will have to clear all the data on the card.
- Not all devices support microSD cards.
1 Open Settings.
2 Touch Security & privacy > Additional settings > Set SD card password and follow onscreen instructions to set a password.
Once you have set your password, you can change or remove the password:
- Touch Change SD card password to change the password.
- Touch Clear SD card password to remove the microSD card password and disable encryption.
Backing up and restoring data
Backing up data to a microSD card
i • Not all devices support microSD cards.
- The feature may vary depending on the carrier you use.
Back up data on your old device to a microSD to avoid losing your files.
1 Open Backup on your old phone.
2 Select Back up > SD card > Next.
3 Select the data you want to back up and touch Back up. When prompted, enter a backup password. No backup password is required for photos, audio files, videos, or documents.
- Set a password reminder to help you remember your password and prevent you from losing access to your files.
- By default, backup files are saved to the HuaweiBackup folder in Files.
Backing up data to your phone's internal storage
Back up data to your phone's internal storage to avoid losing your files. Only back up smaller files.
1 Open Backup.
2 Touch Back up > Internal storage > Next.
3 Select the data you want to back up and touch Back up. When prompted, enter a backup password. No backup password is required for photos, audio files, videos, or documents.
- Set a password reminder to ensure you don't lose access to your files.
- By default, backup files are saved to the HuaweiBackup folder in Files.
Backing up data to a USB storage device
Use a USB On-The-Go (OTG) cable to connect your device to a USB storage device and back up your files. Compatible USB storage devices include USB flash drives, card readers, and device with a microSD card.

flowchart
graph TD
    A["Smartphone with app icons"] -->|Data Transfer| B["Laptop with tulips"]
    B -->|Data Transfer| A
1 Open Backup.
2 Touch Back up > USB storage > Next.
3 Select the data you want to back up and touch Back up. When prompted, enter a backup password. No backup password is required for photos, audio files, videos, or documents.
- Set a password reminder to help you remember your password and prevent you from losing access to your files.
- By default, backup data is saved to the HuaweiBackup folder on the USB storage device.
Transferring data using a computer
Back up data on your device to a computer to avoid losing your files.
Install HiSuite before using your computer to back up and restore data. For more information, see Installing HiSuite.
1 Connect your device to a computer using a USB cable. HiSuite will launch automatically.
If your old device is not a Huawei device, use manufacturer-provided software to back up data to your computer, and then proceed directly to step 4.
2 Go to the backup screen in HiSuite. Select the data that you want to back up and follow the onscreen instructions to back up the data.
Follow the onscreen instructions to set a password reminder to help you remember your password and prevent you from losing access to your files.
3 Use a USB cable to connect your new device to the computer.
4 Go to the data restore screen in HiSuite. Choose which backup you want to restore and follow the onscreen instructions to restore the data. If the backup files are encrypted, you will need to enter the encryption password when you are prompted to recover data.
File management
Creating folders
Keep your device organised by creating folders for your files.
1 Open Files.
2 In the Local tab, touch Internal storage.
3 Touch+. Enter the name of the new folder and touch Save.
Viewing files
Viewing files by category
Open Files. Select the Categories tab to view your files by category.

Finding files quickly
Locate files quickly using the file search feature.
1 Open Files.
2 On the Local tab, touch Internal storage.
3 Touch and enter the file name or keywords. Search results will be displayed beneath the search bar.
Sorting files
Use the sort feature to arrange your files by type, name, size, or date.
1 Open Files.
2 On the Local tab, touch Internal storage.
3 Touch= and then sort files by type, name, size, or date.
Viewing downloads
1 Open Files.
2 On the Categories tab, touch Downloads and favourites to view files you have downloaded or received from other devices.
Adding and viewing favourites
1 Open Files.
2 On the Local tab, touch Internal storage.
3 Touch and hold the file or folder you want to add and touch > Add to favourites.
4 On the Categories tab, touch Downloads and favourites to view favourites.
Creating file shortcuts on the home screen
Create a shortcut to frequently-used files on the home screen for easy access.
1 Open Files.
2 On the Local tab, touch Internal storage.
3 Touch and hold the file or folder you want to add and touch > Create desktop shortcut.
Sharing files
Use the file sharing feature to share files, photos, and videos.
1 Open Files.
2 On the Local tab, touch Internal storage.
3 Select the files you want to share and touch > Share.
4 Choose a sharing method and follow the onscreen instructions to share your files.
Renaming files
Give your files memorable names so that you can find them quickly.
1 Open Files.
2 On the Local tab, touch Internal storage.
3 Touch and hold the file or folder you want to rename and then touch >Rename.
4 Enter a new name and touch OK.
Copying, moving, or deleting files
1 Open Files.
2 On the Local tab, touch Internal storage.
3 Touch and hold the files and folders you want to copy, move, or delete. You can:
- Copy files to a destination folder: Touch ☐. Select a destination folder and touch ☐.
- Move files to a destination folder: Touch ☐. Select a destination folder and touch ☐.
- Delete files or folders: Touch > Delete.
Creating or extracting archives
Compress files in a zip archive to free up space and share files more easily.
1 Open Files.
2 On the Local tab, touch Internal storage.
3 Touch and hold the file or folder you want to compress, and then touch > Compress.
4 Choose the archive destination. The selected files will be compressed into a zip file, which will be named automatically.
To extract an archive, touch and hold the archive file. Touch > Extract to and select where the contents of the archive should be extracted to.
Hiding small image files
When you browse your images in Files, you might also see some cached images from websites. You can prevent these images from being displayed as follows:
1 Open Files.
2 Touch > Settings and switch on Filter small pictures to hide files that are smaller than 30 KB. This should hide most cached images.
Storing files securely
Enable Safe, set a password, and move files into a safe to encrypt them. You can remove files from a safe at any time.
You can add images, audio files, videos, and documents to a safe.
1 Open Files.
2 In the Local or Categories tab, touch Safe.
3 Touch Enable.
4 Set the safe storage location.
5 Follow the onscreen instructions to set a password and security question, and then touch Done to open Safe.
6 Touch↓.
7 Follow the onscreen instructions to select files, and then touch ↓ to add your files to the safe.
In Safe, you can also:
- Remove files from a safe: In Safe, open a folder and touch and hold the files you want to remove, and then touch ↑↓
- Destroy a safe: In Safe, touch Settings > Destroy Safe. Follow the onscreen instructions to remove files from the safe and destroy it.
- Change the safe password: In Safe, touch Settings > Change password. Follow the onscreen instructions to change the password.
- Change the security question: In Safe, touch Settings > Change security question. Follow the onscreen instructions to change the security question.
- Switch to another safe: In Safe, touch Settings > Switch Safe. Follow the onscreen instructions to select another safe.
- View the storage location: In Safe, touch Settings > Safe location to view the safe's storage location.
Don't change the storage location folder, otherwise you may not be able to access your files.
Camera and Gallery
Camera options
Open Camera to display the viewfinder.

Swipe right on the viewfinder to display the list of shooting modes.
Swipe left on the viewfinder to access the camera settings.
Photos and video recordings
Taking a photo
Geotagging photos
Enable geotagging to record the location of photos and video recordings. In Gallery you can view the shooting location of photos and videos. In Gallery, you can display all photos and videos on a map.
1 Open Camera.
When opening Camera for the first time, enable location services in the popup dialog.
2 Swipe left on the screen and switch on GPS tag.
Zooming in and out
Spread two fingers apart to zoom in, or pinch them together to zoom out. The image quality may be affected if you continue to zoom in after the maximum optical zoom has been reached. You can also zoom in or out by adjusting the slider that appears in the viewfinder after you perform the zoom in or zoom out functions with your two fingers.
Adjusting the exposure
The camera automatically adjusts the exposure according to the ambient brightness. A higher exposure produces brighter images.
Manually adjust the exposure: In the viewfinder, touch the screen and swipe up or down to adjust the exposure.
Turning on the flash
Touch the flash icon in the top-left corner of the viewfinder to turn on the flash. Touch 7 to display the four options:
- ^4 Automatically enables or disables the flash based on the ambient brightness.
• : Disables the flash. - : Enables the flash.
- : Keeps the flash on when you open Camera.
Using filters to enhance images
The camera comes with a number of image filters to give your photos a unique look. In the viewfinder, you can:
Touch , and then select a filter.
Ultra Snapshot
Press the volume down button twice to take a photo when the screen is off.

i This feature is not available during music playback.
1 Open Camera.
2 Swipe left and touch Ultra snapshot > Open camera and take quick snapshot.
3 When the screen is off, point the camera at the desired object and press the volume down button twice in quick succession to take a photo. The camera will automatically take a photo and display the capture time.
i Disable Ultra Snapshot: Touch Ultra snapshot > Off in the camera settings.
Burst shooting
Use burst shooting when you want to take a photo of a moving subject, such as during a football match. The camera will capture several images in quick succession and automatically select the best photo.
This feature is not available in HDR mode, Panorama mode, Super Night mode, and Light Painting mode.
1 Open Camera.
2 Touch and hold 📷 to start the burst sequence. The number of captured photos will be displayed above 📷
3 Release to stop the burst shooting.
You can take up to 100 photos in one burst sequence, provided that there is enough storage space on your phone.
Select the best shot: Touch the image thumbnail to view the image in Gallery, and then touch ☐ to select a photo. Touch and follow the onscreen instructions to save the photo.
Self timer
Use a self timer to include yourself in shots.
1 Open 📄 Camera. Swipe left on the screen to access the camera settings.
2 Touch Timer to set the countdown time.
3 Return to the viewfinder. Rest your device on a stable surface and frame the scene you want to capture.
4 Touch 📷 to start the countdown timer. Your phone will automatically take a photo when the countdown time has elapsed.
Audio-controlled shooting
Use voice commands to control the camera remotely, or set the camera to take a photo when it detects a loud sound.
1 Open Camera.
2 Swipe left on the screen to access the camera settings.
3 Touch Audio control and switch on Audio control.
4 You can then:
- Say Cheese to take photos: Set the camera, so that it will take a photo when you issue a voice command.
The camera will only take photos when default voice command Cheese is detected. You cannot configure custom voice commands.
- Take photos when your voice reaches a certain decibel level: Set the camera to take a photo when the surrounding noise reaches a certain decibel level.
5 Frame the scene you want to capture. Your device will take a photo automatically when you issue a voice command or the device detects a loud sound.
Shooting a video
Shooting a video
1 Open Camera.
2 Touch to switch to recording mode.
3 Touch to start recording.
4 In the process, you can perform the following:
- Touch ⑪ to stop recording. Touch ⑦ to continue recording.
- Touch 📷 to save the current scene as a photo.
5 Touch to complete recording.
Zooming in and out
Spread two fingers apart to zoom in, or pinch them together to zoom out. The image quality may be affected if you continue to zoom in after the maximum optical zoom has been reached.
Turning on the flash
Touch the flash icon in the top-left corner of the viewfinder. There are two options:
- Keep the flash on when you are recording.
- : Disable the flash.
Object recognition and Pro camera mode
Pro camera options
Open ● Camera, swipe right on the screen and touch Pro photo to enter Pro camera mode.

Pro camera settings
Selecting the metering mode
Touch ☐ to select the metering mode. The metering mode affects how your camera determines the exposure. You can select matrix metering, center-weighted metering, or spot metering.
Adjusting the ISO
The ISO determines the camera's sensitivity to light. Increasing the ISO will create a brighter image, but there will be a noticeable increase in noise. Touch ISO and drag the slider to change
the ISO settings. You can configure the camera to adjust the ISO automatically, or you can adjust it manually.
Adjusting the shutter speed
Touch S and drag the slider to set the shutter speed. By default, the shutter speed is set to Auto.
Adjusting the exposure compensation
Touch EV to set the exposure compensation. Select an exposure setting to increase or decrease the brightness. Touch and hold the icon to lock the current exposure setting.
The camera will automatically determine the ambient brightness. If the current exposure setting is too high or too low, 🧑 or 🧑 will be displayed.
Changing the focus mode
Touch AF to set the focus mode. You can select touch to focus (AF-S), continuous autofocus (AF-C), or manual focus (MF). Continuous autofocus is set by default. When continuous autofocus is selected, touch and hold AF-C to enable the focus lock.
Setting the white balance
Touch AWB to select a white balance according to the ambient light conditions. You can choose from daylight, tungsten bulb, fluorescent lamp, and more. You can also adjust the colour temperature. Touch and hold AWB to lock the white balance.
Using the spirit level
Enable the spirit level to ensure that the camera is level.
In the Pro camera viewfinder, swipe left and switch on Horizontal level. When this feature is enabled, a spirit level will appear on the viewfinder. Ensure that the solid line covers the dotted line.
Saving images in RAW format
Save photos in RAW format to retain all image data for post processing.
In the Pro camera viewfinder, swipe left and switch on RAW format. Photos will be saved in RAW and JPEG format.
Wide aperture mode
Use wide aperture mode for close-up shots of objects and people. You can adjust the focal point after taking a photo to blur the background and make the subject stand out.
For optimal results, ensure that the subject is no more than 2 meters (6 ft) from the camera.
1 Open Camera.
2 Touch® on the upper screen to enter the wide aperture mode.
i The wide aperture mode is only available in the Photo and Video mode.
3 Touch the viewfinder to focus on a particular area.
For optimal results, the focal length is fixed and cannot be adjusted.
4 Touch in the viewfinder and swipe left or right to adjust the aperture.
5 Touch to take a photo.
Adjust the background blur: Open Gallery, and touch a photo with tagged with 📋 and then touch 🔒 to adjust the focal point and aperture. Touch 🔒 to save the photo.
Monochrome mode
The camera comes with a separate monochrome lens that takes black and white photos with greater contrast and detail.
1 Open Camera.
2 Swipe right and touch Monochrome.
3 Touch.
Beauty mode
Use beauty mode for stunning selfies and smoother-looking skin.
1 Open Camera.
2 Touch on the top of the screen.
3 Touch and drag the slider to adjust the effect.
4 Touch to take a photo.
Perfect Selfie mode
Use Perfect Selfie mode to automatically apply customised beauty settings to your face.
1 Open Camera.
2 Touch 📋 on the top of the screen.
3 Swipe left and touch Perfect selfie.
4 Switch on Perfect selfie and follow the onscreen instructions to take three photos of your face from the front, side, and with your head lowered.
5 Configure skin tone, pupils, and face shape settings. Choose a higher value for a more noticeable effect. Touch √ to save your settings.
To design you beauty solution, you can perform the following:
- Modify your personal information: In the camera settings, touch Perfect selfie > Edit personal info to update photos of your face from the front, side, and with your head lowered.
- Adjust your beauty settings: In the camera settings, touch Perfect selfie > Set beauty effects to adjust the beauty settings, such as skin tone and face shape.
Slow motion recording
Record videos in slow motion to watch fast-moving scenes in detail.
1 Open Camera.
2 Swipe right on the screen and touch Slow-mo.
3 Touch to start a video recording. Touch the screen to focus on an object or area during recording.
4 Touch to end the recording.
Slow motion recording works best in bright surroundings. To select the video clip portion to be played in slow motion, refer to Cropping slow-motion videos.
Time-lapse mode
Time-lapse mode allows you to capture and speed up subtle changes in the natural world. For example, you can record the opening of a flower or the movement of clouds.
1 Open ● Camera. Swipe right and touch Time-lapse.
2 Place your phone on a stable surface or use a tripod. Touch ☐ to start a video recording.
The camera will automatically select a suitable frame rate according to the length of the recording. The zoom cannot be adjusted during recording.
3 Touch to end the recording.
When you play the video in Gallery, it will be played back at a higher frame rate. The frame rate is determined automatically by the camera and cannot be adjusted.
Adding watermarks to photos
Add watermarks to personalize your photos and help you remember where they were taken.
1 Open Camera.
2 Swipe right and touch Watermark.
When you add a watermark for the first time, you will be prompted to connect to the Internet to obtain weather and location information.
3 Touch: and select the desired watermark type (such as time or location).
You can add text to some watermarks. Touch the flashing text box, enter the desired text, and then touch √.
4 Drag the watermark to adjust its position.
i Touch < or to preview other watermarks.
5 Touch to take a photo.
Audio notes
Add audio notes to bring your photos to life.
1 Open Camera.
2 Swipe right and touch Audio note.
3 Frame the scene you want to capture. Touch 📷 to take a photo with an audio note.
4 The camera will record a short audio clip of up to 10 seconds to add to your photo. Touch ⏻ to stop recording.
Photos with audio notes are indicated by the icon in Gallery.
When viewing a photo with an audio note, touch 📷 to play the audio note.
Managing shooting modes
Rearranging the shooting mode list
Move your favourite shooting modes to the top of the list to make them easier to find.
1 Open Camera.
2 Swipe right to display the list of shooting modes.
3 Touch/.
4 Drag mode icons to the desired position. Touch √ to save the settings.
Updating shooting modes
Update your camera's shooting modes to the latest version for enhanced features and better image quality.
Open Camera and go to the list of shooting modes. A red dot will be displayed on the icon when an update is available. Touch ↓ and select the shooting mode that you want to update. Your phone will download and install the latest version.
Deleting shooting modes
Delete unwanted shooting modes to free up storage space.
i Pre-installed shooting modes cannot be deleted.
1 Open Camera.
2 Swipe right to display the list of shooting modes and touch /.
3 Shooting modes that can be deleted are indicated by the ✗ icon. Just touch ✗
4 Touch √ to delete the selected modes.
Configuring the camera settings
Configure the camera settings to suit your needs.
Setting the photo and video resolutions
Increase the resolution for higher quality images and videos. Larger resolution images take up more space on your device. Changing the resolution will also change the image dimensions.
i Some resolutions may not be supported in certain shooting modes.
Open 📄 Camera. Swipe left and touch Resolution to change the resolution.
Configuring the default storage location for photos and videos
i Not all devices support microSD cards.
Open Camera. Swipe left and switch on Priority save to SD card to change the default storage location to the microSD card.
This option is only available when the device supports microSD card and a microSD card is inserted. If the microSD card is full, photos will be saved to your
Adding an overlay
Add a grid or spiral overlay to the viewfinder to help you compose your image.
i Overlays may not be available in some shooting modes.
Open 📄 Camera. Swipe left on the screen, touch Camera grid, and then select an overlay. To disable the overlay, touch Off.
Configuring the volume button function
By default, the volume button functions as the shutter button. You can change the function of the volume button to adjust the zoom or focus.
Open Camera. Swipe left on the screen. Touch Volume button function and select Shutter, Zoom, or Focus as desired.
Configuring the touch and hold settings for the shutter
By default, touch and hold the shutter to take burst shots. You can change the function of the shutter to adjust the focus.
Open 📄 Camera. Swipe left on the screen. Touch Touch & hold shutter button and select Burst shoot or Focus as desired.
Other camera settings
Your camera also comes with a number of other settings to help you shoot high-quality images in a variety of different shooting scenarios.
i Some settings may not be available in certain shooting modes.
Swipe left on the viewfinder to configure the following settings:
- Touch to capture: Touch the viewfinder to take a photo.
- Capture smiles: The camera will automatically take a photo when it detects a smile.
- Object tracking: Touch the object you want to focus on. The camera will track and focus on the selected object.
- Image adjustment: Adjust saturation, contrast, and brightness.
- Stabiliser: Corrects shaky in video recordings. Not all devices support this feature.
Viewing photos and videos
Viewing photos in full screen mode
Open Gallery and touch a photo to view it in full screen. Touch the screen to show or hide the menu.
When viewing photos in full-screen mode, you can:
- Zoom in or out: Spread two fingers apart to zoom in, or pinch two fingers together to zoom out.
- View image details: Touch to ⓘ view the image details, such as the ISO, exposure compensation, and resolution.
- Rename photos: Touch : >Rename. Enter a new name and select OK.
- Set photo as the home screen wallpaper, or assign the photo to a contact: Touch > Set as > Wallpaper or Contact photo.
- Enable auto-rotation: In Gallery, touch > Settings > Photo orientation > Always rotate to rotate photos when you change the screen orientation.
Viewing photos and videos in chronological order
Go to the Photos tab. Photos and videos are automatically displayed in chronological order.
Touch : > Settings and switch on Show time to display the date when the photo was taken. In the Photos tab, zoom in or out to switch between month and day view.
Viewing photos by location
If GPS tag is switched on in Camera, you can view photos and videos by location in Gallery.
Go to the Photos tab and touch 📋 to view your geotagged photos on a map.
Viewing photos and videos by album
Go to the Albums tab. Photos and videos are automatically sorted into default folders. For example, videos that you take with the camera are automatically added to the Camera videos folder, and screenshots are added to the Screenshots folder.
i Touch : > Hide albums and turn on the switch next to albums that you want to hide. These albums will not appear in the album list.
Viewing photos as a slideshow
Go to the Photos tab and touch : > Slideshow. Touch the screen to stop the slideshow.
Organising albums
Adding photos or videos to a new album
1 Open Gallery.
2 On the Albums tab, touch + . Enter the album name and touch OK.
3 Select the images or videos that you want to add to the new album and touch √.
4 Touch Copy or Move to add selected files to the new album.
If you copy the files to a new album, the original files will be saved. If you move the files to a new album, the original files will be deleted.
Moving photos and videos
Combine photos and videos from separate albums.
1 Open Gallery.
2 On the Photos or Albums tab, touch and hold the photo or video that you want to move until
√ appears, and then select the files that you want to move.
3 Touch☐.
4 Select the destination album.
Files are deleted from their original album after they have been moved.
Moving albums
De-clutter your photo collection by moving and merging less important albums into one album.
• The Camera, Camera videos, and Screenshots albums cannot be moved to Others.
- Moving an album created by a third-party app to Others will not prevent the app from functioning.
1 Open Gallery.
2 On the Albums tab, touch and hold the target album, and then select the albums to be moved in.
3 Touch↓ to move the selected album or albums to Others.
In Others, touch and hold an album, and then touch ↗ to restore the album to its original location.
Rearranging albums
Change the order in which albums are displayed so you can always find your favourite photos.
i You cannot rearrange Camera or Screenshots.
1 Open Gallery.
2 Go to the Albums tab, and then touch and hold an album until — appears on the left of all your albums.
3 Touch and hold—next to the album that you want to move, and drag it to the desired position. Exit to save the modifications.
Deleting photos and videos
1 Open Gallery.
2 Touch and hold an image or album to open the file selection interface, and then select the files that you want to delete.
3 Touch > Delete.
Sharing photos and videos
Use the sharing feature in Gallery to share photos and videos.
Sharing photos and videos stored on your phone's internal storage or microSD card
1 Open Gallery.
2 Touch and hold file to open the file selection interface, and then select the files you want to share.
3 Touch. Select a sharing method and follow the onscreen instructions to share the selected file(s).
Editing a photo
The Gallery app features powerful image editing tools that you can use to draw graffiti, add watermarks, or apply filters.
1 Open Gallery.
2 Touch an image to view it in full-screen mode. In full-screen view, touch/ — to open the photo editor and edit your photo using the available tools.
- Rotate an image: Touch ⏻ and swipe the screen to adjust the angle of rotation.
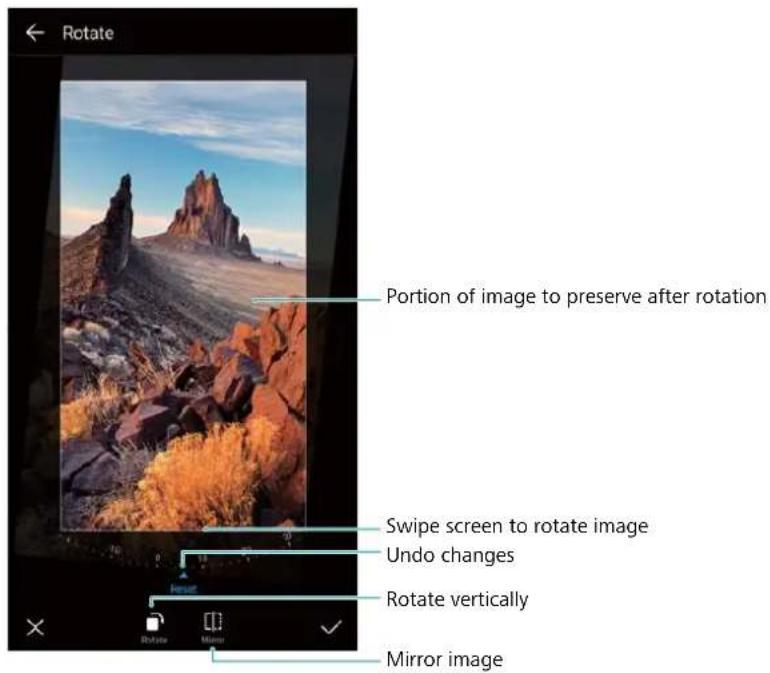
- Crop an image : Touch 📋 to select the crop ratio . Drag the dotted edges to crop the image to the desired size.
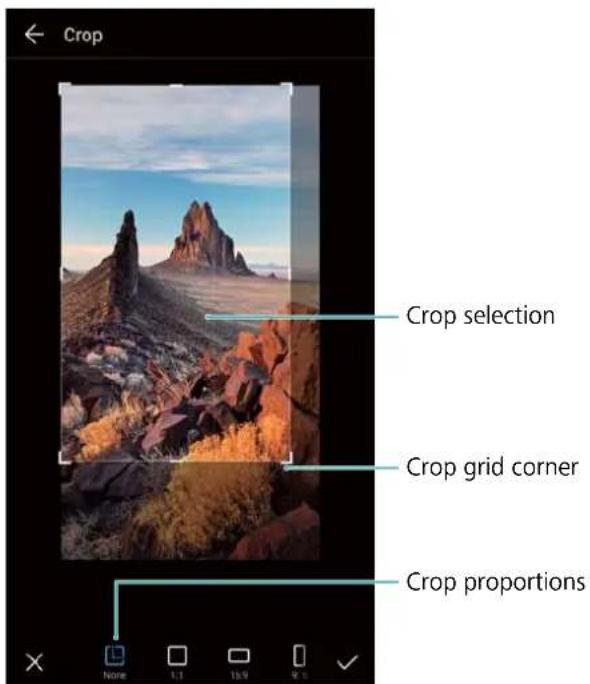
- Add a filter: Touch and select the desired filter.
- Accentuate colours: Touch 😊. Select an area of the image to accentuate the color. All other areas will be displayed as black and white.

natural_image
Black-and-white photo of peony flowers on a wooden post, no text or symbols visible
natural_image
Black-and-white photo of pink peony flowers on a wooden surface, with no visible text or symbols.- Blur an image: Touch Ⓞ. Drag the slider to adjust the amount of blur. Drag the circle to the part of the image that you do not want to blur.
- Adjust image parameters: Touch 📄. You can adjust the brightness, contrast, saturation, and more to make your image look more vivid.
- Apply facial enhancement effects: Touch 📋 to apply facial enhancement effects to people in an image. You can choose from various skin and eye enhancement effects.
- Apply mosaic effects: Touch and select the desired mosaic effect.
- Draw graffiti: Touch ✅ to select the brush and colour.
- Add a watermark: Touch ⚠ to add a watermark and personalise your photo. You can choose from time, location, weather, activity, and other watermarks.
- Add a label: Touch 🔒, and then select the desired label type and font. You can use labels to record your mood or thoughts.
Editing Videos
Editing a video
Select highlights from videos and save them as separate files.

1 Open Gallery.
2 Select the video that you want to edit and touch /-.
3 On the video editing screen, drag the sliders to select the portion of the video that you want to keep.
i You can touch ▶ to preview the video.
4 Touch√ to crop and save the video.
To change the resolution, select a resolution on the video editing screen. Videos with higher resolution occupy more space of your device.
Cropping slow-motion videos
Use the video editing tool in Gallery to crop slow-motion videos.
1 Open Gallery.
2 Touch the slow-motion video that you want to edit, and touch▶ to start playback.
3 Touch the screen to display the slow-motion editing interface. Drag the sliders to select the portion you want to view in slow motion.
To save the edited slow-motion video as a separate video, touch file > Save slow-mo
Configuring Gallery
Displaying the capture time and location
You can see the capture time and location when viewing the photos.
1 Open Gallery.
2 Touch : > Settings.
3 You can configure the following two settings:
- Switch on Show location. When viewing a geotagged photo, the photo's location will be displayed.
- Switch on Show time. When viewing a photo, the date and time at which the photo was taken will be displayed.
Calls and Contacts
Making calls
Smart dialling
Enter the name, initials, or number of a contact in the dialler. Your device will display matching contacts.
1 Open Dialler.
2 Enter the name, initials, or number of a contact in the dialler (for example, John Smith or JS). Your device will search your contacts and call log and list the results above the dialler.

3 Select the contact you want to call from the list. If your device has dual SIM support, touch

or

to make a call.
i The call status will be displayed on the screen (for example, ringing or call forwarding).
4 Touch to end the call.

To end a call using the power button, go to 📋 Dialer, touch ⚠ > Settings, and then switch on Power button ends call.
Making a call from Contacts
1 Open Contacts.
2 Touch the search bar and enter the name or initials of the person you want to call.
3 Touch the contact number. If your device has dual SIM support, touch 📋 or 📋 to make a call.
Making a call from the call log
1 Open Dialler.
2 Slide the list up and down to view all calls. Touch the name or number of the person that you want to call. If your device has dual SIM support, touch 📞 or 📞 to make a call.
Calling contacts when the screen is off
Call people when the screen is switched off.
1 Open Dialler.
2 Touch : > Settings > Quick calling and switch on Quick calling.
Press and hold the volume down button for one second when the screen is off. When you hear the alert sound, release the volume down button and say the name of the contact you want to call. The device will dial their number.

Making an emergency call
In the event of an emergency, you can make emergency calls from your device, even without a SIM card. However, you must be in an area with network coverage.
1 Open Dialler.
i You can also touch Emergency call from the lock screen.
2 Enter the emergency number for your location in the dialler, and then touch 📞.
If you are in an area with good network reception, your device will automatically obtain your location and display it on the screen.
The ability to make emergency calls depend on local regulations and network providers in your area. Poor network coverage or environmental interference may prevent your call from being connected. Never rely solely on your device for essential communication during emergencies.
Making international calls
Before making a long-distance call, contact your network provider to activate international calling or roaming services.
1 Open Dialler.
2 On the dialler screen, touch and hold the 0 key to enter a + symbol, and then enter the country code, area code, and phone number.
3 Touch to make a call. If your device has dual SIM support, touch or to make a call.
Making a call while roaming
Use Contacts to call a contact when you're roaming.
Before using this feature, make sure you have activated international call or roaming service. For more details, contact your network provider.
Open Contacts. To initiate a call, select the contact you want to call, and then touch the contact's number.
Answering calls
Answering or rejecting a call
When a call comes in, press the volume button to mute the ringtone.
If the screen is locked:

natural_image
Dark background with abstract curved and circular icons (no text or symbols)- Drag right to answer the call.
- Drag ○ left to reject the call.
- Touch 🔔 to reject the call and send an SMS.
- Touch ⏻ to configure a callback reminder.
If the screen is unlocked:
- Touch to answer the call.
- Touch ⏻ to reject the call.
- Touch 🔔 to reject the call and send an SMS.
- Touch ⏻ to configure a callback reminder.
- To use an app during a call, touch □ Recent to open the list of recently used apps. You can also swipe left or right on the front-facing fingerprint sensor , if it is available on your phone. Touch the desired app. The Dialer app will continue to run in the background.
If you receive a call when you are entering text or using full-screen mode (for example, when you are viewing an image or playing a game), the incoming call will be displayed at the top of the screen in a floating window. Touch to answer the call or to decline the call.
Switching between calls
i Ensure that you have turned on call waiting before using this feature. For details, contact your network provider.
1 If you receive an incoming call when in another call, touch 📋. You can then answer the incoming call and hold the other line.
2 To switch between the two calls, touch ⇌ or select the call that is on hold.

Making a conference call
Set up a conference call using the multi-party call feature. Call one contact's number (or receive a call), and then call another number to add it to the conference call.
i Conference calling must be supported by your carrier. Please ensure you have activated this service. For details, contact your network provider.
1 Call the first participant.
2 Once the call is connected, touch +, and then dial the second participant's number. The first participant will be placed on hold.
3 When the second call is connected, touch ↑ to start a conference call.
4 Repeat steps 2 and 3 to add more people to the conference.
5 During a call, touch > to view the list of participants. You can:
- Touch next to a contact to remove the contact from the call.
- Touch Y next to a contact to remove the contact from the conference call and keep them in a separate call.
- Touch ← to return to the main call screen.
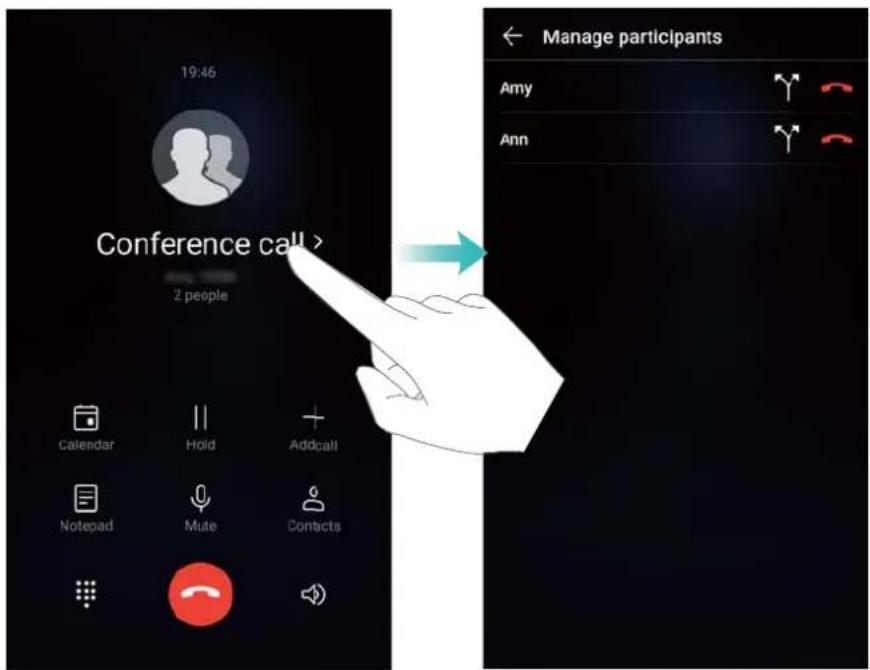
6 Touch to end the conference call.
In-call options
Do not cover the microphone during a call.
During a call, your device will display an in-call menu.
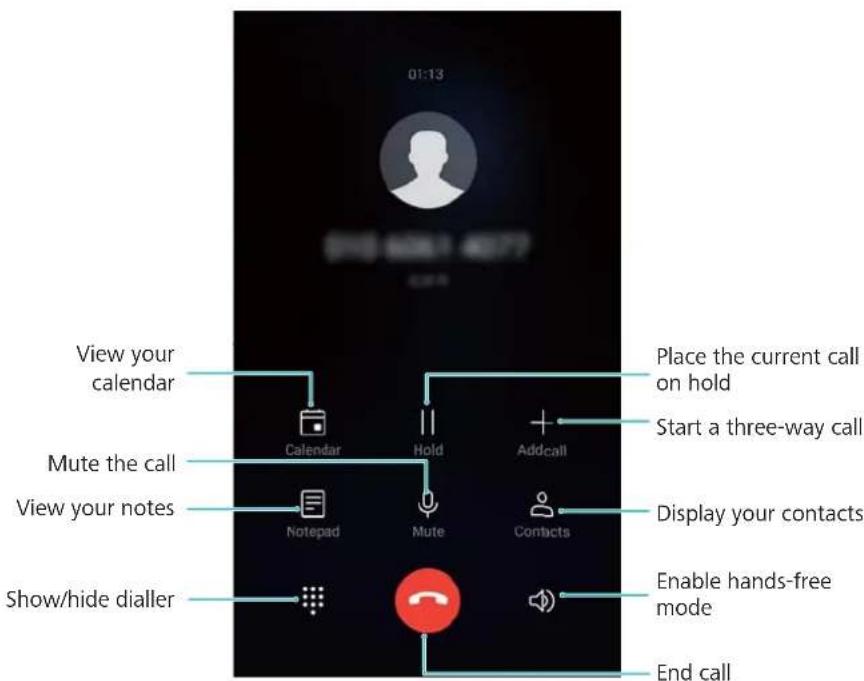
- Hide the in-call menu: Touch ○ Home or ◀ Back. If the front-facing fingerprint sensor is available on your device, where the navigation bar is hidden by default, you can also touch ○. Touch the green status bar at the top of the screen to return to the in-call menu.
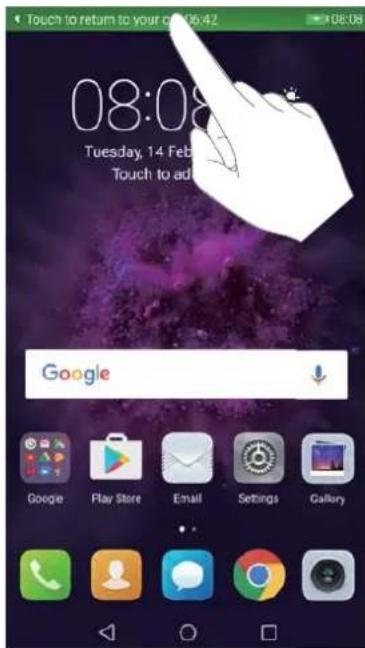
- Start a three-way call: Contact your network provider to find out how to use this feature.
- Adjust the volume: Press the volume up button to increase the volume, or the volume down button to decrease the volume.
Managing call logs
Viewing missed calls
1 Open Dialler.
2 To display all missed calls, touch the Missed tab and swipe down in the call log.
You can also view missed calls in the All tab. Missed calls are marked in red.
3 Touch ⓘ next to a call log to return the call, send a message, and more.
Managing unknown numbers in the call log
1 Open Dialler.
2 Touch Unknown.
3 Select a number and touch ⓘ. You can:
- Add the number to your contacts: Touch + to create a new contact, or touch 🔊 to add the number to an existing contact.
- Add the number to the blacklist: Touch : > Add to blacklist.
- Share the number: Touch : > Send number to send the number as a text message.
Merging call logs
Merge call logs belonging to the same contact or number to keep your call log organised.
1 Open Dialler.
2 Touch : > Settings > Merge call log.
3 Touch By contact. Your device will automatically merge call logs belonging to the same contact or number. Touch ⓘ next to a call log to view detailed call log information.
Clearing the call log
Open Dialler. You can clear the call log in two ways:
- Delete one entry: Touch and hold a log entry, and then touch Delete entry.
- Delete multiple entries: Touch 📄. Select the entries you want to delete, and then touch 📄.
Backing up the call log
1 Open Backup.
2 Touch Back up > SD card or Internal storage to back up the call log to a microSD card or your phone's internal storage.
3 Select Call log and touch Back up.
4 Follow the onscreen instructions to configure a password.
Call settings
Enabling call forwarding
If you are unavailable to take a call, you can configure your device to forward calls to another number.
1 Open Dialler.
2 Touch : > Settings.
3 Touch Call forwarding. If your device has dual SIM support, touch SIM 1 or SIM 2, and then touch Call forwarding.
4 Select a method of forwarding the call. Enter the destination number and touch Enable.
When call forwarding is enabled, your device will forward certain calls (such as unanswered calls) to the number you specified.
Enabling call waiting
Call waiting allows you to take an incoming call when you are already in a call and switch between the two conversations.
i You may need to contact your network provider to enable this feature.
1 Open Dialler.
2 Touch : > Settings.
3 Touch Additional settings and switch on Call waiting. If your device has dual SIM support, touch SIM 1 or SIM 2, then Additional settings, and switch on Call waiting.
When you receive an incoming call while already in a call, touch to answer the new call, and
to switch between the two calls.
Enabling pocket mode
Enable pocket mode to make sure you don't miss calls when your device is in your pocket. The ringtone volume will gradually increase when you receive a call.
1 Open Dialler.
2 Touch : > Settings.
3 Switch on Pocket mode.

natural_image
Simple line drawing of a shopping bag with a smartphone and wireless signal icon (no text or symbols)When pocket mode is enabled, the ringtone volume will gradually increase when you receive a call and your device is in your pocket or bag.
Rejecting calls with a text message
Send a predefined text message when you're not available to take a call.
1 Open Dialler.
2 Touch : > Settings > Reject calls with SMS.
3 Touch a predefined text message to edit the message content. Once you have finished, touch OK to save the message.
When you are unavailable to take an incoming call, touch 🔒 and select a predefined message to send to the caller.
Configuring the harassment filter
The harassment filter automatically blocks calls and messages from unknown or blacklisted numbers.
1 Open Dialler.
2 Touch : > Harassment filter.
3 Touch to configure the harassment filter settings and the blacklist.
You can also configure the harassment filter settings and the blacklist in Phone Manager > Blocklist >
Configuring the call ringtone
Choose from a selection of system ringtones or pick a song from your music library.
i Features may vary depending on your network provider.
1 Open Dialler.
2 Go to : > Settings > Phone ringtone. Choose a system ringtone or select a song from your music library.
Alternatively, go to Settings > Sound, touch Call ringtone & vibration, and then configure the ringtone settings.
Configuring voicemail
Divert calls to your voicemail when your device is switched off or when there is no network coverage. Callers can leave a voice message that you can listen to later.
Voicemail must be supported by your network provider. Please ensure that you have subscribed to this service. Contact your network provider for information about their voicemail service.
1 Open Dialler.
2 Touch : > Settings.
3 Touch Additional settings. If your device has dual SIM support, touch SIM 1 or SIM 2, and then touch Additional settings.
4 Touch Voicemail > Voicemail number and enter your voicemail number.
Creating a contact card
Create a contact card to quickly share your contact information. You can share your contact information by scanning the QR code or by sending the contact card using an instant messaging service such as WhatsApp.
1 Open Contacts.
2 Touch Me.
3 Set your profile picture. Enter your name, company, telephone number and other contact information, and then touch √. Your device will automatically create a contact card with a QR code.

Share your contact card: Touch ⚙️. Select the card format and sharing method, and then follow the onscreen instructions.
Creating a new contact
Creating a contact
1 Open Contacts.
2 Touch + . If you are creating a contact for the first time, touch Create a new contact.
3 In the options menu, select a location to save the contact.
The number of contacts you can store on your device depends on the size of your device's internal storage. The number of SIM card contacts you can store depends on your SIM card's storage capacity.
4 Touch the contact's profile picture to choose a photo. Enter the contact's name, company, phone number and other contact information, and then touch √.
- If you add the contact's birthday, your device will automatically create a birthday reminder in Calendar.
- The contact's photo will be displayed when the contact calls you. Other contact information such as company name and job title will also be displayed.
You can also add phone numbers, email addresses, and other contact information in to your contacts in Call log, Messaging, or Email.
Quickly adding contact details
Enter contact information on your device more rapidly. Simply scan or take pictures of business cards to automatically add names, phone numbers, and other information to your contacts.
1 Open Contacts.
2 Touch Business cards > Scan.
3 You can:
- Take a photo of one card: Place the business card on a flat surface. Adjust the viewfinder frame so that the card fits the guidelines, and then touch

- Take a photo of multiple cards: Switch to Burst mode and follow the onscreen instructions.
After you have finished scanning or taking photos, contact information will automatically be saved to Business cards.
Sharing your QR code
Share your QR code with your friends so that they can add you to their contacts quickly. On the contact details screen, touch the QR code at the top of the screen to display your personal QR code.

Importing and exporting contacts
Importing contacts from a storage device
1 Open Contacts.
2 Touch : > Import/Export > Import from storage.
3 Select one or more .vcf files, and then touch OK.
Exporting contacts to a storage device
1 Open Contacts.
2 Touch : > Import/Export > Export to storage > Export.
3 Choose where you want to export the contacts from and touch OK.
By default, the exported .vcf file is saved to the root directory of your device's internal storage. Open Files to view the exported file.
Importing contacts from a SIM card
1 Open Contacts.
2 Touch : > Import/Export > Import from SIM card. If your device has dual SIM support, touch : > Import/Export and choose the SIM card you want to import your contacts from.
3 Select the contacts you want to import and touch ↓.
4 Choose the location. The device will automatically import the contacts.
Exporting contacts to a SIM card
1 Open Contacts.
2 Touch : > Import/Export > Export to SIM card. If your device has dual SIM support, touch : > Import/Export, and choose the SIM card you want to export your contacts to.
3 Select the contacts you want to export and touch
4 Touch Continue.
Using the Huawei Backup app to import contacts
1 Open Backup.
2 Touch Restore >Restore from internal storage and select Next.
3 Select the backup you want to restore.
i If the backup data is encrypted, enter the encryption password when prompted.
4 Select Contacts and touch Restore.
Using the Huawei Backup app to back up your contacts
1 Open Backup.
2 Go to Backup > Internal storage, and then touch Next.
3 Select Contacts. Touch Back up and follow the onscreen instructions to set a password. By default, backup data is saved to the HuaweiBackup folder in Files.
Managing contacts
Editing a contact
After creating a contact, you can edit their contact information at any time. This includes adding or deleting default information such as phone numbers or email addresses. You can also choose a custom ringtone and add a birthday, nickname, or photo.
i Contact photos cannot be added for contacts stored on your SIM card.
1 Open Contacts.
2 Touch and hold the contact you want to edit, and then touch Edit.
3 Touch the contact's portrait to choose another image. Update the contact's information, and then touch √.
i Add multiple numbers for one contact: Select a contact from the contact list and touch Edit > Add phone number.
Merging duplicate contacts
When you add contacts to your device from different sources, you may end up with duplicate entries. These duplicate entries can be merged into one to help keep your contacts organised.
1 Open Contacts.
2 Touch : > Organise contacts > Merge duplicate contacts.
3 Select the contacts you want to merge and touch √.
Deleting contacts
1 Open Contacts.
2 Touch : > Organise contacts > Delete contacts by batch.
3 Select the contacts you want to delete, and then touch 📄.
4 Touch Delete.
Alternatively, touch and hold a contact until a popup menu appears. From here, select Delete to delete the contact.
Deleting contact history
Delete call records and text messages by contact to protect your privacy.
1 Open Contacts.
2 Select a contact and touch : > Erase trace > Erase.
Your device will delete all call records and text messages for the selected contact.
Adding contacts to the blacklist
1 Open Contacts.
2 Touch and hold the contact that you want to add to the blacklist, and then touch Add to blacklist.
Your device will automatically block incoming calls and messages from blacklisted contacts.
i View blacklisted contacts: Open 📋 Phone Manager and touch Blocklist > ⚙️. Touch Numbers blacklist to view blacklisted contacts.
Remove contacts from the blacklist: Open 📋 Contacts. Touch and hold the contact that you want to remove from the blacklist, and then touch Remove from blacklist.
Identifying contacts with incomplete information
1 Open Contacts.
2 Touch : > Organise contacts > Contacts with incomplete info.
3 Your device will display a list of contacts with incomplete information. You can then choose to add missing information or delete unwanted contacts.
Viewing contacts from different accounts
1 Open Contacts.
2 Touch : > Display preferences.
3 Select the account you want to display, or customise the display options.
- Hide contact photos, company information, and job title: Touch > Display preferences on the contacts screen and switch on Simple layout.
- View storage information: Touch > Display preferences on the contacts screen. Go to Accounts to view the available and total storage space on your device or SIM card.
Searching for contacts
Search contacts stored on the device, SIM card, or linked to an online account.
Finding contacts
1 Open Contacts.
For more complete search results, ensure that Contacts is configured to display all of your contacts. On the contacts screen, touch > Display preferences and select All contacts.
2 On the contact list, you can:
- Swipe the contact list up or down.
- Slide your finger up or down the index on the right-hand side of the screen to scroll through your contacts.
- Enter the contact name, initials, phone number, email address, or other information in the search bar at the top of the contact list. Search results will be displayed underneath.
You can enter multiple keywords, such as "Tom London". The system will find the contacts that meet the search criteria.
3 Select a contact. You can call them, send a text message, or edit their contact information.
If an error message is displayed or you are unable to search for a contact, touch Organise contacts and select Rebuild index data.
Searching for a contact from the home screen
1 Swipe down on the home screen to display the search bar.
2 Enter one or more keywords (such as the contact's name or email address). The search results will be displayed beneath the search bar.
You can enter multiple keywords, such as "Tom London". The system will find contacts that meet the search criteria.
3 Select a contact. You can then choose to call them, send them a text message, or edit their contact information.
Sharing contacts
Share a contact's vCard
1 Open Contacts.
2 Touch : > Import/Export > Share contact.
3 Select the contacts you want to share, or touch Select all to select all contacts, and then touch Share contact.
4 Choose your sharing method and follow the onscreen instructions.
Share a contact's QR code
1 Open Contacts
2 Select the contact you want to share. Touch the QR code and select Share.
3 Choose your sharing method and follow the onscreen instructions.
If the other device has a camera that can scan QR codes, you can also share a contact by scanning the contact's QR code.
Adding a contact to your favourites
Add frequently contacted people to your favourites to make them easier to find.
1 Open Contacts.
2 Touch and hold the contact you want to add to your favourites, and then touch Add to favourites.
When viewing contact details, touch ☆ to add the contact to your favourites.
- Add contacts to your favourites in batch : Touch Add, and choose the contact you want to add, and then touch √. If the contact has already been added, touch to add the contact to your favourites.
- Edit your favourites: Touch Edit on the favourites screen. Drag — next to a contact to adjust the position of the contact in your favourites list.
- Remove contacts from your favourites: Touch Edit on the favourites screen. Select the contacts that you want to remove from your favourites, and then touch Remove.
Changing contact photos
i Contact photos cannot be added for contacts stored on your SIM card.
1 Open Contacts.
2 Touch and hold the contact you want to edit, and then touch Edit.
3 Touch the contact's photo. You can choose to select a photo from Gallery or take a photo with the camera.
4 Touch√.
The contact's photo will be displayed when you receive a call from them.
Viewing call records for individual contacts
1 Open Contacts.
2 Select the desired contact and touch Call log.
3 Swipe up on the list to view all entries. You can:
- Touch an entry to call the contact.
- Touch 📋 > Delete to delete all entries.
- Touch and hold an entry to delete it or edit it before calling.
Assigning a ringtone to a contact
Assign a unique ringtone to frequently used contacts so that you can easily tell who is contacting you.
1 Open Contacts.
2 Select the desired contact and touch Phone ringtone.
3 Select the desired ringtone or music file, and then touch √.
Contact groups
Creating a group
1 Open Contacts.
2 Touch Groups and select +.
3 Enter the group name (for example, Family or Friends) and touch OK.
4 Touch+. Select the contacts you want to add to the group and touch √.
Using smart groups
Use smart groups to automatically group contacts by company, location, or contact frequency.
1 Open Contacts.
2 Touch Groups.
3 Under Smart groups, open a group, and then touch 🔒 to send a group message or ✉ to send a group email.
Editing a group
Add or remove people from a group, or change the group name.
1 Open Contacts.
2 Touch Groups and select the group you want to edit.
3 Touch+ and add new members to the group.
4 Touch : . There are three options:
- Touch Remove members to remove members from the group.
- Touch Delete group to delete the group.
- Touch Rename to edit the group name.
Sending a group text message or email
1 Open Contacts.
2 Touch Groups and select which group you want to send a message or email to.
3 Touch to send a message or to send an email.
Deleting a group
1 Open Contacts.
2 Touch Groups.
3 Touch and hold the group you want to delete, and then touch Delete.
4 Touch Delete.
i Deleting a group will not remove the contacts in the group from your device.
Messaging and Email
Sending a message
You can add a range of different content to messages, such as emoticons, images, and recordings.
1 Open Messaging.
2 In the list of message threads, touch +.
3 Select the recipient box and enter the contact name or phone number. You can also touch to open your contact list and choose a contact or contact group.
4 Select the text field to begin composing your message. If you enter more than two lines of text, touch to switch to full screen mode.
- Touch 📋 to add an attachment to your message.
- Touch △ Back to save the message as a draft. For device with the front facing fingerprint sensor, the navigation bar is turned off by default. In this case, you can touch to save the message as a draft.
5 Touch ▶. If your device has dual SIM support, touch ▶ or ▶ ^2 .
Cancel a message: Touch > Settings in the message list, and then turn on Cancel send. You can cancel a message up to 6 seconds after it was sent.
Replying to a message
1 Open Messaging.
2 Touch a message to view the message content. Your device will automatically highlight phone numbers, web addresses, email addresses, times, and other information. Touch highlighted information to access a range of shortcuts. You can also:
- Save message attachments: Touch and hold the attachment that you want to save, then touch Save.
- Call the sender: Touch 🔔 at the top of the message.
- Add the caller's number to your contacts: Touch > Create a new contact or Save to existing contact at the top of the message.
3 To send a reply, select the text field and enter your message, and then touch ▶. If your device has dual SIM support, touch ▶ ^1 or ▶ ^2 .
i Quickly reply to message: New messages will be displayed in the notification bar. Touch the button to compose a reply.
Searching for messages
There are two ways to search for messages:
- In the list of message threads, touch the search bar at the top of the screen and enter one or more keywords. The results will be displayed beneath the search bar.
- Swipe down on the home screen to display the search bar. Touch the search bar and enter one or more keywords. The results will be displayed beneath the search bar.
Deleting message threads
Delete unwanted or old threads to tidy up your message list.
i Deleted threads cannot be retrieved, so please proceed with caution.
You can delete a message thread in two ways:
- To delete a single thread, swipe left on the thread that you want to delete and touch 📄.
- To delete multiple threads, touch and hold one of the threads that you want to delete. Select the other threads and touch Delete.
Managing messages
Delete unwanted messages, forward messages to other contacts, copy and paste message content, and lock messages or add them to your favourites to prevent them from being deleted by accident.
1 Open Messaging.
2 In the list of message threads, touch a contact name or phone number to view your conversations.
3 Touch and hold a message, and then follow the onscreen instructions to forward, archive, lock, or share the message.
Returning to the top of the message list
If you have a long list of messages, use a shortcut to return to the top of list without swiping the screen.
1 Open Messaging.
2 In the list of message threads, double touch the bar at the top of the screen. Your device will automatically return to the top of the list or display unread messages.
Pinning messages to the top of the list
Pin important messages to the top of your message list so that you can access them quickly.
1 Open Messaging.
2 In the list of message threads, touch and hold the message that you want to pin to the top.
3 Select the desired message and touch ↑. Pinned messages will be displayed below text message alerts.
Marking messages as read
Mark unwanted messages as read to keep your inbox organized.
Open Messaging. In the list of message threads, you can:
- Mark all messages as read: Touch : > Mark all as read.
- Mark a message as read: Swipe left on the message that you want to mark as read, and then touch
Blocking spam messages
1 Open Messaging.
2 In the list of message threads, touch : > Harassment filter.
3 Touch ⚙️ to configure the harassment filter settings and the blacklist.
Alternatively, open 📋 Phone Manager and touch Blocklist > 🔗 to configure the harassment filter settings and the blacklist.
Adding a message signature
Add a message signature to save you time when sending messages.
1 Open Messaging.
2 Touch : > Settings > Advanced > Signature in the list of message threads, and then switch on Attach signature.
3 Touch Edit signature. Enter your signature and select OK.
Configuring the message ringtone
1 Open Messaging.
2 In the list of message threads, touch : > Settings > Ringtones and vibration.
3 Touch Notification tone. If your device has dual SIM support, select SIM 1 notification tone or SIM 2 notification tone. You can then choose a system ringtone or music file.
Identifying malicious URLs in text messages
Set your device to automatically identify malicious URLs to protect your personal data and financial information.
i Ensure that your device is connected to the Internet before enabling this feature.
1 Open Messaging.
2 In the list of message threads, open : > Settings.
3 Switch on Malicious website identification.
After receiving the message, the system will automatically identify malicious URLs. This service is provided by Avast. The result is for your reference only.
Adding an email account
If you don't know your account settings, please consult your email service provider.
Adding a personal email account
1 Open Email.
2 Choose an email service provider or touch Others.
3 Enter you email address and password, and then touch Sign in.
4 Follow the onscreen instructions to configure your account. The system will automatically connect to the server and check your settings.
Your Inbox will be displayed once the account has been set up.
Adding an Exchange account
Microsoft Exchange is a corporate email management solution. Some email service providers also provide individual and family Exchange accounts.
1 Open Email.
2 Touch Exchange.
3 Enter your email address, user name, and password. Touch Sign in.
4 Follow the onscreen instructions to configure your account. The system will automatically connect to the server and verify your settings.
Your Inbox will be displayed once the account has been set up.
Sending emails
1 Open Email.
2 Touch+.
3 In To:, enter one or more recipients.
4 Touch Cc/Bcc, From: to add Cc and Bcc recipients, and select the email account to use.
5 Enter the email subject and body. Touch 📋 to add an attachment.
6 Touch to send the email.
Your email service provider may have an attachment size limit. If attachments exceed the limit, you can send them in separate emails.
To save your email as a draft and send it later, touch , and then touch Save.
Replying to emails
1 Open Email.
2 Open the email you want to reply to and touch
To reply to all recipients of the original email, touch
3 After drafting your message, touch ➤ to send the email.
Configuring fast responses: Touch : > Settings. Select an account and touch Quick responses to create or edit a fast response.
Managing emails
Viewing emails
You can check, reply, forward or delete your emails after you create a personal email account.
1 Open Email.
2 On the Inbox screen, touch ≡ and select the account you want to use. Swipe down to refresh your inbox and download new emails.
i On the inbox, touch ☆ to star the email.
3 You can check, reply, forward or delete your emails. Open an email and swipe left or right on the screen to view the previous or next email.
To delete multiple emails, go to the Inbox screen. Select a contact picture or touch and hold an email to activate the email management interface. Select the emails you want to delete and touch
Saving email attachments
Open an email and touch ↓ to preview the attachment. Touch to save the attachment to your device.
i For large attachments, open the link provided in the email to download.
Syncing emails
On the Inbox screen, swipe down to refresh your inbox.
1 Open Email.
2 Touch : > Settings.
3 Select the account you want to configure. Switch on Sync Email.
To sync your emails automatically, touch Sync frequency and select a sync interval.
Searching emails
You can search for emails in two ways:
- On the inbox screen, enter one or more keywords in the search bar, such as the email title, content, or the attachment filename.
- On the home screen, swipe down to open the search bar. Enter search keywords, such as the email title, content, or the attachment filename.
Managing VIP contacts
If you want to make sure you never miss messages from important contacts, you can add them to your VIP contact list. Your device will automatically place emails from these contacts in your VIP inbox.
1 Open Email.
2 Touch : > Settings > VIP contacts.
3 From VIP list, touch Add > Create or Add from contacts.
You can also open an email, touch the sender's profile picture, and then touch Add to VIP list from the popup menu.
Add or delete VIP contacts: On VIP list touch + or 📋 to manage your VIP contacts.
Configure VIP contact email notifications: On the inbox screen, touch : > Settings > VIP notifications.
Managing email accounts
Adding an email account
1 Open Email.
2 Touch: > Settings > +
i Alternatively, On the inbox screen, touch ≡Touch add account.
3 Select a service provider and enter your details to add an account. For more information on how to add an account, see Adding an email account.
Switching between email accounts
On the inbox screen, touch 📄.Touch the account image to switch to that account.
Configuring an email account
On the inbox screen, touch :> Settings and select an account. You can perform the following operations:
- Rename the account: Touch Account name and enter an account name in the popup dialog box.
- Set as default: Switch on Default account to make the account the default account.
- Delete the account: Touch Remove account to delete the account.
Configuring Mail
Configuring automatic replies
Configure automatic replies when you are out of office.
i You must log in to your Exchange account to use this feature.
1 Open Email.
2 Touch : > Settings.
3 Choose the Exchange account you want to configure and switch Automatic replies on.
4 Switch on Automatic replies to configure a message and set the start and end time.
5 Touch Done.
Configuring an email signature
1 On the inbox screen, touch : > Settings.
2 Select the account you want to configure and touch Signature.
3 Enter a signature and touch OK.
Configuring email notifications
1 On the inbox screen, touch : > Settings.
2 Select the account you want to configure and switch Email notifications on.
3 Select a notification sound or enable vibration alerts.
Configuring the email view
On the inbox screen, touch : > Settings > General settings. You can configure the following:
- Only download attachments over Wi-Fi: Switch Do not load pics over mobile network on.
- Group emails with the same title: Switch Organise by subject on.
- Display contact images: Switch Sender profile picture on to display contact images next to emails.
Configuring how emails are sorted
On the inbox screen, touch :> Sort by and select a sort method.
Calendar and Notepad
Changing the calendar view

To view your schedule for a specific day, touch Go to, select a date, and then touch OK.
Open Calendar and touch >Settings. You can:
- Configure the weekend settings: Touch Customise weekend and configure the settings.
- Configure the first day of the week: Touch Week starts on and configure the settings.
Viewing global holidays
Enable global holidays to view public holiday information for different countries.
This feature requires an Internet connection.
1 Open Calendar.
2 Touch≡> Settings > Global holidays.
3 Turn on the switch next to the country whose holidays you want to view. Your phone will automatically download the country's holiday information.
Birthday reminders
Configure Calendar to import birthday information from your contacts and automatically create birthday reminders.
Before using this feature, ensure that you have added birthday information to your contacts. For more information, see Creating a contact.
1 Open Calendar.
2 Touch≡ and select Contacts' birthdays.
Once you have enabled this feature, Calendar will automatically import birthday information from your contacts and send you birthday reminders.
Syncing events
Syncing events from your Exchange account
i Ensure that you have enabled the Exchange calendar sync feature in the email account settings.
1 Open Calendar.
2 Touch≡. Select an Exchange account to sync events to your device.
Creating an event
Add events and set reminders to help you plan ahead.
1 Open Calendar.
2 Touch+.
3 Enter the event name, location, and start and end time. Touch More > Remind to create a reminder.
4 Touch√ to save the event.
- You can add up to 5 reminders for an event. To add a reminder, touch Add reminder.
- In month or week view, touch and hold an area on the screen to create an event for the corresponding date.
Sharing events
You can share events with your contacts.
1 Open Calendar.
2 Open the event that you want to share and touch 📁.
3 Choose how you want to share the event and follow the onscreen instructions.
You cannot share birthday reminders that are created automatically. To share birthday information, manually create an event, and then share the event with your friends.
Deleting an event
Open Calendar. You can delete an event in two ways:
- Delete a single event: Open the event that you want to delete and touch 📄.
- Delete multiple events: Touch 📄, and then touch and hold an event to activate the event management interface. Select the events that you want to delete and touch 📄
To delete a birthday reminder, go to Contacts, and then delete the contact's birthday information, or delete the corresponding contact.
Searching for events
You can search for events in two ways:
- In Calendar, touch 🔒 Enter one or more keywords in the search bar, such as the event name or location.
- Swipe down on the home screen to display the search bar. Enter one or more keywords, such as the event name or location.
Sending event invitations
Send event invitations to your friends or colleagues to keep track of who is attending.
Before using this feature, log in to your Exchange account.
1 Open Calendar.
2 Touch+. Enter the event name, location, and start and end time.
3 Touch More. Under Guests, enter the exchange accounts of the people that you want to invite.
4 Touch√ to save the event and send the invitations.
i Event invitations are displayed in the notification panel. To respond to an invitation, touch Email guests.
Creating a note
1 Open Notepad.
2 Touch+ and enter your note.

3 Touch√ to save the note.
Managing notes
Adding a note to favourites
Open Notepad. You can add a note to your favourites in two ways:
- In the list of notes, swipe left on a note and touch ☆.
- Touch the note that you want to add to your favourites and touch ☆.
Sharing a note
In the list of notes, open the note that you want to share and touch ⚙️. Choose your sharing method and follow the onscreen instructions.
Deleting a note
You can delete a note in three ways:
- In the list of notes, swipe left on the note that you want to delete and touch 📄.
- Touch and hold a note to activate the note management interface. Select the notes that you want to delete and touch 📄
- Touch the note that you want to delete and touch : > Delete.
Searching your notes
You can search your notes in two ways:
- In the list of notes, touch the search bar and enter one or more keywords.
- Swipe down on the home screen to display the search bar, and then enter one or more keywords.
Backing up notes
Backing up notes
1 Open Backup.
2 Touch Back up > Internal storage > Next > More.
3 Select Notes and touch√.
4 Touch Back up and follow the onscreen instructions to configure a password.
Importing notes
1 Open Backup.
2 Touch Restore >Restore from internal storage >Next.
3 Select the notes that you want to restore. In the popup dialog, enter the password and touch OK.
4 Touch More. Select Notes and touch√.
5 Touch Restore.
Music and Video
Listening to music
You can choose to listen to your favourite local songs.
1 Open Music.
2 You can then play music stored on your device, add a song to the personal song book, play a song in the personal playlist, or listen to recently played songs.
3 You can play, pause, or change songs during the process.
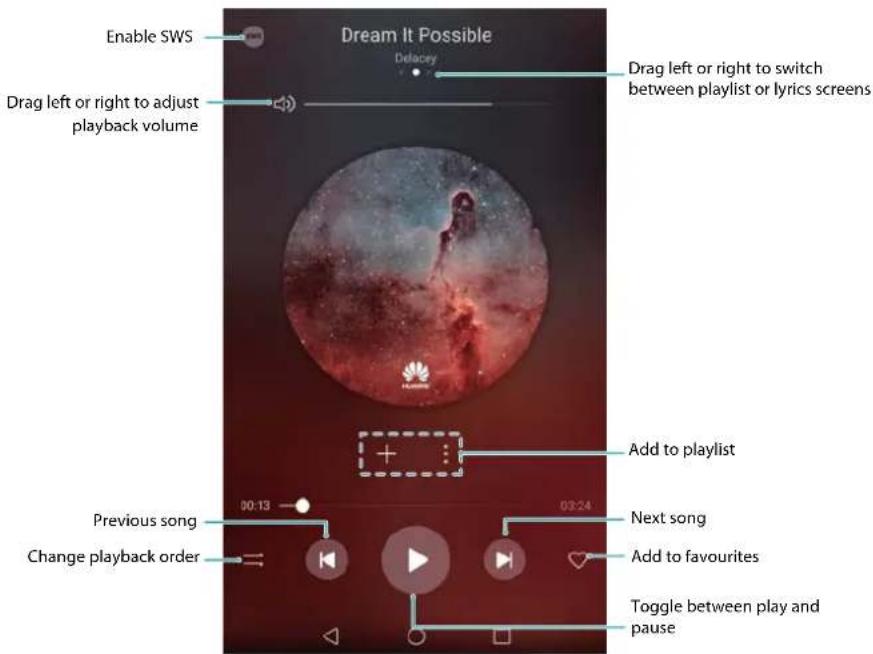
Searching for music
Searching for music on your internal storage or microSD card
Sort your music by category or search with a keyword to find your music files quickly.
1 Open Music.
2 Touch All songs.
3 Touch© to search for and view music stored on your phone.
4 You can choose to organise your music by song name, artist, album name, or folder. To search for a specific song, touch 🔒 and enter the song name, artist, or album in the search bar.
Deleting songs
Delete unwanted songs to free up storage space.
1 Open Music.
2 Touch All songs.
3 Go to the Songs tab. Touch and hold the list of songs and select the songs that you want to delete.
4 Touch : > Delete.
5 Touch Delete.
Creating a playlist
Organise your music by creating customised playlists that contain your favourite songs.
1 Open Music
2 Touch Playlists > Create new playlist.
3 Name the playlist and touch Save.
4 Touch Add in the dialog box.
5 Select the songs you want to add and touch √.
i Touch : next to the playlist to Rename or Delete the playlist.
Playing a playlist
My playlists
1 Open Music.
2 Touch Playlists.
3 Select the desired playlist. Touch a song to start playback, or touch Shuffle all to shuffle all songs.
Playing a video
Playing a video
1 Open Videos.
2 Touch the thumbnail to start the video.
During playback, you can:
- Adjust the playback speed: Touch 1.0X and drag the speed slider.
- Adjust the screen brightness: Swipe up or down on the left-hand side of the screen. Swipe up to increase the brightness, or swipe down to decrease the brightness.
- Adjust the volume: Swipe up or down on the right-hand side of the screen. Swipe up to increase the volume, or swipe down to decrease the volume.
- Rewind or fast-forward: Drag the progress bar left to rewind, or right to fast-forward.
Phone Manager
Optimising performance
Use Phone Manager to make your phone run faster and optimise performance.
Open 📋 Phone Manager and touch OPTIMISE. Your phone will automatically optimise performance, enhance security, and reduce power consumption.
Enhancing speed
Clear the app cache and delete residual files and system trash to optimise performance.
1 Open Phone Manager.
2 Touch Cleanup to clear the app cache and system trash.
To free up more storage space, you can:
- Touch Storage manager to clear large files, images, and app data.
- Restore an app to its default settings. Touch Application restore. Select the app you want to restore and touch Delete. The app will be restored to its default settings, and all app-specific data will be deleted.
3 Touch Finish to exit.
Managing data usage
Phone Manager comes with a data management feature that you can use to monitor data usage and avoid exceeding your monthly allowance.
Open 📋 Phone Manager and touch Mobile data. You can view detailed data usage statistics or configure the following settings:

• Data usage ranking: View data usage for each app.
• Networked apps: Manage Internet access permissions for each app.
- Total monthly data available: Touch > Total monthly data available to configure your data plan settings and data usage reminders. Your phone will calculate your mobile data usage and remaining data allowance for the billing period you specify. When you have used up your monthly allowance, you will receive a reminder, or your phone will disable mobile data.
- Data saver: Enable data saver and choose the apps that you do not want to restrict data for.
Harassment filter
Phone Manager comes with a harassment filter feature, which can help you block unwanted calls and messages.
Open 📋 Phone Manager. Touch Blocklist > ⚙️ and follow the onscreen instructions to configure the blacklist and the whitelist, blacklisted keywords, and spam settings.
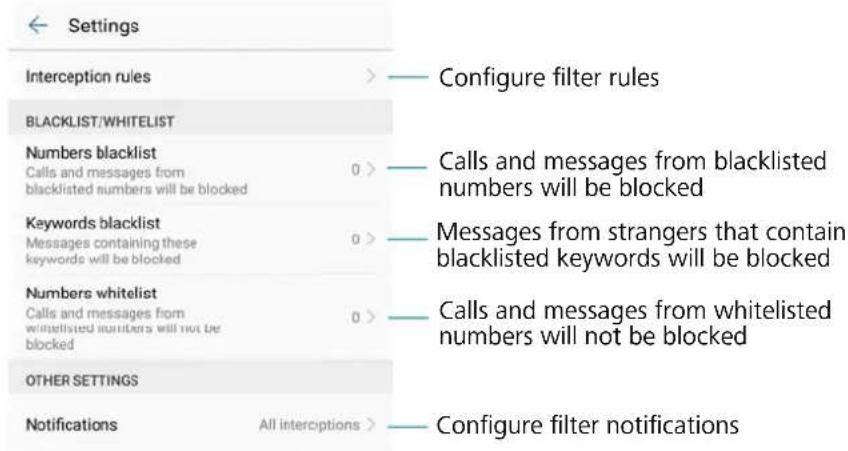
Battery management
Viewing battery usage statistics
Use Phone Manager to view detailed battery usage statistics for each app.
Open Phone Manager. Touch remaining and swipe up on the screen. You can:
- Touch Battery usage details to view detailed battery usage statistics.
- Touch Consumption level to see which phone hardware and software is using the most power.
- Touch Optimise to check for power consumption problems and optimize performance.
- Switch on Remaining battery percentage to display the remaining battery percentage in the status bar.
Reducing power consumption
Use Phone Manager to optimize performance and reduce power consumption.
Open Phone Manager and touch remaining. You can:
- Optimize performance: Touch Optimise. Your phone will check for power consumption problems and optimize performance. To further reduce power consumption, touch items need to be optimised manually, and then select View or Optimise to adjust the power settings manually.
- Restrict background apps: Touch Lock screen cleanup and turn off the switches next to the apps that you do not want to run in the background when the screen is locked.
- Close battery-draining apps: Touch Power-intensive apps and select the apps that you want to close.
A message will appear in the notification panel if battery-draining apps are running in the background. If you don't want to receive these notifications, touch 📋 and switch off Power-intensive prompt.
- Reduce the screen resolution: Switch on Low resolution power saving to reduce the screen resolution and lower power consumption.
- Automatically close power-intensive apps: Touch 🎨 and switch on Close excessively power-intensive apps.
Managing app permissions
Phone Manager comes with a permission manager that you can use to restrict app permissions and protect your personal data.
1 Open Phone Manager.
2 Touch Permissions and configure the desired permissions.
Virus scanner
Phone Manager comes with a virus scanner feature that helps you remove malware.
1 Open Phone Manager.
2 Touch Virus scan. Your device will automatically identify and remove malware.
i Touch ⚙️ You can:
- Enable Cloud scan to scan your device using the latest antivirus database. An Internet connection is required to access the online database.
- Enable Scan reminder to receive a notification when you have not conducted a virus scan for 30 days.
- Select a scan mode. The Quick scan only scans important files and installed apps. The Full scan takes longer and scans for malicious files.
- Switch on Auto update and Update only via Wi-Fi to automatically update the antivirus database when you have a Wi-Fi connection.
Encrypting apps
Use App Lock to encrypt apps and prevent unauthorised access.
1 Open Phone Manager.
2 Touch App lock. When you access App Lock for the first time, follow the onscreen instructions to set a four-digit PIN and password reminder.
3 Turn on the switch next to the apps that you want to encrypt. You will need to enter the PIN each time you open an encrypted app.
On the App Lock screen, touch 📋 to change password or disable App Lock.
Setting apps to close automatically when the screen is locked
Choose which apps you want to close when the screen is locked to reduce power consumption and mobile data usage.
1 Open Phone Manager.
2 Touch Lock screen cleanup.
3 Turn on the switch next to the apps that you want to close.
The selected apps will close automatically when the screen is locked. You may not receive new messages from email, messaging, and social networking apps after they are closed.
Configuring Phone Manager
Adding shortcut for Phone Manager
Create home screen shortcuts for frequently-used device management features.
1 Open Phone Manager.
2 Touch ⚙️ > Shortcuts and switch on the feature that you want to add to the home screen.
Tools
Logging in to two social media accounts at the same time
Log in to two, Whatsapp or Facebook accounts at the same time to keep your work and personal life separate.
i This feature only works with Facebook and WhatsApp.
1 Open Settings.
2 Touch App twin. Turn on the Facebook or WhatsApp switches as desired.
- When App twin is enabled for an app, two app icons will appear on the home screen, allowing you log in to two accounts at the same time.
- Press and hold the App twin icon to disable the feature.
Clock
Managing alarms
Set an alarm to wake you up or remind you about important events.
Open Clock. From the Alarm tab, you can:
- Add an alarm: Touch + and set the alarm time, ringtone, repeat settings, and more. Touch √ to apply the settings.
- Enable or disable an alarm: Touch the switch next to an alarm.
- Configure the alarm settings: Touch ⚙️ and go to ALARM to configure the snooze duration, silent mode settings, and volume button behavior.
- Delete an alarm: Touch and hold the alarm you want to delete. Touch ✗ next to the clock, and then touch √.
- Turn off an alarm: Touch Slide to turn off alarm at the bottom of the lock screen.
- Mute an alarm: Press the volume down button.
- Snooze for 10 minutes: Press the power button. The alarm will go off again after 10 minutes. To turn off the alarm, swipe down from the top of the screen to open the notification panel, and then touch the alarm notification.
- Enable alarms when your device is powered off: Select Keep alarm active, will ring in. Alarms will still go off when your device is switched off.
Configuring the world clock
Add multiple clocks to view the time in various cities around the world.
1 Open Clock.
2 From the World clock tab, you can:
- Add a city: Touch + . Enter a city name or select a city from the list.
- Set the system date and time: Touch ⚙ > Date & time and configure the settings.
- Delete a city: Touch and hold the city you want to delete. Touch ✗ next to the city, and then touch √.

Enabling dual clocks
By default, your phone displays the network time. Enable dual clocks to display the time in your current time zone and your home time zone on the lock screen.
1 Open Clock.
2 Under World clock, touch ⚙ > Date & time .
3 Switch on Dual clocks. Touch Home city and select your home time zone from the list of cities.

i Only one clock is displayed when the local time zone is the same as the home time zone.
Stopwatch
1 Open Clock.
2 Go to the Stopwatch tab and touch ▶ to start the stopwatch.
While the stopwatch is running, touch ☐ to count laps. Swipe up on the timer in the middle of the screen to view your lap data.
3 Touch ^⑪ to pause the stopwatch.
4 Touch to reset the stopwatch, or to resume the stopwatch.
i The screen will stay on when the stopwatch is running.
Timer
1 Open Clock.
2 Go to the Timer tab and swipe up or down to set the countdown time.
3 Touch ▶ to start the timer.
4 When the timer goes off, swipe the screen to silence the ringtone.
When the timer is counting down, touch ⏻ to pause the countdown, or to reset the timer.
Sound recorder
Recording sound
1 Touch Sound Recorder.
2 Touch Start to start recording.
3 Touch Pause or Resume to pause or resume the recording.
Add a tag: Add a Quick tag or Photo tag for easy reference.
4 Touch Stop, and enter the name. Then touch Save.
- Your phone will not ring if you receive a call during a recording.
- When the Recorder app is recording sound in the background, use the controller in the notification panel to Pause, Resume, or Stop the recording.
Playing a recording
Play sound from a particular direction, or start playback from a tagged location.
1 Touch Sound Recorder.
2 Select Recordings.
3 Select a recording. On the playback screen, you can:
- Select a tag: Swipe left on the playback screen to view recording tags, and then select a tag to start playback from the corresponding location.
- Change the playback mode: Switch between Earpiece and Speaker.
When the Recorder app is recording sound in the background, use the controller in the notification panel to play, pause, or cancel a recording.
Managing recordings
Share, rename, and sort recordings.
1 Touch Sound Recorder.
2 Select Recordings.
3 On the file management screen, you can sort, share, and rename recordings.
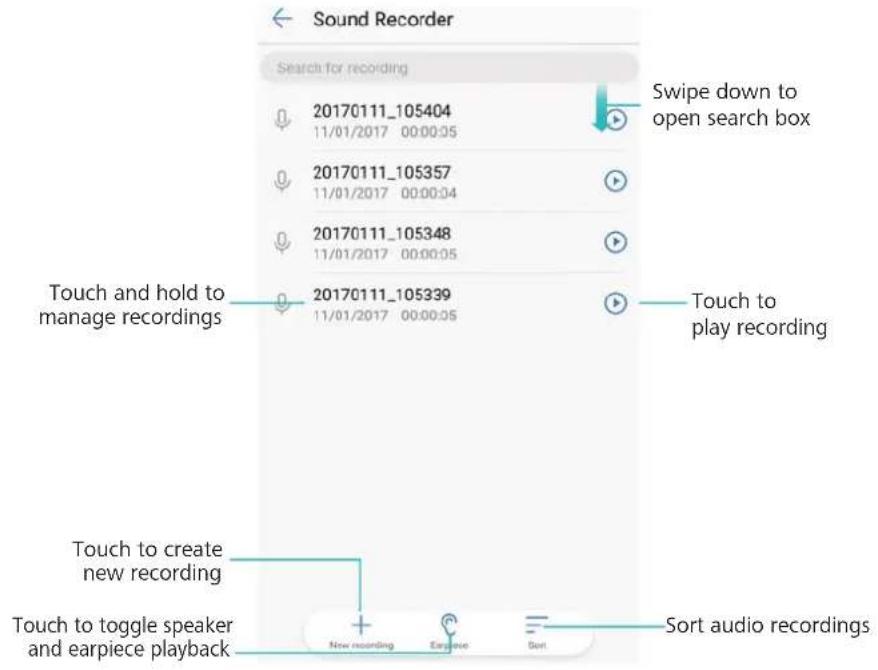
System Features and Settings
Power on and off timer
Use the power on and off timer to reduce power consumption and prevent disturbances when you're asleep.
Open Settings, touch Smart assistance > Scheduled power on and off. Switch on Scheduled power off and Scheduled power on, and then configure the power on and off time and repeat settings. Your device will automatically turn on or off at the preset time.
To disable the timer, switch off Scheduled power off and Scheduled power on.
Restarting your device
You may notice a drop in performance when your device has been powered on for a long time. Restart your device regularly to clear cached files and ensure optimal performance.
To restart your device, press and hold the power button for 3 seconds, and then touch Restart.
To force your device to restart, press and hold the power button until your device vibrates.
Changing the system language
1 Open Settings.
2 Touch Advanced settings > Language & input.
3 Touch Language and select the desired language.
If the language you are looking for is not listed, touch Add language to search for a language and add it to the list.
Changing the input method
Switch between text input methods as desired.
1 On the text input screen, touch 📄 at the bottom of the screen.
2 Select the desired input method.
To add an input method, open Settings. Touch Advanced settings > Language & input > Default keyboard > Configure input methods and switch on the desired input method.
Input method settings
Adding a keyboard
1 Open Settings.
2 Touch Advanced settings > Language & input and select Virtual keyboard under Keyboard & input methods.
3 Touch Add a virtual keyboard and switch on the keyboard that you want to add.
i After adding a keyboard, you can configure the keyboard settings to suit your needs.
Selecting the default input method
1 Open Settings.
2 Touch Advanced settings > Language & input. Under Keyboard & input methods, touch Default keyboard and select the desired input method. Your device will automatically enable the default input method when you enter text.
Editing text
Select, cut, copy, paste, and share text.

- Selecting text: Touch and hold the text until 🎨 appears. Drag 🔴 and 🔵 to select a section of text, or touch Select all to select all text.
- Copying text: Select the text you want to copy and touch Copy to copy it to the clipboard.
- Cutting text: Select the text you want to cut and touch Cut to move it to the clipboard.
- Pasting text: Touch and hold where you want to insert the text, and then touch Paste.
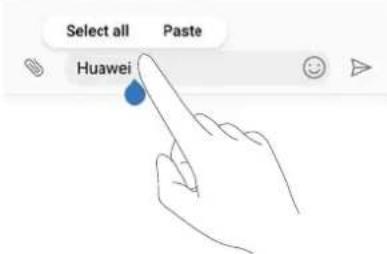
The pasted text will remain available in the clipboard until you cut or copy other content.
- Sharing text: Select the text you want to share and touch Share. Choose how you want to share the text and follow the onscreen instructions.
Airplane mode
To avoid interference, please enable airplane mode when you are on board a plane. When enabled, call, mobile data, Bluetooth, and Wi-Fi will be disabled. You can enable Bluetooth and Wi-Fi manually.
Use any of the following methods to enable or disable airplane mode:
- Use the shortcut switch: Swipe down from the status bar to open the notification panel.
Touch √ to display all shortcut switches, and then switch on

- Go to Settings: Open 📷 Settings and toggle the Airplane mode switch.
When airplane mode is enabled, the airplane mode icon will display in the status bar
Configuring the sound settings
Adjusting the system volume
Adjust the ringtone, media, alarm, and call volume to suit your needs.
1 Open Settings.
2 Touch Sound > Volumes to adjust the ringtone, media, alarm, and call volume.
Enabling silent mode
Enable silent mode to avoid disturbing others in quiet surroundings, such as when you are in a meeting.
1 Open Settings.
2 Touch Sound and switch on Silent mode.
i Vibrate in silent mode: When Silent mode is enabled and Vibrate in silent mode is switched on, your device will vibrate when you receive an incoming call or message.
Quickly switch between Silence mode, Vibration, Sound mode
Quickly switch between Silence mode, Vibration, Sound mode from the status bar.
Swipe down from the status bar and open the shortcuts tab. Touch to switch between Sound, Silent, and Vibration mode.

Setting the default notification tone
Choose a preset ringtone or a music file as the notification tone for messages, emails, and other notifications.
1 Open Settings.
2 Touch Sound > Notification ringtone and choose a new notification Ringtone or a Music file.
Configuring dialpad touch tones
1 Open Settings.
2 Touch Sound > Dial pad touch tones and select Default, Melody or None.
Enabling or disabling system alert sounds and haptic feedback
1 Open Settings.
2 Touch Sound. You can enable or disable Touch sounds, Screen lock sounds, Screenshot tone, and Vibrate on touch.
When Vibrate on touch is enabled, your phone will vibrate when you touch a key on the navigation bar or unlock the screen.
One-hand mode
Enable mini screen view or the shifting keyboard to make it easier to use your device with one hand.
1 Open Settings.
2 Touch Smart assistance > One-handed UI. You can:
- Shrink the screen: Switch on Mini screen view. The mini screen view will display texts and images in smaller sizes for easier operation. You can switch between mini screen and normal screen by swiping left or right on the virtual navigation bar.

i Navigation bar is turned off by default for devices with a front-facing fingerprint sensor navigation button. You can switch between mini screen and normal screen by swiping on the screen from the bottom left or bottom right corner.

- Enable the shifting keyboard: Switch on Shifting keyboard. The dialler, in-call menu, and lock screen dialpad will shrink to the corner of the screen for easier one-handed typing. Touch the arrow next to the keyboard to move the keyboard to the other side of the screen.
Gloves mode
Enable gloves mode so that you can continue to use your device when wearing gloves.
1 Open Settings.
2 Touch Smart assistance and switch on Gloves mode.

natural_image
Illustration of a hand interacting with a smartphone screen (no text or symbols)Do not disturb mode
Do not disturb mode allows you to work or relax in peace and quiet. Your device will only notify you about important calls or messages.
1 Open Settings.
2 Touch Do not disturb and switch on Enable now.
3 Touch Do not disturb mode. You can:
- Configure the incoming call and message settings: Select Allow only priority interruptions. Touch Define priority interruptions, and then touch Calls and Messages to set the contact range from whom you want to receive calls or messages.
i Selecting Whitelist only only sets the contact range. Select Whitelist for calls and messages to set specific contacts.
- Enable alarm ringtones in do not disturb mode: Select Alarms only to only allow alarm ringtones.
- Disable all inruptions: Select Don't interrupt to disable all ringtones and vibrations. The screen will not turn on for incoming calls messages, or alarms.
- To enable do not disturb mode for a specific period, touch Time.
- To enable do not disturb mode for a specific event, touch Event.
Setting up an account
Adding an account
Add an email or social media account to sync your emails and messages to your device.
1 Open Settings.
2 Touch Accounts > Add account. Select an account type and follow the onscreen instructions to enter the account information.
- You must install the corresponding app before you can add a third-party account.
- For more information on adding email and company accounts, see Adding an email account.
Deleting an account
1 Open Settings.
2 Touch Accounts and select an account type.
3 Select the account that you want to delete and follow the onscreen instructions.
Syncing data with your phone
Enable the sync feature to keep all of your device's data up-to-date and prevent data loss. You can sync emails, and other data from your old device.
i The type of data that can be synced depends on the account type.
1 Open Settings.
2 Select Accounts.
3 Touch : in the top-right corner of the screen. Select Auto-sync data and follow the onscreen instructions.
If the data sync switch is turned off, you can sync data manually by selecting an account and touching
Viewing memory and storage information
View storage and memory information, change the default storage location, and format the microSD card.
i Not all devices support microSD cards.
1 Open Settings.
2 Touch Memory & storage to view storage information for your internal storage and microSD card.
3 From there, you can:
- Format the microSD card: Touch SD Card > Format > Erase & format to clear all data from the microSD card. Back up your files before formatting the card to avoid using your data.
- Set the default storage location: Touch Default location and set the default storage location to the internal storage or microSD card.
Setting the date and time
Your device automatically sets the date and time using network-provided values. You can also set the time manually and display it in 12-hour or 24-hour formats.
1 Open Settings.
2 Touch Advanced settings > Date & time. You can:
- Set the time and date automatically using network-provided values: Switch on Automatic date & time.
- Set the time zone automatically using network-provided values: Switch on Automatic time zone.
- Set time format: Switch on the 24-hour format to display the time in 24-hour format. By default, the time is displayed in 12-hour format.
Enabling location access
Enable location-based services to ensure that map, navigation, and weather apps can access your location information.
Configuring the location settings
Features may vary depending on your network provider.
1 Open Settings.
2 Touch Security & privacy > Location services.
3 Switch on Access to my location, you can
- Use GPS, Wi-Fi and mobile networks: Uses GPS and your phone's Internet connection. Enable this option for highly accurate positioning.
- Use Wi-Fi and mobile networks: Only uses your phone's Internet connection. Enable this option for reduced power consumption and longer standby times.
- Use GPS only: Does not require an Internet connection. Enable this option to reduce mobile data usage.
Increasing indoor positioning accuracy
Your phone uses Wi-Fi and Bluetooth for more accurate positioning when you are indoors.
1 Open Settings.
2 Touch Security & privacy > Location services.
3 Touch : > Scan settings, you can:
- Switch on Wi-Fi scanning. Location apps and services will continually scan for Wi-Fi networks for more accurate positioning.
- Switch on Bluetooth scanning. Location apps and services will search for Bluetooth devices for more accurate positioning.
Restoring factory settings
Restore factory settings if your device crashes or is slow to respond.
Restoring factory settings will erase your personal data from your device, including account information, downloaded apps, and system settings. Back up important data on your device before restoring factory settings.
1 Open Settings.
2 Touch Advanced settings > Backup & reset.
3 Touch Factory data reset and choose whether to format your internal storage.
Selecting Erase internal storage will delete all files on your internal storage, such as music and images. Proceed with caution.
4 Touch Reset phone to restore your device to its factory settings.
OTA updates
Update your device's system to the latest version to enhance performance.
This feature requires an Internet connection. Connect to a Wi-Fi network to avoid incurring unnecessary data charges.
- Using unauthorised third-party software to update your device may render your device unusable or put your personal information at risk. For optimum results, use the OTA update feature or take your device to your nearest Huawei service centre.
- Your personal data may be erased during a system update. Always back up important data before updating your device.
- When updating, ensure that your device has at least 20% battery power remaining.
- After updating, you may find that some third-party apps are incompatible with your system, such as Internet banking applications and games. This is because it takes a while for third-party application developers to release updates for new Android releases. Please wait until a new version of the application is released.
i Touch Settings > About phone > Build number to view your device's version number.
1 Open Settings.
2 Touch System update. Your device will automatically check for updates.
3 Select the latest version to download the update package.
4 Once the download is complete, touch Update. The update process may take a while to complete. Do not use your device before it has finished updating. Your device will restart automatically when it has finished updating.
Viewing product information
Renaming your device
Rename your device to make it easier to find when connecting other devices to your portable Wi-Fi hotspot, or when pairing other devices over Bluetooth.
1 Open Settings.
2 Touch About phone > Device name and rename your device.
Viewing your model number and version information
View your model number and system version information.
1 Open Settings.
2 Touch About phone to view your model number, version number, EMUI version, and Android version.
Viewing your IMEI
All devices have a unique 15-digit IMEI that you can use to verify if your device is genuine.
1 Open Settings.
2 Touch About phone to view the IMEI.
Dual-SIM devices have two IMEIs.
Viewing your device's specifications
View your device's specifications using a few simple steps. You can view information about your processor, memory, screen resolution, and more.
1 Open Settings.
2 Touch About phone. Swipe up or down on the screen to view information about the processor, RAM, internal storage, screen resolution, and more.
Accessibility features
Enabling TalkBack
TalkBack provides audible prompts and captions to help visually impaired users. When TalkBack is enabled, your device will issue audible prompts for all content that you touch, select, or enable.
i Audible prompts are not available for all languages. If your language is not available, you can download a third-party speech synthesis engine. For more information, see Text To Speech (TTS) output.
1 Open Settings.
2 Touch Advanced settings > Accessibility > Talkback.
3 Switch on Talkback and touch OK.
A tutorial will be played when you enable TalkBack for the first time. To replay the tutorial, touch 🔗 to access TalkBack Settings, and then select the tutorial.
4 Touch ⚙️ and switch on Explore by touch.
When Explore by touch is enabled, your device will issue audible prompts for content that you touch.
Disable TalkBack: Press the power button until your device vibrates, and then touch and hold the screen for 3 seconds.
Using TalkBack to control your device
After you have enabled TalkBack, use gestures to:
Browse the screen: Swipe up or down with two fingers to scroll through menu lists. Swipe left or right to move between screens.

natural_image
Illustration of a hand interacting with a tablet screen showing two arrows indicating upward and downward motion (no text or symbols)
natural_image
Illustration of a hand interacting with a tablet device, showing a finger pointing at the screen (no text or symbols present)Select an item: Touch an item with one finger to select it (it will not open). Your phone will read out the content of the selected item.

natural_image
Hand pressing a button on a tablet device (no text or symbols visible)Open an item: Double touch any part of the screen using one finger to confirm your selection from the previous step.

natural_image
Hand pointing at a smartphone screen displaying a notification icon (no text or symbols present)For example, if you want to open Settings, touch the Settings icon once using one finger, and then touch twice on any part of the screen.
Configuring the TalkBack settings
1 Open Settings.
2 Touch Advanced settings > Accessibility > Talkback >
3 Follow the onscreen instructions to adjust the feedback volume, audible feedback settings, control gestures, and more.
Text To Speech (TTS) output
This feature converts text into speech for visually impaired users. Text To Speech (TTS) output requires TalkBack to be enabled.
1 Open Settings.
2 Touch Advanced settings > Accessibility. Switch on Text-to-speech output, and then select the desired speech synthesis engine and voice speed.
Colour correction
Colour correction mode adjusts colours to make it easier for colour vision impaired users to distinguish between different parts of the screen.
i Enable this mode with caution, as it may affect your device's performance.
1 Open Settings.
2 Touch Advanced settings > Accessibility > Colour correction, and switch on Colour correction.
3 Touch Correction mode, and select the desired colour correction mode.
Obtaining help
Read the Quick Start Guide included with your phone.
Touch Settings > About phone > Legal information to read the legal information.
Visit http://consumer.huawei.com/en/ for more information.
Personal Information and Data Security
The use of some functions or third-party applications on your device could result in your personal information and data being lost or becoming accessible to others. Use the following measures to help you protect your personal information:
- Put your device in a safe place to prevent unauthorised use.
- Set your device screen to lock and set a password or unlock pattern.
- Periodically back up personal information stored on your SIM card, memory card or your device memory. If you change to a different device, be sure to move or delete any personal information on your old device.
- Periodically back up personal information stored on your memory card or your device memory. If you change to a different device, be sure to move or delete any personal information on your old device.
- Do not open messages or emails from strangers to prevent your device from becoming infected with a virus.
- When using your device to browse the Internet, do not visit websites that might pose a security risk to avoid your personal information from being stolen.
- If you use services such as the portable Wi-Fi hotspot or Bluetooth, set passwords for these services to prevent unauthorised access. Turn these services off when they are not in use.
• Install device security software and regularly scan for viruses. - Be sure to obtain third-party applications from a legitimate source. Downloaded third-party applications should be scanned for viruses.
- Install security software or patches released by Huawei or authorised third-party application providers.
- Using unauthorised third-party software to update your device may damage your device or put your personal information at risk. It is recommended that you update through your device's online update feature or download official update packages for your device model from Huawei.
- Some applications require and transmit location information. As a result, a third-party may be able to share your location information.
- Some third-party application providers may collect detection and diagnostic information on your device to improve their products and services.
List of safety features
Huawei phones come with a number of security features to keep your data secure.
| Lock screen style and password | Set a screen lock password to prevent unauthorised access to your phone. For more information, see Changing the lock screen style. |
| Fingerprint recognition | Use a fingerprint to unlock your screen, open encrypted files, unlock apps, and make secure payments. For more information, see Fingerprint recognition. |
| Encrypting a microSD card | Encrypt your microSD card to prevent unauthorised access to your data. A password must be entered when the microSD card is inserted into another phone. For more information, see Setting microSD card password. |
| Setting your SIM card PIN | Enable the SIM lock to prevent others from using your SIM card. You will need to enter your SIM card PIN each time you turn on your phone or insert your SIM card into another phone. For more information, see Setting your SIM card PIN. |
| Blocking spam messages | Use the harassment filter and blacklist in Phone Manager to block spam calls and messages. For more information, see Blocking spam messages. |
| Identifying malicious URLs in messages | Enable URL recognition to receive warnings about malicious URLs. For more information, see Identifying malicious URLs in text messages. |
| VPNs | You can use a VPN to connect to your company network and email server. For more information, see VPNs. |
| Harassment filter | Use the harassment filter and blacklist in Phone Manager to block spam calls and messages. For more information, see Harassment filter. |
| App Lock | Use the App Lock in Phone Manager to lock apps and prevent unauthorised access. The App Lock password is required to open locked apps. For more information, see Encrypting apps. |
| Managing data usage | Use the data management feature in Phone Manager to keep track of your mobile data usage. Mobile data will be automatically disabled when you exceed the preset limit to prevent you from incurring excessive data charges. For more information, see Managing data usage. |
| Virus scanner | Use the virus scanner in Phone Manager to remove malware. For more information, see Virus scanner. |
| Multi-user mode | User accounts: Create separate user accounts, each with their own user profile and data. For more information, see Multi-user accounts. |
| Adding a secure storage space | Create a secure storage space in which you can install private apps that other users cannot see or access. For more information, see Using PrivateSpace. |
Legal Notice
Copyright © Huawei Technologies Co., Ltd. 2017. All rights reserved.
This document, whether in part or whole, shall not be reproduced or transmitted in any way, shape, or form without the prior written consent of Huawei Technologies Co., Ltd. and its affiliates ("Huawei").
The product described in this document may include software that is the copyright of Huawei or its licensors. Such software shall not be reproduced, distributed, modified, decompiled, disassembled, decrypted, extracted, reverse engineered, leased, assigned, or sublicensed unless such restrictions are prohibited by law or such actions are approved by the copyright holder.
Trademarks and Permissions
honor, HUAWEI and are trademarks or registered trademarks of Huawei Technologies Co., Ltd.
Android ^TM is a trademark of Google Inc.
The Bluetooth ^® word mark and logos are registered trademarks owned by Bluetooth SIG, Inc. and any use of such marks by Huawei Technologies Co., Ltd. is under license.
Other trademarks, products, services and company names mentioned herein may be the property of their respective owners.
Notice
Some features of the product and its accessories described herein rely on the software installed or the capacities and settings of the local network, and therefore may not be activated or may be limited by local network operators or network service providers.
Therefore, the descriptions herein may not exactly match the purchased product or its accessories.
Huawei reserves the right to change or modify any information or specifications contained in this document at any time without prior notice and without any liability.
Third-Party Software Statement
Huawei does not own the intellectual property of the third-party software and applications that are delivered with this product. Therefore, Huawei will not provide any warranty of any kind for third-party software and applications. Neither will Huawei provide support to customers who use third-party software and applications, nor be responsible or liable for the functions or performance of third-party software and applications.
Third-party software and applications services may be interrupted or terminated at any time, and Huawei does not guarantee the availability of any content or service. Third-party service providers provide content and services through network or transmission tools outside of the
control of Huawei. To the greatest extent permitted by applicable law, it is explicitly stated that Huawei shall not compensate or be liable for services provided by third-party service providers, or the interruption or termination of third-party contents or services.
Huawei shall not be responsible for the legality, quality, or any other aspects of any third-party software installed on this product, or for any uploaded or downloaded third-party works in any form, including but not limited to texts, images, videos, or software etc. Customers shall bear the risk for any and all effects, including incompatibility between the software and this product, which result from installing software or uploading or downloading the third-party works.
This product is based on the open-source Android ^™ platform. Huawei has made necessary changes to the platform. Therefore, this product may not support all the functions that are supported by the standard Android platform or may be incompatible with third-party software. Huawei does not provide any warranty or representation in connect with any such compatibility and expressly excludes all liability in connection with such matters.
DISCLAIMER
ALL CONTENTS OF THIS DOCUMENT ARE PROVIDED "AS IS". EXCEPT AS REQUIRED BY APPLICABLE LAWS, NO WARRANTIES OF ANY KIND, EITHER EXPRESS OR IMPLIED, INCLUDING BUT NOT LIMITED TO, THE IMPLIED WARRANTIES OF MERCHANTABILITY AND FITNESS FOR A PARTICULAR PURPOSE, ARE MADE IN RELATION TO THE ACCURACY, RELIABILITY OR CONTENTS OF THIS DOCUMENT.
TO THE MAXIMUM EXTENT PERMITTED BY APPLICABLE LAW, UNDER NO CIRCUMSTANCES SHALL HUAWEI BE LIABLE FOR ANY SPECIAL, INCIDENTAL, INDIRECT, OR CONSEQUENTIAL DAMAGES, OR LOSS OF PROFITS, BUSINESS, REVENUE, DATA, GOODWILL SAVINGS OR ANTICIPATED SAVINGS REGARDLESS OF WHETHER SUCH LOSSES ARE FORSEEABLE OR NOT.
THE MAXIMUM LIABILITY (THIS LIMITATION SHALL NOT APPLY TO LIABILITY FOR PERSONAL INJURY TO THE EXTENT APPLICABLE LAW PROHIBITS SUCH A LIMITATION) OF HUAWEI ARISING FROM THE USE OF THE PRODUCT DESCRIBED IN THIS DOCUMENT SHALL BE LIMITED TO THE AMOUNT PAID BY CUSTOMERS FOR THE PURCHASE OF THIS PRODUCT.
Import and Export Regulations
All applicable export or import laws and regulations must be complied with and all necessary governmental permits and licenses must be obtained before exporting or importing the product, including the software and technical data, described in this document.
This guide is for reference only. The actual product, including but not limited to the color, size, and screen layout, may vary. All statements, information, and recommendations in this guide do not constitute a warranty of any kind, express or implied.
Please visit http://consumer.huawei.com/en/support/hotline for recent updated hotline and email address in your country or region.
Model: DUK-L09
V100R001_01




- honor8Pro
- User Guide
- Contents
- Foreword
- Unboxing your Phone
- Getting Started
- Screen and Display
- Network and Sharing
- Security and Backup
- Camera and Gallery
- Calls and Contacts
- Messaging and Email
- Calendar and Notepad
- Music and Video
- Phone Manager
- Tools
- System Features and Settings
- Inserting a SIM card and microSD card
- Charging your device
- Using a charger to charge your device
- Using a USB port to charge your device
- Using your USB Type-C port to charge other devices
- Safety information
- Battery status information
- Quick charging
- Viewing the battery status
- Displaying the remaining battery percentage in the status bar
- Watch VR videos
- Initial setup
- Enabling or disabling a SIM card
- Naming a SIM card
- Selecting the default mobile data SIM
- Setting the default SIM card
- Connecting to the Internet
- Connecting to a Wi-Fi network
- Connecting using mobile data
- Transferring data from another device
- Using Phone Clone to import data
- Using HiSuite to import data
- Viewing recommended settings
- Home screen
- About the home screen
- Basic screen gestures
- Enabling the Drawer home screen
- Adding app shortcuts to the home screen
- Reverting to the standard home screen
- Switching to simple home screen
- Displaying or hiding notification badges
- Setting the home screen wallpaper
- Changing the wallpaper
- Changing the wallpaper automatically
- Managing home screen icons
- Moving home screen icons
- Deleting apps from the home screen
- Shaking your device to auto-align icons
- Managing home screens
- Adding home screens
- Deleting home screens
- Moving home screens
- Setting the default home screen
- Managing home screen widgets
- Adding widgets
- Moving widgets
- Deleting widgets
- Managing home screen folders
- Creating a folder
- Renaming folders
- Adding apps to a folder
- Removing apps from a folder
- Deleting folders
- Locking and unlocking the screen
- Changing the lock screen style
- Changing the screen lock method
- Setting the screen lock password
- Locking the screen
- Unlocking the screen
- Configuring Magazine Unlock images
- Adding online wallpapers to the viewing list
- Sharing Magazine Unlock wallpapers
- Adding offline wallpapers to the viewing list
- Updating Magazine Unlock covers
- Accessing tools from the lock screen
- Configuring your lock screen signature
- Notification panel and status bar
- About the status bar
- Opening the notification panel and status bar
- Opening the notification panel and status bar from the lock screen
- Opening the notification panel and status par when the screen is unlocked
- About notification and status icons
- Status icons
- Notification icons
- Configuring notifications
- Configuring the screen to turn on when you receive a notification
- Configuring the status bar
- Using shortcut switches to access settings
- Accessing shortcut switches
- Configuring shortcut switches
- Navigation bar
- About the navigation bar
- Changing the navigation bar style
- Using the navigation bar
- Opening the notification panel
- Accessing Google Search and split screen mode
- Managing recent tasks
- Viewing recent tasks
- Switching between recent tasks
- Ending recent tasks
- Themes
- About themes
- Changing the theme
- Global search
- About global search
- Searching for content on your device
- Searching for contacts
- Searching for SMS messages
- Searching for emails
- Searching for apps
- Searching for settings
- Screenshot
- Capturing the entire screen
- Screenshot shortcut
- Using your knuckle to take a screenshot
- Capturing part of the screen
- Taking scrolling screenshots
- Using the shortcuts tab
- Using your knuckle
- Viewing screenshots
- Editing a screenshot
- Sharing a screenshot
- Deleting a screenshot
- Screen recording
- About screen recordings
- Screen recorder
- Pressing buttons to record
- Using knuckle gestures to record
- Viewing, sharing, and deleting screen recordings
- Viewing screen recordings
- Sharing screen recordings
- Deleting screen recordings
- Configuring the default storage location for screen recordings
- Split-screen mode
- About split-screen mode
- Enabling split screen mode
- Using your knuckle to enable split screen mode
- Using the Recent key to enable split screen mode
- Using swipe gestures to enable split screen mode
- Using split screen mode
- Switching to full screen mode
- Moving screens
- Changing the screen orientation
- Accessing the home screen
- Exiting split-screen mode
- Using motion gestures
- Eye comfort mode
- Adjusting the colour temperature
- Enabling and disabling eye comfort mode
- Configuring the timer
- Display settings
- Changing the font size
- Adjusting the screen brightness
- Configuring the screen rotation settings
- Mobile Internet
- Using mobile data
- Enabling mobile data
- Enabling data roaming
- Sharing your mobile Internet with other devices
- Using USB tethering
- Using Bluetooth tethering
- Wi-Fi
- About Wi-Fi
- Connecting to the Internet using Wi-Fi
- Connecting to a Wi-Fi network using Wi-Fi Protected Setup (WPS)
- Using Wi-Fi+
- Using a QR code to share your Wi-Fi hotspot
- Transferring data using Wi-Fi Direct
- Enabling or disabling Wi-Fi Direct
- Using Wi-Fi Direct to send and receive files
- Bluetooth
- Connecting to other devices using Bluetooth
- Enabling Bluetooth and pairing with other devices
- Unpairing Bluetooth devices
- Transferring data using Bluetooth
- Using Bluetooth to share files
- Sharing photos and videos with Bluetooth
- Bluetooth settings
- Renaming your device
- Making your device visible
- NFC
- About NFC
- Enabling NFC
- Using NFC to make payments
- Using a SIM card to make payments
- Using card emulation to make payments
- Using NFC to transfer files
- Using NFC to pair two devices
- Multi-screen
- Using multi-screen
- Mirroring your screen to a display device
- VPNs
- About VPNs
- Connecting to a VPN
- HiSuite
- Using HiSuite
- Installing HiSuite
- Using Huawei Share to transfer files between two Huawei devices
- Enabling Huawei Share
- Using Huawei Share to transfer files
- Using a USB port to transfer data
- Selecting the USB connection mode
- Transferring data between your phone and a computer
- Transfer files
- Transferring images
- Transferring MIDI data to your phone
- Transferring data between your phone and a USB storage device
- Transferring data between your phone and a microSD card
- Fingerprint recognition
- Adding a fingerprint for the first time
- Adding, deleting, or renaming a fingerprint
- Accessing Safe with your fingerprint
- Accessing App Lock with your fingerprint
- Multi-user accounts
- About multi-user accounts
- Create user accounts
- Deleting user accounts
- Switching between user accounts
- Configuring usernames and profile pictures
- Creating a guest account
- Deleting the guest account
- Authorizing users to make calls and access the call log
- Using PrivateSpace
- Security settings
- Setting your SIM card PIN
- Setting microSD card password
- Backing up and restoring data
- Backing up data to a microSD card
- Backing up data to your phone's internal storage
- Backing up data to a USB storage device
- Transferring data using a computer
- File management
- Creating folders
- Viewing files
- Viewing files by category
- Finding files quickly
- Sorting files
- Viewing downloads
- Adding and viewing favourites
- Creating file shortcuts on the home screen
- Sharing files
- Renaming files
- Copying, moving, or deleting files
- Creating or extracting archives
- Hiding small image files
- Storing files securely
- Camera options
- Photos and video recordings
- Taking a photo
- Geotagging photos
- Zooming in and out
- Adjusting the exposure
- Turning on the flash
- Using filters to enhance images
- Ultra Snapshot
- Burst shooting
- Self timer
- Audio-controlled shooting
- Shooting a video
- Object recognition and Pro camera mode
- Pro camera options
- Pro camera settings
- Selecting the metering mode
- Adjusting the ISO
- Adjusting the shutter speed
- Adjusting the exposure compensation
- Changing the focus mode
- Setting the white balance
- Using the spirit level
- Saving images in RAW format
- Wide aperture mode
- Monochrome mode
- Beauty mode
- Perfect Selfie mode
- Slow motion recording
- Time-lapse mode
- Adding watermarks to photos
- Audio notes
- Managing shooting modes
- Rearranging the shooting mode list
- Updating shooting modes
- Deleting shooting modes
- Configuring the camera settings
- Setting the photo and video resolutions
- Configuring the default storage location for photos and videos
- Adding an overlay
- Configuring the volume button function
- Configuring the touch and hold settings for the shutter
- Other camera settings
- Viewing photos and videos
- Viewing photos in full screen mode
- Viewing photos and videos in chronological order
- Viewing photos by location
- Viewing photos and videos by album
- Viewing photos as a slideshow
- Organising albums
- Adding photos or videos to a new album
- Moving photos and videos
- Moving albums
- Rearranging albums
- Deleting photos and videos
- Sharing photos and videos
- Sharing photos and videos stored on your phone's internal storage or microSD card
- Editing a photo
- Editing Videos
- Editing a video
- Cropping slow-motion videos
- Configuring Gallery
- Displaying the capture time and location
- Making calls
- Smart dialling
- Making a call from Contacts
- Making a call from the call log
- Calling contacts when the screen is off
- Making an emergency call
- Making international calls
- Making a call while roaming
- Answering calls
- Answering or rejecting a call
- Switching between calls
- Making a conference call
- In-call options
- Managing call logs
- Viewing missed calls
- Managing unknown numbers in the call log
- Merging call logs
- Clearing the call log
- Backing up the call log
- Call settings
- Enabling call forwarding
- Enabling call waiting
- Enabling pocket mode
- Rejecting calls with a text message
- Configuring the harassment filter
- Configuring the call ringtone
- Configuring voicemail
- Creating a contact card
- Creating a new contact
- Creating a contact
- Quickly adding contact details
- Sharing your QR code
- Importing and exporting contacts
- Importing contacts from a storage device
- Exporting contacts to a storage device
- Importing contacts from a SIM card
- Exporting contacts to a SIM card
- Using the Huawei Backup app to import contacts
- Using the Huawei Backup app to back up your contacts
- Managing contacts
- Editing a contact
- Merging duplicate contacts
- Deleting contacts
- Deleting contact history
- Adding contacts to the blacklist
- Identifying contacts with incomplete information
- Viewing contacts from different accounts
- Finding contacts
- Searching for a contact from the home screen
- Sharing contacts
- Share a contact's vCard
- Share a contact's QR code
- Adding a contact to your favourites
- Changing contact photos
- Viewing call records for individual contacts
- Assigning a ringtone to a contact
- Contact groups
- Creating a group
- Using smart groups
- Editing a group
- Sending a group text message or email
- Deleting a group
- Sending a message
- Replying to a message
- Searching for messages
- Deleting message threads
- Managing messages
- Returning to the top of the message list
- Pinning messages to the top of the list
- Marking messages as read
- Blocking spam messages
- Adding a message signature
- Configuring the message ringtone
- Identifying malicious URLs in text messages
- Adding an email account
- Adding a personal email account
- Adding an Exchange account
- Sending emails
- Replying to emails
- Managing emails
- Viewing emails
- Saving email attachments
- Syncing emails
- Searching emails
- Managing VIP contacts
- Managing email accounts
- Switching between email accounts
- Configuring an email account
- Configuring Mail
- Configuring automatic replies
- Configuring an email signature
- Configuring email notifications
- Configuring the email view
- Configuring how emails are sorted
- Changing the calendar view
- Viewing global holidays
- Birthday reminders
- Syncing events
- Syncing events from your Exchange account
- Creating an event
- Sharing events
- Deleting an event
- Searching for events
- Sending event invitations
- Creating a note
- Managing notes
- Adding a note to favourites
- Sharing a note
- Deleting a note
- Searching your notes
- Backing up notes
- Importing notes
- Listening to music
- Searching for music
- Deleting songs
- Creating a playlist
- Playing a playlist
- My playlists
- Playing a video
- Optimising performance
- Enhancing speed
- Managing data usage
- Harassment filter
- Battery management
- Viewing battery usage statistics
- Reducing power consumption
- Managing app permissions
- Virus scanner
- Encrypting apps
- Setting apps to close automatically when the screen is locked
- Configuring Phone Manager
- Adding shortcut for Phone Manager
- Logging in to two social media accounts at the same time
- Clock
- Managing alarms
- Configuring the world clock
- Enabling dual clocks
- Stopwatch
- Timer
- Sound recorder
- Recording sound
- Playing a recording
- Managing recordings
- Power on and off timer
- Restarting your device
- Changing the system language
- Changing the input method
- Input method settings
- Adding a keyboard
- Selecting the default input method
- Editing text
- Airplane mode
- Configuring the sound settings
- Adjusting the system volume
- Enabling silent mode
- Quickly switch between Silence mode, Vibration, Sound mode
- Setting the default notification tone
- Configuring dialpad touch tones
- Enabling or disabling system alert sounds and haptic feedback
- One-hand mode
- Gloves mode
- Do not disturb mode
- Setting up an account
- Adding an account
- Deleting an account
- Syncing data with your phone
- Viewing memory and storage information
- Setting the date and time
- Enabling location access
- Configuring the location settings
- Increasing indoor positioning accuracy
- Restoring factory settings
- OTA updates
- Viewing product information
- Viewing your model number and version information
- Viewing your IMEI
- Viewing your device's specifications
- Accessibility features
- Enabling TalkBack
- Using TalkBack to control your device
- Configuring the TalkBack settings
- Text To Speech (TTS) output
- Colour correction
- Obtaining help
- Personal Information and Data Security
- List of safety features
- Legal Notice
- Trademarks and Permissions
- Notice
- Third-Party Software Statement
- DISCLAIMER
- Import and Export Regulations
Mærke : HUAWEI
Model : Honor 8 Pro
Kategori : Smartphone