
FSS67000GW - Komfur BEKO - Gratis brugsanvisning og manual
Find enhedens vejledning gratis FSS67000GW BEKO i PDF-format.

Brugerspørgsmål om FSS67000GW BEKO
0 spørgsmål om dette apparat. Besvar dem du kender, eller stil dit eget.
Stil et nyt spørgsmål om dette apparat
Download vejledningen til din Komfur i PDF-format gratis! Find din vejledning FSS67000GW - BEKO og tag din elektroniske enhed tilbage i hånden. På denne side er alle dokumenter nødvendige for brugen af din enhed offentliggjort. FSS67000GW af mærket BEKO.
BRUGSANVISNING FSS67000GW BEKO
beko
Oven
User Manual
Ahi
Kasutusjuhend
Плита
Руководство пользователя

natural_image
Simple line drawing of a cupcake with frosting and toppings (no text or symbols)FSS67000GW
EN / ET / RU
285.3033.32/R.AJ/18.12.2019/5-1
7786587808
Please read this user manual first!
Dear Customer,
Thank you for purchasing this Beko product. We hope that you get the best results from your product which has been manufactured with high quality and state-of-the-art technology. Therefore, please read this entire user manual and all other accompanying documents carefully before using the product and keep it as a reference for future use. If you handover the product to someone else, give the user manual as well. Follow all warnings and information in the user manual.
Remember that this user manual is also applicable for several other models. Differences between models will be identified in the manual.
Explanation of symbols
Throughout this user manual the following symbols are used:

Important information or useful hints about usage.
Warning of hazardous situations with regard to life and property.
Warning of electric shock.
Warning of risk of fire.
Warning of hot surfaces.
Arçelik A.Ş.
Karaağaç caddesi No:2-6
34445 Süflüce/Istanbul/TURKEY
Made in TURKEY
CE
This product was manufactured using the latest technology in environmentally friendly conditions.
1 Important instructions and warnings for safety and environment 4
General safety 4
Electrical safety 4
Product safety 5
Intended use 8
Safety for children....8
Disposing of the old product 8
Package information 9
2 General information 10
Overview....10
Package contents 11
Technical specifications 12
3 Installation 13
Before installation....13
Installation and connection 14
Future Transportation....15
4 Preparation 16
Tips for saving energy....16
Initial use....16
First cleaning of the appliance 16
Initial heating....16
5 How to use the hob 17
General information about cooking 17
Using the hobs....17
6 How to operate the oven 19
General information on baking, roasting and grilling19
How to operate the electric oven 19
Operating modes....20
Cooking times table....20
How to operate the grill....21
Cooking times table for grilling 22
7 Maintenance and care 23
General information.... 23
Cleaning the hob 23
Cleaning the control panel 23
Cleaning the oven 23
Removing the oven door 24
Removing the door inner glass 25
Replacing the oven lamp.... 25
8 Troubleshooting 27
1 Important instructions and warnings for safety and environment
This section contains safety instructions that will help protect from risk of personal injury or property damage. Failure to follow these instructions shall void any warranty.
General safety
- This appliance can be used by children aged from 8 years and above and persons with reduced physical, sensory or mental capabilities or lack of experience and knowledge if they have been given supervision or instruction concerning use of the appliance in a safe way and understand the hazards involved.
Children shall not play with the appliance. Cleaning and user maintenance shall not be made by children without supervision.
- The appliance is not to be used by persons (including children) with reduced physical, sensory or mental capabilities, or lack of experience and knowledge, unless they have been given supervision or instruction. Children should be supervised and ensure they do not play with the appliance
- If the product is handed over to someone else for personal use or second-hand use purposes, the
user manual, product labels and other relevant documents and parts should be also given.
- Never place the product on a carpet-covered floor. Otherwise, lack of airflow beneath the product will cause electrical parts to overheat. This will cause problems with your product.
- Installation and repair procedures must always be performed by Authorised Service Agents. The manufacturer shall not be held responsible for damages arising from procedures carried out by unauthorised persons which may also void the warranty. Before installation, read the instructions carefully.
- Do not operate the product if it is defective or has any visible damage.
- Ensure that the product function knobs are switched off after every use.
Electrical safety
- If the product has a failure, it should not be operated unless it is repaired by an Authorised Service Agent. There is the risk of electric shock!
- Only connect the product to a grounded outlet/line with the
voltage and protection as specified in the “Technical specifications”. Have the grounding installation made by a qualified electrician while using the product with or without a transformer. Our company shall not be liable for any problems arising due to the product not being earthed in accordance with the local regulations.
- Never wash the product by spreading or pouring water onto it! There is the risk of electric shock!
- The product must be disconnected during installation, maintenance, cleaning and repairing procedures.
- If the power connection cable for the product is damaged, it must be replaced by the manufacturer, its service agent or similarly qualified persons in order to avoid a hazard.
- The appliance must be installed so that it can be completely disconnected from the mains supply. The separation must be provided by a switch built into the fixed electrical installation, according to construction regulations.
- Rear surface of the oven gets hot when it is in use. Make sure that the electrical connection does not contact the rear surface;
otherwise, connections can get damaged.
- Do not trap the mains cable between the oven door and frame and do not route it over hot surfaces. Otherwise, cable insulation may melt and cause fire as a result of short circuit.
- Any work on electrical equipment and systems should only be carried out by authorised and qualified persons.
- In case of any damage, switch off the product and disconnect it from the mains. To do this, turn off the fuse at home.
• Make sure that fuse rating is compatible with the product.
Product safety
- WARNING: The appliance and its accessible parts become hot during use. Care should be taken to avoid touching heating elements. Children less than 8 years of age shall be kept away unless continuously supervised.
- Never use the product when your judgment or coordination is impaired by the use of alcohol and/or drugs.
-
Be careful when using alcoholic drinks in your dishes. Alcohol evaporates at high temperatures and may cause fire since it can ignite when it comes into contact with hot surfaces.
-
Food Poisoning Hazard: Do not let food sit in oven for more than 1 hour before or after cooking. Doing so can result in food poisoning or sickness.
- Do not place any flammable materials close to the product as the sides may become hot during use.
- During use the appliances becomes hot. Care should be taken to avoid touching heating elements inside the oven.
- Keep all ventilation slots clear of obstructions.
- Do not heat closed tins and glass jars in the oven. The pressure that would build-up in the tin/jar may cause it to burst.
- Do not place baking trays, dishes or aluminium foil directly onto the bottom of the oven. The heat accumulation might damage the bottom of the oven.
- Do not use harsh abrasive cleaners or sharp metal scrapers to clean the oven door glass since they can scratch the surface, which may result in shattering of the glass.
- Do not use steam cleaners to clean the appliance as this may cause an electric shock.
• (Varies depending on the product model.)
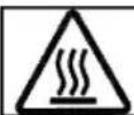
Placing the wire shelf and tray onto the wire racks properly It is important to place the wire shelf and/or tray onto the rack properly. Slide the wire shelf or tray between 2 rails and make sure that it is balanced before placing food on it (Please see the following figure).
Intended use
- This product is designed for domestic use. Commercial use will void the guarantee. - CAUTION: This appliance is for cooking purposes only. It must not be used for other purposes, for example room heating. - This product should not be used for warming the plates under the grill, drying towels, dish cloths etc. by hanging them on the oven door handles. This product should also not be used for room heating purposes. - The manufacturer shall not be liable for any damage caused by improper use or handling errors. - The oven can be used for defrosting, baking, roasting and grilling food.Safety for children
- WARNING: Accessible parts may become hot during use. Young children should be kept away. - The packaging materials will be dangerous for children. Keep the packaging materials away from children. Please dispose of all parts of the packaging according to environmental standards. - Electrical products are dangerous to children. Keep children away from the product when it is operating and do not allow them to play with the product. - Do not place any items above the appliance that children may reach for. - When the door is open, do not load any heavy object on it and do not allow children to sit on it. It may overturn or door hinges may get damaged.Disposing of the old product
Compliance with the WEEE Directive and Disposing of the Waste Product:  This product complies with EU WEEE Directive (2012/19/EU). This product bears a classification symbol for waste electrical and electronic equipment (WEEE). This product has been manufactured with high quality parts and materials which can be reused and are suitable for recycling. Do not dispose of the waste product with normal domestic and other wastes at the end of its service life. Take it to the collection center for the recycling of electrical and electronic equipment. Please consult your local authorities to learn about these collection centers.Compliance with RoHS Directive:
The product you have purchased complies with EU RoHS Directive (2011/65/EU). It does not contain harmful and prohibited materials specified in the Directive.Package information
\- Packaging materials of the product are manufactured from recyclable materials in accordance with our National Environment Regulations. Do not dispose of the packaging materials together with the domestic or other wastes. Take them to the packaging material collection points designated by the local authorities.2 General information
Overview
  1 Front door 2 Handle 3 Lower part 4 Tray 5 Wire shelf 6 Control panel 7 Burner plate 8 Lamp 9 Grill heating element 10 Shelf positions  1 Warning lamp 2 Thermostat lamp 3 Thermostat knob 4 Function knob 5 Single-circuit cooking plate Rear left 6 Single-circuit cooking plate Front left 7 Single-circuit cooking plate Front right 8 Single-circuit cooking plate Rear rightPackage contents
 Accessories supplied can vary depending on the product model. Not every accessory described in the user manual may exist on your product.1. User manual
2. Standard tray
Used for pastries, frozen foods and big roasts. natural_image
3D rendering of a rectangular tray with a grid pattern (no text or symbols)3. Wire grill
Used for roasting and for placing the food to be baked, roasted or cooked in casserole dishes to the desired rack. natural_image
Two technical line drawings of a grid-like structure with horizontal slats, no text or symbols present.natural_image
Technical diagram of a mechanical assembly with two circular insets showing internal components (no text or symbols)natural_image
Technical line drawing of a mechanical assembly with two views (top and side), no visible text or symbols| GENERAL | |
| External dimensions (height / width / depth) | 850 mm/600 mm/600 mm |
| Voltage / frequency | 220-240V ~ 50 Hz |
| Total power consumption | 8,1 kW |
| Cable type / section | min.H05W-FG 3 x 2,5 mm^2 |
| HOB | |
| Burners | |
| Rear left | Single-circuit cooking plate |
| Dimension | 140 mm |
| Power | 1200 W |
| Front left | Single-circuit cooking plate |
| Dimension | 180 mm |
| Power | 1700 W |
| Front right | Single-circuit cooking plate |
| Dimension | 140 mm |
| Power | 1200 W |
| Rear right | Single-circuit cooking plate |
| Dimension | 180 mm |
| Power | 1700 W |
| OVEN/GRILL | |
| Main oven | Conventional oven |
| Inner lamp | 15-25 W |
| Grill power consumption | 2.2 kW |
Basics: Information on the energy label of electrical ovens is given in accordance with the EN 60350-1 / IEC 60350-1 standard. Those values are determined under standard load with bottom-top heater or fan assisted heating (if any) functions.
Energy efficiency class is determined in accordance with the following prioritization depending on whether the relevant functions exist on the product or not. 1-Cooking with eco-fan, 2-Turbo slow cooking, 3-Turbo cooking, 4-Fan assisted bottom/top heating, 5-Top and bottom heating.  Technical specifications may be changed without prior notice to improve the quality of the product.  Figures in this manual are schematic and may not exactly match your product.  Values stated on the product labels or in the documentation accompanying it are obtained in laboratory conditions in accordance with relevant standards. Depending on operational and environmental conditions of the product, these values may vary.3 Installation
Product must be installed by a qualified person in accordance with the regulations in force. The manufacturer shall not be held responsible for damages arising from procedures carried out by unauthorized persons which may also void the warranty. Before installation
To ensure that critical air gaps are maintained under the appliance, we recommend that this appliance is mounted on a solid base and that the feet do not sink into any carpet or soft flooring. The kitchen floor must be able to carry the weight of the appliance plus the additional weight of cookware and bakeware and food. If the range is placed on a base, measures have to be taken to prevent the appliance slipping from the base. The appliances must not be installed behind a decorative door in order to avoid overheating.  - It can be used with cabinets on either side but in order to have a minimum distance of 400mm above hotplate level allow a side clearance of 65mm between the appliance and any wall, partition or tall cupboard. - It can also be used in a free standing position. Allow a minimum distance of 750 mm above the hob surface. (\*) If a cooker hood is to be installed above the cooker, refer to cooker hood manufacturer' instructions regarding installation height (min 650 mm). - The appliance corresponds to device class 1, i.e. it may be placed with the rear and one side to kitchen walls, kitchen furniture or equipment of any size. The kitchen furniture or equipment on the other side may only be of the same size or smaller. - Any kitchen furniture next to the appliance must be heat-resistant (100 °C min.).Safety chain
If your product has 2 safety chains;
The appliance must be secured against overbalancing by using the supplied two safety chains on your oven. Fasten hook (1) by using a proper peg to the kitchen wall (6) and connect safety chain (3) to the hook via the locking mechanism (2).  1 Stability hook 2 Locking mechanism 3 Safety chain (supplied and mounted to oven) 4 Firmliy fix chain to cooker rear 5 Rear of cooker 6 Kitchen wallIf your product has 1 safety chain;
The appliance must be secured against overbalancing by using the supplied one safety chain on your oven. Follow below steps in the picture to secure the safety chain to your product.   Stability chain to be as short as practicable to avoid oven tilting forward and diagonal to avoid oven side tilting. Cooker stability chain for cookers is not designed with bracket engagement slot.Installation and connection
Product can only be installed and connected in accordance with the statutory installation rules.  Do not install the product next to refrigerators or freezers. The heat emitted by the product will increase the energy consumption of cooling appliances. • Carry the product with at least two persons. - Product must be placed directly on the floor. It must not be placed onto a base or a pedestal.  Do not use the door and/or handle to carry or move the product. The door, handle or hinges get damaged.Electrical connection
Connect the product to a grounded outlet/line protected by a miniature circuit broker of suitable capacity as stated in the "Technical specifications" table. Have the grounding installation made by a qualified electrician while using the product with or without a transformer. Our company shall not be liable for any damages that will arise due to using the product without a grounding installation in accordance with the local regulations. DANGER:
The product must be connected to the mains supply only by an authorised and qualified person. The product's warranty period starts only after correct installation. Manufacturer shall not be held responsible for damages arising from procedures carried out by unauthorised persons. DANGER:
The power cable must not be clamped, bent or trapped or come into contact with hot parts of the product. A damaged power cable must be replaced by a qualified electrician. Otherwise, there is risk of electric shock, short circuit or fire! The mains supply data must correspond to the data specified on the type label of the product. The rating plate is either seen when the door or the lower cover is opened or it is located at the rear wall of the unit depending on the unit type. Power cable of your product must comply with the values in "Technical specifications" table. DANGER:
Before starting any work on the electrical installation, disconnect the product from the mains supply. There is the risk of electric shock!Connecting the power cable
 While performing the wiring, you must apply with the national/local electrical regulations and must use the appropriate socket outlet/line and plug for oven. In case of the product's power limits are out of current carrying capability of plug and socket outlet/line, the product must be connected through fixed electrical installation directly without using plug and socket outlet/line. 1. If it is not possible to disconnect all poles in the supply power, a disconnection unit with at least 3 mm contact clearance (fuses, line safety switches, contactors) must be connected and all the poles of this disconnection unit must be adjacent to (not above) the product in accordance with IEE directives. Failure to obey this instruction may cause operational problems and invalidate the product warranty. Additional protection by a residual current circuit breaker is recommended.If a cable is supplied with the product:
flowchart
graph TD
    subgraph_Single_phase["Single phase 220/230/240V AC"]
        A1["1"] --> B1["2"]
        B1 --> C1["3"]
        C1 --> D1["4"]
        D1 --> E1["N"]
        E1 --> F1["5"]
        F1 --> G1["*"]
    end
    subgraph_Two_phase["Two phase 380/400/415V AC"]
        H1["1"] --> I1["2"]
        I1 --> J1["3"]
        J1 --> K1["4"]
        K1 --> L1["L1"]
        L1 --> M1["N"]
        M1 --> N1["5"]
        N1 --> O1["*"]
    end
    subgraph_Three_phase["Three phase 380/400/415V AC"]
        P1["1"] --> Q1["L1"]
        Q1 --> R1["2"]
        R1 --> S1["3"]
        S1 --> T1["4"]
        T1 --> U1["N"]
        U1 --> V1["5"]
        V1 --> W1["*"]
    end
Final check
1. Reconnect the product to the mains. 2. Check electrical functions.Future Transportation
- Keep the product's original carton and transport the product in it. Follow the instructions on the carton. If you do not have the original carton, pack the product in bubble wrap or thick cardboard and tape it securely. - To prevent the wire grill and tray inside the oven from damaging the oven door, place a strip of cardboard onto the inside of the oven door that lines up with the position of the trays. Tape the oven door to the side walls. - Do not use the door or handle to lift or move the product.  Do not place any objects onto the product and move it in upright position.  Check the general appearance of your product for any damages that might have occurred during transportation.4 Preparation
Tips for saving energy
The following information will help you to use your appliance in an ecological way, and to save energy: - Use dark coloured or enamel coated cookware in the oven since the heat transmission will be better. - While cooking your dishes, perform a preheating operation if it is advised in the user manual or cooking instructions. - Do not open the door of the oven frequently during cooking. - Try to cook more than one dish in the oven at the same time whenever possible. You can cook by placing two cooking vessels onto the wire shelf. • Cook more than one dish one after another. The oven will already be hot. - You can save energy by switching off your oven a few minutes before the end of the cooking time. Do not open the oven door. • Defrost frozen dishes before cooking them. - Use pots/pans with cover for cooking. If there is no cover, energy consumption may increase 4 times. - Select the burner which is suitable for the bottom size of the pot to be used. Always select the correct pot size for your dishes. Larger pots require more energy. - Pay attention to use flat bottom pots when cooking with electric hobs. Pots with thick bottom will provide a better heat conduction. You can obtain energy savings up to 1/3. - Vessels and pots must be compatible with the cooking zones. Bottom of the vessels or pots must not be smaller than the hotplate. - Keep the cooking zones and bottom of the pots clean. Dirt will decrease the heat conduction between the cooking zone and bottom of the pot. - For long cookings, turn off the cooking zone 5 or 10 minutes before the end of cooking time. You can obtain energy savings up to 20% by using the residual heat.Initial use
First cleaning of the appliance
 The surface might get damaged by some detergents or cleaning materials. Do not use aggressive detergents, cleaning powders/creams or any sharp objects during cleaning. Do not use harsh abrasive cleaners or sharp metal scrapers to clean the oven door glass since they can scratch the surface, which may result in shattering of the glass. 1. Remove all packaging materials. 2. Wipe the surfaces of the appliance with a damp cloth or sponge and dry with a cloth.Initial heating
Heat up the product for about 30 minutes and then switch it off. Thus, any production residues or layers will be burnt off and removed. WARNING
Hot surfaces cause burns! Product may be hot when it is in use. Never touch the hot burners, inner sections of the oven, heaters and etc. Keep children away. Always use heat resistant oven gloves when putting in or removing dishes into/from the hot oven.Electric oven
1. Take all baking trays and the wire grill out of the oven. 2. Close the oven door. 3. Select Static position. 4. Select the highest grill power; See How to operate the electric oven, page 19. 5. Operate the oven for about 30 minutes. 6. Turn off your oven; See How to operate the electric oven, page 19Grill oven
1. Take all baking trays and the wire grill out of the oven. 2. Close the oven door. 3. Select the highest grill power; see How to operate the grill, page 21. 4. Operate the grill about 30 minutes. 5. Turn off your grill; see How to operate the grill, page 21  Smoke and smell may emit for a couple of hours during the initial operation. This is quite normal. Ensure that the room is well ventilated to remove the smoke and smell. Avoid directly inhaling the smoke and the smell that emits.5 How to use the hob
General information about cooking
 Never fill the pan with oil more than one third of it. Do not leave the hob unattended when heating oil. Overheated oils bring risk of fire. Never attempt to extinguish a possible fire with water! When oil catches fire, cover it with a fire blanket or damp cloth. Turn off the hob if it is safe to do so and call the fire department. - Before frying foods, always dry them well and gently place into the hot oil. Ensure complete thawing of frozen foods before frying. • Do not cover the vessel you use when heating oil. - Place the pans and saucepans in a manner so that their handles are not over the hob to prevent heating of the handles. Do not place unbalanced and easily tilting vessels on the hob. - Do not place empty vessels and saucepans on cooking zones that are switched on. They might get damaged. - Operating a cooking zone without a vessel or saucepan on it will cause damage to the product. Turn off the cooking zones after the cooking is complete. - As the surface of the product can be hot, do not put plastic and aluminum vessels on it. Clean any melted such materials on the surface immediately. Such vessels should not be used to keep foods either. • Use flat bottomed saucepans or vessels only. - Put appropriate amount of food in saucepans and pans. Thus, you will not have to make any unnecessary cleaning by preventing the dishes from overflowing. Do not put covers of saucepans or pans on cooking zones. Place the saucepans in a manner so that they are centered on the cooking zone. When you want to move the saucepan onto another cooking zone, lift and place it onto the cooking zone you want instead of sliding it.Tips about glass ceramic hobs
\- Glass ceramic surface is heatproof and is not affected by big temperature differences. - Do not use the glass ceramic surface as a place of storage or as a cutting board. - Use only the saucepans and pans with machined bottoms. Sharp edges create scratches on the surface. - Do not use aluminum vessels and saucepans. Aluminum damages the glass ceramic surface. natural_image
Diagram of a hand using a tool to mark crossed-out electrical lines (no text or symbols)Using the hobs
 1 Single-circuit cooking plate 14-16cm 2 Single-circuit cooking plate 18-20cm 3 Single-circuit cooking plate 14-16 cm 4 Single-circuit cooking plate 18-20cm is list of advised diameter of pots to be used on related burners. DANGER:
Do not allow any object to drop on the hob. Even small objects such as a saltshaker may damage the hob. Do not use cracked hobs. Water may leak through these cracks and cause short circuit. In case of any kind of damage on the surface (eg., visible cracks), switch off the product immediately to minimize the risk of electric shock. Glass ceramic hob is equipped with an operation light and a hot zone warning indicator. Hot zone warning indicator indicates the status of the active zone and it remains lit after the plate is turned off. When the temperature of the plate cools down to a level that it can be touched by hand, warning indicator turns off. Flickering of the hot zone warning indicator is not a failure. natural_image
Abstract diagram with a black arrow pointing to four dots on a textured gray background, no text or symbols present.Turning on the ceramic plates
The hob control knobs are used for operating the plates. To obtain the desired cooking power, turn the hob control knobs to the corresponding level.| Cooking level | 1 | 2—3 | 4—6 |
| warming | stewing, simmering | cooking, roasting, boiling |
| Cooking level | 1 | 2 | 3 |
| warming | stewing, simmering | cooking, roasting, boiling |
Turning off the ceramic plates
Turn the plate knob to OFF (upper) position.6 How to operate the oven
General information on baking, roasting and grilling
WARNING
Hot surfaces cause burns! Product may be hot when it is in use. Never touch the hot burners, inner sections of the oven, heaters and etc. Keep children away. Always use heat resistant oven gloves when putting in or removing dishes into/from the hot oven. DANGER:
Be careful when opening the oven door as steam may escape. Exiting steam can scald your hands, face and/or eyes.Tips for baking
- Use non-sticky coated appropriate metal plates or aluminum vessels or heat-resistant silicone moulds. • Make best use of the space on the rack. - Place the baking mould in the middle of the shelf. - Select the correct rack position before turning the oven or grill on. Do not change the rack position when the oven is hot. - Keep the oven door closed.Tips for roasting
- Treating whole chicken, turkey and large piece of meat with dressings such as lemon juice and black pepper before cooking will increase the cooking performance. - It takes about 15 to 30 minutes longer to roast meat with bones when compared to roasting the same size of meat without bones. • Each centimeter of meat thickness requires approximately 4 to 5 minutes of cooking time. - Let meat rest in the oven for about 10 minutes after the cooking time is over. The juice is better distributed all over the roast and does not run out when the meat is cut. - Fish should be placed on the middle or lower rack in a heat-resistant plate.Tips for grilling
When meat, fish and poultry are grilled, they quickly get brown, have a nice crust and do not get dry. Flat pieces, meat skewers and sausages are particularly suited for grilling as are vegetables with high water content such as tomatoes and onions. \- Distribute the pieces to be grilled on the wire shelf or in the baking tray with wire shelf in such a way that the space covered does not exceed the size of the heater. \- Slide the wire shelf or baking tray with grill into the desired level in the oven. If you are grilling on the wire shelf, slide the baking tray to the lower rack to collect fats. Add some water in the tray for easy cleaning.  Foods that are not suitable for grilling carry the risk of fire. Only grill food which is suitable for intensive grilling heat. Do not place the food too far in the back of the grill. This is the hottest area and fatty food may catch fire.How to operate the electric oven Select temperature and operating mode
 1 Thermostat knob 2 Function knob 1. Set the Function knob to the desired operating mode. 2. Set the Temperature knob to the desired temperature. » Oven heats up to the adjusted temperature and maintains it. During heating, temperature lamp stays on.Switching off the electric oven
Turn the function knob and temperature knob to off (upper) position.Rack positions (For models with wire shelf)
It is important to place the wire shelf onto the side rack correctly. Wire shelf must be inserted between the side racks as illustrated in the figure. Do not let the wire shelf stand against the rear wall of the oven. Slide your wire shelf to the front section of the rack and settle it with the help of the door in order to obtain a good grill performance. (Varies depending on the product model.) Operating modes
The order of operating modes shown here may be different from the arrangement on your product.Top and bottom heating
 Top and bottom heating are in operation. Food is heated simultaneously from the top and bottom. For example, it is suitable for cakes, pastries, or cakes and casseroles in baking moulds. Cook with one tray only.Bottom heating
 Only bottom heating is in operation. It is suitable for pizza and for subsequent browning of food from the bottom.  This function must be used for easy steam cleaning as well.Grill
 Small grill at the ceiling of the oven is in operation. Suitable for grilling. - Put small or medium-sized portions in correct shelf position under the grill heater for grilling. - Set the temperature to maximum level. - Turn the food after half of the grilling time.Full grill
 Large grill at the ceiling of the oven is in operation. It is suitable for grilling large amount of meat. - Put big or medium-sized portions in correct rack position under the grill heater for grilling. - Set the temperature to maximum level. • Turn the food after half of the grilling time.Cooking times table
 The timings in this chart are meant as a guide. Timings may vary due to temperature of food, thickness, type and your own preference of cooking.Baking and roasting
 1st rack of the oven is the bottom rack.| Dish | Cooking level number | Accessory to use | Operating mode | Rack position | Temperature (°C) | Cooking time (approx. in min.) |
| Cakes in tray | One level | Standard tray* | 3 | 180 | 25 ... 30 | |
| Cakes in mould | One level | Cake mold on wire grill** | 2 | 180 | 40 ... 50 | |
| Small cakes | One level | Standard tray* | 3 | 160 | 25 ... 35 | |
| Sponge cake | One level | Round springform pan with a diameter of 26 cm on wire grill** | 3 | 160 | 25 ... 35 | |
| Cookies | One level | Pastry tray* | 3 | 180 | 25 ... 30 | |
| Dough pastry | One level | Standard tray* | 2 | 200 | 30 ... 40 | |
| Rich pastry | One level | Standard tray* | 2 | 200 | 25 ... 35 | |
| Leaven | One level | Standard tray* | 2 | 200 | 35 ... 45 | |
| Lasagna | One level | Glass/metal rectangular pan on wire grill** | 2 - 3 | 200 | 30 ... 40 | |
| Pizza | One level | Standard tray* | 2 | 200 ... 220 | 15 ... 20 | |
| Beef steak (whole) / Roast | One level | Standard tray* | 2 | 25 min. 250/max, then 180 ... 190 | 100 ... 120 | |
| Leg of Lamb (casserole) | One level | Standard tray* | 2 | 25 min. 220 then 190 | 70 ... 90 | |
| Roasted chicken (1,8-2 kg) | One level | Standard tray* | 2 | 15 min. 250/max, then 190 | 70 ... 90 | |
| Turkey (5.5 kg) | One level | Standard tray* | 1 | 25 min. 250/max, then 190 | 150 ... 210 | |
| Fish | One level | Standard tray* | 3 | 200 | 20 ... 30 | |
| It is suggested to perform preheating for all foods.These accessories may not supplied with the product.These accessories are not supplied with the product. They are commercially available accessories. | ||||||
Cooking table for test meals
Meals in this cooking table are prepared according to EN 60350-1 to make it easier for control institutes to test the product| Dish | Cooking level number | Accessory to use | Operating mode | Rack position | Temperature (°C) | Cooking time (approx. in min.) |
| Shortbread | One level | Standard tray* | 3 | 140 | 20 ... 30 | |
| Small cakes | One level | Standard tray* | 3 | 160 | 25 ... 35 | |
| Sponge cake | One level | Round springform pan with a diameter of 26 cm on wire grill** | 3 | 160 | 25 ... 35 | |
| Apple pie | One level | Round black metal dish with a diameter of 20 cm on wire grill** | 2 | 180 | 50 ... 60 | |
| It is suggested to perform preheating for all foods.* These accessories may not supplied with the product.** These accessories are not supplied with the product. They are commercially available accessories. | ||||||
Tips for baking cake
- If the cake is too dry, increase the temperature by 10°C and decrease the cooking time. - If the cake is wet, use less liquid or lower the temperature by 10^ C. - If the cake is too dark on top, place it on a lower rack, lower the temperature and increase the cooking time. - If cooked well on the inside but sticky on the outside use less liquid, lower the temperature and increase the cooking time.Tips for baking pastry
- If the pastry is too dry, increase the temperature by 10°C and decrease the cooking time. Dampen the layers of dough with a sauce composed of milk, oil, egg and yoghurt. - If the pastry takes too long to bake, pay care that the thickness of the pastry you have prepared does not exceed the depth of the tray. - If the upper side of the pastry gets browned, but the lower part is not cooked, make sure that the amount of sauce you have used for the pastry is not too much at the bottom of the pastry. Try to scatter the sauce equally between the dough layers and on the top of pastry for an even browning.  Cook the pastry in accordance with the mode and temperature given in the cooking table. If the bottom part is still not browned enough, place it on one lower rack next time.Tips for cooking vegetables
- If the vegetable dish runs out of juice and gets too dry, cook it in a pan with a lid instead of a tray. Closed vessels will preserve the juice of the dish. - If a vegetable dish does not get cooked, boil the vegetables beforehand or prepare them like canned food and put in the oven.How to operate the grill
WARNING
Close oven door during grilling. Hot surfaces may cause burns!Switching on the grill
1. Turn the Function knob to the desired grill symbol. 2. Then, select the desired grilling temperature. 3. If required, perform a preheating of about 5 minutes. » Temperature light turns on.Switching off the grill
1. Turn the Function knob to Off (top) position.  Foods that are not suitable for grilling carry the risk of fire. Only grill food which is suitable for intensive grilling heat. Do not place the food too far in the back of the grill. This is the hottest area and fatty food may catch fire. Cooking times table for grilling Grilling with electric grill| Food | Accessory to use | Rack position | Recommended temperature (°C)** | Cooking time (approx. in min.) |
| Fish | Wire grill | 4...5 | 250/max | 20...25 min.# |
| Sliced chicken | Wire grill | 4...5 | 250/max | 25...35 min. |
| Lamb chops | Wire grill | 4...5 | 250/max | 20...25 min. |
| Roast beef | Wire grill | 4...5 | 250/max | 25...30 min.# |
| Veal chops | Wire grill | 4...5 | 250/max | 25...30 min.# |
| Toast bread* | Wire grill | 4 | 250/max | 1..3 min. |
| #depending on thickness*Preheat for 5 minutes**If the grill temperature of your product cannot be adjusted, the grill will work at the maximum temperature. | ||||
| Food | Accessory to use | Rack position | Temperature (°C) | Cooking time (approx. in min.) |
| Toast bread | Wire grill | 4 | 250/max | 1...3 min. |
| Meatballs (beef) - 12 pieces | Wire grill | 4 | 250/max | 25...35 min. |
| Turn the food after 2/3 of the total grilling time.It is suggested to perform 5 minutes preheating for all foods brolling. | ||||
Maintenance and care
General information
Service life of the product will extend and the possibility of problems will decrease if the product is cleaned at regular intervals. DANGER:
Disconnect the product from mains supply before starting maintenance and cleaning works. There is the risk of electric shock! DANGER:
Allow the product to cool down before you clean it. Hot surfaces may cause burns! - Clean the product thoroughly after each use. In this way it will be possible to remove cooking residues more easily, thus avoiding these from burning the next time the appliance is used. - No special cleaning agents are required for cleaning the product. Use warm water with washing liquid, a soft cloth or sponge to clean the product and wipe it with a dry cloth. - Always ensure any excess liquid is thoroughly wiped off after cleaning and any spillage is immediately wiped dry. - Do not use cleaning agents that contain acid or chloride to clean the stainless or inox surfaces and the handle. Use a soft cloth with a liquid detergent (not abrasive) to wipe those parts clean, paying attention to sweep in one direction.  The surface might get damaged by some detergents or cleaning materials. Do not use aggressive detergents, cleaning powders/creams or any sharp objects during cleaning. Do not use harsh abrasive cleaners or sharp metal scrapers to clean the oven door glass since they can scratch the surface, which may result in shattering of the glass.  Do not use steam cleaners to clean the appliance as this may cause an electric shock.Cleaning the hob
Glass ceramic surface
Wipe the glass ceramic surface (vitroceramic) with cold water, paying attention to leave no residual cleaning agents, and dry with a soft clothing. Residues may cause damage on the glass ceramic surface when using the hob for the next time. Dried residues on the glass ceramic surface (vitroceramic) should under no circumstances be scraped with hook blades, steel wool or similar tools. Remove calcium stains (yellow stains) with commercially available lime remover or a small amount of lime remover such as vinegar or lemon juice. If the surface is heavily soiled, apply the cleaning agent on a sponge and wait until it is absorbed well. Then, clean the surface of the hob with a damp cloth.  Sugar-based foods such as thick cream and syrup must be cleaned promptly without waiting the surface to cool down. Otherwise, glass ceramic surface may get damaged permanently. Slight color fading may occur on coatings or other surfaces in time. This does not affect the operation of the product. Color fading and stains on the glass ceramic surface is a normal condition, and not a defect.Cleaning the control panel
Clean the control panel and knobs with a damp cloth and wipe them dry.  If your product is equipped with buttons/knobs do not remove the control buttons/knobs to clean the control panel. Control panel may get damaged!Cleaning the oven
To clean the side wall (Varies depending on the product model.)
(This feature is optional. It may not exist on your product.) 1. Remove the front section of the side rack by pulling it in the opposite direction of the side wall. 2. Remove the side rack completely by pulling it towards you. Catalytic walls
(This feature is optional. It may not exist on your product.)
The inner side walls (A) and/or the rear wall (B) of your product may be coated with catalytic enamel. Catalytic walls have a light matte colour and a porous surface. Catalytic walls of the oven should not be cleaned. Porous surfaces of the catalytic walls are automatically cleaned by absorbing and converting the spilled oil (steam and carbon dioxide). natural_image
Two technical diagrams labeled A and B showing internal components with grid patterns (no text or symbols beyond labels)Easy Steam Cleaning
It ensures easy cleaning because the dirt (having waited not for too long) is softened with the steam that forms inside the oven and the water drops condensing on the inner surfaces of the oven. 1. Remove all accessories inside the oven. 2. Pour 500 ml of water into the oven tray and place the tray at the 2nd rack of the oven. natural_image
Illustration of a laptop with a screen showing abstract graphics (no text or symbols)Clean oven door
To clean the oven door, use warm water with washing liquid, a soft cloth or sponge to clean the product and wipe it with a dry cloth.  Don't use any harsh abrasive cleaners or sharp metal scrapers for cleaning the oven door. They could scratch the surface and destroy the glass.Removing the oven door
1. Open the front door (1). 2. Open the clips at the hinge housing (2) on the right and left hand sides of the front door by pressing them down as illustrated in the figure.  1 Door 2 Hinge lock(closed position) 3 Oven 4 Hinge lock(open position) natural_image
Mechanical assembly diagram showing a clamping mechanism with labeled component 4 (no text or symbols beyond the number)natural_image
Diagram showing two mechanical assembly steps with directional arrows indicating motion (no text or symbols)Removing the door inner glass
(This feature is optional. It may not exist on your product.) The inner glass panel of the oven door can be removed for cleaning. Open the oven door. natural_image
3D diagram of a layered electronic component with labeled parts (1 and 2), showing internal structure without any text or symbols beyond labels.natural_image
3D diagram of a rectangular electronic component with labeled parts A and B, showing internal structure and directional arrows (no text or symbols beyond labels)Replacing the oven lamp
DANGER:
Before replacing the oven lamp, make sure that the product is disconnected from mains and cooled down in order to avoid the risk of an electrical shock. Hot surfaces may cause burns!  The oven lamp is a special electric light bulb that can resist up to 300 °C. See Technical specifications, page 12 for details. Oven lamps can be obtained from Authorised Service Agents or technician with licence.  Position of lamp might vary from the figure.  The lamp used in this appliance is not suitable for household room illumination. The intended purpose of this lamp is to assist the user to see foodstuffs.  The lamps used in this appliance have to withstand extreme physical conditions such as temperatures above 50 °C.If your oven is equipped with a round lamp:
1. Disconnect the product from mains. 2. Turn the glass cover counter clockwise to remove it. natural_image
Diagram of a mechanical or electrical component with three circular arrows indicating rotational or feedback motion (no text or symbols)natural_image
Two mechanical diagrams labeled A and B showing a rotating component with directional arrows, no text or symbols present.8 Troubleshooting
Oven emits steam when it is in use.
\- It is normal that steam escapes during operation. >>> This is not a fault.Product emits metal noises while heating and cooling.
\- When the metal parts are heated, they may expand and cause noise. >>> This is not a fault.Product does not operate.
- The mains fuse is defective or has tripped. >>> Check fuses in the fuse box. If necessary, replace or reset them. • Product is not plugged into the (grounded) socket. >>> Check the plug connection.Oven light does not work.
- Oven lamp is defective. >>> Replace oven lamp. - Power is cut. >>> Check if there is power. Check the fuses in the fuse box. If necessary, replace or reset the fuses.Oven does not heat.
- Might not be set to a certain cooking function and/or temperature. >>> Set the oven to a certain cooking function and/or temperature. - Power is cut. >>> Check if there is power. Check the fuses in the fuse box. If necessary, replace or reset the fuses.  Consult the Authorised Service Agent or technician with licence or the dealer where you have purchased the product if you can not remedy the trouble although you have implemented the instructions in this section. Never attempt to repair a defective product yourself. Arcelik A.S. Karaağaç Caddesi No:2-6 Sütlüce, 34445, Turkey Made in TURKEY Importer in Russia: «BEKO LLC» Address: Selskaya street, 49, Fedorovskoe village, Pershinskoe rural settlement, Kirzhach district, Vladimir region, Russian Federation 601021 The manufacture date is included in the serial number of a product specified on rating label, which is located on a product, namely: first two figures of serial number indicate the year of manufacture, and last two – the month. For example, "10- 100001-05" indicates that the product was produced in May, 2010. You can ask for certification number from our Call Center 8-800-200-23-56 The manufacturer reserves the right for making changes in modification, design and specification of an electric device.beko
Ahi
Kasutusjuhend
natural_image
Simple line drawing of a steaming cupcake (no text or symbols)Tutvuge palun esmalt käesoleva kasutusjuhendiga!
Lugupeetud klient! Aitäh, et otsustasite Bekou toote kasuks. Loodetavasti jääte selle kaasaegse tehnoloogia järgi valmistatud kvaliteetse toote tööga rahule. Selleks tutvuge enne toote kasutamist hoolikalt kasutusjuhendi ja köigi kaasasolevate dokumentidega ja hoidke need alles. Kui annate toote üle uuele omanikule, pange kaasa ka kasutusjuhend. Järgige köiki kasutusjuhendis toodud hoiatusi ja juhiseid. Pidage meeles, et kasutusjuhendis võib olla juttu mitmest mudelist. Mudelite erinevused on kasutusjuhendis välja toodud.Sümbolite tähendused
Kasutusjuhendis kasutatakse järgmisi sümboleid:  Oluline teave või kasulikud nõuanded.  Hoiatus eluohtlike või vara kahjustavate olukordade kohta.  Hoiatus elektrilöögi kohta.  Hoiatus tulekahju kohta.  Hoiatus tuliste pindade kohta.1 Olulised hoiatused ning juhised ohutuse tagamiseks ja keskkonna säästmiseks 4
Üldine ohutus 4 Elektriohutus 4 Toote ohutu kasutamine....5 Ettenähtud otstarve....8 Laste ohutuse tagamine....8 Toote kõrvaldamine kasutuselt....8 Pakkematerjali kõrvaldamine 82 Üldine teave 9
Ülevaade....9 Pakendi sisu....10 Tehnilised andmed....113 Paigaldamine 12
Enne paigaldamist 12 Paigaldamine ja ühendamine....13 Toote kõrvaldamine kasutuselt....144 Ettevalmistused 15
Nõuandeid energia säästmiseks....15 Esimene kasutuskord....15 Seadme esmane puhastamine....15 Esmane kuumutamine....155 Pliidiplaadi kasutamine 16
Üldine teave toiduvalmistamise kohta 16 Pliidi kasutamine....166 Kuidas ahju kasutada 18
Üldine teave küpsetamise, röstimise ja grillimise kohta 18 Elektriahju kasutamine....18 Töörežiimid 19 Küpsetusaegade tabel 20 Kuidas grilli kasutada....21 Küpsetamisaegade tabel grillimiseks 217 Hoidmine ja hooldus 22
Üldine teave....22 Pliidi puhastamine....22 Juhtpaneeli puhastamine 22 Ahju puhastamine 22 Ahjuukse eemaldamine 23 Ukse siseklaasi eemaldamine.... 24 Ahjuvalgusti pirni vahetamine.... 248 Probleemide lahendamine 26
1 Olulised hoiatused ning juhised ohutuse tagamiseks ja keskkonna säästmiseks
Käesolev peatükk sisaldab ohutusjuhiseid, mis aitavad teil vältida kehavigastusi ja varalist kahju. Nende juhiste eiramisel kaotab garantii kehtivuse.Üldine ohutus
\- Üle 8-aastased lapsed ja füüsilise, meele- või vaimupuudega inimesed või isikud, kellel puuduvad vastavad kogemused või teadmised, võivad seadet kasutada juhul, kui nad teevad seda järelevalve all või on saanud seadme kasutamiseks vajalikud juhised ning mõistavad sellega kaasnevaid ohte. Lapsed ei tohi seadmega mängida. Lapsed ei tohi omapead seadet puhastada ja hooldada. \- Seadet ei tohi kasutada lapsed ega füüsilise, meele- või vaimse puudega isikud või kogemusteta ja vastavate teadmisteta isikud, kui nad ei tegutse nende ohutuse eest vastutava isiku järelevalve või juhendamise all. Lapsed ei tohi seadmega mängida, kui puudub järelevalve. \- Kui toode antakse kellelegi teisele isiklikuks kasutamiseks või uuele omanikule, tuleb anda kaasa ka kasutusjuhend, toote etiketid ja muud olulised dokumendid ja osad. - Toodet ei tohi asetada vaibaga kaetud põrandale. Sel juhul on õhuringlus toote all takistatud, mistõttu elektriosad võivad üle kuumeneda. See võib põhjustada toote kasutamisel probleeme. - Paigaldus- ja remonttööd tuleb alati jätta volitatud teeninduse hooleks. Tootja ei vastuta kahjude eest, mis tulenevad volitamatute isikute tehtud protseduuridest ja võivad muuta garantii kehtetuks. Enne paigaldamist tutvuge hoolikalt juhistega. - Ärge kasutage toodet, kui see on rikkis või sellel on nähtavaid vigastusi. - Kontrollige pärast iga kasutuskorda, et toote funktsiooninupud on välja lülitatud.Elektriohutus
- Rikkis toodet ei tohi kasutada, vaid see tuleb lasta volitatud teeninduses korda teha. Elektrilöögi oht! - Toote võib ühendada ainult maandatud elektrikontakti/-liiniga, mille pinge ja kaitse vastavad tabelile “Tehnilised andmed”. Laske maandus paigaldada kvalifitseeritud elektrikul olenemata sellest, kas kasutate toodet transformaatoriga või ilma. Meie ettevõte ei vastuta probleemide eest, mis on tingitud toote kasutamisest ilma kohalikele eeskirjadele vastava maanduseta. \- Ärge kunagi peske toodet veega uhtudes või üle kallates! Elektrilöögi oht! \- Paigaldamise, hoolduse, puhastamise ja remondi ajaks tuleb toode vooluvõrgust lahutada. \- Kui toote toitejuhe saab viga, peab tootja, hooldusfirma või vastava kvalifikatsiooniga elektrik ohu vältimiseks selle välja vahetama. \- Seade tuleb paigaldada nii, et selle saab võrgust täielikult lahti ühendada. Lahtiühendamise võimalus tuleb tagada voolupistikuga või püsielektrisüsteemi paigaldatud lülitiga, mis vastab ehitusnõuetele. \- Kasutamisel ahju tagakülg kuumeneb. Veenduge, et elektrijuhtmed ei puutu vastu ahju tagakülge, sest kuumus võib neid kahjustada. \- Ärge muljuge toitejuhet ahjuukse ja korpuse vahele ja ärge asetage seda tuliste pindade peale. Juhtme isolatsioon võib sulada ning lühise tõttu võib tekkida tulekahju. - Elektriseadmetel ja -süsteemidel peaksid töid teostama ainult volitatud ja vastava kvalifikatsiooniga isikud. - Kahjustuste tekkimisel lülitage toode välja ning lahutage see vooluvõrgust. Selleks lülitage välja kaitsekork. - Veenduge, et kaitsme voolutugevus vastab toote niminäitajatele.Toote ohutu kasutamine
HOIATUS: Seade ja selle välispinnad muutuvad kasutamise käigus tuliseks. Kindlasti tuleb hoiduda kokkupuutest kuumutuselementidega. Alla 8-aastased lapsed tuleb seadmest eemal hoida, välja arvatud juhul, kui nad on täiskasvanu pideva jälgimise all. \- Ärge kasutage toodet, kui mötlemisvõime või koordinatsioon on alkoholi ja/või uimastite tarbimise tagajärjel halvenenud. \- Olge toitudesse alkohoolseid jooke lisades ettevaatlik. Kõrgel temperatuuril alkohol aurustub ning võib tuliste pindadega kokku puutudes põhjustada tulekahju. \- Ärge asetage toote lähedusse kergestisüttivaid materjale, kuna selle küljed võivad kasutamise ajal kuumeneda. \- Kasutamise käigus seade kuumeneb. Kindlasti tuleb hoiduda kokkupuutest ahju sees paiknevate kuumutuselementidega. - Årge tõkestage ventilatsiooniavasid. - Ärge kuumutage ahjus suletud konservikarpe ja klaaspurke. Purgis tekkida võiva surve tagajärjel võib see lõhkeda. - Ärge asetage küpsetusplaate, nõusid või fooliumit ahju põhja. Kogunev kuumus võib ahju põhja kahjustada. - Ärge kasutage ahju ukseklaasi puhastamiseks tugevatoimelisi abrasiivseid puhastusvahendeid ega teravaid metallkraabitsaid, sest need võivad pinda kriimustada ning põhjustada klaasi purunemise. \- Ärge kasutage puhastamiseks aurupuhasteid, muidu võite saada elektrilöögi. \- (Varieerub olenevalt toote mudelist.) Traatresti ja ahjuplaadi asetamine siinidele Traatrest ja/või ahjuplaat tuleb kindlasti asetada siinidele õigesti. Lükake traatrest või küpsetusplaat kahe siini vahele ja enne sellele toidu asetamist veenduge, et see püsib kindlalt paigal (vt allolevat joonist).  - Ärge kasutage toodet, kui selle esiukse klaas on eemaldatud või mõranenud. - Uksekäepide ei ole möeldud käterättide kuivatamiseks. Ärge riputage ahju külge rätikuid, kindaid vms riideasemeid, kui uks on lahti ja grillifunktsioon töötab. - Toitu kuuma ahju pannes või välja võttes kasutage alati kuumuskindlaid pajakindaid. - Katke pann või ahjutarvik (nt plaat või rest) küpsetuspaberiga, asetage selle peale toit ning pange kõik eelsoojendatud ahju. Üle ahjutarviku või panni ääre ulatuv küpsetuspaber tuleb eemaldada, et see ei puutuks kütteelementidega kokku. Ärge kunagi kasutage küpsetuspaberit küpsetuspaberi jaoks ettenähtud temperatuurist körgemal temperatuuril. Ärge kunagi asetage küpsetuspaberit vahetult ahjupõhjale. HOIATUS: Enne lambipirni vahetamist veenduge, et seadme toitejuhe on pistikust eemaldatud või seade on välja lülitatud - muidu võite saada elektrilöögi. - Ülekuumenemise vältimiseks ei tohi seadet paigaldada dekoratiivse ukse taha. - Toode tuleb paigutada otse põrandale. Seda ei tohi asetada aluse või postamendi peale. HOIATUS: Rasva või õli sisaldava anuma jätmine pliidile järelevalveta on ohtlik ja võib põhjustada tulekahju. ÄRGE üritage tuld kustutada veega, vaid lülitage seade välja ja seejärel katke leek nt pajakaane või tuletekiga kinni. • TÄHELEPANU: Küpsetamistoimingut peab jälgima. Lühiajalist küpsetamistoimingut peab pidevalt jälgima. • HOIATUS: Tuleoht: Ärge hoidke keedupindadel esemeid. - HOIATUS: Kui pind on pragunenud, lülitage seade välja, et vältida elektrilöögi ohtu. \- Klaasist pliidiplaadi purunemisel tehke järgmist. Lülitage otsekohe välja köik põletid ja elektrilised kütteelemendid ning eemaldage seade vooluvõrgust. Ärge puudutage seadme pinda. Ärge kasutage seadet. \- Seade ei ole möeldud kasutamiseks välise taimeri või eraldi kaugjuhtimissüsteemiga. \- Rõhk, mis tekib keeduplaadi pinnal või keedunõu põhja all oleva niiskuse aurustumisel, võib keedunõu paigast nihutada. Seepärast jälgige alati, et pliidipind ja keedunõude põhjad oleksid kuivad. \- HOIATUS: Kasutage ainult seadme külge paigaldatud, tootja poolt valmistatud või kasutusjuhendis soovitatud kaitsepiirdeid. Ebasobivate kaitsepiirete kasutamine võib lõppeda õnnetusega. Toote tuleohutuse tagamine: - Veenduge, et pistik on kindlalt pesas, et ei tekiks sädemeid. - Ärge kasutage kahjustatud või vigastatud juhet. Samuti ei tohi kasutada pikendusjuhet. - Vältige niiskuse või vedeliku sattumist toote ühendamiseks kasutatud pistikupesale.Ettenähtud otstarve
- Toode on möeldud ainult kodukasutuseks. Kasutamine ettevõtluses ei ole lubatud. - TÄHELEPANU: Seade on möeldud ainult toidu valmistamiseks. Seda ei tohi kasutada muuks otstarbeks, näiteks ruumi kütmiseks. - Toodet ei tohi kasutada taldrikute soojendamiseks grillielemendi all, käterätikute ja nõudepesulappide vms kuivatamiseks (riputades need käepidemete külge) ja kütmiseks. - Tootja ei võta mingit vastutust ebaõige kasutamise või käsitsemise tagajärjel tekkinud kahjude eest. - Ahju võib kasutada toidu sulatamiseks, küpsetamiseks, hautamiseks ja grillimiseks.Laste ohutuse tagamine
• HOIATUS: Ligipääsetavad osad võivad kasutamisel kuumeneda. Väikelapsed tuleb eemal hoida. - Pakkematerjalid on lastele ohtlikud. Hoidke pakkematerjale väljaspool laste käeulatust. Käidelge köiki pakendijäätmeid vastavalt keskkonnastandarditele. - Elektriseadmed on lastele ohtlikud. Hoidke lapsed töötavast seadmest eemal ja ärge laske neil seadmega mängida. - Ärge asetage seadme kohale asju, mida lapsed vöiksid üritada kätte saada. - Kui uks on avatud, ärge toetage sellele raskeid asju ja ärge lubage lastel selle peal istuda. Muidu võib uks alla vajuda või hinged kahjustada saada.Toote körvaldamine kasutuselt
WEEE direktiivi täitmine ja romuseadme kõrvaldamine:  Seade vastab Euroopa Liidu WEEE direktiivile (2012/19/EL). Seadmel on elektri- ja elektroonikaseadmete jäätmete (WEEE) liigiti kogumise tähis. Seade on valmistatud kvaliteetsetest osadest ja materjalidest, mis sobivad ringlussevõtmiseks ja taaskasutamiseks. Ärge visake tarbetuks muutunud seadet tavalise olmeprügi ega muude jäätmete hulka. Viige see elektri- ja elektroonikajäätmete kogumispunkti. Kogumispunktide kohta saate täpsemat teavet kohalikust omavalitsusest.RoHS-direktiivi täitmine:
Seade vastab Euroopa Liidu RoHS-direktiivile (2011/65/EL). See ei sisalda direktiivis mainitud kahjulikke ja keelatud materjale.Pakkematerjali körvaldamine
\- Pakkematerjalid on lastele ohtlikud. Hoidke pakkematerjale ohutus kohas, kust lapsed neid kätte ei saa. Toote pakend on valmistatud taaskasutatavatest materjalidest. Körvaldage pakkematerjalid nõuetekohaselt ja sorteerige vastavalt taaskasutatavate jäätmete kogumise eeskirjadele. Ärge visake neid olmeprügi hulka.2 Üldine teave
Ülevaade
  1 Eesuks 2 Käepide 3 Alumine osa 4 Kandik 5 Traatrest 6 Juhtpaneel 7 Põletiplaat 8 Tuli 9 Grilli kuumutuselement 10 Riiuli asendid  1 Hoiatustuli 2 Termostaadilamp 3 Termostaatnupp 4 Funktsiooninupp 5 Ühesööriline küpsetusplaat Vasak tagumine 6 Ühesööriline küpsetusplaat Vasak esimene 7 Ühesööriline küpsetusplaat Parem esimene 8 Ühesööriline küpsetusplaat Parem taguminePakendi sisu
 Lisavarustus võib sõltuvalt toote mudelist varieeruda. Kõiki kasutusjuhendis kirjeldatud lisasid ei pruugi teie tootel olla.1. Kasutusjuhend
2. Harilik plaat
Kasutatakse küpsetiste, külmutatud toitude ning suurte praadide valmistamiseks. natural_image
3D rendering of a rectangular baking tray with a textured surface (no text or symbols)3. Traatrest
Kasutatakse praadide valmistamiseks või haudenõus valmistatavate roogade asetamiseks soovitud kõrgusega siinile. natural_image
Line drawing of a rectangular metal grate or rack structure (no text or symbols)natural_image
Line drawing of a rectangular grid structure with two side handles (no text or symbols)natural_image
Technical diagram of a structural support frame with two circular inset views showing internal components (no text or symbols)natural_image
Technical illustration of a mechanical assembly with two views of a component (no text or symbols)| ÜLDANDMED | |
| Välismõõtmed (kõrgus/laius/sügavus) | 850 mm/600 mm/600 mm |
| Pinge/sagedus | 220-240V ~ 50 Hz |
| Energiatarve kokku | 8,1 kW |
| Juhtme tüüp/ristlöige | minH05W-FG 3 x 2,5 mm^2 |
| PLIIT | |
| Põletid | |
| Vasak tagumine | Ühesõõriline küpsetusplaat |
| Suurus | 140 mm |
| Võimsus | 1200 W |
| Vasak esimene | Ühesõõriline küpsetusplaat |
| Suurus | 180 mm |
| Võimsus | 1700 W |
| Parem esimene | Ühesõõriline küpsetusplaat |
| Suurus | 140 mm |
| Võimsus | 1200 W |
| Parem tagumine | Ühesõõriline küpsetusplaat |
| Suurus | 180 mm |
| Võimsus | 1700 W |
| AHI/GRILL | |
| Peamine ahi | Traditsiooniline ahi |
| Sisevalgusti | 15–25 W |
| Grilli energiatarve | 2.2 kW |
3 Paigaldamine
Toode tuleb lasta paigaldada pädeval spetsialistil vastavalt kehtivatele eeskirjadele. Muidu muutub garantii kehtetuks. Tootja ei vastuta kahjude eest, mis tulenevad volitamatute isikute tehtud protseduuridest ja võivad muuta garantii kehtetuks.  Toote paigalduskoha ning elektrisüsteemi ettevalmistamine on kliendi ülesanne. OHT:
Toote paigaldamisel tuleb järgida köiki gaasi- ja elektrisüsteemidele kehtestatud kohalikke eeskirju. OHT:
Enne paigaldamist vaadake üle, kas tootel ei pole defekte. Defektide esinemisel ärge laske toodet paigaldada. Kahjustatud toode võib kujutada ohtu.Enne paigaldamist
Et seadme all oleks tagatud vajalik õhuvah, soovitame selle paigaldada kindlale pinnale ja jälgida, et seadme jalad ei vajuks vaiba või pehme põrandakatte sisse. Köögipõrand peab vastu pidama seadme ja lisaks köögi- ja küpsetustarvete ning toidu raskusele.  \- Seadet võib kasutada köögikappide vahel, kuid selleks, et pliidiplaadi kohal oleks vähemalt 400 mm vaba ruumi, paigutage seade nii, et see asetseks seintest, vaheseintest ja kõrgetest kappidest vähemalt 65 mm kaugusel. - Seda võib kasutada ka vabalt seisvas asendis. Jätke pliidi pinna kohale vähemalt 750 mm vaba ruumi. (\*) Kui kavatsete paigaldada pliidi kohale õhupuhasti, valige selle paigalduskõrgus vastavalt tootja juhistele (vähemalt 650 mm). - Seade vastab 1. seadmeklassi nõuetele, mis tähendab, et seda võib paigutada tagaosa ja ühe küljega vastu seinu, köögimööblit või igas suuruses seadmeid. Teisel küljel paiknev köögimööbel või seade võib olla kas sama suur või väiksem. - Igasugune seadme kõrval asuv köögimööbel peab olema kuumuskindel (vähemalt 100 °C).Ohutuskett
Kui teie tootel on 2 ohutusketti.
Seade tuleb ümbermineku vältimiseks kinnitada, kasutades kahte ahju juurde kuuluvat ohutusketti. Kinnitage konks (1) sobiva tüübli abil köögiseina (6) külge ja ühendage ohutuskett (3) lukustusmehhanismi (2) kaudu konksuga.  1 Fikseerimiskonks 2 Lukustusmehhanism 3 Ohutuskett 4 Kinnitage kett kindlalt seadme tagaosa külge 5 Seadme tagakülg 6 KöögiseinKui teie tootel on 1 ohutuskett.
Seade tuleb ümbermineku vältimiseks kinnitada, kasutades ühte ahju juurde kuuluvat ohutusketti. Ohutusketi toote külge kinnitamiseks toimige joonisel kujutatud juhiste järgi.   Stabiliseerimiskett peab olema võimalikult lühike ja paiknema diagonaalselt, et ahi ei kalduks ette ega küljele. Pliidi stabiliseerimisketil pole ava kronsteini kinnitamiseks.Paigaldamine ja ühendamine
Toodet tohib paigaldada ja ühendada ainult vastavalt ametlikele paigalduseeskirjadele.  Ärge paigaldage toodet külmkappide ega sügavkülmikute körvale. Tootest eralduv soojus suurendab jahutusseadmete energiatarvet. • Kandke toodet vähemalt kahe inimesega. - Toode tuleb paigutada otse põrandale. Seda ei tohi asetada aluse või postamendi peale.  Ärge kasutage toote tõstmiseks või liigutamiseks ust ega uksekäepidet. Uks, käepide või hinged võivad kahjustada saada.Elektriühendused
Ühendage toode maandatud elektrikontakti/-liiniga, millel on sobivate näitajatega minikaitselüliti (vt tabelit "Tehnilised andmed"). Laske maandus paigaldada kvalifitseeritud elektrikul olenemata sellest, kas kasutate toodet transformaatoriga või ilma. Meie ettevõte ei vastuta kahjude eest, mis on tingitud toote kasutamisest ilma kohalikele eeskirjadele vastava maanduseta. OHT:
Toote võivad vooluvõrku ühendada ainult autoriseeritud ja kvalifitseeritud isikud. Toote garantiiaeg algab alles pärast nõuetekohast paigaldamist. Tootja ei vastuta kahjude eest, mis tulenevad volitamatute isikute tehtud protseduuridest. OHT:
Toitejuhet ei tohi kinnitada klambritega, väänata ega muljuda ning see ei tohi puutuda kokku toote kuumenevate osadega. Kahjustatud toitejuhtme peab välja vahetama kvalifitseeritud elektrik. Muul juhul tuleb arvestada elektrilöögi, lühise või tulekahju ohuga! Võrgutoite näitajad peavad vastama seadme tüübisildile märgitud andmetele. Reitinguplaati on näha, kui uks või alumine kate on avatud, või kui see asub seadme tagaküljes, sõltuvalt seadme tüübist. Toote toitejuhe peab vastama tehniliste andmete tabelis toodud väärtustele. OHT:
Enne elektritööde tegemist ühendage toode vooluvõrgust lahti. Elektrilöögi oht!Toitejuhtme ühendamine
 Juhtmestiku paigaldamisel tuleb järgida elektrisüsteemidele kehtestatud siseriiklikke/kohalikke eeskirju ning kasutada ahju jaoks sobivat elektrikontakti/-liini ja pistikut. Kui toote võimsus on suurem kui pistiku ja elektrikontakti/-liini (kestev) taluvusvool, tuleb toode ühendada püsielektrisüsteemi otse, kasutamata pistikut ja elektrikontakti/-liini. 1. Kui toitevoolu kõiki poolusi ei ole võimalik lahutada, tuleb ühendada vähemalt 3 mm kontaktivahega voolukatkestusseade (kaitse, liinikatkestuslüliti, kontaktor) ja kõik voolukatkestusseadme poolused peavad vastavalt IEE direktiividele paiknema toote kõrval (mitte kõrgemal). Selle juhise eiramine võib põhjustada probleeme toote kasutamisel ja muuta garantii kehtetuks. Soovitatav on kasutada lisakaitseks jääkvoolukatkestit.Kui tootega on kaasas juhe:
flowchart
graph TD
    A["1"] --> B["2"]
    B --> C["3"]
    C --> D["4"]
    D --> E["5"]
    E --> F["Ground"]
    style A fill:#f9f,stroke:#333
    style B fill:#ccf,stroke:#333
    style C fill:#cfc,stroke:#333
    style D fill:#fcc,stroke:#333
    style E fill:#cff,stroke:#333
    style F fill:#ffc,stroke:#333
    note bottom of A: Úhefaasiline
    note bottom of F: 220/230/240 V vahelduvvool
flowchart
graph TD
    A["3"] -->|L1| B["4"]
    C["2"] -->|L2| D["5"]
    E["1"] -->|N| D
    D --> F["+"]
    style A fill:#fff,stroke:#000
    style C fill:#fff,stroke:#000
    style E fill:#fff,stroke:#000
    style B fill:#fff,stroke:#000
    style D fill:#fff,stroke:#000
    style F fill:#fff,stroke:#000
2. Ühefaasilise ühenduse puhul ühendage juhtmed alljärgnevalt:
• Pruun juhe = L (Faas) • Sinine juhe = N (Neutraal) • Roheline/kollane juhe = (E) ⏻ (maandus) • Lükake toode köögiseina juurde. • Ahju jalgade reguleerimine Töötava seadme vibreerimisel vöivad küpsetusnõud paigast nihkuda. Seadme loodimise ja tasakaalustamisega on vöimalik niisugust ohtlikku olukorda vältida. Kasutajate ohutuse tagamiseks tuleb toode loodida. Selleks keeratakse nelja jalga (põhja all) vasakule vöi paremale ja rihitakse ahi tööpinnaga ühele joonele.Löppkontroll
1. Ühendage toode uuesti vooluvörku. 2. Kontrollige elektrifunktsioone.Toote körvaldamine kasutuselt
- Hoidke toote originaalkarp alles ja kasutage seada toote transportimiseks. Järgige karbile märgitud juhiseid. Kui teil originaalkarpi pole, pakkige toode mullikillesse või paksu kargongi sisse ja kinnitage kindlalt teibiga. - Et traatrest ja ahjus asuv küpsetusplaat ei saaks kahjustada ahju ust, asetage ahju ukse siseküljele papiriba, mis oleks küpsetusplaatidega ühel joonel. Teipige ahju uks külgseinte külge. - Ärge kasutage toote töstmiseks vöi liigutamiseks ust ega uksekäepidet.  Ärge asetage tootele esemeid ja hoidke seda teisaldamise ajal püstiasendis.  Kontrollige toote üldilmet, et avastada võimalikke transpordi käigus tekkinud defekte.4 Ettevalmistused
Nõuandeid energia säästmiseks
Alljärgnevad nõuanded aitavad teil oma seadet kasutada ökoloogilisel viisil ja säästa energiat: - Kasutage ahjus tumedaid ja emailkattega küpsetusnõusid, kuna need juhivad paremini soojust. - Roogade valmistamisel eelkuumutage ahju, kui nii on soovitatud kasutusjuhendis või retseptis. - Küpsetamise ajal vältige ahjuukse sagedast avamist. - Kui vähegi võimalik, küpsetage ahjus korraga mitut rooga. Traatrestile võib asetada kaks hautamisanumat. - Samuti vöib valmistada mitu rooga üksteise järel. Ahi on juba eelnevalt kuum. - Saate säästa energiat, kui lülitate ahju välja mõned minutid enne küpsetusaja lõppu. Ärge avage ahjuust. - Külmutatud road sulatage enne kuumutamist üles. - Kasutage hautamisel kaantega potte/panne. Ilma kaaneta võib kuluda kuni 4 korda rohkem energiat. - Valige põleti, mille läbimõõt vastab kasutatava poti/panni läbimõõdule. Kasutage roogade valmistamisel alati sobiva suurusega kastrulit. Suuremad potid/pannid vajavad rohkem energiat. - Elektripliidi puhul kasutage lameda põhjaga potte. Paksu põhjaga potid juhivad paremini soojust. Saate säästa kuni kolmandiku elektrist. - Keedunõud ja pannid peavad vastama keeduala suurusele. Poti või panni põhi ei tohi olla keeduplaadist väiksem. - Hoidke keedualad ja pottide/pannide põhjad puhtad. Mustus halvendab soojusülekannet keeduala ja keedunõu põhja vahel. - Pikema valmistusaja korral lülitage keeduala 5 kuni 10 minutit enne valmistusaja löppu välja. Jääkkuumuse kasutamisel saate säästa kuni 20% energiat.Esimene kasutuskord Seadme esmane puhastamine
 Mõned puhastusained või -vahendid võivad pinda kahjustada. Ärge kasutage tugevatoimelisi puhastusaineid, puhastuspulbrit või -pastat ega teravaid esemeid. 1. Eemaldage köik pakkematerjalid. 2. Pühkige seadme pindu niiske lapi või käsnaga ja kuivatage lapiga.Esmane kuumutamine
Kuumutage toodet umbes 30 minutit ning seejärel lülitage see välja. Selle käigus põlevad ära võimalikud tootmisjäägid või määrdekihid. HOIATUS
Kuumad pinnad tekitavad põletusi! Toode võib kasutamisel olla kuum. Ärge kunagi puudutage kuumi põleteid, ahju sisekülgi, kütteelemente jne. Hoidke lapsed eemal! Toite kuuma ahju pannes või välja võttes kasutage alati kuumuskindlaid pajakindaid.Elektriahi
1. Võtke kõik küpsetusplaadid ja traatrest ahjust välja. 2. Sulgege ahjuuks. 3. Valige staatiline asend. 4. Valige köige vöimsam grilli kuumutusaste, vt Elektriahju kasutamine, Ik 18. 5. Laske ahjul töötada umbes 30 minutit. 6. Lülitage ahi välja, vt Elektriahju kasutamine, Ik 18.Grillahi
1. Võtke kõik küpsetusplaadid ja traatrest ahjust välja. 2. Sulgege ahjuuks. 3. Valige kõige võimsam grilli kuumutusaste, vt Kuidas grilli kasutada, lk 21. 4. Laske ahjul töötada umbes 30 minutit. 5. Lülitage grill välja, vt Kuidas grilli kasutada, Ik 21.  Seadme esimesel kasutuskorral võib paari tunni vältel esineda suitsu ja ebameeldivat löhna. See on normaalne. Suitsu ja löhna eemaldamiseks tuulutage ruumi. Vältige tekkiva suitsu ja löhna sissehingamist.5 Pliidiplaadi kasutamine
Üldine teave toiduvalmistamise kohta
 Ärge kunagi pange pannile öli rohkem kui kolmandiku ulatuses. Öli kuumutamisel ärge jätke pliiti järelevalveta. Öli ülekuumenemisega kaasneb tulekahju oht. Ärge kunagi üritage kustutada tuld veega! Öli süttimisel summutage leegid tuleteki või märja lapiga. Lülitage pliit välja, kui seda saab ohutult teha, ja helistage tuletörjesse. - Enne toiduainete praadimist kuivatage need hoolikalt ja asetage ettevaatlikult kuuma öli sisse. Külmutatud toiduained tuleb enne praadimist täielikult üles sulatada. - Öli kuumutamisel ärge katke anumat kaanega. - Jälgige, et pottide ja pannide sangad ei jääks pliidikohale, et vältida nende kuumenemist. Ärge asetage pliidile köikuvaaid ja kergesti ümberminevaaid keedunõusid. - Ärge asetage sisselülitatud keedualadele tühje potte või panne. See võib neid kahjustada. - Kui keedualal ei ole potti või panni ja see töötab tühjalt, võivad tagajärjeks olla toote kahjustused. Kui olete toidu valmistamise lõpetanud, lülitage keedualad välja. - Kuna toote pind võib olla tuline, ärge asetage sellele plastist või alumiiniumist nõusid. Sulanud materjal tuleb pinnalt kohe eemaldada. Sellistes nõudes ei tohiks hoida ka toitu. - Kasutage ainult lameda põhjaga potte või panne. - Pange potti või pannile sobiv kogus toitu. Nii ei voola toit üle äära ja säästate end pliidipuhastamisest. Ärge asetage poti- või pannikaasi keedualadele. Jälgige, et potid ja pannid asetseksid keeduala keskel. Kui soovite panna poti teisele keedualale, ärge libistage seda, vaid tõstke üles ja asetage soovitud keedualale.Soovitusi klaaskeraamiliste pliitide kasutami-seks
- Klaaskeraamiline pind on kuumuskindel ja tundetu suurte temperatuurierinevuste suhtes. - Ärge kasutage klaaskeraamilist pinda esemete hoidmiseks või lõikelauana. - Kasutage ainult sileda põhjaga tööstuslikke potte ja panne. Teravad servad kriimustavad pinda. \- Ärge kasutage alumiiniumist potte ja panne. Alumiinium kahjustab klaaskeraamilist pinda.  Pritsmed võivad klaaskeraamilist pinda kahjustada ja põhjustada tulekahju. Ärge kasutage nõgusa või kumera põhjaga potte/panne. Kasutage ainult lameda põhjaga potte ja panne. Need tagavad parema soojusülekande. Kui poti läbimõõt on liiga väike, läheb energia raisku. Pliidi kasutamine  1 Ühesööriline küpsetusplaat 14-16cm 2 Ühesööriline küpsetusplaat 18-20cm 3 Ühesööriline küpsetusplaat 14-16 cm 4 Ühesööriline küpsetusplaat 18-20cm on nimekiri vastavatele põletitele sobivate pottide diameetritest. OHT:
Ärge pillake esemeid pliidile. Isegi väiksemõõdulised esemed (nt soolatoos) võivad pliiti kahjustada. Ärge kasutage pragunenud pliiti. Pragudesse võib tungida vesi, mis võib põhjustada lühise. Kui toote pind on kahjustatud või vigastatud (nt selles on silmaga nähtavad praod), lülitage see elektrilöögi ohu vähendamiseks kohe välja. Klaaskeraamiline plaat on varustatud töötule ja tulise pinna hoiatusnäidikuga. Tulise pinna hoiatusnäidik näitab sisselülitatud ala asukohta ning jääb plaadi väljalülitamise järel põlema. Kui plaadi temperatuur langeb, nii et seda saab juba käega puudutada, lülitub hoiatusnäidik välja. Tulise pinna hoiatusnäidiku vilkumine ei viita rikkele. natural_image
Abstract diagram with a black arrow pointing to four dots on a textured gray background, no text or symbols present.Keraamiliste plaatide sisselülitamine
Plaadi juhtnuppe kasutatakse plaatide reguleerimiseks. Soovitud kuumuse saamiseks keerake nupud vastavasse asendisse.| Kuumusaste | 1 | 2–3 | 4–6 |
| soojendamine | hautamine, kuumutamine | hautamine, pradimine, keetmine |
| Kuumusaste | 1 | 2 | 3 |
| soojendamine | hautamine, kuumutamine | hautamine, pradimine, keetmine |
Keraamiliste plaatide väljalülitamine
Keerake plaadi nupp väljalülitatud (ülemisse) asendisse.6 Kuidas ahju kasutada
Üldine teave küpsetamise, röstimise ja grillimise kohta
HOIATUS
Kuumad pinnad tekitavad põletusi! 'Toode võib kasutamisel olla kuum. Ärge kunagi puudutage kuumi põleteid, ahju sisekülgi, kütteelemente jne. Hoidke lapsed eemal! Toite kuuma ahju pannes või välja võttes kasutage alati kuumuskindlaid pajakindaid. OHT:
Ahjuukse avamisel olge ettevaatlik, sest ahjust võib välja paiskuda auru. Väljuv aur võib kõrvetada käsi, nägu ja/või silmi.Nõuanded küpsetamiseks
- Kasutage külgevõtmatu kattega sobivaid metall-või alumiiniumnõusid või kuumuskindlaid silikoonvorme. • Kasutage raami pinda nutikalt. • Asetage küpsetusvorm resti keskele. - Enne ahju või grilli sisselülitamist valige õige riiulivahe. Ärge vahetage riiulivahet, kui ahi on kuum. • Hoidke ahjuuks suletuna.Nõuanded röstimiseks
- Terve kana, kalkun ja suured lihatükid küpsevad paremini läbi, kui neid immutada kastmega, nt sidrunimahla ja musta pipraga. - Kontidega liha küpsetamiseks kulub samas mõõdus kontideta lihaga võrreldes umbes 15–30 minutit kauem aega. - Liha iga sentimeetri kohta (paksus) tuleb küpsemisaega arvestada umbes 4–5 minutit. - Laske lihal pärast küpsetusaja löppu umbes 10 minutit ahjus jahtuda. Mahl jaguneb paremini üle kogu liha ja ei jookse liha löikamisel välja. - Kala tuleb asetada kuumuskindla alusega keskmisele või alumisele siinile.Nõuanded grillimiseks
Liha, kala ja linnuliha muutuvad grillimisel kiirelt pruuniks, saavad kena kooriku ja ei muutu kuivaks. Eriti hästi sobivad grillimiseks lapikud tükid, lihavardad ja vorstid, aga ka suure veesisaldusega köögiviljad (nt tomatid ja sibulad). \- Jaotage grillitavad tükid traatrestile või küpsetusplaadile nii, et nad ei jääks kuumuti välispiiridest välja. \- Lükake traatrest või restiga küpsetusplaat ahjus soovitud siinile. Kui kasutate grillimisel traatresti, lükake alumisele siinile küpsetusplaat, et rasv maha ei tilguks. Lisage küpsetusplaadile veidi vett, et seda oleks kergem puhastada.  Grillimiseks sobimatud toiduained võivad põhjustada tulekahju. Grillige ainult suurel kuumusel grillimiseks sobilikku toitu. Ärge paigutage grillitavat toitu liiga kaugele ahju tahaossa. See on köige kuumem piirkond ning rasvane toit vöib süttida.Elektriahju kasutamine Valige temperatuur ja töörežiim
 1 Termostaatnupp 2 Funktsiooninupp 1. Seadke funktsiooninupp soovitud töörežiimile. 2. Seadke temperatuurinupp soovitud temperatuurile. » Ahi kuumeneb eelseatud temperatuurini ja jääb sellele püsima. Kuumenemise ajal on temperatuurituli sees.Elektriahju väljalülitamine
Keerake funktsiooninupp ja temperatuurinupp väljalülitatud (ülemisse) asendisse. Oluline on asetada traatrest traatriiulile õigesti. Traatrest tuleb asetada traatriiulite vahele, nagu joonisel näidatud. Ärge lükake traatresti vastu ahju tagaseina. Et grill töötaks töhusalt, lükake traatrest riiuli esiserva juurde ja fikseerige see ukse abil. (Varieerub olenevalt toote mudelist.) natural_image
Technical diagram of a microwave oven with numbered components and internal structure (no text or symbols)Töörežiimid
Siin näidatud töörežiimide järjekord vöib erineda teie toote süsteemist.Ülemine ja alumine kuumutus
 Töötavad nii ülemine kui ka alumine küttekeha. Toitu kuumutatakse korraga nii pealt kui ka alt. Sobib näiteks kookide ja taignatoodete või vormikookide ja -roogade valmistamiseks. Kasutage küpsetamiseks korraga ainult ühte panni.Alumine kuumutus
 Töötab ainult alumine küttekeha. Sobib pitsa valmistamiseks ja toidu pruunistamiseks altpoolt. Seda funktsiooni tuleb kasutada ka hölpsaks auruga puhastamiseks. Grill
 Töötab väike grill ahju laes. Sobib grillimiseks. - Pange väiksed või keskmise suurusega portsjonid grillimiseks õige riiuli asendiga grilli alla. - Seadke temperatuur maksimumtasemele. - Pärast poolt grillimisaega pöörake toitu.Täisgrill
 Töötab suur grill ahju laes. See sobib suure hulga liha grillimiseks. - Pange suured või keskmise suurusega portsjonid grillimiseks grilli all õigesse riiulivahesse. - Seadke temperatuur maksimumtasemele. - Pärast poolt grillimisaega pöörake toitu.Küpsetusaegade tabel
 Tabelis esitatud ajad on mõeldud orientiiriks. Tegelik aeg võib varieeruda olenevalt toidu temperatuurist, paksusest, tüübist ja teie enda toiduvalmistuseelistustest.Küpsetamine ja röstimine
 1. siiniks loetakse ahju alumist riiulivahet.| Roog | Plaatide arv | Kasutatavad lisatarvikud | Töörežilm | Silni asend | Temperatuur (°C) | Küpsetusaeg (ligikaudne, min) |
| Koogid küpsetusplaadil | Üks plaat | Harilik plaat* | 3 | 180 | 25 ... 30 | |
| Koogid vormis | Üks plaat | Koogivorm ja traatrest** | 2 | 180 | 40 ... 50 | |
| Väiksed koogid | Üks plaat | Harilik plaat* | 3 | 160 | 25 ... 35 | |
| Biskvittkook | Üks plaat | 26 cm labimööduga ümmargune tordivorm traatrestil** | 3 | 160 | 25 ... 35 | |
| Küpsised | Üks plaat | Küpsetusplaat* | 3 | 180 | 25 ... 30 | |
| Taignatooled | Üks plaat | Harilik plaat* | 2 | 200 | 30 ... 40 | |
| Muretaigen | Üks plaat | Harilik plaat* | 2 | 200 | 25 ... 35 | |
| Juuretis | Üks plaat | Harilik plaat* | 2 | 200 | 35 ... 45 | |
| Lasanje | Üks plaat | Klaasist/metallist kandiline vorm traatrestil** | 2 - 3 | 200 | 30 ... 40 | |
| Pitsa | Üks plaat | Harilik plaat* | 2 | 200 ... 220 | 15 ... 20 | |
| Biifsteek (suur tükk) / praad | Üks plaat | Harilik plaat* | 2 | 25 min 250/max, seejärel 180 ... 190 | 100 ... 120 | |
| Lambakints (pajaroog) | Üks plaat | Harilik plaat* | 2 | 25 min 220 seejärel 190 | 70 ... 90 | |
| Kanapraad (1,8-2 kg) | Üks plaat | Harilik plaat* | 2 | 15 min 250/max, seejärel 190 | 70 ... 90 | |
| Kalkun (5.5 kg) | Üks plaat | Harilik plaat* | 1 | 25 min 250/max, seejärel 190 | 150 ... 210 | |
| Kala | Üks plaat | Harilik plaat* | 3 | 200 | 20 ... 30 | |
| Kõigi toitude puhul on soovitatav eelkuumutamine.Lisatarvikud ei pruugi kuuluda komplekti.Lisatarvikud ei kuulu komplekti. Lisatarvikud on kaubanduses saadaval. | ||||||
Küpsetustabel testtoitudele
Selle küpsetustabeli toidud on valmistatud järgides standardit EN 60350-1, et riiklikel kontrollasutustel oleks tooteid lihtsam testida| Roog | Plaatide arv | Kasutatavad lisatarvikud | Töörežilm | Siini asend | Temperatuur (°C) | Küpsetusaeg (ligikaudne, min) |
| Murekook | Üks plaat | Harilik plaat* | 3 | 140 | 20 ... 30 | |
| Väiksed koogid | Üks plaat | Harilik plaat* | 3 | 160 | 25 ... 35 | |
| Biskviitkook | Üks plaat | 26 cm läbimõõduga ümmargune tordivorm traatrestil** | 3 | 160 | 25 ... 35 | |
| Öunapirukas | Üks plaat | 20 cm läbimõõduga ümmargune must metallist nõu traatrestil** | 2 | 180 | 50 ... 60 | |
| Kõigi toitude puhul on soovitatav eelkuumutamine. | ||||||
Nõuandeid kookide küpsetamiseks
- Kui kook on liiga kuiv, suurendage temperatuuri umbes 10 °C võrra ja lühendage küpsetusaega. - Kui kook on liiga niiske, kasutage vähem vedelikku või vähendage temperatuuri 10 °C võrra. - Kui kook on pealt liiga pruun, asetage see madalamale siinile, vähendage temperatuuri ja pikendage küpsetusaega. - Kui kook on seest hästi läbi küpsenud, kuid pealt toores, kasutage vähem vedelikku, vähendage temperatuuri ja pikendage küpsetusaega.Nõuandeid küpsetiste tegemiseks
- Kui küpsetis on liiga kuiv, suurendage temperatuuri umbes 10 °C võrra ja lühendage küpsetusaega. Niisutage taignakihte piimast, õlist, munast ja jogurtist tehtud kastmega. - Kui küpsemine võtab liiga kaua aega, siis vaadake, et taigen ei ulatuks üle plaadi servade. - Kui küpsetise pealispind pruunistub, aga alumine osa ei küpse, siis veenduge, et te pole küpsetise alaosas liiga palju kastet kasutanud. Püüdke jaotada kastet taignakihtide vahele ja peale vördsetes kogustes, et need pruunistuks ühtlaselt.  Küpsetage vastavalt küpsetustabelis toodud režiimile ja temperatuurile. Kui alumine osa pole ikka piisavalt pruunistunud, asetage see järgmine kord madalamale siinile.Nõuandeid köögiviljade küpsetamiseks
- Kui köögiviljade küpsetusnõus saab mahl otsa ja need hakkavad kuivama, siis tasub köögivilju küpsetada ahjuplaadi asemel kaanega pannil. Kaanega suletud nõus jääb toit mahlaseks. - Kui köögiviljaroog jääb tooreks, keetke köögiviljad eelnevalt läbi või valmistage neid nagu purgitoitu ja asetage siis ahju.Kuidas grilli kasutada
HOIATUS
Sulgege grillimise ajaks ahjuuks. Kuumad pinnad võivad tekitada põletusi!Grilli sisselülitamine
1. Keerake funktsiooninupp soovitud grillitähisele. 2. Seejärel valige soovitud grillimistemperatuur. 3. Vajadusel eelkuumutage ahju umbes 5 minutit. » Süttib temperatuuri märgutuli.Grilli väljalülitamine
1. Keerake funktsiooninupp väljalülitatud (ülemisse) asendisse.  Grillimiseks sobimatud toiduained võivad põhjustada tulekahju. Grillige ainult suurel kuumusel grillimiseks sobilikku toitu. Ärge paigutage grillitavat toitu liiga kaugele ahju tahaossa. See on köige kuumem piirkond ning rasvane toit vöib süttida.Küpsetamisaegade tabel grillimiseks
Grillimine elektrigrilliga
| Toit | Kasutatavad lisatarvikud | Siini asend | Soovitatav temperatuur (°C)** | Grillimisaeg (ligikaudu) |
| Kala | Traatrest | 4...5 | 250/max | 20...25 min. " |
| Viilutatud kana | Traatrest | 4...5 | 250/max | 25...35 min. |
| Lambakarbonaad | Traatrest | 4...5 | 250/max | 20...25 min. |
| Röstbiif | Traatrest | 4...5 | 250/max | 25...30 min. " |
| Vasikakarbonaad | Traatrest | 4...5 | 250/max | 25...30 min. " |
| Röstleib * | Traatrest | 4 | 250/max | 1...3 min. |
| *soltuvalt paksusest*Eelsoojendage 5 minutit**Kui grilli temperatuuri ei saa teie toote puhul reguleerida, töötab grill maksimumtemperatuuril. | ||||
| Toit | Kasutatavad lisatarvikud | Slini asend | Temperatuur (°C) | Küpsetusaeg(ligikaudne, min) |
| Röstleib | Traatrest | 4 | 250/max | 1...3 min |
| Lihapallid(loomaliha) - 12tükid | Traatrest | 4 | 250/max | 25...35 min |
| Keerake toitu, kui möödunud on 2/3 kogu grillimisajast.Kölki grillitavaid toidualneld on soovitatav 5 minutit eelkuumutada. | ||||
7 Hoidmine ja hooldus
Üldine teave
Toote kasutusiga pikeneb ja probleeme tekib harvem, kui toodet regulaarselt puhastada. OHT:
Enne hooldus- ja puhastustööde alustamist ühendage toode vooluvõrgust lahti. Elektrilöögi oht! OHT:
Enne toote puhastamist laske sellel maha jahtuda. Kuumad pinnad võivad tekitada põletusi! - Puhastage toodet põhjalikult pärast iga kasutuskorda. Sel viisil on lihtsam eemaldada toiduvalmistusjääke, vältides nende kõrbemist seadme järgmisel kasutuskorral. - Toote puhastamiseks pole vaja spetsiaalseid puhastusvahendeid. Kasutage toote puhastamiseks sooja vett koos vedela pesuvahendiga, pehmet lappi või käsna ning kuivatamiseks kuiva lappi. - Liigne vedelik tuleb pärast puhastamist alati ära pühkida ja pritsmed kohe kuivatada. - Ärge kasutage roostevabast terasest või inoxist pindade ja käepideme puhastamiseks puhastusvahendeid, mis sisaldavad hapet või kloriidi. Nende osade puhastamiseks kasutage pehmet lappi ja vedelat puhastusvahendit (mitteabrasiivset), tömmates lapiga ainult ühes suunas.  Mõned puhastusained või -vahendid võivad pinda kahjustada. Ärge kasutage tugevatoimelisi puhastusaineid, puhastuspulbrit või -pastat ega teravaid esemeid.  Ärge kasutage puhastamiseks aurupuhasteid, muidu võite saada elektrilöögi.Pliidi puhastamine
Klaaskeraamiline pind
Puhastage klaaskeraamilist (vitrokeraamilist) pinda külma veega, eemaldades hoolikalt puhastusainete jäägid, ja kuivatage pehme lapiga. Jäägid võivad pliidi järgmisel kasutuskorral klaaskeraamilist pinda kahjustada. Mitte mingil juhul ei tohi klaaskeraamilisele (vitrokeraamilisele) pinnale kuivanud jääke kraapida noatera, traatnuustiku vms abivahenditega. Kaltsiumiplekid (kollased plekid) eemaldatakse vähese koguse katlakivieemaldusvahendiga (näiteks äädikas või sidrunimahl), mida leiab poodidest. Kui pind on tugevalt määrdunud, kandke puhastusvahend pesukäsnale ja oodake, kuni see korralikult imendub. Seejärel puhastage plidi pind niiske lapiga.  Suure suhkrusisaldusega toidud (nt kondenspiim või siirup) tuleb eemaldada kohe, mitte jääda ootama pinna jahtumist. Muidu võivad need klaaskeraamilist pinda pöördumatult kahjustada. Kattekihid või muud pinnad võivad aja jooksul mõnevõrra pleekida. See ei mõjuta seadme tööd. Pleekimine ja plekid klaaskeraamilisel pinnal on normaalsed ilmingud, mitte defektid.Juhtpaneeli puhastamine
Puhastage juhtpaneeli ja nuppe niiske lapiga ning seejärel pühkige need kuivaks.  Ärge eemaldage juhtpaneeli puhastamiseks nuppe, kui teie tootel neid on. Muidu võite juhtpaneeli kahjustada!Ahju puhastamine
Külgseina puhastamine(Varieerub olenevalt toote mudelist.)
(See funktsioon on valikuline. Teie tootel ei pruugi seda olla.) 1. Eemaldage küljeraami eesmine osa, tömmates seda külgseinast eemale. 2. Võtke küljeraam välja, tömmates seda enda suunas. Katalüutilised seinad
(See funktsioon on valikuline. Teie tootel ei pruugi seda olla.) Teie toote külgseinad (A) ja/või tagasein (B) võivad seestpoolt olla kaetud katalüütilise emailiga. Katalüütilised seinad on heledat matti värvi ja poorse pinnnaga. Ahju katalüütilisi seinu ei tohiks puhastada. Katalüütiliste seinte poorne pind puhastub automaatselt, imedes pritsivat rasva sisse ning muundades seda (auruks ja süsihappegaasiks). natural_image
Two technical diagrams labeled A and B showing internal components with grid patterns (no readable text or symbols)Hölbus auruga puhastamine
Muudab puhastamise hõlpsaks, kuna mustus (mis ei ole liiga kauaks puhastamata jäänud) pehmeneb ahju sisemuses tekkiva auru ja sisepindadele kondenseeruvate veepiiskade toimel. 1. Võtke ahjust välja kõik lisad. 2. Valage ahjuplaadile 500 ml vett ja asetage plaat ahju teisele restile. natural_image
Illustration of a laptop with a glass cup emerging from its screen (no text or symbols)Ahjuukse puhastamine
Kasutage ahjuukse puhastamiseks sooja vett koos vedela pesuvahendiga, pehmet lappi või käsna ning kuivatamiseks kuiva lappi.  Ärge kasutage ukse puhastamiseks karedaid abrasiivseid puhastusvahendeid või teravaid metallkraabitsaid. Need võivad pinda kriimustada ning klaasi lõhkuda.Ahjuukse eemaldamine
1. Avage eesuks (1). 2. Avage eesukse paremal ja vasakul küljel asuva hingede pesa (2) klambrid, vajutades neid alla joonisel kujutatud viisil.  1 Uks 2 Hinge lukk(suletud asend) 3 Ahi 4 Hinge lukk(avatud positsioon) natural_image
Mechanical assembly diagram showing a clamp or bracket inserted into a housing component (no text or symbols visible)natural_image
Technical illustration of a mechanical assembly with directional arrows indicating motion (no text or symbols)Ukse siseklaasi eemaldamine
(See funktsioon on valikuline. Teie tootel ei pruugi seda olla.) Ahjuukse sisemist klaaspaneeli saab puhastamiseks eemaldada. Avage ahjuuks. natural_image
Close-up of a mechanical component with labeled parts 1 and 2 (no text or symbols beyond labels)natural_image
3D diagram of a rectangular electronic component with labeled parts A and B, showing internal structure and rotation direction (no text or symbols beyond labels)Ahjuvalgusti pirni vahetamine
OHT:
Et vältida elektrilöögi ohtu, vaadake enne ahju lambi vahetamist, et toode oleks vooluvõrgust lahti ühendatud ning maha jahtunud. Kuumad pinnad võivad tekitada põletusi!  Ahjuvalgustil on spetsiaalne kuumuskindel (kuni 300 °C) elektripirn. Täpsemat teavet vt Tehnilised andmed, Ik 11. Ahjuvalgusti pirne saab hankida volitatud teenindusest.  Valgusti asukoht ei pruugi olla sama mis joonisel.  Sellel seadmel kasutatud lamp pole sobiv koduse majapidamise valgustamiseks. Selle lambi eesmärk on aidata kasutajal toiduaineid paremini näha.  Sellel seadmel kasutatud lambid peavad vastu pidama ekstreemsetele tingimustele, nt üle 50 °C temperatuurile.Kui ahjul on ümar valgusti:
1. Lahutage toode vooluvõrgust. 2. Keerake vastupäeva lahti klaaskate. natural_image
Diagram of a mechanical component with three curved arrows indicating rotational motion (no text or symbols)natural_image
Two mechanical diagrams labeled A and B showing a rotating component with directional arrows, no text or symbols present.8 Probleemide lahendamine
Kasutamise ajal tuleb ahjust auru
\- Auru tekkimine töötamisel on tavaline. >>> Tegemist ei ole rikkega.Toote kuumenemisel ja jahtumisel on kuulda metalset heli.
\- Metallosade kuumenemisel võivad need paisuda ning tekitada hääli. >>> Tegemist ei ole rikkega.Toode ei tööta.
- Vörgukaitse on rakendunud või läbi põlenud. >>> Kontrollige elektrikilbi korke. Vajadusel vahetage või lähtestage need. • Toode ei ole ühendatud (maandatud) pistikupessa. >>> Kontrollige pistiku ühendust.Ahju tuli ei tööta.
• Ahju pirn on vigane. >>> Vahetage pirn välja. - Voolukatkestus. >>> Kontrollige, kas vool on olemas. Kontrollige elektrikilbi kaitsmeid. Vajadusel vahetage või lähtestage kaitsmed.Ahi ei lähe soojaks.
- Ei pruugi olla seatud konkreetse küpsetusfunktsiooni ja/või temperatuuri jaoks. >>> Määrake konkreetne küpsetusfunktsioon ja/või temperatuur. - Voolukatkestus. >>> Kontrollige, kas vool on olemas. Kontrollige elektrikilbi kaitsmeid. Vajadusel vahetage või lähtestage kaitsmed.  Kui teil ei önnestu probleemi käesolevas lõigus antud juhiste kohaselt lahendada, konsulteerige volitatud teenindusega või edasimüüjaga, kellelt te toote ostsite. Ärge kunagi üritage rikkis toodet ise parandada.  Плита Руководство пользователя natural_image
Simple line drawing of a steaming cupcake (no text or symbols)Перед началом эксплуатации прочитайте это руководство пользователя!
Уважаемый покупатель! Спасибо за то, что отдали предпочтение продукции компании «Веко». Надеемся, что это высококачественное изделие, изготовленное с применением самых современных технологий, будет демонстрировать наилучшие результаты эксплуатации. Для этого перед началом эксплуатации внимательно прочитайте это руководство и всю сопутствующую документацию и используйте его в дальнейшем в качестве справочника. Если вы передаете изделие новому владельцу, передайте ему и руководство пользователя. Придерживайтесь всех предупреждений и информации, содержащихся в руководстве. Помните, что данное руководство пользователя также может быть применимо к некоторым другим моделям. Различия между моделями будут указаны в руководстве.Пояснения к символам
В данном руководстве пользователя используются следующие символы:  Важная информация или полезные советы по использованию.  Предупреждение о ситуациях, опасных для жизни людей и имущества.  Предупреждение об опасности поражения электрическим током.  Предупреждение об опасности пожара.  Предупреждение о горячих поверхностях. 1 Важные инструкции и предупреждения по технике безопасности и охране окружающей среды 4 Общие правила техники безопасности......4 Электробезопасность....5 Безопасность изделия 6 Использование по назначению....10 Безопасность детей....10 Утилизация старого изделия....11 Утилизация упаковочных материалов....11 2 Общие сведения 12 Обзор 12 Содержание упаковки ....13 Технические характеристики....14 3 Установка 15 До начала установки....15 Установка и подключение .....16 Для будущей транспортировки ..... 18 4 Подготовка к эксплуатации 19 Рекомендации по экономии электроэнергии ....19 Подготовка к эксплуатации ....19 Очистка прибора перед началом эксплуатации19 Первоначальный прогрев 19 5 Правила эксплуатации варочной панели 21 Общие сведения о приготовлении пищи..... 21 Эксплуатация варочных панелей.... 22 6 Правила эксплуатации духовки 23 Общие сведения о выпекании, жарении и приготовлении с грилем.... 23 Правила эксплуатации электрической духовки 23 Режимы работы....24 Время приготовления блюд 25 Как пользоваться грилем.... 26 Время приготовления блюд на гриле.... 27 7 Уход и техническое обслуживание 28 Общие сведения.... 28 Чистка варочной панели.... 28 Чистка панели управления.... 28 Чистка духовки 29 Снятие дверцы духового шкафа 29 Снятие внутреннего стекла дверцы 30 Замена лампочки освещения духового шкафа 31 8 Поиск и устранение неисправностей 321 Важные инструкции и предупреждения по технике безопасности и охране окружающей среды
В данном разделе содержатся инструкции по технике безопасности, которые помогут вам избежать травм и повреждений. При несоблюдении этих правил все гарантийные обязательства аннулируются. Общие правила техники безопасности \- Это изделие может эксплуатироваться детьми старше 8 лет и людьми с ограниченными физическими, сенсорными или умственными способностями, а также лицами, не имеющими достаточного опыта и знаний, только в том случае, если они находятся под наблюдением лиц, ответственных за их безопасность, или проинструктированы на предмет безопасного использования изделия и осознают связанные с этим риски. Следите за тем, чтобы дети не играли с устройством. Дети могут чистить и обслуживать устройство только под наблюдением. • Прибор не должен использоваться лицами (включая детей) с ограниченными физическими, сенсорными или умственными способностями или недостатком опыта и знаний, за исключением случаев, когда использование происходит под непосредственным контролем или в соответствии с указаниями. Следите за детьми, чтобы они не играли с прибором. \- В случае передачи изделия третьему лицу в личное пользование или в целях вторичного использования необходимо также передать руководство пользователя, наклейки изделия, а также другие связанные с ним документы и компоненты. \- Не устанавливайте устройство на ковровом покрытии. Недостаточная вентиляция под днищем устройства может привести к перегреву электрических деталей и проблемам в работе изделия. \- Работы по установке и ремонту должны выполняться только представителями авторизованной сервисной службы. Производитель не несет ответственности за повреждения в результате выполнения работ лицами, не имеющими соответствующей квалификации. Это также может привести к аннулированию гарантии. Перед установкой внимательно прочтите инструкции. - Не пользуйтесь неисправным изделием, а также при наличии на нем заметных повреждений. - Проверяйте, чтобы после каждого использования переключатели функций изделия были выключены.Электробезопасность
• В случае неисправности следует прекратить эксплуатацию изделия, пока оно не будет отремонтировано в авторизованном сервисном центре. Существует риск поражения электрическим током! \- Изделие можно подключать только к заземленной розетке/линии, напряжение и уровень защиты которой соответствуют параметрам, указанным в разделе «Технические характеристики». Установку заземления должен выполнять квалифицированный специалист (при использовании прибора с трансформатором или без него). Наша компания не несет ответственности за какие-либо проблемы, возникшие вследствие использования изделия без заземления, выполненного в соответствии с местными нормами и правилами. - Никогда не лейте воду на изделие во время мытья! Существует риск поражения электрическим током! \- Прежде чем приступить к установке, техническому обслуживанию, чистке и ремонту, изделие необходимо отключить от электросети. \- Во избежание несчастных случаев при повреждении кабеля питания его замену должен выполнять производитель, его специалист по сервису или лицо, имеющее аналогичную квалификацию. \- Электроприбор следует устанавливать таким образом, чтобы его можно было полностью отсоединить от сети электропитания. Отсоединение должно осуществляться с помощью штепсельной вилки или выключателя, встроенного в фиксированную сеть электропитания, в соответствии со строительными нормативами и правилами. \- Задняя стенка духового шкафа во время работы сильно нагревается. Следите за тем, электрические провода не соприкасались с задней стенкой, так как это может привести к их повреждению. \- Следите за тем, чтобы шнур питания не был зажат между рамой и дверцей духового шкафа, и не прокладывайте его по горячим поверхностям. В противном случае изоляция кабеля может расплавиться, что приведет к короткому замыканию и пожару. \- Все работы с электрическим оборудованием и системами должны выполняться только квалифицированными специалистами, допущенными к выполнению таких работ. • В случае какого-либо повреждения выключите прибор и отсоедините его от электросети. Для этого выключите общий предохранитель в доме. • Проверьте, соответствуют ли изделию номинальные характеристики предохранителя.Безопасность изделия
ВНИМАНИЕ: Данное изделие и его внешние части нагреваются в процессе использования. Будьте осторожны, не касайтесь нагревательных элементов. Детей младше 8 лет следует допускать к духовому шкафу только под постоянным присмотром взрослых. \- Не пользуйтесь прибором, находясь под воздействием алкоголя или лекарственных препаратов, снижающих скорость реакции или нарушающих координацию движений. \- Будьте осторожны при использовании спиртных напитков в приготавливаемых блюдах. При высокой температуре спирт испаряется и при соприкосновении с горячими поверхностями может загореться и вызвать пожар. \- Не располагайте рядом с прибором легковоспламеняющиеся материалы, так как во время работы его боковые поверхности могут сильно нагреваться. - Во время работы устройство может нагреваться. Будьте осторожны, не касайтесь нагревательных элементов внутри духового шкафа. - Следите за тем, чтобы вентиляционные отверстия были полностью открыты. - Не разогревайте в духовом шкафу продукты в закрытых жестяных или стеклянных банках. Внутри банок может повыситься давление, что приведет к взрыву. \- Не ставьте противни или посуду непосредственно на дно духового шкафа, а также не кладите на него алюминиевую фольгу. Избыточное тепло может привести к повреждению дна духового шкафа. \- Не используйте для чистки стеклянной дверцы духового шкафа грубые абразивные чистящие средства или острые металлические скребки, чтобы не поцарапать поверхность, поскольку это может привести к разрушению стекла. \- Не используйте для чистки устройства пароочистители, поскольку это может привести к поражению электрическим током. • (Может отличаться в зависимости от модели изделия.) Правильное расположение проволочной решетки и противня на направляющих Проволочную решетку и/или противень следует правильно устанавливать на направляющие. Вставьте проволочную решетку или противень между 2 направляющими и проверьте, устойчиво ли держится решетка или противень (см. рисунок). Только после этого можно класть на них продукты. natural_image
Two-panel technical illustration of a metal cooling rack system, labeled A and B, with no visible text or symbols beyond labels.Утилизация старого изделия
Соответствие Директиве ЕС об утилизации электрического и электронного оборудования (WEEE) и утилизация вышедшего из употребления оборудования:  Данное изделие соответствует Директиве ЕС об утилизации электрического и электронного оборудования (2012/19/EU). Данное изделие имеет маркировку, указывающую на утилизацию его как электрического и электронного оборудования (WEEE). Это изделие произведено из высококачественных деталей и материалов, которые подлежат повторному использованию и переработке. Поэтому не выбрасывайте изделие с обычными бытовыми отходами после завершения его эксплуатации. Его следует сдать в соответствующий центр по утилизации электрического и электронного оборудования. О местонахождении таких центров вы можете узнать в местных органах власти.Соответствие Директиве ЕС об ограничении содержания вредных веществ (RoHS):
Приобретенное вами изделие соответствует Директиве ЕС о правилах ограничения содержания вредных веществ (2011/65/EU). Оно не содержит вредных и запрещенных материалов, указанных в Директиве.Утилизация упаковочных материалов
\- Упаковочные материалы опасны для детей. Храните упаковочные материалы в безопасном и недоступном для детей месте. Упаковочные материалы изделия изготовлены из материалов, подлежащих вторичной переработке. Утилизируйте их соответствующим образом и сортируйте согласно инструкций по обращению с отходами, подлежащими вторичной переработке. Не утилизируйте их вместе с обычными бытовыми отходами.2 Общие сведения
Обзор
  1 Передняя дверца 2 Ручка дверцы 3 Нижняя часть 4 Противень 5 Проволочная решетка 6 Панель управления 7 Крышка конфорки 8 Лампочка 9 Нагревательный элемент гриля 10 Положения полок  1 Сигнальная лампочка 2 Лампочка термостата 3 Ручка термостата 4 Ручка выбора функции 5 Одноконтурная зона нагрева Задняя левая 6 Одноконтурная зона нагрева Передняя левая 7 Одноконтурная зона нагрева Передняя правая 8 Одноконтурная зона нагрева Задняя праваяСодержание упаковки
 Изделие комплектуется различным набором дополнительных принадлежностей в зависимости от модели. Некоторые дополнительные принадлежности, описанные в руководстве пользователя, в комплекте этого изделия могут отсутствовать.1. Руководство пользователя
2. Стандартный противень
Предназначен для выпечки изделий из теста, размораживания замороженных продуктов и жарения продуктов большими кусками. natural_image
3D rendering of a rectangular tray with a grid pattern, no text or symbols visible3. Решетка
Предназначена для жарения, а также для размещения продуктов на нужной полке при выпечке, жарении или приготовлении в формах. natural_image
Two technical line drawings of a grid-like structure with horizontal slats, shown from top and side views (no text or symbols)natural_image
Technical line drawings of a structural frame with internal components and cross-sectional views (no text or symbols)| ОБЩИЕ СВЕДЕНИЯ | |
| Габариты (высота / ширина / глубина) | 850 мм/600 мм/600 мм |
| Напряжение/частота | 220-240В ~ 50 Гц |
| Общая потребляемая мощность | 8,1 кВт |
| Тип кабеля/сечение | мин.Н05VV-FG 3 x 2,5 мм2 |
| ВАРОЧНАЯ ПАНЕЛЬ | |
| Конфорки | |
| Задняя левая | Одноконтурная зона нагрева |
| Размеры | 140 мм |
| Мощность | 1200 Вт |
| Передняя левая | Одноконтурная зона нагрева |
| Размеры | 180 мм |
| Мощность | 1700 Вт |
| Передняя правая | Одноконтурная зона нагрева |
| Размеры | 140 мм |
| Мощность | 1200 Вт |
| Задняя правая | Одноконтурная зона нагрева |
| Размеры | 180 мм |
| Мощность | 1700 Вт |
| ДУХОВКА/ГРИЛЬ | |
| Главный духовой шкаф | Обычный духовой шкаф |
| Лампочка внутреннего освещения | 15–25 Вт |
| Гриль: потребляемая мощность | 2.2 кВт |
| Класс защиты -1 | |
Степень защиты IP 44
\# Основные сведения Данные на паспортной табличке энергопотребления электрических духовых шкафов приведены в соответствии со стандартом EN 60350-1 / IEC 60350-1. Эти данные определены при стандартной нагрузке с функциями нижнего-верхнего нагревательного элемента или нагрева с помощью вентилятора (при наличии). Класс энергетической эффективности определен в соответствии с приведенными ниже приоритетами в зависимости от наличия или отсутствия соответствующих функций в изделии. 1 - Приготовление с вентилятором - экономичный режим, 2 - Медленное приготовление в турборежиме, 3 - Приготовление в турборежиме, 4 - Нагрев сверху и снизу с вентилятором, 5 - Нагрев сверху и снизу. «Этикетка энергоэффективности представлена на продукте»  При усовершенствовании качества продукции технические характеристики могут быть изменены без предварительного уведомления.  Иллюстрации в данном руководстве являются схематичными и могут несколько отличаться от конкретного изделия.  Значения, указанные на этикетках изделия или в сопроводительной документации, получены в лабораторных условиях согласно соответствующим стандартам. Эти данные могут быть иными в зависимости от условий эксплуатации изделия.3 Установка
Прибор должен устанавливаться квалифицированным специалистом в соответствии с действующими нормами и правилами. В противном случае гарантия аннулируется. Производитель не несет ответственности за повреждения в результате выполнения работ лицами, не имеющими соответствующей квалификации. Это может привести к аннулированию гарантии.  Подготовка места установки, электрического оборудования обеспечивается покупателем.  ОПАСНО: Бытовой прибор следует устанавливать в соответствии со всеми местными нормами по подключению газового и/или электрического оборудования.  ОПАСНО: Прежде чем приступить к установке, визуально проверьте отсутствие внешних дефектов духового шкафа. При наличии дефектов не устанавливайте его. Поврежденные электроприборы представляют собой угрозу вашей безопасности.До начала установки
Для того чтобы обеспечить наличие необходимых зазоров для циркуляции воздуха под плитой, рекомендуем устанавливать ее на твердом основании так, чтобы ножки не погружались в ковер или мягкое напольное покрытие. Кухонный пол должен выдерживать вес прибора с учетом веса посуды и продуктов.  - Ее можно использовать с кухонными шкафами с обеих сторон, однако следует оставить свободное пространство минимум 400 мм над уровнем конфорок, а также боковое свободное пространство не менее 65 мм между плитой и стеной, перегородкой или высоким кухонным шкафом. - Плита может также стоять отдельно. Обеспечьте свободное расстояние не менее 750 мм от поверхности плиты до поверхностей над ней. • В случае установки надплитного воздухоочистителя соблюдайте инструкции его производителя в отношении высоты монтажа устройства (мин. 650 мм). - Это устройство соответствует требованиям к приборам класса 1, и его можно устанавливать так, чтобы задняя и одна из боковых стенок примыкали к стенам помещения, стенкам кухонных шкафчиков или бытовых приборов любой высоты. Кухонная мебель или бытовые приборы, примыкающие с другой стороны, должны быть не выше прибора. - Вся кухонная мебель, рядом с которой устанавливается устройство, должна быть термостойкой (не менее 100 °C).редохранительная цепь
Если изделие оснащено двумя предохранительными цепями(2);
Для обеспечения устойчивости изделия его необходимо закрепить с помощью двух предохранительных цепей, входящих в комплект поставки. С помощью соответствующего дюбеля установите крючок (1) в стене кухни (6), а затем подсоедините предохранительную цепь (3) к крючку с помощью карабина (2).  1 Крючок 2 Карабин 3 Предохранительная цепь 4 Прочно закрепите цепь с задней стороны плиты 5 Задняя сторона плиты 6 Стена кухниЕсли изделие оснащено одной предохранительной цепью(1);
Для обеспечения устойчивости изделия его необходимо закрепить с помощью входящей в комплект поставки предохранительной цепи на духовом шкафу. Следуйте указаниям на рисунке ниже для крепления предохранительной цепи к изделию.   Предохранительная цепь должна быть как можно короче, чтобы исключить опрокидывание изделия как вперед, так и в сторону. В конструкции предохранительной цепи для плиты нет гнезда для крепления скобы.Установка и подключение
Прибор следует устанавливать и подключать в соответствии с действующими нормами и правилами.  Не устанавливайте изделие рядом с холодильником или морозильной камерой. Поскольку духовой шкаф излучает тепло, холодильники будут потреблять больше электроэнергии. • Переносить прибор должны не менее двух человек. - Прибор следует устанавливать прямо на пол. Не устанавливайте прибор на подставки.  Не перемещайте устройство, держась за дверцу и/или за ручку дверцы. Дверца, ручка или петли могут повредиться.Подключение к электросети
Подключайте изделие к розетке или линии с заземлением, защищенной миниатюрным автоматическим выключателем с соответствующим номиналом, который указан в таблице «Технические характеристики». Установку заземления должен выполнять квалифицированный электрик (при использовании изделия с трансформатором или без него). Наша компания не несет ответственности за ущерб, понесенный вследствие использования изделия без заземления, выполненного в соответствии с местными нормами и правилами. ОПАСНО:
Подключение прибора к электросети должен выполнять квалифицированный специалист, имеющий право на выполнение таких работ. Гарантийный период начинается только после правильной установки. Производитель не несет ответственности за повреждения в результате выполнения работ лицами, не имеющими соответствующей квалификации. ОПАСНО:
Шнур питания не должен быть сдавлен, изогнут или зажат, а также не должен соприкасаться с нагревающимися компонентами изделия. Замену поврежденного шнура питания должен выполнять квалифицированный электрик. В противном случае это может привести к поражению электрическим током, короткому замыканию или возгоранию! Параметры электрической сети должны соответствовать данным, указанным на паспортной табличке прибора. Паспортную табличку можно увидеть либо при открытой дверце или нижней крышке, либо на задней стенке прибора, в зависимости от типа прибора. Шнур питания прибора должен соответствовать параметрам, указанным в таблице "Технические характеристики". ОПАСНО:
Перед выполнением каких-либо электромонтажных работ отключите прибор от электрической сети. Существует риск поражения электрическим током!Подключение кабеля питания
 При монтаже проводки необходимо соблюдать национальные/местные электротехнические правила и нормы, а также использовать соответствующие розетки/штепсельные вилки и вилку для духовки. В случае если предельные значения мощности продукции превышают допустимую нагрузку на вилку и розетку, изделие должно быть подключено через стационарное электрическое оборудование напрямую без использования вилки и розетки. 1. Если нет возможности установить автоматический выключатель на все контакты, то в соответствии с директивами МЭК следует использовать для подключения размыкатели с контактным зазором не менее 3 мм (плавкие предохранители, защитные сетевые выключатели, замыкатели). Место подключения должно находиться рядом с прибором, но не над плитой. Несоблюдение этих указаний может вызвать проблемы в процессе эксплуатации, а также привести к аннулированию гарантии на прибор. В качестве дополнительной меры безопасности рекомендуется использовать устройство защитного отключения.Подключение кабелем, прилагаемым к прибору
 \* Медная перемычка   2. Инструкция по подключению к однофазной электрической сети. • коричневый провод = L (фаза) • синий провод = N (нейтраль) • желто-зеленый провод = (E) ⏻ (земля) • Придвиньте прибор к стене кухни. • Регулирование ножек духовки При наличии вибрации посуда во время приготовления может сдвигаться. Для предотвращения опасных ситуаций необходимо, чтобы прибор стоял ровно и устойчиво. В целях безопасности, выровняйте прибор с помощью 4 регулируемых ножек ножки. Для этого поворачивайте их влево и вправо до тех пор, пока прибор не будет ровно стоять на столешнице.Окончательная проверка
1. Включите прибор в сеть. 2. Проверьте, работают ли электрические компоненты.Для будущей транспортировки
- Сохраните оригинальную упаковочную коробку и перевозите прибор в ней. Следуйте указаниям, нанесенным на упаковке. Если оригинальная упаковочная кробка не сохранилась, заверните изделие в пузырчатую упаковку или поместите в плотный картон. Надежно заклейте клейкой лентой. - Чтобы проволочная решетка и противень, которые хранятся внутри духовки, не повредили дверцу, поместите с внутренней стороны дверцы картонную полоску вровень с противнями. Прикрепите дверцу духового шкафа к боковым стенкам клейкой лентой. \- Не поднимайте и не передвигайте духовой шкаф, держась за дверцу или за ручку дверцы.  Не размещайте на приборе никаких предметов и не ставьте его вертикально.  Осмотрите прибор снаружи на предмет возможных повреждений при транспортировке.4 Подготовка к эксплуатации
Рекомендации по экономии электроэнергии
Эти рекомендации помогут вам использовать изделие экологически чистым способом и экономить электроэнергию. - Используйте в духовом шкафу темную или эмалированную посуду: это позволит улучшить теплопередачу. - Прогревайте духовой шкаф перед приготовлением пищи, если это рекомендуется в руководстве пользователя или в инструкциях по приготовлению продуктов. • Во время приготовления пищи не открывайте дверцу духового шкафа слишком часто. - По возможности старайтесь готовить в духовом шкафу несколько блюд одновременно. При приготовлении пищи на решетку можно устанавливать по две емкости с продуктами. • Готовьте блюда одно за другим. Духовой шкаф уже будет прогрет. • Для экономии электроэнергии можно выключать духовой шкаф за несколько минут до окончания приготовления блюда. Не открывайте дверцу духового шкафа. - Размораживайте замороженные продукты перед приготовлением. • Готовьте пищу в закрытой посуде. При приготовлении в открытой посуде энергопотребление может возрасти в 4 раза. - Выбирайте конфорку соответственно размеру дна посуды. Обязательно выбирайте посуду соответственно объему приготовляемого блюда. Чем больше объем посуды, тем выше энергопотребление. • Для приготовления пищи на электрических конфорках используйте посуду только с плоским дном. Посуда с толстым дном лучше проводит тепло, что позволяет на треть сократить потребление энергии. - Размер посуды должен соответствовать размеру зон нагрева. Не следует использовать посуду с дном меньшего диаметра, чем диаметр конфорки. • Следите за тем, чтобы зоны нагрева и дно посуды были чистыми. Загрязнения ухудшают теплопередачу между зоной нагрева и дном посуды. \- Если блюдо готовится долго, выключайте зону нагрева за 5-10 минут до окончания приготовления. Использование остаточного тепла позволяет сэкономить до 20% электроэнергии.Подготовка к эксплуатации Очистка прибора перед началом эксплуатации
 Некоторые моющие средства и чистящие материалы могут повредить поверхность. Не используйте для чистки агрессивные моющие средства, чистящие порошки/кремы, а также острые предметы 1. Снимите все упаковочные материалы. 2. Протрите поверхность прибора влажной тканью или губкой и вытрите насухо.Первоначальный прогрев
Прогрейте прибор в течение 30 минут, а затем выключите. Это обеспечит выгорание и удаление производственных загрязнений и покрытий. ПРЕДУПРЕЖДЕНИЕ!
Горячие поверхности могут причинить ожоги! Во время работы прибор может сильно нагреваться. Не прикасайтесь к горячим конфоркам, внутренним частям духового шкафа, нагревательным элементам и т.п. Не разрешайте детям приближаться к нему. Помещая продукты в горячий духовой шкаф или вынимая их оттуда, обязательн пользуйтесь термостойкими рукавицами.Электрический духовой шкаф
1. Выньте из духового шкафа все противни и решетку. 2. Закройте дверцу духового шкафа. 3. Выберите положение Static (Статический) 4. Включите гриль на максимальную мощность (см. раздел Правила эксплуатации электрической духовки, стр. 23). 5. Дайте духовому шкафу поработать около 30 минут. 6. Затем выключите духовой шкаф (см. раздел Правила эксплуатации электрической духовки, стр. 23).Духовой шкаф с грилем
1. Выньте из духового шкафа все противни и решетку. 2. Закройте дверцу духового шкафа. 3. Включите гриль на максимальную мощность (см. раздел Как пользоваться грилем, стр. 26). 4. Дайте духовому шкафу поработать около 30 минут. 5. Затем выключите духовой шкаф (см. раздел Как пользоваться грилем, стр. 26).  При первом включении в течение нескольких часов возможно выделение дыма и запаха. Это вполне нормально. Убедитесь, что кухня хорошо проветривается, чтобы удалить дым и запах. Не вдыхайте выделяющиеся дым и запахи.5 Правила эксплуатации варочной панели
Общие сведения о приготовлении пищи
 Не заполняйте кастрюлю растительным маслом более чем на одну треть. При нагревании масла не оставляйте варочную панель без присмотра. Остерегайтесь возгорания раскаленных масел. Не тушите огонь водой! При возгорании масла накройте посуду одеялом или влажной тканью. По возможности выключите варочную панель и позвоните в пожарную службу. • Перед жареньем продукты нужно обязательно обсушивать. Опускайте продукты в горячий жир с осторожностью. Замороженные продукты перед жареньем следует полностью разморозить. - Посуду, в которой разогревается жир, накрывать нельзя. - Посуду следует ставить на плиту таким образом, чтобы ручки не нагревались над горячей поверхностью плиты. Не ставьте на плиту неустойчивую посуду, которая легко опрокидывается. - Не ставьте на включенные конфорки пустую посуду – это может привести к ее повреждению. - Не оставляйте включенными конфорки, на которых нет посуды – это может привести к повреждению плиты. Обязательно выключайте конфорки после окончания приготовления пищи. - Не ставьте на плиту пластмассовую или алюминиевую посуду, так как на горячей поверхности они могут расплавиться. Расплавившиеся материалы следует сразу же счищать с поверхности. Такую посуду также не следует использовать для хранения пищевых продуктов. - Можно использовать только посуду с плоским дном. \- Размер посуды должен соответствовать количеству продуктов. Тогда продукты не будут выплескиваться из посуды, и не придется лишний раз мыть плиту. Не кладите на конфорки крышки кастрюль. Размещайте посуду по центру конфорки. Если нужно переместить посуду на другую конфорку, поднимите ее и переставьте. Ни в коем случае не передвигайте посуду по поверхности плиты.Советы по использованию стеклокерамических варочных панелей
• Стеклокерамическая поверхность устойчива к нагреву и большим перепадам температуры. - Не кладите на стеклокерамическую поверхность продукты и другие предметы и не используйте ее в качестве разделочной доски. - Используйте посуду только с гладким дном. Посуда с острыми краями может поцарапать поверхность. - Не используйте алюминиевую посуду, так как алюминий может повредить стеклокерамическую поверхность. natural_image
Diagram showing a steam rising above a building with a crossed-out X (no text or symbols present)natural_image
Two identical diagrams of a cooking pot with crossed X marks on two different surfaces (no text or symbols)ОПАСНО:
Следите за тем, чтобы на варочную панель ничего не упало. Даже небольшие предметы (например, солонка) могут повредить варочную панель. Не пользуйтесь варочной панелью, если на ней есть трещины. В трещины может попасть вода и вызвать короткое замыкание. При обнаружении на поверхности каких- либо повреждений (например, трещин) немедленно выключите электроприбор во избежание поражения электрическим током. Стеклокерамическая варочная панель оснащена индикатором питания и индикатором остаточного тепла. Индикатор остаточного тепла указывает статус включенной зоны нагрева. После выключения конфорки индикатор остается включенным. Индикатор остаточного тепла погаснет, когда температура конфорки снизится до уровня, при котором ее можно касаться рукой. Мигание индикатора остаточного тепла не является неисправностью. natural_image
Diagram showing a surface with four dots and an arrow pointing to a specific point, no text or symbols present.Включение керамических конфорок
Включение конфорок выполняется с помощью ручек регуляторов. Чтобы установить нужный уровень мощности, поверните ручку регулятора в соответствующее положение.| Уровень мощности | 1 | 2–3 | 4–6 |
| разогревание | тушение,приготовление намедленномогне | варка,жарение,кипячение |
| Уровень мощности | 1 | 2 | 3 |
| разогревание | тушение,приготовление намедленномогне | варка,жарение,кипячение |
Выключение керамических конфорок
Поверните регулятор конфорки в положение «ВЫКЛ.» (вверх).6 Правила эксплуатации духовки
Общие сведения о выпекании, жарении и приготовлении с грилем
ПРЕДУПРЕЖДЕНИЕ!
Горячие поверхности могут причинить ожоги! Во время работы прибор может сильно нагреваться. Не прикасайтесь к горячим конфоркам, внутренним частям духового шкафа, нагревательным элементам и т.п. Не разрешайте детям приближаться к нему. Помещая продукты в горячий духовой шкаф или вынимая их оттуда, обязательно пользуйтесь термостойкими рукавицами. ОПАСНО:
Будьте осторожны, открывая дверцу духового шкафа, так как наружу может выходить пар. Выпускаемый пар может обжечь вам руки, лицо и/или глаза.Советы по выпеканию
- Используйте антипригарные металлические тарелки или алюминиевые контейнеры с соответствующим покрытием, либо термостойкие силиконовые формы. • Рационально используйте площадь решетки. • Устанавливайте форму для выпекания в середине решетки. - Выбирайте правильное положение решетки перед включением духового шкафа или гриля. Не изменяйте положение решетки, когда духовой шкаф горячий. • Держите закрытой дверцу шкафа.Советы по приготовлению жаренных блюд
- Тушку курицы или индейки и большие куски мяса перед приготовлением рекомендуется сбрызнуть лимонным соком и посыпать черным перцем. Тогда готовое блюдо будет вкуснее. - Мясо с костями следует жарить на 15-30 минут дальше, чем такое же количества мяса без костей. - На каждый сантиметр толщины мяса требуется приблизительно 4-5 минут времени приготовления. • По истечении времени приготовления мяса оставьте его в духовом шкафу примерно на 10 минут. Сок лучше распределится внутри куска жареного мяса и не будет вытекать, когда вы будете разрезать мясо. \- Рыбу в термостойкой посуде следует готовить на решетке, установленной на средний или нижний уровень. Советы по приготовлению продуктов на гриле При приготовлении на гриле мясо, рыба или птица быстро подрумячивается, сверху образуется хрустящая корочка, и продукт не пересыхает. На гриле можно отлично приготовить не только тонкие куски мяса, шашлыки и сосиски, но и овощи с большим содержанием жидкости (например, помидоры и лук). • Для приготовления на гриле разложите куски продуктов на решетке или на противне с решеткой так, чтобы площадь, занимаемая продуктами, соответствовала размерам нагревательного элемента. • Вставьте решетку или противень с решеткой в духовку на нужный уровень. Если продукты готовятся на решетке, установите на нижний уровень поддон для сбора жира. Для облегчения чистки поддона налейте в него немного воды.  Продукты, которые не подходят для приготовления на гриле, могут привести к возгоранию. На гриле можно готовить только такие продукты, которые выдерживают интенсивный нагрев. Не размещайте продукты слишком близко к задней части гриля. Эта зона нагревается сильнее всего, и жирные продукты могут загореться.Правила эксплуатации электрической духовки
Выберите температуру и режим работы
 1 Ручка термостата 2 Ручка выбора функции 1. Установите нужный режим работы с помощью ручки выбора функций. 2. Установите нужную температуру с помощью регулятора температуры. » После нагрева духовки в ней будет поддерживаться заданная температура. Во время нагрева будет светиться индикатор температуры.Выключение электрической духовки
Поверните ручку выбора функций и регулятор температуры в положение отключения (вверх).Уровни духовки (для моделей с грилем)
Правильно устанавливайте решетку в направляющие. Решетку следует вставить между направляющими, как показано на рисунке. Следите за тем, чтобы решетка не упиралась в заднюю стенку духовки. Чтобы гриль нормально работал, выдвиньте решетку к передней части направляющих и отрегулируйте ее положение с помощью дверцы. (Может отличаться в зависимости от модели изделия.) Режимы работы
Приведенная здесь последовательность режимов работы может отличаться от вашей модели.Нагрев сверху и снизу
 Работают оба нагревательных элемента — и верхний, и нижний. Продукты подогреваются одновременно сверху и снизу. Этот режим подходит, например, для тортов, разной выпечки, а также кексов и запеканок в формах.. Готовьте только с одним противнем.Нагрев снизу
 (二)  Работает только нижний нагревательный элемент. Подходит для выпечки пиццы и дополнительного обжаривания продуктов с нижней стороны. Эта функция также упрощает очистку паром.Гриль
 Работает малый гриль на потолке духовки. Может использоваться для приготовления блюд на гриле. • Для приготовления блюд в этом режиме расположите под нагревателем гриля на соответствующем уровне духовки небольшое или среднее количество продукта. • Установите температуру на максимальный уровень. - Когда пройдет половина времени, отведенного на приготовление, переверните продукт.Full grill (Усил. гриль)
 Работает большой гриль на потолке духовки. Подходит для приготовления на гриле больших порций мяса. • Для приготовления на гриле положите большие или средние порции под нагревательный элемент гриля на соответствующий уровень полки духового шкафа. • Установите температуру на максимальный уровень. - Когда пройдет половина времени, отведенного на приготовление, переверните продукт.Время приготовления блюд
 Значения времени в этой таблице следует считать справочными. Они могут изменяться в зависимости от температуры продуктов, толщины, вида и ваших кулинарных предпочтений.Выпечка и жарение
 1-й полкой духового шкафа является нижняя полка.| Блюдо | Количество противней | Аксессуары для пользования | Режим работы | Уровень размещения | Температура (°C) | Примерное время приготовления (мин.) |
| Выпечка на противне | Один противень | Стандартный противень* | 3 | 180 | 25 ... 30 | |
| Выпечка в форме | Один противень | Формы для кексов на решетке** | 2 | 180 | 40 ... 50 | |
| Пирожные | Один противень | Стандартный противень* | 3 | 160 | 25 ... 35 | |
| Бисквит | Один противень | Круглая пружинная сковорода диаметром 26 см на решетке** | 3 | 160 | 25 ... 35 | |
| Печенье | Один противень | Противень для выпечки* | 3 | 180 | 25 ... 30 | |
| Изделия из теста | Один противень | Стандартный противень* | 2 | 200 | 30 ... 40 | |
| Сдобная выпечка | Один противень | Стандартный противень* | 2 | 200 | 25 ... 35 | |
| Закваска | Один противень | Стандартный противень* | 2 | 200 | 35 ... 45 | |
| Лазанья | Один противень | Стеклянная / металлическая прямоугольная сковорода на решетке** | 2 - 3 | 200 | 30 ... 40 | |
| Пицца | Один противень | Стандартный противень* | 2 | 200 ... 220 | 15 ... 20 | |
| Бифштекс (куском)/жаркое | Один противень | Стандартный противень* | 2 | 25 мин. 250/max, затем 180 ... 190 | 100 ... 120 | |
| Баранья нога (запеканка) | Один противень | Стандартный противень* | 2 | 25 мин. 220 затем 190 | 70 ... 90 | |
| Жареная курица (1,8-2 кг) | Один противень | Стандартный противень* | 2 | 15 мин. 250/max, затем 190 | 70 ... 90 | |
| Индейка (5.5 кг) | Один противень | Стандартный противень* | 1 | 25 мин. 250/max, затем 190 | 150 ... 210 | |
| Рыба | Один противень | Стандартный противень* | 3 | 200 | 20 ... 30 | |
| Для всех типов продуктов рекомедуется произвести предварительный разогрев.* Эти аксессуары могут не поставляться с продуктом.** Эти аксессуары не поставляются с продуктом. Эти аксессуары доступны в продаже. | ||||||
Таблица для пробного приготовления
Блюда, внесенные в настоящую таблицу готовятся в соответствии с EN 60350-1, чтобы облегчить контролирующим организациям процесс проверки продукта.| Блюдо | Количество противней | Аксессуары для пользования | Режим работы | Уровень размещения | Температура (°C) | Примерное время приготовления (мин.) |
| песочное печенье | Один противень | Стандартный противень* | 3 | 140 | 20 ... 30 | |
| Пирожные | Один противень | Стандартный противень* | 3 | 160 | 25 ... 35 | |
| Бисквит | Один противень | Круглая пружинная сковорода диаметром 26 см на решетке** | 3 | 160 | 25 ... 35 | |
| Яблочный пирог | Один противень | Круглая металлическое блюдо диаметром 20 см на решетке** | 2 | 180 | 50 ... 60 | |
| Для всех типов продуктов рекомендуется произвести предварительный разогрев.* Эти аксессуары могут не поставляться с продуктом.** Эти аксессуары не поставляются с продуктом. Эти аксессуары доступны в продаже. | ||||||
Советы по выпечке
- Если изделие получается слишком сухим, следует повысить температуру примерно на 10°C и сократить время приготовления. - Если изделие получается сырым, следует уменьшить количество жидкости или понизить температуру на 10°C. - Если верхняя корочка слишком зарумянивается, следует поставить изделие ниже, понизить температуру и увеличить время приготовления. - Если изделие хорошо пропекается, но снаружи пригорает, следует уменьшить количество жидкости, понизить температуру и увеличить время приготовления.Советы по выпечке
- Если изделие получается слишком сухим, следует повысить температуру примерно на 10°C и сократить время приготовления. Смажьте слои теста смесью из молока, растительного масла, яиц и йогурта. • Следите за тем, чтобы толщина изделия не превышала глубины противня, иначе оно будет долго выпекаться. - Если верхний слой изделия подгорает, а нижний остается сырым, возможно, в нижнем слое изделия слишком много начинки. Чтобы изделие ровно подрумянивалась, старайтесь равномерно распределять начинку между слоями теста и по поверхности изделия.  При выпечке изделий из теста соблюдайте режим и температуру, указанные в таблице рецептов. Если нижний слой изделия плохо пропекается, в следующий раз поставьте противень на один уровень ниже.Советы по приготовлению овощных блюд
- Если овощи выпускают сок и становятся слишком сухими, готовьте их не на противне, а в сковороде под крышкой. В закрытой посуде сок сохранится. - Если овощное блюдо остается сыроватым, прежде чем готовить овощи в духовом шкафе, можно их проверить или пробланшировать.Как пользоваться грилем
 ПРЕДУПРЕЖДЕНИЕ! Закрывайте дверцу во время приготовления пищи на гриле. Горячие поверхности могут причинить ожоги!Включение гриля
1. Поверните ручку выбора функций и установите на нужный значок режима «Гриль». 2. Затем установите нужную температуру жаренья. 3. При необходимости прогрейте гриль около 5 минут. » При этом включится индикаторная лампочка температуры.Выключение гриля
1. Поверните ручку выбора функций в положение отключения (вверх).  Продукты, которые не подходят для приготовления на гриле, могут привести к возгоранию. На гриле можно готовить только такие продукты, которые выдерживают интенсивный нагрев. Не размещайте продукты слишком близко к задней части гриля. Эта зона нагревается сильнее всего, и жирные продукты могут загореться.Время приготовления блюд на гриле
Приготовление блюд на электрическом гриле| Продукты | Аксессуары для пользования | Уровень размещения | Рекомендуемая температура (°C)** | Время приготовления на гриле (прибл.) |
| Рыба | Решетка | 4...5 | 250/max | 20...25 мин. # |
| Курица (куски) | Решетка | 4...5 | 250/max | 25...35 мин. |
| Отбивные из молодой баранины | Решетка | 4...5 | 250/max | 20...25 мин. |
| Ростбиф | Решетка | 4...5 | 250/max | 25...30 мин. # |
| Отбивные из телятины | Решетка | 4...5 | 250/max | 25...30 мин. # |
| Гренки * | Решетка | 4 | 250/max | 1...3 мин. |
| *в зависимости от толщины*Разогрейте в течение 5 минут.**Если настройка температуры гриля в вашем изделии не предусмотрена, то гриль будет работать при максимальной температуре. | ||||
| Продукты | Аксессуары для пользования | Уровень размещения | Температура (°C) | Примерное время приготовления (мин.) |
| Гренки | Решетка | 4 | 250/max | 1...3 мин. |
| Тефтели (говядина) - 12 кусками | Решетка | 4 | 250/max | 25...35 мин. |
| Переверните еду после 2/3 от общего времени приготовления на гриле. Перед приготовлением любых блюд рекомендуется разогреть духовой шкаф в течение 5 минут. | ||||
7 Уход и техническое обслуживание
Общие сведения
Регулярно выполняйте чистку прибора. Это позволит продлить срок его службы, а также избежать многих проблем. ОПАСНО:
Перед выполнением работ по обслуживанию и чистке отключите прибор от электрической сети. Существует риск поражения электрическим током! ОПАСНО:
Дайте изделию остыть, прежде чем приступить к чистке. Горячие поверхности могут причинить ожоги! - Прибор следует тщательно чистить после каждого использования. Так легче удалять остатки пищи, которые могут пригореть при следующем использовании прибора. • Для чистки прибора не требуются специальные чистящие средства. Прибор можно вымыть теплой водой с добавлением жидким моющего средства, используя мягкую ткань или губку. А затем протереть сухой тканью. - Обязательно протирайте прибор насухо после чистки и сразу же удаляйте попавшую на него жидкость. - Не используйте для чистки ручки и поверхностей из нержавеющей стали чистящие средства, содержащими кислоту или хлор. Эти детали можно протирать мягкой тканью, смоченной в жидком моющем средств (без абразивных добавок), стараясь тереть в одном направлении.  Некоторые моющие средства и чистящие материалы могут повредить поверхность. Не используйте для чистки агрессивные моющие средства, чистящие порошки/кремы, а также острые предметы.  Не используйте для чистки устройства пароочистители, поскольку это может привести к поражению электрическим током.Чистка варочной панели
Стеклокерамические поверхности
Очистите стеклокерамические поверхности с помощью холодной воды, полностью удаляя чистящее средство с поверхности, и протрите насухо мягкой тканью. Остатки пищи на стеклокерамической поверхности могут повредить ее при следующем включении. Ни в коем случае не используйте для удаления со стеклокерамической поверхности засохших остатков пищи ножи с зубчатым лезвием, металлические мочалки и т. п. Известковый налет (желтые пятна) можно удалять специальными средствами для удаления накипи, которые можно приобрести в торговой сети, или другими используемыми для этого средствами, например, столовым уксусом или лимонным соком. Для удаления сильных загрязнений нанесите моющее средство губкой и оставьте на некоторое время для воздействия. Затем очистите поверхность варочной панели влажной тканью.  Продукты, содержащие сахар, такие, как крем или сироп, нужно удалять немедленно, не дожидаясь остывания поверхности, так как они могут необратимо повредить стеклокерамическую поверхность. Со временем может произойти изменение цвета поверхности, однако это никоим образом не влияет на ее работу. Появление пятен и обеспеччивание стеклокерамической поверхности – это обычное явление, которые не является признаком ее повреждения.Чистка панели управления
Очистьте панель управления и ручки-регуляторы влажной тканью и вытрите насухо.  Если ваш прибор оснащен кнопками/ручками, не снимайте ручки- регуляторы для чистки панели управления. Так можно повредить панель управления!Чистка духовки
Чистка боковых стенок(Может отличаться в зависимости от модели изделия.) (Данная функция — дополнительная. Она может отсутствовать в вашем изделии.) 1. Снимите переднюю часть боковой решетки, оттянув ее от боковой стенки. 2. Потяните боковую решетку к себе и полностью выньте ее из духовки. Стенки с каталитическим покрытием (Данная функция — дополнительная. Она может отсутствовать в вашем изделии.)
Внутренние боковые стенки (А) и (или) задняя стенка (В) вашего изделия могут быть покрыты каталитической эмалью. Стенки с каталитическим покрытием имеют светлую матовую пористую поверхность. Стенки духовки, имеющие каталитическое покрытие, не следует чистить. Пористые поверхности стенок с каталитическим покрытием самоочищаются путем впитывания и разложения пролитого жира (на воду и углекислый газ). natural_image
Close-up of a window with grid lines and a circular label marked 'A' (no readable text or symbols beyond the label)natural_image
Top-down view of a device casing with a hexagonal grid pattern and labeled point B (no readable text or symbols)Простая очистка паром
Это упрощает чистку, поскольку грязь (после кратковременного ожидания) смягчается паром, образовывающимся в духовом шкафу, и каплями воды, конденсирующимися на внутренних поверхностях духового шкафа. 1. Выньте из духового шкафа все принадлежности. 2. Налейте в противень 500 мл воды и поместите его на 2-ю решетку духовки. natural_image
Illustration of a laptop with a glass lens and wings, no text or symbols presentЧистка дверцы духовки
Мойте дверцу духовки мягкой тканью или губкой, смоченной в теплой воде с добавлением жидкого моющего средства, и вытирайте сухой тканью.  Не используйте для чистки дверцы моющие средства с абразивными веществами или металлические скребки. Они могут поцарапать поверхность и повредить стекло.Снятие дверцы духового шкафа
1. Откройте переднюю дверцу (1). 2. Откройте зажимы на корпусе петли (2) с правой и левой стороны передней дверцы, нажав на них, как показано на рисунке.  1 Дверца 2 Шарнирный замок(закрытое положение) 3 Духовой шкаф 4 Шарнирный замок(открытая позиция) natural_image
Mechanical assembly diagram showing a clamp securing a component labeled '4' (no text or symbols beyond the number)natural_image
Technical illustration of a mechanical assembly with two views showing a curved component being lifted (no text or symbols present)natural_image
3D diagram of a mechanical component with labeled parts 1 and 2 (no text or symbols beyond labels)natural_image
3D diagram of a mechanical component with labeled parts A and B, showing internal structure and motion direction (no text or symbols beyond labels)Замена лампочки освещения духового шкафа
ОПАСНО:
Во избежание поражения электрическим током, прежде чем заменять лампочку, убедитесь в том, что электроприбор отсоединен от сети и остыл. Горячие поверхности могут причинить ожоги!  Для освещения духового шкафа используется специальная электрическая лампочка, которая может выдерживать температуру до 300 С. Дополнительные сведения см. в разделе "Технические характеристики, стр. 14". Лампочки освещения духового шкафа можно приобрести в фирменных сервисных центрах.  Расположение лампочки может отличаться от изображения на рисунке.  Лампа, используемая в этом приборе, не подходит для освещения бытовых помещений. Эта лампа предназначена для вспомогательной цели, позволяющей пользователю увидеть пищевые продукты.  Лампы, используемые в этом приборе, должны выдерживать экстремальные физические условия, например температуру выше 50 °C.Замена круглой лампочки освещения духового шкафа
1. Отсоедините духовой шкаф от электросети. 2. Снимите стеклянный плафон, повернув его против часовой стрелки. natural_image
Diagram of a mechanical or electrical component with three circular arrows indicating rotational motion (no text or symbols)natural_image
Mechanical diagram showing a rotating component with curved arrows indicating rotational motion (no text or symbols)natural_image
Cross-sectional diagram of a mechanical component with internal structure and directional arrows (no text or symbols)8 Поиск и устранение неисправностей
Во время работы из духового шкафа выделяется пар.
\- Вполне нормально, если пар выделяется во время работы. >>> Это не является неисправностью.При нагревании и охлаждении прибор издает металлические шумы.
\- При нагревании металлические детали могут расширяться и издавать звуки. >>> Это не является неисправностью.Прибор не работает.
\- Плавкий предохранитель неисправен или сработал. >>> Проверьте плавкие предохранители в блоке предохранителей. При необходимости замените их или включите. - Духовой шкаф не включен в (заземленную) розетку электросети. >>> Проверьте соединение штепсельной вилки.Освещение духовки не работает.
\- Лампочка освещения духового шкафа неисправна. >>> Замените лампочку освещения шкафа. - Нет электропитания. >>> Проверьте наличие электропитания. Проверьте предохранители в блоке предохранителей. При необходимости замените или включите предохранители.Духовка не нагревается.
\- Не задана функция или температура. >>> Выберите функцию и установите температуру с помощью переключателя функций и (или) регулятора температуры. - Нет электропитания. >>> Проверьте наличие электропитания. Проверьте предохранители в блоке предохранителей. При необходимости замените или включите предохранители.  Если вы не можете устранить неполадки, несмотря на выполнение инструкций, приведенных в данном разделе, обратитесь к представителю авторизованной сервисной службы. Не пытайтесь самостоятельно отремонтировать неисправный электроприбор. Изготовитель: «Arcelik A.S.» Юридический адрес: Караач Джаддеси № 2-6 34445 Сютлюдже Стамбул, Турция (Karaağaç Caddesi No:2-6 Sütlüce, 34445, Turkey) Произведено в Турции Импортер на территории РФ: ООО «БЕКО» Юридический адрес: 601021 Россия, Владимирская обл., Киржачский р-н, МОСП Першинское, дер. Федоровское, ул. Сельская, д. 49. Информацию о сертификации продукта Вы можете уточнить, позвонив на горячую линию 8-800-200-23-56. Дата производства включена в серийный номер продукта, указанный на этикетке, расположенной на продукте, а именно: первые две цифры серийного номера обозначают год производства, а последние две – месяц. Например, "10-100001-05" обозначает, что продукт произведен в мае 2010 года. Изготовитель оставляет за собой право на внесение изменений в конструкцию, дизайн и комплектацию электроприбора.- beko
- Please read this user manual first!
- Explanation of symbols
- Arçelik A.Ş.
- CE
- Important instructions and warnings for safety and environment 4
- General information 10
- Installation 13
- Preparation 16
- How to use the hob 17
- How to operate the oven 19
- Maintenance and care 23
- Troubleshooting 27
- Important instructions and warnings for safety and environment
- General safety
- Electrical safety
- Product safety
- Intended use
- Safety for children
- Disposing of the old product
- Compliance with RoHS Directive:
- Package information
- General information
- Overview
- Package contents
- User manual
- Standard tray
- Wire grill
- Basics: Information on the energy label of electrical ovens is given in accordance with the EN 60350-1 / IEC 60350-1 standard. Those values are determined under standard load with bottom-top heater or fan assisted heating (if any) functions.
- Installation
- Before installation
- Safety chain
- If your product has 2 safety chains;
- If your product has 1 safety chain;
- Installation and connection
- Electrical connection
- DANGER:
- Connecting the power cable
- If a cable is supplied with the product:
- Final check
- Future Transportation
- Preparation
- Tips for saving energy
- Initial use
- First cleaning of the appliance
- Initial heating
- WARNING
- Electric oven
- Grill oven
- How to use the hob
- General information about cooking
- Tips about glass ceramic hobs
- Using the hobs
- Turning on the ceramic plates
- Turning off the ceramic plates
- How to operate the oven
- General information on baking, roasting and grilling
- Tips for baking
- Tips for roasting
- Tips for grilling
- How to operate the electric oven Select temperature and operating mode
- Switching off the electric oven
- Rack positions (For models with wire shelf)
- Operating modes
- Top and bottom heating
- Bottom heating
- Grill
- Full grill
- Cooking times table
- Baking and roasting
- Cooking table for test meals
- Tips for baking cake
- Tips for baking pastry
- Tips for cooking vegetables
- How to operate the grill
- Switching on the grill
- Switching off the grill
- Maintenance and care
- General information
- Cleaning the hob
- Glass ceramic surface
- Cleaning the control panel
- Cleaning the oven
- To clean the side wall (Varies depending on the product model.)
- Catalytic walls
- (This feature is optional. It may not exist on your product.)
- Easy Steam Cleaning
- Clean oven door
- Removing the oven door
- Removing the door inner glass
- Replacing the oven lamp
- If your oven is equipped with a round lamp:
- Troubleshooting
- Oven emits steam when it is in use.
- Product emits metal noises while heating and cooling.
- Product does not operate.
- Oven light does not work.
- Oven does not heat.
- Ahi
- Kasutusjuhend
- Tutvuge palun esmalt käesoleva kasutusjuhendiga!
- Sümbolite tähendused
- Olulised hoiatused ning juhised ohutuse tagamiseks ja keskkonna säästmiseks 4
- Üldine teave 9
- Paigaldamine 12
- Ettevalmistused 15
- Pliidiplaadi kasutamine 16
- Kuidas ahju kasutada 18
- Hoidmine ja hooldus 22
- Probleemide lahendamine 26
- Olulised hoiatused ning juhised ohutuse tagamiseks ja keskkonna säästmiseks
- Üldine ohutus
- Elektriohutus
- Toote ohutu kasutamine
- Ettenähtud otstarve
- Laste ohutuse tagamine
- Toote körvaldamine kasutuselt
- RoHS-direktiivi täitmine:
- Pakkematerjali körvaldamine
- Üldine teave
- Ülevaade
- Pakendi sisu
- Kasutusjuhend
- Harilik plaat
- Traatrest
- Paigaldamine
- OHT:
- Enne paigaldamist
- Ohutuskett
- Kui teie tootel on 2 ohutusketti.
- Kui teie tootel on 1 ohutuskett.
- Paigaldamine ja ühendamine
- Elektriühendused
- Toitejuhtme ühendamine
- Kui tootega on kaasas juhe:
- Ühefaasilise ühenduse puhul ühendage juhtmed alljärgnevalt:
- Löppkontroll
- Ettevalmistused
- Nõuandeid energia säästmiseks
- Esimene kasutuskord Seadme esmane puhastamine
- Esmane kuumutamine
- HOIATUS
- Elektriahi
- Grillahi
- Pliidiplaadi kasutamine
- Üldine teave toiduvalmistamise kohta
- Soovitusi klaaskeraamiliste pliitide kasutami-seks
- Keraamiliste plaatide sisselülitamine
- Keraamiliste plaatide väljalülitamine
- Kuidas ahju kasutada
- Üldine teave küpsetamise, röstimise ja grillimise kohta
- Nõuanded küpsetamiseks
- Nõuanded röstimiseks
- Nõuanded grillimiseks
- Elektriahju kasutamine Valige temperatuur ja töörežiim
- Elektriahju väljalülitamine
- Töörežiimid
- Ülemine ja alumine kuumutus
- Alumine kuumutus
- Täisgrill
- Küpsetusaegade tabel
- Küpsetamine ja röstimine
- Küpsetustabel testtoitudele
- Nõuandeid kookide küpsetamiseks
- Nõuandeid küpsetiste tegemiseks
- Nõuandeid köögiviljade küpsetamiseks
- Kuidas grilli kasutada
- Grilli sisselülitamine
- Grilli väljalülitamine
- Küpsetamisaegade tabel grillimiseks
- Grillimine elektrigrilliga
- Hoidmine ja hooldus
- Üldine teave
- Pliidi puhastamine
- Klaaskeraamiline pind
- Juhtpaneeli puhastamine
- Ahju puhastamine
- Külgseina puhastamine(Varieerub olenevalt toote mudelist.)
- Katalüutilised seinad
- Hölbus auruga puhastamine
- Ahjuukse puhastamine
- Ahjuukse eemaldamine
- Ukse siseklaasi eemaldamine
- Ahjuvalgusti pirni vahetamine
- Kui ahjul on ümar valgusti:
- Probleemide lahendamine
- Kasutamise ajal tuleb ahjust auru
- Toote kuumenemisel ja jahtumisel on kuulda metalset heli.
- Toode ei tööta.
- Ahju tuli ei tööta.
- Ahi ei lähe soojaks.
- Перед началом эксплуатации прочитайте это руководство пользователя!
- Пояснения к символам
- Важные инструкции и предупреждения по технике безопасности и охране окружающей среды
- Электробезопасность
- Безопасность изделия
- Утилизация старого изделия
- Соответствие Директиве ЕС об ограничении содержания вредных веществ (RoHS):
- Утилизация упаковочных материалов
- Общие сведения
- Обзор
- Содержание упаковки
- Руководство пользователя
- Стандартный противень
- Решетка
- Степень защиты IP 44
- Установка
- До начала установки
- редохранительная цепь
- Если изделие оснащено двумя предохранительными цепями(2);
- Если изделие оснащено одной предохранительной цепью(1);
- Установка и подключение
- Подключение к электросети
- ОПАСНО:
- Подключение кабеля питания
- Подключение кабелем, прилагаемым к прибору
- Окончательная проверка
- Для будущей транспортировки
- Подготовка к эксплуатации
- Рекомендации по экономии электроэнергии
- Подготовка к эксплуатации Очистка прибора перед началом эксплуатации
- Первоначальный прогрев
- ПРЕДУПРЕЖДЕНИЕ!
- Электрический духовой шкаф
- Духовой шкаф с грилем
- Правила эксплуатации варочной панели
- Общие сведения о приготовлении пищи
- Советы по использованию стеклокерамических варочных панелей
- Включение керамических конфорок
- Выключение керамических конфорок
- Правила эксплуатации духовки
- Общие сведения о выпекании, жарении и приготовлении с грилем
- Советы по выпеканию
- Советы по приготовлению жаренных блюд
- Правила эксплуатации электрической духовки
- Выберите температуру и режим работы
- Выключение электрической духовки
- Уровни духовки (для моделей с грилем)
- Режимы работы
- Нагрев сверху и снизу
- Нагрев снизу
- Гриль
- Full grill (Усил. гриль)
- Время приготовления блюд
- Выпечка и жарение
- Таблица для пробного приготовления
- Советы по выпечке
- Советы по приготовлению овощных блюд
- Как пользоваться грилем
- Включение гриля
- Выключение гриля
- Время приготовления блюд на гриле
- Уход и техническое обслуживание
- Общие сведения
- Чистка варочной панели
- Стеклокерамические поверхности
- Чистка панели управления
- Чистка духовки
- Стенки с каталитическим покрытием (Данная функция — дополнительная. Она может отсутствовать в вашем изделии.)
- Простая очистка паром
- Чистка дверцы духовки
- Снятие дверцы духового шкафа
- Замена лампочки освещения духового шкафа
- Замена круглой лампочки освещения духового шкафа
- Поиск и устранение неисправностей
- Во время работы из духового шкафа выделяется пар.
- При нагревании и охлаждении прибор издает металлические шумы.
- Прибор не работает.
- Освещение духовки не работает.
- Духовка не нагревается.
Mærke : BEKO
Model : FSS67000GW
Kategori : Komfur