
FSM89302GXS - Komfur BEKO - Gratis brugsanvisning og manual
Find enhedens vejledning gratis FSM89302GXS BEKO i PDF-format.


Brugerspørgsmål om FSM89302GXS BEKO
0 spørgsmål om dette apparat. Besvar dem du kender, eller stil dit eget.
Stil et nyt spørgsmål om dette apparat
Download vejledningen til din Komfur i PDF-format gratis! Find din vejledning FSM89302GXS - BEKO og tag din elektroniske enhed tilbage i hånden. På denne side er alle dokumenter nødvendige for brugen af din enhed offentliggjort. FSM89302GXS af mærket BEKO.
BRUGSANVISNING FSM89302GXS BEKO
beko
Oven
User Manual
Backofen
Gebrauchsanleitung

natural_image
Simple line drawing of a steaming cupcake (no text or symbols)FSM89302GXS
EN / DE
285.3085.28/R.AA/19.09.2022/2-1
7785886768
Please read this user manual first!
Dear Customer,
Thank you for purchasing this Beko product. We hope that you get the best results from your product which has been manufactured with high quality and state-of-the-art technology.
Therefore, please read this entire user manual and all other accompanying documents carefully before using the product and keep it as a reference for future use. If you handover the product to someone else, give the user manual as well. Follow all warnings and information in the user manual.
Remember that this user manual is also applicable for several other models. Differences between models will be identified in the manual.
Explanation of symbols
Throughout this user manual the following symbols are used:

Important information or useful hints about usage.

Warning of hazardous situations with regard to life and property.

Warning of electric shock.

Warning of risk of fire.

Warning of hot surfaces.
1 Important instructions and warnings for safety and environment 4
General safety 4
Electrical safety....5
Product safety 6
Intended use 9
Safety for children 9
Disposing of the old product....9
Package information....10
2 General information 11
Overview....11
Package contents....12
Technical specifications 13
3 Installation 14
Before installation 14
Installation and connection....15
Future Transportation 17
4 Preparation 18
Tips for saving energy 18
Initial use....18
Time setting....18
First cleaning of the appliance....19
Initial heating....19
5 How to use the hob 20
General information about cooking.....20
Using the hobs 21
Control panel 21
6 How to operate the oven 29
General information on baking, roasting and grilling....29
How to operate the electric oven....29
Operating modes 30
Using the oven clock....31
Cooking times table....33
How to operate the grill 36
Cooking times table for grilling 36
7 Maintenance and care 38
General information 38
Cleaning the hob 38
Cleaning the control panel 38
Cleaning the oven 39
Cleaning the oven door....40
Removing the door inner glass....40
Replacing the oven lamp....41
8 Troubleshooting 43
Important instructions and warnings for safety and environment
This section contains safety instructions that will help protect from risk of personal injury or property damage. Failure to follow these instructions shall void any warranty.
General safety
- This appliance can be used by children aged from 8 years and above and persons with reduced physical, sensory or mental capabilities or lack of experience and knowledge if they have been given supervision or instruction concerning use of the appliance in a safe way and understand the hazards involved.
Children shall not play with the appliance. Cleaning and user maintenance shall not be made by children without supervision.
- The appliance is not to be used by persons (including children) with reduced physical, sensory or mental capabilities, or lack of experience and knowledge,
unless they have been given supervision or instruction. Children should be supervised and ensure they do not play with the appliance
- If the product is handed over to someone else for personal use or second-hand use purposes, the user manual, product labels and other relevant documents and parts should be also given.
- Never place the product on a carpet-covered floor. Otherwise, lack of airflow beneath the product will cause electrical parts to overheat. This will cause problems with your product.
• Installation and repair procedures must always be performed by Authorised Service Agents. The manufacturer shall not be held responsible for damages arising from procedures carried out by unauthorised persons which may also void the warranty. Before installation, read the instructions carefully.
- Do not operate the product if it is defective or has any visible damage.
- Ensure that the product function knobs are switched off after every use.
Electrical safety
- If the product has a failure, it should not be operated unless it is repaired by an Authorised Service Agent. There is the risk of electric shock!
- Only connect the product to a grounded outlet/line with the voltage and protection as specified in the “Technical specifications”. Have the grounding installation made by a qualified electrician while using the product with or without a transformer. Our company shall not be liable for any problems arising due to the product not being earthed in accordance with the local regulations.
- Never wash the product by spreading or pouring water onto it! There is the risk of electric shock!
• The product must be disconnected during installation, maintenance, cleaning and repairing procedures.
- If the power connection cable for the product is damaged, it must be replaced by the manufacturer, its service agent or similarly qualified persons in order to avoid a hazard.
- The appliance must be installed so that it can be completely disconnected from the mains supply. The separation must be provided by a switch built into the fixed electrical installation, according to construction regulations.
- Rear surface of the oven gets hot when it is in use. Make sure that the electrical connection does not contact with the rear surface; otherwise, connections can get damaged.
- Do not trap the mains cable between the oven door and frame and do not route it over hot surfaces. Otherwise, cable insulation may melt and cause fire as a result of short circuit.
- Any work on electrical equipment and systems should only be carried out by authorised and qualified persons.
• In case of any damage, switch off the product and disconnect it from the mains. To do this, turn off the fuse at home.
• Make sure that fuse rating is compatible with the product.
Product safety
- WARNING: The appliance and its accessible parts become hot during use. Care should be taken to avoid touching heating elements. Children less than 8 years of age shall be kept away unless continuously supervised.
- Never use the product when your judgment or coordination is impaired by the use of alcohol and/or drugs.
- Be careful when using alcoholic drinks in your dishes. Alcohol evaporates at high temperatures and may cause fire since it can ignite when it comes into contact with hot surfaces.
- Food Poisoning Hazard: Do not let food sit in oven for more than 1 hour before or after cooking. Doing so can result in food poisoning or sickness.
- Do not place any flammable materials close to the product as the sides may become hot during use.
- During use the appliances becomes hot. Care should be taken to avoid touching heating elements inside the oven.
- Keep all ventilation slots clear of obstructions.
- Do not heat closed tins and glass jars in the oven. The pressure that would build-up in the tin/jar may cause it to burst.
- Do not place baking trays, dishes or aluminium foil directly onto the bottom of the oven. The heat accumulation might damage the bottom of the oven.
- Do not use harsh abrasive cleaners or sharp metal scrapers to clean the oven door glass since they can scratch the surface, which may result in shattering of the glass.
- Do not use steam cleaners to clean the appliance as this may cause an electric shock.
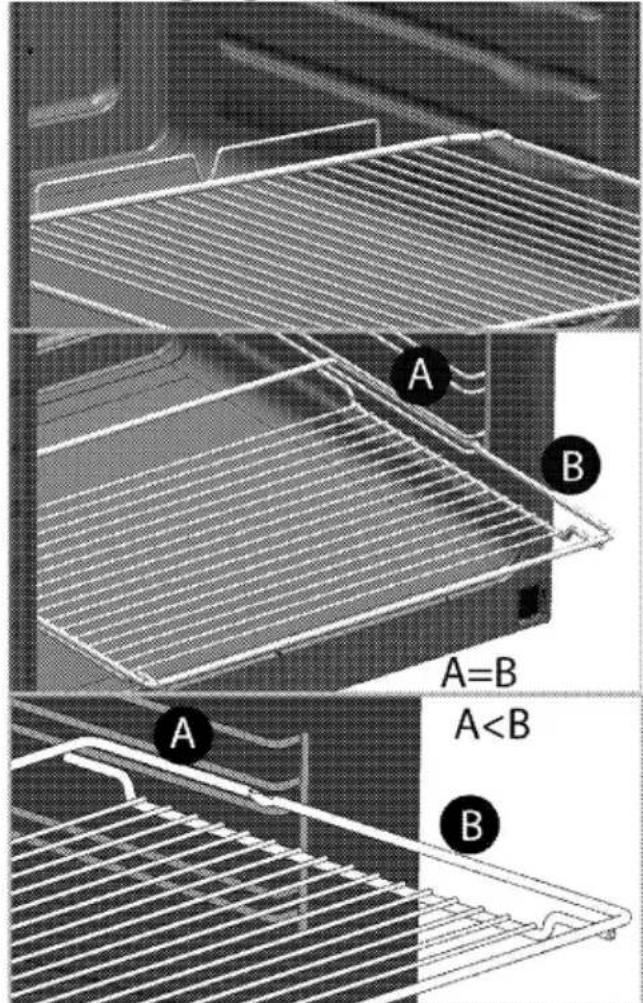
• (Varies depending on the product model.) Placing the wire shelf and tray onto the wire racks properly
It is important to place the wire shelf and/or tray onto the rack properly. Slide the wire shelf or tray between 2 rails and make sure that it is balanced before placing food on it (Please see the following figure).
Intended use
- This product is designed for domestic use. Commercial use will void the guarantee. - CAUTION: This appliance is for cooking purposes only. It must not be used for other purposes, for example room heating. - This product should not be used for warming the plates under the grill, drying towels, dish cloths etc. by hanging them on the oven door handles. This product should also not be used for room heating purposes. - The manufacturer shall not be liable for any damage caused by improper use or handling errors. • The oven can be used for defrosting, baking, roasting and grilling food.Safety for children
- WARNING: Accessible parts may become hot during use. Young children should be kept away. - The packaging materials will be dangerous for children. Keep the packaging materials away from children. Please dispose of all parts of the packaging according to environmental standards. • Electrical products are dangerous to children. Keep children away from the product when it is operating and do not allow them to play with the product. • Do not place any items above the appliance that children may reach for. - When the door is open, do not load any heavy object on it and do not allow children to sit on it. It may overturn or door hinges may get damaged.Disposing of the old product
Compliance with the WEEE Directive and Disposing of the Waste Product:
 This product complies with EU WEEE Directive (2012/19/EU). This product bears a classification symbol for waste electrical and electronic equipment (WEEE). This product has been manufactured with high quality parts and materials which can be reused and are suitable for recycling. Do not dispose of the waste product with normal domestic and other wastes at the end of its service life. Take it to the collection center for the recycling of electrical and electronic equipment. Please consult your local authorities to learn about these collection centers.Compliance with RoHS Directive:
The product you have purchased complies with EU RoHS Directive (2011/65/EU). It does not contain harmful and prohibited materials specified in the Directive.Package information
\- Packaging materials of the product are manufactured from recyclable materials in accordance with our National Environment Regulations. Do not dispose of the packaging materials together with the domestic or other wastes. Take them to the packaging material collection points designated by the local authorities.2 General information
Overview   1 Front door 2 Handle 3 Lower part 4 Tray 5 Wire shelf 6 Control panel 7 Burner plate 8 Fan motor (behind steel plate) 9 Lamp 10 Grill heating element 11 Shelf positions  1 Warning lamp 2 Function knob 3 Digital timer 4 Thermostat knobPackage contents
 Accessories supplied can vary depending on the product model. Not every accessory described in the user manual may exist on your product. 1. User manual 2. Deep tray Used for pastries, large roasts, juicy dishes, and for collecting the fat while grilling. natural_image
3D rendering of a rectangular baking tray with no text or symbolsnatural_image
3D rendering of a rectangular tray with a grid pattern, no text or symbols visiblenatural_image
Line drawing of a rectangular metal grate or rack structure (no text or symbols)natural_image
Two technical line drawings of a grid-like structure with horizontal slats, no text or symbols present.natural_image
Technical illustration of a mechanical component with two circular views showing internal structure (no text or symbols)natural_image
Technical illustration of a mechanical assembly with two circular insets showing internal components (no text or symbols)| GENERAL | |
| External dimensions (height / width / depth) | 850 mm/600 mm/600 mm |
| Voltage / frequency | 1N ~ 220-240 V/3N ~ 380-415 V; 50 Hz |
| Total power consumption | 9.7 kW |
| Cable type / section | min.H05VV-FG3 x 4 mm ^2 (1N) / 5 x 1,5 mm ^2 (3N) or 5 x 2,5 (3N) mm ^2 special customer requirement for Belgium-Netherlands-Luxemburg |
| HOB | |
| Burners | |
| Rear left | Induction cooking plate |
| Dimension | 180 mm |
| Power | 2000/2300 W |
| Front left | Induction cooking plate |
| Dimension | 180 mm |
| Power | 2000/2300 W |
| Front right | Induction cooking plate |
| Dimension | 145 mm |
| Power | 1600/1800 W |
| Rear right | Induction cooking plate |
| Dimension | 210 mm |
| Power | 2000/2300 W |
| OVEN/GRILL | |
| Main oven | Multifunction oven |
| Inner lamp | 15-25 W |
| Grill power consumption | 2.2 kW |
Basics: Information on the energy label of electrical ovens is given in accordance with the EN 60350-1 / IEC 60350-1 standard. Those values are determined under standard load with bottom-top heater or fan assisted heating (if any) functions.
Energy efficiency class is determined in accordance with the following prioritization depending on whether the relevant functions exist on the product or not. 1-Cooking with eco-fan, 2-Turbo slow cooking, 3-Turbo cooking, 4-Fan assisted bottom/top heating, 5-Top and bottom heating.  Technical specifications may be changed without prior notice to improve the quality of the product.  Figures in this manual are schematic and may not exactly match your product.  Values stated on the product labels or in the documentation accompanying it are obtained in laboratory conditions in accordance with relevant standards. Depending on operational and environmental conditions of the product, these values may vary.3 Installation
Product must be installed by a qualified person in accordance with the regulations in force. The manufacturer shall not be held responsible for damages arising from procedures carried out by unauthorized persons which may also void the warranty.  Preparation of location and electrical installation for the product is under customer's responsibility.  The product must be installed in accordance with all local electrical regulations.  Prior to installation, visually check if the product has any defects on it. If so, do not have it installed. Damaged products cause risks for your safety.Before installation
To ensure that critical air gaps are maintained under the appliance, we recommend that this appliance is mounted on a solid base and that the feet do not sink into any carpet or soft flooring. The kitchen floor must be able to carry the weight of the appliance plus the additional weight of cookware and bakeware and food. If the range is placed on a base, measures have to be taken to prevent the appliance slipping from the base. The appliances must not be installed behind a decorative door in order to avoid overheating.  - This product is a class 1 device according to EN 30-1-1 standard, i.e. it may be placed with the rear and one side to kitchen walls, kitchen furniture or equipment of any size. The kitchen furniture or equipment on the other side may only be of the same size or smaller. - It can be used with cabinets on either side but in order to have a minimum distance of 400mm above hotplate level allow a side clearance of 65mm between the appliance and any wall, partition or tall cupboard. - It can also be used in a free standing position. Allow a minimum distance of 750 mm above the hob surface. - (\*) If a cooker hood is to be installed above the cooker, refer to cooker hood manufacturer' instructions regarding installation height. If not defined any size in the hood manual, this height should be at least 650 mm. - Any kitchen furniture next to the appliance must be heat-resistant (100 °C min.).Safety chain
If your product has 2 safety chains;
The appliance must be secured against overbalancing by using the supplied two safety chains on your oven. Fasten hook (1) by using a proper peg to the kitchen wall (6) and connect safety chain (3) to the hook via the locking mechanism (2).  1 Stability hook 2 Locking mechanism 3 Safety chain (supplied and mounted to oven) 4 Firmliy fix chain to cooker rear 5 Rear of cooker 6 Kitchen wallIf your product has 1 safety chain;
The appliance must be secured against overbalancing by using the supplied one safety chain on your oven. Follow below steps in the picture to secure the safety chain to your product.  i Stability chain to be as short as practicable to avoid oven tilting forward and diagonal to avoid oven side tilting. Cooker stability chain for cookers is not designed with bracket engagement slot.Installation and connection
Product can only be installed and connected in accordance with the statutory installation rules. Do not install the product next to refrigerators or freezers. The heat emitted by the product will increase the energy consumption of cooling appliances. - Carry the product with at least two persons. - Product must be placed directly on the floor. It must not be placed onto a base or a pedestal. Do not use the door and/or handle to carry or move the product. The door, handle or hinges get damaged.Electrical connection
Connect the product to a grounded outlet/line protected by a miniature circuit braker of suitable capacity as stated in the "Technical specifications" table. Have the grounding installation made by a qualified electrician while using the product with or without a transformer. Our company shall not be liable for any damages that will arise due to using the product without a grounding installation in accordance with the local regulations. The product must be connected to the mains supply only by an authorised and qualified person. The product's warranty period starts only after correct installation. Manufacturer shall not be held responsible for damages arising from procedures carried out by unauthorised persons. The power cable must not be clamped, bent or trapped or come into contact with hot parts of the product. A damaged power cable must be replaced by a qualified electrician. Otherwise, there is risk of electric shock, short circuit or fire! The mains supply data must correspond to the data specified on the type label of the product. The rating plate is either seen when the door or the lower cover is opened or it is located at the rear wall of the unit depending on the unit type. Power cable of your product must comply with the values in "Technical specifications" table.  Before starting any work on the electrical installation, disconnect the product from the mains supply. There is the risk of electric shock!Connecting the power cable
 While performing the wiring, you must apply with the national/local electrical regulations and must use the appropriate socket outlet/line and plug for oven. In case of the product's power limits are out of current carrying capability of plug and socket outlet/line, the product must be connected through fixed electrical installation directly without using plug and socket outlet/line. 1. If it is not possible to disconnect all poles in the supply power, a disconnection unit with at least 3 mm contact clearance (fuses, line safety switches, contactors) must be connected and all the poles of this disconnection unit must be adjacent to (not above) the product in accordance with IEE directives. Failure to obey this instruction may cause operational problems and invalidate the product warranty. Additional protection by a residual current circuit breaker is recommended. If a cable is supplied with the product:  2. For single-phase connection, connect as identified below: • Brown cable = L (Phase) - Blue cable = N (Neutral) • Green/yellow cable = (E) ⏻ (Ground) 3. For three-phase connection, connect the wires as identified below: • Brown cable = L1 (Phase 1) • Grey/Black cable= L2 (Phase 2) • Grey/Black cable= L3 (Phase 3) • Blue cable = N (Neutral) • Green/yellow cable = (E) ⏻ (Ground) - Push the product towards the kitchen wall. - Adjusting the feet of oven Vibrations during use may cause cooking vessels to move. This dangerous situation can be avoided if the product is level and balanced. For your own safety please ensure the product is level by adjusting the four feet at the bottom by turning left or right and align level with the work top.For products with cooling fan (This may not exist on your product.)
 1 Cooling fan 2 Control panel 3 Door The cooling fan cools both the control panel and the front of the appliance. Cooling fan continues to run for up to 20-30 minutes (approx.) even after the oven is turned off.Final check
1. Reconnect the product to the mains. 2. Check electrical functions.Future Transportation
- Keep the product's original carton and transport the product in it. Follow the instructions on the carton. If you do not have the original carton, pack the product in bubble wrap or thick cardboard and tape it securely. - To prevent the wire grill and tray inside the oven from damaging the oven door, place a strip of cardboard onto the inside of the oven door that lines up with the position of the trays. Tape the oven door to the side walls. - Do not use the door or handle to lift or move the product. Do not place any objects onto the product and move it in upright position. Check the general appearance of your product for any damages that might have occurred during transportation.4 Preparation
Tips for saving energy
The following information will help you to use your appliance in an ecological way, and to save energy: - Use dark coloured or enamel coated cookware in the oven since the heat transmission will be better. - While cooking your dishes, perform a preheating operation if it is advised in the user manual or cooking instructions. - Do not open the door of the oven frequently during cooking. - Try to cook more than one dish in the oven at the same time whenever possible. You can cook by placing two cooking vessels onto the wire shelf. • Cook more than one dish one after another. The oven will already be hot. - You can save energy by switching off your oven a few minutes before the end of the cooking time. Do not open the oven door. - Defrost frozen dishes before cooking them. \- Use pots/pans with cover for cooking. If there is no cover, energy consumption may increase 4 times. \- Select the burner which is suitable for the bottom size of the pot to be used. Always select the correct pot size for your dishes. Larger pots require more energy. \- Pay attention to use flat bottom pots when cooking with electric hobs. Pots with thick bottom will provide a better heat conduction. You can obtain energy savings up to 1/3. \- Vessels and pots must be compatible with the cooking zones. Bottom of the vessels or pots must not be smaller than the hotplate. \- Keep the cooking zones and bottom of the pots clean. Dirt will decrease the heat conduction between the cooking zone and bottom of the pot. • Information on energy efficiency according to EU 66/2014 can be found on the product fiche given with the product.Initial use
Time setting
While making any adjustment, related symbols will flash on the display. Press +/— keys to set the time of the day after the oven is energized for the first time. For touch control models, touch ≡ first and then use + / — to set the time of the day. Confirm the setting by touching Ⓛ symbol and wait for 4 seconds without touching any keys to confirm.  1 Adjustment key 2 Key lock symbol 3 Clock symbol 4 Alarm volume symbol \* 5 Eco mode symbol 6 Plus key 7 Minus key 8 Time slice symbol 9 Alarm symbol 10 End of Cooking Time symbol\* 11 Cooking Time symbol 12 Program key \* (Varies depending on the product model.) If the initial time is not set, clock will run starting from 12:00 and symbol will be displayed. The symbol will disappear once the time is set. Current time settings are canceled in case of power failure. It needs to be readjusted.First cleaning of the appliance
The surface might get damaged by some detergents or cleaning materials. Do not use aggressive detergents, cleaning powders/creams or any sharp objects during cleaning. Do not use harsh abrasive cleaners or sharp metal scrapers to clean the oven door glass since they can scratch the surface, which may result in shattering of the glass. 1. Remove all packaging materials. 2. Wipe the surfaces of the appliance with a damp cloth or sponge and dry with a cloth.Initial heating
Heat up the product for about 30 minutes and then switch it off. Thus, any production residues or layers will be burnt off and removed.  Hot surfaces cause burns! Product may be hot when it is in use. Never touch the hot burners, inner sections of the oven, heaters and etc. Keep children away. Always use heat resistant oven gloves when putting in or removing dishes into/from the hot oven.Electric oven
1. Take all baking trays and the wire grill out of the oven. 2. Close the oven door. 3. Select Static position. 4. Select the highest grill power; See How to operate the electric oven, page 29. 5. Operate the oven for about 30 minutes. 6. Turn off your oven; See How to operate the electric oven, page 29Grill oven
1. Take all baking trays and the wire grill out of the oven. 2. Close the oven door. 3. Select the highest grill power; see How to operate the grill, page 36. 4. Operate the grill about 15 minutes. 5. Turn off your grill; see How to operate the grill, page 36  Smoke and smell may emit for a couple of hours during the initial operation. This is quite normal. Ensure that the room is well ventilated to remove the smoke and smell. Avoid directly inhaling the smoke and the smell that emits.5 How to use the hob
General information about cooking
 Never fill the pan with oil more than one third of it. Do not leave the hob unattended when heating oil. Overheated oils bring risk of fire. Never attempt to extinguish a possible fire with water! When oil catches fire, cover it with a fire blanket or damp cloth. Turn off the hob if it is safe to do so and call the fire department. - Before frying foods, always dry them well and gently place into the hot oil. Ensure complete thawing of frozen foods before frying. - Do not cover the vessel you use when heating oil. - Place the pans and saucepans in a manner so that their handles are not over the hob to prevent heating of the handles. Do not place unbalanced and easily tilting vessels on the hob. - Do not place empty vessels and saucepans on cooking zones that are switched on. They might get damaged. - Operating a cooking zone without a vessel or saucepan on it will cause damage to the product. Turn off the cooking zones after the cooking is complete. - As the surface of the product can be hot, do not put plastic and aluminum vessels on it. Clean any melted such materials on the surface immediately. Such vessels should not be used to keep foods either. - Use flat bottomed saucepans or vessels only. - Put appropriate amount of food in saucepans and pans. Thus, you will not have to make any unnecessary cleaning by preventing the dishes from overflowing. Do not put covers of saucepans or pans on cooking zones. Place the saucepans in a manner so that they are centered on the cooking zone. When you want to move the saucepan onto another cooking zone, lift and place it onto the cooking zone you want instead of sliding it.Saucepan selection
- Glass ceramic surface is heatproof and is not affected by big temperature differences. - Do not use the glass ceramic surface as a place of storage or as a cutting board. - Use only the saucepans and pans with machined bottoms. Sharp edges create scratches on the surface. natural_image
Diagram showing a fire extinguishing a chimney with crossed-out X marks (no text or symbols)For induction hobs, use only vessels suitable for induction cooking.
Saucepan test
Use following methods to test whether your saucepan is compatible with the induction hob or not. 1. Your saucepan is compatible if its base holds magnet. 2. Your saucepan is compatible if "☐" does not flash when you place your saucepan on cooking zone and start the hob. You can use steel, teflon or aluminium saucepans with special magnetic base that contains labels or warnings indicating that the saucepan is compatible with induction cooking. Glass and ceramic vessels, pots and the stainless steel vessels with non- magnetic aluminium base should not be used.Pan detection-focusing system
In induction cooking, energy is generated only in the area where the base of the pan on the respective cooking zone covers. The base of the pan is detected by the induction system and only this area is automatically heated. If the pan is removed from the cooking zone during cooking, the cooking process will be stopped. "L" symbol flashes.(For some hob models, the selected cooking zone level and "L" flash respectively.Safe use
Do not select high heating levels when you will use a non-sticking (teflon) saucepan with no oil or with very little oil. Do not put metal items such as forks, knives or saucepan covers onto your hob since they can get heated. Never use aluminium foil for cooking. Never place food items wrapped with aluminium foil onto the cooking zone.  If there is an oven under your hob and if it is running, sensors of the hob can decrease the cooking level or turn off the hob.  When the hob is running, keep items with magnetic properties such as credit cards or cassettes away from the hob. Selecting cooking zone suitable to the vessel| Large cooking zone∅ 28-32∅ 24 cm∅ 21 cm | Normal cooking zone∅ 18 cm | Small cooking zone∅ 14,5-15 cm |
| Large cooking zone• Automatically fits to the saucepan.• Distributes the power ideally.• Provides perfect heat distribution. Used to cook dishes such as large crepes or large fishes rare or very rare. | Normal cooking zone• Automatically fits to the saucepan.• Distributes the power ideally.• Provides perfect heat distribution. Used for all kinds of cookings. | Small cooking zone• Used for slow cookings (sauces, creams)• Used to prepare small portions or portions based on number of persons. |
Using the hobs
Do not allow any object to drop on the hob. Even small objects such as a saltshaker may damage the hob. Do not use cracked hobs. Water may leak through these cracks and cause short circuit. In case of any kind of damage on the surface (eg., visible cracks), switch off the product immediately to minimize the risk of electric shock.Control panel
Specifications
 On / Off key Keylock/Childlock key Timer Activation / Deactivation key High power setting (Booster) key Cleaning lock key Stop and Go key Minus key Plus key  Graphics and figures are for informational purposes only. Actual appearances or functions may vary according to the model of your hob.Cooking Zone display
 1 High power setting (Booster) activation key 2 Zone Minus key (for temperature level) 3 Zone Plus key (for temperature level) 4 Cooking zone displayTimer display
 1 Decimal point for time setting 2 Timer display 3 Timer Plus key (for timer level) 4 Decimal point for Keylock/Childlock 5 Timer Minus key (for timer level)  This product is controlled with a touch control panel. Each operation you make on your touch control panel will be confirmed by an audible signal.  Always keep the control panel clean and dry. Having damp and soiled surface may cause problems in the functions.Switching on the hob:
1. Switch on the hob by touching"①" key. "0" appears on all the cooking zones display.  The hob will automatically return to Standby mode if no operation is performed within 10 seconds.. The product will switch itself off for safety reasons if no key is touched for a long time.Switching off the cooking zone:
An active cooking zone can be switched off in 3 different ways: 1. By touching the "①" key Touch the "①" key. 2. By dropping the temperature to "0" level; You can switch off the cooking zone by adjusting the temperature setting to "0" level. 3. By using the switching off function on the timer for the desired cooking zone; When the time is over, the timer will switch off the cooking zone assigned to it. "0" or "00" will appear on related display. When the time is over, an audible alarm will sound. Touch any key on the control panel to silence the audible alarm. 4. By touching the zone "—"/"+" keys simultaneously for the desired cooking zone; You can switch off the related cooking zone by touching its "—"/"+" keys simultaneously. If "H" or "h" is on after the cooking zone has been switched off, it means that the cooking zone is still hot. Do not touch the cooking zones.Residual heat indicator
If "H" symbol is flashing on the cooking zone display, it means that the hob is still hot and can be used to keep a small amount of food warm. The symbol will soon turn to "h" symbol, which means it is less hot. When the electricity is cut off, residual heat indicator will not light up and does not warn the user against hot cooking zones.Adjusting the temperature level
1. Switch on the hob by touching"①" key. 2. Adjust the desired temperature level by touching the zone "—"/"+" keys.  » The relevant cooking zone will start to operate at the set temperature level. The outer section of the 280 mm induction hob cooking zone (if your product is equipped with a 280 mm induction hob cooking zone) is activated only when a saucepan large enough to cover the cooking zone is placed on the cooking zone and the temperature is set to a level higher than 8.High power setting (BOOSTER)
You can use booster function for rapid heating. However, this function is not recommended for cooking a long time. Booster function may not be available in all cooking zones.Selecting the high power setting (BOOSTER):
1. Switch on the hob by touching"①" key. 2. Touch the "☐" key of related zone.  » Selected cooking zone will operate with maximum power and "P" symbol will appear on the cooking zone display. Cooking zone goes out of booster and continues to operate at level "9".Switching off the high power setting (BOOSTER) prematurely:
You can switch off the high power setting anytime you want by touching the "—" or "?" key. Cooking zone goes out of booster and continues to operate at level "9".Working prencible of 2 zones which are located same vertical direction:
If one zone is set to level booster and than the other zone, which is located same vertical direction set to bigger than level 6 (7, 8 and 9), first zone drops to level 9 and the other zone can be set bigger than level 6 (7, 8 and 9). If the second zone is set to level booster, first zone drops to level 6.Cleaning lock
The cleaning lock prevents operation of all keys on the control panel for 20 seconds while the hob is switched on to allow the user to make a short cleaning. Product will not draw any power throughout this time.Activating the cleaning lock
1. Touch and hold the " finger" key until a single signal sound is heard when any cooking zone is switched on. A countdown begins from 20 on the timer display of the hob. None of the keys on the panel will function except the "①" key throughout this period.Deactivating the cleaning lock
You do not have to press any key to deactivate the cleaning lock. The hob will give a signal audio signal after 20 seconds and the cleaning lock will automatically be deactivated.  If you want to deactivate the cleaning lock earlier, touch and hold the " finger" key until two signal sound is heard.Child Lock
When the cooking zones are switched off, you can protect the hob with the child lock to prevent children from switching on the cooking zones. You can activate or deactivate the child lock only when the cooking zones are switched off (in the standby mode).Activating the child lock
1. Touch and hold the both "hand" and "nothing" keys simultaneously until a single signal sound is heard when the hob is in the standby mode. The child lock will be activated. "L" will be displayed on all cooking zones display for a while and the decimal point of the 🔒 key will be turned on.  If any key is pressed when the child lock function is active, two signal sound will be heard and "L" will blink on all cooking zones display.Deactivating the child lock
1. Touch and hold the both "hand" and "nothing" keys simultaneously until two signal sound is heard when the child lock is active. » The child lock function will be deactivated. "L" will blink on all cooking zones display and the light of the 🔊 key goes out.Key Lock
You can activate the key lock in order to prevent the functions from being changed by mistake while the hob is operating.Activating the key lock
1. Touch and hold the both "hand" and "nothing" keys simultaneously until a single signal sound is heard. The Key lock will be activated and the decimal point of the "☐" key will be turned on after blinking. You can activate the key lock in the operation mode only. Only the "①" key will be functional when the key lock is active. When you touch any other button, the decimal point of the "♂" key will blink to indicate that the key lock is active. If you switch the hob off when the keys are locked, you must deactivate the key lock in order to be able to switch on the hob again. If you touch any button without deactivating key lock, "L" will blink on all cooking zones display to indicate that the key lock is active. Deactivate the key lock to turn on the hob again.Deactivating the key lock
1. Touch the both "hand" and "nothing" keys simultaneously until two signal sound is heard when the key lock is active. » The light of the "☐" key will go out and the control panel will get unlocked.Timer function
This function makes it easier for you to cook. You will not have to watch the hob for the whole cooking period. The cooking zone will be switched off automatically at the end of the time period you have set.Activating the timer
1. Switch on the hob by touching "①" key. 2. Adjust the desired temperature level by touching the zone "−"/"+" keys.  3. Activate the timer by touching the "L" key. "00" symbol and decimal point of selected zone will blink on timer display. 4. Set the desired duration by touching the timer "/+" keys. 5. After 10 second, the setting will be activated. Decimal point of selected zone will blink on timer display. 6. In order to set the timers of the other cooking zones, repeat the process explained above. If more than one timer value are set to different zones, the zone timer which has minimum timer value is displayed on the timer display and the decimal point for that zone blinks. The decimal points of the other zones illuminate continuously. You can see the remaining cooking time by touching the "L" key of all cooking zone. For each touching, different zone timer value is displayed. Finally, the minimum timer value is displayed again. Timer cannot be set without selecting the cooking zone and its temperature value The timer can only be set for the operating cooking zones.Deactivating the timer
Once the set time is over, the hob will be switched off automatically and give audible signal sound. Press any key to silence the audible signal sound. If you do not press any key, the signal sound will be cancel after a few minutes.Deactivating the timers earlier
If you deactivate the timer earlier, the hob will keep on operating at the set temperature until it is switched off. You can deactivate the timer earlier in two different ways:Deactivating the timer for related zone by dropping its value to "00":
1. Touch the timer "—"/"+" keys until "00" appears on the display of the cooking zone whose timer is active. » Decimal point symbol of the related zone will permanently goes off and the timer will be canceled.Deactivating the timer for related zone by touching the related zone “—”/“+” keys simultaneously:
1. Touch the related zone "—"/"+" keys simultaneously. » Decimal point symbol of the related zone will permanently goes off and the timer will be canceled. After this step, the temperature level of the related zone will be "0" also with the timer level.Stop function
You can decrease operating temperature level of the cooking zones to minimum level (level 1) by means of this function. If the timer is set for any cooking zone, it will continue operating during stoppage. 1. Touch the "☐" key when any of the cooking zones is operating. All operating cooking zones will operate at minimum level (level 1). "☐" symbol will appear on the display of the active cooking zones. 2. Touch the "☐" key again to reoperate all cooking zones with their previous settings.Power management function
Your appliance is equipped with a power management function. You may change the total power that may be drawn by the cooker with this function. There are 8 levels available for the power management function. Power management function - Total power levels that may be set| Power management display indicator | Total power |
| 25 | 2,5 kW |
| 30 | 3 kW |
| 36 | 3,6 kW |
| 44 | 4,4 kW |
| 54 | 5,4 kW |
| 57 | 5,7 kW |
| 67 | 6,7 kW |
| Power management display indicator | Total power |
| 72 | 7,2 kW |
Using induction cooking zones safely and efficiently
Operating principles: Induction hob directly heats the cooking vessel as a matter of principle. Therefore, it has a lot of advantages as compared with other hob types. It operates more efficiently and the hob surface is colder. Your induction hob is equipped with superior safety systems that will provide you maximum safe usage.  Your hob can be equipped with induction cooking zones with a diameter of 145, 180, 210 and 280 mm depending on the model. Each cooking zone automatically detects the vessel placed on it thanks to the induction feature. Energy is generated only where the vessel comes into contact with the cooking zone and thus, minimum energy consumption is achieved.  The product might start-stop when it is operating on levels from 1 to 7, especially with cookware with a small diameter and when water-oil is little. This is not a fault.Operation time constraints
The hob control is equipped with an operation time limit. If one or more cooking zones are left on, the cooking zone will automatically be deactivated after a certain period of time (see, Table-1). If there is a timer assigned to the cooking zone, the timer display will also turn off later. Operation time limit depends on the selected temperature level. Maximum operation time is applied at this temperature level. The cooking zone may be reactivated by the user after it is switched off automatically as described above. Table-1: Operation time limits| Temperature level | Operation time limit - hour |
| 0 | 0 |
| 1 | 6 |
| 2 | 6 |
| 3 | 5 |
| 4 | 5 |
| 5 | 4 |
| 6 | 1,5 |
| 7 | 1,5 |
| 8 | 1,5 |
| 9 | 30 minutes |
| P (Booster) | 10 minutes (*) |
| (*) The hob will drop to level 9 after 5 minutes | |
Overheating protection
Your hob is equipped with some sensors which provide protection against overheating. Following may be observed in case of overheating: - Operating cooking zone may get switched off. - Selected level may drop to level 7 from higher level.Overflow safety system
Your hob is equipped with an overflow safety system. If there is any overflow that spills onto the control panel, the system will cut the power connection immediately and switch off your hob. "E" warning appears on the indicator during this period.Precise power setting
Induction hob reacts the commands immediately as an operating principle. It changes the power settings very fast. Thus, you can prevent a cooking pot (containing water, milk and etc.) from overflowing even if it was just about to overflow.Noises
User may hear noises while cooking
During using the hob there may be some noises depending on the base material of the pots. These noises are a normal part of induction technology. It is not a defect.Possible noise causes and types:
Fan noise
The hob has a fan which activates automatically according to temperature of the product. Fan has different driving levels and according the temperature it is activated different levels.Low buzzing noise like transformer operation
This is nature of the induction technology. Since heat is directly tranferred to cookware base, there may be such buzzing noise depending on the material of the cookware. Therefore user can hear different noises with different cookwares.Crakling
There may be crakling noises while cooking. This is because of the material and construction of the cookware base. If cookware is made of different layers with different materials, crakling noise may occur.Whistling noises
There may be whistling noises while cooking two hotplates on same side of the hob with different cooking levels.Empty pot
Noise can be heard if an empty pot is heated. When you put water or food in it, this sound will clear away.Error messages
Table-2: Error codes and error causes| Error cause | Indicator | Display |
| Two or more keys are pressed | The "E" symbol blinks | Cooking zone display |
| Error cause | Indicator | Display |
| Hob is overheated | The "H" symbol blinks | Cooking zone display |
6 How to operate the oven
General information on baking, roasting and grilling
 Hot surfaces cause burns! Product may be hot when it is in use. Never touch the hot burners, inner sections of the oven, heaters and etc. Keep children away. Always use heat resistant oven gloves when putting in or removing dishes into/from the hot oven.  Be careful when opening the oven door as steam may escape. Exiting steam can scald your hands, face and/or eyes.Tips for baking
- Use non-sticky coated appropriate metal plates or aluminum vessels or heat-resistant silicone moulds. • Make best use of the space on the rack. - Place the baking mould in the middle of the shelf. - Select the correct rack position before turning the oven or grill on. Do not change the rack position when the oven is hot. - Keep the oven door closed.Tips for roasting
- Treating whole chicken, turkey and large piece of meat with dressings such as lemon juice and black pepper before cooking will increase the cooking performance. - It takes about 15 to 30 minutes longer to roast meat with bones when compared to roasting the same size of meat without bones. • Each centimeter of meat thickness requires approximately 4 to 5 minutes of cooking time. - Let meat rest in the oven for about 10 minutes after the cooking time is over. The juice is better distributed all over the roast and does not run out when the meat is cut. - Fish should be placed on the middle or lower rack in a heat-resistant plate.How to operate the electric oven Select temperature and operating mode
 1 Function knob 2 Thermostat knob 1. Set the Function knob to the desired operating mode. 2. Set the Temperature knob to the desired temperature. » Oven heats up to the adjusted temperature and maintains it. During heating, temperature lamp stays on.Switching off the electric oven
Turn the function knob and temperature knob to off (upper) position.Rack positions (For models with wire shelf)
It is important to place the wire shelf onto the side rack correctly. Wire shelf must be inserted between the side racks as illustrated in the figure. Do not let the wire shelf stand against the rear wall of the oven. Slide your wire shelf to the front section of the rack and settle it with the help of the door in order to obtain a good grill performance. (Varies depending on the product model.) Operating modes
The order of operating modes shown here may be different from the arrangement on your product.Top and bottom heating
 Top and bottom heating are in operation. Food is heated simultaneously from the top and bottom. For example, it is suitable for cakes, pastries, or cakes and casseroles in baking moulds. Cook with one tray only.Bottom heating
 Only bottom heating is in operation. It is suitable for pizza and for subsequent browning of food from the bottom. This function must be used for easy steam cleaning as well. Fan supported bottom/top heating
 Top heating, bottom heating plus fan (in the rear wall) are in operation. Hot air is evenly distributed throughout the oven rapidly by means of the fan. Cook with one tray only.Operating with fan
 The oven is not heated. Only the fan (in the rear wall) is in operation. Suitable for thawing frozen granular food slowly at room temperature and cooling down the cooked food. The time required to thaw a whole piece of meat is longer than the food with grains.Fan Heating
 二  Warm air heated by the rear heater is evenly distributed throughout the oven rapidly by means of the fan. It is suitable for cooking your meals in different rack levels and preheating is not required in most cases. Suitable for cooking with multi trays. This function must be used for easy steam cleaning as well."3D" function
 Top heating, bottom heating and fan assisted heating (in the rear wall) are in operation. Food is cooked evenly and quickly all around. Cook with one tray only.Full grill
 Large grill at the ceiling of the oven is in operation. It is suitable for grilling large amount of meat. - Put big or medium-sized portions in correct rack position under the grill heater for grilling. - Turn the food after half of the grilling time.Grill+Fan
 Grilling effect is not as strong as in Full Grill - Put small or medium-sized portions in correct shelf position under the grill heater for grilling. - Turn the food after half of the grilling time.Using the oven clock
 1 Adjustment key 2 Key lock symbol 3 Clock symbol 4 Alarm volume symbol \* 5 Eco mode symbol 6 Plus key 7 Minus key 8 Time slice symbol 9 Alarm symbol 10 End of Cooking Time symbol\* 11 Cooking Time symbol 12 Program key \* (Varies depending on the product model.) i Maximum time that can be set for end of cooking is 5 hours 59 minutes. Program will be cancelled in case of power failure. You must reprogram the oven. While making any setting, related symbols will flash on the display. You must wait for a short time for the settings to take effect. If no cooking setting is made, time of the day cannot be set. Remaining time will be displayed if cooking time is set when the cooking starts.Cooking by setting the cooking time;
You can set the oven so that it will stop at the end of the specified time by setting the cooking time on the timer. 1. Select the function for cooking. 2. Touch ⏻ until |→| symbol appears on display for cooking time. 3. Set the cooking time with + / - keys. » • After the cooking time is set, |→| symbol and the time slice will appear on display continuously. 4. Place the dish into the oven and set the temperature with temperature knob. Cooking will start. » Cooking time starts to count down on display when cooking starts and all parts of time slice symbol is lit. The set cooking time is divided into 4 equal parts and when the time of each parts ends, the symbol of that parts turns off. So you can understand the ratio of remaining cooking time to total cooking time easily.Setting the the end of cooking time to a later time; (This feature is optional. It may not exist on your product.)
After setting the cooking time on the timer, you can set the end of cooking time to a later time. 1. Select the function for cooking. 2. Touch ⏻ until |→| symbol appears on display for cooking time. 3. Set the cooking time with + / - keys. » · Once the Cooking Time is set, |→| symbol will appear on display continuously. 4. Touch ⓣ until → symbol appears on display for the end of cooking time. 5. Press + /— keys to set the end of cooking time. » After the cooking time is set, symbol plus symbol and the time slice will appear on display continuously. Once the cooking starts, symbol disappears. 6. Place the dish into the oven and set the temperature with temperature knob. Cooking will start. » Oven timer calculates the startup time by deducting the cooking time from the end of cooking time you have set. Selected operating mode is activated when the startup time of cooking has come and the oven is heated up to the set temperature. It maintains this temperature until the end of cooking time. » Cooking time starts to count down on display when cooking starts and all parts of time slice symbol is lit. The set cooking time is divided into 4 equal parts and when the time of each parts ends, the symbol of that parts turns off. So you can understand the ratio of remaining cooking time to total cooking time easily. 7. After the cooking process is completed, "End" appears on the displayed and the timer gives an audio warning. 8. Audio warning sounds for 2 minutes. To stop the audio warning, just press any key. Audio warning will be silenced and current time will be displayed.  If you press any key at the end of the audio warning, the oven will restart operating. Turn the temperature knob and function knob to "0" (off) position to switch off the oven in order to prevent re-operation of the oven at the end of warning.Activating the keylock
You can prevent digital timer from being intervened with by activating the key lock function. 1. Touch ⚪ until 🔒 symbol appears on display. » "OFF" will appear on the display. 2. Press + to activate the key lock. » Once the key lock is activated, "On" appears on the display and the 🔒 symbol remains lit.  Digital timer keys are not functional when the key lock is activated. Key lock will not be cancelled in case of power failure.To deactivate the keylock
1. Touch ≡ until 🔒 symbol appears on display. » "On" will appear on the display. 2. Disable the key lock by pressing the key. » "OFF" will be displayed once the keylock is deactivated.Setting the alarm clock
You can use the timer of the product for any warning or reminder apart from the cooking program. The alarm clock has no influence on the functions of the oven. It is only used as a warning. For example, this is useful when you want to turn food in the oven at a certain point of time. Timer will give an audio warning at the end of the set time. 1. Touch ⏻ until ⚠ symbol appears on display.  Maximum alarm time can be 23 hours and 59 minutes. 2. Set the alarm duration by using +/ - keys.  Function keys for alarm tone, time of day, display brightness and temperature keys should be at 0 (OFF) position. » △ symbol will remain lit and the alarm time will appear on the display once the alarm time is set. 3. At the end of the alarm time, △ symbol starts flashing and the audio warning is heard.Turning off the alarm
1. Audio warning sounds for 2 minutes. To stop the audio warning, just press any key. »Audio warning will be silenced and current time will be displayed.Cancelling the alarm;
1. Touch Ⓤ until △ symbol appears on display in order to cancel the alarm. 2. Press and hold ■ key until "00:00" is displayed.  Alarm time will be displayed. If the alarm time and cooking time are set concurrently, shortest time will be displayed.Changing alarm tone
1. Touch ≡ until 🔊 symbol appears on display. 2. Adjust the desired alarm tone with + / - keys. 3. The tone you have set will be activated in a short time. » Selected alarm tone will appear as "b-01", "b-02" or "b-03" on the display.Changing the time of the day
To change the time of the day you have previously set: 1. Touch ≡ until ⏻ symbol appears on display. 2. Set the time of the day with + /— keys. 3. The time you have set will be activated in a short time.Economy mode
You can save energy with economy mode while cooking by setting cooking time in the oven. This mode completes the cooking with the inner temperature of the oven by switching off the heaters before the end of cooking time.Setting the economy mode
1. Touch: symbol until eco symbol appears on display. » "OFF" will appear on the display. 2. Enable economy mode by touching + key. » Once the economy mode is activated, "On" appears on the display and the eco symbol remains lit.Disabling economy mode
1. Touch ≡ symbol until eco symbol appears on display. » "On" will appear on the display. 2. Disable economy mode by touching key. » "Off" will be displayed once the eco mode is deactivated.Setting the screen brightness
(This feature is optional. It may not exist on your product.)
1. Touch: ≡ until d-01 or d-02 or d-03 appears on display for display brightness. 2. Set the desired brightness with + /— keys. » The time you have set will be activated in a short time.Cooking times table
 The timings in this chart are meant as a guide. Timings may vary due to temperature of food, thickness, type and your own preference of cooking.Baking and roasting
 1st rack of the oven is the bottom rack.| Dish | Cooking level number | Accessory to use | Operating mode | Rack position | Temperature (°C) | Cooking time (approx. in min.) |
| Cakes in tray | One level | Standard tray* | 3 | 180 | 25 ... 30 | |
| Cakes in mould | One level | Cake mold on wire grill** | 2 | 180 | 40 ... 50 | |
| Small cakes | One level | Standard tray* | 3 | 160 | 25 ... 35 | |
| One level | Standard tray* | 3 | 150 | 30 ... 40 | ||
| 2 levels | 1-Pastry tray*3-Standard tray* | 1 - 3 | 150 | 35 ... 50 | ||
| 3 levels | 1-Standard tray*3-Pastry tray*5-Deep tray* | 1 - 3 - 5 | 150 | 35 ... 50 | ||
| Sponge cake | One level | Round springform pan with a diameter of 26 cm on wire grill** | 3 | 160 | 25 ... 35 | |
| One level | Round springform pan with a diameter of 26 cm on wire grill** | 2 | 150 | 30 ... 40 | ||
| 2 levels | 1-Round springform pan with a diameter of 26 cm on wire grill**4-Round springform pan with a diameter of 26 cm on pastry tray** | 1 - 4 | 150 | 35 ... 45 | ||
| Cookies | One level | Pastry tray* | 3 | 180 | 25 ... 30 | |
| 2 levels | 1-Pastry tray*3-Standard tray* | 1 - 3 | 180 | 30 ... 40 | ||
| 3 levels | 1-Pastry tray*3-Standard tray*5-Deep tray* | 1 - 3 - 5 | 180 | 35 ... 45 | ||
| Dough pastry | One level | Standard tray* | 2 | 200 | 30 ... 40 | |
| 2 levels | 1-Pastry tray*5-Standard tray* | 1 - 5 | 200 | 45 ... 55 | ||
| 3 levels | 1-Pastry tray*3-Standard tray*5-Deep tray* | 1 - 3 - 5 | 200 | 55 ... 65 | ||
| Rich pastry | One level | Standard tray* | 2 | 200 | 25 ... 35 | |
| 2 levels | 1-Pastry tray*3-Standard tray* | 1 - 3 | 200 | 35 ... 45 | ||
| 3 levels | 1-Pastry tray*3-Standard tray*5-Deep tray* | 1 - 3 - 5 | 190 | 45 ... 55 | ||
| Leaven | One level | Standard tray* | 2 | 200 | 35 ... 45 | |
| Lasagna | One level | Glass/metal rectangular pan on wire grill** | 2 - 3 | 200 | 30 ... 40 | |
| Pizza | One level | Standard tray* | 2 | 200 ... 220 | 15 ... 20 | |
| Beef steak (whole) / Roast | One level | Standard tray* | 3 | 25 min. 250/max, then 180 ... 190 | 100 ... 120 | |
| Leg of Lamb (casserole) | One level | Standard tray* | 3 | 25 min. 250/max, then 190 | 70 ... 90 | |
| One level | Standard tray* | 3 | 25 min. 250/max, then 190 | 60 ... 80 | ||
| Roasted chicken (1,8-2 kg) | One level | Standard tray* | 2 | 15 min. 250/max, then 180 ... 190 | 60 ... 80 | |
| One level | Standard tray* | 2 | 15 min. 250/max, then 180 ... 190 | 60 ... 80 | ||
| Turkey (5.5 kg) | One level | Standard tray* | 1 | 25 min. 250/max, then 180 ... 190 | 150 ... 210 | |
| One level | Standard tray* | 1 | 25 min. 250/max, then 180 ... 190 | 150 ... 210 | ||
| Fish | One level | Standard tray* | 3 | 200 | 20 ... 30 | |
| One level | Standard tray* | 3 | 200 | 20 ... 30 | ||
| It is suggested to perform preheating for all foods.* These accessories may not supplied with the product.** These accessories are not supplied with the product. They are commercially available accessories. | ||||||
Cooking table for test meals
Meals in this cooking table are prepared according to EN 60350-1 to make it easier for control institutes to test the product.| Dish | Cooking level number | Accessory to use | Operating mode | Rack position | Temperature (°C) | Cooking time (approx. in min.) |
| Shortbread | One level | Standard tray* | 3 | 140 | 20 ... 30 | |
| One level | Standard tray* | 3 | 140 | 20 ... 30 | ||
| 2 levels | 1-Standard tray*3-Pastry tray* | 1 - 3 | 140 | 20 ... 30 | ||
| 3 levels | 1-Standard tray*3-Pastry tray*5-Deep tray* | 1 - 3 - 5 | 140 | 25 ... 35 | ||
| Small cakes | One level | Standard tray* | 3 | 160 | 25 ... 35 | |
| One level | Standard tray* | 3 | 150 | 30 ... 40 | ||
| 2 levels | 1-Pastry tray*3-Standard tray* | 1 - 3 | 150 | 35 ... 50 | ||
| 3 levels | 1-Standard tray*3-Pastry tray*5-Deep tray* | 1 - 3 - 5 | 150 | 35 ... 50 | ||
| Sponge cake | One level | Round springform pan with a diameter of 26 cm on wire grill** | 3 | 160 | 25 ... 35 | |
| One level | Round springform pan with a diameter of 26 cm on wire grill** | 2 | 150 | 30 ... 40 | ||
| 2 levels | 1-Round springform pan with a diameter of 26 cm on wire grill**4-Round springform pan with a diameter of 26 cm on pastry tray** | 1 - 4 | 150 | 35 ... 45 | ||
| Apple pie | One level | Round black metal dish with a diameter of 20 cm on wire grill** | 2 | 180 | 50 ... 60 | |
| One level | Round black metal dish with a diameter of 20 cm on wire grill** | 2 | 170 | 50 ... 60 | ||
| 2 levels | 1-Round black metal dish with a diameter of 20 cm on wire grill**4-Round black metal dish with a diameter of 20 cm on pastry tray** | 1 - 4 | 170 | 50 ... 60 | ||
| It is suggested to perform preheating for all foods.* These accessories may not supplied with the product.** These accessories are not supplied with the product. They are commercially available accessories. | ||||||
Tips for baking cake
- If the cake is too dry, increase the temperature by 10°C and decrease the cooking time. - If the cake is wet, use less liquid or lower the temperature by 10°C. - If the cake is too dark on top, place it on a lower rack, lower the temperature and increase the cooking time. - If cooked well on the inside but sticky on the outside use less liquid, lower the temperature and increase the cooking time.Tips for baking pastry
- If the pastry is too dry, increase the temperature by 10°C and decrease the cooking time. Dampen the layers of dough with a sauce composed of milk, oil, egg and yoghurt. - If the pastry takes too long to bake, pay care that the thickness of the pastry you have prepared does not exceed the depth of the tray. - If the upper side of the pastry gets browned, but the lower part is not cooked, make sure that the amount of sauce you have used for the pastry is not too much at the bottom of the pastry. Try to scatter the sauce equally between the dough layers and on the top of pastry for an even browning.  Cook the pastry in accordance with the mode and temperature given in the cooking table. If the bottom part is still not browned enough, place it on one lower rack next time.Tips for cooking vegetables
- If the vegetable dish runs out of juice and gets too dry, cook it in a pan with a lid instead of a tray. Closed vessels will preserve the juice of the dish. - If a vegetable dish does not get cooked, boil the vegetables beforehand or prepare them like canned food and put in the oven.How to operate the grill
 Close oven door during grilling. Hot surfaces may cause burns!Switching on the grill
1. Turn the Function knob to the desired grill symbol. 2. Then, select the desired grilling temperature. 3. If required, perform a preheating of about 5 minutes. » Temperature light turns on.Switching off the grill
1. Turn the Function knob to Off (top) position.  Foods that are not suitable for grilling carry the risk of fire. Only grill food which is suitable for intensive grilling heat. Do not place the food too far in the back of the grill. This is the hottest area and fatty food may catch fire.Cooking times table for grilling
Grilling with electric grill| Food | Accessory to use | Rack position | Recommended temperature (°C)** | Cooking time (approx. in min.) |
| Fish | Wire grill | 4...5 | 250/max | 20...25 min.# |
| Sliced chicken | Wire grill | 4...5 | 250/max | 25...35 min. |
| Lamb chops | Wire grill | 4...5 | 250/max | 20...25 min. |
| Roast beef | Wire grill | 4...5 | 250/max | 25...30 min.# |
| Veal chops | Wire grill | 4...5 | 250/max | 25...30 min.# |
| Toast bread* | Wire grill | 4 | 250/max | 1...3 min. |
| #depending on thickness*Preheat for 5 minutes**If the grill temperature of your product cannot be adjusted, the grill will work at the recommended temperature. | ||||
| Food | Accessory to use | Rack position | Temperature (°C) | Cooking time (approx. in min.) |
| Toast bread | Wire grill | 4 | 250/max | 1...3 min. |
| Meatballs (beef) - 12 pieces | Wire grill | 4 | 250/max | 25...35 min. |
| Turn the food after 2/3 of the total grilling time.It is suggested to perform 5 minutes preheating for all foods broiling. | ||||
7 Maintenance and care
General information
Service life of the product will extend and the possibility of problems will decrease if the product is cleaned at regular intervals.  Disconnect the product from mains supply before starting maintenance and cleaning works. There is the risk of electric shock!  Allow the product to cool down before you clean it. Hot surfaces may cause burns! - Clean the product thoroughly after each use. In this way it will be possible to remove cooking residues more easily, thus avoiding these from burning the next time the appliance is used. - No special cleaning agents are required for cleaning the product. Use warm water with washing liquid, a soft cloth or sponge to clean the product and wipe it with a dry cloth. • Always ensure any excess liquid is thoroughly wiped off after cleaning and any spillage is immediately wiped dry. - Do not use cleaning agents that contain acid or chloride to clean the stainless or inox surfaces and the handle. Use a soft cloth with a liquid detergent (not abrasive) to wipe those parts clean, paying attention to sweep in one direction.  The surface might get damaged by some detergents or cleaning materials. Do not use aggressive detergents, cleaning powders/creams or any sharp objects during cleaning. Do not use harsh abrasive cleaners or sharp metal scrapers to clean the oven door glass since they can scratch the surface, which may result in shattering of the glass.  Do not use steam cleaners to clean the appliance as this may cause an electric shock.Cleaning the hob
Glass ceramic surface
Wipe the glass ceramic surface (vitroceramic) with cold water, paying attention to leave no residual cleaning agents, and dry with a soft clothing. Residues may cause damage on the glass ceramic surface when using the hob for the next time. Dried residues on the glass ceramic surface (vitroceramic) should under no circumstances be scraped with hook blades, steel wool or similar tools. Remove calcium stains (yellow stains) with commercially available lime remover or a small amount of lime remover such as vinegar or lemon juice. If the surface is heavily soiled, apply the cleaning agent on a sponge and wait until it is absorbed well. Then, clean the surface of the hob with a damp cloth.  Sugar-based foods such as thick cream and syrup must be cleaned promptly without waiting the surface to cool down. Otherwise, glass ceramic surface may get damaged permanently. Slight color fading may occur on coatings or other surfaces in time. This does not affect the operation of the product. Color fading and stains on the glass ceramic surface is a normal condition, and not a defect.Cleaning the control panel
Clean the control panel and knobs with a damp cloth and wipe them dry.  If your product is equipped with buttons/knobs do not remove the control buttons/knobs to clean the control panel. Control panel may get damaged!Cleaning the oven
To clean the side wall (Varies depending on the product model.)
(This feature is optional. It may not exist on your product.) 1. Remove the front section of the side rack by pulling it in the opposite direction of the side wall. 2. Remove the side rack completely by pulling it towards you. Catalytic walls
(This feature is optional. It may not exist on your product.)
The inner side walls (A) and/or the rear wall (B) of your product may be coated with catalytic enamel. Catalytic walls have a light matte colour and a porous surface. Catalytic walls of the oven should not be cleaned. Thanks to their perforated structure, catalytic surfaces absorb grease and once the surface is filled with grease, they start to shine. In this case, it is recommended to replace the parts. natural_image
Two technical diagrams labeled A and B showing internal components with grid patterns (no text or symbols beyond labels)Easy Steam Cleaning
It ensures easy cleaning because the dirt (having waited not for too long) is softened with the steam that forms inside the oven and the water drops condensing on the inner surfaces of the oven. 1. Remove all accessories inside the oven. 2. Pour 500 ml of water into the oven tray and place the tray at the 2nd rack of the oven. natural_image
Illustration of a laptop with a glass lens and abstract background elements (no text or symbols)Clean oven door
To clean the oven door, use warm water with washing liquid, a soft cloth or sponge to clean the product and wipe it with a dry cloth. Wipe the glass with vinegar and then rinse it against lime residues that may occur on the oven glass.  Don't use any harsh abrasive cleaners or sharp metal scrapers for cleaning the oven door. They could scratch the surface and destroy the glass.Cleaning the oven door
 Do not use harsh abrasive cleaners, metal scrapers, wire wool or bleach materials to clean the oven door and glass. You can remove your oven door and door glasses to clean them. How to remove the doors and windows is explained in the sections "Removing the oven door" and "Removing the inner glasses of the door". After removing the door inner glasses, clean them using a dishwashing detergent, warm water and a soft cloth or sponge and dry them with a dry cloth. Wipe the glass with vinegar and then rinse it against lime residues that may occur on the oven glass.Removing the oven door
1. Open the front door (1). 2. Open the clips at the hinge housing (2) on the right and left hand sides of the front door by pressing them down as illustrated in the figure.  1 Door 2 Hinge lock(closed position) 3 Oven 4 Hinge lock(open position) natural_image
Mechanical assembly diagram showing a clamping mechanism with a numbered component (4), no text or symbols present.natural_image
Diagram showing two mechanical assembly steps with directional arrows indicating motion (no text or symbols)Removing the door inner glass (This feature is optional. It may not exist on your product.)
The inner glass panel of the oven door can be removed for cleaning. 1. Open the oven door. natural_image
Simple line drawing of a rectangular object with a curved arrow indicating rotation or change (no text or symbols)natural_image
Technical line drawing of a rectangular electronic component with a side panel and internal structure, showing assembly or assembly motion (no text or symbols)Replacing the oven lamp
 Before replacing the oven lamp, make sure that the product is disconnected from mains and cooled down in order to avoid the risk of an electrical shock. Hot surfaces may cause burns! In this oven, an incandescent lamp with a power of less than 40 W, a height of less than 60 mm, a diameter of less than 30 mm or a halogen lamp with socket type G9, a power of less than 60 W is used. The lamps are suitable for operation at temperatures above 300 °C. Oven lamps can be obtained from Authorised Service Agents or technician with licence. This product contains a lamp of energy class G. i Position of lamp might vary from the figure. The lamp used in this appliance is not suitable for household room illumination. The intended purpose of this lamp is to assist the user to see foodstuffs. The lamps used in this appliance have to withstand extreme physical conditions such as temperatures above 50 °C.If your oven is equipped with a round lamp:
1. Disconnect the product from mains. 2. Turn the glass cover counter clockwise to remove it. natural_image
Diagram of a mechanical or electrical component with three circular arrows indicating rotational motion (no text or symbols)natural_image
Two mechanical diagrams labeled A and B showing a rotating component with directional arrows indicating motion (no text or symbols present)8 Troubleshooting
Oven emits steam when it is in use
\- It is normal that steam escapes during operation. >>> This is not a fault.Product emits metal noises while heating and cooling.
\- When the metal parts are heated, they may expand and cause noise. >>> This is not a fault.Product does not operate.
- The mains fuse is defective or has tripped. >>> Check fuses in the fuse box. If necessary, replace or reset them. - Product is not plugged into the (grounded) socket. >>> Check the plug connection. - If the display does not light up when you switch the hob on again. >>> Disconnect the appliance at the circuit breaker. Wait 20 seconds and then reconnect it. • Overheat protection is active. >>> Allow your hob to cool down. • The cooking pot is not suitable. >>> Check your pot.Oven light does not work.
- Oven lamp is defective. >>> Replace oven lamp. - Power is cut. >>> Check if there is power. Check the fuses in the fuse box. If necessary, replace or reset the fuses.Oven does not heat.
- Might not be set to a certain cooking function and/or temperature. >>> Set the oven to a certain cooking function and/or temperature. - In models equipped with a timer, the timer is not adjusted. >>>Adjust the time. (In products with microwave oven, timer controls only microwave oven.) - Power is cut. >>> Check if there is power. Check the fuses in the fuse box. If necessary, replace or reset the fuses.^1 symbol appears on the cooking zone display.
- You have not placed the pot on the active cooking zone. >>> Check if there is a pot on the cooking zone. - Your pot is not compatible with induction cooking. >>> Check if your cooking pot is compatible with induction hob. - The cooking pot is not centered properly or the bottom surface of the pot is not wide enough for the cooking zone. >>> Choose a pot wide enough and center the pot on the cooking zone properly. - Cooking pot or cooking zone is overheated. >>> Allow them to cool down.Selected cooking zone suddenly turns off during operation.
- Cooking time for the selected cooking zone may be over. >>> You may set a new cooking time or finish cooking. • Overheat protection is active. >>> Allow your hob to cool down. - An object may be covering the touch control panel. >>> Remove the object on the panel.The pot does not get warm even if the cooking zone is on.
- Your pot is not compatible with induction cooking. >>> Check if your cooking pot is compatible with induction hob. - The cooking pot is not centered properly or the bottom surface of the pot is not wide enough for the cooking zone. >>> Choose a pot wide enough and center the pot on the cooking zone properly.(In models with timer) Clock display is blinking or clock symbol is on.
\- A previous power outage has occurred. >>> Adjust the time / Switch of the product and switch it on again.  Consult the Authorised Service Agent or technician with licence or the dealer where you have purchased the product if you can not remedy the trouble although you have implemented the instructions in this section. Never attempt to repair a defective product yourself. Backofen
Gebrauchsanleitung natural_image
Simple line drawing of a steaming cupcake (no text or symbols)Bitte zuerst diese Bedienungsanleitung lesen!
Sehr geehrte Kundin, sehr geehrter Kunde, vielen Dank für den Kauf eines Beko-Produktes. Wir hoffen, dass dieses Produkt, das mit hochwertiger und hochmoderner Technologie hergestellt wurde, beste Ergebnisse erzielt. Daher bitte die gesamte Bedienungsanleitung und alle beiliegenden Dokumente aufmerksam durchlesen und zum zukünftigen Nachschlagen aufbewahren. Bei Weitergabe des Produktes auch die Bedienungsanleitung mit aushändigen. Alle Warnungen und Informationen in der Bedienungsanleitung einhalten. Bitte beachten, dass diese Bedienungsanleitung für unterschiedliche Modelle geschrieben wurde. Unterschiede zwischen den verschiedenen Modellen werden natürlich in der Anleitung erwähnt.Die Symbole
In dieser Anleitung verwenden wir folgende Symbole:  Wichtige Informationen oder nützliche Tipps zum Gebrauch.  Warnung vor gefährlichen Situationen, in denen es zu Verletzungen oder Sachschäden nen kann.  Warnung vor Stromschlägen.  Warnung vor Brandgefahr.  Warnung vor heißen Flächen.1 Wichtige Sicherheits- und Umwelthinweise 4
Allgemeine Sicherheit 4 Elektrische Sicherheit 5 Produktsicherheit 6 Bestimmungsgemäße Verwendung...... 10 Sicherheit von Kindern 10 Informationen zur Entsorgung...... 11 Verpackungsmaterialien entsorgen...... 112 Allgemeine Informationen 12
Geräteübersicht 12 Lieferumfang....13 Technische Daten 143 Installation 15
Vor der Installation....15 Einbauen und Anschließen.... 16 Transport 184 Vorbereitungen 19
Tipps zum Energiesparen....19 Erste Inbetriebnahme 19 Zeiteinstellung....19 Erstreinigung des Gerätes 20 Erstaufheizung....205 Bedienung Kochfeld 21
Allgemeine Hinweise zum Kochen......21 Kochfeld verwenden....23 Bedienfeld....236 Bedienung des Backofens 31
Allgemeine Hinweise zum Backen, Braten und Grillen....31 So bedienen Sie den Backofen....31 Betriebsarten 32 Ofenuhr verwenden 33 Garzeitentabelle 35 So bedienen Sie den Grill....39 Garzeitentabelle zum Grillen....407 Reinigung und Wartung 41
Allgemeine Hinweise....41 Kochfeld reinigen 41 Bedienfeld reinigen 41 Backofen reinigen 42 Reinigung der Ofentür......43 Türinnenscheibe ausbauen 44 Beleuchtung des Backofens auswechseln448 Problemlösungen 46
1 Wichtige Sicherheits- und Umwelthinweise
Dieser Abschnitt enthält Hinweise, die für die Sicherheit des Benutzers und anderer Personen unerlässlich sind. Diese Hinweise müssen beachtet werden, damit es nicht zu Verletzungen oder Sachschäden kommt. Bei Nichteinhaltung dieser Anweisungen erlöschen sämtliche Garantieansprüche.Allgemeine Sicherheit
\- Dieses Gerät darf von Kindern (ab acht Jahren) oder Personen bedient werden, die unter körperlichen, sensorischen oder geistigen Einschränkungen leiden oder denen es an der nötigen Erfahrung und Wissen im Umgang mit solchen Geräten mangelt, wenn solche Personen beaufsichtigt werden und, zuvor gründlich mit der sicheren Bedienung des Gerätes vertraut gemacht wurden und sich der damit verbundenen Gefahren voll und ganz bewusst sind. Kinder dürfen nicht mit dem Gerät spielen. Reinigungs- und Wartungsarbeiten dürfen von Kindern nicht ohne Aufsicht eines Erwachsenen durchgeführt werden. - Das Gerät darf nicht von Personen genutzt werden, die unter körperlichen oder geistigen Einschränkungen leiden oder denen es an der nötigen Erfahrung im Umgang mit solchen Geräten mangelt. Ausnahmen sind nur dann möglich, wenn solche Personen beaufsichtigt werden oder gründlich über den richtigen Umgang mit dem Gerät aufgeklärt wurden. Dies gilt natürlich auch für Kinder. Kinder müssen stets beaufsichtigt werden, damit sie nicht mit dem Gerät spielen. - Falls das Produkt an jemand anderen zur persönlichen oder Secondhand-Benutzung übergeben wird, sollten Bedienungsanleitung, Produktetiketten und andere relevante Dokumente und Teile ebenfalls übergeben werden. - Produkt niemals auf einen Teppichboden stellen. Andernfalls kann die geringe Luftzirkulation unter dem Produkt eine Überhitzung der elektrischen Teile zur Folge haben. Dies führt zu Problemen mit dem Produkt. \- Installation und Reparaturen müssen grundsätzlich vom autorisierten Kundendienst ausgeführt werden. Der Hersteller haftet nicht für Schäden, die durch den Eingriff nicht autorisierter Personen entstehen; zudem kann dadurch die Garantie erlöschen. Vor der Installation aufmerksam alle Anweisungen lesen. \- Gerät nicht nutzen, falls es nicht ordnungsgemäß funktioniert oder sichtbare Beschädigungen aufweist. \- Nach jeder Benutzung prüfen, ob die Funktionsknöpfe des Produktes ausgeschaltet sind.Elektrische Sicherheit
\- Falls das Produkt einen Fehler aufweist, sollte es bis zur Reparatur durch einen autorisierten Kundendienstmitarbeiter nicht in Betrieb genommen werden. Es besteht Stromschlaggefahr! \- Schließen Sie das Produkt nur an eine geerdete Steckdose an, deren Spannung und Schutz den Angaben unter „Technische Daten“ entsprechen. Lassen Sie durch einen qualifizierten Elektriker eine Erdung vornehmen. Unser Unternehmen haftet nicht für Probleme, die durch ein nicht entsprechend den örtlichen Richtlinien geerdetes Produkt entstehen. \- Reinigen Sie das Produkt niemals, indem Sie Wasser darauf verteilen oder schütten! Es besteht Stromschlaggefahr! \- Das Produkt darf während Installation, Wartung, Reinigung und Reparatur nicht an eine Steckdose angeschlossen sein. \- Falls das Netzkabel des Produktes beschädigt ist, muss es zur Vermeidung von Gefahren vom Hersteller, einem Kundendienstmitarbeiter oder vergleichbar qualifizierten Personen ausgetauscht werden. \- Das Gerät muss so installiert sein, dass es vollständig vom Netzwerk getrennt werden kann. Die Trennung muss entsprechend den Baurichtlinien entweder durch einen Netzstecker oder einen in der festen elektrischen Installation eingebauten Schalter ermöglicht werden. • Die Rückseite des Ofens wird im Betrieb heiß. Achten Sie darauf, dass der Elektroanschluss die Rückseite nicht berührt; andernfalls kann der Anschluss beschädigt werden. \- Klemmen Sie das Netzkabel nicht zwischen Backofentür und Rahmen ein; führen Sie es nicht über heiße Oberflächen. Andernfalls kann die Kabelisolierung schmelzen und in Folge eines Kurzschlusses einen Brand verursachen. \- Jegliche Arbeiten an elektrischen Geräten und Systemen sollten von autorisierten und qualifizierten Personen ausgeführt werden. \- Schalten Sie das Gerät bei Schäden aus, unterbrechen Sie die entsprechende Stromversorgung. Schalten Sie dazu die Sicherungen im Haus ab. \- Stellen Sie sicher, dass die Sicherungsangaben mit dem Produkt kompatibel sind.Produktsicherheit
\- WARNUNG: Das Gerät und seine zugänglichen Teile werden während des Betriebs heiß. Keine Heizelemente berühren. Kinder unter 8 Jahren fernhalten, sofern nicht kontinuierlich beaufsichtigt. \- Produkt niemals nutzen, wenn Urteilsvermögen oder Koordination durch Alkohol und/oder Drogen beeinträchtigt sind. \- Bei alkoholischen Getränken in den Gerichten entsprechend vorsichtig sein. Alkohol verdampft bei hohen Temperaturen und kann durch Entzünden bei Kontakt mit heißen Oberflächen Feuer verursachen. \- Keine brennbaren Materialien in der Nähe des Produktes aufstellen, da die Seiten während des Gebrauchs heiß werden können. \- Während des Gebrauchs wird das Gerät heiß. Keine Heizelemente im Inneren des Backofens berühren. - Darauf achten, dass keine Belüftungsschlitze blockiert werden. - Keine geschlossenen Dosen und Glasgefäße im Ofen erhitzen. Der in der Dose/im Glasgefäß entstehende Druck könnte Dose/Glasgefäß bersten lassen. - Backbleche, Gerichte und Alufolie nicht direkt auf den Boden des Backofens stellen. Der Hitzestau kann den Boden des Backofens beschädigen. - Zur Reinigung der Backofen-Glastür keine aggressiven scheuernden Reiniger oder scharfen Metallschaber verwenden, da diese die Oberfläche zerkratzen und so das Glas springen lassen können. - Zur Reinigung des Gerätes keine Dampfreiniger verwenden; andernfalls besteht Stromschlaggefahr. • (Variiert je nach Produktmodell.) Rost und Backblech richtig einsetzen Es ist wichtig, dass Rost und/oder Blech richtig in den Einschüben sitzen. Schieben Sie Rost oder Blech zwischen zwei Schienen ein, vergewissern Sie sich, dass insbesondere der Rost gerade sitzt, bevor Sie Lebensmittel darauf legen; bitte schauen Sie sich die folgende Abbildung an.  - Produkt nicht verwenden, falls das Glas der Fronttür entfernt oder gesprungen ist. - Beim Hineingeben oder Herausnehmen von Gerichten in den/aus dem heißen Ofen immer hitzebeständige Handschuhe verwenden. - Legen Sie das Backpapier mit den Lebensmitteln in einem Kochtopf oder auf einem Ofenzubehör (Backblech, Rost etc.) aus und geben Sie alles zusammen in den vorgeheizten Ofen. Entfernen Sie überschüssige Bereiche des Backpapiers, die über das Zubehör oder den Topf hinausragen, damit es keine Heizelemente des Ofens berührt. Verwenden Sie Backpapier niemals bei einer Betriebstemperatur, welche die für das Backpapier angegebenen Werte übersteigen. Legen Sie Backpapier nicht direkt auf dem Boden des Ofens aus. \- WARNUNG: Stellen Sie vor dem Lampenwechsel sicher, dass das Netzkabel des Gerätes getrennt oder die Sicherung deaktiviert ist, damit kein Stromschlag möglich ist. \- Damit es nicht zu Überhitzung kommt, darf das Gerät nicht hinter Zierklappen/Ziertüren aufgestellt werden \- Das Gerät muss direkt auf dem Boden stehen. Es darf nicht auf Sockeln oder anderweitig erhöht aufgestellt werden. \- WARNUNG: Unbeaufsichtigtes Garten auf einem Kochfeld mit Fett oder Öl kann gefährlich sein und Brände verursachen. Niemals versuchen, ein Feuer mit Wasser zu löschen; stattdessen das Gerät abschalten und Flammen z. B. mit einem Deckel oder einer Feuerlöschdecke abdecken. • VORSICHT: Das Gerät muss beim Kochen im Auge behalten werden. Auch bei kurzen Zubereitungen muss das Gerät ständig im Auge behalten werden. \- WARNUNG: Brandgefahr: Keine Gegenstände auf den Kochoberflächen aufbewahren. \- WARNUNG: Falls die Oberfläche gesprungen ist, Gerät zur Vermeidung möglicher Stromschlaggefahr abschalten. \- Falls das Glas der Herdplatte springt: Schalten Sie umgehend alle Brenner und elektrischen Heizelemente aus und trennen Sie das Gerät von der Stromversorgung. Geräteoberfläche nicht berühren! Gerät nicht benutzen. \- Kochfeld nach dem Einsatz über den Regler abschalten und nicht auf Kochgeschirrdetektor verlassen. \- Metallische Objekte, wie Messer, Gabeln, Löffel und Deckel, sollten nicht auf dem Kochfeld abgelegt werden, da sie heiß werden können. \- Das Gerät darf nicht über externe Timer oder separate Fernsteuerungssysteme betrieben werden. \- Dampfdruck, der aufgrund von Feuchtigkeit an der Kochfeldoberfläche oder an der Unterseite des Kochgeschirrs entsteht, kann dazu führen, dass sich das Kochgeschirr bewegt. Stellen Sie daher sicher, dass die Kochfeldoberfläche und der Boden der Töpfe immer trocken sind. \- Kochfelder sind mit Induktionstechnologie ausgestattet. Das Induktionskochfeld, das sowohl Zeit- als auch Kosteneinsparungen bedeutet, muss mit zum Induktionskochen geeignetem Kochgeschirr verwendet werden; andernfalls funktionieren die Kochfelder nicht. Siehe. Allgemeine Hinweise zum Kochen, Seite 21, Kochgeschirrauswahl. \- Da Induktionskochfelder ein magnetisches Feld erzeugen, können sie für Menschen, die Geräte wie Insulinpumpen oder Herzschrittmacher verwenden, gefährlich sein. \- Stellen Sie keine elektronischen Produkte wie Mobiltelefone, Tablets, Computer auf das Induktionskochfeld. Ihr Produkt kann beschädigt werden. \- WARNUNG: Verwenden Sie nur Kochfeldschutzabdeckungen, die vom Hersteller des Gerätes entwickelt wurden oder vom Gerätehersteller in der Anleitung als geeignet angegeben sind, bzw. die mit dem Gerät gelieferten Kochfeldschutzabdeckungen. Die Nutzung nicht geeigneter Schutzabdeckungen kann Unfälle verursachen. Brandschutzvorkehrungen des Produktes: \- Sicherstellen, dass die elektrische Verbindung richtig in die Steckdose eingesteckt ist und keine Funken erzeugt. \- Keine beschädigten oder abgeschnittenen Kabel bzw. Verlängerungskabel verwenden; nur das Originalkabel einsetzen. \- Beim Anschließen des Produktes sicherstellen, dass sich keine Flüssigkeit oder Feuchtigkeit an der elektrischen Verbindung befindet.Bestimmungsgemäße Verwendung
\- Dieses Gerät wurde für den reinen Hausgebrauch entwickelt. Eine gewerbliche Nutzung ist nicht zulässig. • VORSICHT: Dieses Gerät dient ausschließlich der Zubereitung von Speisen. Es darf nicht zu anderen Zwecken eingesetzt werden. \- Benutzen Sie das Gerät nicht zum Vorwärmen von Tellern, hängen Sie keine Küchentücher, Handtücher und dergleichen zum Trocknen oder Anwärmen an die Griffe. \- Der Hersteller haftet nicht für Schäden, die durch unsachgemäßen Gebrauch oder falsche Bedienung verursacht werden. • Das Gerät ist zum Garen, Auftauen, Backen, Braten und Grillen von Lebensmitteln geeignet.Sicherheit von Kindern
\- WARNUNG: Verschiedene Teile des Gerätes werden während des Gebrauchs heiß. Daher kleine Kinder vom Gerät fernhalten. \- Verpackungsmaterialien können eine Gefahr für Kinder darstellen. Sämtliche Verpackungsmaterialien an einem sicheren Ort und außerhalb der Reichweite von Kindern aufbewahren. \- Elektrische Produkte können eine Gefahr für Kinder darstellen. Kinder im Betrieb daher unbedingt vom Gerät fernhalten. Kinder nicht mit dem Gerät spielen lassen. \- Keine Gegenstände auf das Gerät stellen, die Kinder erreichen können. \- Wenn die Ofentür geöffnet ist, keine schweren Gegenstände darauf ablegen und keine Kinder darauf sitzen lassen. Das Gerät kann kippen oder die Ofentür oder die Türscharniere können beschädigt werden.Informationen zur Entsorgung Erfüllung von WEEE-Vorgaben zur Entsorgung von Altgeräten:
 Dieses Produkt erfüllt die Vorgaben der EU-WEEE-Direktive (2012/19/EU). Das Produkt wurde mit einem Klassifizierungssymbol für elektrische und elektronische Altgeräte (WEEE) gekennzeichnet. Dieses Gerät wurde aus hochwertigen Materialien hergestellt, die wiederverwendet und recycelt werden können. Entsorgen Sie das Gerät am Ende seiner Einsatzzeit nicht mit dem regulären Hausmüll; geben Sie es stattdessen bei einer Sammelstelle zur Wiederverwertung von elektrischen und elektronischen Altgeräten ab. Ihre Stadtverwaltung informiert Sie gerne über geeignete Sammelstellen in Ihrer Nähe.Einhaltung von RoHS-Vorgaben:
Das von Ihnen erworbene Produkt erfüllt die Vorgaben der EU-RoHS Direktive (2011/65/EU). Es enthält keine in der Direktive angegebenen gefährlichen und unzulässigen Materialien.Verpackungsmaterialien entsorgen
• Die Verpackung des Gerätes besteht aus wiederverwertbaren Materialien. Entsorgen Sie diese vorschriftsgemäß und entsprechend sortiert. Entsorgen Sie solche Materialien nicht mit dem normalen Hausmüll.2 Allgemeine Informationen
Geräteübersicht   1 Backofentür 2 Griff 3 Unterteil 4 Backblech 5 Gitterrost 6 Bedienfeld 7 Brennerplatte 8 Lüftermotor (hinter der Metallplatte) 9 Beleuchtung 10 Grill-Heizelement 11 Einschubpositionen  1 Warnleuchte 2 Funktionsknopf 3 Digitaltimer 4 TemperaturknopfLieferumfang
 Je nach Modell wird eventuell unterschiedliches Zubehör mitgeliefert. Daher kann es vorkommen, dass nicht sämtliches in der Anleitung erwähntes Zubehör mit Ihrem Gerät geliefert wird.1. Bedienungsanleitung
2. Tiefes Backblech/Tropfschale
Für Gebäck, große Braten, Gerichte mit viel Flüssigkeit und zum Fettauffangen beim Grillen. natural_image
3D rendering of a rectangular tray or container with a textured interior (no text or symbols visible)3. Gebäckblech
Für Gebäck wie Kekse, Biskuits und Kuchen. natural_image
3D rendering of a square metal tray with grid pattern (no text or symbols)4. Rost
Zum Rösten und Grillen und als Unterlage für Behälter, in denen unterschiedlichste Lebensmittel gegart werden können. natural_image
Three technical line drawings of a grid-like structure with horizontal slats, shown from different angles (no text or symbols)5. Gitterrost und Backblech richtig in die Teleskopeinschübe einschieben (Dieses Merkmal ist optional. Es ist bei Ihrem Modell möglicherweise nicht vorhanden.)
Durch die Teleskopeinschübe lassen sich Bleche und Rost besonders leicht einlegen und entfernen. Achten Sie beim Einsatz von Backblech und Gitterrost mit den Teleskopeinschüben darauf, dass die Stifte am rückwärtigen Teil des Teleskopeinschubs die Kanten von Backblech und Gitterrost berühren. natural_image
Technical diagram of a structural support frame with two circular inset views showing internal components (no text or labels)natural_image
Technical illustration of a mechanical assembly with two views (top and side), showing internal components without any text or symbols.| ALLGEMEIN | |
| Außenabmessungen (Höhe/Breite/Tiefe) | 850 mm/600 mm/600 mm |
| Spannung/Frequenz | 1N ~ 220-240 V/3N ~ 380-415 V; 50 Hz |
| Leistungsaufnahme gesamt | 9.7 kW |
| Kabeltyp/Kabelquerschnitt | MinimumH05VV-FG3 x 4 mm ^2 (1N) / 5 x 1,5 mm ^2 (3N) oder 5 x 2,5 (3N) mm ^2 Spezielle Kundenanforderung für Belgien-Niederlande-Luxemburg |
| KOCHFELD | |
| Kochzonen | |
| Hinten links | Induktionskochplatte |
| Abmessungen | 180 mm |
| Leistung | 2000/2300 W |
| Vorne links | Induktionskochplatte |
| Abmessungen | 180 mm |
| Leistung | 2000/2300 W |
| Vorne rechts | Induktionskochplatte |
| Abmessungen | 145 mm |
| Leistung | 1600/1800 W |
| Hinten rechts | Induktionskochplatte |
| Abmessungen | 210 mm |
| Leistung | 2000/2300 W |
| BACKOFEN/GRILL | |
| Hauptofen | Multifunktionsofen |
| Garraumleuchte | 15-25 W |
| Leistungsaufnahme Grill | 2.2 kW |
Allgemeine Hinweise: Energieangaben von Elektroöfen werden gemäß des Standards EN 60350-1 / IEC 60350-1 ermittelt. Die entsprechenden Werte werden unter üblichen Einsatzbedingungen bei Ober-/Unterhitze oder im Umluftbetrieb (sofern vorhanden) ermittelt.
Die Energieeffizienzklasse wird gemäß Funktion ermittelt: je nachdem, ob das Gerät mit den entsprechenden Funktionen ausgestattet ist. 1. Garen mit Eco-Umluft, 2. Turbo-Niedertemperaturgaren, 3. Turbogaren, 4. Ober-/Unterhitze mit Umluft, 5. Ober-/Unterhitze  Im Zuge der Qualitätsverbesserung können sich technische Daten ohne Vorankündigung ändern.  Die Abbildungen in dieser Anleitung dienen lediglich der Veranschaulichung und können etwas vom tatsächlichen Aussehen des Gerätes abweichen.  Angaben am Produkt oder in der begleitenden Dokumentation wurden unter Laborbedingungen unter Berücksichtigung der zutreffenden Richtlinien ermittelt. Solche Werte können je nach Einsatzumgebung und Nutzungsweise des Gerätes abweichen.3 Installation
Gerät vom nächstgelegenen autorisierten Kundendienst gemäß gültigen Bestimmungen installieren lassen. Andernfalls erlischt die Garantie. Der Hersteller haftet nicht für Schäden, die durch Aktivitäten nicht autorisierter Personen entstehen; zudem kann dadurch die Garantie erlöschen.  Die Vorbereitung des Aufstellungsortes und der elektrischen Anschlüsse sind Sache des Kunden.  Die Installation des Gerätes muss in Übereinstimmung mit sämtlichen zutreffenden Vorschriften zur Elektroinstallation erfolgen.  Gerät vor der Installation auf eventuelle, sichtbare Defekte untersuchen. Falls Defekte vorliegen, darf das Gerät nicht installiert werden. Beschädigte Geräte müssen grundsätzlich als Sicherheitsrisiko betrachtet werden.Vor der Installation
Un sicherzustellen, dass unter dem Produkt genügend Abstand zur Oberfläche ist, empfehlen wir, dass das Produkt auf einer soliden Basis montiert wird und dass die Füße nicht auf einen Teppich oder eine andere weiche Oberfläche gestellt werden. Der Küchenboden muss das Gerätegewicht sowie zusätzlich das Gewicht von Koch- bzw. Backgeschirr und von Speisen mühelos tragen können.  - Dieses Produkt ist ein Gerät der Klasse 1 gemäß der Norm EN 30-1-1, d. h. es kann mit der Rückwand und einer Seitenwand an Küchenwände, Küchenmöbel oder Geräte beliebiger Höhe gestellt werden. An der anderen Seitenwand dürfen nur Küchenmöbel oder Geräte mit gleicher oder geringerer Höhe stehen. - Der Ofen kann mit Schränken an beiden Seiten benutzt werden. Ein Abstand von mindestens 400 mm über der Herdplatte und ein Abstand von 65 mm zwischen Gerät und Wand oder Hochschrank muss eingehalten werden. - Das Kochfeld kann auch freistehend benutzt werden. Achten Sie auf einen minimalen Abstand von 750 mm oberhalb des Kochfeldes. - (\*) Wenn eine Dunstabzugshaube über dem Kochfeld installiert werden soll, beachten Sie die Anweisungen des Herstellers zur Installationshöhe. Wenn im Handbuch der Haube keine Größe definiert ist, sollte diese Höhe mindestens 650 mm betragen. - Angrenzende Küchenmöbel müssen hitzebeständig sein (bis mindestens 100 °C).Sicherheitskette
Falls Ihr Gerät zwei Sicherheitsketten besitzt:
Das Gerät muss mit der mitgelieferte Kette gegen Umkippen gesichert werden. Befestigen Sie den Haken (1) mit einem geeigneten Hering an der Küchenwand (6), verbinden Sie die Sicherheitskette (3) per Verschlussmechanismus (2) mit dem Haken.  1 Befestigungshaken 2 Verschlussmechanismus 3 Sicherheitskette 4 Kette an der Herdrückseite fixieren 5 Herdrückseite 6 KüchenwandFalls Ihr Gerät eine Sicherheitskette besitzt:
Das Gerät muss mit den beiden mitgelieferten Ketten gegen Umkippen gesichert werden. Bringen Sie die Kette anhand der Schritte in der Abbildung an Ihrem Gerät an.  Die Haltekette sollte so kurz wie möglich sein, damit der Ofen nicht nach vorne umkippt; sie sollte diagonal verlaufen, damit der Ofen nicht zur Seite kippt. Herd-Haltekette für Herde, die über keinen Schlitz zur Halterbefestigung verfügen.Einbauen und Anschließen
Das Gerät darf nur nach den gesetzlichen Installationsvorschriften angeschlossen und installiert werden. Stellen Sie das Gerät nicht neben Kühl- oder Gefriergeräten auf. Die Wärmeabgabe des Gerätes führt zu steigendem Energieverbrauch der Kühlgeräte. - Tragen Sie das Gerät grundsätzlich mit mindestens zwei Personen. - Das Gerät muss direkt auf dem Fußboden stehen. Es darf nicht auf einen Sockel oder eine andere Erhöhung gestellt werden. i Missbrauchen Sie die Tür/den Türgriff nicht zum Anheben oder Bewegen des Gerätes. Tür, Griff und Scharniere können beschädigt werden.Elektrischer Anschluss
Schließen Sie das Gerät an eine geerdete Schutzkontaktsteckdose/Leitung an, die mit einem Miniatur-Leistungstrennschalter passender Kapazität gemäß der „Technische Daten“-Tabelle abgesichert wird. Lassen Sie durch einen qualifizierten Elektriker eine Erdung vornehmen, egal ob Sie das Produkt mit oder ohne Transformator verwenden. Der Hersteller haftet nicht bei Schäden, die durch den Einsatz des Gerätes ohne vorschriftsmäßige Erdung entstehen. Das Gerät darf nur von einer autorisierten Fachkraft an das Stromnetz angeschlossen werden. Der Hersteller haftet nicht für Schäden, die durch Aktivitäten nicht autorisierter Dritter entstehen.  Das Netzkabel darf nicht eingeklemmt, geknickt oder gequetscht werden und darf nicht mit heißen Geräteteilen in Berührung kommen. Beschädigte Netzkabel müssen durch einen zugelassenen Elektriker ausgetauscht werden. Andernfalls kann es zu Stromschlägen, Kurzschlüssen und Bränden kommen! Die Netzanschlussdaten müssen mit den Daten auf dem Typenschild des Gerätes übereinstimmen. An das Typenschild gelangen Sie nach Öffnen der Tür oder der unteren Abdeckung; je nach Modell kann es sich auch an der Rückwand des Gerätes befinden. Verwenden Sie nur Netzkabel, die den Angaben im Abschnitt „Technische Daten“ entsprechen.  Trennen Sie das Gerät vollständig von der Stromversorgung, bevor Sie mit der Elektroinstallation beginnen. Es besteht Stromschlaggefahr!Netzkabel anschließen
 Beim Ausführen der Elektroinstallation müssen die nationalen/lokalen Elektroinstallationsregeln eingehalten und muss eine korrekte Steckdose und ein passender Stecker für den Ofen verwendet werden. Falls die Anschlusswerte des Geräts zu hoch für den Steckeranschluss sind, muss es ohne Steckverbindung mit direktem Kabelanschluss fest installiert werden. 1. Falls der Netzanschluss nicht vollständig getrennt werden kann, muss ein Trennschalter (Sicherung, Netzschalter oder dergleichen) mit mindestens 3 mm Kontaktabstand zwischengeschaltet werden. Die einschlägigen Installationsvorschriften (in Deutschland VDE 0100) sind dabei einzuhalten. Bei Nichtbeachtung kann es zu Betriebsstörungen und zum Erlöschen der Garantie kommen. Wir empfehlen eine zusätzliche Absicherung mit einem Fehlerstromschutzschalter (FI-Schutzschalter).Falls ein Netzkabel mit dem Gerät geliefert wird:
 2. Bei Einphasenanschlusserfolgt der Anschluss wie folgt: • Braunes Kabel = L (Phase) - Blaues Kabel = N (Nullleiter) • Grünes/gelbes Kabel = (E) ⏻ (Erde) 3. Bei Dreiphasenanschluss erfolgt der Anschluss der Kabel wie folgt: • Braunes Kabel = L1 (Phase 1) • Graues/Schwarzes Kabel = L2 (Phase 2) • Graues/Schwarzes Kabel = L3 (Phase 3) - Blaues Kabel = N (Nullleiter) • Grünes/gelbes Kabel = (E) ⏚ (Erde) - Schieben Sie das Produkt an die Küchenwand. • Füße des Ofens anpassen Vibrationen während des Betriebs können das Kochgeschirr in Bewegung versetzen. Diese Gefahrensituation kann vermieden werden, wenn das Produkt ebenerdig steht. Achten Sie zu Ihrer eigenen Sicherheit darauf, dass das Produkt gerade steht, indem Sie die vier Füße an der Unterseite nach links oder rechts drehen und dadurch die Ebenerdigkeit der Arbeitsoberfläche anpassen.Bei Geräten mit Lüfter (Es ist bei Ihrem Modell möglicherweise nicht vorhanden.)
 1 Lüfter 2 Bedienfeld 3 Tür Der Lüfter kühlt sowohl das Bedienfeld als auch die Vorderseite des Gerätes. Der Kühlungslüfter läuft auch nach dem Abschalten des Ofens noch etwa 20 bis 30 Minuten lang nach.Endkontrolle
1. Schließen Sie das Gerät wieder an die Stromversorgung an. 2. Elektrische Funktionen prüfen.Transport
- Bewahren Sie den Originalkarton auf, falls Sie das Gerät künftig transportieren müssen. Halten Sie sich an die Hinweise auf dem Karton. Falls Sie den Originalkarton nicht mehr besitzen sollten, verpacken Sie das Gerät in Luftpolsterfolie oder starken Karton, anschließend gut mit Klebeband sichern. - Damit Gitterroste und Bleche nicht zu Beschädigungen der Ofentür führen, schützen Sie die Ofentür von innen mit einem passenden Stück Karton. Fixieren Sie die Ofentür mit Klebeband. - Verwenden Sie die Tür/den Türgriff nicht zum Anheben oder Bewegen des Gerätes. Legen Sie keine Gegenstände auf dem Gerät ab, bewegen Sie das Gerät grundsätzlich in aufrechter Position. Überprüfen Sie das Gerät nach dem Transport genau, überzeugen Sie sich davon, dass es nicht zu Beschädigungen gekommen ist.4 Vorbereitungen
Tipps zum Energiesparen
Mit den folgenden Hinweisen nutzen Sie Ihr Gerät umweltbewusst und energiesparend: - Verwenden Sie am besten dunkles oder emailliertes Kochgeschirr \_ dies leitet die Wärme besser. - Lassen Sie den Backofen vorheizen, wenn dies durch Bedienungs- oder Zubereitungsanleitung empfohlen wird. - Verzichten Sie bei der Zubereitung auf häufiges Öffnen der Backofentür. - Bereiten Sie mehrere Gerichte gleichzeitig zu, sofern dies möglich ist. Dazu stellen Sie einfach mehrere Behälter auf den Gitterrost. - Größere Gerichte und solche, deren Geschmack sich nicht gegenseitig beeinflussen soll, bereiten Sie nacheinander zu. Der Backofen ist dann bereits vorgeheizt. - Sie können zusätzliche Energie sparen, indem Sie den Backofen ein paar Minuten vor Ende der Garzeit bereits abschalten. Verzichten Sie während der Zubereitung möglichst auf ein Öffnen der Backofentür. - Tauen Sie gefrorene Gerichte vor der Zubereitung auf. - Kochen Sie mit Deckel. Beim Kochen ohne Deckel kann der Energieverbrauch auf das Vierfache ansteigen. - Wählen Sie stets die zum Bodendurchmesser des Kochgeschirrs passende Kochstelle. Entscheiden Sie sich immer für Kochgeschirr in der passenden Größe. Größeres Kochgeschirr verbraucht mehr Energie. - Achten Sie darauf, beim Kochen mit Elektroherden grundsätzlich Kochgeschirr mit flachem Boden zu verwenden. Kochgeschirr mit dickem Boden leitet die Wärme besser und speichert diese eine Weile. Auf diese Weise können Sie bis zu ein Drittel Energie einsparen. • Die Größe des Kochgeschirrs muss grundsätzlich zur Kochzone passen. Der Boden des Kochgeschirrs darf nicht kleiner als die Kochstelle sein. - Halten Sie das Kochfeld und den Boden des Kochgeschirrs sauber. Verschmutzungen verschlechtern die Wärmeübertragung zwischen Kochfeld und Kochgeschirrboden. • Informationen zur Energieeffizienz nach EU 66/2014 finden Sie auf dem beigelegten Datenblatt.Erste Inbetriebnahme Zeiteinstellung
Wenn Sie Einstellungen ändern, blinken die entsprechenden Symbole in der Anzeige. Drücken Sie nach dem ersten Einschalten des Ofens zum Einstellen der Uhrzeit +/— Berühren Sie bei berührungsgesteuerten Modellen zuerst ≡ und verwenden Sie dann zur Einstellung der Tageszeit + / - Bestätigen Sie die Einstellung, indem Sie das Symbol Ⓤ berühren oder 4 Sekunden warten, ohne eine Taste zu berühren.  1 Einstelltaste 2 Tastensperre-Symbol 3 Uhrsymbol 4 Alarm volume symbol \* 5 EcoMode-Symbol 6 Plus-Taste 7 Minus-Taste 8 Zeitscheibensymbol 9 Alarmsymbol 10 Garzeitendesymbol\* 11 Garzeitsymbol 12 Programmtaste \* (Variiert je nach Produktmodell.)  Wurde die Zeit noch nicht eingestellt, startet die Uhr bei 12:00 und das Symbol wird angezeigt. Das Symbol verschwindet nach der Zeiteinstellung.  Bei einem Stromausfall werden die aktuellen Zeiteinstellungen abgebrochen. Eine Neueinstellung ist erforderlich.Erstreinigung des Gerätes
 Durch bestimmte Reinigungsmittel können die Oberflächen des Gerätes beschädigt werden. Verwenden Sie keine aggressiven Reinigungsmittel, keine Scheuermittel und keine scharfen oder spitzen Gegenstände bei der Reinigung. 1. Entfernen Sie sämtliches Verpackungsmaterial. 2. Geräteoberflächen mit einem feuchten Tuch oder Schwamm abwischen und mit einem Tuch trocknen.Erstaufheizung
Lassen Sie das Gerät etwa 30 Minuten lang aufheizen, schalten Sie es anschließend ab. Auf diese Weise werden sämtliche Rückstände und Beschichtungen entfernt.  Verbrennungsgefahr durch heiße Flächen! Das Gerät kann sich im Betrieb stark aufheizen. Berühren Sie niemals heiße Brenner, das Innere des Backofens, Heizelemente und so weiter. Halten Sie Kinder fern. Tragen Sie grundsätzlich hitzebeständige Schutzhandschuhe, wenn Sie etwas in den Backofen stellen oder herausnehmen.Backofen-Funktion
1. Nehmen Sie sämtliches Zubehör (z. B. Backbleche und Gitterrost) aus dem Backofen heraus. 2. Schließen Sie die Backofentür. 3. Wählen Sie die Einstellung „Ober- und Unterhitze“. 4. Wählen Sie die höchste Backofentemperatur; siehe "So bedienen Sie den Backofen, Seite 31". 5. Lassen Sie den Backofen etwa 30 Minuten lang heizen. 6. Schalten Sie den Backofen ab; siehe "So bedienen Sie den Backofen, Seite 31"Grill-Funktion
1. Nehmen Sie sämtliches Zubehör (z. B. Backbleche und Gitterrost) aus dem Backofen heraus. 2. Schließen Sie die Backofentür. 3. Wählen Sie die Einstellung „Grill, groß“. 4. Wählen Sie die höchste Temperatureinstellung; siehe "So bedienen Sie den Grill, Seite 39". 5. Lassen Sie den Grill etwa 15 Minuten lang heizen. 6. Schalten Sie den Grill ab; siehe "So bedienen Sie den Grill, Seite 39"  Bei der ersten Inbetriebnahme kann es über mehrere Stunden zu Rauch- und Geruchsentwicklung kommen. Dies ist völlig normal. Lüften Sie den Raum gut durch, damit Rauch und Gerüche schnell abziehen können. Atmen Sie die Dämpfe möglichst nicht ein.5 Bedienung Kochfeld
Allgemeine Hinweise zum Kochen
 Füllen Sie Kochgeschirr maximal bis zu einem Drittel mit Öl. Lassen Sie das Kochfeld niemals unbeaufsichtigt, wenn Sie mit heißem Öl arbeiten. Überhitzte Öle und Fette können Brände verursachen. Versuchen Sie niemals, Fettbrände mit Wasser zu löschen! Falls Öle oder Fette Feuer fangen, ersticken Sie die Flammen mit einer Löschdecke, notfalls mit einem leicht feuchten Tuch. Trennen Sie den Herd von der Stromversorgung, falls dies gefahrlos möglich ist. Rufen Sie die Feuerwehr. - Vor dem Frittieren trocknen Sie die Lebensmittel gründlich und lassen sie langsam in das heiße Öl hinab. Achten Sie darauf, dass gefrorene Lebensmittel vor dem Frittieren restlos aufgetaut sind. - Decken Sie das Kochgeschirr beim Frittieren nicht ab. - Platzieren Sie das Kochgeschirr so auf dem Kochfeld, dass dessen Griffe oder Stiele nicht von anderen Kochstellen erhitzt werden. Stellen Sie keine Behälter auf das Kochfeld, die zum Kippen neigen. - Stellen Sie kein leeres Kochgeschirr auf eingeschaltete Kochzonen. Es kann zu Beschädigungen kommen. - Wenn Sie eine Kochzone verwenden, ohne Kochgeschirr darauf zu platzieren, verursacht dies Schäden am Gerät. Schalten Sie die Kochzonen nach dem Gebrauch aus. - Da sich die Oberfläche des Gerätes erhitzt, legen Sie niemals Gegenstände aus Kunststoff oder Aluminium darauf ab. Entfernen Sie geschmolzene Rückstände solcher Materialien sofort von der Oberfläche. Übrigens sollten Lebensmittel grundsätzlich nicht in solchen Gefäßen gelagert werden. - Verwenden Sie ausschließlich Kochgeschirr mit flachem Boden. - Geben Sie die richtige Menge an Lebensmitteln in das jeweilige Kochgeschirr; nicht überfüllen. Dadurch ersparen Sie sich unnötige Reinigungsarbeit durch überlaufende Speisen. Legen Sie die Deckel des Kochgeschirrs nicht auf den Kochzonen ab. Stellen Sie Kochgeschirr so auf das Kochfeld, dass es exakt in der Mitte der Kochzone steht. Wenn Sie Kochgeschirr von einer Kochzone zur nächsten bewegen möchten, heben Sie das Kochgeschirr an, anstatt es über das Kochfeld zu schieben, da es ansonsten zu Schäden der Glaskeramik kommt.Kochgeschirr wählen
- Glaskeramik ist hitzefest und beständig gegen starke Temperaturdifferenzen. - Missbrauchen Sie die Glaskeramik nicht als Ablage oder als Schneidbrett. - Verwenden Sie ausschließlich Kochgeschirr mit entsprechend bearbeitetem Boden. Scharfe Kanten verursachen Kratzer auf der Oberfläche. natural_image
Diagram showing a fire with smoke rising above a chimney and crossed-out X marks (no text or symbols)Verwenden Sie bei Induktionsherden nur Kochgeschirr, das zum Kochen mit Induktion geeignet ist.
Kochgeschirr testen
Prüfen Sie anhand folgender Methoden, ob Ihr Kochgeschirr mit dem Induktionskochfeld kompatibel ist. 1. Ihr Kochgeschirr ist kompatibel, wenn an dessen Unterseite ein Magnet haften bleibt. 2. Ihr Kochgeschirr ist kompatibel, wenn "L" nicht blinkt, sobald Sie Ihr Kochgeschirr auf der Kochzone abstellen und das Kochfeld einschalten. Sie können Kochgeschirr aus Stahl, Teflon oder Emaille mit spezieller magnetischer Unterseite verwenden, an denen sich Angaben befinden, die darauf hinweisen, dass das Kochgeschirr zum Kochen mit Induktion eingesetzt werden kann. Glas- und Keramikkochgeschirr sowie Töpfe und Edelstahlkochgeschirr ohne magnetische Unterseite können nicht verwendet werden.Kochgeschirrerkennungssystem
Beim Kochen mit Induktion wird nur der Bereich aktiviert, der auf der entsprechenden Kochzone durch das Kochgeschirr abgedeckt ist. Die Unterseite des Kochgeschirrs wird vom System erkannt; ausschließlich dieser Bereich wird automatisch erhitzt. Die Kochzone wird deaktiviert, sobald das Kochgeschirr von der Kochzone heruntergenommen wird. Die ausgewählte Kochzone und das "■"-Symbol blinken abwechselnd.Sichere Benutzung
Wählen Sie keine hohen Temperaturenstufen, wenn Sie ein antihaftbeschichtetes (Teflon) Kochgeschirr ohne bzw. mit nur wenig Öl verwenden. Platzieren Sie keine metallischen Gegenstände, wie z. B. Gabeln, Messer oder Deckel von Kochgeschirr auf der Kochstelle; andernfalls werden diese erhitzt. Verwenden Sie zum Kochen keinesfalls Aluminiumfolie. Platzieren Sie niemals in Aluminiumfolie eingewickelte Lebensmittel auf der Kochzone.  Falls sich unter Ihrem Kochfeld ein Ofen befindet und dieser in Betrieb ist, können die Sensoren des Kochfeldes die Kochstufe verringern oder das Kochfeld ausschalten.  Halten Sie Gegenstände mit magnetischen Eigenschaften (z. B. Kreditkarten oder Kassetten) vom Kochfeld fern, solange dieses in Betrieb ist. Kochzone passend zum Kochgeschirr wählen| Große Kochzone∅ 28-32∅ 24 cm∅ 21 cm | Normale Kochzone∅ 18 cm | Kleine Kochzone∅ 14,5-15 cm |
| Große Kochzone• Passt sich automatisch an das Kochgeschirr an.• Verteilt die Leistung ideal.• Bietet perfekte Hitzeverteilung. Ideal zur Zubereitung von Gerichten, wie z. B. großen Pfannenkuchen, bzw. zum leichten Anbraten von großen Fischen. | Normale Kochzone• Passt sich automatisch an das Kochgeschirr an.• Verteilt die Leistung ideal.• Bietet perfekte Hitzeverteilung. Ideal bei allerlei Gerichte. | Kleine Kochzone• Ideal zum langsamen Erhitzen (Saucen, Rahmsaucen)• Ideal zur Zubereitung kleiner Portionen bzw. einer geringen Anzahl an Portionen. |
Kochfeld verwenden
 Lassen Sie keine Gegenstände auf das Kochfeld fallen. Selbst kleine Gegenstände wie Salzstreuer können das Kochfeld beschädigen. Verwenden Sie keine Kochfelder, die gesprungen sind. Durch die Sprünge kann Wasser eindringen und einen gehörigen Kurzschluss verursachen. Falls Sie Beschädigungen der Glaskeramik (z. B. sichtbare Sprünge) bemerken sollten, unterbrechen Sie sofort die Stromversorgung, damit es nicht zu Stromschlägen kommt. Bedienfeld  Technische Daten| Ein-/Austaste | |
| Tastensperre/Kindersicherung-Taste | |
| Timer-aktivieren/deaktivieren-Taste | |
| Hochleistungseinstelltaste(Turboheizen) | |
| Reinigungssperre-Taste | |
| Stop-and-Go-Taste | |
| Minus-Taste | |
| Plus-Taste |
Timeranzeige
 1 Dezimalpunkt bei der Zeiteinstellung 2 Timeranzeige 3 Timer-Plus-Taste (Timereinstellung) 4 Dezimalpunkt bei der Tastensperre/Kindersicherung 5 Timer-Minus-Taste (Timereinstellung) Das Produkt wird über ein Sensorbedienfeld bedient. Bei jeder Berührung der Sensortasten hören Sie einen kurzen Quittungston. Halten Sie das Bedienfeld stets sauber und trocken. Ein feuchtes und/oder verschmutztes Bedienfeld kann Funktionsstörungen verursachen.Kochfeld einschalten:
1. Schalten Sie das Kochfeld ein, indem Sie die Taste "①" berühren. „0“ erscheint auf allen Kochzonenanzeigen.  Falls innerhalb 10 Sekunden keine Tasten betätigt werden, wechselt das Kochfeld automatisch wieder in den Bereitschaftsmodus. Wenn längere Zeit keine Tasten betätigt werden, schaltet sich das Gerät aus Sicherheitsgründen ab.Kochzone abschalten:
Eine aktive Kochzone lässt sich auf drei unterschiedliche Weisen abschalten: 1. Durch Berührung der Taste "①" Berühren Sie die Taste "①". 2. Durch Einstellen der Temperaturstufe auf „0“: Sie können eine Kochzone abschalten, indem Sie deren Temperaturstufe auf „0“ einstellen. 3. Durch Timer-gesteuerte Abschaltung der ausgewählten Kochzone: Nach Ablauf der vorgegebenen Zeit schaltet der Timer die ihm zugewiesene Kochzone selbsttätig ab. „0“ oder „00“ erscheinen in den entsprechenden Anzeigen. Nach Ablauf der Zeit erklingt ein Signalton. Zum Abstellen des Signaltons berühren Sie einfach eine beliebige Taste am Bedienfeld. 4. Durch gleichzeitiges Berühren der Tasten “—”/“+” der gewünschten Kochzone: Sie können die entsprechende Kochzone abschalten, indem Sie deren Tasten "—" / "+" gleichzeitig drücken. Wenn „H“ oder „h“ nach dem Abschalten der Kochzone erscheint, bedeutet dies, dass die jeweilige Kochzone noch heiß ist. Kochzonen nicht berühren!Restwärmeanzeige
Wenn das Symbol „H“ in der Kochzonenanzeige blinkt, signalisiert dies, dass das Kochfeld noch heiß ist und zum Warmhalten kleinerer Speisen verwendet werden kann. Beim Abkühlen verwandelt sich das Symbol in ein kleines „h“. Bei unterbrochener Stromversorgung leuchtet die Restwärmeanzeige nicht, warnt also auch nicht vor heißen Kochzonen.Temperaturstufe einstellen
1. Schalten Sie das Kochfeld ein, indem Sie die Taste "①" berühren. 2. Stellen Sie die gewünschte Temperaturstufe durch Berühren der Tasten "—"/" + " ein.  » Die entsprechende Kochzone arbeitet bei der eingestellten Temperaturstufe.  Der Außenbereich der 280-mm-Induktionskochzone (sofern Ihr Gerät mit einer solchen ausgestattet ist) wird nur dann aktiv, wenn das auf die Kochzone gestellte Kochgeschirr die Kochzone komplett abdeckt und eine Leistungsstufe über 8 gewählt wird.Hochleistungseinstellung (Turboheizen)
Die Turboheizen-Funktion nutzen Sie, wenn es einmal schnell gehen muss. Wir raten davon ab, diese Funktion längere Zeit zu nutzen. Die Turboheizen-Funktion kann eventuell nicht bei sämtlichen Kochzonen genutzt werden.Hochleistungseinstellung (Turbo) wählen:
1. Schalten Sie das Kochfeld ein, indem Sie die Taste "①" berühren. 2. Berühren Sie die Taste "☐" der entsprechenden Zone.  » Die ausgewählte Kochzone arbeitet nun mit maximaler Leistung und das Symbol P erscheint in der Kochzonenanzeige. Die Hochleistung-Funktion der Kochzone wird aufgehoben, die Kochzone arbeitet mit der Stufe „9“ weiter.Hochleistungseinstellung (Turboheizen) vorzeitig ausschalten:
Bei Bedarf können Sie die Hochleistungseinstellung jederzeit durch Berühren der Taste "—" / "☐" abschalten. Die Hochleistung-Funktion der Kochzone wird aufgehoben, die Kochzone arbeitet mit der Stufe „9“ weiter.Arbeitsprinzip von 2 Zonen in derselben vertikalen Ausrichtung:
Falls eine Zone auf Turboheizen und die andere Zone in derselben vertikalen Ausrichtung auf eine höhere Stufe als 6 (also 7, 8 oder 9) eingestellt wird, wird die erste Zone auf Stufe 9 gesenkt, so dass die andere Zone auf eine höhere Stufe als 6 (also 7, 8 oder 9) eingestellt werden kann. Wenn die zweite Zone auf Turboheizen eingestellt wird, wird die erste Zone auf Stufe 6 gesenkt.Reinigungssperre
Die Reinigungssperre setzt 20 Sekunden lang sämtliche Tasten am Bedienfeld außer Kraft eine praktische Funktion, wenn Sie im laufenden Betrieb einmal kurz über das Bedienfeld wischen möchten. Das Gerät zieht während dieser Zeit keinen Strom.Reinigungssperre einschalten
1. Wenn eine beliebige Kochzone eingeschaltet ist, halten Sie die Taste "√" berührt, bis Sie einen einzelnen Signalton hören. Ein Countdown beginnt von 20 in der Timeranzeige des Kochfeldes herunterzuzählen. In dieser Zeit sind sämtliche Tasten des Bedienfeldes mit Ausnahme der Taste "①" ohne Funktion.Reinigungssperre aufheben
Zum Aufheben der Reinigungssperre müssen Sie keine Tasten betätigen. Nach 20 Sekunden erklingt ein Tonsignal, die Reinigungssperre wird danach automatisch aufgehoben. Falls Sie die Reinigungssperre vorzeitig aufheben möchten, halten Sie die Taste "hand" berührt, bis Sie zwei Signaltöne hören.Kindersicherung
Wenn die Kochzonen ausgeschaltet sind, können Sie das Kochfeld gegen unerwünschtes Einschalten durch Kinder sperren. Sie können die Kindersicherung nur aktivieren oder deaktivieren, wenn die Kochzonen ausgeschaltet sind (oder sich im Bereitschaftsmodus befinden).Kindersicherung einschalten
1. Wenn sich das Kochfeld im Bereitschaftsmodus befindet, halten Sie die Tasten "♡" und "☐" so lange berührt, bis Sie einen einzelnen Signalton hören. Die Kindersicherung wird eingeschaltet. „L“ wird einige Zeit in allen Kochzonenanzeigen angezeigt und der Dezimalpunkt der Taste "☐" leuchtet. Falls bei aktiver Kindersicherung Tasten betätigt werden, werden zwei Tonsignale ausgegeben und „L“ blinkt in allen Kochzonenanzeigen.Kindersicherung abschalten
1. Berühren und halten Sie bei aktiver Kindersicherung gleichzeitig die Tasten "☐" und "☐", bis zwei Signaltöne ausgegeben werden. » Die Kindersicherung wird deaktiviert. „L“ blinkt in allen Kochzonenanzeigen und das Licht der Taste "☐" erlischt.Tastensperre
Mit der Tastensperre können Sie das Kochfeld im Betrieb gegen unabsichtliche Bedienung sperren.Tastensperre aktivieren
1. Berühren und halten Sie die beiden Tasten "♡" und "☐" gleichzeitig, bis ein Signalton zu hören ist. Die Tastensperre schaltet sich ein, der Dezimalpunkt der Taste "💡" leuchtet nach dem Blinken dauerhaft. Die Tastensperre lässt sich nur im Betrieb einschalten. Bei aktiver Tastensperre reagiert das Kochfeld nur noch auf die Taste "①". Falls andere Tasten berührt werden, blinkt das Dezimalzeichen der Taste "②" und zeigt damit an, dass die Tastensperre aktiv ist. Wenn Sie das Kochfeld bei aktiver Tastensperre ausschalten möchten, müssen Sie zunächst die Tastensperre deaktivieren, damit Sie das Kochfeld wieder einschalten können. Wenn Sie Tasten berühren, ohne die Tastensperre zu deaktivieren, weist ein blinkendes „L“ in allen Kochzonenanzeigen darauf hinweist, dass die Tastensperre eingeschaltet ist. Deaktivieren Sie die Tastensperre, um das Kochfeld wieder einzuschalten.Tastensperre abschalten
1. Berühren Sie bei aktiver Tastensperre gleichzeitig die Tasten "♡" und "☐", bis zwei Signaltöne ausgegeben werden. » Die Anzeigeleuchte der Taste "☐" erlischt, das Bedienfeld ist wieder freigegeben.Timerfunktionen
Diese Funktion vereinfacht das Garen. Sie müssen das Kochfeld nicht während der gesamten Garzeit im Blick behalten. Die Kochzone schaltet sich am Ende der von Ihnen eingestellten Zeit automatisch aus.Timer einschalten
1. Schalten Sie das Kochfeld ein, indem Sie die Taste "①" berühren. 2. Stellen Sie die gewünschte Temperaturstufe durch Berühren der Tasten "—"/"+" ein.  3. Aktivieren Sie den Timer durch Berühren der "L"-Taste. „00" und der Dezimalpunkt der ausgewählten Zone blinken in der Timeranzeige. 4. Stellen Sie die gewünschte Dauer mit den Tasten "—"/" +" ein. 5. Nach 10 Sekunden wird die Einstellung aktiviert. Der Dezimalpunkt der ausgewählten Zone blinkt in der Timeranzeige. 6. Wiederholen Sie die obigen Schritte bei Bedarf mit weiteren Kochzonen, für die Sie ebenfalls einen Timer einstellen möchten. Falls bei mehreren Zonen ein Timerwert eingestellt ist, wird der Timer mit dem niedrigsten Wert in der Timeranzeige angezeigt und der Dezimalpunkt dieser Zone blinkt. Die Dezimalpunkte anderer Zonen leuchten dauerhaft. Sie können die verbleibende Garzeit anzeigen, indem Sie die Taste "L" einer beliebigen Kochzone berühren. Mit jeder Berührung wird der Timerwert einer andere Zone angezeigt. Abschließend wird wieder der niedrigste Timerwert angezeigt. Der Timer kann ohne Auswahl der Kochzone und ihres Temperaturwertes nicht eingestellt werden. Der Timer kann nur bei bereits aktiven Kochzonen verwendet werden.Timer ausschalten
Nach Ablauf der eingestellten Zeit schaltet sich das Kochfeld automatisch ab, ein Signalton erklingt. Den Signalton können Sie durch Berühren einer beliebigen Taste abschalten. Wenn Sie keine Taste drücken, wird nach wenigen Minuten der Signalton abgebrochen.Timer vorzeitig abschalten
Bei vorzeitiger Abschaltung des Timers arbeitet das Kochfeld mit der zuvor eingestellten Temperaturstufe bis zum Abschalten weiter. Sie können den Timer auf zwei Weisen vorzeitig abschalten:Timer der entsprechenden Zone durch Einstellung der Zeit auf „00“ abschalten:
1. Berühren Sie die Tasten „—“/“+”, bis „00“ in der Anzeige der Kochzone erscheint, deren Timer aktiv ist. » Dezimalpunkt-Symbol der entsprechenden Zone erlischt dauerhaft und der Timer wird abgebrochen.Timer der entsprechenden Zone durch
gleichzeitige Berührung der Tasten "-/+" der entsprechenden Zone abschalten: 1. Berühren Sie die Tasten "—"/"+" der entsprechenden Zone gleichzeitig. » Dezimalpunkt-Symbol der entsprechenden Zone erlischt dauerhaft und der Timer wird abgebrochen. Nach diesem Schritt ist die Temperaturstufe der zugehörigen Zone ebenso wie die Timer-Stufe „0“.Stoppfunktion
Sie können die Betriebstemperaturstufe der Kochzonen anhand dieser Funktion auf ein Minimum (Stufe 1) verringern. Falls Timer gestartet wurden, laufen diese auch beim Stopp unbeeinflusst weiter. 1. Berühren Sie die Taste "☐", wenn eine beliebige Kochzone im Betrieb ist. Alle aktiven Kochzonen arbeiten auf minimaler Stufe (Stufe 1). Das Symbol "☐" erscheint am Display der aktiven Kochzonen. 2. Durch erneutes Berühren der Taste "oo" werden sämtliche Kochzonen wieder eingeschaltet; die vorherigen Einstellungen bleiben dabei erhalten.Leistungsverwaltungsfunktion
Ihr Gerät ist mit einer Leistungsverwaltungsfunktion ausgestattet. Mit dieser Funktion können Sie die Gesamtleistung ändern, die der Herd möglicherweise verbraucht. Für die Leistungsverwaltungsfunktion stehen 8 Stufen zur Verfügung. Leistungsverwaltungsfunktion - Gesamtleistung, die eingestellt werden kann| Anzeige für die Leistungsverwaltung | Gesamtleistung |
| 25 | 2,5 kW |
| 30 | 3 kW |
| 36 | 3,6 kW |
| 44 | 4,4 kW |
| 54 | 5,4 kW |
| 57 | 5,7 kW |
| 67 | 6,7 kW |
| 72 | 7,2 kW |
Induktionskochzonen sicher und effizient verwenden
Funktionsweise: Das Induktionskochfeld erhitzt grundsätzlich direkt das Kochgeschirr. Daher hat es viele Vorteile im Vergleich zu anderen Kochfeldtypen. Es arbeitet effizienter und die Oberfläche des Kochfeldes ist kälter. Ihr Induktionskochfeld ist mit ausgezeichneten Sicherheitssystemen ausgestattet, die beim Einsatz maximale Sicherheit bieten. i Ihr Kochfeld ist je nach Modell mit Induktionskochzonen mit einem Durchmesser von 145, 180, 210 und 280 mm ausgestattet. Dank der Induktionsfunktion wird automatisch erkannt, auf welcher Kochzone Kochgeschirr platziert wurde. Energie wird nur dort erzeugt, wo das Kochgeschirr mit der Kochzone in Kontakt steht; dadurch wird ein minimaler Energieverbrauch gewährleistet.  Das Produkt startet und stoppt möglicherweise, wenn es in den Stufen 1 bis 7 betrieben wird, insbesondere bei Kochgeschirr mit kleinem Durchmesser und wenn nur wenig Wasser und Öl vorhanden sind. Dies ist kein Fehler.Betriebszeitbegrenzung
Ihr Kochfeld ist mit einer praktischen Betriebszeitbegrenzung ausgestattet. Wenn Sie bei einer oder mehreren Kochzonen das Abschalten vergessen sollten, werden die Kochzonen nach Ablauf einer bestimmten Zeit (siehe Tabelle 1) automatisch abgeschaltet. Falls die Kochzone mit einem Timer arbeitet, wird auch die Timeranzeige mit abgeschaltet. Die Betriebszeitbegrenzung ist von der ausgewählten Temperaturstufe abhängig. Die maximale Betriebszeit wird bei dieser Temperaturstufe angewandt. Nachdem eine Kochzone auf diese Weise abgeschaltet wurde, kann sie natürlich auch wieder eingeschaltet werden. Tabelle 1: Betriebszeitbegrenzungen| Temperaturstufe | Betriebszeitbegrenzung in Stunden |
| 0 | 0 |
| 1 | 6 |
| 2 | 6 |
| 3 | 5 |
| 4 | 5 |
| 5 | 4 |
| 6 | 1,5 |
| 7 | 1,5 |
| 8 | 1,5 |
| 9 | 30 Minuten |
| P (Schnellheizen) | 10 Minuten (*) |
| (*) Nach 5 Minuten schaltet das Kochfeld auf Stufe 9 zurück. | |
Überhitzungsschutz
Ihr Kochfeld ist mit einigen Sensoren ausgestattet, die einen guten Schutz gegen Überhitzung bieten. Folgendes gilt bei Überhitzung: • Die aktive Kochzone kann ausgeschaltet werden. \- Eine hohe eingestellte Temperaturstufe kann automatisch auf Stufe 7 heruntergestellt werden.Überlaufsicherheitssystem
Ihr Kochfeld ist mit einem Überlaufsicherheitssystem ausgestattet. Falls überlaufende Speisen auf das Bedienfeld gelangen, trennt das System sofort die Stromversorgung; das Kochfeld schaltet sich aus. Dabei erscheint die Warnung „E“ in der Anzeige.Präzise Leistungseinstellungen
Ein Funktionsprinzip ist, dass das Induktionskochfeld umgehend auf die Befehle reagiert. Es ändert die Leistungseinstellungen sehr schnell. Dadurch können Sie verhindern, dass Speisen in einem Kochgeschirr (Wasser, Milch etc.) überkochen; selbst wenn dies kurz bevorsteht.Geräusche
Der Benutzer kann beim Kochen Geräusche hören
Während der Benutzung des Kochfeldes können je nach Basismaterial der Töpfe Geräusche auftreten. Diese Geräusche sind ein normaler Bestandteil der Induktionstechnik. Es ist kein Mangel.Mögliche Geräuschursachen und -typen: Lüftergeräusche
Das Kochfeld verfügt über einen Lüfter, der sich je nach Temperatur des Produkts automatisch aktiviert. Der Lüfter hat verschiedene Fahrstufen und wird je nach Temperatur in verschiedenen Stufen aktiviert.Geringe Brummgeräusche wie beim Betrieb von Transformatoren
Das liegt in der Natur der Induktionstechnik. Da die Wärme direkt auf den Kochgeschirrboden übertragen wird, kann es je nach Material des Kochgeschirrs zu einem solchen Brummen kommen. Dadurch kann der Benutzer mit verschiedenen Kochgeschirren verschiedene Geräusche hören.Knistern
Beim Kochen kann es zu knisternden Geräuschen kommen. Dies liegt an dem Material und der Konstruktion des Kochgeschirrs. Wenn das Kochgeschirr aus verschiedenen Schichten mit unterschiedlichen Materialien besteht, kann es zu knisternden Geräuschen kommen.Pfeifgeräusche
Beim Kochen von zwei Kochplatten auf der gleichen Seite des Kochfeldes mit unterschiedlichen Kochstufen kann es zu Pfeifgeräuschen kommen.Leerer Topf
Bei der Erwärmung eines leeren Topfes sind Geräusche zu hören. Wenn Sie Wasser oder Essen hineinlegen, wird dieses Geräusch verschwinden.Fehlermeldungen
Tabelle 2: Fehlermeldungen und Ursachen| Fehlerursache | Anzeige | Display |
| Mehrere Tasten auf einmal berührt | Das Symbol „E“ blinkt | Kochzonenanzeige |
| Kochfeld überhitzt | Das Symbol „H“ blinkt | Kochzonenanzeige |
6 Bedienung des Backofens
Allgemeine Hinweise zum Backen, Braten und Grillen
 Verbrennungsgefahr durch heiße Flächen! Das Gerät kann sich im Betrieb stark aufheizen. Berühren Sie niemals heiße Brenner, das Innere des Backofens, Heizelemente und so weiter. Halten Sie Kinder fern. Tragen Sie grundsätzlich hitzebeständige Schutzhandschuhe, wenn Sie etwas in den Backofen stellen oder herausnehmen.  Öffnen Sie die Backofentür vorsichtig: Heißer Dampf kann austreten. Der austretende Dampf kann zu Verbrühungen von Händen, Gesicht und Augen führen.Tipps zum Backen
- Benutzen Sie Metallgeschirr mit Antihaftbeschichtung oder hitzebeständige Silikonformen. - Nutzen Sie den Platz auf dem Gitterrost gut aus. - Stellen Sie Backformen in die Mitte des Gitterrostes. - Wählen Sie die richtige Einschubposition, bevor Sie Backofen oder Grill einschalten. Wechseln Sie die Einschubposition nicht, solange der Backofen heiß ist. - Halten Sie die Backofentür geschlossen.Tipps zum Rösten
- Eine Würzmischung aus Zitronensaft und schwarzem Pfeffer sorgt für eine besonders schmackhafte Zubereitung von ganzen Hühnern, Puten und größeren Fleischportionen. - Fleisch mit Knochen braucht etwa 15 30 Minuten länger zum Garen als dieselbe Menge Fleisch ohne Knochen. - Jeder Zentimeter an Fleischdicke braucht etwa 4 5 Minuten mehr an Garzeit. - Lassen Sie Fleisch nach Ablauf der Garzeit noch etwa 10 Minuten im Backofen ruhen. Der Fleischsaft verteilt sich so gleichmäßiger im Braten und läuft beim Anschneiden nicht aus. \- Fisch stellen Sie auf einem hitzebeständigem Teller möglichst in der mittleren oder unteren Einschubposition in den Backofen.So bedienen Sie den Backofen Temperatur und Betriebsart einstellen
 1 Funktionsknopf 2 Temperaturknopf 1. Stellen Sie den Funktionswähler auf die gewünschte Betriebsart ein. 2. Stellen Sie den Temperaturwähler auf die gewünschte Temperatur ein. » Der Ofen heizt sich auf die eingestellte Temperatur auf und hält diese aufrecht. Während des Aufheizens bleibt die Temperaturleuchte eingeschaltet.Backofen ausschalten
Bringen Sie Funktions- und Temperatureinstellungsknopf in die obere Position (Aus).Einschubpositionen (bei Modellen mit Grillrost)
Es ist wichtig, dass der Grillrost richtig in die Einschübe eingesetzt wird. Setzen Sie den Grillrost wie in der Abbildung gezeigt in den Einschub ein. Achten Sie darauf, dass der Grillrost nicht die Rückwand des Ofens berührt. Schieben Sie den Rost daher nur so weit ein, bis sich die Backofentür problemlos schließen lässt so funktioniert der Grill am besten. (Variiert je nach Produktmodell.) Betriebsarten
Die hier gezeigte Reihenfolge der Betriebsarten kann je nach Gerätemodell etwas abweichen.Ober- und Unterhitze
 Ober- und Unterhitze werden eingesetzt. Das Gargut wird gleichzeitig von oben und unten erhitzt. Diese Betriebsart eignet sich beispielsweise für Kuchen, Gebäck und Aufläufe. Nur ein Blech verwenden.Unterhitze
 Bei dieser Betriebsart wird lediglich das untere Heizelement eingesetzt. Geeignet z. B. für Pizza und zum Nachbräunen von unten.  Diese Funktion muss auch zur einfachen Dampfreinigung verwendet werden.Umluft
 Bei dieser Betriebsart werden Oberhitze, Unterhitze und der Lüfter (in der Rückwand) eingesetzt. Durch den Lüfter wird heiße Luft schnell gleichmäßig im Backofen verteilt. Nur ein Blech verwenden.Auftauen
 Der Backofen wird nicht beheizt. Nur der Lüfter (in der Rückwand) arbeitet. Gefrorene Lebensmittel werden langsam bei Zimmertemperatur aufgetaut, heiße Lebensmittel abgekühlt. Die Zeit, die benötigt wird, um ein ganzes Stück Fleisch aufzutauen, ist länger als das Essen mit Getreide.Heißluft
 Der Ringheizkörper (in der Rückwand) arbeitet. Durch den Lüfter wird heiße Luft schnell gleichmäßig im Backofen verteilt. Ein Vorheizen ist meistens nicht erforderlich. Eignet sich zum Garen auf unterschiedlichen Einschubebenen. Mehrere Bleche können verwendet werden. Diese Funktion muss auch zur einfachen Dampfreinigung verwendet werden. „3D“-Funktion
 Bei dieser Betriebsart werden Oberhitze, Unterhitze und Heißluft (hinteres Heizelement) eingesetzt. Das Gargut wird gleichmäßig und schnell von allen Seiten gegart. Nur ein Blech verwenden.Grill, groß
 Der große Grill an der Oberseite des Backofens ist in Betrieb. Diese Betriebsart eignet sich insbesondere zum Grillen größerer Fleischmengen. - Stellen Sie mittelgroße bis große Portionen auf dem richtigen Einschub direkt unter das Grillelement. - Wenden Sie das Grillgut nach der Hälfte der Garzeit.Grill + Umluft
 Der Grilleffekt ist nicht so stark wie bei Flächengrill - Kleine oder mittelgroße Portionen in der richtigen Einschubposition unter dem Grill-Heizkörper grillen. - Wenden Sie das Grillgut nach der Hälfte der Garzeit. Ofenuhr verwenden  1 Einstelltaste 2 Tastensperre-Symbol 3 Uhrsymbol 4 Alarm volume symbol \* 5 EcoMode-Symbol 6 Plus-Taste 7 Minus-Taste 8 Zeitscheibensymbol 9 Alarmsymbol 10 Garzeitendesymbol\* 11 Garzeitsymbol 12 Programmtaste \* (Variiert je nach Produktmodell.)  Die maximal einstellbare Zeit bis zum Garzeitende beträgt 5 Stunden 59 Minuten. Bei Stromausfällen wird die aktuelle Betriebsart aufgehoben. Sie müssen den Backofen also wieder neu einstellen. Wenn Sie Einstellungen ändern, blinken die entsprechenden Symbole in der Anzeige. Bitte warten Sie einen Moment ab, bis die Einstellungen in Kraft treten. Falls keine Gareinstellungen vorgenommen werden, kann die Uhrzeit nicht eingestellt werden. Bei eingestellter Garzeit wird die verbleibende Zeit angezeigt, sobald das Gerät arbeitet.Garen mit Einstellung der Garzeit
Sie können den Ofen durch Vorgabe der Garzeit so einstellen, dass Ihr Gericht zu einer bestimmten Zeit servierbereit ist. 1. Wählen Sie die Funktion zum Garen. 2. Berühren Sie Ⓤ, bis das Symbol |→| für die Garzeit in der Anzeige erscheint. 3. Stellen Sie die Garzeit mit den Tasten + /— ein. » » Nachdem Sie die Garzeit eingestellt haben, erscheinen das Symbol → und die Zeitscheibe kontinuierlich in der Anzeige. 4. Geben Sie das Gericht in den Ofen und stellen Sie die Temperatur über den Temperaturknopf ein. Das Garen starte » Die am Display angezeigte Garzeit wird heruntergezählt, sobald das Garen beginnt und alle Teile der Zeitscheibe leuchten. Die eingestellte Garzeit wird in 4 gleiche Teile unterteilt; sobald die Zeit eines Teils abgelaufen, erlischt das Symbol dieses Teils. Dies zeigt übersichtlich das Verhältnis der verbleibenden Garzeit zur Gesamtgarzeit.Ende der Garzeit verzögern: (Dieses Merkmal ist optional. Es ist bei Ihrem Modell möglicherweise nicht vorhanden.)
Nach der Einstellung der Garzeit können Sie das Garzeitende auf einen späteren Zeitpunkt verschieben. 1. Wählen Sie die Funktion zum Garen. 2. Berühren Sie Ⓤ, bis das Symbol |→| für die Garzeit in der Anzeige erscheint. 3. Stellen Sie die Garzeit mit den Tasten + /— ein. » » Sobald Sie die Garzeit eingestellt haben, erscheint das Symbol ↗ kontinuierlich in der Anzeige. 4. Berühren Sie Ⓤ, bis das Symbol → für das Garzeitende in der Anzeige erscheint. 5. Stellen Sie das Garzeitende mit den Tasten + /— ein. » Nachdem Sie die Garzeit eingestellt haben, erscheinen die Symbole |→| und →| sowie die Zeitscheibe kontinuierlich in der Anzeige. Sobald das Garen startet, verschwindet das →|-Symbol. 6. Geben Sie das Gericht in den Ofen und stellen Sie die Temperatur über den Temperaturknopf ein. Das Garen startet. » Der Ofentimer berechnet die richtige Startzeit anhand von Garzeitende und Garzeit. Beim Erreichen der Startzeit wird der ausgewählte Betriebsmodus automatisch eingestellt und der Ofen auf die festgelegte Temperatur vorgeheizt. Diese Temperatur wird bis zum Garzeitende beibehalten. » Die am Display angezeigte Garzeit wird heruntergezählt, sobald das Garen beginnt und alle Teile der Zeitscheibe leuchten. Die eingestellte Garzeit wird in 4 gleiche Teile unterteilt; sobald die Zeit eines Teils abgelaufen ist, erlischt das Symbol dieses Teils. Dies zeigt übersichtlich das Verhältnis der verbleibenden Garzeit zur Gesamtgarzeit. 7. Nach Abschluss des Garens erscheint „End (Ende)“ in der Anzeige, der Timer gibt einen Alarm aus. 8. Der Signalton erklingt 2 Minuten lang. Drücken Sie zum Beenden des Signaltons einfach eine beliebige Taste. Der Signalton verstummt, die aktuelle Zeit wird angezeigt. Wenn Sie nach Abschluss des Alarms eine beliebige Taste drücken, schaltet sich der Ofen wieder ein. Drehen Sie Temperaturknopf und Funktionswähler zum Abschalten des Ofens in die Aus-Position (0); dadurch wird verhindert, dass sich der Ofen nach Abschluss des Alarms wieder einschaltet.Tastensperre einschalten
Die Tastensperre verhindert die unerwünschte Bedienung des Ofens. 1. Berühren Sie ≡, bis das Symbol ☑ in der Anzeige erscheint. » „OFF (Aus)" erscheint in der Anzeige. 2. Drücken Sie zum Aktivieren der Tastensperre +. » Sobald die Tastensperre aktiviert ist, erscheint „On (Ein)“ in der Anzeige und das Symbol leuchtet weiter. Bei eingeschalteter Tastensperre sind die Bedientasten ohne Funktion. Auch nach einem Stromausfall bleibt die Tastensperre weiterhin eingeschaltet.Deaktivierung der Tastensperre
1. Berühren Sie ≡, bis das Symbol ☑ in der Anzeige erscheint. » „On (Ein)" erscheint in der Anzeige. 2. Deaktivieren Sie die Tastensperre, indem Sie die Taste ■ drücken. » Nach dem Abschalten der Tastensperre wird „OFF (Aus)" angezeigt.Alarmfunktion einstellen
Sie können die Alarmfunktion des Gerätes auch als Kurzzeitwecker einsetzen, wenn Sie sich an etwas erinnern lassen möchten. Der Kurzzeitwecker hat keinen Einfluss auf die Funktionen des Backofens. Er wird lediglich zur Erinnerung eingesetzt. Dies ist beispielsweise sinnvoll, wenn Sie Speisen nach einer bestimmten Zeit wenden müssen. Nach Ablauf der voreingestellten Zeit gibt der Timer einen Alarm aus. 1. Berühren Sie ⓣ, bis das Symbol ⬆ in der Anzeige erscheint. Die Alarmfunktion kann auf maximal 23 Stunden und 59 Minuten eingestellt werden. 2. Stellen Sie die Alarmzeit mit + / — ein. i Funktionstasten für Alarmton, Uhrzeit, Anzeigehelligkeit und Temperaturtasten sollten auf Position 0 (Aus) eingestellt sein. » Das ⬆-Symbol leuchtet weiter und die Alarmzeit erscheint in der Anzeige, sobald die Alarmzeit eingestellt ist. 3. Am Ende der Alarmzeit beginnt das Symbol zu blinken und der Signalton wird ausgegeben.Alarm abschalten
1. Der Signalton erklingt 2 Minuten lang. Drücken Sie zum Beenden des Signaltons einfach eine beliebige Taste. » Der Signalton verstummt, die aktuelle Zeit wird angezeigt.Alarm abbrechen
1. Zum Abbrechen des Alarms berühren Sie ⏻, bis das Symbol ⚠ in der Anzeige verschwindet. 2. Halten Sie die Taste — gedrückt, bis „00:00“ angezeigt wird. Die Alarmzeit wird angezeigt. Falls Alarm- und Garzeit gleichzeitig eingestellt sind, wird die kürzere Zeiteinstellung angezeigt.Signalton ändern
1. Berühren Sie: ≡, bis das Symbol ◀ in der Anzeige erscheint. 2. Stellen Sie den gewünschten Signalton mit den Tasten + / — ein. 3. Der von Ihnen eingestellte Ton wird nach kurzer Zeit aktiviert. » Der ausgewählte Alarmton wird mit „b-01“, „b-02“ oder „b-03“ angezeigt.Uhrzeit ändern
So ändern Sie die zuvor eingestellte Uhrzeit: 1. Berühren Sie: ≡, bis das Symbol ⓣ in der Anzeige erscheint. 2. Stellen Sie die Uhrzeit mit den Tasten + /— ein. 3. Die von Ihnen eingestellte Zeit wird kurz darauf aktiviert.Energiesparmodus
Mit dem Energiesparmodus können Sie während des Garens Energie sparen, indem Sie die Garzeit einstellen. Dieser Modus schließt das Garen mit der Innentemperatur des Ofens ab, indem er die Heizelemente bereits vor Ablauf der Garzeit abschaltet.Energiesparmodus einstellen
1. Berühren Sie das Symbol ≡, bis das eco-Symbol in der Anzeige erscheint. » „OFF (Aus)" erscheint in der Anzeige. 2. Aktivieren Sie den Energiesparmodus durch Berühren der +-Taste. » Sobald der Energiesparmodus aktiviert ist, erscheint „On (Ein)“ in der Anzeige und das Energiesparen-Symbol leuchtet weiter.Energiesparmodus deaktivieren
1. Berühren Sie das Symbol ≡, bis das eco-Symbol in der Anzeige erscheint. » „On (Ein)" erscheint in der Anzeige. 2. Deaktivieren Sie den Energiesparmodus durch Berühren der ■-Taste. » „Off (Aus)“ erscheint, sobald die der Energiesparmodus deaktiviert ist.Displayhelligkeit einstellen (Dieses Merkmal ist optional. Es ist bei Ihrem Modell möglicherweise nicht vorhanden.)
1. Berühren Sie ≡, bis „d-01“, „d-02“ oder „d-03“ für die Displayhelligkeit im Display erscheint. 2. Stellen Sie die gewünschte Helligkeit mit +/— ein. » Die von Ihnen eingestellte Displayhelligkeit wird kurz darauf aktiviert.Garzeitentabelle
Die Zeitangaben in dieser Tabelle sollen als Richtwerte dienen. Zeitangaben können aufgrund von Temperatur, Dicke, Typ der Lebensmittel und Ihren eigenen Vorlieben abweichen.Backen und Braten
Der erste Einschub ist der untere Einschub.| Gericht | Backblechanzahl (Anzahl Einschübe) | Zu verwendendes Zubehör | Betriebsart | Einschubposition | Temperatur (°C) | Garzeit (ca.-Angabe in Min.) |
| Kuchen, Backblech | Ein Blech | Backblech* | 3 | 180 | 25 ... 30 | |
| Kuchen, Form | Ein Blech | Kuchenform auf Rost** | 2 | 180 | 40 ... 50 | |
| Kleine Kuchen | Ein Blech | Backblech* | 3 | 160 | 25 ... 35 | |
| Ein Blech | Backblech* | 3 | 150 | 30 ... 40 | ||
| Zwei Bleche | 1-Gebäckblech*3-Backblech* | 1 - 3 | 150 | 35 ... 50 | ||
| Drei Bleche | 1-Backblech*3-Gebäckblech*5-TiefesBackblech/Tropfscha le* | 1 - 3 - 5 | 150 | 35 ... 50 | ||
| Biskuitkuchen | Ein Blech | Runde Springform mit einem Durchmesser von 26 cm auf Rost** | 3 | 160 | 25 ... 35 | |
| Ein Blech | Runde Springform mit einem Durchmesser von 26 cm auf Rost** | 2 | 150 | 30 ... 40 | ||
| Zwei Bleche | 1-Runde Springform mit einem Durchmesser von 26 cm auf Rost**4-Runde Springform mit einem Durchmesser von 26 cm aufGebäckblech** | 1 - 4 | 150 | 35 ... 45 | ||
| Kekse | Ein Blech | Gebäckblech* | 3 | 180 | 25 ... 30 | |
| Zwei Bleche | 1-Gebäckblech*3-Backblech* | 1 - 3 | 180 | 30 ... 40 | ||
| Drei Bleche | 1-Gebäckblech*3-Backblech*5-TiefesBackblech/Tropfscha le* | 1 - 3 - 5 | 180 | 35 ... 45 | ||
| Teiggebäck | Ein Blech | Backblech* | 2 | 200 | 30 ... 40 | |
| Zwei Bleche | 1-Gebäckblech*5-Backblech* | 1 - 5 | 200 | 45 ... 55 | ||
| Drei Bleche | 1-Gebäckblech*3-Backblech*5-TiefesBackblech/Tropfscha le* | 1 - 3 - 5 | 200 | 55 ... 65 | ||
| Teilchen | Ein BlechZwei Bleche | Backblech*1-Gebäckblech*3-Backblech* | 21 - 3 | 200200 | 25 ... 3535 ...45 | |
| Drei Bleche | 1-Gebäckblech*3-Backblech*5-Tiefes Backblech/Tropfschale* | 1 - 3 - 5 | 190 | 45 ...55 | ||
| Sauerteig | Ein Blech | Backblech* | 2 | 200 | 35 ...45 | |
| Lasagne | Ein Blech | Rechteckige Glas-/Metallform auf Rost** | 2 - 3 | 200 | 30 ...40 | |
| Pizza | Ein Blech | Backblech* | 2 | 200 ... 220 | 15 ...20 | |
| Rindersteak (ganz)/Braten | Ein Blech | Backblech* | 3 | 25 Minute250/max,dann180 ... 190 | 100 ...120 | |
| Lammkeule (Auflauf) | Ein Blech | Backblech* | 3 | 25 Minute250/max,dann 190 | 70 ...90 | |
| Ein Blech | Backblech* | 3 | 25 Minute250/max,dann 190 | 60 ...80 | ||
| Brathähnchen (1,8-2 kg) | Ein Blech | Backblech* | 2 | 15 Minute250/max,dann180 ... 190 | 60 ...80 | |
| Ein Blech | Backblech* | 2 | 15 Minute250/max,dann180 ... 190 | 60 ...80 | ||
| Pute (5.5 kg) | Ein Blech | Backblech* | 1 | 25 Minute250/max,dann180 ... 190 | 150 ...210 | |
| Ein Blech | Backblech* | 1 | 25 Minute250/max,dann180 ... 190 | 150 ...210 | ||
| Fisch | Ein Blech | Backblech* | 3 | 200 | 20 ...30 | |
| Ein Blech | Backblech* | 3 | 200 | 20 ...30 | ||
| Wir empfehlen, den Ofen grundsätzlich vorzuheizen.* Dieses Zubehör wird möglicherweise nicht mit dem Produkt geliefert.** Dieses Zubehör wird nicht mit dem Produkt geliefert. Handelsübliches Zubehör. | ||||||
| Gericht | Backblechanzahl (Anzahl Einschübe) | Zu verwendendes Zubehör | Betriebsart | Einschubposition | Temperatur (°C) | Garzeit (ca.-Angabe in Min.) |
| Butterkekse | Ein Blech | Backblech* | 3 | 140 | 20 ... 30 | |
| Ein Blech | Backblech* | 3 | 140 | 20 ... 30 | ||
| Zwei Bleche | 1-Backblech*3-Gebäckblech* | 1 - 3 | 140 | 20 ... 30 | ||
| Drei Bleche | 1-Backblech*3-Gebäckblech*5-Tiefes Backblech/Tropfscha le* | 1 - 3 - 5 | 140 | 25 ... 35 | ||
| Kleine Kuchen | Ein Blech | Backblech* | 3 | 160 | 25 ... 35 | |
| Ein Blech | Backblech* | 3 | 150 | 30 ... 40 | ||
| Zwei Bleche | 1-Gebäckblech*3-Backblech* | 1 - 3 | 150 | 35 ... 50 | ||
| Drei Bleche | 1-Backblech*3-Gebäckblech*5-Tiefes Backblech/Tropfscha le* | 1 - 3 - 5 | 150 | 35 ... 50 | ||
| Biskuitkuchen | Ein Blech | Runde Springform mit einem Durchmesser von 26 cm auf Rost** | 3 | 160 | 25 ... 35 | |
| Ein Blech | Runde Springform mit einem Durchmesser von 26 cm auf Rost** | 2 | 150 | 30 ... 40 | ||
| Zwei Bleche | 1-Runde Springform mit einem Durchmesser von 26 cm auf Rost**4-Runde Springform mit einem Durchmesser von 26 cm auf Gebäckblech** | 1 - 4 | 150 | 35 ... 45 | ||
| Apfelkuchen | Ein Blech | Rundes schwarzes Metallgeschirr mit einem Durchmesser von 20 cm auf Rost** | 2 | 180 | 50 ... 60 | |
| Ein Blech | Rundes schwarzes Metallgeschirr mit einem Durchmesser von 20 cm auf Rost** | 2 | 170 | 50 ... 60 | ||
| Zwei Bleche | 1-Rundes schwarzes Metallgeschirr mit einem Durchmesser von 20 cm auf Rost**4-Rundes schwarzes Metallgeschirr mit einem Durchmesser von 20 cm auf Gebäckblech** | 1 - 4 | 170 | 50 ... 60 | ||
| Wir empfehlen, den Ofen grundsätzlich vorzuheizen.* Dieses Zubehör wird möglicherweise nicht mit dem Produkt geliefert.** Dieses Zubehör wird nicht mit dem Produkt geliefert. Handelsübliches Zubehör. | ||||||
Tipps zum Kuchenbacken
- Falls Gebäck zu trocken wird, erhöhen Sie die Temperatur etwas und vermindern gleichzeitig die Garzeit. - Werden Kuchen zu feucht, reduzieren Sie die Flüssigkeiten oder senken die Temperatur um 10 °C. - Sofern die Oberseite des Kuchens zu stark gebräunt wird, backen Sie etwas länger mit reduzierter Temperatur. - Wenn der Kuchen außen gut gelingt, innen jedoch noch klebrig ist, geben Sie weniger Flüssigkeit hinzu, senken die Temperatur und verlängern dafür die Garzeit etwas.Tipps für Gebäck
- Falls Gebäck zu trocken wird, erhöhen Sie die Temperatur etwas und vermindern gleichzeitig die Garzeit. Befeuchten Sie den Teig mit einer Mischung aus Milch, Öl, Ei und Joghurt. - Sollte Gebäck sehr lange zum Garen benötigen, achten Sie darauf, dass das Gebäck nicht über die Oberkante des Backblechs hinausragt. - Wird Gebäck an der Oberseite gut gebräunt, innen jedoch nicht richtig gar, achten Sie darauf, dass sich Flüssigkeiten nicht am Boden des Gebäcks konzentrieren. Versuchen Sie, Flüssigkeitsmischungen gleichmäßig zwischen den Teigschichten zu verteilen; so erreichen Sie eine gleichmäßige Bräunung.  Halten Sie sich beim Backen an die Betriebsart- und Temperaturempfehlungen der Zubereitungstabelle. Falls die Unterseite nicht ausreichend gebräunt wird, nutzen Sie beim nächsten Mal den nächstniedrigeren Einschub.Tipps zur Zubereitung von Gemüse
- Falls Gemüsegerichte zu trocken werden, bereiten Sie diese in einem Geschirr mit Deckel statt auf dem Blech zu. Geschlossene Behälter sorgen dafür, dass nicht zu viel Flüssigkeit verloren wird. - Falls Gemüsegerichte nicht richtig gar werden, kochen Sie das Gemüse zuvor und geben es erst danach in den Ofen.So bedienen Sie den Grill
 Backofentür beim Grillen geschlossen halten. Verbrennungsgefahr durch heiße Flächen!Grill einschalten
1. Drehen Sie den Funktionswähler auf das gewünschte Grillsymbol. 2. Wählen Sie dann die gewünschte Grilltemperatur. 3. Heizen Sie den Grill bei Bedarf etwa 5 Minuten vor. » Die Temperaturleuchte schaltet sich ein.Grill ausschalten
1. Drehen Sie den Funktionswähler in die Aus-Position (oben). Lebensmittel, die nicht zum Grillen geeignet sind, können sich im schlimmsten Fall entzünden. Grillen Sie nur Lebensmittel, die bei der starken Hitze beim Grillen keinen Schaden nehmen. Platzieren Sie das Grillgut nicht nahe der Backofenrückwand. Dort wird es besonders heiß, fettes Grillgut kann in Brand geraten.Garzeitentabelle zum Grillen
Elektrischer Grill| Speise | Zu verwendendes Zubehör | Einschubposition | Empfohlene Temperatur (°C)** | Grilldauer (ca.) |
| Fisch | Rost | 4...5 | 250/max | 20...25 Min.# |
| Hühnerklein | Rost | 4...5 | 250/max | 25...35 Min. |
| Lammkoteletts | Rost | 4...5 | 250/max | 20...25 Min. |
| Rinderbraten | Rost | 4...5 | 250/max | 25...30 Min.# |
| Kalbskoteletts | Rost | 4...5 | 250/max | 25...30 Min.# |
| Toastbrot * | Rost | 4 | 250/max | 1...3 min. |
| #je nach Dicke*5 Minuten vorheizen**Wenn die Grilltemperatur Ihres Produkts nicht eingestellt werden kann, arbeitet der Grill mit der empfohlenen Temperatur. | ||||
| Speise | Zu verwendendes Zubehör | Einschubposition | Temperatur (°C) | Garzeit (ca.-Angabe in Min.) |
| Toast | Rost | 4 | 250/max | 1...3 Minute |
| Frikadellen (Rindfleisch) - 12 Stücke | Rost | 4 | 250/max | 25...35 Minute |
| Wenden Sie die Speise nach 2/3 der gesamten Grillzeit.Wir empfehlen, das Gerät bei allen Lebensmitteln 5 Minuten lang vorheizen zu lassen. | ||||
7 Reinigung und Wartung
Allgemeine Hinweise
Durch regelmäßiges Reinigen verlängern Sie die Lebenserwartung Ihres Gerätes und beugen Fehlfunktionen vor.  Trennen Sie das Gerät von der Stromversorgung, bevor Sie es reinigen. Es besteht Stromschlaggefahr!  Lassen Sie das Gerät vor dem Reinigen gründlich abkühlen. Verbrennungsgefahr durch heiße Flächen! - Reinigen Sie das Gerät nach jedem Gebrauch gründlich. Dadurch lassen sich Speisereste leichter entfernen und können beim nächsten Einsatz des Gerätes nicht einbrennen. - Zur Reinigung benötigen Sie keine Spezialreiniger. Verwenden Sie am besten warmes Wasser mit etwas herkömmlichem Reiniger, ein weiches Tuch oder einen Schwamm. Anschließend mit einem Tuch trocknen. - Achten Sie stets darauf, überschüssige und verschüttete Flüssigkeiten nach der Reinigung gründlich ab- bzw. aufzuwischen. - Wenn Sie Edelstahl und Griffe reinigen verzichten Sie auf Reinigungsmittel, die Säuren oder Chlor enthalten. Reinigen Sie diese Teile mit einem weichen Tuch und etwas Flüssigreiniger (kein Scheuermittel); wischen Sie dabei am besten nur in eine Richtung.  Durch bestimmte Reinigungsmittel können die Oberflächen des Gerätes beschädigt werden. Verwenden Sie keine aggressiven Reinigungsmittel, keine Scheuermittel und keine scharfen oder spitzen Gegenstände bei der Reinigung.  Nutzen Sie keine Dampfreiniger zur Reinigung des Gerätes \_ es besteht Stromschlaggefahr.Kochfeld reinigen
Glaskeramik
Wischen Sie die Glaskeramikoberfläche mit warmes Wasser ab; achten Sie darauf, dass keine Reinigungsmittelreste zurückbleiben; anschließend mit einem weichen Tuch abtrocknen. Achten Sie darauf, dass keine Rückstände auf der Glaskeramik verbleiben; andernfalls kann das Kochfeld bei der nächsten Nutzung beschädigt werden. Versuchen Sie niemals, Rückstände mit Messern, Stahlwolle und ähnlichen Hilfsmitteln von der Glaskeramikoberfläche zu entfernen. Entfernen Sie Kalkflecken (beige bis gelbe Flecken) mit handelsüblichem Kalkentferner oder einer kleinen Menge alternativer Kalkentferner, wie Essig oder Zitronensaft. Bei hartnäckigen Verschmutzungen tragen Sie Reinigungsmittel mit einem Schwamm auf und warten ab, bis das Mittel richtig in den Schmutz eingezogen ist. Anschließend wischen Sie die Glaskeramik des Kochfeldes mit einem feuchten Tuch sauber.  Stark zuckerhaltige Lebensmittel müssen sofort entfernt werden, bevor die Glaskeramik abkühlt. Andernfalls kann die Glaskeramikoberfläche dauerhaft beschädigt werden. Mit der Zeit kann es zu leichten Farbveränderungen der Glaskeramik und der Markierungen kommen. Dies wirkt sich nicht auf den Betrieb des Produktes aus. Farbveränderungen und sonstige leichte optische Veränderungen sind bei Glaskeramik normal; es handelt sich nicht um einen Defekt.Bedienfeld reinigen
Reinigen Sie Bedienfeld und Knöpfe mit einem feuchten Tuch; anschließend trocken reiben.  Falls Ihr Produkt mit mechanischen Tasten oder Knöpfen ausgestattet ist, ziehen Sie die diese zum Reinigen des Bedienfelds nicht ab. Das Bedienfeld kann beschädigt werden!Backofen reinigen
So reinigen Sie die Seitenwand(Variiert je nach Produktmodell.)
(Dieses Merkmal ist optional. Es ist bei Ihrem Modell möglicherweise nicht vorhanden.) 1. Lösen Sie den vorderen Bereich der seitlichen Halterungen, indem Sie diese von der Seitenwand wegziehen. 2. Ziehen Sie die seitliche Halterung komplett zu sich hin heraus. Katalytische Seitenwände
(Dieses Merkmal ist optional. Es ist bei Ihrem Modell möglicherweise nicht vorhanden.) Die Innenwände (A) und/oder Rückwand (B) des Gerätes können mit katalytischem Emaille beschichtet sein. Katalytische Wände erkennen Sie an der matten Farbe und porösen Oberfläche. Die katalytischen Ofenwände sollten nicht gereinigt werden. Dank ihrer porösen Struktur absorbieren katalytische Oberflächen Fett. Sobald diese Flächen mit Fett gefüllt sind, beginnen sie zu glänzen. Dann sollten sie ersetzt werden. natural_image
Two technical diagrams showing internal components labeled A and B, with no readable text or symbols beyond labels.SimpleSteam Reinigung
Diese Funktion gewährleistet eine einfache Reinigung, da Schmutz (der durch langes Warten eingetrocknet ist) mit dem im Inneren des Backofens entstehenden Dampf und den an den Innenflächen des Backofens kondensierenden Wassertropfen aufgeweicht wird. 1. Entfernen Sie sämtliches Zubehör aus dem Garraum. 2. Gießen Sie 500 ml Wasser in das Blech und platzieren Sie es im 2. Einschub des Ofens. natural_image
Illustration of a computer monitor with a stylized pen and abstract background (no text or symbols)Backofentür reinigen
Verwenden Sie zum Reinigen der Backofentür am besten warmes Wasser mit etwas herkömmlichem Reiniger, ein weiches Tuch oder einen Schwamm. Anschließend mit einem Tuch trocknen. Wischen Sie das Glas mit Essig ab und spülen Sie es dann gegen Kalkreste ab, die auf dem Ofenglas auftreten können. Verzichten Sie bei der Reinigung der Backofentür auf aggressive Reinigungsmittel und auf scharfkantige Schaber aus Metall. Solche Hilfsmittel können die Oberflächen zerkratzen und das Glas beschädigen.Reinigung der Ofentür
i Verwenden Sie zur Reinigung der Ofentür und des Glases keine scharfen Scheuermittel, Metallschaber, Drahtwolle oder Bleichmittel. Sie können die Ofentür und das Türglas entfernen, um sie zu reinigen. Das Entfernen der Türen und Glasscheiben wird in den Abschnitten "Entfernen der Ofentür" und "Entfernen der Innenscheiben der Tür" erklärt. Reinigen Sie die Türinnenscheiben nach dem Entfernen mit einem Geschirrspülmittel, warmem Wasser und einem weichen Tuch oder Schwamm und trocknen Sie sie mit einem trockenen Tuch ab. Wischen Sie das Glas mit Essig ab und spülen Sie es dann gegen Kalkreste ab, die auf dem Ofenglas auftreten können.Backofentür ausbauen
1. Öffnen Sie die Backofentür (1). 2. Öffnen Sie die Clips am Scharniergehäuse links und rechts der Backofentür, indem Sie diese wie in der Abbildung gezeigt nach unten drücken.  1 Tür 2 Scharniersperre (geschlossene Position) 3 Ofen 4 Scharniersperre(geöffnete Position) natural_image
Mechanical assembly diagram showing a clamping mechanism with a numbered component (4), no text or symbols present.natural_image
Diagram showing two mechanical assembly steps with directional arrows indicating motion (no text or symbols)Türinnenscheibe ausbauen (Dieses Merkmal ist optional. Es ist bei Ihrem Modell möglicherweise nicht vorhanden.)
Die Türinnenscheibe kann zur Reinigung ausgebaut werden. 1. Öffnen Sie die Backofentür. natural_image
Simple line drawing of a rectangular object with a curved arrow indicating rotation or movement (no text or symbols)natural_image
Technical line drawing of a rectangular electronic component with mounting brackets and a separate rod, showing internal structure and assembly (no text or symbols)Beleuchtung des Backofens auswechseln
 Bevor Sie die Beleuchtung des Backofens auswechseln, sorgen Sie dafür, dass das Gerät vollständig von der Stromversorgung getrennt und komplett abgekühlt ist; ansonsten droht Verbrennungs- und Stromschlaggefahr. Verbrennungsgefahr durch heiße Flächen! In diesem Backofen wird eine Glühlampe mit einer Leistung von weniger als 40 W, einer Höhe von weniger als 60 mm, einem Durchmesser von weniger als 30 mm oder eine Halogenlampe mit Fassungstyp G9, einer Leistung von weniger als 60 W verwendet. Die Lampen sind für den Betrieb bei Temperaturen über 300 °C geeignet. Backofenlampen sind bei autorisierten Servicepartnern oder Technikern mit Lizenz erhältlich. Dieses Produkt enthält ein Leuchtmittel der Energieklasse G. i Die Position der Beleuchtung kann etwas von der Abbildung abweichen. Die in diesem Gerät verwendete Lampe ist nicht zur Raumbeleuchtung geeignet. Der vorgesehene Zweck dieser Lampe besteht darin, dass der Nutzer Lebensmittel besser sehen kann. Die in diesem Gerät verwendeten Lampen müssen extremen physikalischen Bedingungen, wie Temperaturen über 50 °C standhalten.Wenn Ihr Ofen mit einer runden Leuchte ausgestattet ist:
1. Trennen Sie das Gerät vollständig von der Stromversorgung. 2. Schrauben Sie die Glasabdeckung gegen den Uhrzeigersinn ab. natural_image
Diagram of a mechanical or electrical component with three circular arrows indicating rotational or feedback motion (no text or symbols)natural_image
Two mechanical diagrams labeled A and B showing a rotating component with directional arrows, no text or symbols present.8 Problemlösungen
Aus dem Backofen tritt im Betrieb Dampf aus
\- Während des Betriebs ist ein Dampfaustritt normal. >>> Dies ist kein Fehler.Beim Aufheizen und Abkühlen sind metallische Geräusche zu hören.
\- Wenn sich die Temperatur von Metallteilen ändert, dehnen sich diese aus oder ziehen sich zusammen dabei entstehen Geräusche. >>> Dies ist kein Fehler.Das Gerät funktioniert nicht.
• Die Sicherung ist durchgebrannt oder ausgelöst. >>> Kontrollieren Sie die Sicherungen im Sicherungskasten. Bei Bedarf austauschen oder zurücksetzen. - Das Gerät ist nicht richtig an die (geerdete) Steckdose angeschlossen. >>> Überprüfen Sie die Steckerverbindung. • Die Anzeige leuchtet beim erneuten Einschalten des Kochfeldes nicht auf. >>> Trennen Sie das Gerät vollständig von der Stromversorgung (Netzstecker ziehen oder Sicherung abschalten). 20 Sekunden abwarten, anschließend wieder anschließen. - Der Überhitzungsschutz ist aktiv. >>> Lassen Sie das Kochfeld abkühlen. • Das Kochgeschirr ist nicht geeignet. >>> Prüfen Sie Ihr Geschirr.Die Ofenbeleuchtung funktioniert nicht.
• Das Leuchtmittel ist defekt. >>> Tauschen Sie das Leuchtmittel aus. - Die Stromversorgung wurde unterbrochen. >>> Überprüfen Sie die Stromversorgung. Kontrollieren Sie die Sicherungen im Sicherungskasten. Sicherungen bei Bedarf austauschen oder zurücksetzen.Backofen heizt nicht.
• Passende Garfunktion und/oder Temperatur nicht eingestellt. >>> Stellen Sie den Ofen auf die richtige Garfunktion und/oder Temperatur ein. - Bei Modellen mit Timer ist der Timer eventuell nicht richtig eingestellt. >>> Stellen Sie die richtige Zeit ein. (Bei Produkten mit Mikrowellenofen kontrolliert der Timer nur die Mikrowelle.) • Die Stromversorgung wurde unterbrochen. >>> Überprüfen Sie die Stromversorgung. Kontrollieren Sie die Sicherungen im Sicherungskasten. Sicherungen bei Bedarf austauschen oder zurücksetzen.Nun erscheint das Symbol "=" auf der Kochzonenanzeige.
- Sie haben das Kochgeschirr nicht auf der aktiven Kochzone aufgestellt. >>> Prüfen Sie, ob sich ein Kochgeschirr auf der Kochzone befindet. - Ihr Kochgeschirr nicht zum Kochen mit Induktion geeignet. >>> Prüfen Sie, ob Ihr Kochgeschirr mit Induktionsherden kompatibel ist. - Das Kochgeschirr ist nicht richtig zentriert oder die Unterseite des Kochgeschirrs ist nicht breit genug für die Kochzone. >>> Wählen Sie ein Kochgeschirr, das breit genug ist; zentrieren Sie es auf der Kochzone. - Kochgeschirr oder Kochzone sind überhitzt. >>> Lassen Sie sie abkühlen.Die ausgewählte Kochzone schaltet sich im Betrieb plötzlich ab.
- Eventuell ist der Timer der ausgewählten Kochzone abgelaufen. >>> Sie können den Timer neu einstellen, das Kochen beenden oder die Kochstelle auf normale Weise wieder einschalten. - Der Überhitzungsschutz ist aktiv. Lassen Sie das Kochfeld abkühlen. - Möglicherweise liegt ein Gegenstand auf dem Bedienfeld. Nehmen Sie den störenden Gegenstand vom Bedienfeld herunter.Das Kochgeschirr wird nicht gleichmäßig warm, wenn die Kochzone eingeschaltet ist.
- Ihr Kochgeschirr nicht zum Kochen mit Induktion geeignet. >>> Prüfen Sie, ob Ihr Kochgeschirr mit Induktionsherden kompatibel ist. - Das Kochgeschirr ist nicht richtig zentriert oder die Unterseite des Kochgeschirrs ist nicht breit genug für die Kochzone. >>> Wählen Sie ein Kochgeschirr, das breit genug ist; zentrieren Sie es auf der Kochzone.(Bei Modellen mit Timer:) Die Uhrzeitanzeige blinkt oder das Uhrensymbol leuchtet.
\- Es gab einen Stromausfall. >>> Stellen Sie die aktuelle Uhrzeit ein, schalten Sie das Gerät aus und anschließend wieder ein.  Falls sich ein Problem nicht mit den obigen Hinweisen lösen lassen sollte, wenden Sie sich bitte an den autorisierten Kundendienst oder an den Händler, bei dem Sie das Gerät gekauft haben. Versuchen Sie niemals, ein defektes Gerät selbst zu reparieren.


- beko
- Please read this user manual first!
- Explanation of symbols
- Important instructions and warnings for safety and environment
- General safety
- Electrical safety
- Product safety
- Intended use
- Safety for children
- Disposing of the old product
- Compliance with the WEEE Directive and Disposing of the Waste Product:
- Compliance with RoHS Directive:
- Package information
- General information
- Package contents
- Basics: Information on the energy label of electrical ovens is given in accordance with the EN 60350-1 / IEC 60350-1 standard. Those values are determined under standard load with bottom-top heater or fan assisted heating (if any) functions.
- Installation
- Before installation
- Safety chain
- If your product has 2 safety chains;
- If your product has 1 safety chain;
- Installation and connection
- Electrical connection
- Connecting the power cable
- For products with cooling fan (This may not exist on your product.)
- Final check
- Future Transportation
- Preparation
- Tips for saving energy
- Initial use
- Time setting
- First cleaning of the appliance
- Initial heating
- Electric oven
- Grill oven
- How to use the hob
- General information about cooking
- Saucepan selection
- For induction hobs, use only vessels suitable for induction cooking.
- Saucepan test
- Pan detection-focusing system
- Safe use
- Using the hobs
- Control panel
- Specifications
- Cooking Zone display
- Timer display
- Switching on the hob:
- Switching off the cooking zone:
- Residual heat indicator
- Adjusting the temperature level
- High power setting (BOOSTER)
- Selecting the high power setting (BOOSTER):
- Switching off the high power setting (BOOSTER) prematurely:
- Working prencible of 2 zones which are located same vertical direction:
- Cleaning lock
- Activating the cleaning lock
- Deactivating the cleaning lock
- Child Lock
- Activating the child lock
- Deactivating the child lock
- Key Lock
- Activating the key lock
- Deactivating the key lock
- Timer function
- Activating the timer
- Deactivating the timer
- Deactivating the timers earlier
- Deactivating the timer for related zone by dropping its value to "00":
- Deactivating the timer for related zone by touching the related zone “—”/“+” keys simultaneously:
- Stop function
- Power management function
- Using induction cooking zones safely and efficiently
- Operation time constraints
- Overheating protection
- Overflow safety system
- Precise power setting
- Noises
- User may hear noises while cooking
- Possible noise causes and types:
- Fan noise
- Low buzzing noise like transformer operation
- Crakling
- Whistling noises
- Empty pot
- Error messages
- How to operate the oven
- General information on baking, roasting and grilling
- Tips for baking
- Tips for roasting
- How to operate the electric oven Select temperature and operating mode
- Switching off the electric oven
- Rack positions (For models with wire shelf)
- Operating modes
- Top and bottom heating
- Bottom heating
- Fan supported bottom/top heating
- Operating with fan
- Fan Heating
- "3D" function
- Full grill
- Grill+Fan
- Using the oven clock
- Cooking by setting the cooking time;
- Setting the the end of cooking time to a later time; (This feature is optional. It may not exist on your product.)
- Activating the keylock
- To deactivate the keylock
- Setting the alarm clock
- Turning off the alarm
- Cancelling the alarm;
- Changing alarm tone
- Changing the time of the day
- Economy mode
- Setting the economy mode
- Disabling economy mode
- Setting the screen brightness
- (This feature is optional. It may not exist on your product.)
- Cooking times table
- Baking and roasting
- Cooking table for test meals
- Tips for baking cake
- Tips for baking pastry
- Tips for cooking vegetables
- How to operate the grill
- Switching on the grill
- Switching off the grill
- Cooking times table for grilling
- Maintenance and care
- General information
- Cleaning the hob
- Glass ceramic surface
- Cleaning the control panel
- Cleaning the oven
- To clean the side wall (Varies depending on the product model.)
- Catalytic walls
- Easy Steam Cleaning
- Clean oven door
- Cleaning the oven door
- Removing the oven door
- Removing the door inner glass (This feature is optional. It may not exist on your product.)
- Replacing the oven lamp
- If your oven is equipped with a round lamp:
- Troubleshooting
- Oven emits steam when it is in use
- Product emits metal noises while heating and cooling.
- Product does not operate.
- Oven light does not work.
- Oven does not heat.
- symbol appears on the cooking zone display.
- Selected cooking zone suddenly turns off during operation.
- The pot does not get warm even if the cooking zone is on.
- (In models with timer) Clock display is blinking or clock symbol is on.
- Backofen
- Bitte zuerst diese Bedienungsanleitung lesen!
- Die Symbole
- Wichtige Sicherheits- und Umwelthinweise 4
- Allgemeine Informationen 12
- Installation 15
- Vorbereitungen 19
- Bedienung Kochfeld 21
- Bedienung des Backofens 31
- Reinigung und Wartung 41
- Problemlösungen 46
- Wichtige Sicherheits- und Umwelthinweise
- Allgemeine Sicherheit
- Elektrische Sicherheit
- Produktsicherheit
- Bestimmungsgemäße Verwendung
- Sicherheit von Kindern
- Informationen zur Entsorgung Erfüllung von WEEE-Vorgaben zur Entsorgung von Altgeräten:
- Einhaltung von RoHS-Vorgaben:
- Verpackungsmaterialien entsorgen
- Allgemeine Informationen
- Lieferumfang
- Bedienungsanleitung
- Tiefes Backblech/Tropfschale
- Gebäckblech
- Rost
- Gitterrost und Backblech richtig in die Teleskopeinschübe einschieben (Dieses Merkmal ist optional. Es ist bei Ihrem Modell möglicherweise nicht vorhanden.)
- Allgemeine Hinweise: Energieangaben von Elektroöfen werden gemäß des Standards EN 60350-1 / IEC 60350-1 ermittelt. Die entsprechenden Werte werden unter üblichen Einsatzbedingungen bei Ober-/Unterhitze oder im Umluftbetrieb (sofern vorhanden) ermittelt.
- Vor der Installation
- Sicherheitskette
- Falls Ihr Gerät zwei Sicherheitsketten besitzt:
- Falls Ihr Gerät eine Sicherheitskette besitzt:
- Einbauen und Anschließen
- Elektrischer Anschluss
- Netzkabel anschließen
- Falls ein Netzkabel mit dem Gerät geliefert wird:
- Bei Geräten mit Lüfter (Es ist bei Ihrem Modell möglicherweise nicht vorhanden.)
- Endkontrolle
- Transport
- Vorbereitungen
- Tipps zum Energiesparen
- Erste Inbetriebnahme Zeiteinstellung
- Erstreinigung des Gerätes
- Erstaufheizung
- Backofen-Funktion
- Grill-Funktion
- Bedienung Kochfeld
- Allgemeine Hinweise zum Kochen
- Kochgeschirr wählen
- Verwenden Sie bei Induktionsherden nur Kochgeschirr, das zum Kochen mit Induktion geeignet ist.
- Kochgeschirr testen
- Kochgeschirrerkennungssystem
- Sichere Benutzung
- Kochfeld verwenden
- Timeranzeige
- Kochfeld einschalten:
- Kochzone abschalten:
- Restwärmeanzeige
- Temperaturstufe einstellen
- Hochleistungseinstellung (Turboheizen)
- Hochleistungseinstellung (Turbo) wählen:
- Hochleistungseinstellung (Turboheizen) vorzeitig ausschalten:
- Arbeitsprinzip von 2 Zonen in derselben vertikalen Ausrichtung:
- Reinigungssperre
- Reinigungssperre einschalten
- Reinigungssperre aufheben
- Kindersicherung
- Kindersicherung einschalten
- Kindersicherung abschalten
- Tastensperre
- Tastensperre aktivieren
- Tastensperre abschalten
- Timerfunktionen
- Timer einschalten
- Timer ausschalten
- Timer vorzeitig abschalten
- Timer der entsprechenden Zone durch Einstellung der Zeit auf „00“ abschalten:
- Timer der entsprechenden Zone durch
- Stoppfunktion
- Leistungsverwaltungsfunktion
- Induktionskochzonen sicher und effizient verwenden
- Betriebszeitbegrenzung
- Überhitzungsschutz
- Überlaufsicherheitssystem
- Präzise Leistungseinstellungen
- Geräusche
- Der Benutzer kann beim Kochen Geräusche hören
- Mögliche Geräuschursachen und -typen: Lüftergeräusche
- Geringe Brummgeräusche wie beim Betrieb von Transformatoren
- Knistern
- Pfeifgeräusche
- Leerer Topf
- Fehlermeldungen
- Bedienung des Backofens
- Allgemeine Hinweise zum Backen, Braten und Grillen
- Tipps zum Backen
- Tipps zum Rösten
- So bedienen Sie den Backofen Temperatur und Betriebsart einstellen
- Backofen ausschalten
- Einschubpositionen (bei Modellen mit Grillrost)
- Betriebsarten
- Ober- und Unterhitze
- Unterhitze
- Umluft
- Auftauen
- Heißluft
- „3D“-Funktion
- Grill, groß
- Grill + Umluft
- Garen mit Einstellung der Garzeit
- Ende der Garzeit verzögern: (Dieses Merkmal ist optional. Es ist bei Ihrem Modell möglicherweise nicht vorhanden.)
- Tastensperre einschalten
- Deaktivierung der Tastensperre
- Alarmfunktion einstellen
- Alarm abschalten
- Alarm abbrechen
- Signalton ändern
- Uhrzeit ändern
- Energiesparmodus
- Energiesparmodus einstellen
- Energiesparmodus deaktivieren
- Displayhelligkeit einstellen (Dieses Merkmal ist optional. Es ist bei Ihrem Modell möglicherweise nicht vorhanden.)
- Garzeitentabelle
- Backen und Braten
- Tipps zum Kuchenbacken
- Tipps für Gebäck
- Tipps zur Zubereitung von Gemüse
- So bedienen Sie den Grill
- Grill einschalten
- Grill ausschalten
- Garzeitentabelle zum Grillen
- Reinigung und Wartung
- Allgemeine Hinweise
- Kochfeld reinigen
- Glaskeramik
- Bedienfeld reinigen
- Backofen reinigen
- So reinigen Sie die Seitenwand(Variiert je nach Produktmodell.)
- Katalytische Seitenwände
- SimpleSteam Reinigung
- Backofentür reinigen
- Reinigung der Ofentür
- Backofentür ausbauen
- Türinnenscheibe ausbauen (Dieses Merkmal ist optional. Es ist bei Ihrem Modell möglicherweise nicht vorhanden.)
- Beleuchtung des Backofens auswechseln
- Wenn Ihr Ofen mit einer runden Leuchte ausgestattet ist:
- Problemlösungen
- Aus dem Backofen tritt im Betrieb Dampf aus
- Beim Aufheizen und Abkühlen sind metallische Geräusche zu hören.
- Das Gerät funktioniert nicht.
- Die Ofenbeleuchtung funktioniert nicht.
- Backofen heizt nicht.
- Nun erscheint das Symbol "=" auf der Kochzonenanzeige.
- Die ausgewählte Kochzone schaltet sich im Betrieb plötzlich ab.
- Das Kochgeschirr wird nicht gleichmäßig warm, wenn die Kochzone eingeschaltet ist.
- (Bei Modellen mit Timer:) Die Uhrzeitanzeige blinkt oder das Uhrensymbol leuchtet.
Mærke : BEKO
Model : FSM89302GXS
Kategori : Komfur