
HI 6443C GT - Komfur BEKO - Gratis brugsanvisning og manual
Find enhedens vejledning gratis HI 6443C GT BEKO i PDF-format.

Brugerspørgsmål om HI 6443C GT BEKO
0 spørgsmål om dette apparat. Besvar dem du kender, eller stil dit eget.
Stil et nyt spørgsmål om dette apparat
Download vejledningen til din Komfur i PDF-format gratis! Find din vejledning HI 6443C GT - BEKO og tag din elektroniske enhed tilbage i hånden. På denne side er alle dokumenter nødvendige for brugen af din enhed offentliggjort. HI 6443C GT af mærket BEKO.
BRUGSANVISNING HI 6443C GT BEKO
Built-in Hob
User manual
natural_image
Four simple black circles arranged in a 2x2 grid within a square frame (no text or symbols)HI 6443C GT
EN | IT
185.9274.05/R.AA/24.03.2017
Please read this user manual first!
Dear Customer,
Thank you for purchasing this Beko product. We hope that you get the best results from your product which has been manufactured with high quality and state-of-the-art technology. Therefore, please read this entire user manual and all other accompanying documents carefully before using the product and keep it as a reference for future use. If you handover the product to someone else, give the user manual as well. Follow all warnings and information in the user manual.
Remember that this user manual is also applicable for several other models. Differences between models will be identified in the manual.
Explanation of symbols
Throughout this user manual the following symbols are used:

Important information or useful hints about usage.
Warning of hazardous situations with regard to life and property.
Warning of electric shock.
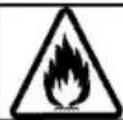
Warning of risk of fire.
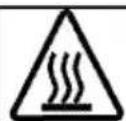
Warning of hot surfaces.
Arçelik A.Ş.
Karaağaç caddesi No:2-6
34445 Süflüce/Istanbul/TURKEY
Made in TURKEY

This product was manufactured using the latest technology in environmentally friendly conditions.
1 Important instructions and warnings for safety and environment 4
General safety 4
Electrical safety 4
Product safety 5
Intended use 7
Safety for children....7
Disposing of the old product....7
Package information 7
2 General information 8
Overview 8
Technical specifications 8
3 Installation 9
Before installation....9
Installation and connection....9
Future Transportation....11
4 Preparation 12
Tips for saving energy 12
Initial use....12
First cleaning of the appliance.... 12
Initial heating 12
5 How to use the hob 13
General information about cooking 13
Using the hobs....14
Control panel 15
6 Maintenance and care 21
General information....21
Cleaning the hob....21
7 Troubleshooting 22
1 Important instructions and warnings for safety and environment
This section contains safety instructions that will help protect from risk of personal injury or property damage. Failure to follow these instructions shall void any warranty.
General safety
- This appliance can be used by children aged from 8 years and above and persons with reduced physical, sensory or mental capabilities or lack of experience and knowledge if they have been given supervision or instruction concerning use of the appliance in a safe way and understand the hazards involved.
Children shall not play with the appliance. Cleaning and user maintenance shall not be made by children without supervision.
- The appliance is not to be used by persons (including children) with reduced physical, sensory or mental capabilities, or lack of experience and knowledge, unless they have been given supervision or instruction. Children should be supervised and ensure they do not play with the appliance
- If the product is handed over to someone else for personal use or second-hand use purposes, the
user manual, product labels and other relevant documents and parts should be also given.
- Installation and repair procedures must always be performed by Authorised Service Agents. The manufacturer shall not be held responsible for damages arising from procedures carried out by unauthorised persons which may also void the warranty. Before installation, read the instructions carefully.
- Do not operate the product if it is defective or has any visible damage.
- Ensure that the product function knobs are switched off after every use.
Electrical safety
- If the product has a failure, it should not be operated unless it is repaired by an Authorised Service Agent. There is the risk of electric shock!
- Only connect the product to a grounded outlet/line with the voltage and protection as specified in the “Technical specifications”. Have the grounding installation made by a qualified electrician while using the product with or without a
transformer. Our company shall not be liable for any problems arising due to the product not being earthed in accordance with the local regulations.
- Never wash the product by spreading or pouring water onto it! There is the risk of electric shock!
- Never touch the plug with wet hands! Never unplug by pulling on the cable, always pull out by holding the plug.
- The product must be disconnected during installation, maintenance, cleaning and repairing procedures.
- If the power connection cable for the product is damaged, it must be replaced by the manufacturer, its service agent or similarly qualified persons in order to avoid a hazard.
- The appliance must be installed so that it can be completely disconnected from the mains supply. The separation must be provided by a switch built into the fixed electrical installation, according to construction regulations.
- Any work on electrical equipment and systems should only be carried out by authorised and qualified persons.
- In case of any damage, switch off the product and disconnect it
from the mains. To do this, turn off the fuse at home.
• Make sure that fuse rating is compatible with the product.
Product safety
- WARNING: The appliance and its accessible parts become hot during use. Care should be taken to avoid touching heating elements. Children less than 8 years of age shall be kept away unless continuously supervised.
- Never use the product when your judgment or coordination is impaired by the use of alcohol and/or drugs.
- Be careful when using alcoholic drinks in your dishes. Alcohol evaporates at high temperatures and may cause fire since it can ignite when it comes into contact with hot surfaces.
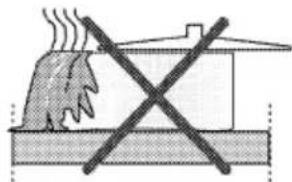
- Do not place any flammable materials close to the product as the sides may become hot during use.
- Keep all ventilation slots clear of obstructions.
- Do not use steam cleaners to clean the appliance as this may cause an electric shock.
- WARNING: Unattended cooking on a hob with fat or oil can be dangerous and may result in fire. NEVER try to extinguish a fire with water, but switch off the
appliance and then cover flame e.g. with a lid or a fire blanket.
- CAUTION: The cooking process has to be supervised. A short term cooking process has to be supervised continuously.
- WARNING: Danger of fire: Do not store items on the cooking surfaces.
- WARNING: If the surface is cracked, switch off the appliance to avoid the possibility of electric shock.
- In case of hotplate glass breakage: Immediately shut off all burners and any electrical heating element and isolate the appliance from the power supply. Do not touch the appliance surface. Do not use the appliance.
- After use, switch off the hob element by its control and do not rely on the pan detector.
- Metallic objects such as knives, forks, spoons and lids should not be placed on the hob surface since they can get hot.
- The appliance is not intended to be operated by means of an external timer or separate remote-control system.
- Vapour pressure that build up due to the moisture on the hob surface or at the bottom of the pot can cause the pot to move. Therefore, make sure that the
oven surface and bottom of the pots are always dry.
- Hotplates are equipped with "Induction" technology. Your induction hob that provides both time and money savings must be used with pots suitable for induction cooking; otherwise hotplates will not operate.
See. General information about cooking, page 13, selecting the pots.
- As induction hobs create a magnetic field, they may cause harmful impacts for people who use devices such as insulin pump or pacemaker.
- WARNING: Use only hob guards designed by the manufacturer of the cooking appliance or indicated by the manufacturer of the appliance in the instructions for use as suitable or hob guards incorporated in the appliance. The use of inappropriate guards can cause accidents.
Prevention against possible fire risk!
- Ensure all electrical connections are secure and tight to prevent risk of arcing.
- Do not use damaged cables or extension cables.
- Ensure liquid or moisture is not accessible to the electrical connection point.
Intended use
- This product is designed for domestic use. Commercial use will void the guarantee.
- This appliance is for cooking purposes only. It must not be used for other purposes, for example room heating.
- The manufacturer shall not be liable for any damage caused by improper use or handling errors.
Safety for children
- WARNING: Accessible parts may become hot during use. Young children should be kept away.
- The packaging materials will be dangerous for children. Keep the packaging materials away from children. Please dispose of all parts of the packaging according to environmental standards.
- Electrical products are dangerous to children. Keep children away from the product when it is operating and do not allow them to play with the product.
- Do not place any items above the appliance that children may reach for.
Disposing of the old product
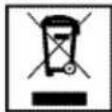
Compliance with the WEEE Directive and Disposing of the Waste Product:
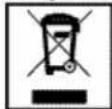
This product complies with EU WEEE Directive (2012/19/EU). This product bears a classification symbol for waste electrical and electronic equipment (WEEE).
This product has been manufactured with high quality parts and materials which can be reused and are suitable for recycling. Do not dispose of the waste product with normal domestic and other wastes at the end of its service life. Take it to the collection center for the recycling of electrical and electronic equipment. Please consult your local authorities to learn about these collection centers.
Compliance with RoHS Directive:
The product you have purchased complies with EU RoHS Directive (2011/65/EU). It does not contain harmful and prohibited materials specified in the Directive.
Package information
- Packaging materials of the product are manufactured from recyclable materials in accordance with our National Environment Regulations. Do not dispose of the packaging materials together with the domestic or other wastes. Take them to the packaging material collection points designated by the local authorities.
2 General information
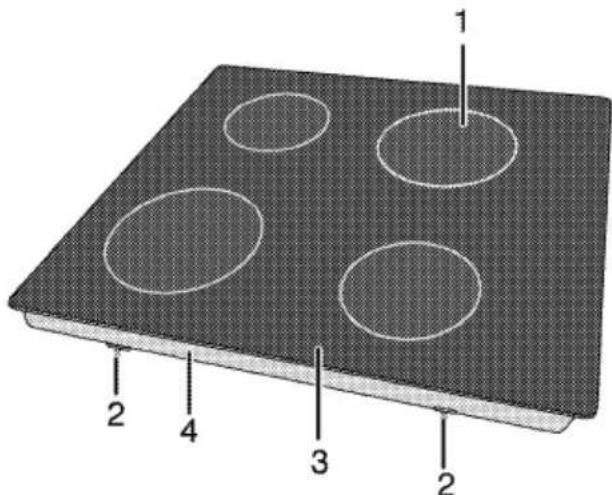
Overview
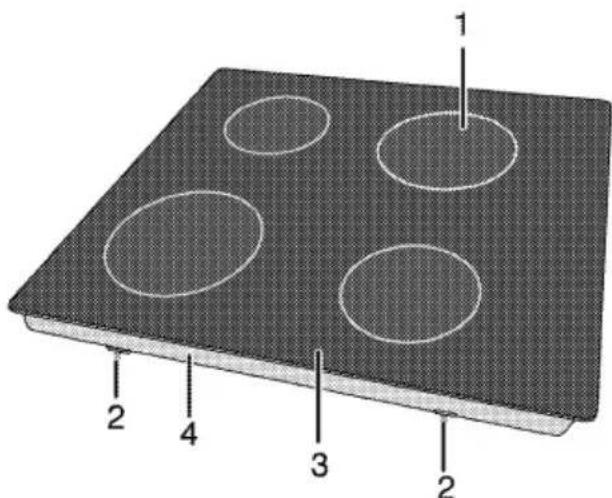
1 Induction cooking plate
2 Assembly clamp
3 Vitroceramic surface
4 Base cover
Technical specifications
| Voltage / frequency | 1N ~ 220-240 V 50 Hz |
| Total power consumption | max. 3700 W |
| Fuse | 16 A |
| Cable type / section | min.H05V2V2-F 3 x 1,5 mm ^2 |
| External dimensions (height / width / depth) | 55 mm/580 mm/510 mm |
| Installation dimensions (width / depth) | 560 (+2) mm/490 (+2) mm |
| Burners | |
| Rear left | Induction cooking plate |
| Dimension | 180 mm |
| Power | 1800/3000 W |
| Front left | Induction cooking plate |
| Dimension | 180 mm |
| Power | 1800/3000 W |
| Front right | Induction cooking plate |
| Dimension | 145mm |
| Power | 1500/2200 W |
| Rear right | Induction cooking plate |
| Dimension | 210 mm |
| Power | 2000/3700 W |

Technical specifications may be changed without prior notice to improve the quality of the product.

Figures in this manual are schematic and may not exactly match your product.

Values stated on the product labels or in the documentation accompanying it are obtained in laboratory conditions in accordance with relevant standards. Depending on operational and environmental conditions of the product, these values may vary.
3 Installation
Product must be installed by a qualified person in accordance with the regulations in force. The manufacturer shall not be held responsible for damages arising from procedures carried out by unauthorized persons which may also void the warranty.
| Preparation of location and electrical installation for the product is under customer's responsibility. | |
| DANGER:The product must be installed in accordance with all local electrical regulations. | |
| DANGER:Prior to installation, visually check if the product has any defects on it. If so, do not have it installed.Damaged products cause risks for your safety. |
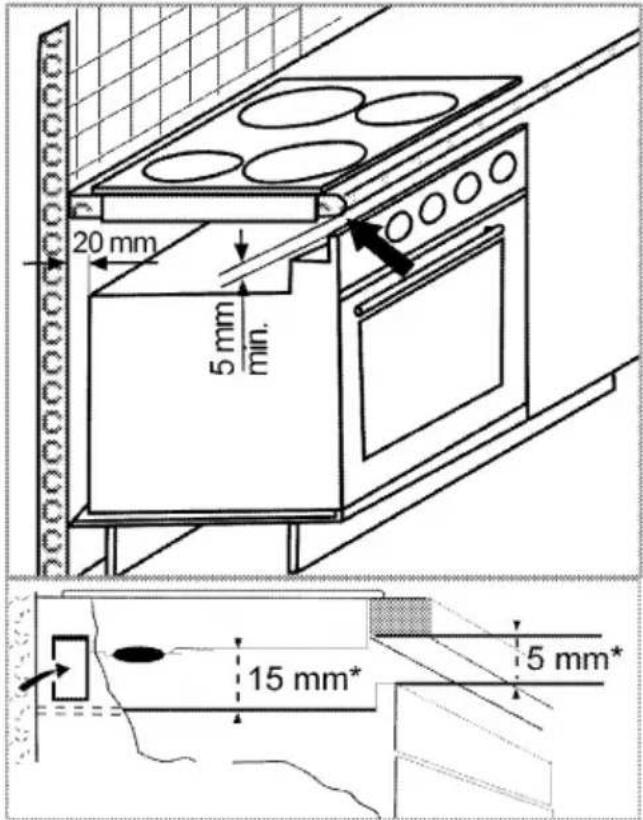
Before installation
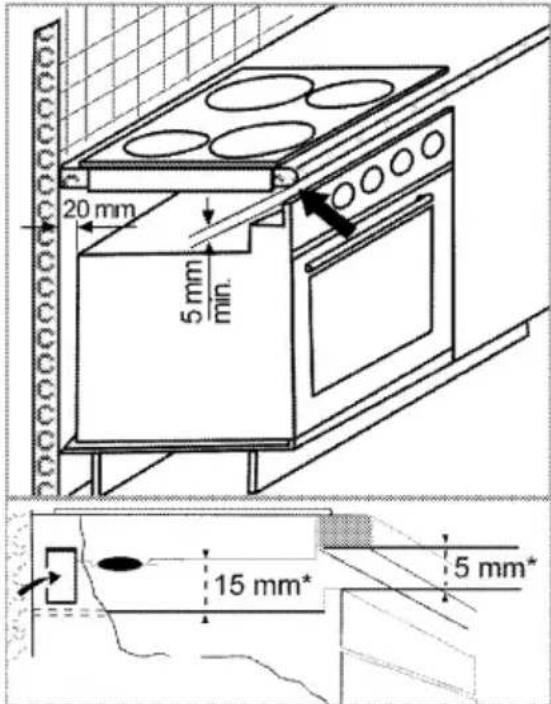
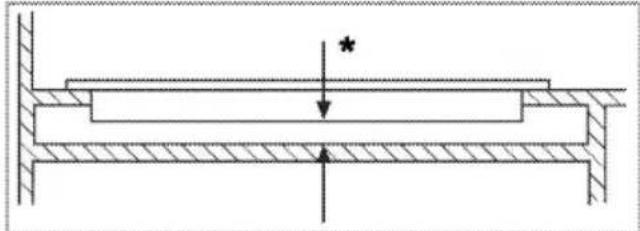
The hob is designed for installation into commercially available work tops. A safety distance must be left between the appliance and the kitchen walls and furniture. See figure (values in mm).
- Allow a minimum distance of 750 mm above the hob surface.
(*) If a cooker hood is to be installed above the cooker, refer to cooker hood manufacturer' instructions regarding installation height (min 650 mm) - Remove packaging materials and transport locks.
- Surfaces, synthetic laminates and adhesives used must be heat resistant (100 °C minimum).
- The worktop must be aligned and fixed horizontally.
- Cut aperture for the hob in worktop as per installation dimensions.
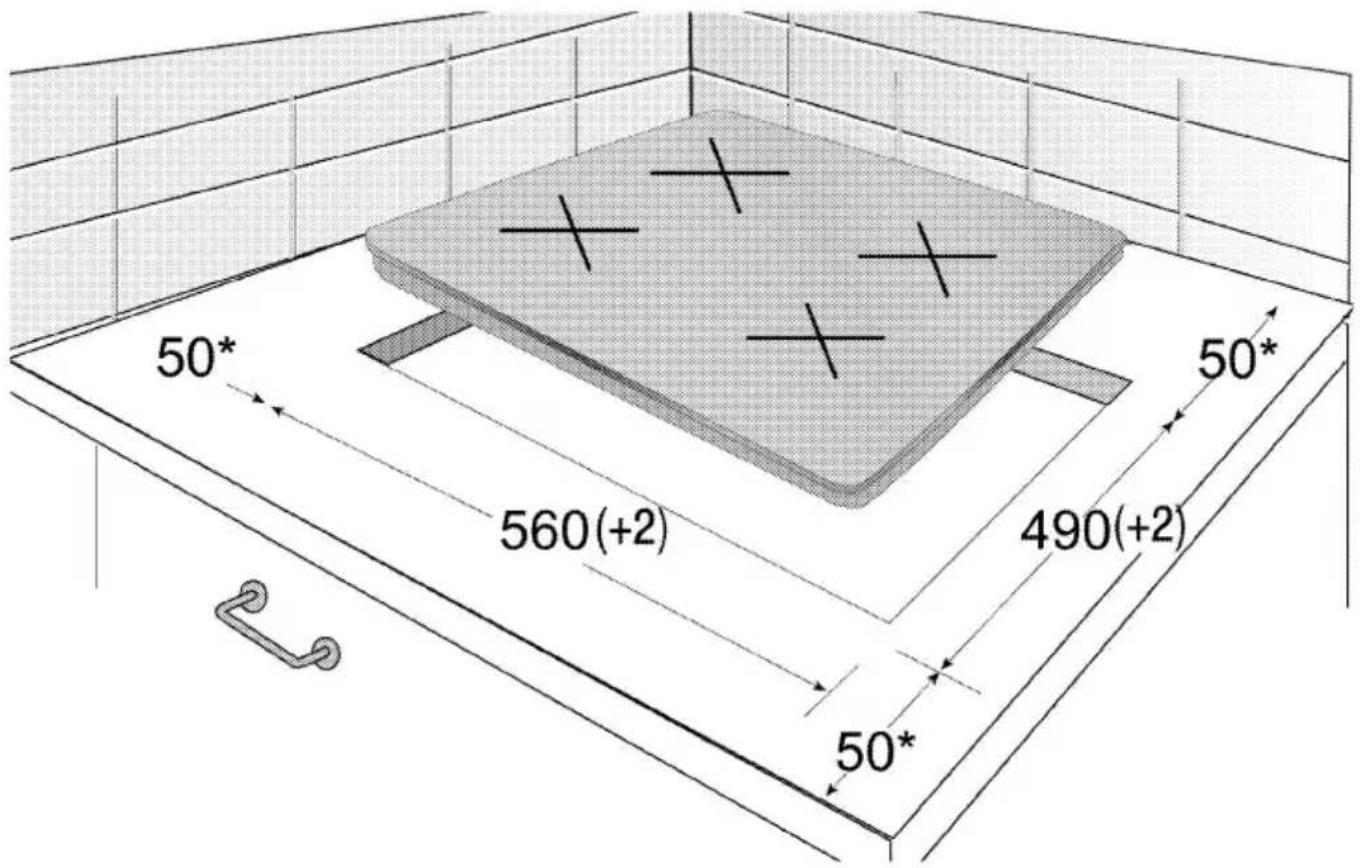
* min.
Installation and connection
- The product must be installed in accordance with all local gas and electrical regulations.

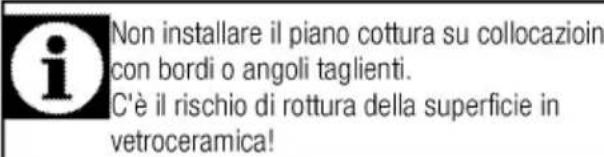
Do not install the hob on places with sharp edges or corners.
There is the risk of breaking for glass ceramic surface!
Electrical connection
Connect the product to a grounded outlet/line protected by a fuse of suitable capacity as stated in
the "Technical specifications" table. Have the grounding installation made by a qualified electrician while using the product with or without a transformer. Our company shall not be liable for any damages that will arise due to using the product without a grounding installation in accordance with the local regulations.

DANGER:
The product must be connected to the mains supply only by an authorised and qualified person. The product's warranty period starts only after correct installation.
Manufacturer shall not be held responsible for damages arising from procedures carried out by unauthorised persons.
DANGER:
The power cable must not be clamped, bent or trapped or come into contact with hot parts of the product.
A damaged power cable must be replaced by a qualified electrician. Otherwise, there is risk of electric shock, short circuit or fire!
- Connection must comply with national regulations.
- The mains supply data must correspond to the data specified on the type label of the product. Type label is at the rear housing of the product.
• Power cable of your product must comply with the values in "Technical specifications" table.

DANGER:
Before starting any work on the electrical installation, disconnect the product from the mains supply.
There is the risk of electric shock!

Power cable plug must be within easy reach after installation (do not route it above the hob).

While performing the wiring, you must apply with the national/local electrical regulations and must use the appropriate socket outlet/line and plug for oven. In case of the product's power limits are out of current carrying capability of plug and socket outlet/line, the product must be connected through fixed electrical installation directly without using plug and socket outlet/line.
Plug the power cable into the socket.
Installing the product
If the oven is below:
min.
If the board is below:
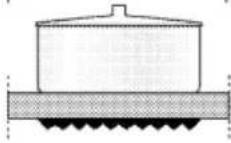
It is required to leave a ventilation opening of minimum 180 cm^2 at the rear section of the furniture as illustrated in the following figure.
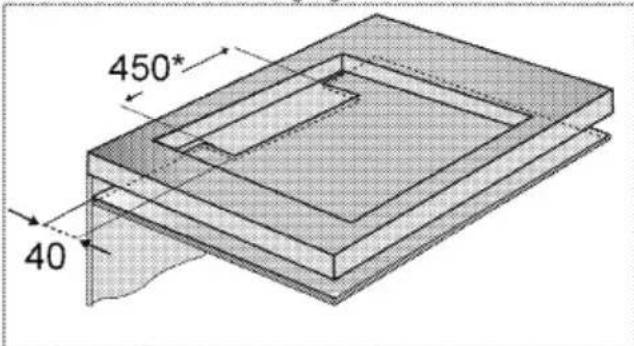
min.
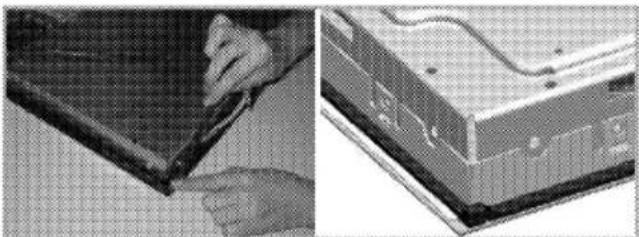
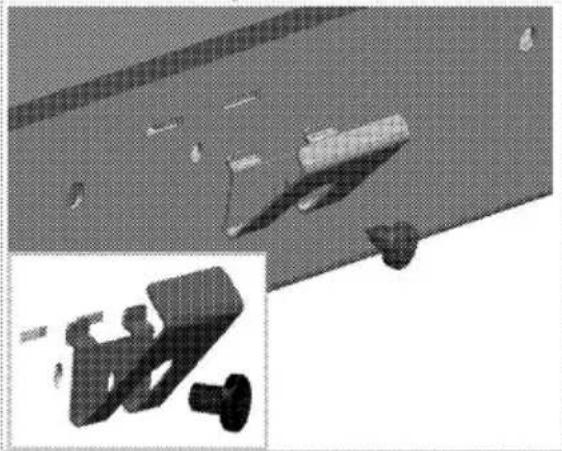
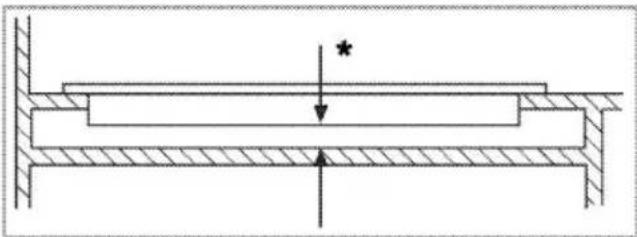
During installation of your induction hob, place the product parallel to the installation surface. Also, apply sealing gasket to the parts of the hob contacting the counter as described below in order to prevent any liquid from penetrating between the product and the counter.
- Prepare the surface of the counter as shown in the figure.
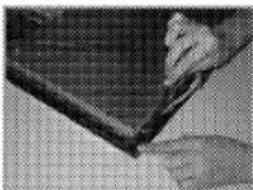
- Turning the hob upside down, place it on a flat surface.
- The sealing gasket provided in the package must be applied on the lower casing bend around the hob as shown in the figure, during installation of the hob.
natural_image
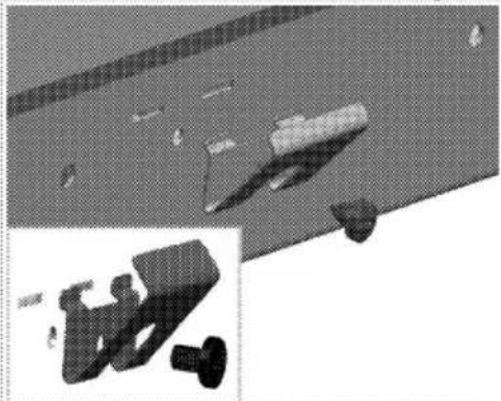
Two grayscale images showing a hand holding a laptop and a close-up of a computer drive (no visible text or symbols)- Fix the mounting springs inserting and screwing them through the holes of the bottom case as shown in the figure.
natural_image
3D rendered mechanical parts including a cylindrical component and a flanged part, displayed against a plain background (no text or symbols)
For some models, your product may come with the mounting springs already fitted on it.

The number of mounting springs on your product varies depending on product model.
- Place the hob on the counter and align it.
- When the hob is placed on the counter top it will be fixed easily with the help of the clamps. If the installation with this clamps are not in appropriate for your cooktop, additional 2 mounting clamps can be fixed to the front side of the product as shown in the below figure.

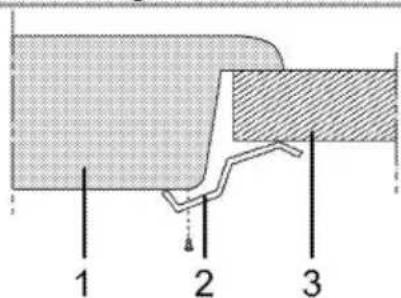
1 Hob
2 Installation clamp
3 Counter

When installing the hob onto a cabinet, a shelf must be installed in order to separate the cabinet from the hob as illustrated in the above figure. This is not required when installing onto a built-under oven.
For example, if it is possible to touch the bottom of the product since it is installed onto a drawer, this section must be covered with a wooden plate.
natural_image
Pure mechanical cross-section diagram without any text, numbers, or symbolsmin. 15 mm
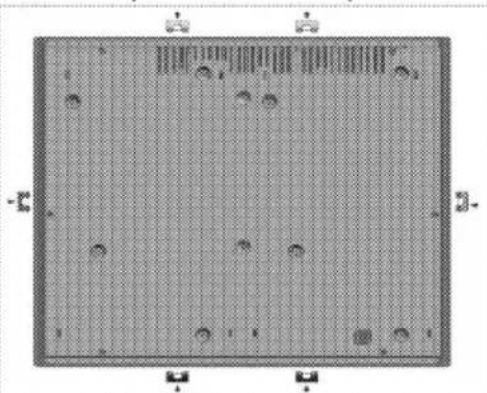
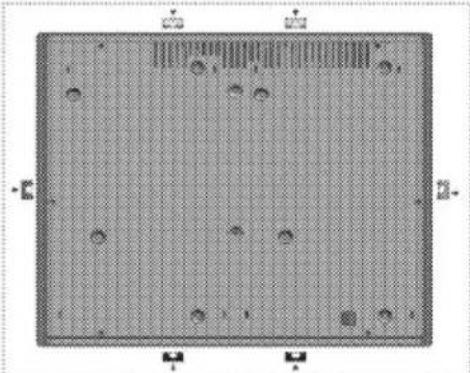
Rear view (connection holes)
natural_image
Top-down view of a grid-patterned surface with scattered circular features and small rectangular markers (no text or symbols)
DANGER:
Making connections to different holes is not a good practice in terms of safety since it can damage the gas and electrical system.
DANGER:
There are gas and electrical components contained within this hob, therefore when fitting the mounting springs/clamps only attach the supplied fixings to the connection holes shown in this manual. Failure to observe this advise may lead to life and property safety

The number of mounting springs on your product varies depending on product model.
Final check
- Connect the power cable and switch on the product's fuse.
- Check the functions.
Future Transportation
- Keep the product's original carton and transport the product in it. Follow the instructions on the carton. If you do not have the original carton, pack the product in bubble wrap or thick cardboard and tape it securely.

Check the general appearance of your product for any damages that might have occurred during transportation.
4 Preparation
Tips for saving energy
The following information will help you to use your appliance in an ecological way, and to save energy:
• Defrost frozen dishes before cooking them.
- Use pots/pans with cover for cooking. If there is no cover, energy consumption may increase 4 times.
- Select the burner which is suitable for the bottom size of the pot to be used. Always select the correct pot size for your dishes. Larger pots require more energy.
- Pay attention to use flat bottom pots when cooking with electric hobs.
Pots with thick bottom will provide a better heat conduction. You can obtain energy savings up to 1/3.
- Vessels and pots must be compatible with the cooking zones. Bottom of the vessels or pots must not be smaller than the hotplate.
- Keep the cooking zones and bottom of the pots clean. Dirt will decrease the heat conduction between the cooking zone and bottom of the pot.
Initial use
First cleaning of the appliance

The surface might get damaged by some detergents or cleaning materials.
Do not use aggressive detergents, cleaning powders/creams or any sharp objects during cleaning.
Do not use harsh abrasive cleaners or sharp metal scrapers to clean the oven door glass since they can scratch the surface, which may result in shattering of the glass.
- Remove all packaging materials.
- Wipe the surfaces of the appliance with a damp cloth or sponge and dry with a cloth.
Initial heating

Smoke and smell may emit for a couple of hours during the initial operation. This is quite normal. Ensure that the room is well ventilated to remove the smoke and smell. Avoid directly inhaling the smoke and the smell that emits.
5 How to use the hob
General information about cooking

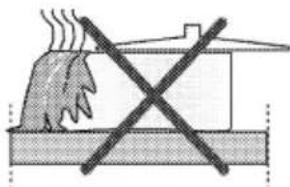
Never fill the pan with oil more than one third of it. Do not leave the hob unattended when heating oil. Overheated oils bring risk of fire. Never attempt to extinguish a possible fire with water! When oil catches fire, cover it with a fire blanket or damp cloth. Turn off the hob if it is safe to do so and call the fire department.
- Before frying foods, always dry them well and gently place into the hot oil. Ensure complete thawing of frozen foods before frying.
• Do not cover the vessel you use when heating oil. - Place the pans and saucepans in a manner so that their handles are not over the hob to prevent heating of the handles. Do not place unbalanced and easily tilting vessels on the hob.
- Do not place empty vessels and saucepans on cooking zones that are switched on. They might get damaged.
- Operating a cooking zone without a vessel or saucepan on it will cause damage to the product. Turn off the cooking zones after the cooking is complete.
- As the surface of the product can be hot, do not put plastic and aluminum vessels on it. Clean any melted such materials on the surface immediately.
Such vessels should not be used to keep foods either.
• Use flat bottomed saucepans or vessels only. - Put appropriate amount of food in saucepans and pans. Thus, you will not have to make any unnecessary cleaning by preventing the dishes from overflowing.
Do not put covers of saucepans or pans on cooking zones.
Place the saucepans in a manner so that they are centered on the cooking zone. When you want to move the saucepan onto another cooking zone, lift and place it onto the cooking zone you want instead of sliding it.
Saucepan selection
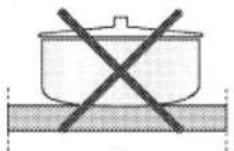
- Glass ceramic surface is heatproof and is not affected by big temperature differences.
- Do not use the glass ceramic surface as a place of storage or as a cutting board.
- Use only the saucepans and pans with machined bottoms. Sharp edges create scratches on the surface.
- Do not use the glass ceramic surface as a place of storage or as a cutting board.
- Use only the saucepans and pans with machined bottoms. Sharp edges create scratches on the surface.
natural_image
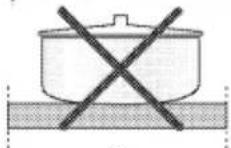
Diagram showing a fire with smoke rising above a building, crossed out by a diagonal line (no text or symbols)Spills may damage the glass ceramic surface and cause fire.
Do not use vessels with concave or convex bottoms.
Use only the saucepans and pans with flat bottoms. They ensure easier heat transfer.
For induction hobs, use only vessels suitable for induction cooking.
Saucepan test
Use following methods to test whether your saucepan is compatible with the induction hob or not.
- Your saucepan is compatible if its bottom holds magnet.
- Your saucepan is compatible if does not flash when you place your saucepan on cooking zone and start the hob.
You can use steel, teflon or aluminium saucepans with special magnetic bottom that contains labels or warnings indicating that the saucepan is compatible with induction cooking. Glass and ceramic vessels, pots and the stainless steel vessels with non-magnetic aluminium bottom should not be used.
Saucepan recognition-focusing system
In induction cooking, only the area covered by the vessel on the relevant cooking zone is energised. The vessel's bottom is recognised by the system and only this area is heated automatically. Cooking stops if the cooking vessel is lifted from the cooking zone during cooking. Selected cooking zone and symbol flashes alternately.
Safe use
Do not select high heating levels when you will use a non-sticking (teflon) saucepan with no oil or with very little oil.
Do not put metal items such as forks, knives or saucepan covers onto your hob since they can get heated.
Never use aluminium foil for cooking. Never place food items wrapped with aluminium foil onto the cooking zone.
| iIf there is an oven under your hob and if it is running, sensors of the hob can decrease the cooking level or turn off the oven. |
| iWhen the hob is running, keep items with magnetic properties such as credit cards or cassettes away from the hob. |
Selecting cooking zone suitable to the vessel
| Large cooking zone | Normal cooking zone | Small cooking zone |
 |  |  |
| Large cooking zone• Automatically fits to the saucepan.• Distributes the power ideally.• Provides perfect heat distribution. Used to cook dishes such as large crepes or large fishes rare or very rare. | Normal cooking zone• Automatically fits to the saucepan.• Distributes the power ideally.• Provides perfect heat distribution. Used for all kinds of cookings. | Small cooking zone• Used for slow cookings (sauces, creams)• Used to prepare small portions or portions based on number of persons. |
Using the hobs
DANGER:
Do not allow any object to drop on the hob. Even small objects such as a saltshaker may damage the hob.
Do not use cracked hobs. Water may leak through these cracks and cause short circuit. In case of any kind of damage on the surface (eg., visible cracks), switch off the product immediately to minimize the risk of electric shock.
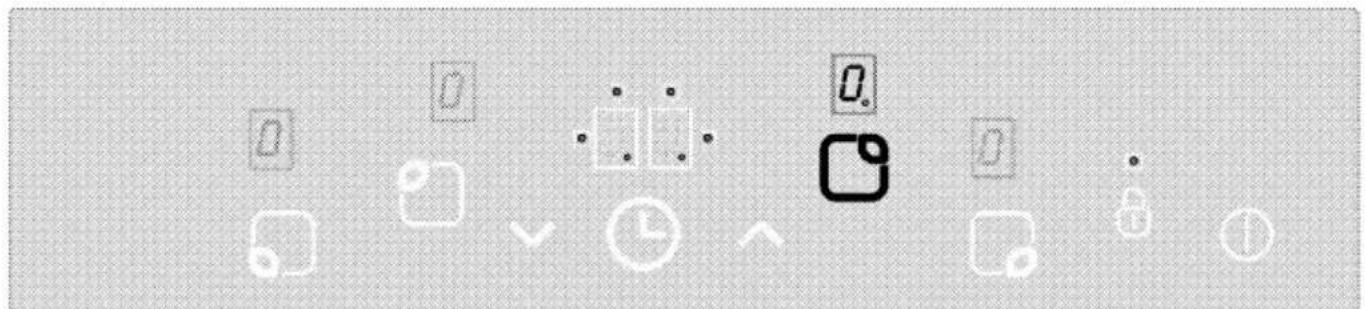
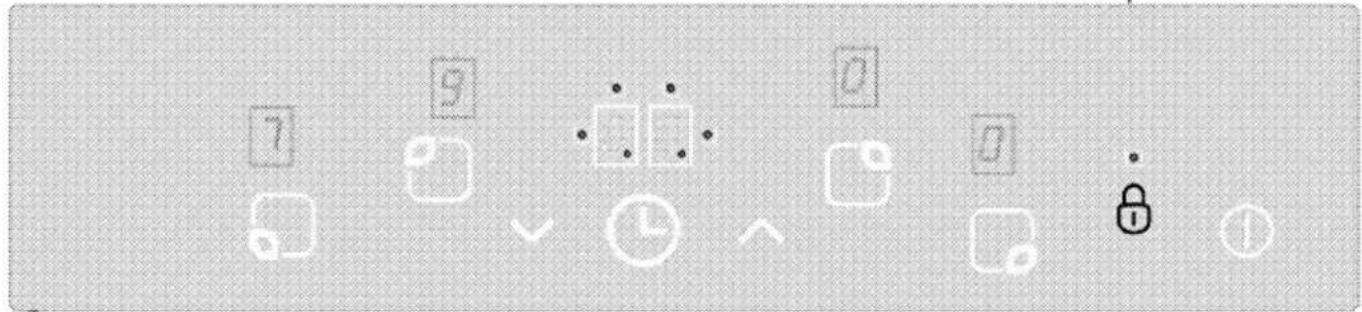
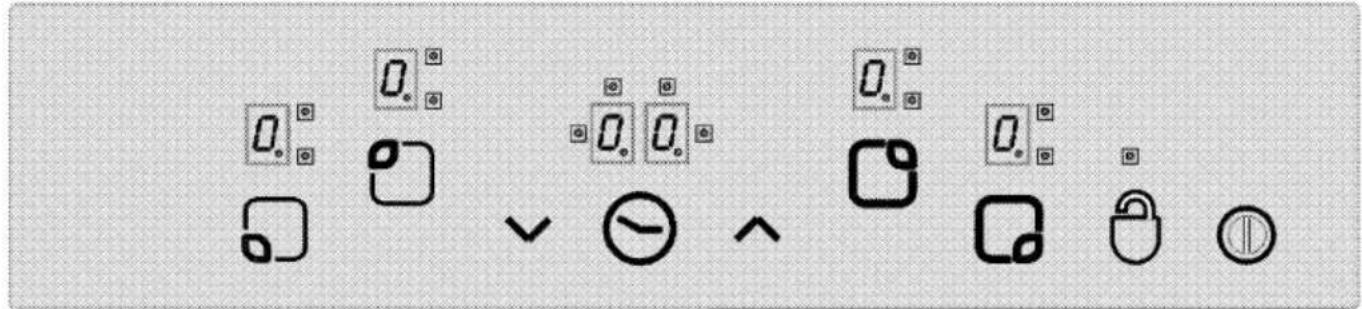
Control panel

Specifications

Main key - ON/OFF key
Keylock
Temperature setting/Increasing timer
Temperature setting/Decreasing timer
* Activate/deactivate timer
Cooking zone selection controls
Cooking zone display
(temperature setting 0 ... 9)
* Timer display (there are 4
LEDs for 4 different cooking zones)

This appliance is controlled via the touch control unit. If your touch control unit has a timer, each operation is confirmed with an audio signal.

Always keep the control panels clean and dry. Moisture and dirt may cause malfunctioning.
natural_image
Pure electrical circuit lines without any symbols(*) If your hob is equipped with a timer.
(*) Not contained in hobs with 3 burners.
(*) If your hob is equipped with a timer.
Graphics and figures are for informational purposes only. Actual appearance or functions may vary.
Turning on the hob
Touch the "①" key on control panel at least 1 second. Hotplate displays light up. "②" and all the relevant decimal points flash in all hotplate displays. The hob is ready for use. You can select different hotplates within next 10 seconds.
The hob will automatically turn off if there is no operation within 10 seconds.
Selecting the Hotplates(Cooking Zone)
Put your pan suitable for induction-cooking (pan with magnetic bottom, see page 12, "suitable pan choice") onto the related hotplate.
natural_image
Pure graphical icons representing basic computer and device symbols without any text or labels- Turn on the hob.
- Touch the relevant hotplate selection control to turn on the desired hotplate. After the hotplate is
selected," "decimal point stops flashing on the related hotplate display and becomes solid.
- Set the heat level between "1" and "9" or "9" or "1" by touching "^" or "√" keys.
"∧" and "∨" keys are equipped with a repeat function. If you touch one of the key longer time, heat level will continually increased or reduced at every 0,4 seconds.
If you begin with "^" key, "1" will appear on the display. If you begin with "√" key, 'A" and "9" will flash on the display with a period of half seconds. This indicates that Automatic Cooking is running. At the end of the preset time for Automatic Cooking by the manufacturer, selected hotplate stops the Automatic Cooking function and starts operating at the level that had been set while the Automatic Cooking function was selected.
- To switch your oven to high power position, increase the level up to 9 with "^" key and then press ""^" key again. Thus, it will switch into the high power "P" (Boost) position.
If is flashing;
- Your pan is not suitable for induction cooking.
• There is nothing on the selected hotplate. - Bottom diameter of the pan is small for the hotplate.

You can not operate both of the hotplates in either right or left hotplate group in the boost position at the same time.
Example: If one of the hotplates in the same direction (right or left) is set to level "P", then the system allows you to adjust the other hotplate up to level 8 without changing the setting of the first hotplate.
Using the induction hotplates safely and efficiently
Operating principle: Because of its operating principle, induction hob directly heats the pan.
Therefore, it has many advantages compared to other types of hobs. It is more efficient and the surface of the hob is cooler.
Your induction hob is equipped with superior safety systems that will allow you to use your appliance with maximum safety.
The hob control has a limitation of the operating time. If one or more hotplates are inadvertently not switched off, hotplate will be automatically deactivated after a certain amount of time. (see following Table-1).
Meantime; If a timer was associated with the hotplate, than a "00" will be displayed on the timer display for 10 second. The limit of the operating time depends on the temperature setting selected by the manufacturer. After the hotplate is switched off automatically as described above it becomes ready to be operated by
the user again. Maximum operating time is applied also for this heat setting.
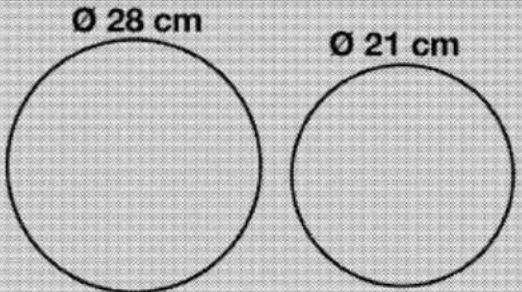
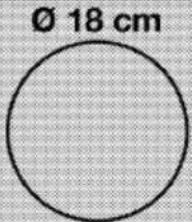
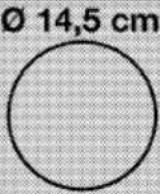
Important: Your hob contains zones of ∅ 145, ∅180, ∅ 210 and ∅ 280 which have induction features.
Thanks to the induction feature, each hotplate automatically detects the diameter of the pan put on it. "Energy is created only at places where the bottom of the pan touches" and thus, energy is consumed at the minimum level.
Table-1: Preset operating times when you forget to turn off the hob
| Temperature level | Operation time limit - hour |
| 0 | 0 |
| 1 | 6 |
| 2 | 6 |
| 3 | 5 |
| 4 | 5 |
| 5 | 4 |
| 6 | 1,5 |
| 7 | 1,5 |
| 8 | 1,5 |
| 9 | 0,5 |
| P (boost) - Quick Cooking (booster) | 10 minutes (*) |
| (*) 10 minutes later, hotplate decreases to level 9. | |
Using 2 cooking zones simultaneously at same side
The total power of hob is 3700 W. The performance of hob can be changed according to number of active zones. If two zones are used at the same time, the zones at the same side should be used. This usage style provides more cooking and pan detection performance. You can see in figure below the recommended usage style to use two cooking zone at the same time.
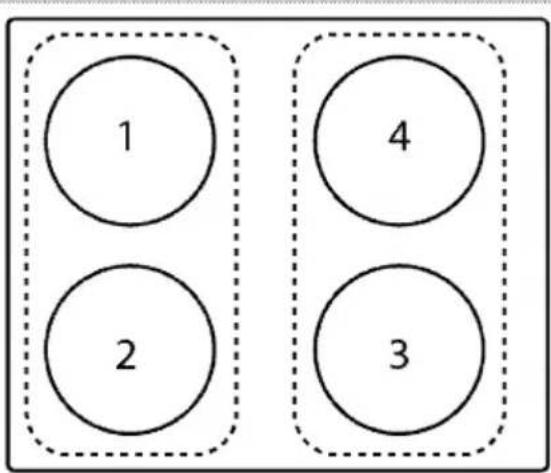

If the right and left cooking zones of hob operates at the same time, the cooking zones operate discontinuously. Therefore the cooking and pan detection performance decrease.
Over Heating Protection
There are some sensors inside your hob in order to provide over heating protection. Below responses may arise in an over heating condition:
• The running hotplate can be turned off.
- Selected level can be decreased. (But it is not indicated on the display.)
If your hob gets overheated, the active cooking zones will drop to the 7th level (if at a level higher than 7) for safety reasons and cannot be set to a high level. They can be set to a high level again when the temperature of your hob drops to a safe level. If the hob gets heated to a critical level, it will automatically turn off and the cooking zones cannot be activated.
Due to the total power limitation of the hob, there may be a decrease in the first hob level set compared to the levels set when the right or left zones are operated at the same time.
Safety system against overflow
Your hob is equipped with a safety system against overflowing. If any overflowing occurs on the control panel for any reason, the system automatically cuts the power connection to turn your hob off. Meantime, "F" appears on the touch -display.
Residual heat indicator
The induction hob may get hot after the cooking process because of the pan left on the hotplate. Until the glass table on the hob section drops down to a safe temperature, "H" will be displayed on the control panel. "Do not touch the related sections until "H" disappears.

Temperature display does not light up and worn the user anymore during a power failure.
Sensitive power setting
Because of its operating principle, induction hob responds to the commands immediately. They change the power settings in a quick way. Thus, you may prevent a cooking dish (water, milk) from overflowing by turning off the appliance.
Automatic Cooking and High Power (Booster)
Automatic cooking function makes cooking easier. If the Automatic Cooking is active, the hotplate will be operated with maximum power for a period of time
(see Table -2). Quick heating time depends on the selected heat level. This is indicated through a flashing "A" alternating with the heat setting value (e.g. half second "A" and half second "9") in the hotplate display. At the end of the quick heating time, hob will return to the normal heating mode for the selected level and "A" will disappear.
All hotplates are equipped with Quick Heating function. The below table contains the automatic heating times for different heating levels.
Table-2: Quick heating times in automatic cooking
| Temperature level | Quick Heating Time of Operation - (second) |
| 1 | 10 |
| 2 | 30 |
| 3 | 47 |
| 4 | 65 |
| 5 | 85 |
| 6 | 25 |
| 7 | 35 |
| 8 | 45 |
| 9 | 10 |
Turning On the Automatic Cooking Feature:
- Turn on the hob.
- Select desired hotplate by touching hotplate selection keys.
- "√" key to switch the heat value of the hotplate to the desired level. "9" and "A" will be displayed on the screen respectively. This means heat setting value "9" and Quick Heating feature is active now.
- Quick heating function of the level to be selected is determined with "∧" or "∨" keys.
- The specified Quick Heating function operates for the period according to the cooking level in table 2 and reverts back to its level after the time elapses. (For example, this period is 25 minutes for level 6)
Turning Off the Automatic Cooking Feature:
- The Automatic Cooking function can be turned off early by decreasing the heat setting to "0".
• Automatic Cooking is not active anymore when the period in table 2 is over.
High Power (Booster)
You can use high power level to heat your hob faster. But, it is not recommended to cook in this position for too long.
Select the relevant hotplate to be operated and place the suitable pan. Increase its level up to 9 and then revert it back to P position by pressing "^" key. Due to temperature, your hob will only be allowed to operate for maximum 10 minutes and the hotplate of the hob selected for booster function will automatically decrease to level 9.
Turning the hob off
If the main switch "①" is pressed more than 2 sec, the hob is turned off. If the relevant hotplate is still hot when the hob is turned off, then "H" will light in the display continuously.
Turning Off The Individual Hotplates:
A selected hotplate can be turned off in 3 different ways:
1. Simultaneous operation of the "^" and "√" keys
The desired hotplate must be chosen with the hotplate selection "☐" key. For example "☐."
Decimal point becomes solid on the display of the hotplate, The "^" and "√" keys must be touched at the same time to turn off the hotplate.
- Reduction of the heat setting to "0" by operating the "√" key of the desired hotplate
- Use of timer turn off function for desired hotplate (If timer function is available)
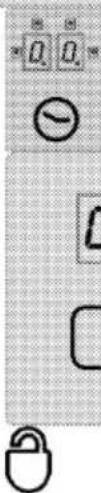
Keylock \*
Touch the "☐" key for longer than 2 seconds to lock the touch control. Operation will be confirmed with an audible signal. Then, "☐" LED will flash and all cooking zones will be locked.
Cooking zones, can only be locked in the operation mode. If the cooking zones are locked: only the main
key "☐" can be operated. "☐" LED will flash and indicate a key lock module. If you turn the hob off when the keys are locked, the keylock will be activated next time you turn the hob on again. Key lock must be deactivated in order to be able to operate the hob.
"☐" key will allow you to lock or unlock the touch control in operation mode.
Touch "☐" key for 2 seconds to unlock the cooking zones. Operation will be confirmed with an audible signal.
Then, "☐" LED turns off. Now the touch control is unlocked and can be operated normally.
Child Lock
You can protect the hob against being operated unintentionally in order to prevent children from turning on the cooking zone. Child Lock function contains a few complex steps to lock the touch control unit. Child Lock can only be activated and deactivated in Standby mode.
Locking the module:
- Touch main key "☐" to turn on the hob.
- Touch "^\" and "^\" keys simultaneously for at least 2 seconds.
- Then, touch "^" key once again.
» Child Lock function is activated and "L." appears on all cooking zone displays.
Disabling the Child Lock:
You can disable the child lock as you have activated it.
- Touch main key "☐" to turn on the hob.
- Touch "^\wedge" and "^\vee" keys simultaneously for at least 2 seconds.
- Then, touch "√" key once again.
» "L." appears on all cooking zone displays as long as the Child lock is activated. "L." will disappear when the lock is deactivated successfully.
Timer function \*
This feature facilitates cooking for you. You will not have to attend the hob continuously during the cooking process and the cooking zone will turn off automatically at the end of the time you have selected.
Timer provides following features: Touch control can command to maximum 4 cooking zone timers and one alarm cooking timer assigned at the same time. All timers can only be used in operation mode.
Timer as an alarm
Alarm timer operates independently from other cooking zones. Therefore, it is not important whether a cooking zone is selected or not.
- Touch "⊗" key to enable the alarm timer. "00" and "□□" will appear on the timer display and a dot will appear on the lower right side. Thus, alarm timer is activated.
- Then, set the desired time value by touching "^\" and "^\" keys.
- Timer will start to countdown after you have made the time setting.
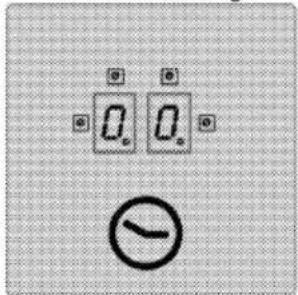
» When the time is over, an audible alarm will sound. Touch any key on the touch control panel to silence the audible alarm.
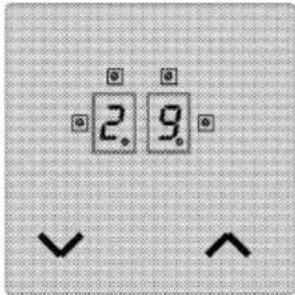
Cooking zone timer:
The cooking zone timers cay only be set for the cooking zones that are activated.
- First turn on the hob and then enable the desired cooking zone. (cooking zone must be set to a value between 1 and 9)
- As in the alarm timer, enable the cooking zone timer by touching "☐" key. "00" and "☐☐=” will appear on the timer display and a dot will appear on the lower right side. Thus, cooking zone timer is activated.
- You must touch "☐" key for a second time in order to enable cooking zone timer. Now you can assign the timer.
- Set the desired time value by touching "^\" and "^\" keys.
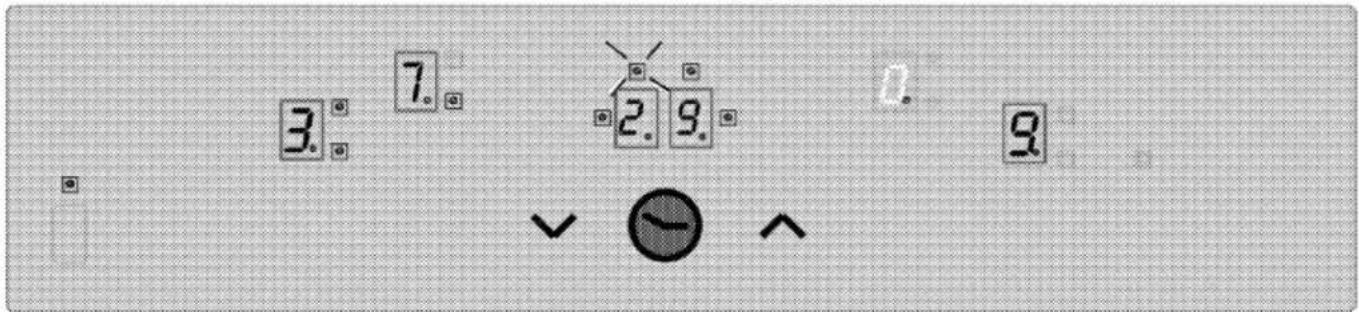
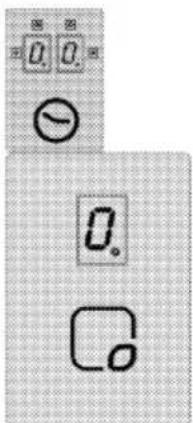
To set the hob timers:
- After enabling the first cooking zone timer, touch the "☐" key again. The control will turn clockwise towards the next active cooking zone assigned to the timer. Assignment proposal will be shown with a flashing "☐" LED.
- Set the desired time value by touching "^\" and "^\" keys.
- Timer activated for the cooking zone which was set first is indicated with a continuously flashing "☐" LED.
- More timers can be assigned for other active cooking zones by touching the "◎" key once again.
• After 10 seconds, timer display reverts back to the timer that will end first.
- "Q D" LEDs that illuminate continuously on the timer display indicate the timer that is currently counting down.
- You can display the values set for cooking zone timers and egg timer by changing the position of "⊖" key. A flashing front right "⊖" LED always shows an assignment.
If no LED is flashing, value of the egg timer will be displayed on the timer screen.
Disabling the timers:
First you must display the timer by changing the position of the "☐" key until the timer appears. This value can later be cancelled in 2 different ways:
- By decreasing the value step by step to "00" by touching "√" key.
- By touching "^" and "∨" keys simultaneously for half second until "00" appears on timer display.
When the time is over, an audible alarm will sound. Touch any key on the touch control panel to silence the audible alarm.
Display the remaining time value of the cooking zone timer 3 (indicator LED flashes) to the timer display (the indicator LEDs of the active timers of the cooking zones 1 and 4 in fact will not be visible on the timer display).
Noises
Some sounds may be heard from induction heated hob. Such sounds are normal and a part of cooking with induction. Such sounds;
- may be intensified when the level is in high power position.
- may arise from the structural materials of the pan.
- In low power positions, a regular on-off sound can be heard due to the operating principle.
- Sound can occur while heating an empty pan. Such sound will disappear when you add water or food in it.
- Noise of the fan which is used to cool the electronic system can be heard.
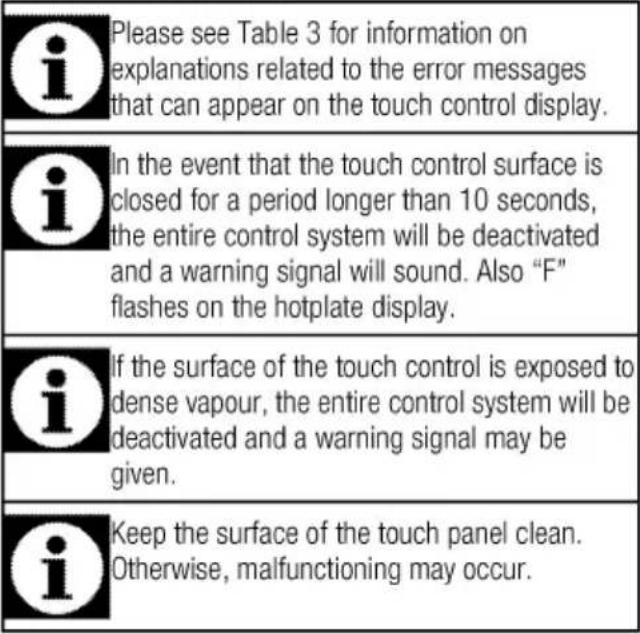
Sensor Calibration and Error Messages
When the supply power is applied, hob control system performs calibration depending on the sensor, glass and ambient conditions. Do not cover the glass part of the sensor with anything during calibration. Hob control system should also not be exposed to strong light sources such as sun light, strong halogen lamps and etc.
Table-3: Error codes and error sources
| Cause of error | Display |
| Ambient light is too high | F1 |
| Fluorescent lamp | F2 |
| Sensor is covered with a bright substance | F3 |
| Ambient light is fluctuating strongly | F4 |
| Calibration error | AX |
| Induction hardware error | EX |
| (x = "0...9") | |
Sample application:
Following lightning conditions will allow a smooth calibration:
Illumination with a bulb without a reflector (100W, dull) 70 cm above the glass ceramic hob. After a successful calibration, it is warranted that the hob will operate as intended even under a strong illumination such as halogen spot lamp wit reflector (50 W). In case of an error, the calibration is repeated until the ambient conditions allow a successful calibration. The operation of the hob control is only possible, if the calibration of all sensors were successfully completed. After successful finished calibration process the control tolerates a very high rate of ambient light. During the operation of the hob control, it continuously adopts and recalibrates itself towards the changes in the ambient conditions.
6 Maintenance and care
General information
Service life of the product will extend and the possibility of problems will decrease if the product is cleaned at regular intervals.
DANGER:
Disconnect the product from mains supply before starting maintenance and cleaning works.
There is the risk of electric shock!
DANGER:
Allow the product to cool down before you clean it.
Hot surfaces may cause burns!
- Clean the product thoroughly after each use. In this way it will be possible to remove cooking residues more easily, thus avoiding these from burning the next time the appliance is used.
- No special cleaning agents are required for cleaning the product. Use warm water with washing liquid, a soft cloth or sponge to clean the product and wipe it with a dry cloth.
- Always ensure any excess liquid is thoroughly wiped off after cleaning and any spillage is immediately wiped dry.
- Do not use cleaning agents that contain acid or chloride to clean the stainless or inox surfaces and the handle. Use a soft cloth with a liquid detergent (not abrasive) to wipe those parts clean, paying attention to sweep in one direction.

The surface might get damaged by some detergents or cleaning materials.
Do not use aggressive detergents, cleaning powders/creams or any sharp objects during cleaning.
Do not use harsh abrasive cleaners or sharp metal scrapers to clean the oven door glass since they can scratch the surface, which may result in shattering of the glass.

Do not use steam cleaners to clean the appliance as this may cause an electric shock.
Cleaning the hob
Glass ceramic surfaces
Wipe the glass ceramic surface using a piece of cloth dampened with cold water in a manner as not to leave any cleaning agent on it. Dry with a soft and dry cloth. Residues may cause damage on the glass ceramic surface when using the hob for the next time. Dried residues on the glass ceramic surface should under no circumstances be scraped with hook blades, steel wool or similar tools.
Remove calcium stains (yellow stains) by a small amount of lime remover such as vinegar or lemon juice. You can also use suitable commercially available products.
If the surface is heavily soiled, apply the cleaning agent on a sponge and wait until it is absorbed well. Then, clean the surface of the hob with a damp cloth.

Sugar-based foods such as thick cream and syrup must be cleaned promptly without waiting the surface to cool down. Otherwise, glass ceramic surface may be damaged permanently.
Slight color fading may occur on coatings or other surfaces in time. This will not affect operation of the product.
Color fading and stains on the glass ceramic surface is a normal condition, and not a defect.
7 Troubleshooting
Product emits metal noises while heating and cooling.
- When the metal parts are heated, they may expand and cause noise. >>> This is not a fault.
Product does not operate.
- The mains fuse is defective or has tripped. >>> Check fuses in the fuse box. If necessary, replace or reset them.
• Product is not plugged into the (grounded) socket. >>> Check the plug connection. - If the display does not light up when you switch the hob on again. >>> Disconnect the appliance at the circuit breaker. Wait 20 seconds and then reconnect it.
• Overheat protection is active. >>> Allow your hob to cool down.
• The cooking pot is not suitable. >>> Check your pot.
symbol appears on the cooking zone display.
• You have not placed the pot on the active cooking zone. >>> Check if there is a pot on the cooking zone.
- Your pot is not compatible with induction cooking. >>> Check if your cooking pot is compatible with induction hob.
- The cooking pot is not centered properly or the bottom surface of the pot is not wide enough for the cooking zone. >>> Choose a pot wide enough and center the pot on the cooking zone properly.
• Cooking pot or cooking zone is overheated. >>> Allow them to cool down.
Selected cooking zone suddenly turns off during operation.
- Cooking time for the selected cooking zone may be over. >>> You may set a new cooking time or finish cooking.
• Overheat protection is active. >>> Allow your hob to cool down.
• An object may be covering the touch control panel. >>> Remove the object on the panel.
The pot does not get warm even if the cooking zone is on.
- Your pot is not compatible with induction cooking. >>> Check if your cooking pot is compatible with induction hob.
- The cooking pot is not centered properly or the bottom surface of the pot is not wide enough for the cooking zone. >>> Choose a pot wide enough and center the pot on the cooking zone properly.

Consult the Authorised Service Agent or technician with licence or the dealer where you have purchased the product if you can not remedy the trouble although you have implemented the instructions in this section. Never attempt to repair a defective product yourself.
Piano cottura incassato
Manuale utente
IT
Leggere questo manuale utente come prima cosa!
Gentile cliente,
Grazie per aver scelto un apparecchio Beko. Vi auguriamo di ottenere i migliori risultati da questo apparecchio, realizzato con tecnologia di alta qualità e di avanguardia. Pertanto, di leggere questo manuale utente e tutta la documentazione allegata con attenzione prima di usare l'apparecchio e di conservarli per riferimento futuro. Se l'apparecchio viene trasferito ad un'altra persona, bisogna consegnare anche il manuale. Seguire tutte le awvertenze e le informazioni del manuale utente.
Ricordare che questo manuale utente può essere applicabile anche a vari altri modelli. Le differenze tra i modelli sono identificate nel manuale.
Spiegazione dei simboli
In questo manuale utente si usano i simboli che seguono:

Informazioni importanti o consigli utili sull'uso.

Avvertenza per situazioni pericolose per la vita e la proprietà.

Avvertenza per shock elettrico.
Avvertenza per rischio di incendio.

Avvertenza per superfici calde.
1 Istruzioni importanti e avvertenze per sicurezza e ambiente 4
Sicurezza generale....4
Sicurezza elettrica....4
Sicurezza del prodotto....5
Uso previsto 7
Sicurezza dei bambini 7
Smaltimento di vecchi prodotti....7
Smaltimento del materiale di imballaggio....7
2 Informazioni generali 8
Panoramica....8
Specifiche tecniche....8
3 Installazione 9
Prima della installazione....9
Installazione e collegamento....9
Smaltimento di vecchi prodotti....11
4 Preparazioni 12
Consigli per il risparmio energetico.... 12
Uso iniziale 12
Prima pulizia del prodotto 12
Riscaldamento iniziale 12
5 Come utilizzare il piano cottura 13
Informazioni generali sulla cottura 13
Uso del piano cottura.... 14
Pannello di controllo....15
6 Manutenzione e cura 22
Informazioni generali 22
Pulizia del piano cottura.... 22
7 Ricerca e risoluzione dei problemi 23
1 Istruzioni importanti e avvertenze per sicurezza e ambiente
Questa sezione contiene istruzioni per la sicurezza che aiutano a proteggere dal rischio di lesioni personali o danni alla proprietà. La mancata osservanza di queste istruzioni priva la garanzia di validità.
Sicurezza generale
- Questo apparecchio può essere utilizzato da bambini con età superiore agli 8 anni e da persone con capacità fisiche, sensoriali o mentali ridotte, o che manchino di esperienza e conoscenza, purché ricevano la supervisione e le istruzioni sull'uso dell'apparecchio in modo sicuro e comprendano i rischi coinvolti. I bambini non devono giocare con l'apparecchio. Pulizia e manutenzione da parte dell'utente non devono essere eseguite da bambini senza supervisione.
- Questo apparecchio non deve essere utilizzato da persone (compresi i bambini) con capacità fisiche, sensoriali o mentali ridotte, oppure prive di esperienza e conoscenza, a meno che non ricevano supervisione o istruzioni al riguardo. I bambini devono essere vigilati affinché non giochi con il dispositivo.
- Se il prodotto viene ceduto a qualcun altro per l'uso personale o per scopi d'uso di seconda mano,
fornire anche il manuale utente, le etichette del prodotto e gli altri documenti e parti.
- Le procedure di installazione e riparazione devono essere sempre eseguite da agenti autorizzati per l'assistenza. Il produttore non sarà considerato responsabile dei danni derivanti da procedure eseguite da persone non autorizzate e potrebbe considerare non valida la garanzia. Prima dell'installazione, leggere le istruzioni con attenzione.
- Non utilizzare il prodotto se è difettoso o se presenta danni visibili. - Controllare che le manopole delle funzioni dell'apparecchio siano disattivate dopo ogni uso.
Sicurezza elettrica
- In caso di guasti all'apparecchio, non utilizzarlo a meno che non venga riparato da un agente autorizzato per l'assistenza. C'è il rischio di shock elettrico!
- Collegare l'apparecchio solo ad una presa messa a terra/linea con tensione e protezione secondo quanto specificato in "Specifiche tecniche". Far eseguire la messa a terra da un elettricista qualificato quando si usa il prodotto con o senza un trasformatore. La nostra azienda non sarà responsabile di problemi derivanti dall'uso
dell'apparecchio senza messa a terra conforme ai regolamenti locali.
- Non lavare mai l'apparecchio spargendo o versando acqua su di esso! C'è il rischio di shock elettrico!
- Non toccare mai la spina con le mani bagnate! Non scollegare mai tirando dal cavo, tirare sempre dalla presa.
- L'apparecchio deve essere scollegato durante le procedure di installazione, manutenzione, pulizia e riparazione.
- Se il cavo di alimentazione dell'apparecchio è danneggiato, deve essere sostituito dal produttore, da un agente per l'assistenza o da persona similmente qualificata, per evitare rischi.
- L'apparecchio deve essere installato in modo che possa essere completamente scollegato dalla rete. La separazione deve essere garantita da una presa di rete o da un interruttore integrato nell'installazione elettrica fissa, secondo i regolamenti di costruzione.
- Tutti gli interventi su apparecchi e sistemi elettrici possono essere eseguiti solo da personale qualificato e autorizzato.
- In caso di danni, spegnere il prodotto e scollegarlo dalla rete. Per farlo, disattivare il fusibile domestico.
- Assicurarsi che la corrente del fusibile sia compatibile con il prodotto.
Sicurezza del prodotto
- AVVERTENZA: Questo apparecchio e le parti accessibili diventano caldi durante l'uso. Bisogna prestare attenzione a evitare di toccare gli elementi che si riscaldano. I bambini di età inferiore agli 8 anni devono essere tenuti lontani a meno che non ricevano continua supervisione.
- Non usare mai il prodotto quando giudizio e coordinazione sono danneggiati dall'uso di alcool e/o droghe.
- Prestare attenzione quando si usano bevande alcoliche nei piatti. L'alcool evapora ad alte temperature e può provocare incendi poiché prende fuoco a contatto con superfici calde.
- Non mettere materiali infiammabili vicini al prodotto poiché i lati possono diventare caldi durante l'uso.
- Tenere tutte le aperture di ventilazione libere da ostruzioni.
- Non usare pulitori a vapore per pulire l'apparecchio poiché ciò potrebbe provocare uno shock elettrico.
- AVVERTENZA: La cottura senza supervisione su un piano cottura usando grassi o olio può essere pericolosa e provocare incendi.
Non cercare MAI di estinguere il fuoco con acqua, ma spegnere l'apparecchio e poi coprire la fiamma, per es. con un coperchio o una coperta ignifuga.
- ATTENZIONE: Il processo di cottura necessita di supervisione. Una cottura di breve durata deve essere vigilata continuamente.
- AVVERTENZA: Pericolo di incendio: Non conservare oggetti sulle superfici di cottura.
- AVVERTENZA: Se la superficie è lesionata, spegnere l'apparecchio per evitare la possibilità di shock elettrico.
- In caso di rottura del vetro della piastra calda: Spegnere immediatamente tutti i bruciatori e ogni elemento elettrico di riscaldamento e isolare l'apparecchio dall'alimentazione. Non toccare la superficie dell'apparecchio. Non utilizzare l'apparecchio.
- Dopo l'uso, spegnere il piano cottura con il relativo comando e non fare affidamento sul rilevatore della padella.
- Oggetti metallici come coltelli, forchette, cucchiai e coperchi non devono essere posti sulla superficie del piano cottura poiché possono diventare caldi.
- L'apparecchio non deve essere utilizzato usando un timer esterno o un telecomando separato.
- La pressione del vapore che si forma per l'umidità sulla superficie del piano cottura o sul fondo della padella può far muovere la padella. Pertanto, assicurarsi che la superficie del forno e il fondo delle padelle siano sempre asciutti.
- Le piastre calde sono dotate di tecnologia "ad induzione". Il piano cottura ad induzione che garantisce risparmio di tempo e soldi deve essere usato con padelle adatte a cottura ad induzione; altrimenti le piastre calde non funzionano. Vedere. Informazioni generali sulla cottura, pagina 13, Scelta delle padelle.
- Poiché i piani cottura ad induzione creano un campo magnetico, possono provocare impatti dannosi alle persone che usano dispositivi come pompe per insulina o pacemaker.
- AVVERTENZA: Utilizzare solo le protezioni del piano cottura progettate dal produttore della cucina o indicate dal produttore dell'elettrodomestico nelle istruzioni per l'uso o le protezioni del piano cottura integrate. L'utilizzo di protezioni inappropriate può provocare incidenti.
Per l'affidabilità antincendio dell'apparecchio:
- Assicurarsi che la spina si adatti bene alla presa e che non provochi scintille.
- Non utilizzare cavi danneggiati, tagliati o prolunghe: utilizzare solo il cavo originale.
- Assicurarsi che non vi sia liquido o umidità sulla presa quando viene collegata all'apparecchio.
Uso previsto
- Questo prodotto è progettato per uso domestico. L'uso commerciale non è ammesso.
- Questo apparecchio serve solo per cucinare. Non deve essere usato per altri scopi, per esempio riscaldare l'ambiente
- Il produttore non sarà responsabile per danni provocati da uso o gestione non corretti.
Sicurezza dei bambini
- AVVERTENZA: Le parti accessibili possono diventare calde durante l'uso. I bambini devono essere tenuti lontani.
- I materiali di imballaggio sono pericolosi per i bambini. Tenere i bambini lontani dai materiali di imballaggio. Smaltire tutte le parti dell'imballaggio secondo gli standard ambientali.
• Gli apparecchi elettrici sono pericolosi per i bambini. Tenere i bambini lontano dall'apparecchio
mentre è in uso e non lasciarli giocare con lo stesso.
- Non mettere sopra all'apparecchio alcun oggetto che possa essere raggiunto dai bambini.
Smaltimento di vecchi prodotti
Conformità alla direttiva WEEE e allo smaltimento dei rifiuti:
Questo apparecchio è conforme alla Direttiva UE WEEE (2012/19/EU). Questo apparecchio riporta il simbolo di classificazione per i rifiuti delle apparecchiature elettriche ed elettroniche (WEEE). Questo apparecchio è stato realizzato con parti e materiali di alta qualità che possono essere riutilizzati e sono adatti ad essere riciclati. Non smaltire i rifiuti dell'apparecchio con i normali rifiuti domestici e gli altri rifiuti alla fine della vita di servizio. Portarlo al centro di raccolta per il riciclaggio di apparecchiature elettriche ed elettroniche. Consultare le autorità locali per conoscere la collocazione di questi centri di raccolta.
Conformità alla Direttiva RoHS:
L'apparecchio acquistato è conforme alla Direttiva UE RoHS (2011/65/EU). Non contiene materiali pericolosi o proibiti specificati nella Direttiva.
Smaltimento del materiale di imballaggio
- I materiali di imballaggio sono pericolosi per i bambini. Tenere i materiali di imballaggio in un luogo sicuro, fuori dalla portata dei bambini. I materiali di imballaggio del prodotto sono realizzati con materiali riciclabili. Smaltirli in modo corretto e dividerli secondo le istruzioni per i rifiuti riciclabili. Non smaltirli con i normali rifiuti domestici.
2 Informazioni generali
Panoramica
1 Piastra di cottura ad induzione
2 Morsetto per il montaggio
3 Superficie in vetroceramica
4 Coperchio base
Specifiche tecniche
| Tensione/frequenza | 1N ~ 220-240 V 50 Hz |
| Consumo energetico totale | max. 3700 W |
| Fusibile | 16 A |
| Tipo/sezione cavo | min.H05V2V2-F 3 x 1,5 mm ^2 |
| Dimensioni esterne (altezza/larghezza/profondità) | 55 mm/580 mm/510 mm |
| Dimensioni installazione (larghezza/profondità) | 560 (+2) mm/490 (+2) mm |
| Bruciatori | |
| Sinistra posteriore | Piastra di cottura ad induzione |
| Dimensione | 180 mm |
| Energia | 1800/3000 W |
| Sinistra anteriore | Piastra di cottura ad induzione |
| Dimensione | 180 mm |
| Energia | 1800/3000 W |
| Destra anteriore | Piastra di cottura ad induzione |
| Dimensione | 145mm |
| Energia | 1500/2200 W |
| Destra posteriore | Piastra di cottura ad induzione |
| Dimensione | 210 mm |
| Energia | 2000/3700 W |

Le specifiche tecniche potrebbero essere modificate senza preavviso per migliorare la qualità del prodotto.

Le figure in questo manuale sono schematiche e potrebbero non corrispondere esattamente al prodotto.

I valori dichiarati sulle etichette del prodotto o nella documentazione che lo accompagna si ottengono in condizioni di laboratorio secondo gli standard relativi. A seconda delle condizioni di funzionamento e ambientali del prodotto, questi valori potrebbero variare.
3 Installazione
Il prodotto deve essere installato da una persona qualificata secondo i regolamenti in vigore. Altrimenti la garanzia non sarà valida. Il produttore non sarà considerato responsabile dei danni derivanti da procedure eseguite da persone non autorizzate e potrebbe considerare non valida la garanzia.
| La preparazione della posizione e l'installazione elettrica del per il prodotto è responsabilità del cliente. | |
| PERICOLO:Il prodotto deve essere installato secondo i regolamenti locali per il gas e/o elettrici. | |
| PERICOLO:Prima dell'installazione, controllare visivamente se il prodotto presenta difetti. Se è così, non installarlo.Prodotti danneggiati provocano rischi per la sicurezza. |
Prima della installazione
Il piano cottura è progettato per essere installato in piani da lavoro in commercio. Bisogna porre un dispositivo di sicurezza tra l'apparecchio e le pareti e i mobili della cucina. Vedere la figura (valori in mm).
- Consentire una distanza minima di 750 mm sulla superficie del piano cottura.
(*) Se la cappa deve essere installata sopra al piano cottura, vedere le istruzioni del produttore della cappa sull'altezza dell'installazione (min 650 mm). - Rimuovere i materiali di imballaggio e i blocchi per il trasporto.
- Superfici, laminati sintetici e adesivi usati devono essere resistenti al calore (100 °C minimo).
- Il piano da lavoro deve essere allineato e fissato in modo orizzontale.
- Tagliare l'apertura per il piano cottura nel piano da lavoro secondo le dimensioni della installazione.

* min.
Installazione e collegamento
• L'unità può essere installata e collegata solo secondo le norme legali sulla installazione.
Collegamento elettrico
Collegare il prodotto ad una presa messa a terra/linea protetta da un fusibile della capacità adatta, dichiarata nella tabella "Specifiche tecniche". Far eseguire la messa a terra da un elettricista qualificato quando si usa il prodotto con o senza un trasformatore. La nostra azienda non sarà responsabile di danni derivanti dall'uso del prodotto senza una installazione di messa a terra conforme ai regolamenti locali.

PERICOLO:
L'apparecchio deve essere collegato alla rete elettrica solo da una persona autorizzata e qualificata. Il periodo di garanzia dell'apparecchio comincia solo dopo la corretta installazione.
Il produttore non sarà considerato responsabile dei danni derivanti da procedure eseguite da persone non autorizzate.

PERICOLO:
Il cavo di alimentazione non deve essere schiacciato, piegato o bloccato né deve venire in contatto con le parti calde dell'apparecchio. Un cavo di alimentazione danneggiato deve essere sostituito da un elettricista qualificato. Altrimenti c'è rischio di shock elettrico, cortocircuito o incendio!
- Il collegamento deve essere conforme ai regolamenti nazionali.
- I dati sull'alimentazione di rete devono corrispondere ai dati specificati sull'etichetta con il tipo dell'unità. L'etichetta con il tipo è sull'alloggiamento posteriore dell'unità.
- Il cavo di alimentazione dell'unità deve essere conforme ai valori della tabella "Specifiche tecniche".

PERICOLO:
Prima di cominciare un lavoro sull'installazione elettrica, scollegare il prodotto dall'alimentazione di rete. C'è il rischio di shock elettrico!

Il cavo di alimentazione deve essere facilmente raggiungibile dopo l'installazione (non farlo correre sopra al piano cottura).
Inserire il cavo di alimentazione nella presa.
Installazione dell'unità
Se c'è un forno sotto
* min.
Se c'è un tavolo sotto
Bisogna lasciare un'apertura di ventilazione di minimo 180 cm² nella sezione posteriore del mobile come illustrato nella figura che segue.

* min.
Durante l'installazione del piano cottura a induzione, mettere l'apparecchio in parallelo rispetto alla superficie di installazione. Inoltre applicare la guarnizione sigillante alle parti del piano cottura in contatto con il ripiano, come descritto sotto, per evitare che il liquido penetri tra l'unità e il ripiano.
- Preparare la superficie del ripiano come mostrato nella figura.
- Ruotando il piano cottura a testa in giù, metterlo su una superficie piatta.
- La guarnizione sigillante in dotazione nella confezione deve essere applicata intorno al piano cottura dalla parte inferiore come mostrato nella figura, durante la installazione del piano cottura.
natural_image
Close-up of hands holding a dark object, possibly a tool or device (no visible text or symbols)
natural_image
Close-up of a layered electronic component or circuit board (no visible text or symbols)- Fissare le molle di montaggio inserendole e avvitandole attraverso i fori sull'alloggiamento inferiore, come mostrato nella figura.
natural_image
3D rendered mechanical component with a highlighted section showing internal features (no text or symbols visible)
In alcuni modelli il prodotto potrebbe essere consegnato con le molle di montaggio già fissate.

Il numero delle molle per il montaggio del prodotto varia a seconda del modello del prodotto.
- Mettere il piano cottura sul ripiano e allinearli.
- Quando il piano cottura è posizionato sul piano di lavoro, sarà facile montarlo con l'aiuto dei morsetti. Se le dimensioni del piano di lavoro non sono idonee, è possibile montare 2 morsetti di montaggio sul lato anteriore del prodotto, come mostrato nella figura sotto.
1 Piano cottura
2 Morsetto per l'installazione
3 Ripiano

Quando si installa il piano cottura su un alloggiamento, bisogna installare una mensola per separare l'alloggiamento dal piano cottura, come illustrato nella figura sopra. Questo non è necessario quando si installa su un forno incassato.
Per esempio, se è possibile toccare il fondo dell'unità che è installata su un cassetto, questa sezione deve essere coperta con una piastra in legno.
natural_image
Cross-sectional diagram of a structural beam with load and dimension lines (no text or symbols)min. 15 mm
Vista posteriore (fori di collegamento)
natural_image
Grid-patterned rectangular panel with scattered circular holes and measurement markings (no readable text or symbols)
PERICOLO:
Eseguire i collegamento a fori diversi non è una buona pratica in termini di sicurezza poiché si può danneggiare il sistema a gas ed elettrico.
PERICOLO:
Il piano cottura contiene componenti che funzionano con gas ed elettricità. Per questo motivo il piano cottura deve essere fissato al piano di lavoro solo mediante i fori di fissaggio, utilizzando solo gli elementi di montaggio e le viti in dotazione e come indicato nel manuale. Altrimenti si presenta un pericolo per la sicurezza di vita e beni.

Il numero delle molle per il montaggio del prodotto varia a seconda del modello del prodotto.
Controllo finale
- Inserire il cavo di alimentazione e accendere il fusibile dell'unità.
- Controllare le funzioni.
Smaltimento di vecchi prodotti
- Conservare il cartone originale del prodotto e trasportare il prodotto in esso. Seguire le istruzioni sul cartone. Se non si ha il cartone originale, imballare il prodotto nella carta con le bolle o in un cartone spesso e assicurarlo con nastro adesivo.

Controllare l'aspetto generale del prodotto per eventuali danni che potrebbero essersi verificati durante il trasporto.
4 Preparazioni
Consigli per il risparmio energetico
Le informazioni che seguono aiutano ad usare l'apparecchio in modo ecologico e a risparmiare energia:
- Scongelare gli alimenti congelati prima di cuocerli.
- Usare pentole/padelle con coperchi per la cottura. Se non vi è coperchio, il consumo energetico può aumentare 4 volte.
- Selezionare il bruciatore adatto per la dimensione del fondo della pentola da usare. Selezionare sempre la dimensione corretta della pentola per i piatti. Pentole più grandi richiedono più energia.
- Prestare attenzione ad usare pentole dal fondo piatto quando si cucina coi piani di cottura elettrici.
Pentole con fondi spessi forniscono una migliore conduzione del calore. Si possono ottenere risparmi energetici fino a 1/3. - Contenitori e pentole devono essere compatibili con le zone di cottura. Il fondo di contenitori o pentole non deve essere più piccolo della piastra calda.
- Tenere puliti zone di cottura e fondo delle pentole. Lo sporco fa diminuire la conduzione del calore tra la zona di cottura e il fondo della pentola.
Uso iniziale
Prima pulizia del prodotto

La superficie può danneggiarsi a causa di alcuni detergenti o materiali di pulizia. Non usare detergenti aggressivi, polvere/creme pulenti o oggetti taglienti durante la pulizia.
- Rimuovere tutti i materiali di imballaggio.
- Pulire le superfici del prodotto con un panno o una spugna umidi e asciugare con un panno.
Riscaldamento iniziale

Durante il primo funzionamento, per un paio d'ore, è possibile che siano emessi odori e fumo. È abbastanza normale. Assicurarsi che l'ambiente sia ben ventilato per rimuovere fumo e odori. Evitare di inalare direttamente fumo e odori emessi.
5 Come utilizzare il piano cottura
Informazioni generali sulla cottura

Non riempire mai la padella con olio per oltre un terzo. Non lasciare il piano cottura incustodito quando si riscalda l'olio. L'olio surriscaldato rappresenta un rischio di incendio. Non cercare mai di spegnere un possibile incendio con l'acqua! Quando l'olio prende fuoco, coprirlo con una coperta idonea o un panno umido. Spegnere il piano cottura se è sicuro farlo e chiamare i vigili del fuoco.
- Prima di friggere gli alimenti, asciugarli bene sempre e metterli delicatamente nell'olio caldo.
Assicurare che gli alimenti congelati siano completamente scongelati prima di friggerli. - Non coprire il contenitore usato quando si riscalda l'olio.
- Mettere pentole e padelle in modo tale che i manici non siano sul piano cottura per evitare il riscaldamento dei manici stessi. Non mettere contenitori sbilanciati e che si inclinano facilmente sul piano cottura.
- Non mettere contenitori e padelle vuoti sulle zone di cottura accese. Potrebbero danneggiarsi.
- L'uso di una zona di cottura senza un contenitore o una padella sopra provoca danni all'apparecchio. Spegnere le zone di cottura quando la cottura è completa.
- Poiché la superficie dell'apparecchio potrebbe essere calda, non mettere contenitori in plastica e alluminio su di essa.
Pulire immediatamente tutti i materiali sciolti sulla superficie.
Tali contenitori non devono essere nemmeno usati per conservare gli alimenti.
• Usare solo padelle o contenitori con fondo piatto.
- Mettere la quantità appropriata di alimenti nelle pentole e nelle padelle. Così non bisognerà eseguire alcuna operazione di pulizia non necessaria evitando traboccamenti.
Non mettere coperchi di pentole o padelle sulle zone di cottura.
Mettere le padelle in modo tale che siano al centro della zona di cottura. Quando si desidera spostare la padella su un'altra zona di cottura,
sollevarla e metterla sulla zona di cottura scelta, non trascinarla.
Selezione pentole
- La superficie in vetroceramica è resistente al calore e non è influenzata da grosse differenze di temperatura.
• Non usare la superficie in vetroceramica per conservare gli alimenti o tagliarli. - Usare solo padelle e pentole con fondi lavorati a macchina. Bordi taglienti provocano graffi sulla superficie.
natural_image
Diagram showing a hand holding a chimney above a fire barrier with crossed-out black lines (no text or symbols)Gli schizzi possono danneggiare la superficie in vetroceramica e provocare incendi. Non usare contenitori con fondi concavi o convessi.
Usare solo padelle e pentole con fondi piatti. Essi assicurano un più facile trasferimento del calore.
Per i piani cottura ad induzione, usare solo contenitori adatti alla cottura ad induzione.
Test pentole
Usare i metodi che seguono per testare la compatibilità della pentola con il piano cottura ad induzione.
- La pentola è compatibile se il fondo trattiene una calamita.
- La pentola è compatibile se non lampeggia quando si mette la pentola sulla zona di cottura e si avvia il piano cottura.
Si possono usare pentole in acciaio, teflon o alluminio con speciale fondo magnetico che contengano etichette o avvertenze indicanti che la pentola è compatibile con la cottura ad induzione. Non devono essere usati contenitori in vetro e ceramica, padelle e contenitori in acciaio inox con fondo in alluminio non magnetico.
Sistema di riconoscimento delle pentole
Nella cottura ad induzione, solo l'area coperta dal contenitore della zona di cottura pertinente riceve energia. Il fondo del contenitore è riconosciuto dal
sistema e solo questa zona è riscaldata automaticamente. La cottura si arresta se il contenitore per la cottura è sollevato dalla zona di cottura durante la cottura. La zona di cottura selezionata e il simbolo lampeggiano in modo alternato.
Uso sicuro
Non selezionare livelli alti di riscaldamento quando si usa una pentola (teflon) antiaderente senza olio o con poco olio.
Non mettere oggetti metallici come forchette, coltelli o coperchi per pentole sul piano cottura poiché possono diventare caldi.
Non usare mai fogli di alluminio per la cottura. Non mettere mai alimenti avvolti in fogli di alluminio sulla zona di cottura.

Se c'è un forno sotto al piano cottura e se è in funzione, i sensori del piano cottura possono diminuire il livello di cottura o spegnere il forno.

Quando il piano cottura è in funzione, tenere gli oggetti con proprietà magnetiche, come carte di credito o cassette, lontani dal piano cottura.
Selezione della zona di cottura adatta al contenitore
| Zona di cottura grande | Zona di cottura normale | Zona di cottura piccola |
| Zona di cottura grandeSi adatta automaticamente alla pentola.Distribuisce il calore in modo ideale.Fornisce una perfetta distribuzione del calore. Usata per cuocere piatti come crepe grandi o pesci grandi, rari o molto rari. | Zona di cottura normaleSi adatta automaticamente alla pentola.Distribuisce il calore in modo ideale.Fornisce una perfetta distribuzione del calore. Usata per tutti i tipi di cottura. | Zona di cottura piccolaUsata per cottura lenta (salse, creme)Usata per preparare piccole porzioni o porzioni basate sul numero di persone. |
Uso del piano cottura
PERICOLO:
Non consentire ad alcun oggetto di cadere sul piano cottura. Anche oggetti piccoli come una saliera potrebbero danneggiare il piano cottura.
Non usare piani cottura lesionati. In queste lesioni può verificarsi una perdita di acqua, provocando un corto circuito.
In caso di danni alla superficie (per es. lesioni visibili), spegnere l'apparecchio immediatamente per minimizzare il rischio di shock elettrico.
Pannello di controllo
Specifiche

Tasto principale - Tasto ON/OFF Blocco tasti
Impostazione temperatura/aumento timer Impostazione temperatura/diminuzione timer
* Attivazione/disattivazione timer
Comandi selezione zona di cottura
Display zona di cottura (impostazione temperatura 0 ... 9)
* Display timer (ci sono 4 LED per le 4 diverse zone di cottura)

Questo apparecchio è controllato mediante unità touch control. Se l'unità touch control è dotata di timer, ogni operazione viene confermata da un segnale audio.

Tenere sempre i pannelli di controllo puliti e asciutti. Umidità e sporco possono provocare malfunzionamento.
(*) Se il piano cottura è dotato di timer.
(*) Non in dotazione con piani cottura con 3 bruciatori.
(*) Se il piano cottura è dotato di timer.

Grafici e figure hanno solo uno scopo informativo. L'aspetto o le funzioni reali possono variare.
Accensione del piano cottura
Toccare il tasto "①" sul pannello di controllo per almeno 1 secondo. Il display della piastra calda si accende. "②" e tutti i relativi punti decimali lampeggiano in tutti i display delle piastre calde. Il piano cottura è pronto per l'uso. Si possono
selezionare le diverse piastre calde entro i successivi 10 secondi.
Il piano cottura si spegne automaticamente se non ci sono operazioni entro 10 secondi.
Selezione delle piastre calde (zona di cottura)
Mettere la pentola adatta alla cottura ad induzione (pentola con fondo magnetico, vedere pagina 12, "scelta padella adatta") sulla relativa piastra calda.

- Accensione del piano cottura.
-
Toccare il comando di selezione pertinente della piastra calda per attivare la piastra calda desiderata. Dopo aver selezionato la piastra calda," "il punto decimale smette di lampeggiare sul display della piastra calda relativa e diventa fisso.
-
Impostare il livello di calore tra "1" e "9" oppure "9" oppure "1" toccando i tasti "^" oppure "√".
I tasti "^" e "√" sono dotati di funzione di ripetizione. Se si tocca uno dei tasti più a lungo, il livello di calore sarà aumentato o ridotto in modo continuo ogni 0,4 secondi.
Se si comincia con il tasto "^", "1" compare sul display. Se si comincia con il tasto "√", 'A" e "9" lampeggiano sul display ogni mezzo secondo. Indica che Cottura automatica è in funzione. Al termine del tempo definito per la Cottura automatica dal fabbricante, la piastra calda selezionata interrompe la funzione di Cottura automatica e comincia a funzionare al livello che è stato impostato mentre la funzione di cottura automatica era selezionata.
- Per portare il forno sulla funzione alta potenza, portare il livello fino a 9 con il tasto "^" e poi premere di nuovo il tasto "^^". Così passa alla posizione alta potenza "P" (Boost).
Se lampeggia;
• La pentola non è adatta alla cottura ad induzione.
• Non c'è niente sulla piastra calda selezionata.
- Il diametro del fondo della padella è piccolo per la piastra calda.

Non è possibile utilizzare entrambe le piastre calde del gruppo di destra o sinistra nella posizione Boost contemporaneamente.
Esempio: Se una delle piastre calde della stessa direzione (destra o sinistra) è impostata sul livello "P", allora il sistema consente di regolare l'altra piastra calda fino al livello 8 cambiando l'impostazione della prima piastra calda.
Uso delle piastre calde ad induzione in modo sicuro ed efficiente
Principio operativo: Grazie al principio operativo, il piano cottura ad induzione riscalda direttamente la pentola. Pertanto ha molti vantaggi rispetto ad altri tipi di piani cottura. È più efficiente e la superficie del piano cottura è più fredda.
Il piano cottura ad induzione è dotato di sistemi di sicurezza superiori che consentono di usare l'apparecchio con la massima sicurezza.
Il controllo del piano cottura ha un limite per il tempo di funzionamento. Se una o più piastre calde restano inavvertitamente accese, la piastra calda sarà automaticamente disattivata dopo un certo periodo di tempo. (vedere la tabella 1 che segue).
Allo stesso tempo; se un timer è stato associato alla piastra calda, allora "00" sarà visualizzato sul display del timer per 10 secondi. Il limite del tempo operativo dipende dall'impostazione di temperatura selezionata dal produttore.
Quando la piastra calda si spegne automaticamente come descritto sopra, diventa pronta per essere usata nuovamente dall'utente. Il tempo di funzionamento massimo si applica anche questa impostazione di calore.
Importante: Il piano cottura è dotato di zone di cottura di ∅ 145, ∅180, ∅ 210 e ∅ 280 che hanno la funzione ad induzione. Grazie alla funzione ad induzione, ciascuna piastra calda rileva automaticamente il diametro della pentola messa su di essa. "L'energia si crea solo nei punti in cui il fondo della pentola
tocca" e così l'energia viene consumata ad un livello minimo.
Tabella 1: Tempi di funzionamento preimpostati quando ci si dimentica di spegnere il piano cottura
| Livello di temperatura | Limite tempo di funzionamento - ore |
| 0 | 0 |
| 1 | 6 |
| 2 | 6 |
| 3 | 5 |
| 4 | 5 |
| 5 | 4 |
| 6 | 1,5 |
| 7 | 1,5 |
| 8 | 1,5 |
| 9 | 0,5 |
| P (boost) - cottura rapida (booster) | 10 minuti (*) |
| (*) 10 minuti dopo, la piastra calda diminuisce fino a livello 9. | |
Utilizzo di 2 zone di cottura contemporaneamente allo stesso lato
La potenza totale del piano cottura è 3700 W. Le prestazioni del piano cottura possono essere modificate secondo il numero delle zone attive. Se due zone sono utilizzate contemporaneamente, bisogna utilizzare quelle dello stesso lato. Questa modalità di utilizzo garantisce migliori prestazioni di cottura e rilevamento della pentola. Si può vedere nella figura sotto la modalità di utilizzo raccomandato per utilizzare due zone di cottura insieme.
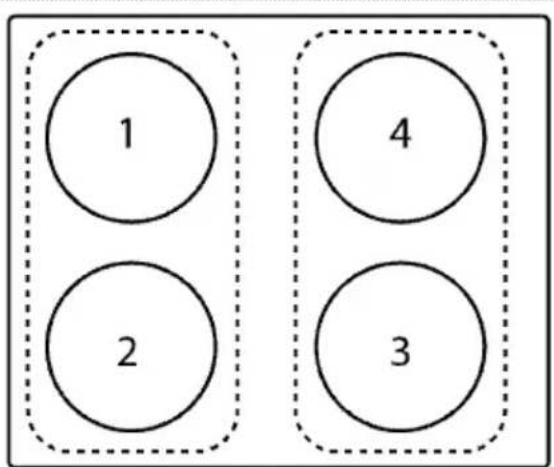

Se le zone di cottura di destra e di sinistra del piano cottura sono utilizzate allo stesso tempo, funzioneranno in modo discontinuo. Pertanto le prestazioni di cottura e rilevamento della pentola sono inferiori.
Protezione da surriscaldamento
Ci sono alcuni sensori dentro al piano cottura per garantire protezione dal surriscaldamento. Di seguito le situazioni che potrebbero verificarsi in caso di surriscaldamento:
• La piastra calda in uso potrebbe spegnersi.
- Il livello selezionato può diminuire. (Ma non è indicato sul display).
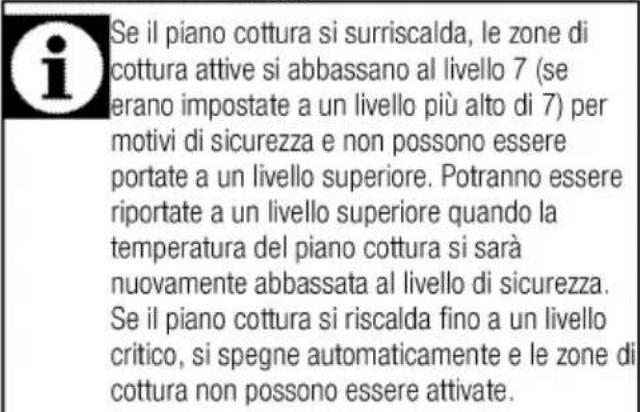
A causa delle limitazioni nella potenza totale del piano cottura, può verificarsi una diminuzione nel primo livello di potenza rispetto ai livelli impostati quando le zone di destra e di sinistra sono in funzione contemporaneamente.
Sistema di sicurezza contro traboccamento
Il piano cottura è dotato di un sistema di sicurezza contro traboccamento. Se si verifica un traboccamento sul pannello di controllo per qualsiasi motivo, il sistema automaticamente taglia il collegamento dell'alimentazione per spegnere il piano cottura. Allo stesso tempo "F" compare sul display touch.
Indicatore calore residuo
Il piano cottura ad induzione potrebbe diventare caldo dopo il processo di cottura a causa della pentola lasciata sulla piastra calda. Finché il ripiano in vetro sulla sezione del piano cottura non scende ad una temperatura sicura, "H" sarà visualizzato sul pannello di controllo. "Non toccare le relative sezioni finché "H" scompare.

Il display della temperatura non si accende e non avvisa l'utente durante un'assenza di elettricità.
Impostazione sensibile di potenza
Grazie al principio operativo, il piano cottura a induzione risponde immediatamente ai comandi. Essi cambiano le impostazioni di potenza in modo rapido. Così si impedisce il traboccare di un piatto in cottura (acqua, latte) spegnendo l'apparecchio.
Cottura automatica e alta potenza (Booster)
La funzione di cottura automatica rende la cottura più facile. Se la cottura automatica è attiva, la piastra
calda sarà azionata ad una potenza massima per un periodo di tempo (vedere tabella -2). Il tempo di riscaldamento rapido dipende dal livello di calore selezionato. Questo è indicato da una "A" lampeggiante in alternanza con il valore di calore impostato (per esempio per mezzo secondo "A" e per mezzo secondo "9") nel display della piastra calda. Alla fine del tempo di riscaldamento rapido, il piano cottura torna alla modalità riscaldamento normale e "A" scompare.
Tutte le piastre sono dotate della funzione di riscaldamento rapido.
La tabella che segue contiene i tempi di riscaldamento automatico per i diversi livelli di riscaldamento.
Tabella 2: Tempi di riscaldamento rapido nelle cottura automatica
| Livello di temperatura | Tempo di funzionamento riscaldamento rapido - (secondi) |
| 1 | 10 |
| 2 | 30 |
| 3 | 47 |
| 4 | 65 |
| 5 | 85 |
| 6 | 25 |
| 7 | 35 |
| 8 | 45 |
| 9 | 10 |
Attivazione della funzione di cottura automatica:
- Accensione del piano cottura.
- Selezionare la piastra calda desiderata toccando i tasti di selezione della piastra calda.
- "√" Tasto per portare il valore di calore della piastra calda al livello desiderato. "9" e "A" saranno visualizzati rispettivamente sullo schermo. Ciò vuol dire che il valore di impostazione del calore "9" e la funzione di riscaldamento rapido sono attivi ora.
- La funzione di riscaldamento rapido del livello da selezionare è determinata con i tasti "^" o "√".
- La funzione di riscaldamento rapido specificata opera per il periodo in base al livello di cottura della tabella 2 e ritorna al suo livello dopo che il tempo è passato. (Per esempio, questo periodo è 25 minuti per il livello 6)
Disattivazione della funzione di cottura automatica:
- La funzione di cottura automatica può essere disattivata prima portando l'impostazione di calore a "0".
- La cottura automatica non è più attiva quando il periodo nella tabella 2 è finito.
Alta potenza (Booster)
Si può usare il livello alta potenza per riscaldare più velocemente il piano cottura. Ma non si consiglia di cucinare troppo a lungo in questa posizione.
Selezionare la piastra calda pertinente e sistemare la pentola adatta. Portare il livello fino a 9 e poi riportarlo alla posizione P premendo il tasto "^". Data la temperatura, al piano cottura sarà consentito di funzionare per massimo 10 minuti e la piastra calda del piano cottura selezionato per la funzione booster torneranno automaticamente al livello 9.
Spegnimento del piano cottura
Se l'interruttore principale "①" è premuto per più di 2 sec, il piano cottura si spegne. Se la piastra calda in questione è ancora calda quando il piano cottura è spento, allora "H" si accende nel display in modo continuo.
Spegnimento delle piastre calde individuali:
Una piastra calda selezionata può essere disattivata in 3 modi diversi:
- Funzionamento simultaneo dei tasti "^"e "√"
La piastra calda desiderata deve essere scelta con il tasto di selezione della piastra calda "Q". Per esempio "O."
Il punto decimale diventa fisso sul display della piastra calda, i tasti "^"e "√" devono essere toccati contemporaneamente per disattivare la piastra calda.
-
Riduzione dell'impostazione di calore a "0" azionando il tasto "√" della piastra calda desiderata
-
Uso della funzione di disattivazione del timer per la piastra calda desiderata (se è disponibile una funzione timer)
Blocco tasti \*
Toccare il tasto "O" per più di 2 secondi per bloccare il touch control. Il funzionamento sarà confermato con un segnale audio. Poi, il LED "O" lampeggia e tutte le zone di cottura saranno bloccate.
Le zone di cottura possono essere bloccate solo in modalità di funzionamento. Se le zone di cottura sono bloccate: solo il tasto principale "①" può essere
azionato. Il LED "O" lampeggia e indica un modulo di blocco tasti. Se si disattiva il piano cottura quando i tasti sono bloccati, il blocco tasti sarà attivato alla
successiva accensione del piano cottura. Il blocco tasti deve essere disattivato per essere in grado di azionare il piano cottura.
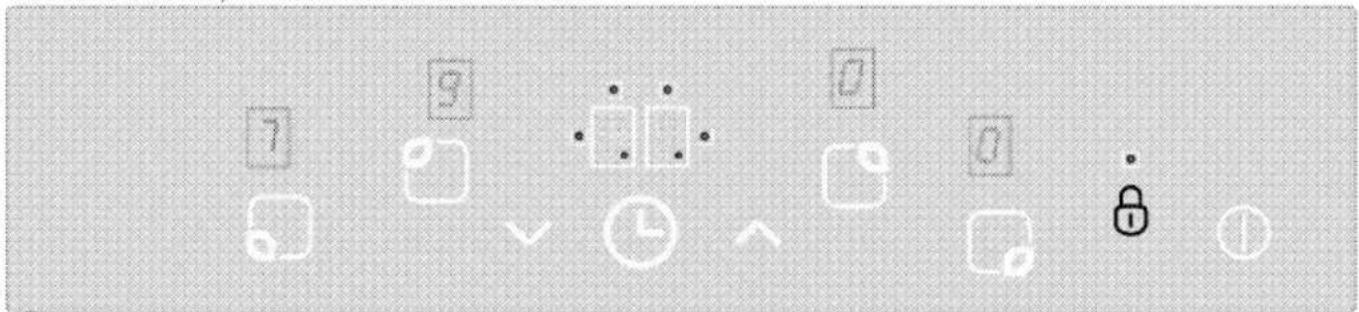
"☐" Il tasto consente di bloccare o sbloccare il touch control in modalità di funzionamento.
Toccare il tasto "☐" per 2 secondi per sbloccare le zone di cottura. Il funzionamento sarà confermato con un segnale audio.
Poi, il LED "☐" si spegne. Ora il touch control è sbloccato e può essere usato come sempre.
Blocco bambini
Si può proteggere il piano cottura da azioni accidentali per evitare che i bambini accendano la zona di cottura. La funzione di blocco bambini contiene pochi punti complessi per bloccare il touch control. Il blocco bambini può essere attivato e disattivato solo in modalità standby.
Blocco del modulo:
- Toccare il tasto principale "☐" per accendere il piano cottura.
- Toccare i tasti "^" e "√" contemporaneamente per almeno 2 secondi.
- Poi toccare il tasto "^" ancora una volta.
» La funzione blocco bambini è attivata e "L." compare su tutti i display delle zone di cottura.
Disattivazione del blocco bambini:
Si può disattivare il blocco bambini come lo si è attivato.
- Toccare il tasto principale "①" per accendere il piano cottura.
- Toccare i tasti "^" e "√" contemporaneamente per almeno 2 secondi.
- Poi toccare il tasto "√" ancora una volta.
» "L." compare su tutti i display delle zone di cottura quando è attivato il blocco bambini. "L." scompare quando il blocco è disattivato con successo.
Funzione timer \*
Questa funzione facilita la cottura. Non bisogna supervisionare in modo continuo il piano cottura durante il processo di cottura e la zona di cottura si spegne automaticamente alla fine del tempo selezionato.
Il timer fornisce le funzioni che seguono: Il touch control può comandare contemporaneamente fino a massimo 4 timer per le zone di cottura e un timer allarme per cottura. Tutti i timer possono essere solo usati in modalità funzionamento.
Timer come allarme
Il timer dell'allarme funziona in modo indipendente dalle altre zone di cottura. Pertanto non è importante se una zona di cottura è selezionata o meno.
- Toccare il tasto "∅" per attivare il timer dell'allarme. "00" e "∅, ∞" compaiono sul display del timer contemporaneamente e un punto compare sul lato inferiore destro. Così il timer dell'allarme è attivato.
- Poi selezionare il valore di tempo desiderato toccando i tasti "^" e "√".
- Il timer avvia il conto alla rovescia dopo aver eseguito l'impostazione del tempo.
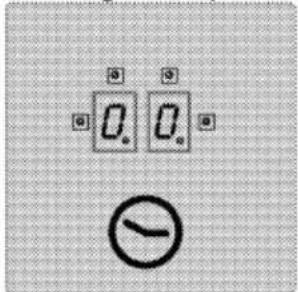
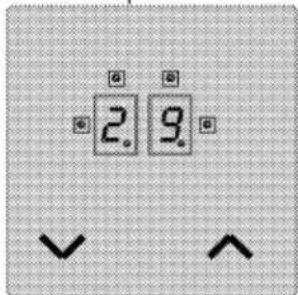
» Quando il tempo è finito, suona un allarme sonoro. Toccare un tasto sul pannello touch control per azzerare l'allarme sonoro.
Timer zona di cottura:
I timer delle zone di cottura possono essere impostati solo per le zone di cottura attivate.
-
Per prima cosa accendere il piano cottura e quindi attivare la zona di cottura desiderata. (la zona di cottura deve essere impostata su un valore compreso tra 1 e 9)
-
Come nel timer dell'allarme, attivare il timer della zona di cottura toccando il tasto "∅". "00" e "s ^m O ^m O ^m " compaiono sul display del timer contemporaneamente e un punto compare sul lato inferiore destro. Così il timer della zona di cottura è attivato.
- Bisogna toccare il tasto "⊖" una seconda volta per attivare il timer della zona di cottura. Ora è possibile assegnare il timer.
- Impostare il valore di tempo desiderato toccando i tasti "^" e "√".
Per impostare i timer del piano cottura:
- Dopo l'attivazione del timer della prima zona di cottura, toccare di nuovo il tasto "☐". Il comando gira in senso orario verso la successiva zona di cottura attiva assegnata al timer. La proposta di assegnazione sarà mostrata con un LED "☐" lampeggiante.
- Impostare il valore di tempo desiderato toccando i tasti "^" e "√".
- Il timer attivato per la zona di cottura che è stata impostata per prima è indicato con un LED "☐" che lampeggia in modo continuo.
-
Altri timer possono essere assegnati per le altre zone di cottura attive toccando ancora una volta il tasto "©".
-
Dopo 10 secondi, il display del timer torna al timer che finisce per primo.
- I LED "C" che si accendono in modo continuo sul display del indicano il timer che sta attualmente eseguendo il conto alla rovescia.
- Possono essere visualizzati i valori impostati per i timer della zona di cottura e la clessidra cambiando la posizione del tasto "☐". Un LED anteriore destro "☐" lampeggiante mostra sempre un'assegnazione.
Se non ci sono LED lampeggianti, il valore della clessidra sarà visualizzato nella schermata timer.
Disattivazione dei timer:
Per prima cosa bisogna visualizzare il timer cambiando la posizione del tasto "∅" finché compare il timer. Questo valore può in seguito essere cancellato in 2 modi diversi:
- diminuendo il valore a scatti fino a "00" toccando il tasto "√".
- Toccando contemporaneamente i tasti "^" e "√" per mezzo secondo finché "00" compare sul display del timer.
Quando il tempo è finito, suona un allarme sonoro. Toccare un tasto sul pannello touch control per azzerare l'allarme sonoro.
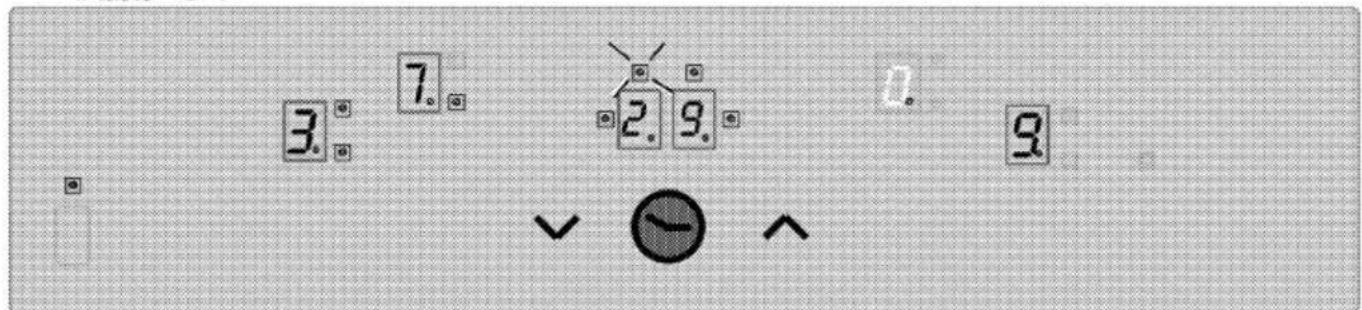
Visualizzazione del valore di tempo rimanente del timer 3 della zona di cottura (l'indicatore LED lampeggia) sul display del timer (i LED dei timer attivi delle zone di cottura 1 e 4 infatti non saranno visibili sul display del timer).
Rumori
Si possono sentire alcuni suoni dal piano cottura ad induzione riscaldato. Tali suoni sono normali e fanno parte della cottura ad induzione. Tali suoni;
- possono essere più intensi quando il livello è in posizione alta potenza.
- possono derivare dal materiale strutturale della pentola.
-
Nelle posizioni a bassa potenza, può essere sentito un regolare suono on-off a causa del principio operativo.
-
Può verificarsi rumore quando si riscalda una pentola vuota. Tale suono scompare quando si aggiungono acqua o cibo.
- Si può sentire il rumore della ventola usata per raffreddare il sistema elettronico.
Calibrazione del sensore e messaggi di errore
Quando si applica l'alimentazione elettrica, il sistema di controllo del piano cottura esegue una calibrazione a seconda di sensore, vetro e condizioni ambiente. Non coprire la parte in vetro del sensore con alcunché durante la calibrazione. Anche il sistema di controllo del piano cottura non deve essere esposto a fonti di luce forte come luce solare, lampade alogene forti, ecc.
Tabella 3: Codici di errore e origini dell'errore
| Causa dell'errore | Display |
| Luce ambiente troppo alta | F1 |
| Lampada fluorescente | F2 |
| Sensore coperto da una sostanza luminosa | F3 |
| Luce ambiente con forti fluttuazioni | F4 |
| Errore di calibrazione | AX |
| Errore sistema induzione | EX |
| (x = "0....9") | |
Esempio applicazione:
Le condizioni di luce che seguono consentono una calibrazione senza problemi:
Illuminazione con una lampadina senza riflettore (100W, opaca) 70 cm al di sopra del piano cottura in vetroceramica. Dopo una calibrazione riuscita, si garantisce che il piano cottura funzionerà come previsto anche sotto una illuminazione forte come lampade alogene con riflettore (50 W).
In caso di errore, la calibrazione è ripetuta finché le condizioni ambiente consentono una calibrazione riuscita. Il funzionamento dei comandi del piano cottura è possibile solo se la calibrazione di tutti i sensori è stata completata con successo. Dopo un processo di calibrazione completato con successo, i comandi tollerano una luce ambiente molto forte.
Durante il funzionamento dei comandi del piano cottura, esso si modifica e ricalibra seguendo i cambiamenti nelle condizioni ambientali.
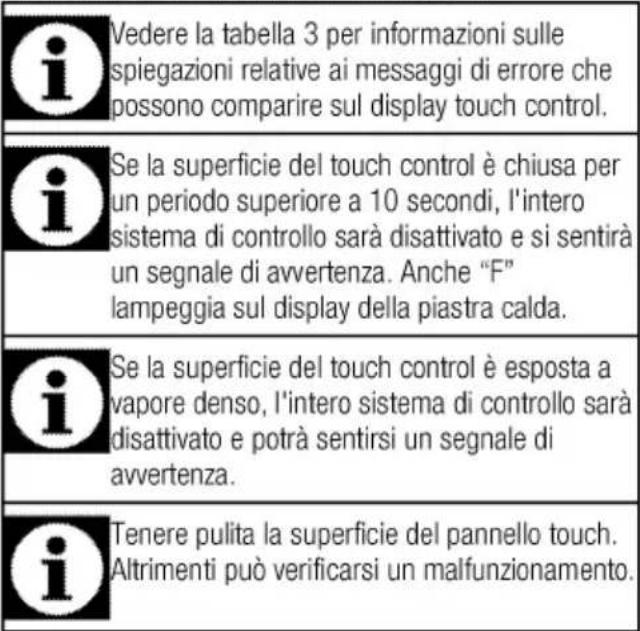
6 Manutenzione e cura
Informazioni generali
La vita di servizio dell'apparecchio si allunga e problemi frequenti diminuiscono se l'apparecchio è pulito ad intervalli regolari.

PERICOLO:
Scollegare l'apparecchio dalla rete elettrica prima di avviare i lavori di manutenzione e pulizia.
C'è il rischio di shock elettrico!
PERICOLO:
Consentire all'apparecchio di raffreddarsi prima di pulirla.
Le superfici calde possono provocare ustioni!
- Pulire completamente l'apparecchio dopo ogni uso. In questo modo sarà possibile rimuovere i residui di cottura con maggiore facilità, evitando così che questi residui brucino all'uso successivo dell'apparecchio.
- Non sono necessari agenti di pulizia speciali per la pulizia dell'apparecchio. Usare acqua calda con detersivo liquido, un panno morbido o una spugna per pulire l'apparecchio e asciugare con un panno asciutto.
• Assicurare sempre che il liquido in eccesso sia completamente asciugato dopo la pulizia e che tutti gli schizzi siano immediatamente asciugati. - Non usare agenti di pulizia che contengono acido o cloro per pulire le superfici e la maniglia in acciaio inox. Usare un panno morbido con un detergente liquido (non abrasivo) per pulire queste parti, prestando attenzione a pulire in un'unica direzione.

La superficie può danneggiarsi a causa di alcuni detergenti o materiali di pulizia.
Non usare detergenti aggressivi, polvere/creme pulenti o oggetti taglienti durante la pulizia.

Non usare pulitori a vapore per pulire l'apparecchio poiché ciò potrebbe provocare uno shock elettrico.
Pulizia del piano cottura
Superficie in vetroceramica
Pulire la superficie in vetroceramica usando un panno inumidito con acqua fredda in modo da non lasciare agente di pulizia su di essa. Asciugare con un panno morbido e asciutto. I residui possono danneggiare la superficie in vetroceramica quando si usa il piano cottura la volta successiva.
I residui asciutti sulla superficie in vetroceramica non devono essere grattati via in nessun caso con lame uncinate, lana di acciaio o strumenti simili.
Rimuovere le macchie di calcio (macchie gialle) con una piccola quantità di agente di rimozione del calcare come aceto o succo di limone. È anche possibile usare prodotti adatti disponibili in commercio.
Se la superficie è molto sporca, applicare l'agente di pulizia su una spugna e aspettare finché non è assorbito bene. Poi, pulire la superficie del piano cottura con un panno umido.

Alimenti a base di zucchero come creme dense e sciroppi devono essere puliti subito senza aspettare che la superficie si raffreddi. Altrimenti la superficie in vetroceramica potrebbe danneggiarsi in modo permanente.
Nel tempo può verificarsi un leggero scolorimento sui rivestimenti o sulle altre superfici. Questo non influisce sul funzionamento del prodotto.
Scolorimento e macchie sulla superficie in vetroceramica rappresentano una condizione normale, non un difetto.
7 Ricerca e risoluzione dei problemi
L'apparecchio emette rumori metallici durante riscaldamento e raffreddamento.
• Quando le parti di metallo si riscaldano, possono espandersi e provocare rumori. >>> Non è guasto.
L'apparecchio non funziona.
- Il fusibile di rete è difettoso o si è bloccato. >>> Controllare i fusibili nella scatola dei fusibili. Se necessario, sostituirli o reimpostarli.
- L'apparecchio non è collegato alla presa (di messa a terra). >>> Controllare il collegamento della spina.
- Se il display non si illumina quando si accende di nuovo il piano cottura. >>> Scollegare l'apparecchio mediante l'interruttore. Attendere 20 secondi e poi ricollegare.
• La protezione da surriscaldamento è attiva. >>> Consentire al piano cottura di raffreddare.
• La pentola usata non è adatta. >>> Controllare la pentola.
Il simbolo compare sul display della zona di cottura.
- La pentola non è stata posizionata sulla zona di cottura attiva. >>> Controllare se c'è una pentola sulla zona di cottura.
- La pentola non è compatibile con la cottura ad induzione. >>> Controllare se la pentola è compatibile con la cottura ad induzione.
- La pentola non è correttamente centrata o la superficie del fondo della pentola non è abbastanza ampia per la zona di cottura. >>> Scegliere una pentola abbastanza ampia e centrare in modo corretto la pentola sulla zona di cottura.
• La pentola o la zona di cottura sono surriscaldate. >>> Lasciarle raffreddare.
La zona di cottura selezionata all'improvviso si spegne durante il funzionamento.
- Potrebbe essere trascorso il tempo di cottura per la zona di cottura selezionata. >>> Si può impostare un nuovo tempo per la cottura o completare la cottura.
- La protezione da surriscaldamento è attiva. >>> Consentire al piano cottura di raffreddare.
- Un oggetto potrebbe coprire il pannello touch control. >>> Rimuovere l'oggetto dal pannello.
La pentola non si riscalda nemmeno se la zona di cottura è accesa.
- La pentola non è compatibile con la cottura ad induzione. >>> Controllare se la pentola è compatibile con la cottura ad induzione.
- La pentola non è correttamente centrata o la superficie del fondo della pentola non è abbastanza ampia per la zona di cottura. >>> Scegliere una pentola abbastanza ampia e centrare in modo corretto la pentola sulla zona di cottura.

Consultare l'agente autorizzato per l'assistenza o il rivenditore dove è stato acquistato l'apparecchio se non si riesce a risolvere il problema nonostante siano state implementate le soluzioni di questa sezione. Non cercare mai di riparare da soli un apparecchio difettoso.
- Built-in Hob
- Please read this user manual first!
- Explanation of symbols
- Arçelik A.Ş.
- Important instructions and warnings for safety and environment 4
- General information 8
- Installation 9
- Preparation 12
- How to use the hob 13
- Maintenance and care 21
- Troubleshooting 22
- Important instructions and warnings for safety and environment
- General safety
- Electrical safety
- Product safety
- Intended use
- Safety for children
- Disposing of the old product
- Compliance with the WEEE Directive and Disposing of the Waste Product:
- Compliance with RoHS Directive:
- Package information
- General information
- Overview
- Installation
- Before installation
- Installation and connection
- Electrical connection
- DANGER:
- If the board is below:
- Final check
- Future Transportation
- Preparation
- Tips for saving energy
- Initial use
- First cleaning of the appliance
- Initial heating
- How to use the hob
- General information about cooking
- Saucepan selection
- For induction hobs, use only vessels suitable for induction cooking.
- Saucepan test
- Saucepan recognition-focusing system
- Safe use
- Using the hobs
- Control panel
- Specifications
- Turning on the hob
- Selecting the Hotplates(Cooking Zone)
- If is flashing;
- Using the induction hotplates safely and efficiently
- Using 2 cooking zones simultaneously at same side
- Over Heating Protection
- Safety system against overflow
- Residual heat indicator
- Sensitive power setting
- Automatic Cooking and High Power (Booster)
- Turning On the Automatic Cooking Feature:
- Turning Off the Automatic Cooking Feature:
- High Power (Booster)
- Turning the hob off
- Turning Off The Individual Hotplates:
- Simultaneous operation of the "^" and "√" keys
- Keylock \*
- "☐" key will allow you to lock or unlock the touch control in operation mode.
- Child Lock
- Locking the module:
- Disabling the Child Lock:
- Timer function \*
- Timer as an alarm
- Cooking zone timer:
- The cooking zone timers cay only be set for the cooking zones that are activated.
- To set the hob timers:
- Disabling the timers:
- Noises
- Sensor Calibration and Error Messages
- Sample application:
- Maintenance and care
- General information
- Cleaning the hob
- Glass ceramic surfaces
- Troubleshooting
- Product emits metal noises while heating and cooling.
- Product does not operate.
- symbol appears on the cooking zone display.
- Selected cooking zone suddenly turns off during operation.
- The pot does not get warm even if the cooking zone is on.
- Piano cottura incassato
- Manuale utente
- Leggere questo manuale utente come prima cosa!
- Spiegazione dei simboli
- Istruzioni importanti e avvertenze per sicurezza e ambiente 4
- Informazioni generali 8
- Installazione 9
- Preparazioni 12
- Come utilizzare il piano cottura 13
- Manutenzione e cura 22
- Ricerca e risoluzione dei problemi 23
- Istruzioni importanti e avvertenze per sicurezza e ambiente
- Sicurezza generale
- Sicurezza elettrica
- Sicurezza del prodotto
- Uso previsto
- Sicurezza dei bambini
- Smaltimento di vecchi prodotti
- Conformità alla Direttiva RoHS:
- Smaltimento del materiale di imballaggio
- Informazioni generali
- Panoramica
- Installazione
- Prima della installazione
- Installazione e collegamento
- Collegamento elettrico
- PERICOLO:
- Se c'è un tavolo sotto
- Controllo finale
- Preparazioni
- Consigli per il risparmio energetico
- Uso iniziale
- Prima pulizia del prodotto
- Riscaldamento iniziale
- Come utilizzare il piano cottura
- Informazioni generali sulla cottura
- Selezione pentole
- Per i piani cottura ad induzione, usare solo contenitori adatti alla cottura ad induzione.
- Test pentole
- Sistema di riconoscimento delle pentole
- Uso sicuro
- Uso del piano cottura
- Pannello di controllo
- Specifiche
- Accensione del piano cottura
- Selezione delle piastre calde (zona di cottura)
- Se lampeggia;
- Uso delle piastre calde ad induzione in modo sicuro ed efficiente
- Utilizzo di 2 zone di cottura contemporaneamente allo stesso lato
- Protezione da surriscaldamento
- Sistema di sicurezza contro traboccamento
- Indicatore calore residuo
- Impostazione sensibile di potenza
- Cottura automatica e alta potenza (Booster)
- Attivazione della funzione di cottura automatica:
- Disattivazione della funzione di cottura automatica:
- Alta potenza (Booster)
- Spegnimento del piano cottura
- Spegnimento delle piastre calde individuali:
- Blocco tasti \*
- "☐" Il tasto consente di bloccare o sbloccare il touch control in modalità di funzionamento.
- Blocco bambini
- Blocco del modulo:
- Disattivazione del blocco bambini:
- Funzione timer \*
- Timer come allarme
- Timer zona di cottura:
- Per impostare i timer del piano cottura:
- Disattivazione dei timer:
- Rumori
- Calibrazione del sensore e messaggi di errore
- Esempio applicazione:
- Le condizioni di luce che seguono consentono una calibrazione senza problemi:
- Manutenzione e cura
- Informazioni generali
- Pulizia del piano cottura
- Superficie in vetroceramica
- Ricerca e risoluzione dei problemi
- L'apparecchio emette rumori metallici durante riscaldamento e raffreddamento.
- L'apparecchio non funziona.
- Il simbolo compare sul display della zona di cottura.
- La zona di cottura selezionata all'improvviso si spegne durante il funzionamento.
- La pentola non si riscalda nemmeno se la zona di cottura è accesa.
Mærke : BEKO
Model : HI 6443C GT
Kategori : Komfur