
CDX-FW560 - Bilradio SONY - Gratis brugsanvisning og manual
Find enhedens vejledning gratis CDX-FW560 SONY i PDF-format.


Brugerspørgsmål om CDX-FW560 SONY
0 spørgsmål om dette apparat. Besvar dem du kender, eller stil dit eget.
Stil et nyt spørgsmål om dette apparat
Download vejledningen til din Bilradio i PDF-format gratis! Find din vejledning CDX-FW560 - SONY og tag din elektroniske enhed tilbage i hånden. På denne side er alle dokumenter nødvendige for brugen af din enhed offentliggjort. CDX-FW560 af mærket SONY.
BRUGSANVISNING CDX-FW560 SONY
XM Satellite Radio Receiver
Operating Instructions
Owner's Record
The model number is located on the bottom and serial number also on the bottom. Record the serial number in the space provide below. Refer to these numbers whenever you call upon your Sony dealer regarding this product.
Model No. XT-XM1
Serial No. ____ XM Radio ID ____

SATELLITE
RADI
XT-XM1
Sony Corporation © 2002 Printed in Japan
WARNING
This equipment has been tested and found to comply with the limits for a Class B digital device, pursuant to Part 15 of the FCC Rules. These limits are designed to provide reasonable protection against harmful interference in a residential installation. This equipment generates, uses, and can radiate radio frequency energy and, if not installed and used in accordance with the instructions, may cause harmful interference to radio communications. However, there is no guarantee that interference will not occur in a particular installation. If this equipment does cause harmful interference to radio or television reception, which can be determined by
turning the equipment off and on, the user is encouraged to try to correct the interference by one or more of the following measures:
— Reorient or relocate the receiving antenna.
— Increase the separation between the equipment and receiver.
— Connect the equipment into an outlet on a circuit different from that to which the
receiver is connected.
— Consult the dealer or an experienced radio/TV technician for help.
You are cautioned that any changes or modifications not expressly approved in this manual could void your authority to operate this equipment.
If you have any questions or problem concerning this product, consult your nearest Sony dealer.
If you have any questions or problem concerning the XM Satellite radio service including the broadcast, consult XM.
The XM Radio ID (XM-ID) is required when consulting XM. It is located on the bottom of the main unit, and you can also check it in the display of this unit (see "Displaying the XM Radio ID").
Welcome!
Thank you for purchasing the Sony XM Satellite Radio Receiver. The receiver allows you to: •Receive XM Satellite Radio programming (with
subscription) by connecting a Sony master unit* compatible with the Sony BUS system. Connect and use an optional CD or MD changer.
- Receive up to 100 channels of XM programming.
• Display channel name, artist name, and song title for most XM channels.
• Store up to 20 favorite XM channels.
•Search XM channels by category.
* Some master units may not be connected to this receiver. (For details, please consult your nearest Sony dealer.)
Introducing XM™ Satellite Radio
There's a world beyond AM and FM. XM Satellite Radio. Up to 100 channels. Coast-to-Coast Coverage. Digital quality sound. With many commercial-free music channels. Plus, the best sports, comedy, talk, news and entertainment, including USA Today, Discovery Radio, NASCAR, Sesame Workshop, CNNfn and CNN/SI. Questions? Visit www.xmradio.com. The future is waiting.
How to Subscribe
Listeners can subscribe by visiting XM on the Web at www.xmradio.com or by calling XM's Listener Care at (800)852-9696. Customers should have their Radio ID ready; it is located on the bottom of the main unit, and you can also check it in the display of this unit (see "Displaying the XM Radio ID").
Technology. It is prohibited to copy, decompile, disassemble, reverse engineer or manipulate any technology incorporated in receivers compatible with the XM Satellite Radio system. Furthermore, the AMBE® voice compression software included in this product is protected by intellectual property rights including patent rights, copyrights, and trade secrets of Digital Voice Systems, Inc. The user of this or any other software contained in an XM Radio is explicitly prohibited from attempting to copy, decompile, reverse engineer, or disassemble the object code, or in any other way convert the object code into human-readableform. The software is licensed solely for use within this product.
Getting Started
Resetting the master unit
Before operating the XM receiver for the first time, reset the master unit. If the unit is not reset in this manner, it may not function properly. For details on how to reset it, refer to the operating instructions of the master unit.
Caution
For the following master units, press the Repeat (REP) button of the master unit for two seconds after turning the XM on and select "setup 2." Without this procedure, the master unit will not display tuning-in information from the receiver correctly. Except for the following master units, "setup 1" is selected in the factory settings.
CDX-C8050X
CDX-C800REC
CDX-M750
CDX-M650
CDX-M610
CDX-M600
MDX-C850 YP-M550
* You may observe flickering in parts of the display while performing operations. This is not malfunction.
Note
Resetting the master unit will erase the clock setting and some stored contents of the master unit.
Basic Operations
Listening to a program
The XM receiver is controlled by the master unit. Button locations vary with different master unit models. Please refer to the master unit instruction manuals.
1 To select XM:
a. Press the Source button until "XM" is displayed.
b. Press the Source button until "MD" is displayed, then press the Mode button to select XM. For master units which can control more than one MD changer, press the Mode button repeatedly (the display will show "MD1," "MD2," etc.) until the receiver is found.
2 Press either Seek button to select the desired channel.
Pressing and holding the Seek button will quickly step through the channels.
Note "LOADING" is indicated while the receiver is reading the information.
Display items
The XM Satellite Radio information (Channel Name, Channel Number, Artist Name/Program Name and Song Title) is available on the display.
Press the Display (DSPL) button.
Each time you press the Display (DSPL)
button, the item changes as follows.
Channel Name → Channel Number → Artist Name/Program Name → Song Title
Artist Name/Program Name → Song Title →
For MEX-5DI, press the ENTER button of the remote control to change the display item.
Notes
- While Artist Name/Program Name or Song Title is displayed, if you select a channel, Channel Name will be displayed for 2 to 3 seconds and then return to the previous display.
- If there is no information about Artist Name, Program Name or Song Title, “----” will be displayed.
- During XM Satellite Radio reception, Spectrum Analyzer, Dual Information, Motion Display function of the master unit cannot be operated. - The display indicates up to 8 characters. The characters on the display cannot be scrolled even when the Auto Scroll function of the master unit is set to on.
- You cannot display the clock during XM Satellite Radio reception on a master unit whose clock display is shown by pressing the Display (DSPL) button.
Using category search to locate channels
Each XM channel is associated with a category that describes the type of music or programming that is played on the channel. Examples of categories include “rock,” “jazz,” “news,” and so on. Users unfamiliar with XM’s programming may use the radio’s search-by-category function to select channels.
1 Press the Repeat (REP) button to enter
category search mode.
The category of the current channel is displayed. With some master units, the
displayed. With some master units, the Repeat button is only equipped on the remote control.
2 Press the Disc/Preset buttons
repeatedly until you find the desired category.
3 Press the Seek buttons repeatedly until you find the desired channel that category.
The display shows "CAT SRCH" to indicate that the radio is in category search mode. While in this mode, you will only be able to tune to channels in the selected category. You may use the Disc/Preset buttons to choose other categories.
4 To exit from category search mode and return to the normal mode, no
and return to the normal mode, press the Repeat (REP) button.
The radio automatically returns to the normal mode if there no key is pressed within 5 seconds.
Storing favorite channels
You can preset up to 20 channels.
1 Tune in a channel that you want to store.
2 Press the Shuffle (SHUF) button.
The radio will show a list of presets, starting with preset number 1. The preset number will be shown if a channel has already been stored into the preset. With some master units, the Shuffle button is only equipped on the remote control.
3 Press the Disc/Preset button to select a preset number.
a preset number. With some master units, the Disc/Preset button is only equipped on the remote control.
4 Press the Disc/Preset + (Disc +) button for 2 seconds.
The display shows "MEMORY" if the radio successfully stores the channel into the preset. The display shows "FAILURE" if the radio fails to store the channel into the preset. The radio automatically returns to the normal mode if there no key is pressed within 5 seconds.
Receiving a stored channel
- Press either Disc/Preset button to select the preset channel you want to listen to.
- Press the Shuffle (SHUF) button. Press the Disc/Preset + (DISC +) button to select the preset channel and then press the SEEK + or SEEK - button to start.
Displaying the XM Radio ID
1 During XM Satellite Radio reception, press the Seek button to select "CHANNEL 1."
2 Press the "Seek – (down)" button. "RADIO ID" is indicated for 2 seconds and the XM Radio ID number is indicated for 10 seconds. These indications will be displayed alternately.
To cancel the XM Radio ID display, press the Seek button to select a channel.
Additional Information
Specifications
Frequency 2332.5 - 2345.0 MHz
Power requirements 12 V DC car battery (negative ground)
(negative group Outputs BUS control output
Audio output Inputs Antenna input (Satellite,
Terrestrial) BUS control input Audio input Dimensions 224 · 37.8 · 160 mm (8 ^7 / 8 · 1 ^1 / 2 · 6 ^3 / _8 in.) (w/h/d)
Mass Approx. 1.0 kg (2 lb, 4 oz)
Supplied accessories Parts for installation and
connection (1 set)
Design and specifications are subject to change without notice.
Troubleshooting
Should any problem persist after you have made the following checks, consult your nearest Sony dealer. Consult XM if you have any questions or problem concerning the broadcast service of the XM Satellite radio.
The information on the display cannot be
changed during XM Satellite Radio reception. • Refer to "Caution" in "Getting Started."
No sound.
- Adjust the volume control of the master unit. - Cancel the attenuate function of the master
unit.
• The connecting cords are not connected properly.
The sound is hampered by noises.
Locate codes and cables such as an antenna code, a BUS cable, an RCA pin code, or a power code so as they do not interfere each other.
The channels cannot be received.
Check the connection of the receiver and the antenna.
Advisory Message
When a problem occurs with the receiver, an error message will be indicated on the display of the master unit.
ANTENNA
The antenna is not connected properly. Check the connection of the receiver and
UPDATING You have not subscribed to XM, or the channel is not authorized. • You need to subscribe to XM.
NO SIGNL
XM signal is too weak. → Move to another area where your system can receive the signal.
OFF AIR
The channel is not broadcasted now.
LOADING
The receiver is reading the channel information → Wait until the receiver completes receiving the information.
“----” or “CH----” • The channel to be tuned-in is void due to the change by the broadcast service, or the receiving condition is not good. • There is no text information or time information in the channel. This is not an error.
Installation
Parts list
The numbers in the list are keyed to those in the instructions.
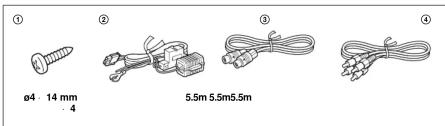
Precautions
- Choose the mounting location carefully, observing the following:
— The unit is not subject to temperatures exceeding 55°C (131°F) (such as in a car parked in direct
sunlight).
— The unit is not subject to direct sunlight.
— The unit is not near heat sources (such as heaters).
— The unit is not exposed to rain or moisture.
— The unit is not exposed to excessive dust or dirt
— The unit is not subject to excessive vibration.
— The fuel tank should not be damaged by the tapping screws. There should be no wire harnesses or wires under the place
— There should be no wire harnesses of pipes under the place where you are going to install the unit.
unit.
— The spare tire, tools or other equipment in or under the trunk should not be interfered with or
damaged by the screws of the unit itself
- Be sure to use only the supplied mounting hardware for a safe and secure installation.
- Use only the supplied screws.
Installing the unit
- Mount the unit either inside the trunk or under a seat.
- Choose the mounting location carefully so the unit will not interfere with the normal movements of
the driver and it will not be exposed to direct sunlight or hot air from the heater.
- Do not install the unit under the floor carpet, where the heat dissipation from the unit will be
considerably impaired.
First, place the unit where you plan to install it, and mark the positions of the four screw holes on the mounting surface.
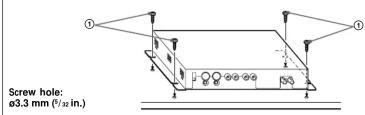
Notes
- Use only the supplied screws
- Be sure not to damage the fuel tank or brake line with the tapping screws.
Fuse replacement
If the fuse blows, check the power connection and replace the fuse. If the fuse blows again after replacement, there may be an internal malfunction.
Warning
Use a fuse with the specified amperage rating.
Use of a higher amperage fuse may cause serious damage.
Connection
Connection example
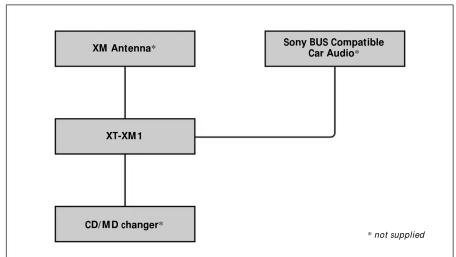
flowchart
graph TD
    A["XM Antenna*"] --> B["XT-XM1"]
    C["Sony BUS Compatible Car Audio*"] --> B
    B --> D["CD/MD changer*"]
    style A fill:#ccc,stroke:#333
    style C fill:#ccc,stroke:#333
    style B fill:#ccc,stroke:#333
    style D fill:#ccc,stroke:#333
Cautions
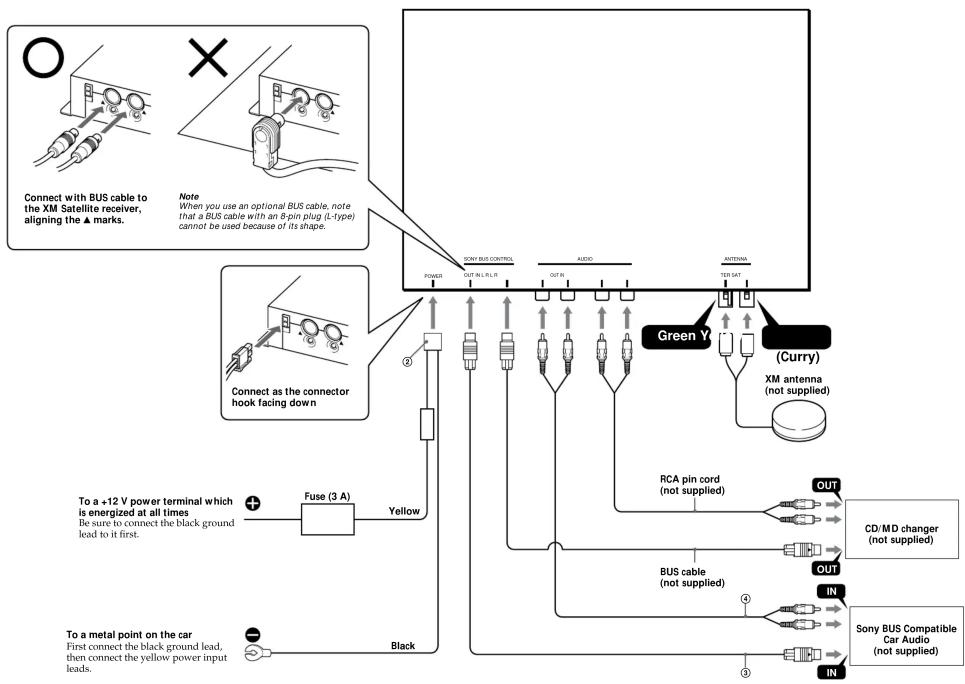
• This unit is designed for negative ground 12 V DC operation only
- Before making connections, turn the car ignition off to avoid short circuits.
- Connect the yellow power input cord only after all other cords have been connected.
- Run all ground leads to a common ground point.
Connection diagram
flowchart
graph TD
    A["Connect with BUS cable to the XM Satellite receiver, aligning the ▲ marks."] --> B["Note: When you use an optional BUS cable, note that a BUS cable with an 8-pin plug (t-type) cannot be used because of its shape."]
    B --> C["Connect as the connector hook facing down"]
    C --> D["Fuse (3 A)"]
    D --> E["Yellow"]
    E --> F["Black"]
    F --> G["To a metal point on the car"]
    G --> H["First connect the black ground lead, then connect the yellow power input leads."]
    H --> I["To a +12 V power terminal which is energized at all times. Be sure to connect the black ground lead to it first."]
    I --> J["Switch Bus Control"]
    J --> K["Green Y"]
    K --> L["Curry"]
    L --> M["XM antenna (not supplied)"]
    M --> N["RCA pin cord (not supplied)"]
    N --> O["CD/MD changer (not supplied)"]
    O --> P["OUT"]
    P --> Q["BUS cable (not supplied)"]
    Q --> R["IN"]
    R --> S["Sony BUS Compatible Car Audio (not supplied)"]
    S --> T["IN"]
    T --> U["OUT"]
    U --> V["Out"]
    V --> W["OUT"]
    W --> X["OUT"]
    X --> Y["OUT"]
    Y --> Z["OUT"]
    Z --> AA["OUT"]
    AA --> AB["OUT"]
    AB --> AC["OUT"]
    AC --> AD["OUT"]
    AD --> AE["OUT"]
    AE --> AF["OUT"]
    AF --> AG["OUT"]
- XM Satellite Radio Receiver
- Owner's Record
- XT-XM1
- WARNING
- Welcome!
- Introducing XM™ Satellite Radio
- How to Subscribe
- Getting Started
- Resetting the master unit
- Caution
- Basic Operations
- Listening to a program
- To select XM:
- Press either Seek button to select the desired channel.
- Display items
- Notes
- Using category search to locate channels
- Press the Repeat (REP) button to enter
- Press the Disc/Preset buttons
- Press the Seek buttons repeatedly until you find the desired channel that category.
- To exit from category search mode and return to the normal mode, no
- Storing favorite channels
- Tune in a channel that you want to store.
- Press the Shuffle (SHUF) button.
- Press the Disc/Preset button to select a preset number.
- Press the Disc/Preset + (Disc +) button for 2 seconds.
- Receiving a stored channel
- - Press either Disc/Preset button to select the preset channel you want to listen to.
- Displaying the XM Radio ID
- During XM Satellite Radio reception, press the Seek button to select "CHANNEL 1."
- Additional Information
- Specifications
- Troubleshooting
- The information on the display cannot be
- No sound.
- The sound is hampered by noises.
- The channels cannot be received.
- Advisory Message
- ANTENNA
- NO SIGNL
- OFF AIR
- LOADING
- Installation
- Parts list
- Precautions
- Installing the unit
- Fuse replacement
- Connection
- Cautions
Mærke : SONY
Model : CDX-FW560
Kategori : Bilradio