
ICF-SW800 - Radiovækkeur SONY - Gratis brugsanvisning og manual
Find enhedens vejledning gratis ICF-SW800 SONY i PDF-format.

Brugerspørgsmål om ICF-SW800 SONY
0 spørgsmål om dette apparat. Besvar dem du kender, eller stil dit eget.
Stil et nyt spørgsmål om dette apparat
Download vejledningen til din Radiovækkeur i PDF-format gratis! Find din vejledning ICF-SW800 - SONY og tag din elektroniske enhed tilbage i hånden. På denne side er alle dokumenter nødvendige for brugen af din enhed offentliggjort. ICF-SW800 af mærket SONY.
BRUGSANVISNING ICF-SW800 SONY
FM/SW PLL Synthesized Receiver
ICF-SW800
Operating Instructions
Before operating the unit, please read this manual thoroughly and retain it for future reference.
Owner's Record
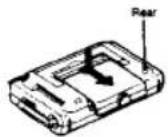
The model number is located at the rear and the serial number is located in the battery compartment.
Record the serial number in the space provided below.
Model No. ICF-SW800 Serial No.
natural_image
Line drawing of a portable electronic device with buttons and a screen (no text or symbols)WARNING
To prevent fire or shock hazard, do not expose the unit to rain or moisture.
To avoid electrical shock, do not open the cabinet. Refer servicing to qualified personnel only.
NOTICE FOR THE CUSTOMERS IN THE UNITED KINGDOM IMPORTANT
The wires in this mains lead are coloured in accordance with the following code:
Blue Neutral
Brown: Live
As the colours of the wire in the main lead of this apparatus may not correspond with the coloured markings identifying the terminals in your plug proceed as follows:
The wire which is coloured blue must be connected to the terminal which is marked with the letter N or coloured black. The wire which is coloured brown must be connected to the terminal which is marked with the letter L or coloured red.
INFORMATION
This equipment generates and uses radio frequency energy and if not installed and used property, that is, in strict accordance with the manufacturer's instructions, may cause interference to radio and television reception. It has been type tested and found to comply with the limits for a Class B computing device in accordance with the specifications in Subpart J of Part 15 of FCC Rules, which are designed to provide reasonable protection against such interference in a residential installation. However, there is no guarantee that interference will not occur in a particular installation. If this equipment does cause interference to radio or television reception, which can be determined by turning the equipment off and on, the user is encouraged to try to correct the interference by one or more of the following measures.
Reorient the receiving antenna
Relocate the equipment with respect to the receiver
Move the equipment away from the receiver
Plug the equipment into a different outlet so that equipment and receiver are on different branch circuits.
If necessary, the user should consult the dealer or an experienced radio/television technician for additional suggestions. The user may find the following booklet prepared by the Federal Communications Commission helpful:
"How to identify and Resolve Radio-TV Interference Problems": This booklet is available from the U.S. Government Printing Office, Washington, DC 20402, Stock No. 004-000-00345-4.
Table of Contents
OverviewFeatures 4 Precautions 5
Notes on the supplied cards
Location of controls
Power sources 10
Using with batteries
Using on other power sources
Setting the clock
Listening to the radio
Using the preset cards (SW only)
Without using the cards
Direct tuning
Manual tuning
To present the desired station using the memory card 15
To improve the radio reception 20
Adjusting the telescopic antenna 20
How to use the supplied compact antenna
To turn the radio on at the desired time — Timer function
Recording radio programs
Technical information
Specifications
Troubleshooting guide Back cover
2
3
Overview/Features
The ICF-SW800 is an FM/SW PLL synthesized receiver which features easy tuning using the frequency-presset cards. Refer to the pages indicated in ● for details.
Various ways of tuning using the preset cards
- Easy tuning . You can receive a desired station by only inserting a card in the unit and lightly touching the number printed on the card.
- Direct tuning .... Tuning in the station by directly inputting the frequency of the station.
- Manual tuning .... Even if you don't know the frequency of the station, you can tune in the station precisely.
- Preset tuning .... Stations can be preset using the cards.
- Timer standby . . . . . . Function for receiving a desired station at a desired time.
Other features
- Quartz controlled PLL (Phase Locked Loop) synthesizer system using a microcomputer for easy pinpoint tuning. The tuned frequency is digitally displayed.
- Provided with a recording output jack.
This unit is supplied with four cards: three for radio reception (frequency-pressat cards and memory cards), and one for clock/timer setting (Clock Card). For details on the cards and the receivable pressat stations, refer to the supplied pressat frequency list.
Precautions
- Operate the unit only on 4.5 V DC.
For battery operation, use three RB (size AA) batteries. For AC operation, use the AC power adaptor recommended for this unit; do not use any other type. For car battery operation, use the car battery cord recommended for this unit; do not use any other type. - Do not leave the unit in a location near heat sources, or in a place subject to direct sunlight, excessive dust, or mechanical shock.
- Use the unit within a temperature range of 9°C to 40°C (32°F to 104°F). If it is used in temperatures outside this range, there may be trouble with the frequency and clock display. If it is used in temperatures lower than this range, the displayed numbers may change very slowly. This is not an internal malfunction. The display will recover when the unit is used within the recommended temperature.
- Should any solid object or liquid fall into the unit, remove the batteries, and have the unit checked by qualified personnel before operating it any further.
- Since a strong magnet is used for the speaker, keep personal credit cards using magnetic coding or spring-wound watches away from the unit to prevent them from possible damage caused by the magnet.
- Reception around 4,900 kHz, 9,355 kHz, 9,575 kHz, 9,950 kHz, 10,250 kHz and 15,150 kHz may be difficult because of internal sourious signals generated by the built-in oscillators.
- When the casing becomes soiled, clean it with a soft cloth dampened with a mild detergent solution. Never use abrasive cleansers or chemical solvents, as they may mar the casing.
- If the unit shows incorrect display or does not work property, reinsert the batteries after a five-minute wait.
If you have any question or problem concerning your unit that is not covered in this manual, please consult the nearest Sony dealer.
4
5
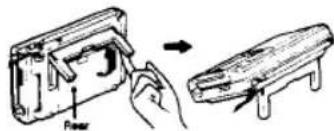
Notes on the Supplied Cards
- Leaving a card in the CARD slot of the unit does not cause any trouble. However, when the unit is not to be used for a long time or when carrying it outside, we suggest that you store all the cards in the card compartment under the battery compartment lid.
- For your convenience, you can leave the card most frequently used in the extra card compartment.
- Since the supplied cards do not use magnetic coding, they cannot be damaged by the magnet. - You can write down the names of newly preset stations on the cards with a pencil.
Notes
- Since a strong magnet is used for the speaker, do not insert a personal credit card using magnetic coding into the CA/IO slot to prevent the card from possible damage caused by the magnet.
- Do not bend the cards.
- Do not leave the cards in a location near heat sources or in a place with excessive moisture. Otherwise the cards may be damaged.
- Do not insert an object other than supplied cards into the CARD slot.
- Since the unit identifies the cards using a built-in optical sensor, please observe the following notes:
When inserting a card into the CARD slot, do not expose the sensor of the unit to direct sunlight.

Do not sell the part indicated in the illustration. Otherwise, the sensor may not be able to identify the card correctly, and the indication may not appear on the display window.
- When the unit cannot identify the card correctly, a continuous beep sound will be heard and the card indication will blink on the display window. In such a case, exact the card and re-insert it correctly
6
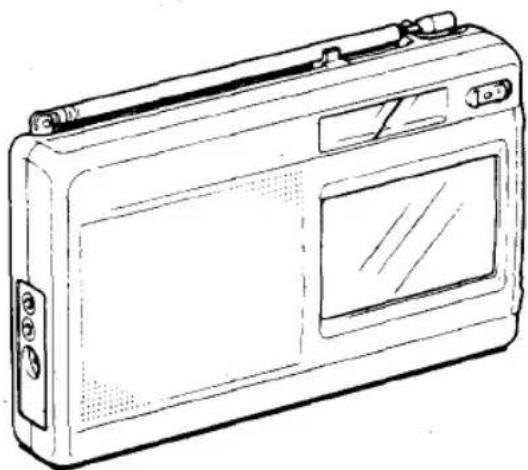
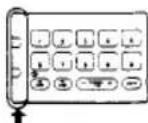
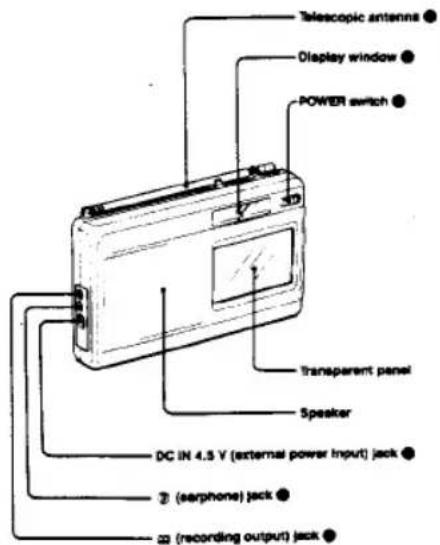
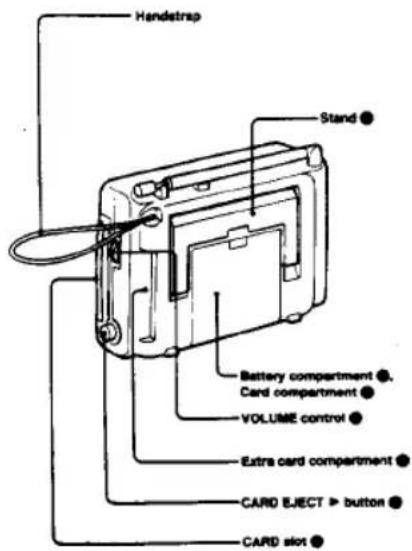
Location of Controls
Refer to the pages in Ⓐ for details.
Front
Peer
Power Sources
1
2
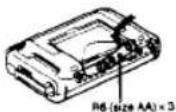
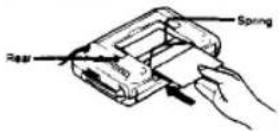
Install the batteries with correct polarity. When the unit is not to be used for a long period of time, remove the batteries to avoid damage from battery leakage and corrosion.
Battery replacement
When the □ Indication blinks on the display window, or when the sound becomes weak or distorted, replace all batteries with new ones. On battery life, see "Specifications" on page ●.
To keep the preset memories, replace the batteries within 50 seconds. The memories of the current time and preset time for the timer function will be erased 50 seconds after the batteries are removed.
If wrong indications appear on the display window after replacing the betteries, set the time again. See "Setting the Clock" on page ②
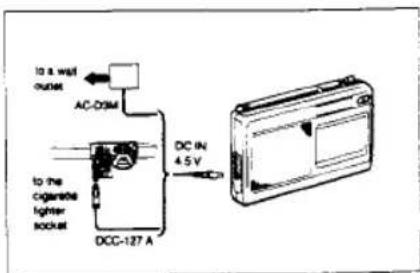
House current
Connect the Sony AC-D3M AC power adaptor (not supplied) to the DC IN 4.5 V jack, and plug it into a wall outlet.
Car battery
For use on 12 V car battery, connect the Sony DCC-127A car battery cord (not supplied) to the DC IN 4.5 V jack, and plug it into the cigarette lighter socket.
The internal batteries are automatically disconnected when the AC power adaptor or the car battery cord is connected to the DC in 4.5 V jack.
Notes
- Keep the batteries installed for the power backup function even when you use the unit on external power sources. If the AC power adaptor or the car battery cord is unplugged when the batteries are not installed, power will not be supplied to the built-in clock.
- When the AC power adaptor is not to be used, be sure to unplug it from both the wall outlet and the DC IN 4.5 V jack.
- If the plug is roughly connected to the OC IN 4.5 V jack when the POWER switch is set to ON, the CC mark may blink, in such a case, set the POWER switch to OFF and then set it to ON again.
- If a car battery cord or an AC power adaptor not manufactured by Sony is used, a fuse must be installed in the battery cord or the adaptor, and the polarity of the plug must be as illustrated.

10
11
Setting the Clock
This clock shows with 24-hour system.
Example: To set to 8.15
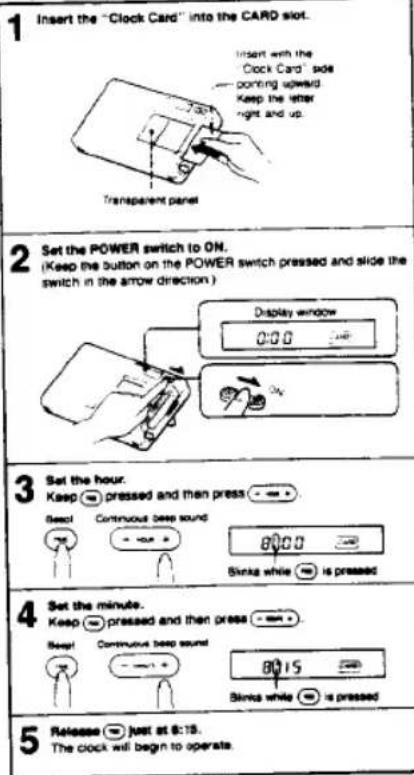
- When -= or -= is kept pressed, the digits advance
rapidly. - The minute digits advance to "00" after "59". The hour digits do not advance by pressing -
Zero second adjustment
If you want to adjust the time exactly to the second with a telephone time signal, proceed as in the following example.
Example: To set to 7:15
- Adjust the time indication to 19:15 and keep pressed.
- Release ≈ simultaneously with the time signal.
The clock will then show the precise time.
You can adjust the time to the second only after setting the hour and minute using ⏻ and ⏻ or ⏻
Notes
- When setting the clock, make sure that the POWER switch is set to ON.
- You can set the clock while the radio is on. However, when 📄 or 📃
- Even if the POWER switch is set to OFF, the current time appears on the display window.
- When the POWER switch is set to STBY, the preset alarm time appears on the display window and changes to the current time display about four seconds later.
- The current one indication will disappear about one minute after the batteries are removed. When the batteries are installed again, 0.00^TM will be displayed.
12
13
The frequencies have been preset in advance.
14
To stop the radio.
Sel the POWER switch to OFF
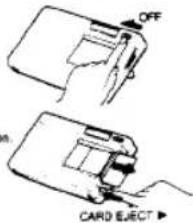
To eject the card
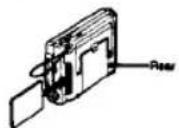
Depress the CARD EJECT ▶ button
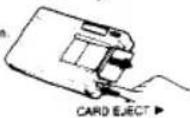
Even after you have ejected the card, the station continues being received. The frequency of the station remains on the display window but the preset number and the indication disappear.
Once you receive a station using a card, the station is memorized in the unit even if the unit is turned off while the station is received. When the unit is turned on and the card is inserted into the unit, the same station will be received automatically.
When an earphone is connected to the ② jack, the radio sound cannot be heard from the speaker.
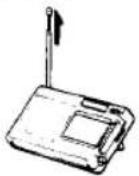
Using the stand
When you use the unit on a table, etc., we recommend you use the stand as shown in the illustration.
15
Direct tuning — When you know the frequency of the desired station
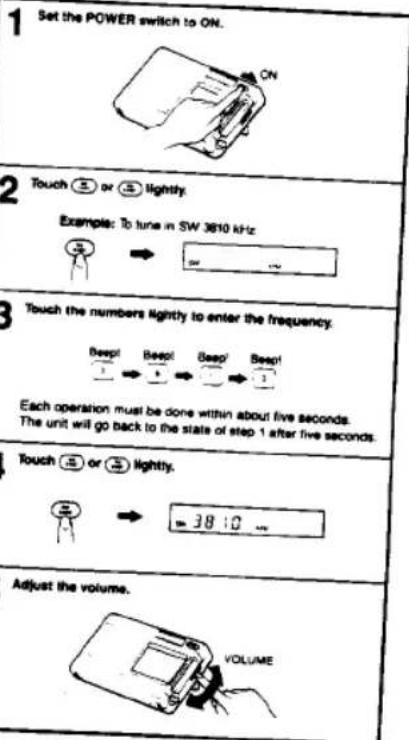
To turn off the radio, set the POWER switch to OFF.
When the frequency near the input frequency is displayed The frequencies which this radio receives are allocated in the following intervals*, depending on the broadcaster band. If you input a frequency that does not match these intervals, the frequency just below the one that you input will be tuned in and will be displayed. e.g. If you input SW 3999, the display will show SW 3995.
| FM | 0.05 MHz or 0.1 MHz |
| SW | 5 kHz |
Manual tuning — When you do not know the frequency of the desired station
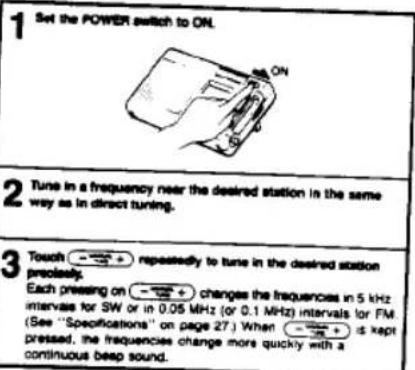
Even when the card is inserted, you can tune in a station in the same way.
16
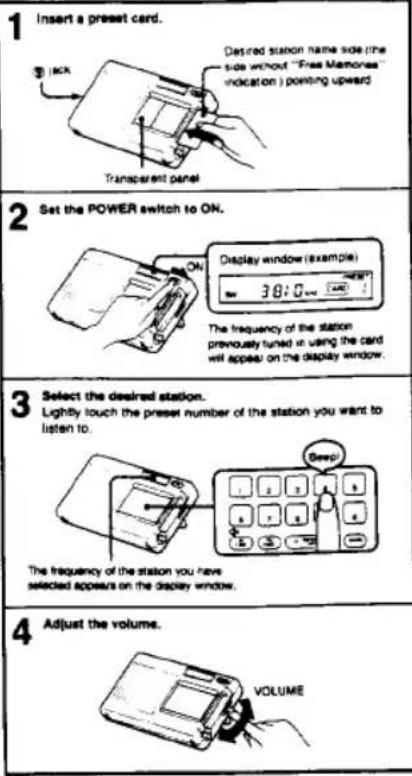
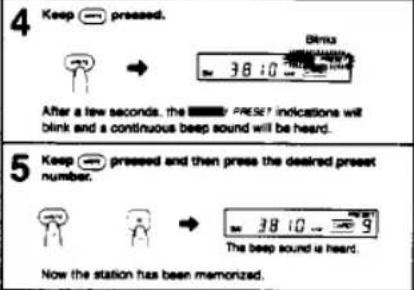
To Preset the Desired Station Using the Memory Card
Example: To preset SW 3810 kHz on preset number 9.
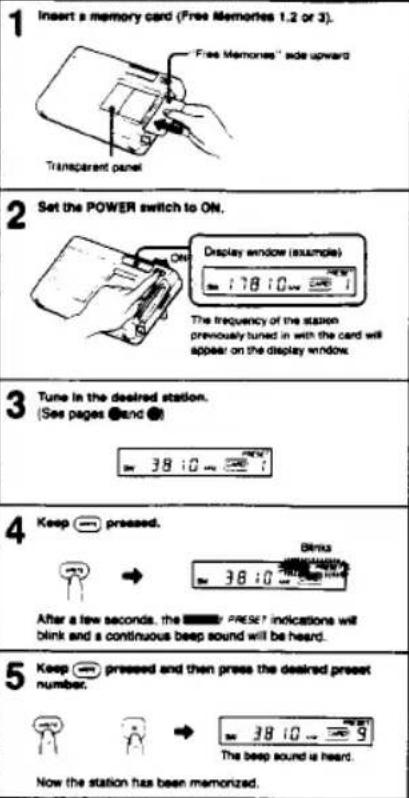
If you keep ⬤ pressed for about seven seconds, the ☐ RESET indications will disapper and you cannot proceed to step 5. In such a case, go back to step 4.
You can have the stations memorized on the empty numbers on the preset cards as well as those on the memory cards.
To change the preset station
Preset a station on a desired number. The station previously stored on the number is erased.
Note
You can also change the stations on the factory-press card. If the frequency of the station changes, press new frequency on the card.
If you touch the wrong number
Repeat the operation from step 3 on page ②. Or, if you leave the unit untouched for more than about four seconds, the unit will go back to the state of step 2. Repeat the steps from 3.
When the indication blinks
If you input a frequency outside the frequency range, the indication will blink. Input the correct frequency so that the indication will decrease.
Or if you leave the unit untouched for more than five seconds, the indication will disappear and the display window will show the frequency being tuned in.

Insert the memory card to the CARD slot and touch the desired preset number.
Notes
- A total of 10 FM and SW stations can be preset on the "Free Memories" sides of the card.
- When the beep sound is not heard while presepting a station (step 5), the station has not been memorized. Try again from step 4 on page
• The preset station will not be erased even if the battenes are removed.
18
19
To Improve the Radio Reception
FM: Extend the amenna and adjust the length, direction and angle.
SW: Extend the antenna vertically.
Usually the telescopic antenna is sufficient for SW reception. However, in a metal or concrete building, the use of the supplied SW compact antenna is recommended.
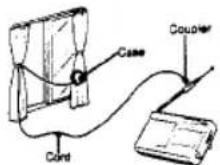
- Pull out the cord fully (approx. 7 m or 20 ft.) from the case.
- Attach the coupler to the telescopic antenna.
3 When the window can be opened:
Extend the cord and the case out through the window, after making sure there is no danger.
When the window cannot be opened: Fully extend the cord along the frame of the window.
After using

To Turn the Radio On at the Desi red Time
(104) Fccto
Example: To set the timer to 8:30
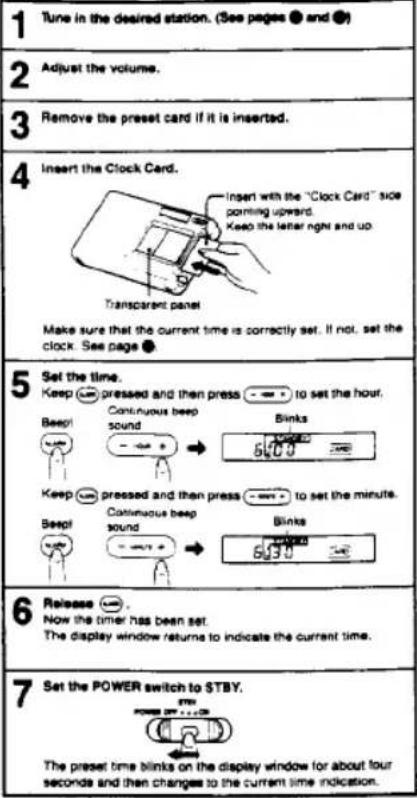
22
The radio will be turned on at the preset time, and then will shut off automatically after 65 minutes.
To check the preset time
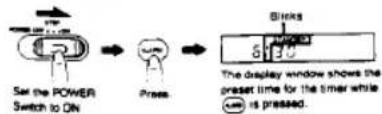
When you set the POWER switch to STBY, the display window will show the preset time for about four seconds even if the Clock Card is not installed.
To change the preset time
Perform the steps on page ⚙ all over again. The previously set time is erased and the newly set time is memorized. You cannot cancel the preset time without presetting a different time.
Once the timer is set
- You do not have to leave the "Clock Card" inserted to have the
timer activated
• If the POWER switch is kept at STBY, the radio will be turned on at
the present time every day.
• Which station will be heard at the preset time?
— When a card is inserted, the station previously tuned in with the
card is received first.
— When no card is inserted, the station that was being received just before is received.
Recording Radio Programs
To record the radio sound with a cassette-corder, connect the equipment as follows:
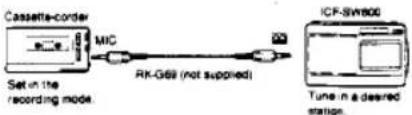
Note
The volume adjustment on the radio has no effect on the recording level.
23
Technical Information
All introduction by Ro Io?aves
Radio waves from around the world fill the skies above you. Knowing the types and features of these waves will help you enjoy radio reception even more. The supplied Short Wave Guide is an easy-to-understand guidebook.
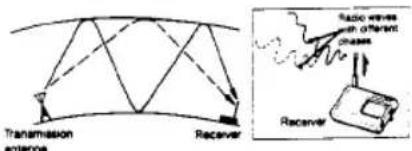
When you listen to short wave radio, sometimes the volume of the reception goes up and down. This does not mean there is anything wrong with your radio; it is just a phenomenon called "fading". Fading occurs because the fluctuation in the ionosphere changes the strength of the short-wave signals and reflects the same signal via different paths, creating interference.
For example, if a wave that has been reflected once by the ionosphere and a wave that has been reflected twice by the ionosphere arrives at your radio antenna at the same time, the phases of the two waves are different. Depending on how large this phase difference is, the two waves sometimes add together for a strong signal and sometimes cancel each other out for a weak signal; so the sound on your radio gets louder or quieter.
When you try to tune in a desired station, you receive one station after another, but it is difficult to decide which one you want to listen to and which one you are receiving. The things to watch for are: - Reception frequency — You can look up this frequency in a station frequency chart.
- Announcements during the broadcast — Most stations announce the station name and the call sign every 15 or 30 minutes.
- Interval signal — Most stations broadcast a specific piece of music or an animal sound before and after their broadcasts. If you learn these as you hear them, they will help you figure out which station you have tuned in.
If you want to know about broadcast times and the contents of programs in detail, send to the stations you are interested in for a pamphlet listing their programs.
Specifications
| Frequency range | Area | Frequency ranges | Scan step | |
| U S A. and European countries | FM | 37.5 108 MHz | 0.05 MHz | |
| SW | 3.700 17 900 kHz | 5 kHz | ||
| Other Countries | FM | 76 108 MHz | 0.1 MHz | |
| SW | 3.700 17 900 kHz | 5 kHz | ||
| Antenna | Telescopic antenna | |||
| Speaker | Approx. 7.7 cm(31⁄2 inches dia. 8 ohms) | |||
| Power output | 250 mW (at 104% harmonic distortion) | |||
| Output | Earphone jack (min/ack) | |||
| Tape recording output jack (min/ack)output level: 0.775 mV (-60 dB)output impedance 1 kHz | ||||
| Power requirements | 4.5 V DC, three RB (base AA) batteriesDC IN 4.5 V jack accepti | |||
| Sony AC-03M AC power adaptor (not supplied)available in the United Kingdom for use on240 V AC, 50 Hzavailable in Continental European countries foruse on 220 V AC, 30 Hzavailable in other countries for use on 120 V AC,80 Hz or 220 V AC, 50 HzSony OCC-127A car battery cord (not supplied)for use with 12 V car battery | ||||
| Battery life | Approx. 17 hours, using Sony batteries SUM-3 (NS) | |||
| Dimensions | Approx. 189 x 116 x 45 mm (with)g(71⁄2F < 45°F × 113⁄2F inches)incl. projecting parts and controls | |||
| Weight | Approx. 540 g (1.2 lb)incl. batteries | |||
| Accessories supplied | Compact antenna (1), Earphone (1).Preset card/memory cards (3). Clock card (1).Short wave guide (1). Preset frequency list (1) | |||
Design and specifications subject to change without notice
Optional accessories
Car battery used DCC-127A
AC power acceptor AC/DCM
Ex: receiver NDR.E143
Eardone ME-L82
Connecting cord EK-G89 (without additional
COMPLATING CVD ACTIVE ANTEROS AN-1, AN-102
Note
This appliance conforms with EEC Directive 87008/EEC regarding interference suppression.
Troubleshooting Guide
The power is not turned on even if you set the POWER switch to ON.
- Weak batteries
- Incorrect polarity of batteries. See page ●
- The AC power adaptor or a car battery cord is not connected firmly - Battery operation is attempted while an AC power adaptor or a car battery cord is connected to the unit, but not to a wall outlet or cigarette lighter socket.
No indication on the display window
- incorrect polarity of bananas. See page ●
- Weak batteries
The display window is dim.
- Weak batteries
- Replace all the batteries with new ones
- The unit is being used in extremely high temperatures or in a place with excessive moisture.
Sound is not heard at all.
• The VOLUME control is turned down completely.
• An earphone is plugged in
- Incorrect polarity of batteries. See page ●
Very weak or interrupted sound, or unsatisfactory reception. * Weak batteries
• Tuning or antenna adjustment is not correct
- Tune in correctly with manual tuning. See page ● For antenna adjustment, see page ●
- Weak signal → When in a vehicle or in a building, listen near a window.
a frequency cannot be input during direct tuning.
Each button has not been pressed within five seconds. See page ●
Stations have not been stored.
You made wrong operation when you stored the stations. — To have a station memorized on the card, press one of the preset numbers while keeping 📄 pressed.
The preset station cannot be received during preset tuning.
- Incorrect preset number has been pressed. Simply press a correct number.
- The preset station was erased. Preset the station again. See page ●
The radio is not activated at the timer-setting time.
- If it took more than a minute to replace batteries, the timer setting-time may have been erased.
- After replacing the batteries, set the timer again. See pages ● and ●
The POWER switch is not set to STBY.
• The VOLUME control is turned down completely.
Sony Corporation Primed in Japan