
ICF-CD873 - Radiovækkeur SONY - Gratis brugsanvisning og manual
Find enhedens vejledning gratis ICF-CD873 SONY i PDF-format.


Brugerspørgsmål om ICF-CD873 SONY
0 spørgsmål om dette apparat. Besvar dem du kender, eller stil dit eget.
Stil et nyt spørgsmål om dette apparat
Download vejledningen til din Radiovækkeur i PDF-format gratis! Find din vejledning ICF-CD873 - SONY og tag din elektroniske enhed tilbage i hånden. På denne side er alle dokumenter nødvendige for brugen af din enhed offentliggjort. ICF-CD873 af mærket SONY.
BRUGSANVISNING ICF-CD873 SONY
FM/AM CD Clock Radio
Operating Instructions
VOICE plus
ICF-CD873
Sony Corporation 1999 Printed in Malaysia

http://www.world.sony.com/
WARRANTY 4-557-145-01(T1)
Owner's Record
The model number and the serial number are located on the rear. Record the serial number in the space provided below. Refer to them whenever you call upon your Sony dealer regarding this product.
Model No. ICF-CD873
WARNING
To prevent fire or shock hazard, do not expose the unit to rain or moisture.
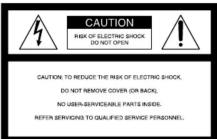
This symbol is intended to alert the user to the presence of uninsulated "dangerous voltage" within the product's enclosure that may be of sufficient magnitude to constitute a risk of electric shock to persons. This symbol is intended to alert the user to the presence of important operating and maintenance (servicing) instructions in the literature accompanying the appliance.
* The graphical symbols are on the rear of the enclosure.
You are cautioned that any changes or modifications not expressly approved in this manual could void your authority to operate this equipment.
INFORMATION
This equipment has been tested and found to comply with the limits for a Class B digital device, pursuant to Part 15 of the FCC Rules. This equipment is not suitable for reasonable protection against harmful interference in a residential installation. This equipment generates, uses, and can radiate radio frequency energy and, if it is installed, and used in accordance with the requirements to cause harmful interference to radio communications. However, there is no guarantee that interference will not occur in a particular installation. If this equipment is not suitable for radios or television reception, which can be determined by turning the equipment off and on, the user is encouraged to try to correct the interference by one or more of the following measures: —Reorient or relocate the receiving antenna. —Increase the separation between the equipment —Connect the equipment into an outlet on a circuit different from that to which the receiver is connected. —Consult the dealer or an experienced radio/TV technology
CAUTION
The use of optical instruments with this product will increase eye hazard.
Before You Begin
Thank you for choosing the Sony CD clock radio! It will give you many hours of reliable service and listening pleasure. Before operating the unit, please read these instructions thoroughly and retain them for future reference.
Features
- 3-D sound system — In addition to the left and right speakers, the center woofer provides rich bass sound for enhanced listening quality. - Voiceplus — announces the time, guides setting of alarm, etc., with talking voice. - Nature sound alarm — wake up to the sound of flowing stream or bird song. - Built in CD Player with Shuffle/Repeat function. - You can wake up to any track of a CD. - 5 random station presets. - A powerful bass is produced with the MEGA BASS sound system. - PLL (Phase Locked Loop) Synthesized Tuner with 5 random memory presets for easy one button tuning. - Summer time (daylight saving time) calculation.
Precautions
- Operate the unit on the power sources specified in "Specifications." - The nameplate indicating voltage, etc. is located at the rear. - Disconnect the components lead by grasping the plug. Never pull it by the cord. - Do not leave the unit in a location near a heat source such as a radiator or airduct, or in a place subject to direct sunlight, excessive dust, mechanical vibration, or shock. - All airlines are the clean air to prevent internal heat build-up. Do not place the unit on a surface (a rug, a blanket, etc.) or near materials (a curtain) which might block the ventilation holes. - Should an air drain or solid object fall into the unit, unplug (or remove batteries from) the unit and have it checked by a qualified personnel before operating it further. - When the casing becomes soiled, clean it with a solid ball of air, and the detergent solution. Never use abrasive cleansers or chemical solvents, as they may mar the casing. - The unit is not disconnected from the AC power source (mains) as long as it is connected to the wall outlet, even if the unit is connected to the wall outlet.
If you have any question, please consult your nearest Sony dealer.
Troubleshooting
Should any problem occur with the unit, make the following checks to determine whether or not servicing is required. If the problem persists, consult the nearest Sony dealer. The clock does not show the current time. • Has an electrical power outage lasting more than one minute latered? The radio or sound alarm does not sound at the preset alarm time. • Has the desired radio and/or sound alarm mode been activated with the ALARM MODE button? Is the B RADIO or B SOUND indicator lit on the display?) The CD player does not operate. • Did you close the CD lid? • Did you place the disc correctly? The disc should be placed with the labeled step. • Dusty or defective disc—Clean the disc with an optional cleaning cloth. Wipe the disc from the center out. • Take out the CD and leave the CD compartment open for about an hour to get rid of moisture condensation. Sporadic loss of sound in CD operation. • Dusty or defective disc—Clean or replace the disc. • Volume too high—Reduce the volume. • Strong vibration.
Specifications
CD player section
System: Compact disc digital audio system
Laser diode properties: Material: GaAlAs
Wavelength: 780 nm
Emission duration: Continuous
Laser output: Less than 44.6 W (This output is the value measured at a distance of about 200~mm from the objective lens surface on the optical pick-up block with 7mm aperture.)
Frequency response: 20-20,000 Hz -1_-1.5dB Wow and flutter: Below measurable limit
Radio section
Frequency range: FM: 87.5-108 MHz AM: 530-1,710 kHz Channel step:
FM: 0.1 MHz (fixed) AM: 10 kHz (fixed)
General
Time display:
Speaker:
Front speakers: 6 cm (2 ^1 /2 inches) · 2, 8 ohms Woofer: 9 cm (3 ^1 /2 inches) 4 ohms Power outputs: Front speakers: 1.2W + 1.2W (at 10% harmonic distortion) Woofer: 4.5 W (at 10% harmonic distortion)
Power requirements: 120VAC 60H
Dimensions:
Approx. 304 · 125 · 233.5 mm(w/h/d) (Approx. 12 · 5 · 91/4 inches) incl. projectir parts and controls
Mass:
Approx. 3.5 kg (7 lb 12 oz)
Design and specifications are subject to change without notice.
IMPORTANT SAFEGUARDS
For your protection, please read these safety instructions completely before operating the appliance, and keep this manual for future reference. Carefully observe all warnings, precautions and instructions on the appliance and in the operating instructions, and adhere to them.
INSTALLATION
Water and Moisture Do not use powerline operated appliances near water - for example, near a bathtub, washbowl, kitchen sink, or laundry tub, in a wet basement, or near a swimming pool, etc.
Do not place the appliance near or over a radiator or heat register, or where it is exposed to direct sunlight.
The slots and openings in the cabinet are provided for necessary ventilation. To ensure reliable operation of the appliance, and to protect it from overheating, these slots and openings must never be blocked or covered. Never cover the slots and openings with a cloth or other materials. Never block the slots and openings by placing the appliance on a bed, sofa, rug or other similar surface. Never place the appliance in a confined space, such as a bookcase, or built-in cabinet, unless proper ventilation is provided.
Do not place the appliance on an unstable cart, stand, tripod, bracket, or table. The appliance may fall, causing serious injury to a child or an adult, and serious damage to the appliance. Use only a cart, stand, tripod, bracket, or table recommended by Sony.
-An appliance and cart combination should be moved with care. Quick stops, excessive force, and uneven surfaces may cause the appliance and cart combination to overturn.
If your appliance can be mounted to a wall or ceiling, mount it only as recommended by Sony
USE
Power Source
This appliance should be operated only from the type of power source indicated on the marking label. If you are not sure of the type of electrical power supplied to your home, consult your dealer or local power company. For those appliances designed to operate from battery power, or other sources, refer to the operating instructions.
Grounding or Polarization
This appliance is equipped with a polarized AC power cord plug (a plug having one blade wider than the other), or with a three-wire grounding type plug (a plug having a third pin for grounding). Follow the instructions below:
-For the appliance with a polarized AC power cord plug:
This plug will fit into the power outlet only one way. This is a safety feature. If you are unable to insert the plug fully into the outlet, try reversing the plug. If the plug should still fail to fit, contact your electrician to have a suitable outlet installed. Do not defeat the safety purpose of the polarized plug by forcing it in.
-For the appliance with a three-wire grounding type AC plug:
This plug will only fit into a grounding-type power outlet. This is a safety feature. If you are unable to insert the plug into the outlet, contact your electrician to have a suitable outlet installed. Do not defeat the safety purpose of the grounding plug.
Overloading
Do not overload wall outlets, extension cords or convenience receptacles beyond their capacity, since this can result in fire or electric shock.
When not in use
Unplug the power cord of the appliance from the outlet when left unused for a long period of time. To disconnect the cord, pull it out by grasping the plug. Never pull the plug out by the cord.
Route the power cord so that it is not likely to be walked on or pinched by items placed upon or against them, paying particular attention to the plugs, receptacles, and the point where the cord exits from the appliance.
For added protection for this appliance during a lightning storm, or when it is left unattended and unused for long periods of time, unplug it from the wall outlet and disconnect the antenna or cable system. This will prevent damage to the appliance due to lightning and powerline surges.
Object and Liquid Entry
Never push objects of any kind into the appliance through openings as they may touch dangerous voltage points or short out parts that could result in a fire or electric shock. Never spill liquid of any kind on the appliance.
Cleaning
Unplug the appliance from the wall outlet before cleaning or polishing it. Do not use liquid cleaners or aerosol cleaners. Use a cloth lightly dampened with water for cleaning the exterior of the appliance Clean the appliance only as recommended by Sony.
Attachments
Do not use attachments not recommended by Sony, as they may cause hazards.
ANTENNAS
Outdoor Antenna Grounding
If an outdoor antenna or cable system is installed, follow the precautions below. An outdoor antenna system should not be located in the vicinity of overhead power lines or other electric light or power circuits, or where it can come in contact with such power lines or circuits. WHEN INSTALLING AN OUTDOOR ANTENNA SYSTEM, EXTREME CARE SHOULD BE TAKEN TO KEEP FROM CONTACTING SUCH POWER LINES OR CIRCUITS AS CONTACT WITH THEM IS ALMOST INVARIABLY FATAL.
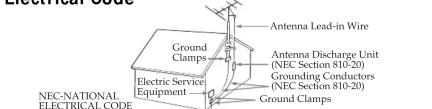
Be sure the antenna system is grounded so as to provide some protection against voltage surges and built-up static charges. Section 810 of the National Electrical Code provides information with respect to proper grounding of the mast and supporting structure, grounding of the lead-in wire to an antenna discharge unit, size of grounding conductors, location of antenna-discharge unit, connection to grounding electrodes, and requirements for the grounding electrode.
Antenna Grounding According to the National Electrical Code
SERVICE
Damage Requiring Service
Unplug the appliance from the wall outlet and refer servicing to qualified service personnel under the following conditions:
-When the power cord or plug is damage or frayed.
-If liquid has been spilled or objects have fallen into the appliance.
-If the appliance has been exposed to rain or water.
-The appliance does not appear to operate normally of exhibits a marked change in performance. This indicates a need for service
-If the appliance does not operate normally when following the operating instructions, adjust only those controls that are specified in the operating instructions. Improper adjustment of other controls may result in damage and will often require extensive work
by a qualified technician to restore the appliance to normal operation.
-If the appliance has been subject to excessive shock by being dropped, or the cabinet has been
damaged.
Servicing Do not attempt to service the appliance yourself as opening or removing covers may expose you to dangerous voltage or other hazards.
Refer all servicing to qualified service personnel
Replacement parts
When replacement parts are required, be sure the service technician has used replacement parts specified by Sony that have the same characteristics as the original parts. Unauthorized substitutions may result in fire, electric shock, or other hazards.
Unauthorized suit Safety Check
Upon completion of any service or repairs to the appliance, ask the service technician to perform routine safety checks (as specified by Sony) to determine that the appliance is in safe operating condition.
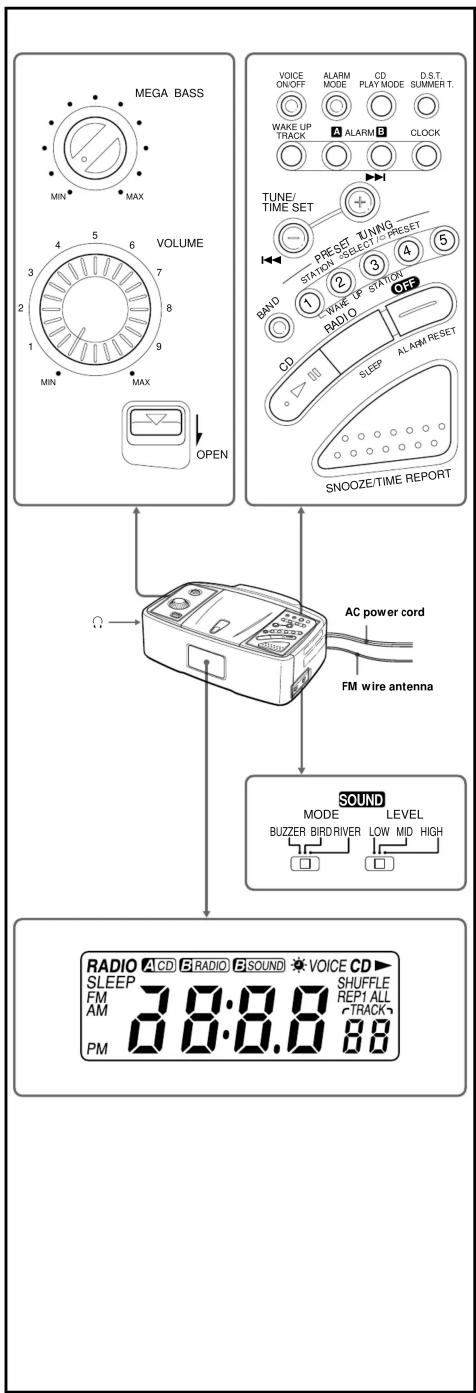
Activating/Deactivating Voiceplus
The Voiceplus function provides time announcements and/or reminders: when the power is turned on for the first time when you press SNOOZE/TIME REPORT at the start of the alarm after the clock, the alarm time or the alarm mode is set
To adjust the Voiceplus talking voice volume, adjust SOUND LEVEL. To deactivate Voiceplus, press VOICE ON/OFF. Press the button again to reactivate the function. Note When the power is turned on after you have removed the AC power cord (i.e., during power backup), the voiceplus function is not activated.
Setting the Clock
1 Plug in the unit. "AM 12:00" flashes on the display.
2 Press CLOCK for a few seconds until you hear a beep. The hour starts to flash on the display.
3 Press TUNE/TIME SET + or - until the correct hour appears.
4 Press CLOCK once.
5 Repeat steps 3 and 4 to set the minute. After setting the minute, press CLOCK again. Two short beeps sound, and the counting of the seconds starts. • To set the current time rapidly, hold down the + or - button. • To set the current time from zero seconds, release CLOCK with the time signal at step 5. • For vocal announcement of the current time, press SNOOZE/TIME REPORT.
To adjust the current time to daylight saving time (summer time) Press D.S.T./SUMMER T. “appears on the display and the current time is adjusted to the daylight saving time. To deactivate the function, press D.S.T./SUMMER T. again.
Playing a Disc
An 8 cm (3-inch) CD can be played without an adaptor.
1 Slide OPEN in the direction of the arrow to open the CD compartment lid and place in a CD.
2 Close the CD compartment lid.
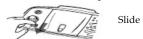


3 Press CD ▶II. "CD ▶" and "01" appear on the display to indicate that track 1 of the CD is playing. 4 Turn VOLUME to adjust the volume.
| To Press | ||
| Pause CD ▶II | ||
| Resume play after pause | CD ▶II again | |
| Locate the beginning of the current track (AMS*) | ||
| Locate the next track (AMS) ▶I** | ▲▼▼▼▼▼▼▼▼▼▼▼▼▼▼▼▼▼▼▼▼▼▼▼▼▼▼▼▼▼▼▼▼▼▼▼▼▼▼▼▼▼▼▼▼▼▼▼▼▼▼▼▼▼▼▼▼▼▼▼▼▼▼▼▼▼▼▼▼▼▼▼▼▼▼▼▼▼▼▼▼▼▼▼▼▼▼▼▼▼▼▼▼▼▼▼▼▼▼▼▼▲▼▼▼▼▼▼▼▼▼▼▼▼▼▼▼▼▼▼▼▼▼▼▼▼▼▼▼▼▼▼▼▼▼▼▼▼▼▼▼▼▼▼▼▼▼▼▼▼▼▼▼▼▼▼▼▼▼▼▼▼▼▼▼▼▼▼▼▼▼▼▼▼▼▼▼▼▼▼▼▼▼▼▼▼▼▼▼▼▼▼▼▼▼▼▼▼▼▼▲▲▼▼▼▼▼▼▼▼▼▼▼▼▼▼▼▼▼▼▼▼▼▼▼▼▼▼▼▼▼▼▼▼▼▼▼▼▼▼▼▼▼▼▼▼▼▼▼▼▼▼▼▼▼▼▼▼▼▼▼▼▼▼▼▼▼▼▼▼▼▼▼▼▼▼▼▼▼▼▼▼▼▼▼▼▼▼▼▼▼▼▼▼▼▼▼▼▼▼●▼▼▼▼▼▼▼▼▼▼▼▼▼▼▼▼▼▼▼▼▼▼▼▼▼▼▼▼▼▼▼▼▼▼▼▼▼▼▼▼▼▼▼▼▼▼▼▼▼▼▼▼▼▼▼▼▼▼▼▼▼▼▼▼▼▼▼▼▼▼▼▼▼▼▼▼▼▼▼▼▼▼▼▼▼▼▼▼▼▼▼▼▼▼▼▼▼▼▼●▲▼▼▼▼▼▼▼▼▼▼▼▼▼▼▼▼▼▼▼▼▼▼▼▼▼▼▼▼▼▼▼▼▼▼▼▼▼▼▼▼▼▼▼▼▼▼▼▼▼▼▼▼▼▼▼▼▼▼▼▼▼▼▼▼▼▼▼▼▼▼▼▼▼▼▼▼▼▼▼▼▼▼▼▼▼▼▼▼▼▼▼▼▼▼▼▼▼▼▽▼▼▼▼▼▼▼▼▼▼▼▼▼▼▼▼▼▼▼▼▼▼▼▼▼▼▼▼▼▼▼▼▼▼▼▼▼▼▼▼▼▼▼▼▼▼▼▼▼▼▼▼▼▼▼▼▼▼▼▼▼▼▼▼▼▼▼▼▼▼▼▼▼▼▼▼▼▼▼▼▼▼▼▼▼▼▼▼▼▼▼▼▼▼▼▼▼▼▼▽▲▼▼▼▼▼▼▼▼▼▼▼▼▼▼▼▼▼▼▼▼▼▼▼▼▼▼▼▼▼▼▼▼▼▼▼▼▼▼▼▼▼▼▼▼▼▼▼▼▼▼▼▼▼▼▼▼▼▼▼▼▼▼▼▼▼▼▼▼▼▼▼▼▼▼▼▼▼▼▼▼▼▼▼▼▼▼▼▼▼▼▼▼▼▼▼▼▼▼▶▼▼▼▼▼▼▼▼▼▼▼▼▼▼▼▼▼▼▼▼▼▼▼▼▼▼▼▼▼▼▼▼▼▼▼▼▼▼▼▼▼▼▼▼▼▼▼▼▼▼▼▼▼▼▼▼▼▼▼▼▼▼▼▼▼▼▼▼▼▼▼▼▼▼▼▼▼▼▼▼▼▼▼▼▼▼▼▼▼▼▼▼▼▼▼▼▼▼▼ | |
| Go back at high speed Hold down ▶◀▼▼▼▼▼▼▼▼▼▼▼▼▼▼▼▼▼▼▼▼▼▼▼▼▼▼▼▼▼▼▼▼▼▼▼▼▼▼▼▼▼▼▼▼▼▼▼▼▼▼▼▼▼▼▼▼▼▼▼▼▼▼▼▼▼▼▼▼▼▼▼▼▼▼▼▼▼▼▼▼▼▼▼▼▼▼▼▼▼▼▼▼▼▼▼▼▼▼▼↓▼▼▼▼▼▼▼▼▼▼▼▼▼▼▼▼▼▼▼▼▼▼▼▼▼▼▼▼▼▼▼▼▼▼▼▼▼▼▼▼▼▼▼▼▼▼▼▼▼▼▼▼▼▼▼▼▼▼▼▼▼▼▼▼▼▼▼▼▼▼▼▼▼▼▼▼▼▼▼▼▼▼▼▼▼▼▼▼▼▼▼▼▼▼▼▼▼▼▼ | Go forward at high Hold down ▶◀▼▼▼▼▼▼▼▼▼▼▼▼▼▼▼▼▼▼▼▼▼▼▼▼▼▼▼▼▼▼▼▼▼▼▼▼▼▼▼▼▼▼▼▼▼▼▼▼▼▼▼▼▼▼▼▼▼▼▼▼▼▼▼▼▼▼▼▼▼▼▼▼▼▼▼▼▼▼▼▼▼▼▼▼▼▼▼▼▼▼▼▼▼▼▲▼▼▼▼▲▼▼▼▼▼▼▼▼▼▼▼▼▼▼▼▼▼▼▼▼▼▼▼▼▼▼▼▼▼▼▼▼▼▼▼▼▼▼▼▼▼▼▼▼▼▼▼▼▼▼▼▼▼▼▼▼▼▼▼▼▼▼▼▼▼▼▼▼▼▼▼▼▼▼▼▼▼▼▼▼▼▼▼▼▼▼▼▼▼▼▼▼▼▼▲▼▼▼▼ ▼▼▼▼▼▼▼▼▼▼▼▼▼▼▼▼▼▼▼▼▼▼▼▼▼▼▼▼▼▼▼▼▼▼▼▼▼▼▼▼▼▼▼▼▼▼▼▼▼▼▼▼▼▼▼▼▼▼▼▼▼▼▼▼▼▼▼▼▼▼▼▼▼▼▼▼▼▼▼▼▼▼▼▼▼▼▼▼▼▼▼▼▼▼▼▼▼▼▼▼ | |
| Stop play OFF-ALARM RESET* AMS = Automatic Music Sensor**These operations are possible during both play and pause. | ||
• To handle compact discs
Correct

Incorrect
Handle the disc by its edge.

Do not touch the surface.
Do not stick paper or tape nor write anything on the surface.
[Non-Text]
Notes
- If you press CD ▶II when there is no disc in the CD compartment, "00" flashes for about 5 seconds on the display and the unit turns off automatically.
• There will be no sound from the speakers when the headphones (not supplied) are plugged in.
Various Modes of CD Playback
You can play tracks repeatedly or in random order.
Press CD PLAY MODE.
Each press changes the play mode as follows:
Display
Play
mod
indication
none (normal play)
All the tracks are played once.
playe
↓
(1)
REF 1 (single repeat) A single track is played repeatedly.
(S)
↓
"REP ALL" (all repeat)
All the tracks are played repeatedly
playe
↓
"SHUFFLE REP" (shuffle repeat)
All the tracks are played repeatedly in random order.
playe
1
"SHUFFLE" (shuffle play)
All the tracks are played once in random order.
playe
[Non-Text]
Playing the Radio
Manual Tuning
1 Press RADIO·SLEEP to turn on the radio.
2 Select FM or AM by pressing BAND. Repeated pressing of BAND switches between the bands.
3 Tune in to a station by pressing TUNE/TIME SET + or -. The channel step is set to 0.1 MHz for FM and to 10kHz for AM. To change the frequency rapidly, press down TUNE/TIME SET + or -. When the end of the band is reached, two beeps sound, and the unit automatically continues to scan from the other end of the band.
4 Turn VOLUME to adjust the volume.
• To turn off the radio, press OFF·ALARM
RESET.
• To improve radio reception FM: Extend the FM wire antenna fully to increase reception sensitivity.
AM: Rotate the unit horizontally for optimum reception. A ferrite bar antenna is built into the unit. Do not operate the unit over a steel desk or metal surface, as this may lead to interference of reception.
- When you release TUNE/TIME SET + or - after locating your desired station, the display switches back to the current time after a few seconds. To check the frequency of the tuned-in station, press RADIO·SLEEP gently and the frequency appears for about 5 seconds.
Preset Tuning
You can preset up to 5 stations; one station for each preset buttons 1 to 5, for one-touch tuning
- 2017年1月1日
Presetting a station
Example: To preset AM 1260 kHz onto preset button 2.
1 Press RADIO·SLEEP to turn on the radio.
2 Tune in to the station on AM 1260 kHz (See "Manual Tuning").
3 Press down the desired STATION·SELECT/PRESET button until you hear two beeps.
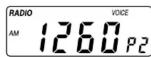
The frequency remains on the display for a few seconds, and then the display returns to the current time.
- When using the radio alarm, preset the station you wish to serve as the alarm (WAKE UP STATION) onto preset button 1.
To change the preset station Press the preset number again after tuning in manually to a different station. The previous station is replaced by the new one.
Tuning in to a preset station
1 Press RADIO·SLEEP to turn on the radio.
2 Press the STATION·SELECT/PRESET button where the desired station is stored.
3 Adjust the volume using VOLUME. After a few seconds, the display returns to the current time but the preset button number remains.
Note • There will be no sound from the speakers when the headphones (not supplied) are plugged in.
Setting the Alarm
This radio is equipped with 3 main alarm modes —CD, radio and sound. Under sound alarm, you can choose from BUZZER, BIRD or RIVER. Before setting the alarm, make sure to set the clock (see "Setting the Clock"). For the radio alarm, make sure to preset a radio station onto preset button 1.
Setting the Alarm Time To set the A CD alarm:
1 Press ALARM A for a few seconds
until you hear a beep.
"A CD" and the hour flashes on the
display.
2 Press TUNE/TIME SET + or - to set the desired hour.
3 Press ALARM A again.
4 Repeat steps 2 and 3 to set the minute. Two short beeps sound to confirm the setting. After a few seconds, the display returns to the current time.
Setting the wake up track
1 Press WAKE UP TRACK for a few seconds until you hear a beep. The track number flashes on the displa
2 Press TUNE/TIME SET + or - to select the desired track number.
3 Press WAKE UP TRACK again. Two short beeps sound to confirm the setting
Note When you change the CD, the WAKE UP TRACK number will be canceled. Set it again.
To set the B RADIO / B SOUND alarm:
1 Press ALARM B for a few seconds until you hear a beep. "B RADIO" and "B SOUND" flashes on
he display.
2 Press TUNE/TIME SET + or - to set the desired hour.
3 Press ALARM B again.
4 Repeat steps 2 and 3 to set the minute. Two short beeps sound to confirm the setting.
Setting the Alarm Mode
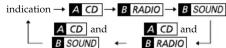
Before setting the alarm mode, be sure to set the alarm time. (See "Setting the Alarm Time".) Press ALARM MODE repeatedly until the desired mode appears on the display.
Each press of ALARM MODE changes the indication on the display as follows:
No alarm
Selecting the sound alarm
To select one of the 3 sounds to wake up to, set the SOUND MODE switch to:
BUZZER for buzzer
BIRD for bird song
RIVER for flowing stream
Adjusting the alarm volume
To adjust the volume of the alarm and the Voiceplus talking voice, set SOUND LEVEL to:
LOW for low
MID for medium
HIGH for loud
- To stop the alarm, press OFF·ALARM RESET. The alarm will sound at the same time the next day.
• To cancel the alarm, press ALARM MODE
repeatedly until there is no alarm indication on the display.
• TO check the alarm time you have set, press ALARM A or ALARM B
Notes
- The alarm does not function unless you set the
- If you set the CD alarm and radio or sound alarm to the same time, the CD alarm takes precedence.
- If you set the CD alarm and there is no disc in the CD player, the buzzer alarm will sound in its place at the time set.
• The radio, sound alarms and CD alarms will activate for 60 minutes.
- When the radio alarm is activated, "B RADIO" flashes on the display. If you wish to listen to the radio on the radio mode instead of the radio alarm mode press.
RADIO·SLEEP. " B RADIO " stops flashing and
To Doze for a Few More Minutes
Press SNOOZE/TIME REPORT
The CD, radio or sound alarm turns off, but will be activated automatically after about 8 minutes. You can repeat this process as many times as necessary.
- When the SNOOZE/TIME REPORT function is activated, the alarm indication flashes.
Setting the Sleep Timer
You can enjoy falling asleep to the radio using the built-in sleep timer that turns off the radio automatically after a preset duration.
Press RADIO·SLEEP repeatedly until the desired countdown duration appears. When RADIO·SLEEP is pressed once, "On" appears on the display. Subsequent pressing of RADIO·SLEEP shows the following countdown durations:
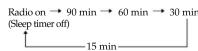
- To turn off the radio before the countdown duration has elapsed, press OFF• ALARM RESET.
To use both the sleep timer and the alarm
You can enjoy falling asleep to the radio and be awakened by the CD, radio or sound alarm.
1 Set the alarm. (See "Setting the Alarm".)
2 Set the sleep timer. (See "Setting the Sleep Timer".)
Other Useful Functions
For Enhanced Bass
The "MEGA BASS" function intensifies the bass sound for richer quality audio reproduction.
Turn MEGA BASS toward MAX to increase the bass emphasis.
- FM/AM CD Clock Radio
- VOICE plus
- Owner's Record
- WARNING
- To prevent fire or shock hazard, do not expose the unit to rain or moisture.
- INFORMATION
- CAUTION
- Before You Begin
- Features
- Precautions
- Troubleshooting
- Specifications
- CD player section
- Radio section
- General
- Speaker:
- Dimensions:
- Mass:
- IMPORTANT SAFEGUARDS
- INSTALLATION
- USE
- Power Source
- Grounding or Polarization
- Overloading
- When not in use
- Object and Liquid Entry
- Cleaning
- Attachments
- ANTENNAS
- Outdoor Antenna Grounding
- Antenna Grounding According to the National Electrical Code
- SERVICE
- Damage Requiring Service
- damaged.
- Replacement parts
- Unauthorized suit Safety Check
- Activating/Deactivating Voiceplus
- Setting the Clock
- Press CLOCK once.
- Playing a Disc
- Notes
- Various Modes of CD Playback
- Press CD PLAY MODE.
- Playing the Radio
- Manual Tuning
- Preset Tuning
- Presetting a station
- Tuning in to a preset station
- Setting the Alarm
- Setting the Alarm Time To set the A CD alarm:
- Setting the wake up track
- Setting the Alarm Mode
- Selecting the sound alarm
- Adjusting the alarm volume
- To Doze for a Few More Minutes
- Press SNOOZE/TIME REPORT
- Setting the Sleep Timer
- To use both the sleep timer and the alarm
- Other Useful Functions
- For Enhanced Bass
Mærke : SONY
Model : ICF-CD873
Kategori : Radiovækkeur