
XDR-S3HD - Radiovækkeur SONY - Gratis brugsanvisning og manual
Find enhedens vejledning gratis XDR-S3HD SONY i PDF-format.

Brugerspørgsmål om XDR-S3HD SONY
0 spørgsmål om dette apparat. Besvar dem du kender, eller stil dit eget.
Stil et nyt spørgsmål om dette apparat
Download vejledningen til din Radiovækkeur i PDF-format gratis! Find din vejledning XDR-S3HD - SONY og tag din elektroniske enhed tilbage i hånden. På denne side er alle dokumenter nødvendige for brugen af din enhed offentliggjort. XDR-S3HD af mærket SONY.
BRUGSANVISNING XDR-S3HD SONY
SONY.
3-208-169-12(1)
FM/AM Digital Radio
Operating Instructions
HD Radio®
XDR-S3HD
© 2007 Sony Corporation Printed in China
|
http://www.sony.net/
Owner's Record
Record the serial number in the space provided below. Refer to them whenever you call upon your Sony dealer regarding this product. Model No. XDR-S3HD
Serial No
For customers who purchased this product in the USA Please register this product on line at http://www.sony.com/productregistration. Proper registration will enable us to send you periodic mailings about new products, services, and other important announcements. Registering your product will also allow us to contact you in the unlikely event that the product needs adjustment or modification. Thank you.
SONY®
Portable Audio
LIMITED WARRANTY
S. Only
Sony Electronics Inc. ("Sony") warrants this product against defects in material or workmanship for the time periods and as set forth below. Pursuant to this Limited Warranty, Sony will, at its option, (i) repair the product using new or refurbished parts or (ii) replace the product with a new or refurbished product. For purposes of this Limited Warranty, "refurbished" means a product or part that has been returned to its original specifications. In the event of a defect, these are your exclusive remedies.
Labor: For a period of one (1) year from the original date of purchase of the product ("Labor Warranty"), Sony will, at its option, repair or replace with new or refurbished product, product determined to be defective. If Sony elects to replace the product after this Labor Warranty has expired but while the Parts Warranty below is still in effect, it will do so for the applicable labor charge.
Parts: For a period of one (1) year from the original date of purchase of product ("Parts Warranty"), Sony will supply new or refurbished replacement parts in exchange for parts determined to be defective.
This Limited Warranty covers only the hardware components packaged with the Product. It does not cover technical assistance for hardware or software usage and it does not cover any software products whether or not contained in the Product; any such software is provided "AS IS" unless expressly provided for in any enclosed software Limited Warranty. Please refer to the End User License Agreements included with the Product for your rights and obligations with respect to the software.
Instructions: To obtain warranty service, you must deliver the product, freight prepaid, in either its original packaging or packaging affording an equal degree of protection to the Sony authorized service facility specified. It is your responsibility to backup any data, software or other materials you may have stored or preserved on your unit. It is likely that such data, software, or other materials will be lost or reformatted during service and Sony will not be responsible for any such damage or loss. A dated purchase receipt is required. For specific instructions on how to obtain warranty service for your product,
Visit Sony's Web Site: www.sony.com/service
Or call the Sony Customer Information Service Center
For an accessory or part not available from your authorized dealer, o
1-800-488-SONY (7669)
Repair / Replacement Warranty: This Limited Warranty shall apply to any repair, replacement part or replacement product for the remainder of the original Limited Warranty period or for ninety (90) days, whichever is longer. Any parts or product replaced under this Limited Warranty will become the property of Sony.
This Limited Warranty only covers product issues caused by defects in material or workmanship during ordinary consumer use; it does not cover product issues caused by any other reason, including but not limited to product issues due to commercial use, acts of God, misuse, limitations of technology, or modification of or to any part of the Sony product. This Limited Warranty does not cover Sony products sold AS IS or WITH ALL FAULTS or consumables (such as fuses or batteries). This Limited Warranty is invalid if the factory-applied serial number has been altered or removed from the product. This Limited Warranty is valid only in the United States.
LIMITATION ON DAMAGES: SONY SHALL NOT BE LIABLE FOR ANY INCIDENTAL OR CONSEQUENTIAL DAMAGES FOR BREACH OF ANY EXPRESS OR IMPLIED WARRANTY ON THIS PRODUCT.
DURATION OF IMPLIED WARRANTIES: EXCEPT TO THE EXTENT PROHIBITED BY APPLICABLE LAW, ANY IMPLIED WARRANTY OF MERCHANTABILITY OR FITNESS FOR A PARTICULAR PURPOSE ON THIS PRODUCT IS LIMITED IN DURATION TO THE DURATION OF THIS WARRANTY.
Some states do not allow the exclusion or limitation of incidental or consequential damages, or allow limitations on how long an implied warranty lasts, so the above limitations or exclusions may not apply to you. This Limited Warranty gives you specific legal rights and you may have other rights which vary from state to state.
D455714503
WARNING
To reduce the risk of fire or electric shock, do not expose this apparatus to rain or moisture.
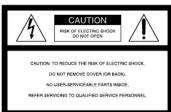
This symbol is intended to alert the user to the presence of uninsulated "dangerous voltage" within the product's enclosure that may be of
sufficient magnitude to constitute a risk of electric shock to persons.
This symbol is intended to alert the user to the presence of important operating and maintenance (servicing) instructions in the literature accompanying the appliance.
* The graphical symbols are on the bottom
INFORMATION
This equipment has been tested and found to comply with the limits for a Class B digital device, pursuant to Part 15 of the FCC Rules. These limits are designed to provide reasonable protection against harmful
interference in a residential installation. This equipment generates, uses, and can radiate radio frequency energy
and, if not installed and used in accordance with the instructions, may cause harmful interference to radio
communications. However, there is no guarantee that interference will not occur in a particular installation. If
this equipment does cause harmful interference to radio television protection, which can be determined by
of television reception, which can be determined by turning the equipment off and on, the user is encouraged
to try to correct the interference by one or more of the following measures:
— Reorient or relocate the receiving antenna — Increase the separation between the equip
receiver. Connect the equipment into an outlet on a circuit
— Connect the equipment into an outlet on a different from that to which the receiver is
connected. — Consult the dealer or an experienced radio
technician for help.
You are cautioned that any changes or modifications not expressly approved in this manual could void your authority to operate this equipment.
HD Radio™ Technology Manufactured Under License From iBiquity Digital Corp. U.S. and Foreign Patents. HD Radio™ and the HD Radio logo are proprietary trademarks of iBiquity Digital Corp.
Note to the CATV Installer
This reminder is provided to call the CATV system installer's attention to Article 820, 40 of the NEC that
installer's definition to Article 820-40 of the NEC that provides guidelines for proper grounding and, in
particular, specifies that the cable ground shall be connected to the grounding system of the building, as
close to the point of cable entry as practical
What is HD Radio™
Technology?
HD Radio Broadcasting was approved by the Federal
Communications Commission in October 2002 as the system for digital AM and FM broadcasting in the U.S.
HD Radio technology features include
- Static-free, clear radio reception. - FM Multicasting – the ability to broadcast multiple
program streams over a single FM frequency.
– A variety of "data services," including text-based information – artist name, song title, etc. scrolled
across your receiver display. Digital broadcasts in the same frequencies as and
- Digital broadcasts in the same frequencies as analog broadcasts; listeners do not need to learn a new station
number and today's stations remain at their current place on the dial.
HD Radio technology is developed and licensed by
HD Radio technology is developed and licensed by iBiquity Digital Corporation and supported by the
leaders of the broadcasting, consumer electronics and automotive industries
automotive industries
Features
• High-fidelity FM (RBDS)/AM Digital Radio with HD
RadioTM Technology. • Furniture-grade, hand-lacquered surface.
• Wood based cabinet, stereo speakers and bass reflex
sound system allows rich warm sound. • Digital tuning control knob permits easy accurate
English tuning will not differ possibly accurate tuning.
- Easy to see large, full-dot LCD display with backlight - High sensitive external FM/AM antenna
• Full range 2.6 inch stereo speakers and cancel magn
system. • Treble/bass tone control and surround sound function
• Alarm time setting (Radio, Buzzer or Line-In source
• LINE IN jack for connecting other portable audio equipment.
• Headphone out (ø 3.5 mm stereo minijack)
[Non-Text]
Precautions
- Play the unit on the power source specified in
"Specifications" • To disconnect the
- To disconnect the AC power cord (mallis lead), pull out by the plug, not the cord.
• The unit is not disconnected from the AC power
source (mains) as long as it is connected to the wall outlet, even if the unit itself has been turned off.
• The nameplate indicating operating voltage, etc. is
located on the bottom exterior.
- Since a strong magnet is used for the speaker, keep personal credit cards using magnetic coding or spiri
wound watches away from the unit to prevent possi
• Do not leave the unit in a location near a heat source
such as a radiator or air duct, or in a place subject to direct sunlight, excessive dust, mechanical vibration
direct sunlight, executive dust, mechanical visuator or shock.
- Allow adequate air circulation to prevent internal building-up. Do not place the unit on a surface (a run.)
build-up: ISO not placed the width on a surface (a log, c blanket, etc.) or near materials (a curtain) which might
block the ventilation holes. • Should any solid object or liquid fall into the unit.
unplug the unit and have it checked by a qualified
personnel before operating it any further. • To clean the casing, use a soft cloth dampened with
mild detergent solution.
- Never touch the wire of the external FM antenna during a thunderstorm. Furthermore, immediately
disconnect the AC power code from the radio.
If you have any questions or problems concerning your unit, please consult your nearest Sony dealer.
Connecting the
antenna
To connect the AM loop
antenna
The shape and the length of the antenna is designed to
receive AM signals. Do not dismantle or roll up the antenna.
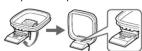
1 Remove
- Remove only the loop part from the plastic stand
2 Set up the AM loop antenna
3 Connect the cords to the AM antenna
- Connect the total to the PRT terminal terminals.
Cord (A) or cord (B) can be connected to either
terminal
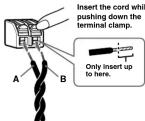
4 Make sure the AM loop antenna is connected
firmly by pulling softly.
Adjusting the AM loop antenna
Find a place and an orientation that provide good
reception. • Do not
- Do not place the Air loop anchina near the unit of other AV equipment, as noise may result.
• If you use an external polarized AM anten
to connect the ground cord to the 1b terminal. The
supplied AM antenna cord has no polarity.
Tip
Adjust the direction of the AM loop antenna for best AM broadcast sound.
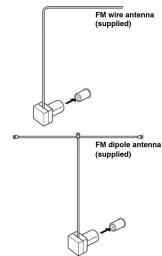
To connect the FM antenna
This unit comes supplied with an FM wire antenna and FM dipole antenna. Connect on antenna that provides
good reception to the FM antenna terminal.
flowchart
graph TD
    A["FM wire antenna (supplied)"] --> B["FM dipole antenna (supplied)"]
    B --> C["External components"]
    style A fill:#f9f,stroke:#333
    style B fill:#ccf,stroke:#333
    style C fill:#cfc,stroke:#333
Adjusting the FM wire antenna
Be sure to fully extend the FM wire antenna, and keep it as horizontal or vertical as possible.
Adjusting the FM dipole antenna
Be sure to fully extend the FM dipole antenna. Attach
the antenna in the shape wall away from this unit
Tip
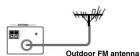
If you have poor FM reception, use a 75 Ω coaxial cable (not supplied) to connect the unit to an outdoor FM.
(Not Supplied) to connect antenna as shown below
Troubleshooting
Should any problem persist after you have made the
following checks, consult your nearest Sony dealer.
Only analog broadcast is received in an HD Radio
- Depending on the conditions, if the incoming signal
Depressing on the conditions, if the incoming signal strength is too weak or unstable, the HD indicator will
not flash or light up. In that case, the HD Radi broadcast will be received as an otocol signal
IMPORTANT SAFEGUARDS
For your protection, please read these safety instructions completely before operating the appliance and keep this manual for future reference.
Carefully observe all warnings, precautions and instructions on the appliance and in the operating
instructions, and adhere to then
INSTALLATION
Do not use powerline operated appliances near water - for example, near a bathtub, washbowl,
kitchen sink, or laundry tub, in a wet basement, or near a swimming pool, etc.
Heat Do no
sunlight.
Ventilation
The slots and openings in the cabinet are provided for necessary ventilation. To ensure reliable operation of the appliance, and to protect it from overheating, these slots and openings must re
Figures of the application, and to present in our material, which is also of charge that has been blocked or covered.
- Never cover the slots and openings with a cloth or other materials. - Never block the slots and openings by placing the appliance on a b
surface. Never possess the appliance in a confined space, such as a backbone, built-in cabinet unless my
- Never place the appliance in a confined space, such as a bookcase, or built-in cabinet, unless proper ventilation is provided.
Accessories
Do not place the appliance on an unstable cart, stand, tripod, bracket, or table. The appliance may fall, causing serious injuries to a child or an adult, and serious damage to the appliance. Use only a cart
causing serious injury to a child or adult, and serious damage to the appliance. Use only a car, stand, tripod, bracket, or table recommended by Sony.
- An appliance and cart combination should be moved with care. Quick stops, excessive force, and unguan surfaces may cause the appliance and cart combination to overturn.
Wall or Ceiling Mounting
If your appliance can be mounted to a wall or ceiling, mount it only as recommended by Sony.
USE
Power Source
This appliance should be operated only from the type of power source indicated on the marking label. If you are not sure of the type of electrical power supplied to your home, consult your dealer or local power company. For those appliances designed to operate from battery power, or other sources, refer to the operating instructions.
Grounding or Polarization
This appliance is equipped with a polarized AC power cord plug (a plug having one blade wider than the other), or with a three-wire grounding type plug (a plug having a third pin for grounding). Follow
the instructions below:
-For the appliance with a polarized AC power cord plug:
This plug will fit into the power outlet only one way. This is a safety feature. If you are unable to insert the plug fully into the outlet, try reversing the plug. If the plug should still fail to fit, contact
your electrician to have a suitable outlet installed. Do not defeat the safety purpose of the polarized
plug by forcing it in
-For the appliance with a three-wire grounding type AC plug; This plug will only fit into a grounding-type power outlet. This is a safety feature
This plug will only fill into a grounding-type power outlet. This is a safety feature. If you are unable to insert the plug into the outlet, contact your electrician to have a suitable outlet installed. Do not defeat
the safety purpose of the grounding plug
Overloading
Do not overload wall outlets, extension cords or convenience receptacles beyond their capacity, since this can result in fire or electric shock.
When not in use
Unplug the power cord of the appliance from the outlet when left unused for a long period of time.
To disconnect the cord, pull it out by grasping the plug. Never pull the plug out by the cord
Power-Cord Protection
Route the power cord so that it is not likely to be walked on or pinched by items placed upon of against them, paying particular attention to the plugs, receptacles, and the point where the cord exits
from the appliance.
Lightning
For added protection for this appliance during a lightning storm, or when it is left unattended and unused for long periods of time, unplug it from the wall outlet and disconnect the antenna or cable
system. This will prevent damage to the appliance due to lightning and powerline surges.
Object and Liquid Entry
Never push objects of any kind into the appliance through openings as they may touch dangerous voltage points or short out parts that could result in a fire or electric shock. Never spill liquid of an
Average price of other out-pair and sold return in a life of excellent condition. For short-lived or any kind on the appliance.
Cleaning
Unplug the appliance from the wall outlet before cleaning or polishing it. Do not use liquid cleaners
or aerosol cleaners. Use a cloth lightly dampened with water for cleaning the exterior of the appliance. Clean the appliance only as recommended by Sony.
Attachments
Do not use attachments not recommended by Sony, as they may cause hazards.
ANTENNAS
Outdoor Antenna Grounding
If an outdoor antenna or cable system is installed, follow the precautions below.
An outdoor antenna system should not be located in the vicinity of overhead power lines or other
electric light or power circuits, or where it can come in contact with such power lines or circuits. WHEN INSTALLING AN OUTDOOR ANTENNA SYSTEM, EXTREME CARE SHOULD BE TAKEN
TO KEEP FROM CONTACTING SUCH POWER LINES OR CIRCUITS AS CONTACT WITH THEM IS ALMOST INVARIABLY FATAL.
Be sure the antenna system is grounded so as to provide some protection against voltage surges and
built-up static charges. Section 810 of the National Electrical Code provides information with respect
to proper grounding of the mast and supporting structure, grounding of the lead-in wire to an antenna discharge unit, size of grounding conductors, location of antenna-discharge unit, connection
to grounding electrodes, and requirements for the grounding electrode.
Antenna Grounding According to the National
Electrical Code
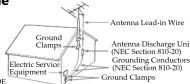
Power Service Grounding Electrode System
(NEC Art 250 Part H)
Damage Requiring Service
Interrupting the appliance from the wall outlet and refer servicing to qualified service personnel under the following conditions:
-When the power core
-If liquid has been spilled or objects have fallen into the appliance
-If the appliance has been exposed to rain or water.
-The appliance does not appear to operate normally or exhibits a marked change in performance. This indicates a need for service
-If the appliance does not operate
those controls that are specified in the operating instructions. Improper adjustment of other controls
may result in damage and will often require extensive work
by a qualified technician to restore the appliance to normal operation. If the appliance has been subject to excessive shock by being dropped, or the cabinet has been
- If the upper damaged.
Servicing
Do not attempt to service the appliance yourself as opening or removing covers may expose you to
dangerous voltage or other hazards
Refer all servicing to qualified service personnel. Replacement parts
Replacement parts
When replacement parts are required, be sure the service technician has used replacement parts specified by any that have the same characteristics as the original parts.
specified by Sony that have the same characteristics as the original parts. Unauthorized substitutions may result in fire, electric shock, or other hazards
Safety Check
Upon completion of any service or repairs to the appliance, ask the service technician to perform
routine safety checks (as specified by Sony) to determine that the appliance is in safe operating
condition.
D455714503
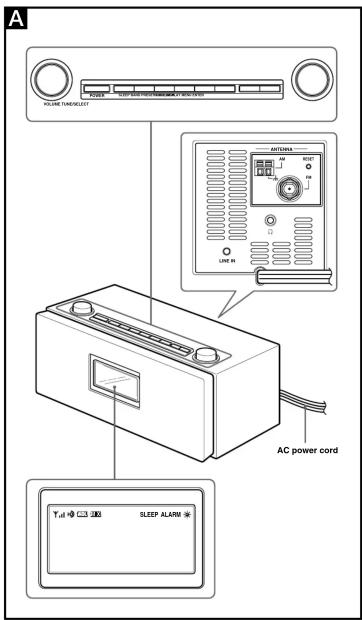
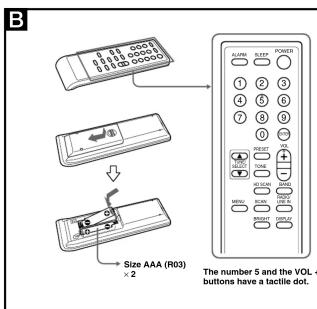
Preparing the remote commander Installing the batteries into the remote commander (See Fig. B)
When to replace the batteries With normal use, the batteries should last for about six months. When the remote commander no longer operates the unit, replace all the batteries with new ones. Notes • Do not charge dry batteries. • When you are not going to use the remote commander for a long time, remove the batteries to avoid any damage caused by leakage and corrosion.
Setting the clock
1 Plug in the unit.
The display will flash "AM 12:00."
2 Press MENU to show the menu display
- Turn TUNE/SELECT clockwise to select
"TIME SET" then press ENTER
TIME SET, then press ENTER. The hour will start to flash in the display.
[EMPTY]
|
12:00
[1]
• • • • • •
-
Turn TUNE/SELECT clockwise or
-
Turn TONE/GELEST clockwise of counterclockwise until current hour appears in
the display, then press ENTER
The hour is set and the minutes start to flash.
5 Repeat step 4 to set the minute.
Note
If you do not set the menu within 65 seconds, the setting
mode is canceled.
To change the display to the
daylight saying time
daynight saving time (summer Time) indie
(summer time) indication
1 Press MENU to show the menu display
2 Turn TUNE/SELECT clockwise or
counterclockwise to select "DST," then
ENTER.
3 Turn TUNE/SELECT counterclockwise to
select "ON," then press ENTER.
某 appears and the time indication change summer time.
To substitute the D&T function, select "OFF" in step 2.
To deactivate the D31 function, select "OFF" in step 3.
Playing the radio
-Manual tuning
- Price POWER to turn on the
If "P" and the preset number are dim
PRESET to turn off them.
If "LINE IN" is displayed, press R.
so that the band (AM or FM) appears.
- Press BAND to select the band AM of PM.
- Turn TUNE/SELECT clockwise or
- Turn Tone, Selection clockwise of counterclockwise to tune in to a desired
frequency.
A beep soun
each band is received during tuning.
4 Adjust the volume using VOLUME
Tip
To attenuate the volume, turn VOLUME
counterclockwise quickly
Note
The frequency cannot be input with the number buttons
of the remote commander.
-Preset tuning
You can preset 20 stations each for AM
Yes can preset no solutions each for AM and FS.
Presetting a station
1 Follow steps 1 to 3 in "Manual tuning" to
tune the frequency you wish to preset.
2 Press and hold PRESET for a few seconds. You will bear a heap.
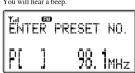
3 Turn TUNE/SELECT clockwise o
counterclockwise to select the preset number,
then press ENTER
The frequency is stored in the selec
number and you will near a beep.
preset another station, repeat these steps.
Note
If you try to store another station in the same preset
number, the previously stored station will be replaced
Tuning in to a station
- Power
1 Press POWER to turn on the radio.
2 Press RAND to select the hand AM or FM
2 Press BAND to select the band AM of PM. 3 Page DRESET
5 Press PRESET The reset number
The preset number appears in upper left in the display.
4 Tu
counterclockwise to select the preset number.
- Adjust the volume using VOLUME
Tin
The preset can be selected by pressing the number
button of the remote commander. Press ENTER after
the preset number is selected.
-Scan tuning
The unit will automatical
In HD scan, HD Radio stations are scanned.
- Press POWER to turn on the radio
2 Press BAND to select the band AN
3 Press MENU to show the menu display.
4 Turn TUNE/SELECT clockwise or
counterclockwise to select "SCAN" or "HD
SCAN," then press ENTER.
Scanning of the selected band start
When a station is received, scanning pulses for 3 seconds and then continues.
5 When the unit tunes in to the desired station
do any of the following operations to stop
scanning.
- Press ENTER on the unit or remote commands
- Press SCAN or HD SCAN on the remote commander
6 If necessary, turn TUNE/SELECT
clockwise or counterclockwise to tune in to
the station more precisely.
7 Adjust the volume using VOLUME.
Tip
You can scan a station directly by pressing SCAN or
HD SCAN on the remote commander.
To listen with the
To listen with headphones
headphones You can arrive the radio
You can enjoy the radio and external equipment connected to the line in by the headphones (not
supplied). Connect the headphones (not supplied) to the
(1) (headphone) jack. The speaker is deactivated when
the headphones are connected.
[Non-Text]
Changing the
changing the display mode and
display mode and
settings
To change the display mode
Peace DISPLAY
The display changes as follows:
The display changes as follows:
When an analog radio station is received
A
B P 5
08.4
| 94 1mL-7
3.1 min
[NO TEXT]
↓
姓名:____
P 5 99 1MHz
□□□□□□
10.00
6 Obi 17:111
图 1-2
●Field strength level indicator
- Field strength level indicator - Preset number*
©Band
Frequency
Current time
* When yo number
Transact:
When an analog FM broadcast that supports
RBDS (Radio Broadcast Data System) is
received
A Y 10 C
B D
00
-
MHz
-
2017年1月1日
1
↓
Yall F20
B D
1
00 1
-
[MHz]
-
2017
↓
¥1 回
B P 5 99 1MHz
- 1. 2017年1月1日
10.00
6 AM 12:00
(1) 1234
↓
3 Field Strength Level Indicator
Field strength Preset number
©Proset Number ©Band
Station name
Name of station currently tuned in.
EFrequency FText informatic
Text information transmitted from station.
⑨Current time
* When you tune in a station by selecting a preset
numb
Note
The display item differs depending on the content of a
broadca
When an HD Radio station is received
A
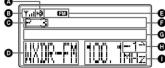
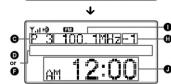
↓
D
Y-100 四
P 3 WXTIR-FM -7
If you press DISPLAY for 2 seconds while the
display above appears, the beep is heard and the
scroll speed of the display item becomes slow. To return to normal scroll speed press DISPLAY
To return to monthly scroll speed, press DISF LAT again for 2 seconds.
- 2017年
AHD Indicator
ND Indicator Reception status
Stays in Strong HD signal, digital reception
Flashes Weak HD signal, analog reception
Not displayed No HD signal, analog reception
* The HD indicator flashes momentarily at first, and then stays lit.
then stays in.
- Field strength level indicator - Preset number ^2
① Reset number ② Current station
Band
FStatio ©TWs/A
⑥ Title/Artist Name ⑦ Sub channel (FM
Appears when HD Radio broadcasts multiple
program.
Turn TUNE/SELECT clockwise or counterclockwise to select a sub-changep
Frequency
⑤ Current time
K Text information
* When you tune in a station by selecting a preset
numb
Note
The display item differs depending on the content of a broadcast or the station.
(1)
Theorem 1.2. (Theorem 1.3) Let F be a finite field and let G be the set of all elements of . Then
To change the display
settings (BRIGHTNESS)
CONTRAST
1 Peace MENU
1 Press MENU to show the menu display 2 Turn TUNE/SELECT clockwise or
counterclockwise to select "BRIGHTNESS"
or "CONTRAST," then press ENTER.
3 Turn TUNE/SELECT clockwise or
counterclockwise to select the setting or to
adjust the level, then press ENTER
BRIGHTNESS:
The brightness of the display is selected from
"HIGH," "MIDDLE" or "LOW.
CONTRAST:
The contrast of the display can be adjusted by 11 levels.
Note
Note If you do not set the menu within 10 seconds, the setting
mode is
Tip
You can adjust "BRIGHTNESS" directly by pressing
BRIGHT on the remote commander.
Adjusting the tone
Adjusting the tone
1 Press POWER to turn on the radio.
2 Press TONE to show the tone setting
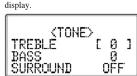
- Turn TUNE/SELECT clockwise or
- Turn TONE/SELECT clockwise of counterclockwise to set "TREBLE" then
press TONE.
4 Turn TUNE/SELECT clockwise or
counterclockwise to set "BASS," then press
TONE.
5 Turn TUNE/SELECT clockwise or
counterclockwise to set "SURROUND," then
press TONE
Tip
The adjustable range of "TREBLE" and "BASS" is from
-6 to +6. "SURROUND" switches "ON" or "OFF".
SURROUND SWITCH ON OF OFF.
广力云智慧零售收银系统
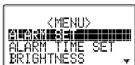
Setting the alarm
Setting the alarm
You can set the unit to turn on automatically at a preset time. The system must use if the unit is off
time. The alarm can be set, even if the unit is off. To adjust the hour and minute, see "Setting the clock."
To adjust the
To set the alarm time
- Press MENU to show the menu display
Turn TUNE/SELECT clockwise or
counterclockwise to select "ALARM TIME
SET, ^™ then press ENTER.
The hour sign starts flashing.
Example of display when unit is off
(No text)
OLORM TIME SET
198412:00 RADIO OM
[4] 520kV
[1] 350kHz UOL 20
VOL 50
- Turn TUNE/SELECT clockwise or
3 Tunn TUNE/SELECT clockwise of counterclockwise to set the hour, then press
ENTEL
The minute sign starts flashing.
4 Turn TUNE/SELECT clockwise or
counterclockwi
press ENTER.
The source sign starts flashing.
Turn TUNE/SELECT clockwise of counterclockwise to select the source from
"RADIO AM." "RADIO FM." "LINE IN" or
"BUZZER." then press ENTER.
If you select "RADIO AM," "RADIO FM" or
"LINE IN" continue the following steps.
6 Turn TUNE/SELECT clockwise or
counterclockwise to select the preset number
then press ENTER. If you selected "LINE 1
If you selected LEVEL IV in Sep 3, and Sep is no necessary.
7 Turn TUNE/SELECT clockwise or
counterclockwise to set the volume, then
press ENTER
To set the alarm
To set the alarm
1 Press MENU to show the menu display.
2 Turn TUNE/SELECT clockwise or
counterclockwise to
then press ENTER. 3. Turn TUNE/SELECT counterlockwise to
3 Turn TONE/SELECT counter select "ON" then press ENTER
- FM/AM Digital Radio
- Owner's Record
- SONY®
- LIMITED WARRANTY
- Visit Sony's Web Site: www.sony.com/service
- Or call the Sony Customer Information Service Center
- 1-800-488-SONY (7669)
- WARNING
- INFORMATION
- Note to the CATV Installer
- What is HD Radio™
- Technology?
- Features
- Precautions
- Connecting the
- antenna
- To connect the AM loop
- To connect the FM antenna
- Troubleshooting
- IMPORTANT SAFEGUARDS
- INSTALLATION
- ANTENNAS
- (NEC Art 250 Part H)
- Setting the clock
- Playing the radio
- -Manual tuning
- Adjusting the tone
Mærke : SONY
Model : XDR-S3HD
Kategori : Radiovækkeur