
SL-20 - Kassetteafspiller SONY - Gratis brugsanvisning og manual
Find enhedens vejledning gratis SL-20 SONY i PDF-format.

Brugerspørgsmål om SL-20 SONY
0 spørgsmål om dette apparat. Besvar dem du kender, eller stil dit eget.
Stil et nyt spørgsmål om dette apparat
Download vejledningen til din Kassetteafspiller i PDF-format gratis! Find din vejledning SL-20 - SONY og tag din elektroniske enhed tilbage i hånden. På denne side er alle dokumenter nødvendige for brugen af din enhed offentliggjort. SL-20 af mærket SONY.
BRUGSANVISNING SL-20 SONY
OPERATING INSTRUCTIONS
Before operating the unit, please read this manual thoroughly, and retain it for future reference.
OWNER'S RECORD
The model and serial number of your set are located at the rear. Record the serial numbers in the space provided below. Refer to these numbers whenever you call upon your Sony dealer regarding this product.
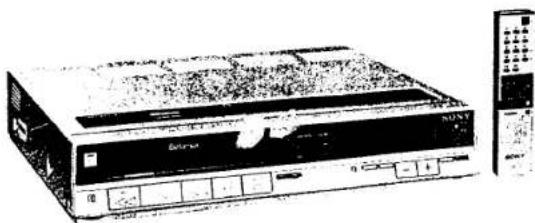
Model No. SL-20
Serial No.
natural_image
Illustration of a Sony electronic device with control panel and external keypad (no visible text or symbols)This unit can be used with any video cassette tapes having the mark B.
It is compatible with the and type recording and playback formats, and will play back tapes recorded in the format.
TABLE OF CONTENTS
BEFORE CONNECTING THE RECORDER TO A POWER SOURCE
Warning....2
Note on operating power voltage and frequency..... 2
Precautions 3
CONNECTIONS
Antenna connections 4
Connecting the TV receiver 5
Connections to a cable TV system.... 6
ADJUSTMENTS
Adjusting the TV 7
Presetting the active channels in your area.... 8
Tuning channels 8
To change the channel display 8
To cancel an unused channel 9
To fine-tune a weak station 9
Handling the video cassettes....9
Setting the clock....10
OPERATIONS
Recording TV programs 11
Recording one TV program while viewing another.....12
Playing back a recorded tape....12
To search for a particular point while viewing the picture....13
To view the picture momentarily when the tape is in the rewind or fast forward mode....13
To index a recorded program using the tape counter 13
Rewind button usage for the automatic tape transportation....13
When playing back a tape recorded on another recorder....13
Timer activated recording....14
Before setting the timer....14
Before the timer-activated recording starts....16
When a timer recording is finished 16
To begin recording a program immediately and to turn off the power automatically....16
Specific notes on timer-activated recordings....17
Remote control operation....18
Battery insertion....18
Operation....18
Tape copy....19
Camera recording....19
GENERAL
Location and function of controls 20
Specifications....23
Trouble checks....back cover
BEFORE CONNECTING THE UNIT TO A POWER SOURCE
WARNING
To prevent fire or shock hazard, do not expose the unit to rain or moisture.
text_image
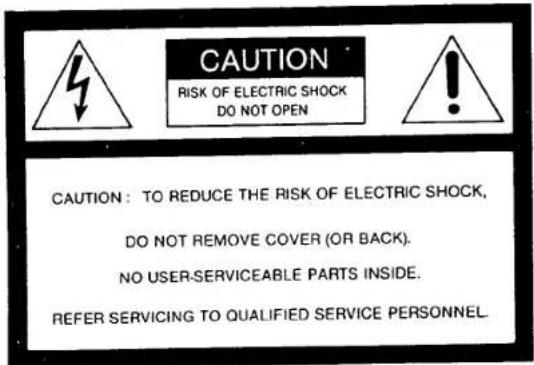
CAUTION RISK OF ELECTRIC SHOCK DO NOT OPEN CAUTION: TO REDUCE THE RISK OF ELECTRIC SHOCK, DO NOT REMOVE COVER (OR BACK). NO USER-SERVICEABLE PARTS INSIDE. REFER SERVICING TO QUALIFIED SERVICE PERSONNEL.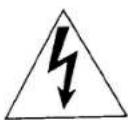
This symbol is intended to alert the user to the presence of uninsulated "dangerous voltage" within the product's enclosure that may be of sufficient magnitude to constitute a risk of electric shock to persons.

This symbol is intended to alert the user to the presence of important operating and maintenance (servicing) instructions in the literature accompanying the appliance.
CAUTION:
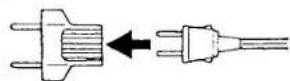
TO PREVENT ELECTRIC SHOCK, DO NOT USE THIS POLARIZED AC PLUG WITH AN EXTENSION CORD, RECEPTACLE OR OTHER OUTLET UNLESS THE BLADES CAN BE FULLY INSERTED TO PREVENT BLADE EXPOSURE.
NOTE ON OPERATING POWER VOLTAGE AND FREQUENCY
Depending on the area to be used, the SL-20 comes in two models to suit the local operating power voltage and frequency. Check which type your model is and be sure to follow Caution below before plugging the unit to the wall outlet.
| Voltage | Frequency | |
| Type 1Rear panelFrequencyselectswitch**covered with a rubber coverfor the models in the U.S.A.and Canada | 120 V | 50/60 Hz |
| Type 2Rear panelFrequencyselect switchVoltage selector | 100/120/220/240 V | 50/60 Hz |
Caution
● For the type 1 model
Operate the unit only on 120 V AC. The frequency select switch is set to 60 Hz at the factory. If you are going to use the unit at a 50 Hz area, set this switch to 50 Hz. The timer will not work properly if this switch is not set correctly.
- For the type 2 model
Make sure to set the voltage selector and frequency select switch in accordance to the voltage and frequency of your area. The unit may suffer serious damage if the voltage selector is not set correctly.
AC power plug adaptor (only for the models available at the PX)
If the ac plug of your recorder does not fit the wall outlet when using it in a 220 V area, attach the supplied ac plug adaptor.
The photos and illustrations used in this manual are those of the type 1 model. The differences on the appearance and the operation of the type 2 model are clearly mentioned as required.
PRECAUTIONS
On safety
- Before operating the set, check that the operating power voltage and frequency of the unit are identical with those of your local power supply.
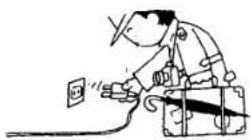
- Should any solid object or liquid fall into the cabinet, unplug the unit and have it checked by qualified personnel before operating it any further.
- For the type 1 models: This unit is equipped with a polarized ac power cord plug (one blade of the plug is wider than the other), which will fit into the power outlet only one way. Should you be unable to insert the plug fully into the outlet, try reversing the plug. If the plug still fails to fit, contact your dealer for assistance. Do not defeat the safety purpose of the polarized plug.
- Unplug the unit from the wall outlet if it is not to be used for an extended period of time. To disconnect the cord, pull it out by the plug. Never pull the cord itself.
On installation
- Allow adequate air circulation to prevent internal heat build-up. Do not place the unit on surfaces (rugs, blankets, etc.) or near materials (curtains, draperies) that may block the ventilation slots.
- Do not install the unit near heat sources such as radiators or air ducts or in a place subject to direct sunlight, excessive dust, mechanical vibration or shock.

natural_image
Simple line drawing of a sun and a house with a bird flying nearby (no text or symbols)- The unit is designed for operation in a horizontal position. Do not install it in an inclined position.
- Keep the unit and cassette tapes away from equipment with strong magnets, as for example a microwave oven or a large loudspeaker.
- Do not place any heavy object on the unit.
On operation
- When the unit is not in use, turn the power off to conserve energy and to extend its useful life.
- Remove and store video cassettes after recording or playback.
On cleaning
Clean the cabinet, panel and controls with a dry soft cloth, or a soft cloth lightly moistened with a mild detergent solution.
Do not use any type of solvent, such as alcohol or benzine, which might damage the finish.
On repacking
Do not throw away the carton and packing materials. They make an ideal container in which to transport the unit. When shipping the unit to another location, repack it as illustrated on the carton.
If you have any questions about this unit, contact your Sony service facility.
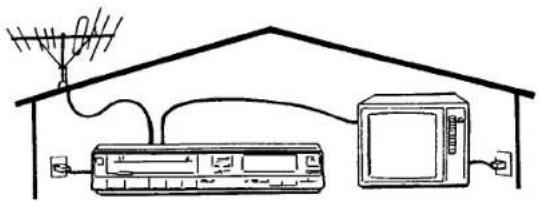
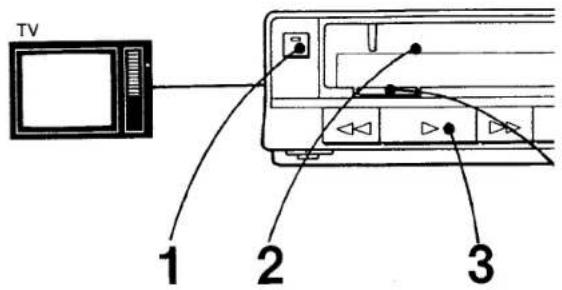
CONNECTIONS
ANTENNA CONNECTIONS
Hook up the outdoor antenna to the video recorder and connect the recorder to the TV.
text_image
Diagram showing household air conditioning setup with antenna, TV, and control panel connected to a microwaveVHF antenna
If the cable is a round 75-ohm coaxial cable
If the cable is a flat 300-ohm twin lead
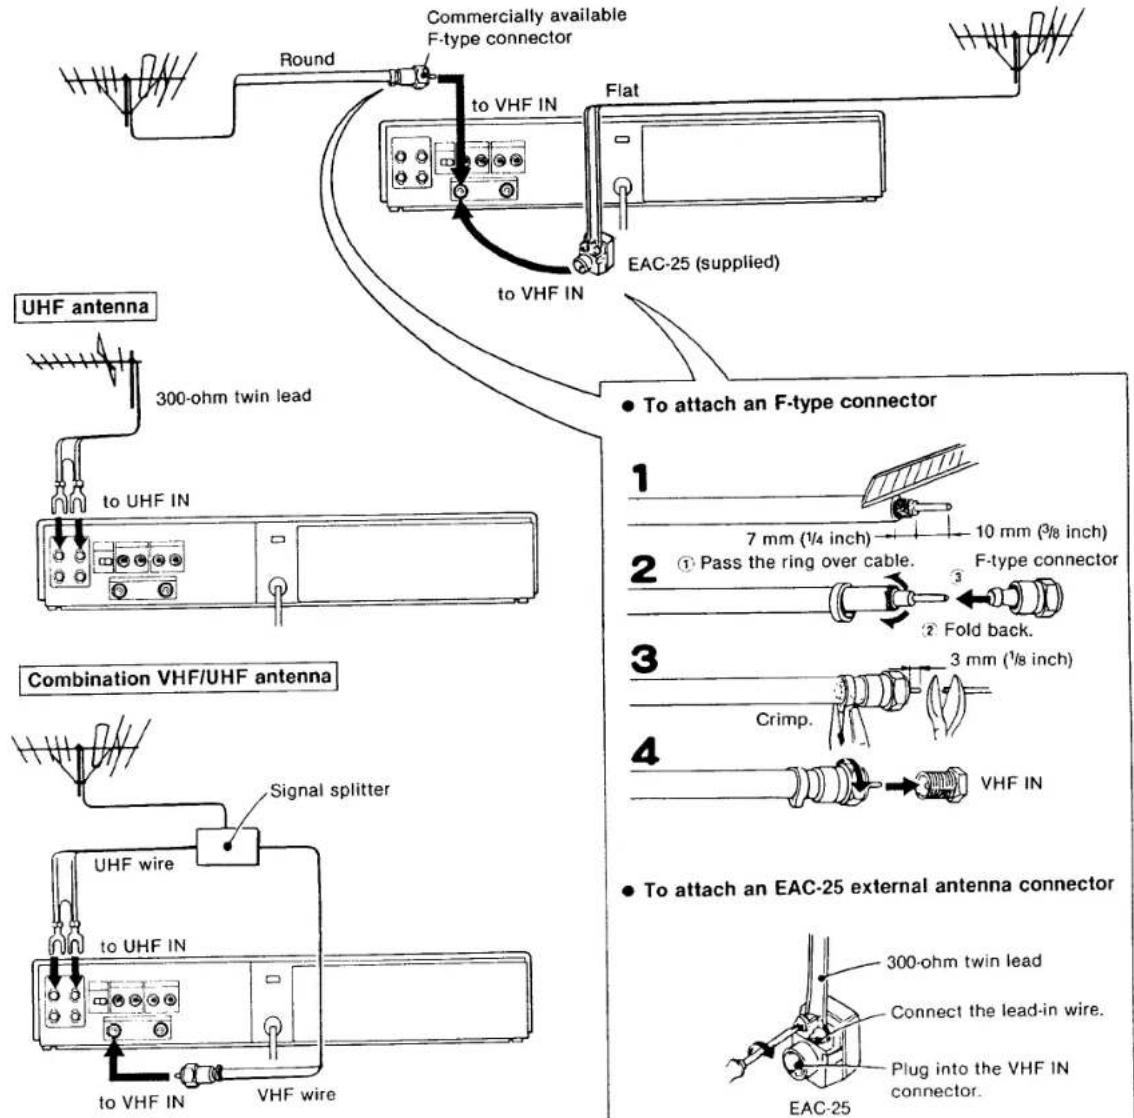
text_image
Round Commercially available F-type connector to VHF IN Flat EAC-25 (supplied) to VHF IN UHF antenna 300-ohm twin lead to UHF IN Combination VHF/UHF antenna Signal splitter UHF wire to UHF IN to VHF IN VHF wire To attach an F-type connector 1 7 mm (¼ inch) 10 mm (¾ inch) 2 ① Pass the ring over cable. F-type connector 3 Fold back. 3 mm (½ inch) Crimp. 4 VHF IN To attach an EAC-25 external antenna connector 300-ohm twin lead Connect the lead-in wire. Plug into the VHF IN connector. EAC-25Most combination antennas are equipped with a signal splitter.
If you need a splitter or an antenna system, see your Sony dealer or a qualified technician.
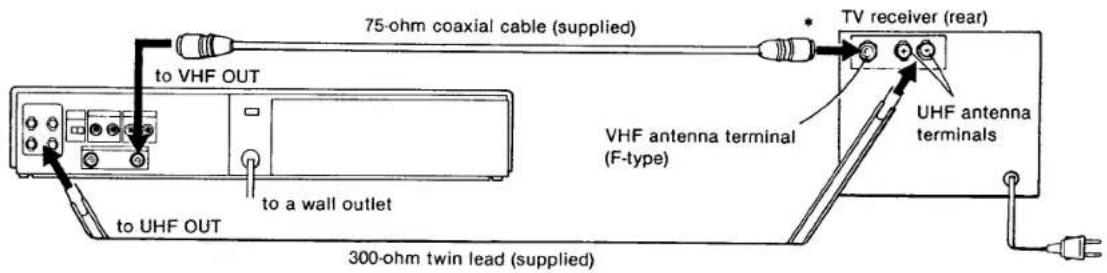
CONNECTING THE TV RECEIVER
Connecting a conventional TV receiver
Once the connections shown below have been made, the TV antenna signals, as well as the signal from the recorder, will be fed to the TV. To view TV programs in the usual way, turn on the TV only.
- Use an optional RFC-8 extension cable, 8 m (25 ft) long, if the supplied 75-ohm coaxial cable is not long enough.
text_image
75-ohm coaxial cable (supplied) to VHF OUT to a wall outlet 300-ohm twin lead (supplied) VHF antenna terminal (F-type) TV receiver (rear) UHF antenna terminals* If the VHF terminal of your TV is for a 300 ohm (flat) twin-lead cable, use the optional EAC-24 (supplied for the type 1 models outside the U.S.A. and Canada) external antenna connector (75 ohm to 300 ohm matching transformer).

natural_image
Pure electrical connector diagram without any text or symbolsCaution
Connections between the recorder VHF OUT connector and the antenna terminals of a TV receiver should be made only as shown in these instructions. Failure to do so may result in operation that violates the regulations of the Federal Communications Commission regarding the use and
operation of rf devices.
Never connect the output of the recorder to an antenna or make simultaneous (parallel) antenna and recorder connections at the antenna terminals of your receiver.
Connecting a color monitor
To obtain a better-quality picture, we recommend the use of a color monitor, such as the Sony Profeel Trinitron Component TV.
If you use a component TV tuner together with the monitor, connect the recorder and the TV tuner in the same way as in the case of the recorder and the conventional TV receiver described above.
For details on the connection of the TV tuner and the monitor, refer to the instruction manual of the TV tuner.
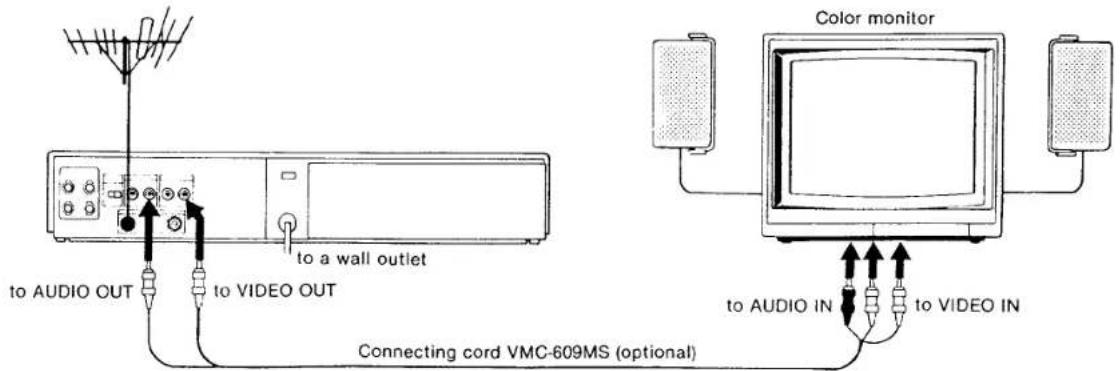
text_image
to AUDIO OUT to VIDEO OUT to a wall outlet Connecting cord VMC-609MS (optional) Color monitor to AUDIO IN to VIDEO INCONNECTIONS TO A CABLE TV SYSTEM
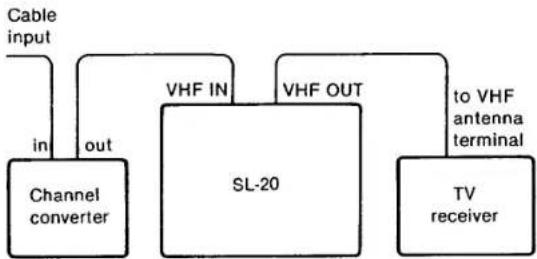
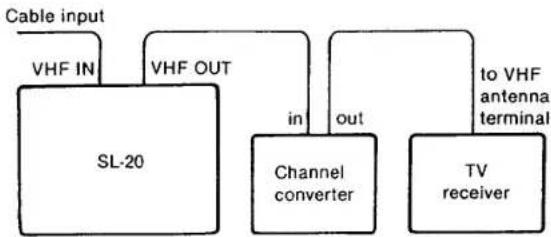
- We recommend that you consult with your cable television company for proper connection of your Betamax unit to your cable TV system.
- Before operating the recorder with a cable TV system, set the RF UNIT channel selector on the recorder to channel 3 or 4, whichever is not active in your area.
The following diagrams show two possible connections.
System A
flowchart
graph TD
    A["Cable input"] --> B["Channel converter"]
    B --> C["VHF IN"]
    C --> D["SL-20"]
    D --> E["VHF OUT"]
    E --> F["to VHF antenna terminal"]
    F --> G["TV receiver"]
    B --> H["in"]
    B --> I["out"]
System B
flowchart
graph TD
    A["Cable input"] --> B["VHF IN"]
    B --> C["SL-20"]
    D["VHF OUT"] --> C
    C --> E["in"]
    E --> F["Channel converter"]
    F --> G["out"]
    G --> H["TV receiver"]
    H --> I["to VHF antenna terminal"]
In system A, you can record any cable program that are converted through the converter.
Set the TV channel selector to the same channel as the RF UNIT channel selector. Set the recorder to receive the output channel of the converter by following "TUNING CHANNELS" on page 8.
Press the TV/VTR button on the recorder to turn the VTR indicator on. Select the channel to be viewed or to be recorded with the channel selector on the converter.
In system B, you can view a program received through the converter while recording a program on VHF channels 2 through 13.
Set the TV channel selector to the output channel of the converter and press the TV/VTR button to turn the VTR indicator off. For playback, set the channel selector on the converter to the same channel as the RF UNIT channel selector.
When a channel converter is not used, connect the cable input to the recorder, then connect the recorder and the TV receiver as shown in the previous TV connection diagrams.
ADJUSTMENTS
ADJUSTING THE TV
Adjust your TV receiver to receive the signal from your recorder.
When you have connected a color monitor, the following adjustment is not necessary.
Note
When you insert the power plug into a wall outlet, all numerals in the indication window will light up for about six seconds (and the tape loading mechanism may also run a little). All functions will not operate at this step, although the power indicator lights up.

text_image
POWER ON/OFF EJECT TV/VTR Rear RF UNIT VHF 3 CH 4 CH +/- buttons INPUT SELECT PLAY STOP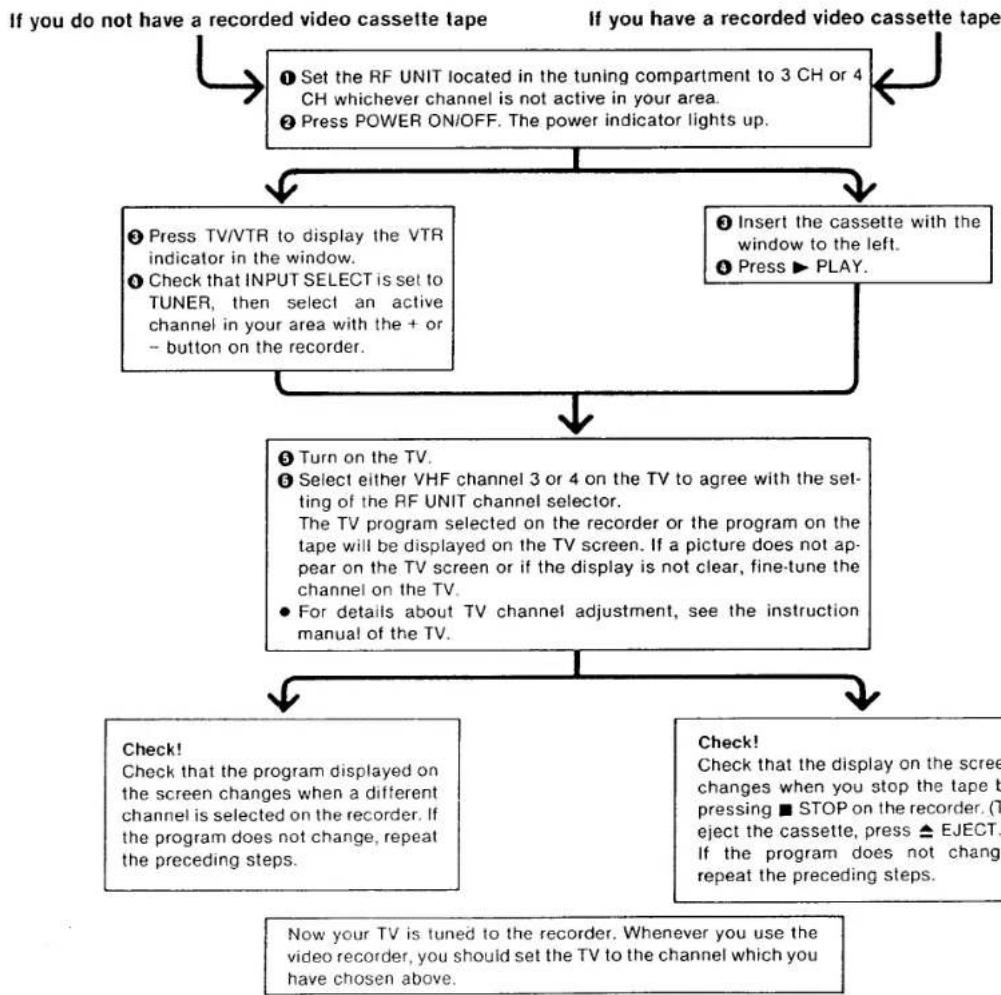
flowchart
graph TD
    A["If you do not have a recorded video cassette tape"] --> B["① Set the RF UNIT located in the tuning compartment to 3 CH or 4 CH whichever channel is not active in your area.<br>② Press POWER ON/OFF. The power indicator lights up."]
    B --> C["③ Press TV/VTR to display the VTR indicator in the window.<br>④ Check that INPUT SELECT is set to TUNER, then select an active channel in your area with the + or - button on the recorder."]
    B --> D["④ Insert the cassette with the window to the left.<br>⑤ Press ► PLAY."]
    C --> E["⑤ Turn on the TV.<br>⑥ Select either VHF channel 3 or 4 on the TV to agree with the setting of the RF UNIT channel selector.<br>The TV program selected on the recorder or the program on the tape will be displayed on the TV screen. If a picture does not appear on the TV screen or if the display is not clear, fine-tune the channel on the TV.<br>• For details about TV channel adjustment, see the instruction manual of the TV."]
    D --> E
    E --> F["Check! Check that the program displayed on the screen changes when a different channel is selected on the recorder. If the program does not change, repeat the preceding steps."]
    E --> G["Check! Check that the display on the screen changes when you stop the tape by pressing ■ STOP on the recorder. (To reject the cassette, press ▲ EJECT: If the program does not change, repeat the preceding steps.)"]
    F --> H["Now your TV is tuned to the recorder. Whenever you use the video recorder, you should set the TV to the channel which you have chosen above."]
    G --> H
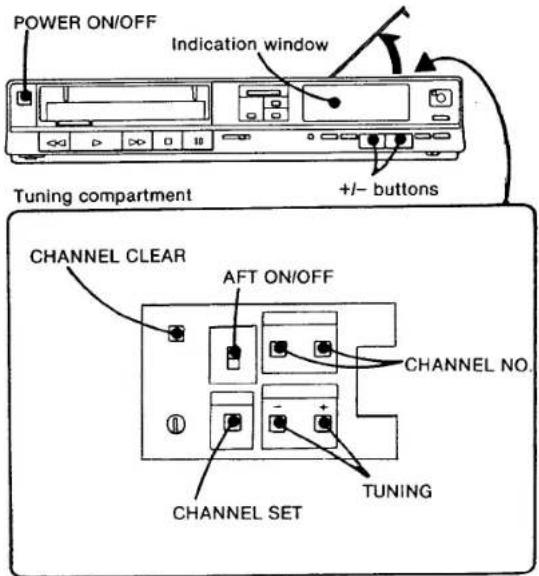
PRESETTING THE ACTIVE CHANNELS IN YOUR AREA
Your recorder is capable of receiving VHF channels 2-13 and UHF channels 14-83.
You can preset 14 channels so that only the desired channels will appear in sequence when you press the large + or - button on the recorder and the CH +/- button on the Remote Commander.
text_image
POWER ON/OFF Indication window Tuning compartment +/- buttons CHANNEL CLEAR AFT ON/OFF CHANNEL NO. CHANNEL SET TUNINGPreparation
1 Open the tuning compartment on the top of the recorder.
2 Turn the recorder and the TV on.
Make sure that the TV is set to the correct channel (channel 3 or 4) for the recorder.
TUNING CHANNELS
1 Press CHANNEL SET.
The "TUNING" indicator will appear in the window.
In the window Channel memory position to be selected with +/- buttons on the front of the recorder or on the Commander.
Actual channel number can be displayed here when the CHANNEL NO. buttons are pressed. See below "TO CHANGE THE CHANNEL DISPLAY".
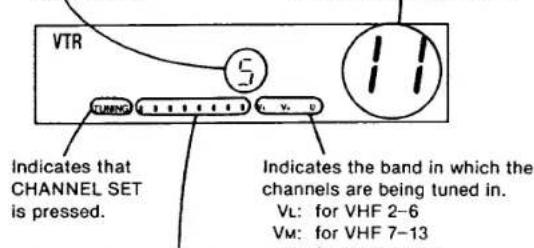
text_image
VTR Indicates that CHANNEL SET is pressed. Indicates the band in which the channels are being tuned in. VL: for VHF 2-6 VM: for VHF 7-13Indicates the approximate location of the channel scanned in the band.
2 Select a channel memory position with the + or - button on the front of the recorder for the desired channel to be tuned in.
3 Press + or - TUNING (in the tuning compartment) once. The first channel appearing on your TV will be memorized.
If this is not the channel you wish, then repeat pressing TUNING until the desired channel appears on your TV. Every time you press TUNING: a higher-numbered channel will be tuned in by pressing + and a lower-numbered channel by -.
Repeat steps 2 and 3 for other channel memory positions to be tuned in.
4 Press CHANNEL SET so that the "TUNING" indicator disappears.
TO CHANGE THE CHANNEL DISPLAY
The channel number display at the far right of the indication window can be made to indicate the actual channel received.
Press "10" to change the tens-digit display and "1" to change the units-digit display.
Every time "10" is pressed, the display changes:
$$ \text { Blank } \rightarrow 1 \rightarrow 2 \rightarrow 3 \dots 8 $$
Every time "1" is pressed, the display changes:
$$ 0 \rightarrow 1 \rightarrow 2 \rightarrow 3 \dots 9 $$
HANDLING THE VIDEO CASSETTES
TO CANCEL AN UNUSED CHANNEL
1 Select the channel to be cancelled with the + or - button.
2 Press CHANNEL SET so that "TUNING" indicator appears.
3 Press CHANNEL CLEAR.
4 Press CHANNEL SET so that "TUNING" indicator disappears.
Then the cancelled channel will be skipped when either of the +/- buttons on the recorder or on the Commander is pressed.
When the channel number buttons on the Commander are pressed, the sound of the cancelled channel will be muted.
TO FINE-TUNE A WEAK STATION
If the picture of a particular channel is not acceptable, set AFT to the OFF position and press + or - TUNING until the picture becomes clearer. To view this particular channel, do not set AFT to ON.
Before loading
The safety tab on the rear of the cassette should not be removed for recording. When a new recording is made on a pre-recorded cassette, the previous recording will be erased automatically.
To avoid erasing a recording, break off the safety tab on the rear using a screwdriver or similar object.
If you cover the opening
with a piece of plastic tape,
where the safety tab has been
removed, you can re-record on the cassette.
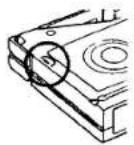
If you activate the REC switch, QUICK TIMER button, or the TIMER REC ON/OFF button, when the inserted cassette has its safety tab removed, the cassette will be automatically ejected.
On loading
Insert the cassette with the side that has the window up (you can see the tape through the window).

natural_image
Simple line drawing of a computer monitor with an open screen and cable (no text or symbols)With the window to the left
Caution
Do not push the cassette forcibly into the compartment. Inserting the cassette roughly may cause a malfunction of the recorder or damage to the cassette.
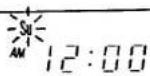
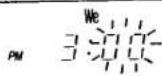
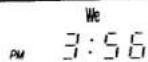
SETTING THE CLOCK
When you connect the AC power cord to a wall outlet, the clock indicates, "Su AM 12:00" after about 6 seconds and will blink to show that it is ready to be set.
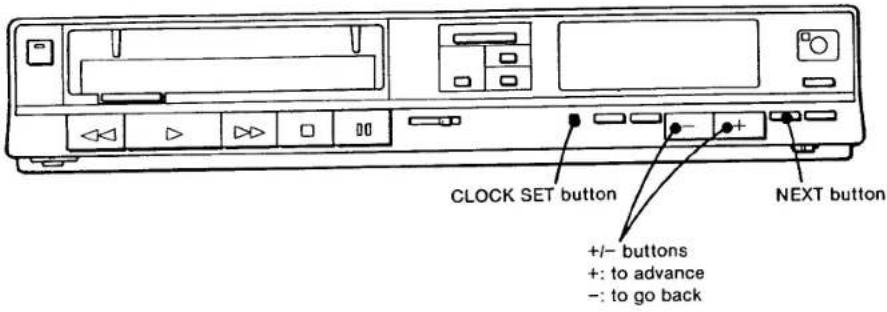
text_image
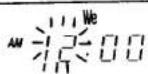
CLOCK SET button +/- buttons +: to advance -: to go back NEXT buttonExample: to set for Wednesday afternoon at 3:56
1 Press CLOCK SET.
Set the day with the + or - button until "We" (for Wednesday) appears.
2 Press NEXT.
Set the hour with the + or - button until "PM3:00" appears.
3 Press NEXT.
Set the minute with the + or - button until "PM3:56" appears.
4 For accurate setting, press NEXT at the same time as an announced time signal.
The clock will now show the current time.
The dots of the colon(:) alternately blink every 30 seconds.
+/- buttons
The + and - buttons can be used in two ways:
When pressed, the digits will advance continuously until the button is released.
When you press and immediately release, the digits will advance by one.


OPERATIONS
RECORDING TV PROGRAMS
Caution
Television programs, films, video tapes and other materials may be copyrighted.
Unauthorized recording of such material may be contrary to the provisions of the copyright laws.

text_image
TV 1 2 ▲ EJECT ■ STOP ■ PAUSE 6 3 4 5 INPUT SELECTNumbers in the illustration show the sequence of operation.
Preparation
● Turn on the TV and select the channel for the recorder.
- Check that INPUT SELECT is set to TUNER.
1 Press POWER ON/OFF.
The power indicator will light up.
2 Insert a cassette.
3 Select the recording tape speed with REC MODE. The length of recording time differs for each mode. Refer to the chart on the same page.
4 Press TV/VTR so that "VTR" indicator appears.
5 Select the channel to be recorded.
6 Slide the REC switch to the right and video recording will begin.

text_image
Check in the window VTR Current time REC 10 Channel to be recordedA sequence of dots will light up indicating movement, direction and speed of tape.
To stop recording, press ■ STOP.
When the tape reaches its end, it will be rewound to the beginning.
To eject the cassette, press ▲ EJECT.
Recording time available in each mode
| Cassette used | BII | BIII |
| L-125 | 30 min. | 45 min. |
| L-250 | 1 hr. | 1 hr. 30 min. |
| L-500 | 2 hr. | 3 hr. |
| L-750 | 3 hr. | 4 hr. 30 min. |
| L-830 | 3 hr. 20 min. | 5 hr. |
The BII mode is recommended for higher quality of sound and picture.
To stop the tape momentarily
Press II PAUSE. All dots will light up in the window. The TV program can still be seen on the TV, but the picture will not be recorded. To resume recording, press II PAUSE again.
To protect the video heads and the tape, the pause mode will be automatically released after about 8 minutes and recording will stop.
Note
The power can be automatically turned on by inserting a cassette without pressing POWER ON/OFF.
RECORDING ONE TV PROGRAM WHILE VIEWING ANOTHER
You can record a TV program selected on the recorder while viewing another TV program on your TV.
1 To start recording the TV program, follow the procedure in "Recording TV programs" on the previous page.
2. Press TV/VTR so that the "VTR" indicator disappears.
3. Select the channel you want to view on the TV.
Notice
To change to channel 3 or 2 on your TV from the channel on which you have been viewing something from the video recorder, be sure to press TV/VTR first and then change to channel 3 or 2 on your TV. If TV/VTR is pressed after channel 3 or 2 is set on your TV, you might not get a picture. In this case, change your TV channel to another channel and then come back to channel 3 or 2.
In case you want to record a tape which is to be played back on another recorder from the very beginning of the tape, run the tape for about 15 seconds before starting recording. Otherwise you may miss the starting point during playback on the other machine.
PLAYING BACK A RECORDED TAPE
text_image
TV 1 2 3Numbers in the illustration show the sequence of operation.
Preparation
Turn on the TV and select the channel for the recorder.
1 Press POWER ON/OFF.
The power indicator will light up.
2 Insert a cassette.
3 Press ▶ PLAY.
4 To stop playing, press ■ STOP.
(Or press ▲ EJECT to take the cassette out.)
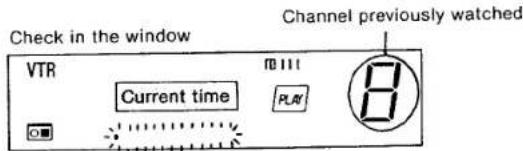
text_image
Check in the window VTR Current time R111 PLAY Channel previously watched 8During playback, the recorded speed mode is automatically selected and the selected indicator appears on the indication window.
To get a freeze picture
Press II PAUSE during playback. Sound will be muted in the freeze picture. To resume playback, press II PAUSE again. To protect the video heads and the tape, the pause mode will be automatically released after about 8 minutes and playback will resume.
natural_image
Cartoon drawing of a baseball pitcher mid-swing with a speech bubble (no text or symbols)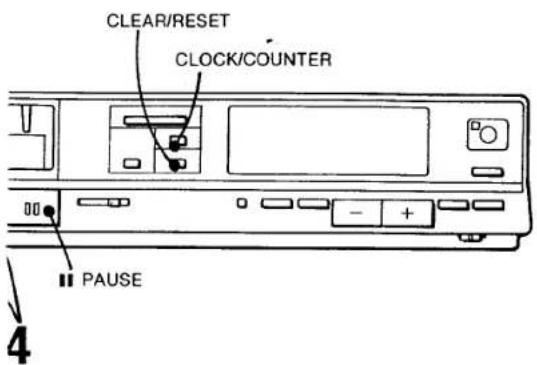
text_image
CLEAR/RESET CLOCK/COUNTER PAUSE 4Betascan
TO SEARCH FOR A PARTICULAR POINT WHILE VIEWING THE PICTURE
text_image
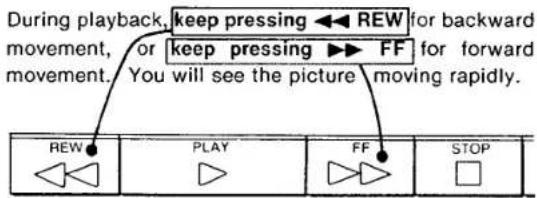
During playback, keep pressing ← REW for backward movement, or keep pressing ► FF for forward movement. You will see the picture moving rapidly. REW PLAY FF STOPAt the desired point, release the button. The playback at normal speed will resume.

TO VIEW THE PICTURE MOMENTARILY WHEN
THE TAPE IS IN THE REWIND OR FAST FOR-
WARD MODE
text_image
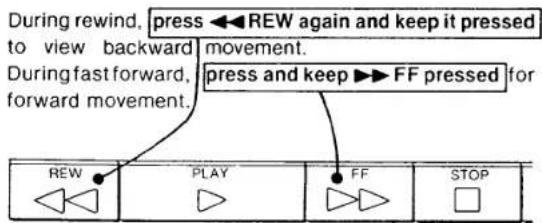
During rewind, press ← REW again and keep it pressed to view backward movement. During fast forward, press and keep ► FF pressed for forward movement. REW PLAY FF STOPAt the desired point, release the button. The rewind or fast forward mode will resume.
Streaks will appear and sound will be muted in the Betascan and Beta SkipScan pictures.
natural_image
Cartoon drawing of a baseball player blowing a speech bubble (no text or symbols)TO INDEX A RECORDED PROGRAM USING THE TAPE COUNTER
Press CLOCK/COUNTER once after turning on the power. The display will indicate numerically how much the tape has advanced during recording and playback. To set the counter to "00 00" before recording or playback, press CLEAR/RESET after pressing CLOCK/COUNTER. By writing on the label of the cassette the counter reading at a particular point on the tape, you can easily find that point later by referring to the counter.
To return the display to the current time, press CLOCK/COUNTER again.
● The counter reading is automatically reset to zero when a cassette is newly inserted.
● While the power is off, the display shows the current time, regardless of the CLOCK/COUNTER setting.
- The counter reading will be retained in the memory even after the power is turned off, as long as the cassette is in the cassette compartment.
- The tape counter will not advance during any portion of a tape that is blank or unrecorded. So the counter can be used to find unrecorded sections on a tape.
- When an unrecorded tape is played, the counter will not work.
◀◀ REW BUTTON USAGE FOR THE AUTOMATIC TAPE TRANSPORTATION
Press CLOCK/COUNTER to display the tape counter. Press ◀◀ REW and while it is pressed, press ▶ PLAY, then remove fingers. The tape will be rewound to the point the counter indicates "00 00" and then playback will begin automatically.
Press ◀◀ REW and while it is pressed, press ■ STOP, then remove fingers. The tape will be rewound to the point the counter indicates "00 00" and then it will stop. If ◀◀ REW is pressed with ▶ PLAY or ■ STOP as described above when the display is showing the current time, the tape will be rewound to the beginning and then played back or stopped automatically.
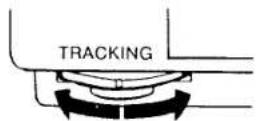
WHEN PLAYING BACK A TAPE RECORDED ON ANOTHER RECORDER
If streaks or snow appears, adjust TRACKING for the best possible picture. Return the control to the center position after playing back the tape.
To get a sharp picture, adjust SHARPNESS located in the tuning compartment.
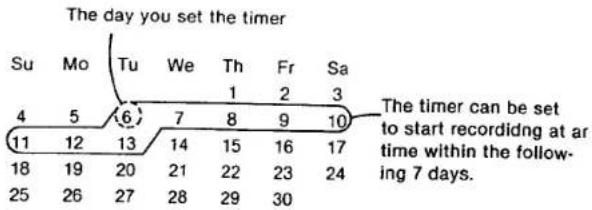
TIMER-ACTIVATED RECORDING
The timer enables your recorder to automatically start and stop recording. By presetting the timer, six recordings can be made for any day within seven days or for everyday. If, for example, you are setting the timer at 12:00 noon of a particular day, you can set the timer to operate as late as 11:59 a.m. of the seventh day following.
other
The day you set the timer | Day | Tu | We | Th | Fr | Sa | |---|---|---|---|---|---| | 4 | 5 | 6 | 7 | 8 | 9 | | 11 | 12 | 13 | 14 | 15 | 16 | | 18 | 19 | 20 | 21 | 22 | 23 | | 25 | 26 | 27 | 28 | 29 | 30 | The timer can be set to start recording at at time within the following 7 days.The clock time must first be set to the correct current time. To set the clock, see page 10.
BEFORE SETTING THE TIMER
● Make sure the cassette tape is long enough to record programs.
- Be sure the safety tab has not been removed. —If removed, the cassette will be automatically ejected when TIMER REC ON/OFF is pressed.
- Press POWER ON/OFF switch to turn power on.
- Be sure a cassette is inserted in the compartment. Check in the window.
- Select the recording tape speed. Check in the window.
- Slide INPUT SELECT to TUNER.
Suppose you want to make a recording of channel 6 from 7:10 to 11:15 on Friday evening.
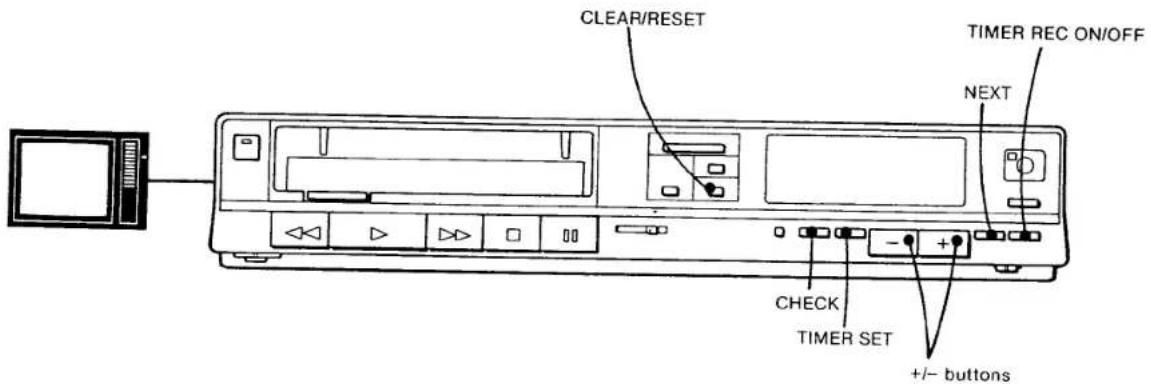
text_image
CLEAR/RESET TIMER REC ON/OFF NEXT CHECK TIMER SET +/- buttonsEvery time you press the NEXT button, the item to be preset flashes on letting you notice the item to be set. If you skip setting any of the items, the NEXT button will not function when it is pressed. To set the appropriate day of the week, the time and channel, press either the + or - button: + to advance and - to go back.
| 1 Press TIMER SET.If the timer memory has not been set for any programs as yet, the number “1” will appear. This indicates that this will be the “first” program (of the 6 possible pro-grams) that the timer will memorize. The days will flash alternately.Set the day with the + or - button. | Check in the windowflashes alternately/DK8C] | NotesWhen the six programs are fully preset, the window will continue to show the current time even if TIMER SET is pressed. To check what has been set, press CHECK.If you want to make a recording for consecutive days at the same time on the same channel for the same duration, press the + or - button un-til all the days appear. |
| 2 Press NEXT.Set the hour with the + or - button. Each time the + or - button is pressed, the hour indication, beginning with 12 a.m. midnight, will change by 1 hour, or if kept pressed, the hour indication will continue to change. | 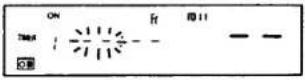 | Hour indication changes:AM 12→AM 1→...AM 11↑↓PM 11...←PM 1←PM 12 |
| Press NEXT.Set the minute with the + or - button.Now the turn-on time for record-ing has been preset. | 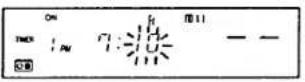 | Minute indication changes:0→1→2→...59↑ |
| 3 Press NEXT.The turn-off time should be preset.Set the hour with the + or - button.Press NEXT.Set the minute with the + or - button. | 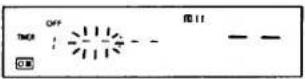 | If the time settings of turn-on and turn-off are the same, timer recor-ding will continue to the end of the tape, and the recorder will be turned off. |
| 4 Press NEXT.Choose the channel of the pro-gram to be recorded with the + or - button. | 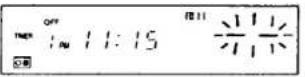 | |
| 5 Press NEXT.The memorized turn-on time, turn-off time and the channel will be displayed for about 3 seconds each. And then the current time will appear.To preset more programs, press TIMER SET again to display the next empty program position.Repeat all steps above. | 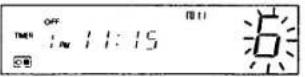 | If there is an overlap, some portion of a program will be missed. See page 17. Confirm the settings at this step by pressing CHECK. |
| 6 Press TIMER REC ON/OFF.The power will be turned off and the recorder will be in the standby mode. | Currenttime | |
Recording will start at the preset time and will automatically stop when the recording is completed.
NOTICE:
ONCE THE TIMER REC INDICATOR HAS LIT UP, only the functions of CHECK and TIMER REC ON/OFF on the recorder can be activated. To turn on the power again for the usual manual operations, press TIMER REC ON/OFF again so that the indicator turns off. This does "not" affect the memory of the timer. As long as you press it again, timer recording will be made exactly as preset.
BEFORE THE TIMER-ACTIVATED RECORDING STARTS
To check the timer settings
Press CHECK. Every time you press CHECK, each preset time will be displayed.
To change the settings
1 Press TIMER REC ON/OFF.
2 Press CHECK to select the setting to be changed.
3 Press TIMER SET
4 Press NEXT enough times until the item to be changed blinks.
5 Change the setting with the + or - button.
6 Press NEXT finally so that the current time appears.
7 Press TIMER REC ON/OFF again to reactivate timer recording mode.
To erase the memory of a particular program position
1 Press TIMER REC ON/OFF.
2 Press CHECK to select the setting to be erased.
3 Press CLEAR/RESET. The memory of the program will be eliminated.
4 If other programs have been preset for recording, press TIMER REC ON/OFF again to reactivate the timer.
To interrupt a recording when the timer recording has started
Press II PAUSE. To resume recording, press II PAUSE again within about 8 minutes.
WHEN A TIMER RECORDING IS FINISHED
When a timer recording is finished, the programming (except the everyday setting) will be eliminated and the next timer recordings will move up one position each. For example, if you have preset 4 programs, when the first timer recording is finished, the fourth program position will be vacant. If TIMER SET is pressed, "4" will appear in the window.
Quick timer recording
TO BEGIN RECORDING A PROGRAM IMMEDIATELY AND TO TURN OFF THE POWER AUTOMATICALLY
You can immediately start a recording and set the duration as well simply by pressing the QUICK TIMER button. The duration can be set for up to 5 hours by 30 minute intervals so that the power will turn off automatically. This button is functional also during a regular non-timer recording so that the recording will stop and the power turns off after the preset duration.
1 Press QUICK TIMER.
The power will be turned on had it not be turned on already.
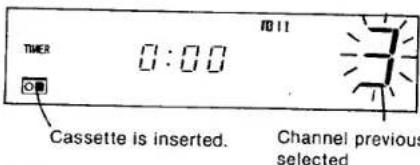
text_image
TURER 0:00 10:11 Cassette is inserted. Channel previous selected2 Choose the channel to be recorded with the + or - button.
If you do not advance to the next step, the recorder will turn off after about 30 seconds.
3 Press QUICK TIMER again so that the recording starts.
Now decide the recording duration.
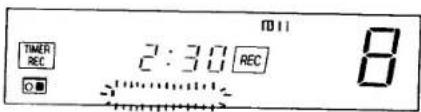
text_image
TIMER REC 2:30 REC 8Every time you press QUICK TIMER, the recording duration indication changes:
$$ \begin{array}{l} 0: 3 0 \rightarrow 1: 0 0 \rightarrow 1: 3 0 \rightarrow 2: 0 0 \dots . 5: 0 0 \rightarrow 0: 0 0 \ 3 0 \text { minutes } \quad \text { one hour } \quad \text { one and a } \quad \text { half hour } \quad \text { two hours } \quad \text { five hours } \quad \text { zero hours } \ \end{array} $$

When the recording starts, the duration decreases minute by minute to 0:00 and the recorder turns off automatically about 30 seconds after the recording has finished.
To stop a quick timer recording
Press TIMER REC ON/OFF. The power will be turned off as well.
Once the quick timer recording has started
No function button except for the following will activate: QUICK TIMER.....to change recording duration TIMER REC ON/OFF.....to interrupt quick timer recording PAUSE.....to stop quick timer recording momentarily CHECK.....to check timer programs preset
SPECIFIC NOTES ON TIMER-ACTIVATED RECORDINGS
When the presettings of your timer-activated recordings overlap
There will be no error indication to inform you of the overlap. Even if there is an overlap, a recording will be made.
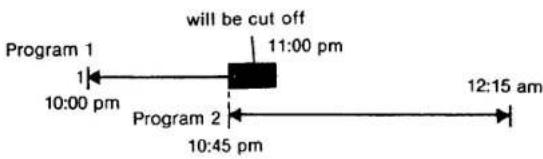
flowchart
graph LR
    A["Program 1"] --> B["10:00 pm"]
    B --> C["11:00 pm"]
    C --> D["12:15 am"]
    E["Program 2"] --> F["10:45 pm"]
    F --> D
In this case, the recording of program 2 will begin before the first recording is completely finished. Consequently, the program 1 will be cut off in the middle of its recording.
If the power should be interrupted before a timer or quick timer recording,
If there had been a power interruption, the time indication "AM 12:00" will blink. This means that the memory of the timer has been completely erased.
Set the clock and the timer again.
A short power interruption of less than approx. 30 seconds will not affect the memory of the timer.
The timer programming will be retained and performed. However, the clock will now slow by the amount of the interruption.
If the power was interrupted during a timer or quick timer recording
Recording will stop and the power will be turned off.
REMOTE CONTROL OPERATION
You can control almost all the functions of this video cassette recorder from your armchair using the supplied Remote Commander.
BATTERY INSERTION
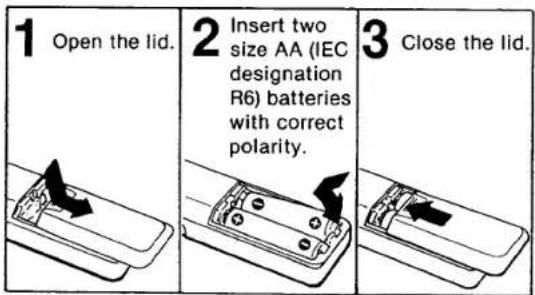
text_image
1 Open the lid. 2 Insert two size AA (IEC designation R6) batteries with correct polarity. 3 Close the lid.Battery life
In normal operation, batteries will last for about six months. If the range of the Remote Commander becomes noticeably shorter, replace the batteries with new ones. When the batteries are exhausted, the indicator will not light when the buttons on the Commander are pressed.
If the Remote Commander is not to be used for a long period of time, remove the batteries to avoid possible damage from battery leakage.
OPERATION
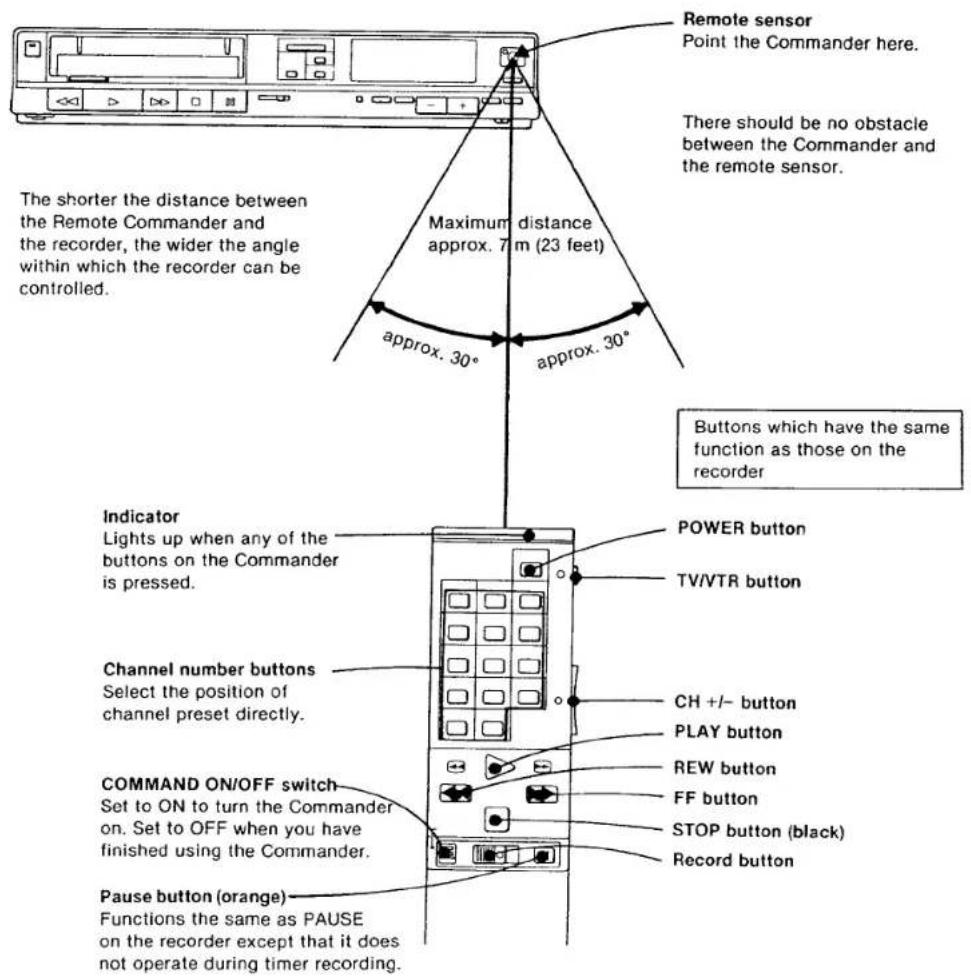
text_image
Remote sensor Point the Commander here. There should be no obstacle between the Commander and the remote sensor. The shorter the distance between the Remote Commander and the recorder, the wider the angle within which the recorder can be controlled. Maximum distance approx. 7 m (23 feet) approx. 30° approx. 30° Buttons which have the same function as those on the recorder Indicator Lights up when any of the buttons on the Commander is pressed. Channel number buttons Select the position of channel preset directly. COMMAND ON/OFF switch Set to ON to turn the Commander on. Set to OFF when you have finished using the Commander. Pause button (orange) Functions the same as PAUSE on the recorder except that it does not operate during timer recording. POWER button TV/VTR button CH +/- button PLAY button REW button FF button STOP button (black) Record buttonTAPE COPY
-CAUTION
Television programs, films, video tapes and other materials may be copyrighted. Unauthorized duplication of such material may be contrary to the provisions of the copyright laws.
To duplicate a tape you will need two video recorders; one is to play back the original tape and the other is to duplicate.

text_image
Recorder for playback to AUDIO OUT (mini) to VIDEO OUT (phono) VMC-IMP3 (1 m) VMC-2MP3 (2 m) (optional) R L (phono) to AUDIO IN (phono) to VIDEO IN Recorder for duplicatingIf the other recorder to be connected is equipped with a phono-type audio output, use the optional Sony VMC-607M (2 m) connecting cord.

CAMERA RECORDING
CONNECTIONS
● The camera must conform to American TV (EIA) standards.
● The use of a Sony HVA-220 AC adaptor is required.

text_image
Sony color video camera CAMERA REMOTE AUDIO OUT R L VIDEO OUT AC adaptor HVA-220 AUDIO IN VIDEO INOPERATION
Set INPUT SELECT on the recorder to LINE.
To start recording, slide REC to the right.
To stop recording press ■ STOP on the recorder or on the Remote Commander.
To stop recording momentarily, press ■ PAUSE on the recorder or on the Commander. The tape run/stop button on your camera will not function with this recorder.
LOCATION AND FUNCTION OF CONTROLS
Front
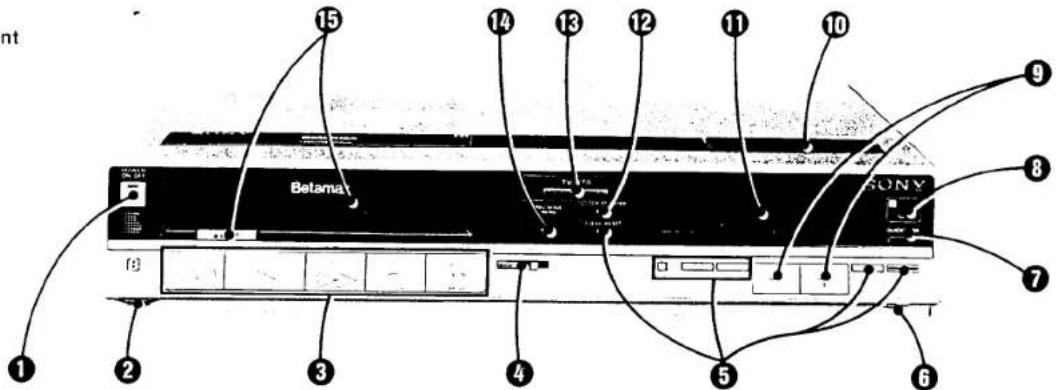
text_image
15 14 13 12 11 10 9 Belama SONY 8 7 6 5 4 3 2 1① POWER ON/OFF switch and indicator
Press the POWER ON/OFF switch to turn the recorder on. The indicator will light up. To turn the recorder off, press this switch again. The indicator will turn off. The timer section will continue to operate and the time will be displayed even if the POWER ON/OFF switch is off, as long as the AC power cord is plugged into a working outlet.
② TRACKING control
The center detent position provides the correct tracking for the cassettes recorded on this recorder.
If streaks or snow appears in the playback of a cassette which has been recorded on another video cassette recorder, turn this knob to obtain the best possible picture.
③ Tape transport buttons
◀ REW (rewind) button: Press to rewind the tape. Pressing this button during playback enables you to view a high-speed playback in reverse (Beta-scan).
▶ PLAY button: Press to play back the tape. When this button is pressed while pressing ◀ REW, the tape returns to the beginning or to the point where the counter indicates "00 00" and then playback will begin automatically. During playback, the "PLAY" indicator is lit in the window.
▶ FF (fast-forward) button: Press to advance the tape rapidly. Pressing this button during playback enables you to view high-speed playback (Betascan).
■ STOP button: Press to stop the tape running. When this button is pressed while pressing REW, the tape returns and stops at the beginning of the tape or at the point where the tape counter indicates "00 00". A sequence of dots in the window will disappear.
II PAUSE button: Press to stop the tape momentarily during recording or playback. All dots will light up. Press again to release the pause mode.
① REC (record) button
Slide to the right to start recording. While a recording is being made, the "REC" indicator will light up in the window.
⑤ Buttons for clock and timer setting
text_image
a b c d e f CLOCK 501 CLOCK 502 CLOAD 503 CLOAD 504 CLOAD 505 CLOAD 506 - +a CLEAR/RESET button
Press to cancel a timer setting of a particular program while the preset program is displayed with the CHECK button or while you are setting the timer. Or press to set the tape counter reading to "00 00".
⑥ CLOCK SET button
Press this button as the first step in setting the current time.
CHECK button
Press to check the contents of the timer preset- tings.
① TIMER SET button
Press this button as the first step in setting or resetting timer recording.
NEXT button
Press to advance to the next item to be set while setting the timer or the clock.
① TIMER REC ON/OFF button
Press to activate the timer recording. To deactivate the timer recording or the quick timer recording, press again.
⑥ INPUT SELECT switch
Select the program to be recorded.
TUNER: for recording TV programs
LINE: for recording signals connected to the VIDEO IN and AUDIO IN jacks. The channel display will disappear.
⑦ QUICK TIMER button
Press consecutively to start a quick timer recording and then to set the duration of the recording. The duration can be set in 30-minute intervals up to 5 hours so that the power will turn off.
Remote sensor
Detects the signals transmitted from the Remote Commander.
⑨ CHANNEL/TIMER +/- buttons
Press + to advance or - to move backward the channel numbers, day of the week, hours and minutes.
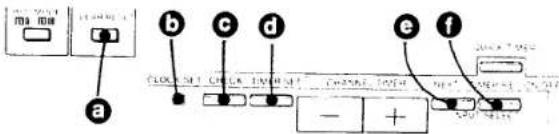
⑩ Buttons in the tuning compartment on the top
text_image
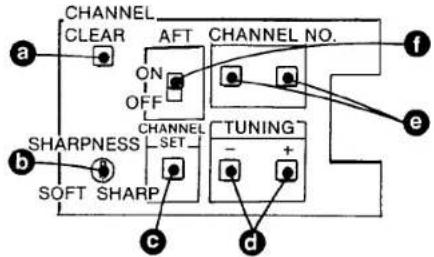
CHANNEL CLEAR AFT CHANNEL NO. a ON OFF CHANNEL SET TUNING - + c b SHARPNESS SOFT SHARP d ea CHANNEL CLEAR button
Press to cancel the memory of a particular channel in order to reset or skip the unused channel.
b SHARPNESS control
Adjust the sharpness of the picture of a tape recorded on another recorder.
© CHANNEL SET button
Press to preset a channel. The "TUNING" indicator appears in the window. After presetting, press again.
⑥ TUNING button
Press to tune in an active channel. Every time you press, a channel will be tuned in. The band indicator, V_L , V_H or U, of the band being scanned will light up in the window.
CHANNEL NO. (number) buttons
Change the channel number displayed to match the channel received. Press "10" to change the tens-digit, and "1" to change the units-digit.
AFT switch
Normally set to ON. The automatic fine tuning circuit locks in and maintains a sharp picture. When the signal is weak on a particular channel, set to OFF.
① Indication window
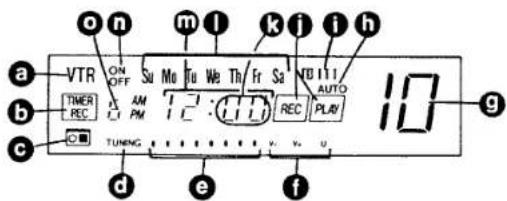
text_image
a VTR ON OFF Su Mo Tu We Th Fr Sa NB111 AUTO THER REC AM PM TC REC PLUV 10 b c TUNING d e fa Indicates the VTR mode.
While setting a timer-activated recording, "TIMER" will appear. When TIMER REC ON/OFF or QUICK TIMER is pressed, "[TIMER]_ will appear."
● Lights when a cassette is inside.
● Lights when CHANNEL SET is pressed for presetting channels.
A sequence of dots show the speed and direction in which the tape is running. When the unit is in the pause mode, all dots will light up. When the tape is stopped, all dots disappear. When a channel is being preset, the dots show the approximate location of the channel in the band.
Band indicators: When a channel is being preset, the band in which the channel is being tuned will light up. VL: VHF low VH: VHF high and U: UHF
⑨ Channel display: The selected channel number will appear. When TUNER/LINE is set to LINE, the display will disappear.
● Lights during automatic playback or automatic stop.
① The tape speed selected will be displayed.
① Indicates recording or playback mode.
- Channel memory position to be selected while presetting channels.
① The day of the week indicators from Mo (Monday) through Su (Sunday).
m Time display and tape counter.
● Lights when timer-activated recording turn-on or turn off time is being set or displayed.
- The program position will appear when TIMER SET is pressed.
⑫ CLOCK/COUNTER button
Press to set the clock to the tape counter when the power is on. To display the clock again, press it again.
⑬ TV/VTR button
To view a TV program selected by +/- buttons on the recorder or to monitor the picture being recorded, press this button so that the "VTR" indicator will appear. When ▶ PLAY on the recorder is pressed, the recorder is automatically set in the VTR mode. To view another TV program during recording, press this button so that "VTR" disappears. When the recorder is turned off, the recorder is automatically set in the TV mode.
⑭ REC MODE button (recording mode)
By pressing this button, select either or to set the recording speed. mode is recommended for higher quality of sound and picture.
⑮ Cassette compartment and ▲ EJECT button
Press ▲ EJECT to take out the cassette. If this button is pressed during playback, rewind or fast-forward operation, tape transportation will stop and the cassette will be ejected.
Rear
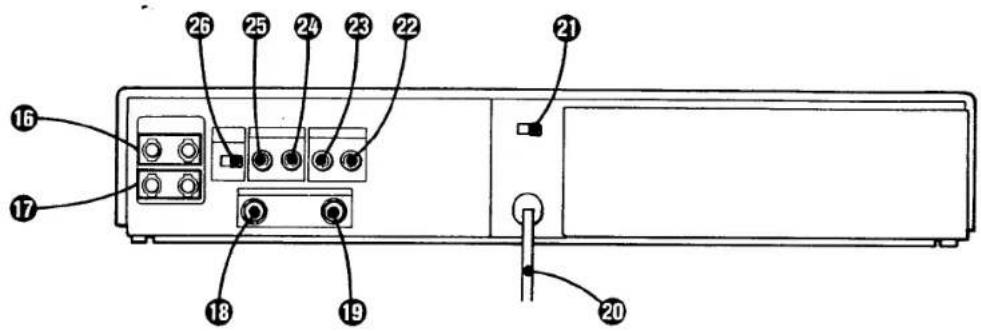
text_image
26 25 24 23 22 21 16 17 18 19 20⑯ UHF IN terminals
Connect the UHF TV antenna here.
⑰ UHF OUT terminals
Connect to the UHF antenna terminals of the TV receiver to be able to view UHF TV programs even when the recorder is turned off.
⑱ VHF IN terminal
Connect a VHF TV antenna here.
⑲ VHF OUT terminal
Connect to the VHF antenna terminal of the TV receiver. The signal of a VTR program (converted to channel 3 or 4) and the VHF TV signal will be supplied to the TV receiver.
⑳ AC power cord
① Frequency select switch (capped on the type 1 models in the U.S.A. and Canada)
Set to either 50 Hz or 60 Hz in order to match the local power supply.
② VIDEO OUT jack (phono)
This jack provides the video signal from this recorder. Connect it to the video input of another video recorder or a video monitor.
23 VIDEO IN jack (phono)
This jack accepts video signals from another video recorder.
24 AUDIO OUT jack (phono)
This jack provides the audio signals from this recorder. Connect it to the line input of an audio equipment, such as an amplifier, tape recorder, or to the audio input of another video recorder or a video monitor.
25 AUDIO IN jack (phono)
This jack accepts audio signals. Connect it to the line output of a piece of audio equipment, such as an amplifier, tape recorder, or to the audio output of another video recorder.
26 RF UNIT selector
Select the output channel at the VHF OUT terminal. Set the switch to 3ch or 4ch, whichever is not active in your area.
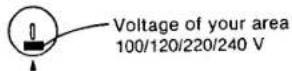
For the type 2 models only
natural_image
Simple line drawing of a device with a curved cable and a circular component (no text or symbols)Voltage selector
Turn this selector so that the arrow under the selector points to the voltage, 100V, 120V, 220V or 240V, of your area.
SPECIFICATIONS
System
| Video recording system | |
| Rotary two-head helical scanning | |
| Video signal | EIA standards, NTSC color |
| Channel coverage | |
| VHF channels 2-13 | |
| UHF channels 14-83 | |
VHF output signal
| Channel 3 or 4 (selectable) | |
| 75 ohms, unbalanced | |
| Antenna | 75-ohm external antenna terminal for VHF |
| 300-ohm external antenna terminals for UHF |
Video
| Input | VIDEO IN: phono-type connector1.0 V (p-p), 75 ohms, unbalanced, sync negative |
| Output | VIDEO OUT: phono-type connector1.0 V (p-p), 75 ohms, unbalanced, sync negative |
| Signal-to-noise ratio | Better than 45 dB |
Audio
| Input | AUDIO IN: phono-type connectorMore than 47 kilohms, -10 dBs(0 dBs = 0.775 V rms) |
| Output | AUDIO OUT: phono-type connectorLess than 10 kilohms, -10 dBs(47 kilohms load), unbalanced |
Frequency response
| III : 50-12,000 Hz |
| III : 50-9,000 Hz |
| Signal-to-noise ratio |
| Better than 40 dB |
Tape transport
| Tape speed | BII : 4.0 cm/sec. (playback only) |
| BIII : 2.0 cm/sec. | |
| BIII : 1.33 cm/sec. | |
| Maximum recording time | |
| Fast forward time | |
| Rewind time | Under 4 min. (L-500) |
| Under 4 min. (L-500) | |
Timer
| Clock | Synchronized with the power frequency |
| Time indication | 12-hour cycle |
| Timer setting | Only for recording6 events/7 days |
General
| Power requirements |
| Model type 1: |
| 120 V ac ±10%, 50/60 Hz ±0.5% |
| Model type 2: |
| 100/120/220/240 V ac ±10%, |
| 50/60Hz ±0.5% |
Power consumption 39 W
| Operating temperature |
| 5°C to 40°C (41°F to +129°F) |
Storage temperature
| -20°C to +60°C (-4°F to +140°F) | |
| Dimensions | Approx. 430 × 80 × 365 mm (w/h/d)(17 × 3 14 × 14 38 inches) |
| incl. projecting parts and controls | |
| Weight | Approx. 8.1 kg (17 lb 14 oz) |
Remote Commander
| Remote control system | |
| Infrared control | |
| Power requirements | |
| 3 V DC, 2 size AA batteries(IEC designation R6) | |
| Dimensions | Approx. 43 × 18 × 175 mm (w/h/d)( 13/4 × 3/4 × 7 inches)including projecting parts and controls |
| Weight | Approx. 105 g (3.7 oz) with batteries |
Accessories supplied
| Remote Commander RMT-124 |
| Betamax video cassette tape (1) |
| EAC-25 external antenna connector (300-ohm to 75-ohm matching transformer) (1) |
| 75-ohm coaxial cable with F-type connectors 2 m (6 feet) long (1) |
| 300-ohm twin lead 2 m (6 feet) long (1) |
| AC power plug adaptor (1) (only for the type 2 models available at the PX) |
| EAC-24 external antenna connector (1) (only for the type 1 models outside the U.S.A. and Canada) |
Optional accessories
| Betamax video cassette tape |
| Video head cleaning cassette L-25CL |
Design and specifications subject to change without notice.
TROUBLE CHECKS
If any difficulty should arise during operation, first check the power cord connection, then go through the following list. Should the difficulty persist, unplug the unit and contact your Sony dealer or local authorized Sony service facility.
| Symptom | Possible causes | |
| GENERAL | POWER ON/OFF switch does not function. | ● About 6 seconds as soon as the power plug is hooked.● TIMER REC ON/OFF button is pressed.Check in the window. |
| Time display blinks, showing 12:00 a.m. | The power has been interrupted.Reset the clock and the timer settings. | |
| Cassette cannot be inserted. | ● A cassette is already in the compartment.● The cassette is wrong side up. | |
| The VTR program is not displayed on the TV screen. | ● Connections are incorrect.● The video channel on the TV receiver is not correctly adjusted. | |
| RECORDING | Recording cannot be made. | ● No cassette has been inserted.● The safety tab has been removed from the cassette.● The tape is at its end. |
| The recording has not been made correctly. | ● The antenna is not correctly connected.● INPUT SELECT is set to LINE.● The tape is at its end. | |
| “☐” and “TIMER” indicators blink and the cassette is ejected when TIMER REC ON/OFF or QUICK TIMER is pressed. | The safety tab has been removed from the cassette. | |
| “☐” and “TIMER” indicators blink when TIMER REC ON/OFF or QUICK TIMER is pressed. | The tape is at its end. | |
| Timer recording has not been made correctly. | ● There has been a power interruption.● The clock time is not set correct.● The turn-on and turn-off time have not been set properly.● The tape is at its end.● The TIMER REC ON/OFF button has not been pressed. | |
| PLAYBACK | Streaks or snow on the picture | A tape recorded on another recorder is being played back. Adjust the TRACKING control until you get the best possible picture. Allow a second or two for the new set- tings to take effect. When playback of this particular cassette is finished, return the control to its center detent position. |
Noisy picture | The video heads may be contaminated. Clean the heads us-ing the Sony L-25CL video head cleaning cassette. For details on cleaning, refer to the instructions furnished with the cleaning cassette. If the cleaning cassette is not available in your area, have the heads cleaned at the nearest Sony facility. | |