
EC-420NR - Vækkeur DENVER - Gratis brugsanvisning og manual
Find enhedens vejledning gratis EC-420NR DENVER i PDF-format.

Brugerspørgsmål om EC-420NR DENVER
0 spørgsmål om dette apparat. Besvar dem du kender, eller stil dit eget.
Stil et nyt spørgsmål om dette apparat
Download vejledningen til din Vækkeur i PDF-format gratis! Find din vejledning EC-420NR - DENVER og tag din elektroniske enhed tilbage i hånden. På denne side er alle dokumenter nødvendige for brugen af din enhed offentliggjort. EC-420NR af mærket DENVER.
BRUGSANVISNING EC-420NR DENVER
LED Dual-alarm Clock
Instructions Manual
text_image
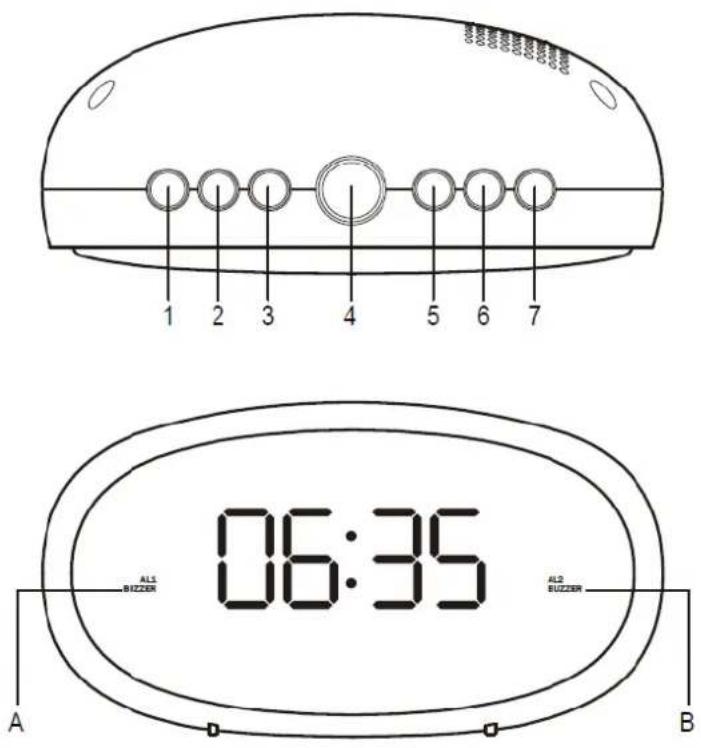
1 2 3 4 5 6 7 06:35 ALS Buzzer ALS Buzzer A BCONTROLS
- "AL/OFF" button
- "HOUR" button
- "MIN" button
- "DIMMER HI/LOW SNOOZE" button
- "ALARM 1" button
- "ALARM 2" button
- "TIME" button
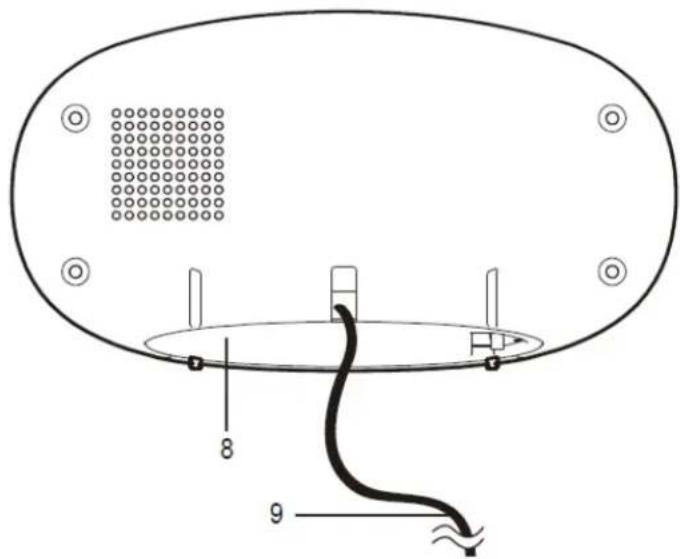
- Battery compartment
- Power cable
INDICATORS
A. AL1 BUZZER
B. AL2 BUZZER
text_image
8 9GET STARTED
This product is AC powered. Use two 'AAA' size batteries to keep time settings for power interruption.
Insert batteries by matching the polarity (+/-) markings in the battery compartment (8).
Replace all batteries at the same time with only new batteries. Remove all batteries when the product is not in use for extended periods of time.
Plug the power cable (9) into an electrical outlet with correct voltage. DO NOT PLUG THE PRODUCT INTO AN ELECTRICAL OUTLET IF YOU ARE UNSURE OF THE VOLTAGE.
USE INSTRUCTIONS
SETTING THE CLOCK
- The time digits flash after connecting power to the product; or hold down the "TIME" button (7) for approximately 3 seconds until the time digits flash on the display.
- Press the "HOUR" button (2) repeatedly to change the hour setting.
- Press the "MIN" button (3) repeatedly to change the minute setting.
- Press the "TIME" button (7) to confirm the settings.
USING ALARM
This product has dual alarms that can be set and used independently. The steps to set both alarms are the same. Follow the instructions below to set alarm time 1. For alarm time 2, substitute "ALARM 1" button (5) with "ALARM 2" button (6).
- Press and hold the "ALARM 1" button (5) to enter setting mode for alarm time 1.
- When the digits are flashing, press the "HOUR" button (2) repeatedly to change the hour setting. Press the "MIN" button (3) repeatedly to change the minute setting.
- Press "ALARM 1" button (5) to confirm the settings. Alarm 1 is activated and indicator "A" is lit.
- To activate or deactivate Alarm 1, press the "ALARM 1" button (5).
- When the alarm sounds, press the "DIMMER HI/LOW SNOOZE" button (4) to enter snooze mode. Alarm will sound again in 9 minutes.
- Or when the alarm sounds, press the "AL/OFF" button (1) to turn off alarm.
Note: During clock and alarm settings, if there is no button operation for five seconds, time digits stop flashing and the setting mode exits without new settings made.
ADJUSTING DISPLAY BRIGHTNESS
You can press the "DIMMER HI/LOW SNOOZE" button (4) to adjust display brightness when the alarm does not ring.

text_image
CEPlease notice - All products are subject to change without any notice. We take reservations for errors and omissions in the manual.
ALL RIGHTS RESERVED, COPYRIGHT DENVER ELECTRONICS A/S
DENVER®
www.denver-electronics.com


Electric and electronic equipment and included batteries contains materials, components and substances that can be hazardous to your health and the environment, if the waste material (discarded electric and electronic equipment and batteries) is not handled correctly.
Electric and electronic equipment and batteries is marked with the crossed out trash can symbol, seen above. This symbol signifies that electric and electronic equipment and batteries should not be disposed of with other household waste, but should be disposed of separately.
As the end user it is important that you submit your used batteries to the appropriate and designated facility. In this manner you make sure that the batteries are recycled in accordance with legislature and will not harm the environment.
All cities have established collection points, where electric and electronic equipment and batteries can either be submitted free of charge at recycling stations and other collection sites, or be collected from the households. Additional information is available at the technical department of your city.
Hereby, Inter Sales A/S declares that the radio equipment type CR-420NR is in compliance with Directive 2014/53/EU. The full text of the EU declaration of conformity is available at the following internet address: www.denver-electronics.com, and then click the search ICON on topline of website. Write model number: CR-420NR. Now enter product page, and red directive is found under downloads/other downloads. Operating Frequency Range: Max Output Power:
DENVER ELECTRONICS A/S
Omega 5A, Soeften
DK-8382 Hinnerup
Denmark
www.facebook.com/denverelectronics