
DD60SI7 - Opvaskemaskiner Fisher & Paykel - Gratis brugsanvisning og manual
Find enhedens vejledning gratis DD60SI7 Fisher & Paykel i PDF-format.


Brugerspørgsmål om DD60SI7 Fisher & Paykel
0 spørgsmål om dette apparat. Besvar dem du kender, eller stil dit eget.
Stil et nyt spørgsmål om dette apparat
Download vejledningen til din Opvaskemaskiner i PDF-format gratis! Find din vejledning DD60SI7 - Fisher & Paykel og tag din elektroniske enhed tilbage i hånden. På denne side er alle dokumenter nødvendige for brugen af din enhed offentliggjort. DD60SI7 af mærket Fisher & Paykel.
BRUGSANVISNING DD60SI7 Fisher & Paykel
QUICK START GUIDE
DishDrawer™ dishwasher (Integrated)
NZ AU US CA
Fisher&Paykel
Keep this document handy for easy reference.
For detailed information on the features of your dishwasher, see your 'User guide'.
■ Before using your aisnwasner, make sure you read the full 'User guide', with special attention to the 'Safety and warnings' section.
- For contact information of if you require service, assistance or replacement parts, see the end of this document or your Service & warranty booklet.
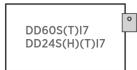
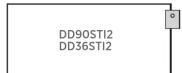
Your model
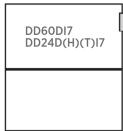
Note: each drawer in double models has its own controls and can run independently of the other drawer.
Your remote control
Important!
To prevent unauthorized use, keep the remote control out of reach of children.
Signal indicator
A single flash indicates a successful signal to the dishwasher. Multiple flashes indicate that the dishwasher cannot read the signal. The remote control may be out of range.
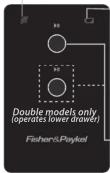
'Battery low' indicator
When this flashes, the battery needs to be replaced. Use a CR2032 battery, ensuring the + symbol faces up. Control button See section 'Opera

Control button(s)
See section 'Operating instructions' for information.
Mounting your
remote
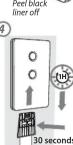
Your remote control comes supplied with a detachable mounting bracket and self adhesive strip. You can choose to affix this bracket on a nearby surface, which should be out of direct sunlight and away from excessive heat and steam. Do not apply on wallpaper.
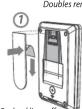

Peel red liner on, press adhesive to bracket
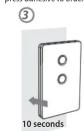
Press remote & bracket to clean, dry surface
Slide off remote, then press bracket firmly to
to clean, dry surface for 10 seconds
press bracket firmly to surface for 30 seconds.
Wait 1 hour before refitting remote
Renting Remote.
Loading and detergent
①
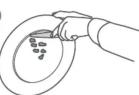
Discard scraps
Scrape large food particles off (e.g. bones, fruit stones) and remove any foreign objects (e.g. toothpicks, strings, paper).
②
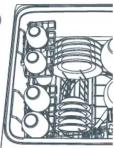
Load dishes carefully
To help with wash performance, arrange dishes so they are evenly spaced and not nesting.
③
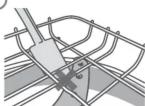
Check spray arm(s)
Ensure there are no items blocking the spray arm(s) from rotating.
④
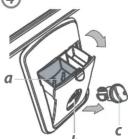
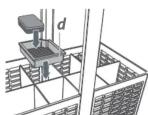
Add detergent and check rinse aid
Fill the detergent dispenser (a) with powdered detergent and close the dispenser door.
Important!
Do not place liquid detergent or tablets in the detergent dispenser.
If the indicator on its plug (c) glows bright red, refill the rinse aid dispenser (b) with liquid rinse aid. Make sure you then refit the rinse aid plug back into its original position.
If using a tablet, place it in the cutlery basket (d) or at the bottom of the drawer.
Selecting a wash program
Wash program indicators
These show which program is selected.

wash program selector
Press to scroll through the wash programs.

HEAVY
NORM

[Non-Text]
DELICATE
RINSE
STANDARD PROGRAMS - designed to clean and dry your dishes
HEAVY
Heavily soiled pots, pans and dishes.
NOR
Dishes that are quite heavily soiled or food soils that have been left to dry overnight
FAST
Lightly soiled dishes. Lightly soiled and heat sensitive crockery.
RINSE
Prevents odors and soils drying on dishes

ECO indicator
The indicator will glow red when an Eco program has been selected.
ECO PROGRAMS - designed to clean your dishes energy-efficiently
HEAVY ECO
The Ground Truth image displays a single, solid horizontal line. According to Rule 2 (UNDERSCORE & LINE RULES), this is a stylistic or background line, not a placeholder underscore. Therefore, the OCR result must ignore it and output nothing or only meaningful text. The provided OCR content is "____", which consists of four underscores. This is an incorrect interpretation of the line as a placeholder, violating the rule that stylistic lines must be ignored. The OCR has hallucinated underscores where none should exist based on the GT's visual context. Hence, the OCR result is inconsistent with the Ground Truth.
Heavily soiled everyday dishes.
Normal soiled dishes for optimum water and energy usage. The Energy Guide is based on this cycle.
Lightly soiled, non-greasy dishes.
DELICATE
ECO
Lightly soiled, non-greasy and heat sensitive crockery.
Operating instructions
You can operate your dishwasher in two ways:

EITHER
by using the ● button on the drawer control panel

OR
by using the remote control button
| Start/resume wash | 1 | Press ⚙2 | Close the drawer. The wash will start |
| Pause wash | You can only pause the wash with theremote. See opposite. | ||
| Cancel wash | 1 | Pause the wash with the remote.2 | Open the drawer, then press andhold ⚙ until you hear aquick double beep.Any water in the drawer will automaticallydrain when you close it. |
| Set Delay start | To delay the start of a wash by 1 to 12hours:Press and hold ⚙ount the beepas the dishwasher emits them (eachrepresents 1 more hour of delay) andrelease the button when you havereached the desired delay time.The indicator of the selected washprogram will flash to show that Delaystart has been set.The wash will start once the delaytime is over, provided the drawer isclosed. | ||
| Cancel Delay start | Press and hold ⚙ until you hear a quickdouble beep and the indicator of theselected wash program goes out. | ||
| Start/resume wash | 1 Close the drawer.2 Press . The wash will start. |
| Pause wash | Press . After pausing a wash, wait for 3 beeps before opening the drawer. Forcing it open in mid-cycle may cause damage or injury. |
| Cancel wash | Press and hold until you hear a quick double beep.Any water in the drawer will automatically drain. |
| Set Delay start | You can only set Delay start on the drawer control panel. See opposite. |
| Cancel Delay start | Press and hold until you hear a quick double beep. |
After the wash
The dishwasher will beep six times to indicate the end of the wash program.
You may notice the following noises at the end of the wash. These are all part of normal operation:
- In double models, both drawers may be draining simultaneously.
- The drying fan may continue to run after a wash program has finished for a set time. The fan assists with drying and uses negligible amounts of energy.
For best drying results, we recommend unloading the dishes once they have cooled.
Dos and don'ts of loading
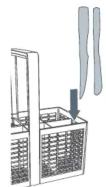

Sharp or pointed items must be placed horizontally or with sharp edges/points facing down to avoid risk of injury.
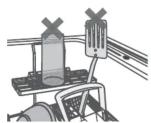

Protruding items will stop the internal lid of the drawer from sealing properly, which could result in a service call.
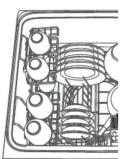

A neatly arranged load with evenly spaced dishes helps wash performance.
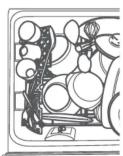

Overcrowding reduces wash performance.
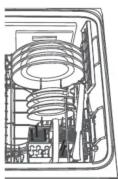

Ensure there is enough space between plates. Mix spoons, knives and forks within the cutlery basket to prevent them from nesting.
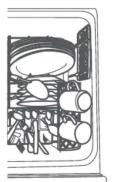

If plates and cutlery are nesting, they are less likely to be cleaned well.
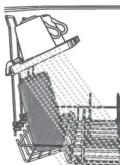

Ensure that water reaches all items on the adjustable racks.
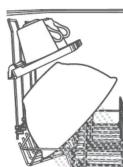

Dishware is blocking water from reaching items on the adjustable racks.
Closed Drawer autolock using the remote control
The Closed Drawer autolock feature will lock the dishwasher when the drawer is closed. To enable this feature - with the drawer closed (and no wash program or delay start is active), press and hold on the remote for 6 seconds until you hear a sequence of 4 beeps together. Ignore any beeps prior to the 6 seconds. The drawer is now locked. To unlock, press once. You will hear a sequence of 4 beeps together. The drawer is now unlocked.
- On double products, the drawers must be locked independently.
If the power to the dishwasher is disconnected, the drawer will remain locked.
Note: this feature is highly recommended if the dishwasher is to be used in motor homes.
Preference options
You can change the setting of these options to suit your preferences or circumstances. We recommend selecting the most suitable settings before you start using your dishwasher.
| Option Rinse aid Water softener® Beeps at end of wash | |||
| What does it do? | Regulates the amount of rinse aid dispensed. Reduce this setting if there is excess foam after a wash. Increase this setting if dishes are wet or streaky after a wash. | Refer to the 'Water softener' section of the 'User guide' for details. | Your dishwasher is factory-set to beep six times at the end of a wash. You can turn this setting off. |
How to change the setting of an option
1 CHECK & OPEN
Check that there is no wash underway, then open the drawer.
2 ENTER MENU & SCROLL TO OPTION
To enter the menu: press ➤ first with one finger, then ➤ with another finger, hold both until one long beep sounds, then release.
- You are now in the Rinse aid option of the preference options menu.
If you want to change the Rinse aid setting, go to step 3 now.
If you want to change the setting of another option, you will need to scroll to that option first.
To scroll to the next option: press ▶. To know which option you're in, keep track of the sequence of options using the table below. When you have scrolled to the end of the sequence, it will start again with Rinse aid (after the lower tone).
| Option Rinse | aid Water softener* Beeps at end of w | × | ▶ | ▶ |
| Possible settings | 1 to 5 | 0 to 5 | On/Off |
| Example | HEAVY NORMAL FAST DELICATE RINSE | HEAVY NORMAL FAST DELICATE RINSE | OnHEAVY NORMAL FAST DELICATE RINSE |






3 CHANGE SETTING
Press ▶ to change the setting within an option. For example, to change the Rinse aid setting from 4 (factory default) to 2, you need to press ▶ times.
4 SAVE SETTING & OUIT MENU
Press and hold ▶ until a beep sounds and the control panel reverts to showing the wash program currently selected.
*This option is disabled on models without water softener. It appears in the sequence of options but cannot be adjusted.
For more info
For detailed information on the features of your dishwasher
For warranty information
If you.
- have any questions or comments
- need a Fisher & Paykel authorized technician to service your product
■ need replacement parts or accessories
■ want to register your product
see your 'User guide'
see your 'Service and warranty' booklet
see your 'Service and warranty' booklet or contact us
NZ toll-free, 24/7 AU toll-free, 24/7 USA toll-free, 24/7 CA toll-free, 24/7
[Non-Text]
0800 372 273
1300 650 590
1 888 936 7872
1 888 936 7872
0800 372 273
1300 650 590
1 888 936 7872
1 888 936 7872
www.fisherpaykel.co.nz www.fisherpaykel.com.au www.fisherpaykel.com www.fisherpaykel.ca
590194C
09.12
- QUICK START GUIDE
- Fisher&Paykel
- Your model
- Your remote control
- Important!
- Loading and detergent
- Discard scraps
- Load dishes carefully
- Check spray arm(s)
- Selecting a wash program
- Operating instructions
- EITHER
- After the wash
- Dos and don'ts of loading
- Closed Drawer autolock using the remote control
- Preference options
- For more info
Mærke : Fisher & Paykel
Model : DD60SI7
Kategori : Opvaskemaskiner