TV-HS 120 - Scanner Traveler - Gratis brugsanvisning og manual
Find enhedens vejledning gratis TV-HS 120 Traveler i PDF-format.

Brugerspørgsmål om TV-HS 120 Traveler
0 spørgsmål om dette apparat. Besvar dem du kender, eller stil dit eget.
Stil et nyt spørgsmål om dette apparat
Download vejledningen til din Scanner i PDF-format gratis! Find din vejledning TV-HS 120 - Traveler og tag din elektroniske enhed tilbage i hånden. På denne side er alle dokumenter nødvendige for brugen af din enhed offentliggjort. TV-HS 120 af mærket Traveler.
BRUGSANVISNING TV-HS 120 Traveler
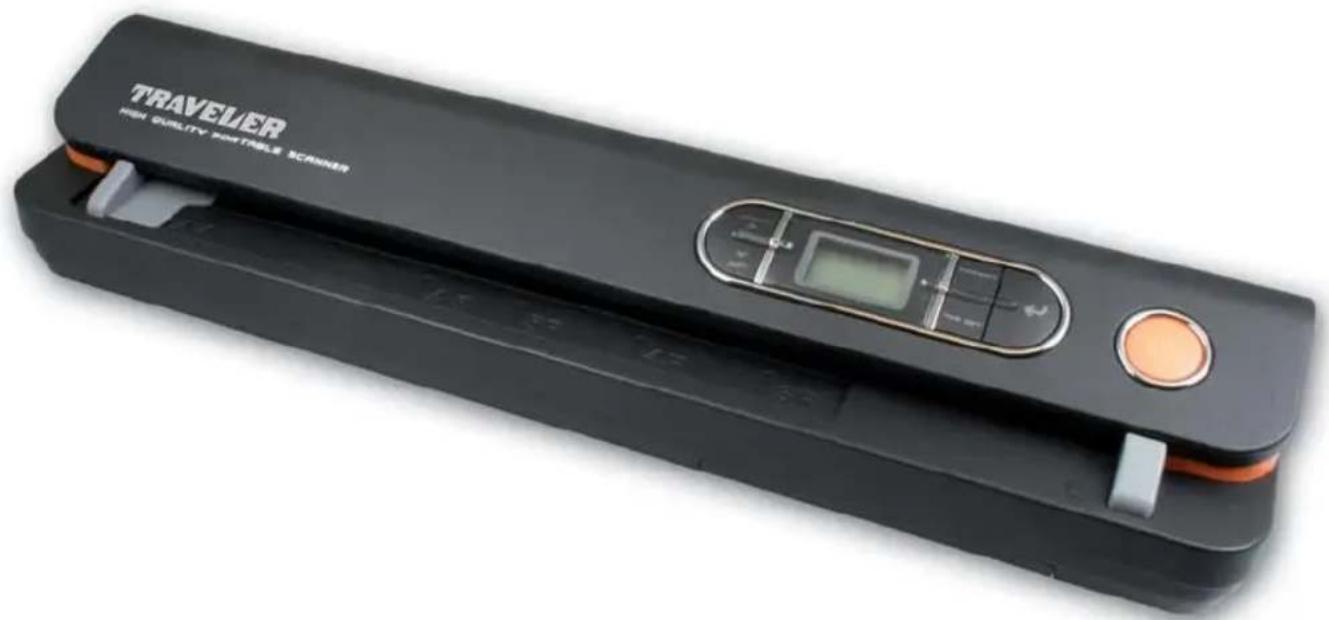
Portable Scanner
Model Number: TV-HS 120
Instruction Manual
After Sales Support TEL: 1800 623 432 WEB Support: www.traveler-service.com/au
natural_image
Black TRAVELER HiFi Quality Portable Scanner device with control panel and orange button (no visible text or symbols on device body)
TRAVELER®
Portable Scanner TV-HS 120
Warranty Details
The product is guaranteed to be free from defects in workmanship and parts for a period of 36 months from date of purchase. Defects that occur within this warranty period, under normal use and care, will be repaired, replaced or refunded at our discretion, solely at our option with no charge for parts and labour. The benefits conferred by this warranty are in addition to all rights and remedies in respect of the product that the consumer has under the Trade Practices Act and similar state and territory laws.
Safety information

HAZARD for children
• Children are unaware of the hazards resulting from an incorrect use of electric appliances. The product should consequently be kept away from children.
- Keep batteries out of children's reach, never short-circuit them or take them apart.
- Keep packaging material out of reach of children. Danger of suffocation!
Electrical HAZARD
- To prevent risk of electrocution, never immerse the portable scanner and USB connecting cable in water.
- Do not touch the product with wet hands and do not operate it in the open or in rooms containing a high humidity.
- Do not place any objects filled with water, such as vases, on or near the device. The object may fall over and the liquid may compromise electrical safety.
- Remove USB cable from USB port of the PC... ... if the scanner is not used for some time,
... during thunderstorms,
... before cleaning the device
... in the event of faults during operation. Always pull on the mains adapter, not on the connecting cable.
- In order to disconnect the device from the mains, pull the USB cable out of the USB port in the PC.
- The connecting cable may not be bent or crushed. Keep connecting cable away from hot surfaces and sharp edges.
- Do not operate device if there are signs of damage to the device itself or to the USB connecting cable.
- Do not make any changes to the product. The USB connecting cable may also not be replaced. Make sure that repairs to the device are only carried out by a specialist workshop or by the Service Center. Incorrect repairs can cause considerable danger for the user.
WARNING against injuries
• Install USB connecting cable in such a way that it does not become a trip hazard.
CAUTION – property damage
- Position the portable scanner on a sturdy, level surface.
- Protect the device from moisture, dust, high temperatures and direct sunlight, as this may otherwise cause malfunctioning or damage to the electronics or housing.
- Ensure sufficient clearance for ventilation of the device.
- Keep sufficient distance from heat sources, such as hobs or ovens.
- Do not drop Portable scanner or expose to extreme shocks.
- Do not place any candles or other uncovered ignition sources close to the device.
- Do not position device next to strong magnetic fields, e.g. loudspeakers, as these could interfere with its functioning.
- Do not use any strong chemicals, aggressive or abrading cleaning agents for cleaning.
SAFE handling using batteries
- Batteries may not be disposed off in household waste. Every user is obliged by law to dispose off batteries in the correct manner at the provided collection points.
- Never recharge batteries! Explosion hazard!
- Ensure correct polarity when inserting the batteries.
- Clean both battery and device contacts prior to inserting the batteries.
- Remove run down batteries immediately from the device! Increased danger of leakage!
- Do not expose batteries to extreme conditions, e.g. radiators, naked sunlight! Increased danger of leakage!
- Avoid contact with skin, eyes and mucous membranes. If coming into contact with battery acid, rinse the affected areas immediately with plenty of clear water and contact a doctor immediately.
- Caution. Explosion hazard in case of incorrect replacement of the battery. Replace battery only with the same or an equivalent battery type.
- If battery is swallowed, contact doctor immediately.
- Ensure that the device is switched off after use.
- Remove batteries from device in case of longer periods of non-usage.
- Batteries may not be exposed to excess heat, such as sunshine, fire or similar.
Purpose
The film scanner is intended for use in dry indoor spaces. It has been designed for private use and is unsuitable for commercial purposes.
Contents
Warranty Details
Safety Information 2
Contents 3
Preface 4
Main features 4
Contents of Box 4
I. Product overview 5
-
Explanation of the status icons 6
-
Using the scanner 6
3.1. Installing the battery 6
3.2. Inserting a Micro SD memory card 7
3.3. Time setting 7
3.4. Formatting the Micro SD memory card 8
3.5. Setting the resolution 8
3.6. Setting the scan mode 8
3.7. How to scan 8
-
Maintenance & cleaning the sensor 9
-
Connect to computer IO
-
Troubleshooting IO
TECHNICAL SPECIFICATIONS II
Preface
Dear customer,
Thank you for purchasing our Traveler Portable Scanner TV-HS 120.
You can now easily scan documents and photos at home or in mobile usage. Please fully study these Operating Instructions prior to using the Portable Scanner and observe the information. This will ensure a long service life of the product. Should you pass on the scanner to another user, please also include these Operating Instructions.
Note:
- Only use the Portable Scanner for the intended purpose. If used for different purposes, the product will not be covered by the warranty in case of damage. Only a correct use ensures that the product does not represent a hazard for users and the environment.
Address of manufacturer: supra Foto Elektronik Vertriebs GmbH
Denisstrasse 28A
D-67663 Kaiserslautern, Germany
Main features
• Max scanning size---LTR / A4
• Color / Monochrome (Mono) scan selection
• 600/300 dpi scan selection
- Direct save JPG file to Micro SD card
• Supports Micro SD cards up to 16 GB
- Driver free to download for Windows 7 / Vista / XP and Mac OS10.4 or above (direct plug-in, driver installation not required)
Contents of box
The packaging contains the following components:
- Traveler Portable Scanner TV-HS 120
- 2 GB Micro SD memory card with SD card adaptor
- USB power supply unit
- 4x Alkaline batteries type AA
- USB cable
- Protecting cover
- Cleaning card and white balance calibration card
- PVC Jacket for photos
- Operating Instructions and Warranty Documents
- Software for optical character recognition
I. Product overview
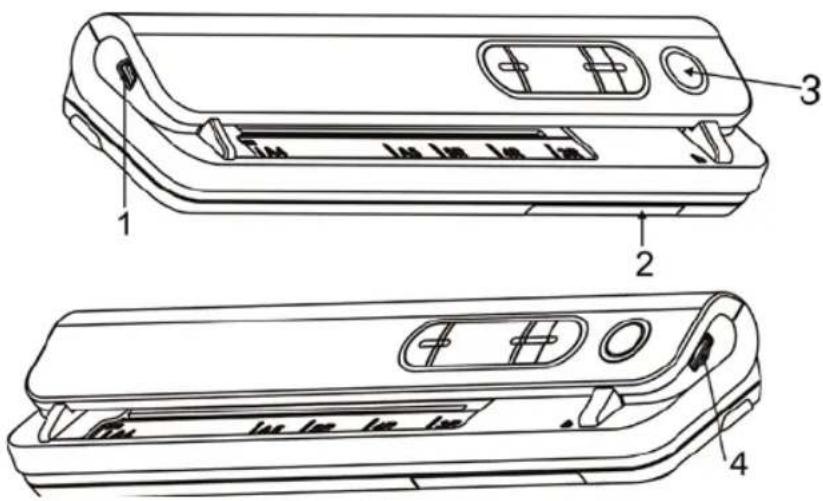
| Part Function | Function | |
| 1 Adapter/USB Interface | Connect supplied AC charger to scanner USB port. Download photo to a computer via USB cable provided. | |
| 2 Battery load for 4x AA alkaline batteries. | For battery alkaline batteries. | |
| 3 Power or off button press | For button button to press, against to aim to turn off. | |
| 4 SDCard slot micro SD card storage location. | Mage location storage location. | |
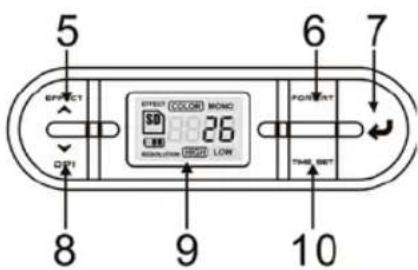
| 5 Effect Up | Select Color / Mono scan, Color / Mono mode icon will be displayed on status LCD. For Time up selection. | |
| 6 For button press this button | For button button to form SD card Micro SD card. | |
| 7 Enter button press this button | Press which but changes confirm changes. | |
| 8 DP/Down | Select High(600dpi) / Low(300dpi) resolution; High / Low resolution mode icon will be displayed on status LCD. For Time down selection. | |
| 9 LCD Screen Scanning status display. | Displaying status display. | |
| 10 Time set Press this button to | Preset Time and Date setting mode. Date setting mode. | |
2. Explanation of the status icons
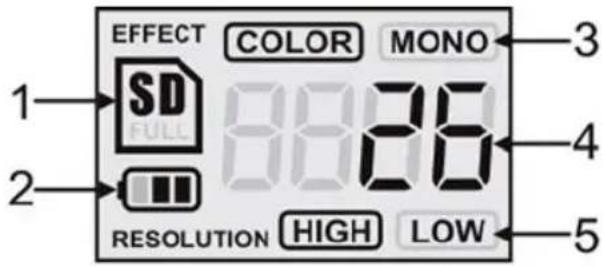
| Function Description | Description | |
| 1 | SD card indicator | Photos will be stored in microSD card |
| 2 | Battery indicator | Battery is fullEmpty battery |
| 3 | Effect indicator color or color | Color Monocrome |
| 4 | Counting indicator show scale | Show file named files D card. |
| 5 | Selected resolution high:600 dpi | High:600dpi 300 dpi |
3. Using the scanner
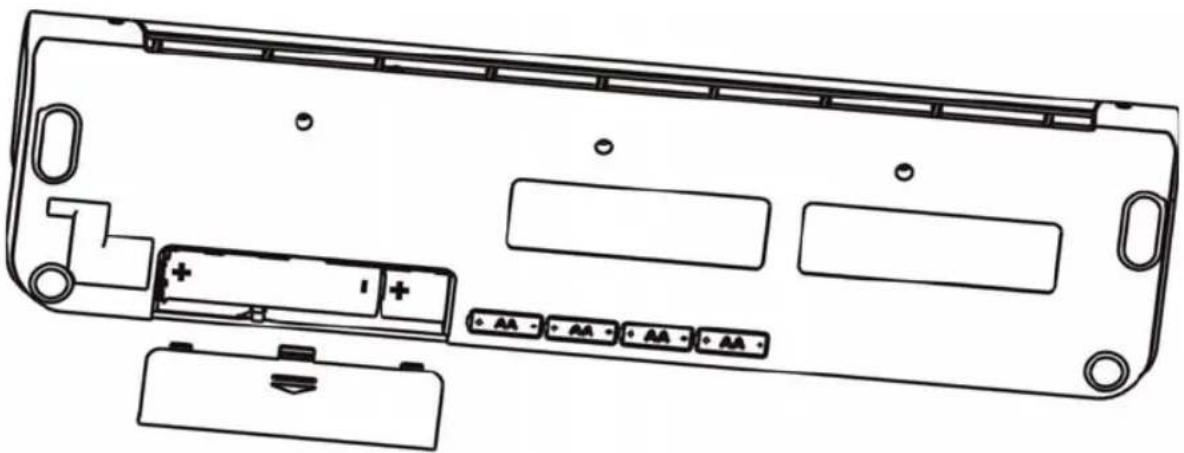
3.1. Installing the battery
- Open the battery door.
- Insert 4x AA alkaline batteries into the battery compartment.
- Turn on the scanner by pressing the [POWER] button.
natural_image
Technical line drawing of a device rear panel with buttons and mounting holes (no text or symbols)3.2. Inserting a Micro SD memory card
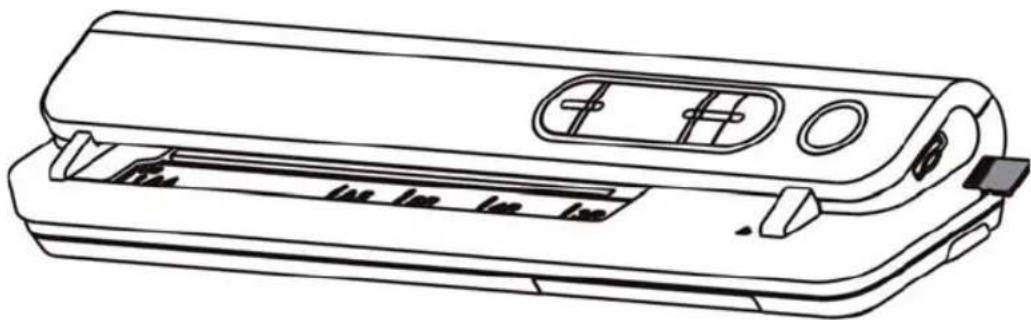
You must insert a Micro SD Card (2 GB card supplied) to record and store your pictures. Inserting the Micro SD memory card:
-
Turn OFF the scanner.
-
Insert the Micro SD card into the Micro SD card slot, gently press in until card is latched.
Note:
- Do not force the card into the slot; forcing may damage scanner and the Micro SD memory card. Align Micro SD card position (as marked) and try again.
- The Micro SD memory card must be formatted before scanning. See the following instruction.
natural_image
Line drawing of a portable electronic device with ports and buttons (no text or symbols)3.3. Time setting
- Press the [TIME SET] button to enter time setting mode.
- In the LCD, it shows 1 XX, and press the [EFFECT & DPI] buttons for up & down number selection
- Press the enter button[←] to confirm setting
- In the LCD, it jumps to next setting mode as below sequence:
1 XX year setting
2 XX month setting
3 XX date setting
4 XX hour setting
5 XX minute setting
- After all the information has been set, press the [TIME SET] button again
3.4. Formatting the Micro SD memory card
- Insert a new Micro SD card into the scanner, then turn on the scanner.
- Press the [FORMAT] button into format mode. "F" shows on the LCD.
- Press the enter button[←] to start formatting the Micro SD card.
- SD card indicator will blink until format is complete.
3.5. Setting the resolution
Press the [DPI] button to select High/Low resolution. High/Low resolution icon will be displayed on status LCD.
3.6. Setting the scan mode
Press the [EFFECT] button to select Color/Mono mode. Color/Mono icon will be displayed on status LCD.
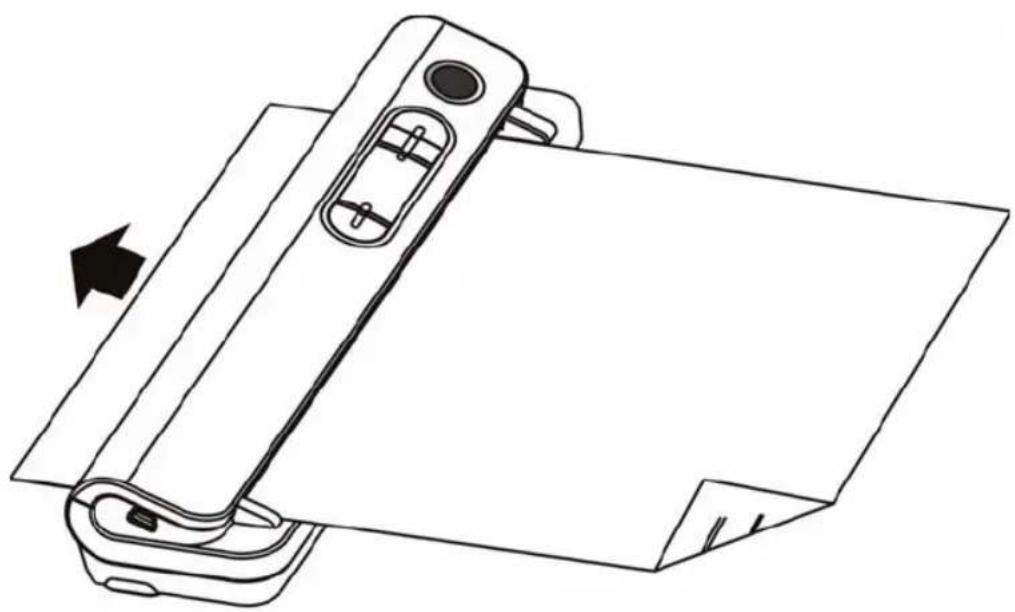
3.7. How to scan
- Press the power button to turn on the scanner.
- The scanner now will be in preset standby mode, select color / mono or DPI if needed.
- Insert the scan document into the scanner with scanning page face down.
- Once the scanner has detected the document, it will start scanning, and the green LED of the "Power" button will glow.
natural_image
Line drawing of a printer or printer with an arrow indicating compression or shift, no text or symbols present.- It will stop scanning when the page is finished and remain in standby mode, waiting for next page.
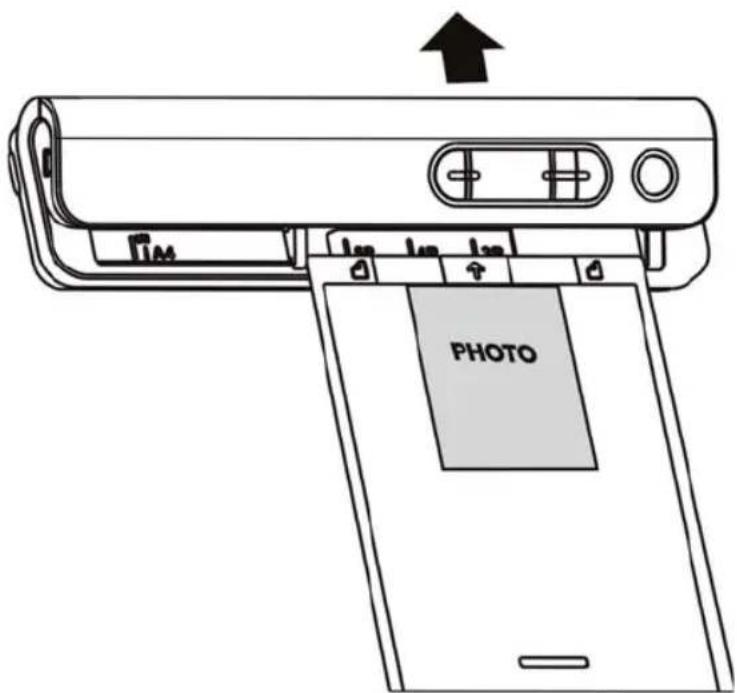
4. Maintenance & cleaning the sensor
For keeping the best image quality, the scanner needs to be cleaned after use. Enclosed with the scanner, A cleaning card.

Insert the cleaning paper as normal paper, let the scanner runs for 6 Sec., then stop it.
Note:
- A PVC jacket is provided for scanning photo which can protect the surface of the photo from being scratched. The photo must be face down.
5. Connect to computer
You may also connect your scanner to your computer and view pictures on the computer monitor, then press the ENTER button into mass storage mode.


natural_image
Line drawing of a USB cable connector with a device inside (no text or symbols)6. Troubleshooting
| Problem Cause Solution Cause | Solution | |
| Cannot turn on the scanner. | 1. Low battery power.2. Battery not inserted properly. | Replace or install the battery correctly. |
| Pictures cannot be saved when you are scanning them. | 1. Micro SD card has not been installed.2. Memory is full.3. The Micro SD card has not been formatted properly. | 1. Install Micro SD card.2. Download the pictures from the scanner to the computer to create storage space.3. Please refer to section 4.4. |
| Computer does not recognize your scanner when connected.(You cannot find removable disk). | Connection failure. | 1. Make sure all cable connections are secured.Restart the computer if Necessary.2. Connect the USB cable, pess the ENTER button. |
| The battery life is very short. | Use wrong type of battery. | Replace with new 4x AA alkaline batteries |
| Blurry images. | 1. The lens of scanner is dirty.2. Contact Image sensor aged. | 1. Clean the lens with soft dry cloth.2. The scanner should be re-do calibration. |
| The paper is stopped and the motor generates noise. | The paper is jammed. | Turn OFF the scanner, take out the jammed paper and scan again the document. |
| Picture only shows half of the file. | Paper tilted during file scanning. | Place the paper correctly and scan again. |
SPECIFICATION
| Model TV-HS 120 | TV-HS 120 |
| Image sensor A4 Color Contact Image Sensor | A4 Color Contact Image Sensor |
| Number of sensor 5136 dots (1st~5104 dots available) | able dots (1st~5104 dots available) |
| Colour depth 24 bit | 24 bit |
| Resolution | Low resolution : 300x300 dpi(default)High resolution: 600x600 dpi |
| Maximum scanning speed for A4 size document | Color High resolution: 6.0 Seconds |
| Mono High resolution: 6.0 Seconds | |
| Color Low resolution: 6.0 Seconds | |
| Mono Low resolution: 6.0 Seconds | |
| Capacity (Based on 1GB microSD card. Scan A4 size file, the quantity of scans varies depending on the content complexity) | 600dpi color: 220 Photos(Min.) |
| 600dpi mono: 290 Photos(Min.) | |
| 300dpi color: 780 Photos(Min.) | |
| 300dpi mono: 1280 Photos(Min.) | |
| Scan width 8.27" | 8.27" |
| Scan length 300DPI: 50"( ax), 600DPI: 25"( ax) | 300DPI: 50"(Max), 600DPI: 25"(Max) |
| File format JPEG | JPEG |
| LCD Scanning status display | Scanning status display |
| Auto Power Off 3 inutes | 3 Minutes |
| USB Port ini USB 2.0 high speed | Mini USB 2.0 high speed |
| External memory icro SD Card | Micro SD Card |
| Standard Battery 4x AA alkaline batteries | 4x AA alkaline batteries |
Minimum system requirements
| Operating System: | Windows 7 / Vista / XP and Mac OS 10.4 or above (direct plug-in, driver installation not required) |
| CPU: | Intel Pentium II or above |
| RAM: | 64 MB |
| Interface | USB port |
Note:
As part of improving our products, we reserve the right to make technical and optical changes.
2610 9701
06/2011
AFTER SALES SUPPORT
Helpline: 1800 623 432
Web Support: www.traveler-service.com/au