Venecia 350 - Telt Inaca - Gratis brugsanvisning og manual
Find enhedens vejledning gratis Venecia 350 Inaca i PDF-format.

Brugerspørgsmål om Venecia 350 Inaca
0 spørgsmål om dette apparat. Besvar dem du kender, eller stil dit eget.
Stil et nyt spørgsmål om dette apparat
Download vejledningen til din Telt i PDF-format gratis! Find din vejledning Venecia 350 - Inaca og tag din elektroniske enhed tilbage i hånden. På denne side er alle dokumenter nødvendige for brugen af din enhed offentliggjort. Venecia 350 af mærket Inaca.
BRUGSANVISNING Venecia 350 Inaca

Accesorios
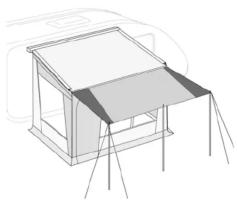
Toldo VERONA
300 / 350 / 400 / 450 / 500 / 550
Opcional para Fiamma F45 S
natural_image
Line drawing of a simple architectural structure with a sloped roof and supporting legs (no text or symbols)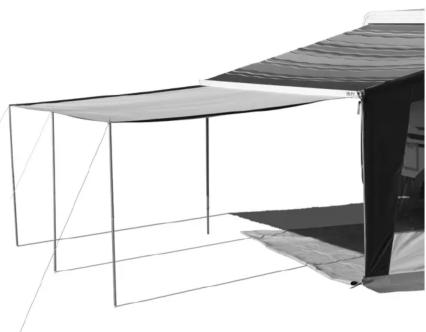
natural_image
Architectural rendering of a modern modular awning structure with support beams and a canopy (no text or symbols)Paravientos
Ideales par aislarse del viento y preservar la intimidad. Ligero y transpirable. Estructura y anclajes incluídos. Dosponibles en Poliéster Acryl liso con o sin ventanas.
Longitud de 4'60 x 1'40 m. Dividido en tres paneles.
Paravientos Gris
Paravientos Azul
Paravientos Azul y gris claro con ventana
natural_image
Black-and-white photo of a small outdoor stall with a person sitting on a chair beside it, next to a tent and vehicle (no visible text or symbols)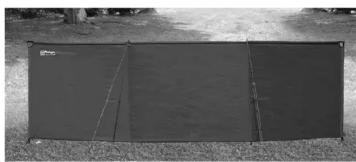
natural_image
Black rectangular tent placed outdoors on grass, no visible text or symbols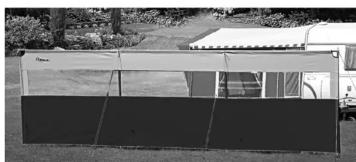
natural_image
Exterior view of a large outdoor tent with a dark base and a vehicle in the background (no visible text or symbols)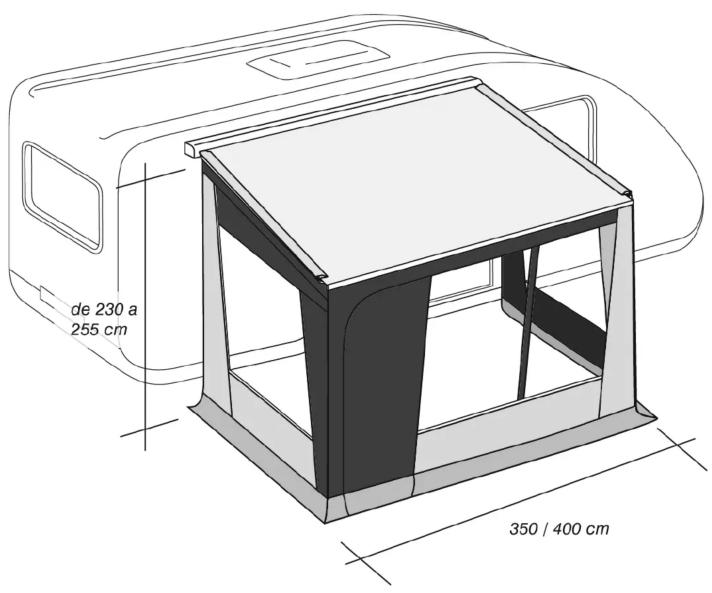
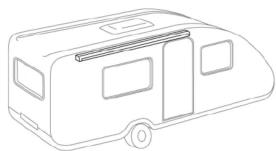
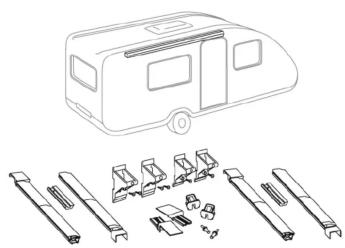
VENECIA350/400 FIAMMA F45 S, F45 Ti
ciones de montaje - assembly instructions - aufbauanleitung - monsterisanvisning - instruction de montage - instrucciones de montaje - assembly instructions - aufbauanleitung - monsterisanvisning - instruction de mo


natural_image
Line drawing of a two-decker bus with wheels and windows (no text or symbols)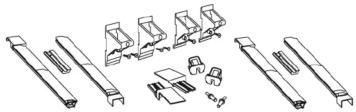
natural_image
Technical line drawings of various mechanical components or assemblies (no text or symbols present)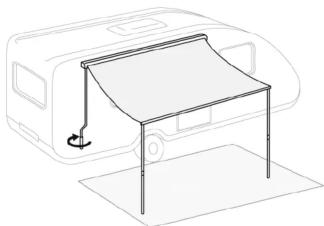
natural_image
Line drawing of a flatbed awning setup inside a vehicle (no text or symbols)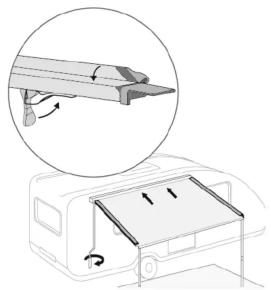
natural_image
Diagram showing a vehicle's roof structure with an inset view of the blade being lifted by a hook (no text or symbols present)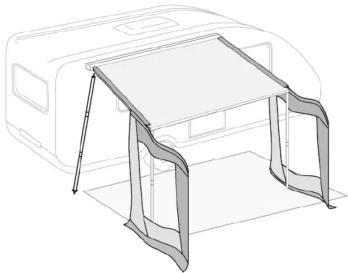
natural_image
Line drawing of a camping tent setup with folding chairs and a back cover (no text or symbols)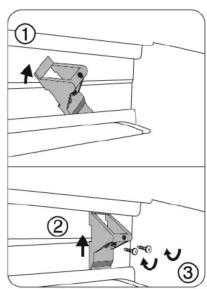
Fiamma F45 S, Fiamma F45 Ti 98655-897
natural_image
Line drawing of a vehicle front view with a flatbed table and two circular components on the side (no text or symbols)
natural_image
Line drawing of a vehicle cabin with a roof frame and side panel (no text or symbols)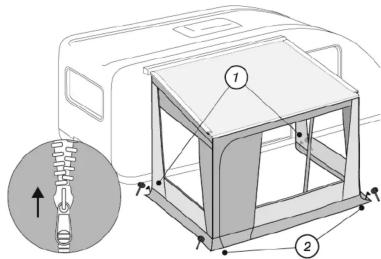
natural_image
Technical illustration of a mechanical assembly with three views: pin, lever mechanism, and base press (no text or symbols)ESP.
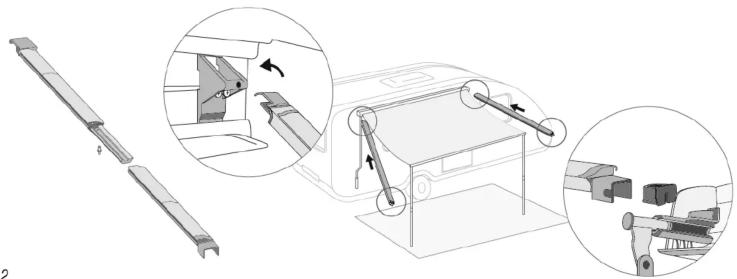
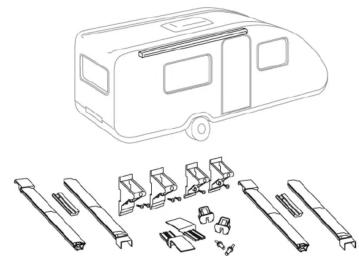
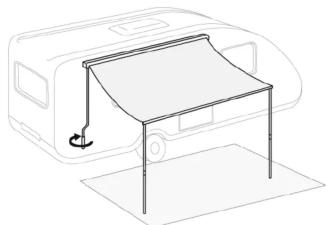
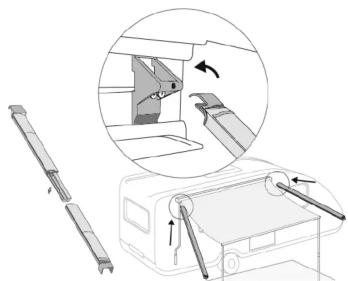
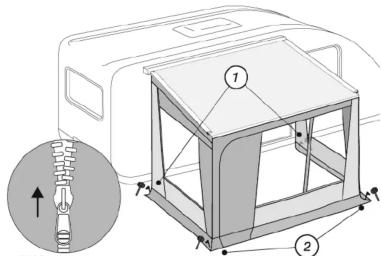
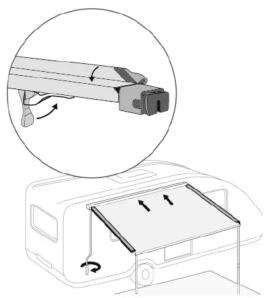
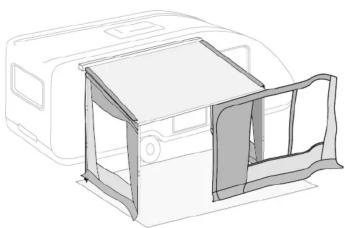
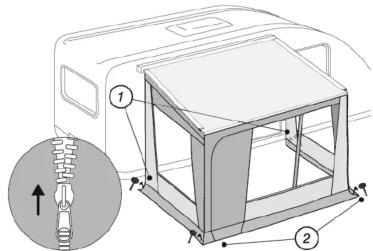
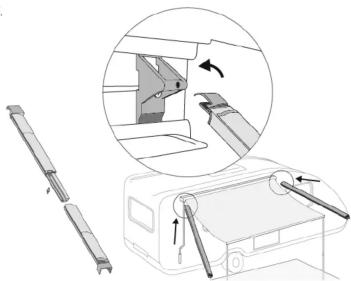
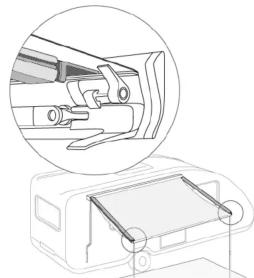
1.- Posicionar el vehículo en el lugar deseado. Desplegar una lona protectora donde se disponga a montar el cerramiento. Abril el paquete de la estructura e identificar las partes. 2.- Cambiar el soporte delantero del Clip System por la pieza plana. 3.- Abrir completamente su toldo y colocar las patas a una altura conveniente dejando cierta pendiente. 4.- Identificar qué soporte trasero utiliza su toldo y colocar según se indica. 5.- Ensamblar el Clip System según el diagrama. Posicionar la estructura sobre el soporte trasero. 6.- Posicionar la parte delantera de la estructura sobre el soporte delantero del toldo. 7.- Cerrar ligeramente el toldo hasta fijar el Clip System. Cerrar las pestañas de la estructura pinzando la lona del toldo. 8.- Pasar el bordón de las laterales por el orificio reservado para este en el Clip System. Colocar la pata trasera introduciendo el piu dentro de la estructura. 9.- Presionar la espuma del lateral con la pata hacia la caravana. Pasar el frontal por la guía frontal del toldo. 10.- Cerrar las cremalleras entre frontal y lateral por encima de la pata del toldo. Retirar la lona protectora del suelo. Clavar el cerramiento empezando desde la parte trasera hacia la delantera.
ENG.
1.- Park your vehicle on the desired place. Extend a protecting canvas on the ground. Open the Clip System set and identify each piece. 2.- Change the front support between the flat one. 3.- Open completely the canopy and fix their legs at the convenient height. 4.- Identify which support is used on the back of your awning and place it as is drawn. 5.- Assemble the Clip System. Place the frame on the back as shown on the diagram. 6.- Place the front of the frame on the front of the canopy. 7.- Close carefully the canopy until fix completely the Clip System Clip the frame with the canvas. 8.- Slide the beading through the Clip System. Place the rear pole fitting the pin in the hole of the frame. 9.- Push the foam of the side with the rear pole against the vehicle. Slide the front panel through the beading guide of the canopy. 10.- Close the zips between sides and front panels leaving the canopy legs in the awning. Remove the protecting canvas. Peg the awning from the back to front of it. Adjust the canvas to get the best fit.
VENECIA350/400 THULE OMNISTOR 5003 / 5002 / 4900 / TRISTOR2
ciones de montaje - assembly instructions - aufbauanleitung - monsterisanvisning - instruction de montage - instrucciones de montaje - assembly instructions


natural_image
Line drawing of a vehicle with various mechanical components and parts, no text or symbols present2.
natural_image
Line drawing of a simple roof-mounted solar panel mounted on a vehicle (no text or symbols)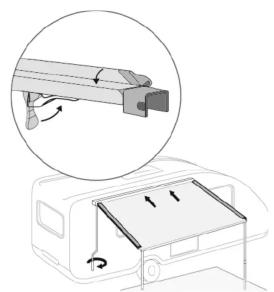
natural_image
Diagram showing a vehicle's roof structure with rotation arrows, no text or symbols present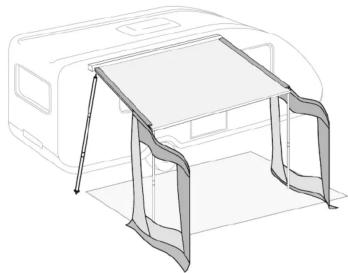
natural_image
Line drawing of a vehicle backrest with a flatbed table and arched windows (no text or symbols)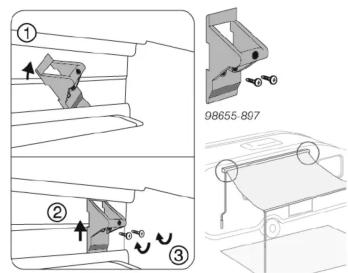
natural_image
Technical illustration of a mechanical assembly with arrows indicating motion or force direction (no text or symbols present)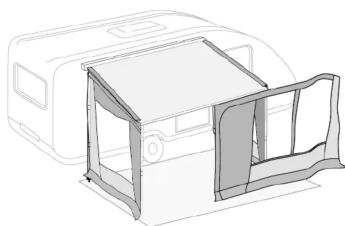
natural_image
Line drawing of a vehicle front view showing the hood and side panel (no text or symbols)9.
5.1.
Thule Omnistor 5003
natural_image
Technical line drawing of a mechanical assembly with a magnified inset showing internal components (no text or symbols)5.2
Thule Omnistor 5002 / 4900 / Tristor2
ESP.
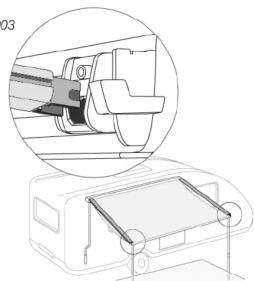
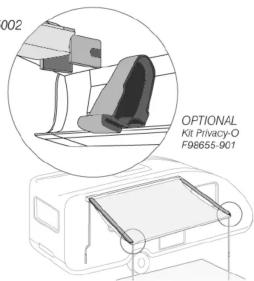
1.- Posicionar el vehículo en el lugar deseado. Desplegar una lona protectora donde se disponga a montar el cerramiento. Abrir el paquete de la estructura e identificar las partes. 2.- Abrir por completo su toldo y colocar las patas a una altura conveniente dejando cierta penciente. 3.- Identificar qué soporte trasero utiliza su toldo y colocar según se indica. 4.- Ensamblar el Clip System según el diagrama. Posicionar la estructura sobre el soporte trasero. 5.1.- THULE Omnistor 5003: Posicionar la parte delantera de la estructura sobre el soporte delantero del toldo. 5.2.- THULE Omnistor 5002 / 4900 / Tristor2: Utilizar la pieza OPCIONAL Kit Privacy-O. Colocalla según se indica sobre el perfil del toldo. Apoyar el frontal de la estructura sobre esta pieza. 6.- Cerrar ligeramente el toldo hasta fijar el Clip System. Cerrar las pestañas de la estructura pinizando la lona del todo. 7.- Pasar el bordón de los laterales por el orificio reservado para este en el Clip System. Colocar la pata trasera introduciendo el pu dentro de la estructura. 8.- Presionar la espuma del lateral con la paa hacia la caravana. Pasar el frontal por la guía frontal del todo. 9.- Cerrar las cremalleras entre frontal y lateral por encima de la pata del todo. Retrirar la iona protectora del suelo. Clavar el cerramiento empezancó desde la parte trasera hacia la delantera.
ENG.
1.- Park your vehicle on the desired place. Extend a protecting canvas on the ground. Open the Clip System set and identify each piece. 2.- Open completely the canopy and fix their legs at the convenient height. 3.- Indently which rear support goes with your canopy and fix it as shown on the diagram. 4.- Assemble the Clip System. Fix the frame on the back support. 5.1.- THULE Omnistor 5003: Place the front of the frame on the front support of your canopy. 5.2.- THULE Omnistor 5002 / 4900 / Tristor2: Use the optional Kit Privacy-O. Fix the red piece on the canopy profile and place the front of the frame on this piece. 6.- Close carefully the canopy until fix completely the Clip System. Clip the frame with the canvas. 7.- Slide the beading through the Clip System. Place the rear pole fitting the pin in the hole of the roof frame. 8.- Push the foam of the side with the rear pole against the vehicle. Slide the front panel through the beading guide of the canopy. 9.- Close the zips between sides and front panels leaving the canopy legs in the awning. Remove the protecting canvas. Peg the awning from the back to front of it. Adjust the canvas to get the best fit.
4.
5.
VENECIA350/400 PROSTOR
ciones de montaje - assembly instructions - aufbauanleitung - monsterisanvisning - instruction de montage - instrucciones de montaje - assembly instructions - aufbauanleitung - monsterisanvisning - instruction de mo


natural_image
Line drawing of a vehicle with various mechanical components below (no text or symbols)
5.
natural_image
Diagram showing a mechanical component being inserted into a vehicle's cab, with no visible text or symbols.6.

natural_image
Line drawing of a simple camping tent setup with folding chairs and a ladder, shown in 3D style (no text or symbols)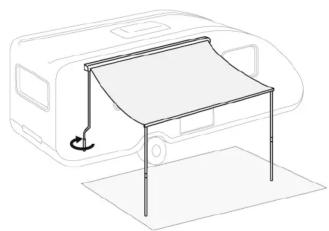
natural_image
Line drawing of a simple roof-mounted structure with a curved roof and vertical supports, mounted on a flat base (no text or symbols)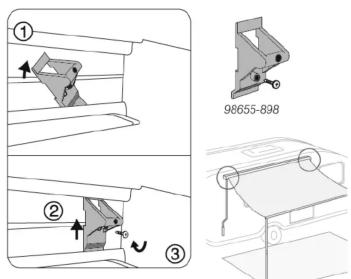
natural_image
Line drawing of a vehicle interior with a door frame and cabin (no text or symbols)8.
natural_image
Technical illustration of a mechanical assembly with a magnified inset showing a component being inserted into a housing (no text or symbols present)6.
natural_image
Technical line drawing of a mechanical assembly with a magnified inset showing internal components (no text or symbols)ESP.
1.- Posicionar el vehículo en el lugar deseado. Desplegar una lona protectora donde se disponga a montar el cerramiento. Abril el paquete de la estructura e identificar las partes. 2.- Abrir completamente su toldo y colocar las patas a una altura conveniente dejando cierta perdite. 3.- Identificar que soporte trasero utiliza su toldo y colocar según se indica. 4.- Ensamblar el Clip System según el diagrama. Posicionar la estructura, primero sobre el soporte trasero y después sobre el delantero. 5.- Cerrar ligeramente el toldo hasta fijar el Clip System. Cerrar las pestañas de la estructura pinzando la lona del toldo. 6.- Pasar el bordón de los laterales por el orificio reservado para este en el Clip System. Colocar la pata trasera introduciendo el piu dentro de la estructura. 7.- Presionar la espuma del lateral con la pata hacia la caravana. Pasar el frontal por la guía frontal del toldo. 8.- Cerrar las cremalleras entre frontal y lateral por encima de la pata del toldo. Retistrar la lona protectora del suelo. Clavar el cerramiento empezando desde la parte trasera hacia la delantera aaaa
ENG.
1.- Park your vehicle on the desired place. Extend a protecting canvas on the ground. Open the Clip System set and identify each piece. 2.- Open completely the canopy and fix their legs at the convenient height. 3.- Indetify which rear support goes with your canopy and fix it as shown on the diagram.
4.- Assemble the Clip System. Fix the frame, first on the back support, then on the front one. 5.- Close the canopy carefully until fix completely the Clip System. Clip the frame with the canvas. 6.- Slide the beading through the Clip System. Place the rear pole fitting the pin in the hole of the frame. 7.- Push the foam of the side with the rear pole against the vehicle.
Slide the front panel through the beading guide of the canopy.
8.- Close the zips between sides and front panels leaving the canopy legs in the awning. Remove the protecting canvas. Peg the awning from the back to front of it. Adjust the canvas to get the best fit.
6.
3.