
MEGALINE - Højttaler Dali - Gratis brugsanvisning og manual
Find enhedens vejledning gratis MEGALINE Dali i PDF-format.


Brugerspørgsmål om MEGALINE Dali
0 spørgsmål om dette apparat. Besvar dem du kender, eller stil dit eget.
Stil et nyt spørgsmål om dette apparat
Download vejledningen til din Højttaler i PDF-format gratis! Find din vejledning MEGALINE - Dali og tag din elektroniske enhed tilbage i hånden. På denne side er alle dokumenter nødvendige for brugen af din enhed offentliggjort. MEGALINE af mærket Dali.
BRUGSANVISNING MEGALINE Dali
DALI MegaLine
Reference Line Source Loudspeaker System
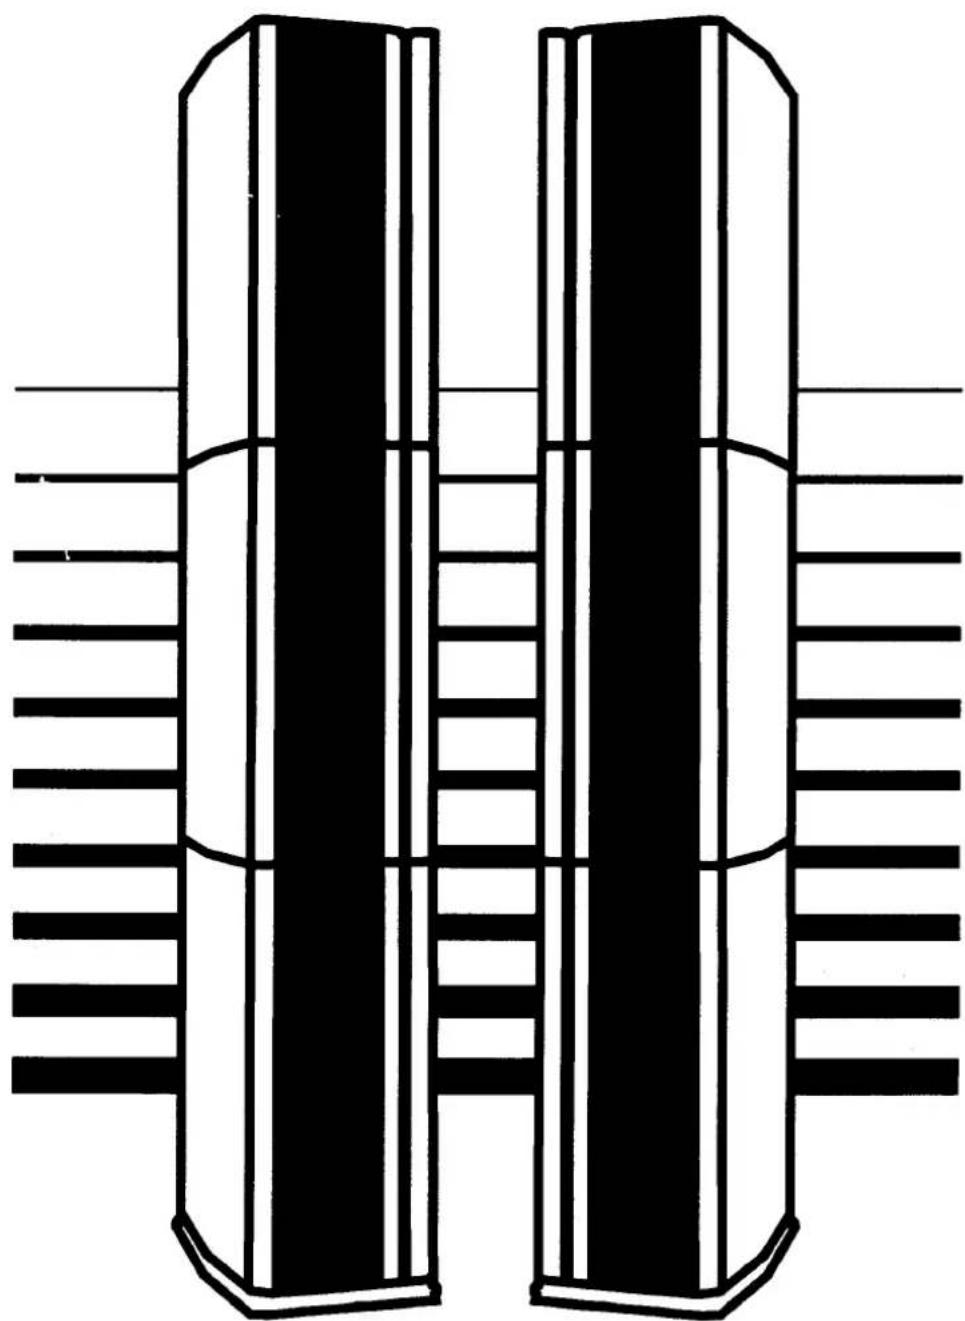
natural_image
Pure electrical circuit lines without any symbolsOwner's Manual
Table of Contents
Introduction....4
Unpacking....4
Placing the loudspeakers....5
Installing loudspeakers and crossover....5-6
Advice on power amplifiers....6-7
Connecting loudspeakers, crossover and power amplifiers....7-8
Break-in....8-9
Fine-tuning loudspeakers and the listening room....9-10
Electrical fine-tuning....10
Tightening the ribbon....11
Advice on power handling, dynamics, etc....11-12
Care and maintenance....12
Technical specifications....12
1. Introduction
Congratulations on the purchase of DALI MegaLine. You are now the owner of one of the world's most sophisticated loudspeaker systems. Properly installed, DALI MegaLine will provide musical experiences of unrivalled sonic quality. DALI MegaLine is the end result of many years of intensive research and development with one objective: to set an uncompromising reference standard for sound reproduction. Employing advanced, innovative technology, we have selected the finest components and materials finished to the highest standards of craftsmanship in order to ensure that the DALI MegaLine will be the new benchmark for future loudspeaker systems.
In order for you to fully appreciate the unique level of performance achieved by DALI's research and development team with the completion of the ambitious DALI MegaLine project, we urge you to study this user's resource handbook thoroughly. Even if you are familiar with set-up and fine-tuning procedures for high end loudspeakers, the DALI MegaLine is unique in many respects, so that reading this resource will be both informative and crucial to realising the fullest benefits of your investment. Since the line source principle and special active cross over configuration make very specific demands with regard to set-up and amplifier connection, we particularly recommend careful study of the sections entitled "Installing loudspeakers and crossover", "Selecting power amplifiers" and "Connecting loudspeakers, crossover and power amplifiers."
We wish you many years of listening pleasure with the DALI MegaLine.
2. Unpacking
DALI MegaLine is shipped in 8 cartons on one pallet (See Fig. 1.) Total shipping weight is approximately 260 kg (572 lb.)! The loaded pallet should only be moved with a lifter or forklift!
To keep the cartons clean and assembled on the pallet, they are covered with a large bag. Cartons, bag and pallet should be kept in a clean, dry place for later transport or storage. Although its modular construction does make

natural_image
Isometric line drawing of a multi-tiered storage or pallet structure with no text or symbolshandling somewhat easier, DALI MegaLine is a heavy loudspeaker system with many parts.
We strongly recommend that at least two and preferably three or four persons be present when moving and lifting the modules into position during assembly of the towers. Also, correct installation and final adjustment will be much easier with the help of at least two persons.
Remove bag. Remove all cartons from pallet. Check that the following are present:
6 cartons labelled "MegaLine Module"
1 carton labelled "MegaLine Accessories"
1 carton labelled "DALI AC-U"
Because of the size of the system and its many component parts, provide open space around the set-up area.
WARNING
The DALI MegaLine utilises a sophisticated tweeter system consisting of a thin, low mass electrically conductive ribbon suspended between a large number of extremely powerful magnets. The magnets can attract tools and other iron or steel objects so forcefully that
serious damage may occur, affecting the speaker's finish and function. The magnetic systems may also attract metal particles that can reach the ribbon, causing it to rattle or even damaging it permanently. Remember to always keep loose metal objects away from the loud-speaker system and avoid installation in spaces near metallic dust.
When lifting the modules, care should be taken to avoid any contact with the ribbon directly from the rear or through the protective grid in front of the ribbon.
The ribbons' strong magnetic fields may damage credit cards, computer discs, audio tapes or watches. Keep such objects well away from DALI MegaLine, especially during set-up and connection.
DALI MegaLine should not be installed near television or computer monitors, because the powerful magnetic radiation from the system can cause image and colour distortion. Extended exposure can permanently damage the picture tube. We recommend a minimum safe distance of at least 2 metres.
- Select the final position for placement (See "Placing the loudspeakers"). Because the system is difficult to move once set-up, we recommend careful selection of the position prior to set-up.
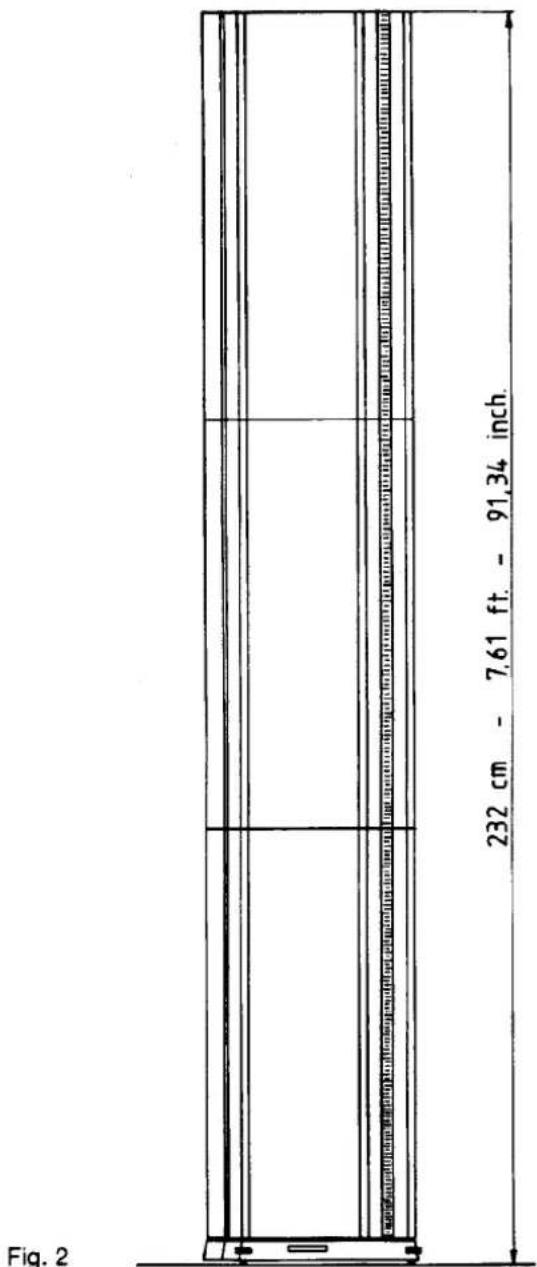
- Make certain that the floor-to-ceiling distance at the selected position is at least 233 cm (92"). (See Fig. 2.)
- Unpack all cartons. Check that the contents are undamaged. Remove cartons and packing materials from the set-up area.
3. Placing the loudspeakers
Position the MegaLine bases correctly relative to the listening position (See Fig. 3) on a stable and even surface. The smallest unevenness or flexing will make the speakers lean or rock. Position both bases at the same distance from the rear wall. Place the long cables from the bases out of the way on the floor behind the speakers.
Ideally, the speakers and the listening position should form an equilateral triangle. Even in installations where an equilateral triangle is not possible, the bases must always be aimed towards the listening position, so that the enclosed template forms a 100° angle relative to the listening position as shown in Fig. 3. Always use the template to properly angle the speakers towards the listening position.

Because of the loose suspension of the tweeter ribbons, the speakers should not be exposed to draughts from open doors, air conditioners, heaters, etc. Imprecise, unstable sound may result from uncontrolled ribbon motion relative to the magnet systems. Extended exposure to draughty conditions may damage the ribbons.
The DALI MegaLine midrange/tweeter systems are mounted on an open baffle and radiate sound with equal intensity to the front and rear. For this reason, control of rear wall reflections is essential to the speaker's performance. We strongly recommend damping the wall behind the speakers with rugs, curtains, etc. Ideally, the entire wall area from which a reflected signal might reach the listening position should be covered. Use a mirror to find the critical areas. (See "Fine-tuning loudspeakers and the listening room.").
We recommend placing both loudspeakers in front of the same uniform acoustical environment.
4. Installing loudspeakers and crossover
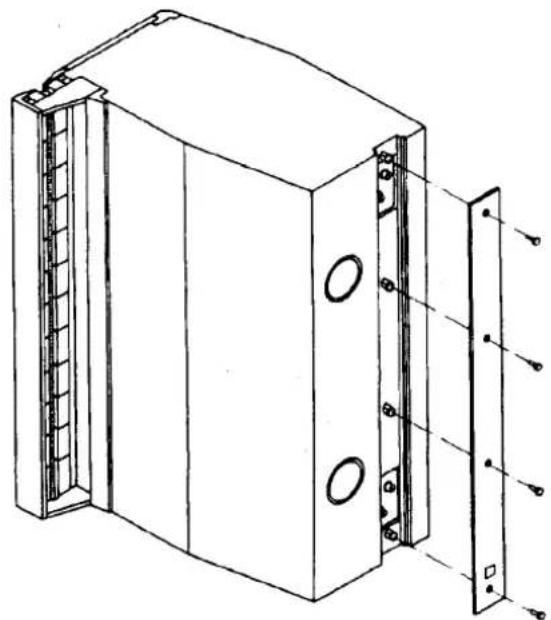
Before installation, remove the screws holding the rear panel aluminium covers on all 6 modules, using the enclosed 2.5 mm Allen wrench (See Fig. 4).
natural_image
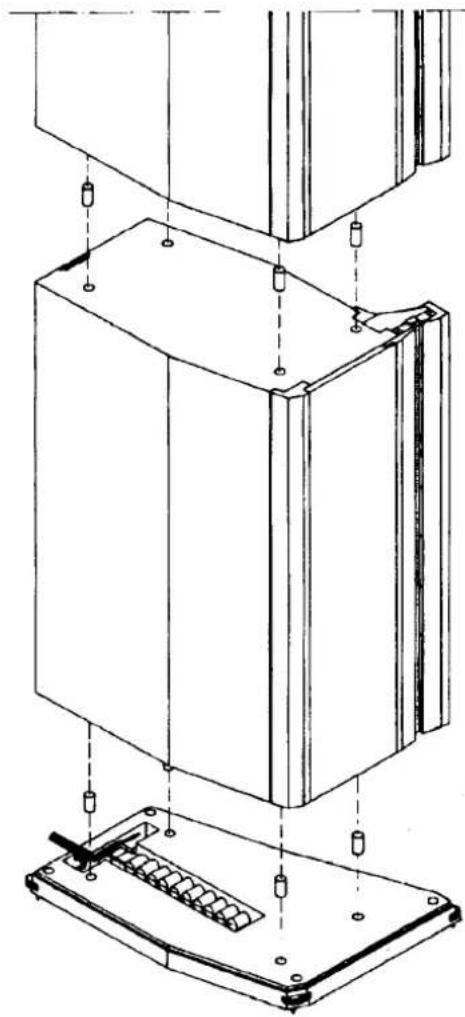
Technical line drawing of a mechanical device with internal components and mounting holes (no text or symbols)- Place four dowels in the pre-drilled holes in the base (See Fig. 5). The holes are slightly larger than the dowels to allow fine adjustment of the alignment of the 3 modules.
- Place the first module on the base, turning it so that it fits the base. (All modules are identical. Any module may be used as top, middle, or bottom module in the left or right speaker.)
- The first module must be perfectly level in the horizontal plane, so that the speakers will stand completely perpendicular without leaning. Use a spirit level placed at various positions on top of the first module (See Fig. 6).
Fig. 5
natural_image
Technical line drawing of a mechanical device with internal components and mounting base (no text or symbols)Fig. 6

natural_image
Simple line drawing of a vertical support structure with no text or symbolsFig. 7
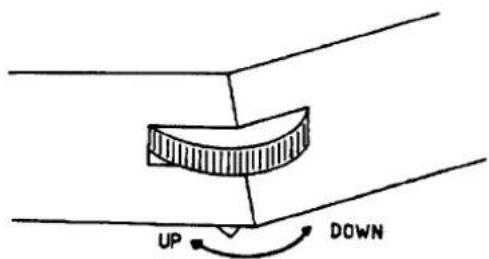
To adjust the spikes until the module is completely level (See Fig. 7). To protect the floor or floor covering from the pointed spikes, a coin may be placed under each spike. For additional information on spikes, see "Fine-tuning loudspeakers and the listening room."
-
Place four dowels in the holes on top of the first module.
-
Carefully lift the second module into place on top of the first module.
-
Place four dowels in the holes on top of the second module.
-
Carefully lift the third module into place on top of the second module. Special caution is advised, due to the height involved and the risk of nicking or scratching the module. The presence of two to three persons is recommended.
-
Repeat steps 1 through 7 for the other speaker.
-
Pressure may be applied to the wood strips on the corners of each tweeter section to push them up or down for a perfect visual match. Individual modules may be shifted slightly left or right for perfect vertical alignment.
-
Place the DALI AC-U crossover near the preamplifier, so that interconnects between them can be as short as possible. Keep all interconnects and loudspeaker cables as short as possible. However, long interconnects between the AC-U and the power amplifiers is preferable to long cables between the power amplifiers and the speakers. The crossover outputs can drive cables up to 10 metres.
-
The tweeter ribbons are secured during transport with foam rubber inserts in the gap directly behind the ribbon. Using fingers only, gently remove the 18 foam rubber pieces and store them with the cartons for future use.
5. Advice on power amplifiers
Two stereo amplifiers or four mono power amplifiers are required to drive DALI MegaLine. Although the loudspeaker system is a non-complex, virtually linear impedance load for most high end amplifiers, the use of the finest possible power amplifiers will enhance its performance. Due to the highly subjective nature of amplifier choice, it is difficult to offer concrete advice. However, careful attention should be paid to a number of factors which affect loudspeaker performance:
-
Use identical power amplifiers for the low and high frequency sections.
-
Use amplifiers of at least 75 Watts per channel. It is critical that the amplifiers be capable of delivering high peak current without clipping, in order to fully realise the distortion-free performance of the tweeter ribbons which will immediately reveal amplifier clipping. Due to their relatively modest sensitivity, the ribbons demand high voltage peaks from the amplifiers.
-
If the amplifiers have adjustable gain, all four channels should be set to the same level for correct tonal balance. While it can be tempting to use adjustable gain as a kind of tone control to modify the sound of a given set-up, we strongly advise against it. Such adjustments will create an accumulative frequency response error in the critical 1-2 kHz midrange region. Any perceived tonal imbalance should be corrected by varying the rear wall damping behind the loudspeakers. (See "Fine-tuning Loudspeakers and the Listening Room."
-
If it is not possible to use identical amplifiers, the gain of the four channels must be matched to within 0.25 dB relative to the speaker load (5 ohms). If in doubt, ask your dealer to check and, if necessary, correct the sensitivity of your amplifiers. Amplifiers of unequal gain will not allow you to fully experience the exemplary integration and tonal neutrality of the DALI MegaLine system. The amplifiers must also be non-inverting. The DALI MegaLine system, including the DALI AC-U active crossover, is non-inverting.
6. Connecting loudspeakers, crossover and power amplifiers
Special cable is included to connect the modules in each tower to one other via hidden rear panel slots. External connections to two channels of power amplification are made via two pairs of banana sockets in the base.
Before proceeding, make certain that initial set-up is complete, with the speakers in their final position and correctly placed relative to the rest of the audio system with regard to necessary connections. Once the hidden wiring is connected, it will be difficult to disassemble the modules from each other or from the base.
Hidden connections
- All cables are of the correct length, making it nearly impossible (See Fig. 8) to make incorrect connections. The same colour coding is used for all the hidden connections: Red cable to red terminals (high frequency section) and black cable to black terminals (low frequency section).
-
Connect the shortest cables from the base to the bottom module.
-
Connect each module to the one directly above it, using the 18 cm cables, making sure to connect black cable to black terminals and red cable to red terminals. See Fig. 8.
-
Connect the long cable from the base to the screw terminals high up on the top module, as always, black to black and red to red.
-
Tighten the terminals as firmly as possible by hand. Because the terminals are fixed in the wood of the cabinet, they must not be overly tightened. Tools should only be used with the greatest caution.
-
Arrange all cables neatly in the slot, so that they do
not cover the screw holes. Do not put on the aluminium covers until the external cable connections have been completed and the system has been tested.
External connections
Make certain that all power amplifiers are turned OFF when making any connections between preamplifier, crossover, power amplifiers and loudspeakers. In the following, "Left" and "Right" refer to the speakers as seen from the listening position. Be careful to connect the red plus (+) amplifier output terminals to the red plus (+) speaker input terminals. Connect the black minus (-) amplifier output terminals to the black minus (-) speaker input terminals. Do not use the "SUB" output of the DALI AC-U.
- Using interconnects with phono plugs, connect the left and right preamplifier outputs to the corresponding inputs of the DALI AC-U active crossover. See Fig. 9.


- Using interconnects with phono plugs, connect the outputs of the DALI AC-U to the correct inputs of the power amplifiers. Then, connect the power amplifier outputs to the correct gold-plated banana sockets on the base of each loudspeaker, using high quality cable, preferably the same type of cable for both the high and low frequency sections. See "Electrical Fine-tuning" for further advice.
- Connect the AC-U Left High output to the left input of the power amplifier which will drive the ribbon sections. Connect the left output of this amplifier to the banana sockets behind the ribbon section of the left speaker. - Connect the AC-U Left Low output to the left input of the power amplifier which will drive the bass/midrange sec-tions.
Connect the left output of this amplifier to the banana sockets behind the bass/midrange section of the left speaker.
- Connect the AC-U Right High output to the right input of the power amplifier which will drive the ribbon sections. Connect the right output of this amplifier to the banana sockets behind the ribbon section of the right speaker. - Connect the AC-U Right Low output to the right input of the power amplifier which will drive the bass/midrange sections.
Connect the right output of this amplifier to the banana sockets behind the bass/midrange section of the right speaker.
- Connect the AC-U to mains power. Because the DALI AC-U is a strict dual mono design, there are two power cords, one for each channel. The AC-U has no power switch and is always on.
- Re-check all connections.
Turn the preamplifier volume control all the way down. Turn on the power amplifiers.
Turn the volume up just loud enough to check that all connections are correct and secure.
Are the left and right channels properly configured? Is the sound in correct phase?
Do the low frequencies come from the bass/midrange sections and the high frequencies from the ribbon sections?
If in doubt, turn off the power amplifiers and carefully check all connections once again. It is particularly important that low frequencies go to the bass/midrange sections and not to the tweeter sections, where they could damage the ribbons. At low levels the error can easily be detected before it can do any harm.
- After checking that everything is in order, carefully put the aluminium covers in place, so as not to scratch the speak-
ers. Press them firmly into place by hand. Do not screw the screws in too tightly. Their job is NOT to bolt the covers down, but merely to hold them in place.
7. Break-in
Why break-in?
Loudspeaker drive units are mechanical devices and require a certain period of normal use before they function optimally. During the break-in period, mechanical tension in moving parts is relieved and the proper mechanical balance is found. The transitional areas between fixed and moving parts, such as the edges of two materials joined with adhesive, are given a thorough work-out which precisely defines the border between fixed and moving parts. Initially, a new loudspeaker will sound shut in and "mechanical." Gradually, performance will improve during the break-in period. The difference between straight-out-of-the-box and broken in is substantial, so please be patient during this period.
The break-in process
Break-in occurs during normal use, playing music at various levels. The length of the break-in period will
depend on the type of music you play and how loud you play, but count on 3-6 weeks before your system reaches its peak.
Do not try to force the break-in process by playing sinus waves, tone sweeps or other artificially generated signals.
The greatest improvements occur early on in the process. You should be able to register the change almost hour by hour or day by day.
Repeating break-in
If your system is not used for a long time, the speakers will reach peak form again after a new, shorter break-in period. A brief period of break-in or acclimatisation may also be beneficial after transport or storage at temperatures below normal.
Wear is not an issue with the DALI MegaLine. Regular use will only extend the speakers' useable life.
8. Fine-tuning Loudspeakers and the Listening Room
Although the DALI MegaLine is very room-independent due to the unique dispersion properties of a line source, every effort must be made to find the ideal position in any given room in order to optimise performance. With the spikes completely elevated, two to three persons, working very carefully, can slide the assembled speakers in order to find the optimal placement.
Room acoustics
The acoustical properties of the listening room represent one of the most crucial links in the audio chain. Obviously, even the finest equipment will be adversely affected by the limitations of the room itself. While it is difficult to generalise on the subject of appropriate acoustical treatments, there are some basic rules which should lead to an enhanced acoustical environment.
A room with "normal" furnishings, books, flowers, plants and relatively soft furniture is pretty much ideal.
Oil paintings on canvas are also beneficial for the acoustics of most rooms. Hard, reflecting surfaces should be avoided, especially in the line of "fire" of the loudspeakers, where direct reflections can destroy the precision and stability of the sonic image.
As an essentially room-independent line source, the DALI MegaLine will perform well even under difficult acoustical conditions. However, three key factors can optimise the performance of the MegaLine system in a given room: 1) correct coupling of the bass system to the rear wall, 2) optimal damping of the tweeter system's rear wall reflections and 3) optimal placement in the room.
Damping of rear and side wall reflections is particularly important, because they are the only reflections which can have negative impact on system performance. The DALI MegaLine, an ideal line source transducer, effectively eliminates bothersome floor and ceiling reflections at mid and high frequencies, so that, in their absence, there is nothing to mask the annoying echo effect of rear wall reflections. Fortunately, they can be easily reduced by the presence of curtains or other wall-mounted textiles. Since damping is most needed at high frequencies, heavy materials are not required to achieve the desired effect. Lightweight curtains with frequent folds covering the en-tire wall area behind the speakers are ideal. As a rule of thumb, the curtain material should be three times the length of the surface to be covered in order for the folds to be sufficient. Care should be taken not to over-damp the midrange and upper bass with heavy drapes, creating a "dead" acoustic, due to the absorbent nature of the material at these frequencies.
Make sure that there are no bare areas from which direct reflections could reach the listening position. This can be checked by holding a mirror against the wall, while a second person seated at the listening position looks for reflections of the loudspeaker in the mirror. See Fig. 10 and 11.

Room symmetry around and behind the listening position is not an absolute advantage, as long as the listening position and speakers form an equilateral triangle. However, the 100° angle defined by the enclosed template must always be respected.

Low frequency performance is not affected by the surface of the walls, but by their mass and rigidity. You can achieve the desired bass balance by moving DALI MegaLine closer to a rear wall for bass reinforcement or away from the wall for bass attenuation. The wall behind DALI MegaLine should be rigid and preferably heavy (i.e. concrete, brick) so that it does not absorb too much low frequency energy. This is of particular importance with a speaker such as DALI MegaLine, because the large, highly directive wavefront generated by the multiple drivers may more easily be absorbed by large wall surfaces which tend to move in the same uniform manner as the wavefront.
Spikes
Opinions vary on the advantages and disadvantages of spikes between a loudspeaker and its supporting surface. The disagreement centres on the question of whether a speaker should "couple" to its support or be "de-coupled" from it.
Spikes can be said to couple the speaker more directly to the surface by penetrating the carpet, rug or other "springy" floor covering. This will stabilise the speaker, so that it does not rock back and forth, compromising precision in the sonic image. However, coupling may transfer the energy which causes the speaker to rock to the floor, along with cabinet resonances, causing the floor to resonate audibly at characteristic frequencies, mud-dying the sound.
On the other hand, spikes can be said to de-couple the speaker, since a spiked speaker only has contact with the surface at four tiny points. Thus, any transfer of energy or resonances can only occur at these four points. Since the resonant pattern of the surface of a loudspeaker is random, the total amount of energy transferred to the surface via spikes is less of a problem than if all vibrations had been transferred. Another possible source of de-coupling could lie in the fact that spikes readily transfer vertical forces through their axis, while horizontal forces are less readily transferred. This might mean that the loudspeak-er's rocking motion is restrained because vertical forces are transferred to the floor, while resonances, horizontal forces, do not reach the floor.
You can easily experiment with spikes, since DALI Mega-Line can be lifted onto the integral spikes, simply by adjusting the finger screws at the corners of each base. It is easiest to adjust a spike while a helper gently pushes the top corner of the bottom module to take some of the weight off the spike to be adjusted. However, please take into account the following:
- If the speakers are sited on a carpet on a hard surface, spikes will also prevent rocking on the soft carpet. Care should be taken so that the spikes do not tear the fabric of the carpet.
- In order to protect the floor from scratches, you may op-tionally place a coin or other hard, flat metal plate under each spike. Because the contact area remains very limited, there is very little performance compromise.
- Note: It may be necessary to adjust the finger screws regularly, especially if the speakers are placed on a soft, or less stable surface.
9. Electrical fine-tuning
DALI MegaLine does not require special electrical maintenance. All circuits and connectors are designed for long-term reliability. The following advice applies equally to every component in your system and will ensure a consistently high level of performance. Always remember to turn off all equipment before connecting or disconnecting anything.
Tight connections
Loose loudspeaker cable connections are the most frequent cause of reduced sound quality. In the worst case, short circuits may occur which could damage your loudspeakers and/or amplifiers. Because even the tightest connections will loosen in time, all connections should be inspected and re-tightened regularly. Remember to remove the aluminium covers in order to tighten the connec-tions hidden behind them.
Clean, dry surfaces provide the best signal transfer. Check all terminals, sockets, plugs, etc., for contamination caused by oxidation, grime or grease. Sound quality may gradually be degraded due to long-term exposure to airborne particles of smoke, grease, dust, etc. Contamination is most effectively removed using cotton swabs and cleaning spirits. Your DALI dealer may also be able to recommend a specialised audio contact cleaner. Always make certain that the cleaner you use is suitable for your contacts.
Equally important is a tight connection between plugs and sockets. Most phono plugs achieve a firm fit due to elasticity in the outer shield. The effectiveness of this elasticity should be checked regularly simply by disconnecting and then reconnecting the plug. The plug should require some pressure and form a snug fit. If the plug fits loosely or can be rocked back and forth in the socket, then it is time to tighten the outer shield or replace the plug.
Screw terminals or binding posts should be tightened as firmly as possible so that they maintain a tight grip on the bare wire, spade lug, pin, etc. Screw terminals are made from materials such as copper, selected for their electrical properties, not their mechanical qualities. Therefore, there is a low limit to how much they can be tightened. As a general rule, they should be tightened as far as possible by hand, without the use of tools. Use tools with caution.
Cable quality
Interconnects and loudspeaker cables will affect the sound of any audio component or system. Due to the extreme transparency of the DALI MegaLine system, the sonic signature of interconnects and cables will be readily revealed. Feel free to experiment in the selection of these components, preferably with a home trial in your own system. We urge you to buy the best possible cables and interconnects which your budget will allow. We recommend that you use the same type of cable for the bass/midrange and treble sections in order to achieve the best consistency and integration.
10. Tightening the ribbon
The ribbon tweeter employed in the DALI MegaLine is a unique, proprietary design which, unlike conventional dynamic drivers, has no edge suspension with unwanted stiffness, losses and non-linearities. The DALI ribbon is centred and controlled only by the tension set during production. Because the ribbon's resonant frequency is several octaves below its operating range, ribbon tension is not a critical performance issue. However, it should be noted that a very loose ribbon may respond to air motion in the room caused by the bass drivers or by a draught. If the ribbon is too loose, it will also be difficult to stabilise it relative to the two rows of magnets. On the other hand, the ribbon should not be over-tightened, as this may reduce the ribbon's elasticity in the long run and add a certain sharpness to the sound due to partial resonances in the overly tightened ribbon.
Adjusting ribbon tension
- While it is not necessary to disassemble the loudspeaker in order to adjust ribbon tension, the job is best handled by two persons. Lots of space and good lighting behind the speaker will be helpful.
- Turn off power amplifiers.
- The ribbon may be tightened either at the top or at the bottom, whichever is easier to reach.
- Be careful of the powerful magnets. They will attract tools, loose screws and iron or steel objects which could instantly damage the ribbon. Keep a very firm grip on tools and screws.

natural_image
Technical line drawing of a mechanical assembly with mounting bracket and clamping mechanism (no text or symbols)- Using a 2.5 mm Allen wrench, loosen by turns the two M4 Allen screws which hold the ribbon attachment plate. Loosen one screw slightly, then the other, then loosen the first one a little more, moving back and forth between them until both are completely loose. Remove the screws (See Fig. 12).
- Remove the attachment plate carefully, gradually working it loose from the mildly adhesive surface.
-
With a slow and steady hand, pull the ribbon until it no longer sticks to the surface. Be very careful to avoid damage to the ribbon.
-
After checking to make sure that the ribbon is completely free of the adhesive surface around the attachment area, tighten the ribbon slowly while observing it from the rear. A helper is recommended. (See next step.)
- You can test the tightness of the ribbon by blowing lightly on it and observing its motion. If the ribbon is properly tightened, you will see it swing 2-5 times with a frequency of 2-5 times per second. If the ribbon is too loose, it will slowly flap back into place. If the ribbon is too tight, it will "oscillate" rapidly (more than 5 times per second).
- When the ribbon is properly tightened (typically 3-6 mm), place the ribbon back on the adhesive mounting PCB (pole plate) with the three conductors perfectly aligned above the tracks on the mounting PCB. Be especially careful and precise to avoid any risk of short circuit. After the ribbon is placed correctly, press it gently into position until the adhesive holds it in place. Check the tension of the ribbon once again by repeating step 9.
- Re-mount the attachment plate with the two M4 Allen screws. Tighten one screw slightly, then the other, then tighten the first one a little more, moving back and forth between them until they are flush against the attachment plate. Finally, fasten the screws gently, using only the force of two fingers holding the Allen wrench (See Fig. 8).
- Turn the system on. Listen to check that everything is working properly. To confirm that the ribbon's electrical characteristics are as they should be, you may measure the impedance of each module separately. Turn off the power amplifiers. Use a low current ohmmeter connected to the top and bottom red terminal sockets of the module. The correct DC resistance for each module should be
1.5-1.7. If the resistance is higher, there is probably poor contact between the ribbon and mounting PCB due to dust, dirt, etc. If the resistance is lower, there is a total or partial short circuit between the conductor tracks of the mounting PCB and the ribbon itself. Please note that system resistance cannot be measured at the sockets on the base, because they are connected to the three modules via a black capacitor battery which protects the ribbon section from any DC offset from the power amplifier.
11. Advice on Power Handling, Dynamics, etc.
Dynamics
We refer to the relationship between quiet and loud passages as "dynamics." It should be noted that a low basic noise level in the listening room is just as important as the loudspeakers' maximum output capability. Many people listen to music amid high levels of traffic noise, air conditioning hum and the general background noise of a typical home. Great benefits can be had by permanently lowering noise levels by insulating windows, doors and walls or by turning off noisy devices such as air conditioners during a listening session. It is generally acknowledged that most audio systems sound significantly better during evening listening sessions, no doubt largely due to the much lower ambient noise level. Apart from the technical aspect of enhanced dynamics, low noise levels also contribute to personal well-being and relaxation. These human factors definitely influence the quality of the music listening experience.
Power handling
Loudspeaker damage occurs most often when small amplifiers are pushed too hard, generating a form of distortion known as clipping. Since a small amplifier which is clipping may deliver more than ten times as much energy in the sensitive high frequency range than a larger amplifier at the same volume level, the clipping of small amplifiers represents a potential threat to the high frequency ribbons. If the amplifier is up to the task, then the ribbons can handle undistorted peaks in excess of 1,000 Watts. So long as your amplifiers do not go into clipping, you will find the power handling capabilities of the DALI MegaLine more than adequate to meet your needs.
Please note, however, that the system does not incorporate mechanical or electrical protection against overload for the simple reason that fuses or protection circuits would compromise sonic performance. The presence of clipping can be determined by observing the ribbon's motion while music is playing. If the ribbon appears to jerk violently at low frequencies, this is generally an indication that the amplifier has clipped and generated a small DC pulse. As long as it occurs infrequently, there is no cause for alarm, but if it happens regularly, in time to the music, then the amplifier is being pushed beyond its safe operating range and is endangering the ribbon section. If you avoid clipping, then your DALI MegaLine will provide many years of trouble-free music listening.
Hearing
While brief musical peaks reproduced by a speaker such as the MegaLine are relatively harmless, you should be aware that long-term exposure to very loud music can do permanent damage to human hearing. Because DALI MegaLine delivers smooth, undistorted sound even at extreme levels, you may be less aware of how loud you are playing. This may cause you to listen at higher levels for longer periods than you normally would. Keep the volume level within reason and take pleasure in the fine dynamics offered by the DALI MegaLine, regardless of volume setting. With a little common sense and caution, you will be able to enjoy every musical nuance and detail for many years to come.
12. Care and maintenance
The DALI MegaLine loudspeaker system requires very little maintenance. Regular use will keep system performance at a peak level and will actually extend the useable life of the loudspeakers.
- All connections should be inspected, cleaned and retightened regularly.
- The front grille should be gently vacuum cleaned with a brush attachment. Do not rub the brush mouthpiece against the material.
- Wood surfaces should be dusted with a clean, soft, dry cloth.
Technical Specifications
DALI MegaLine Loudspeaker System
Cabinet type: Bass Reflex
Reflex tuning: 38.5 Hz
Frequency response (±3 dB): 35-22,000 Hz
Crossover frequency (via DALI AC-U):....1,200 Hz
Recommended side wall distance:....>1 metre
Recommended back wall distance
(to rear panel): 0.5-2 metres
System impedance: 6Ω nominal, 4.8Ω minimum
Recommended amplifier power:...100-1,000W (4 channels)
Input connectors:......Gold-plated banana plugs (included)
Module dimensions (HxWxD):....755 x 365 x 492 mm
System dimensions (HxWxD):.....2310 x 365 x 492 mm
Module net weight: 32 kg/70.4 lb
System net weight: 2 x 101 kg/ 2 x 222 lb
DALI MegaLine AC-U Active Crossover
Frequency response (±0.5 dB): 5 Hz-200 kHz
Filter precision (20 Hz - 20 kHz):....±0.25 dB
Connections:......phono
Input impedance: 20 kΩ
Output impedance: 50Ω
Max. input (peak): 10V
Max. output (peak): 8V
Dimensions (HxWxD): 48 x 440 x 305 mm
Weight ex. PS/incl. PS:....4.8/6.1 kg 10.56/13.4 lb
Power consumption:....13 Watts per channel


- DALI MegaLine
- Table of Contents
- Introduction
- Unpacking
- WARNING
- Placing the loudspeakers
- Installing loudspeakers and crossover
- Advice on power amplifiers
- Connecting loudspeakers, crossover and power amplifiers
- Hidden connections
- External connections
- Break-in
- Why break-in?
- The break-in process
- Repeating break-in
- Fine-tuning Loudspeakers and the Listening Room
- Room acoustics
- Spikes
- Electrical fine-tuning
- Tight connections
- Cable quality
- Tightening the ribbon
- Adjusting ribbon tension
- Advice on Power Handling, Dynamics, etc.
- Dynamics
- Power handling
- Hearing
- Care and maintenance
- Technical Specifications
- DALI MegaLine Loudspeaker System
- DALI MegaLine AC-U Active Crossover
Mærke : Dali
Model : MEGALINE
Kategori : Højttaler