SKILLER SGS3 - Kontorstol Sharkoon - Gratis brugsanvisning og manual
Find enhedens vejledning gratis SKILLER SGS3 Sharkoon i PDF-format.

Brugerspørgsmål om SKILLER SGS3 Sharkoon
0 spørgsmål om dette apparat. Besvar dem du kender, eller stil dit eget.
Stil et nyt spørgsmål om dette apparat
Download vejledningen til din Kontorstol i PDF-format gratis! Find din vejledning SKILLER SGS3 - Sharkoon og tag din elektroniske enhed tilbage i hånden. På denne side er alle dokumenter nødvendige for brugen af din enhed offentliggjort. SKILLER SGS3 af mærket Sharkoon.
BRUGSANVISNING SKILLER SGS3 Sharkoon
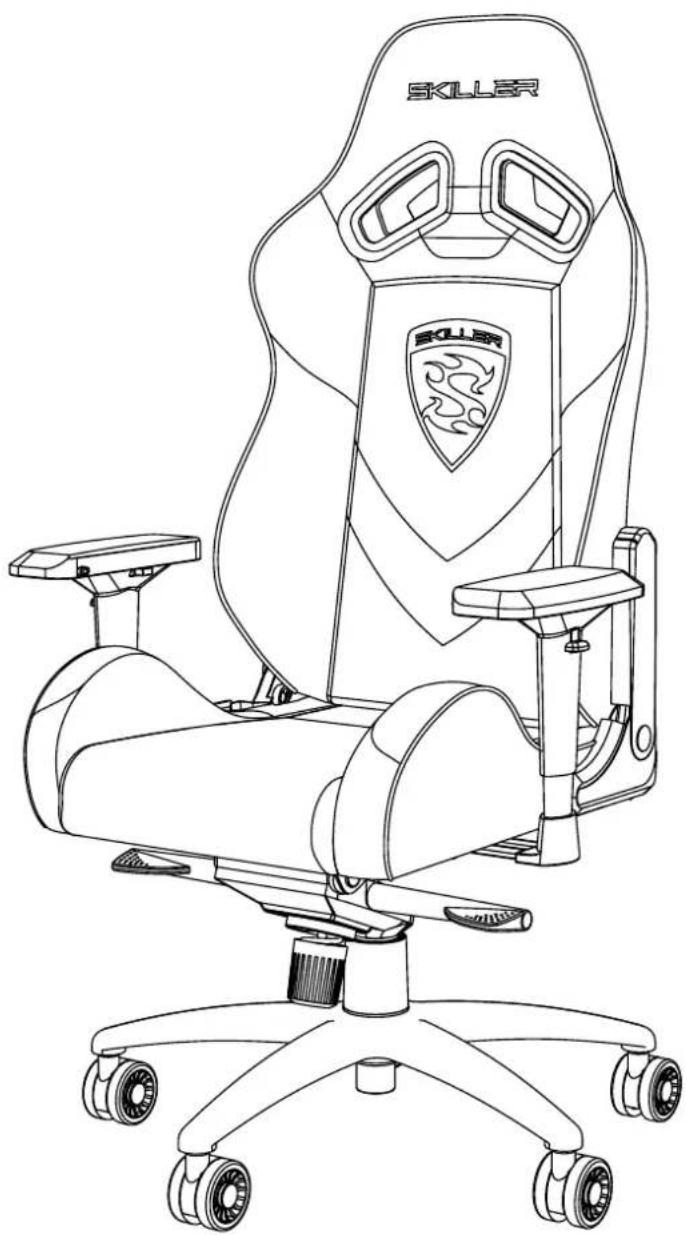
SKILLER
SGS3
GAMING SEAT
natural_image
Line drawing of a SKILLER VR game engine chair with two front seats and wheels (no text or symbols on the chair itself)Manual • Anleitung • 使用説明 • マニュアル
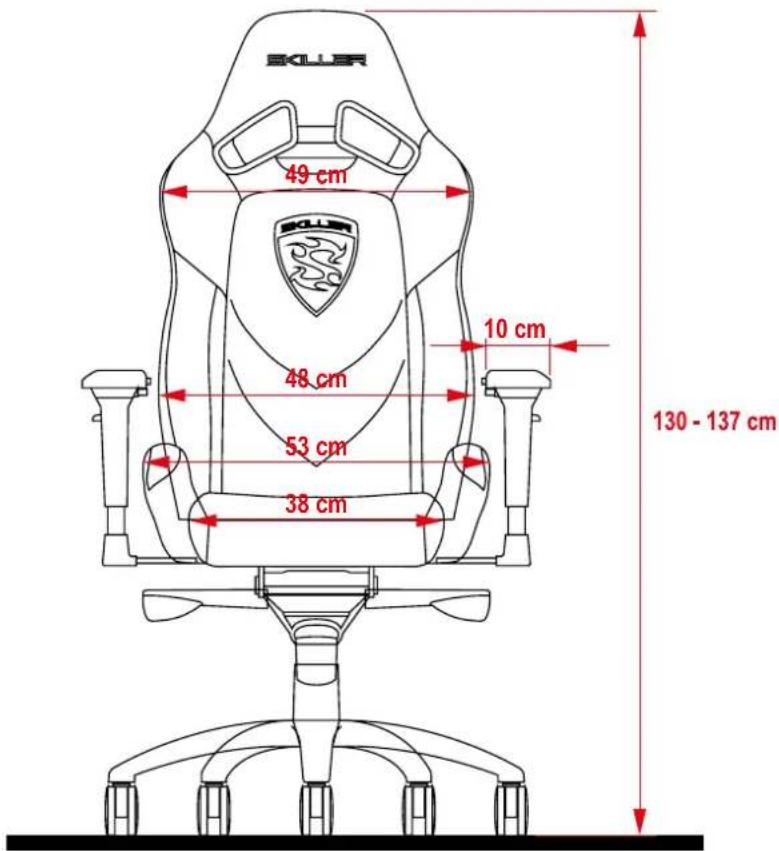
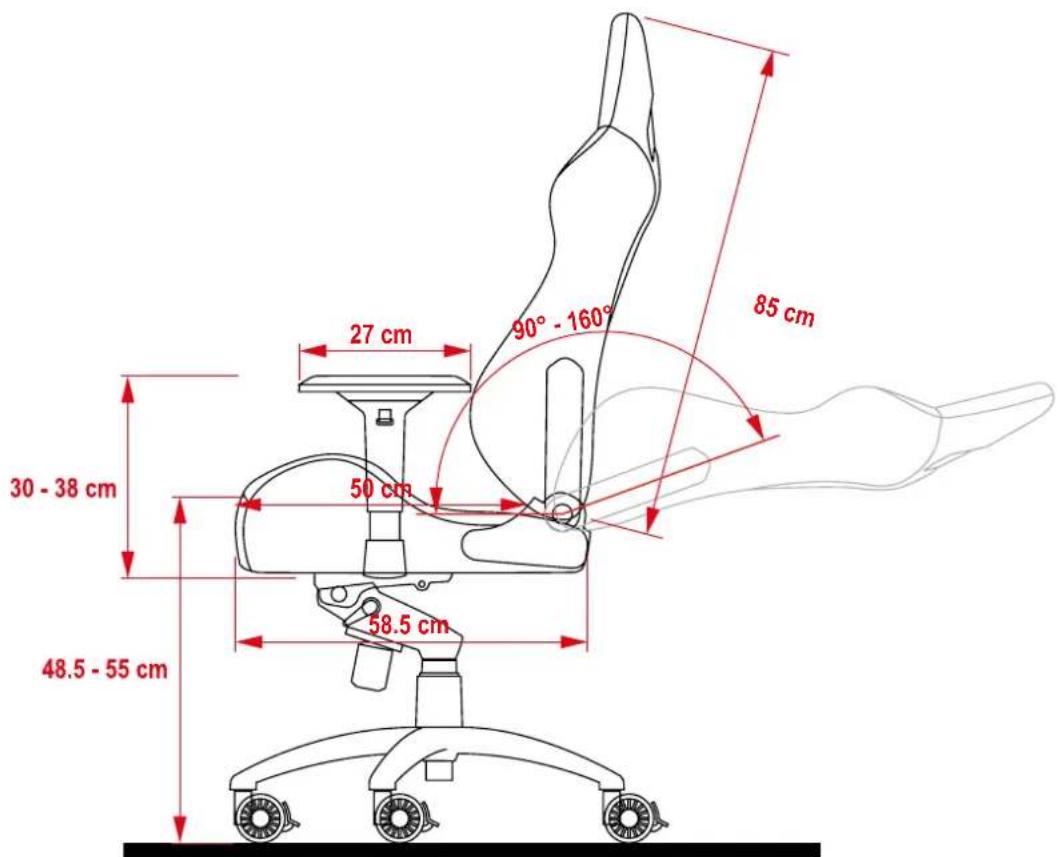
1 Dimensions
EN Dimensions
DE Abmessungen
ES Dimensiones
CN 尺寸
PT Dimensões
JP 寸法

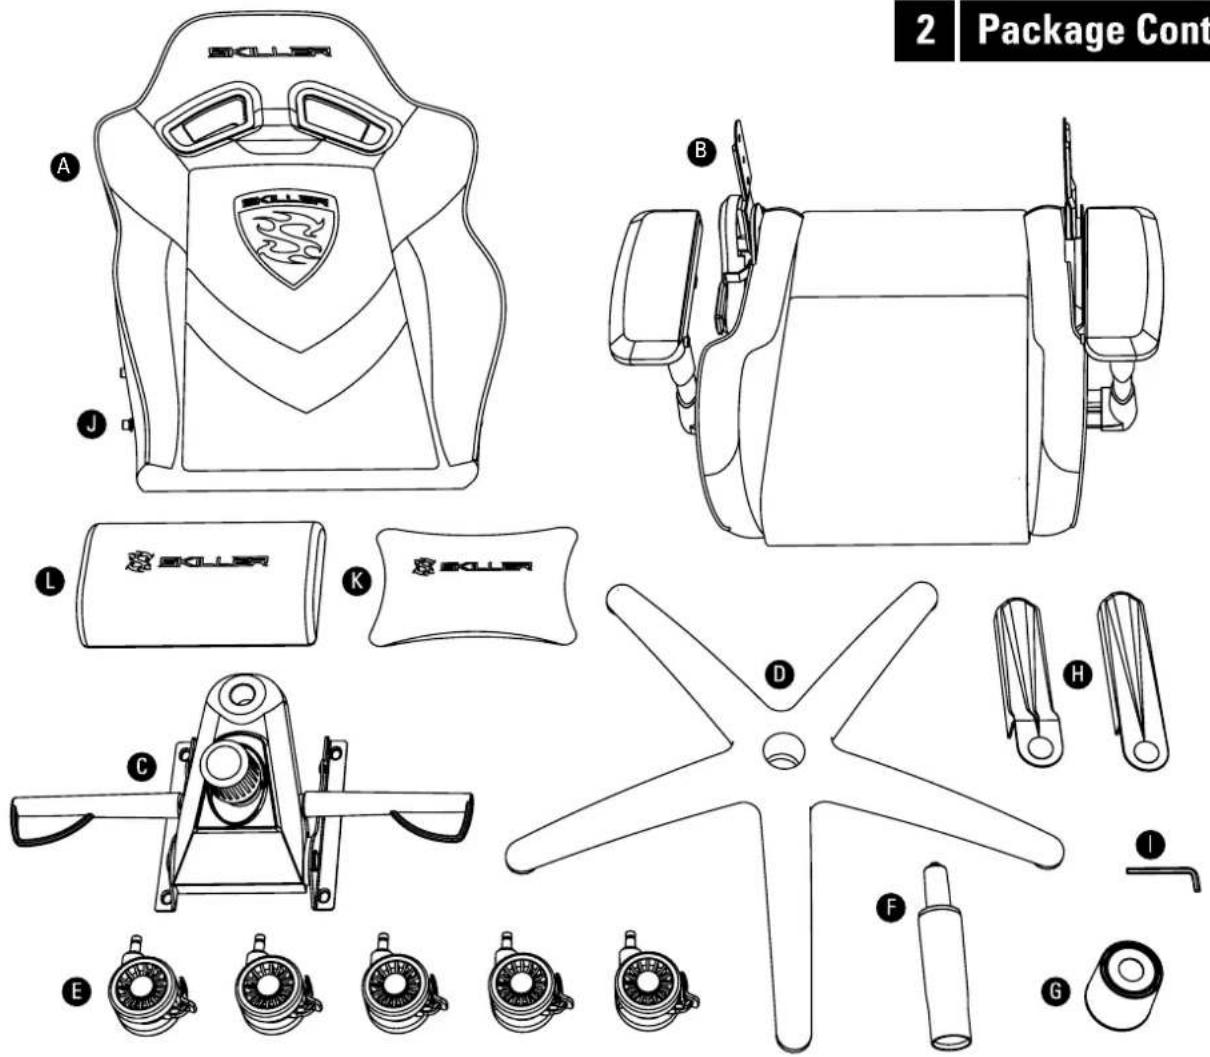
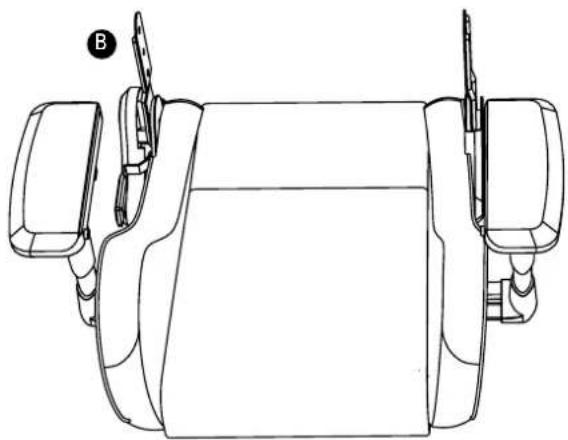
EN Package Contents
A) 1x Backrest
B) 1x Seatbase with armrests
C) 1x Chair mechanism
D) 1x Five-star base
E) 5x Wheels with breaking function
F) 1x Gas lift piston
G) 1x Piston cover
H) 2x Side covers
I) 1x Allen wrench (M8)
J) 8x M8 screws (pre-installed)
K) 1x Headrest cushion
L) 1x Lumbar cushion
ES Contenidos del paquete
A) 1x Respaldo
B) 1x Base del asiento con reposabrazos
C) 1x Mecanismo de silla
D) 1x Base de cinco radios
E) 5x Ruedas con función de bloqueo
F) 1x Pistón de gas
G) 1x Cubierta de pistón
H) 2x Cubiertas laterales
I) 1x Llave Allen hexagonal (M8)
J) 8x Tornillos M8 (preinstalados)
K) 1x Cojín reposa-
cabezas
L) 1x Cojín lumbar
CN 包装内含物件
A) 1x 椅背
B) 1x坐墊與扶手
C) 1x 座椅調節機構
D) 1x鋁合金五星椅腳
E) 5x 煞車輪
F) 1x 氣桿
G) 1x 三節防塵罩
H) 2x 側蓋
I) 1x 内六角板手 (M8)
J) 8x M8 螺絲 (預裝)
K) 1x 頭枕
L) 1x腰枕
natural_image
Top-down line drawing of a car rear view showing front, side, and side panels (no text or symbols)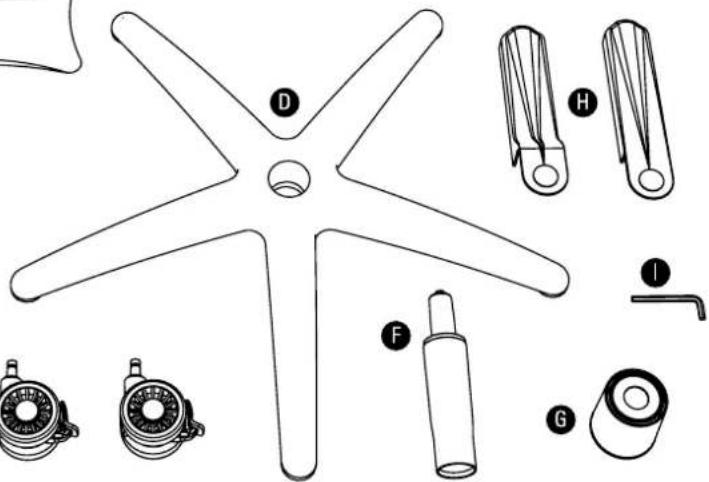
DE Verpackungsinhalt
A) 1x Rückenlehne
B) 1x Sitzfläche mit Armlehnen
C) 1x Stuhlmechanik
D) 1x Fußkreuz
E) 5x Rolle mit Bremsfunktion
F) 1x Gasdruckfeder
G) 1x Teleskopabdeckung
H) 2x Seitenabdeckung
1) 1x Innensechskantschlüssel (M8)
J) 8x M8 Schraube (vorinstalliert)
K) 1x Kopfkissen
L) 1x Lendenkissen
PT Conteúdo da embalagem
A) 1x Encosto para as costas
B) 1x Base do assento com repouso para os braços
C) 1x Mecanismo da cadeira
D) 1x Base de cinco estrelas
E) 5x Rodas com a
função de trava
F) 1x Pistão de
elevação de gás
G) 1x Tampa do pistão
H) 2x Tampas laterais
I) 1x Chave allen (M8)
J) 8x Parafusos M8
(pré-instalados)
K) 1x Almofada para a
cabeça
L) 1x Almofada para a lombar
JP パッケージの内容
A) 1x 背もたれ部
B) 1x アームレスト
付き座部
C) 1x 調整機構
D) 1x 五本足ベース
E) 5x ブレーキ付き
キャスター
F) 1x ガスシリンダー
G) 1x ガスシリンダーカバー
H) 2x サイドカバー
1) 1x アレンレンチ(M8)
J) 8x M8 ネジ (仮止めされている)
K) 1x ヘッドクッション
L) 1x ランバーサポート
クッション
3 Safety Instructions

EN Safety Instructions
A) We recommended that the chair be assembled with the help of a second person.
B) To avoid dropping the chair, ensure the weight is evenly distributed.
C) Ensure to keep your feet on the ground at all times and do not press your head against the backrest while fully reclining in the chair.
D) Do not place heavy objects on the chair and do not use it as a ladder.
E) When adjusting the backrest, ensure your fingers are out of the way.
F) To avoid damage, never pull hard and fast on the handles.
G) Avoid direct sunlight to ensure plastic components do not become brittle.
H) Do not use aggressive cleaning agents to clean the chair.
DE Sicherheitshinweise
A) Am besten lässt sich der Stuhl mithilfe einer zweiten Person aufbauen.
B) Um ein Umfallen des Stuhls zu vermeiden, stellen Sie sicher, dass das Gewicht gleichmäßig verteilt ist.
C) Halten Sie die Füße jederzeit auf dem Boden und drücken Sie nicht im Liegen mit dem Kopf gegen die Lehne.
D) Stellen Sie keine schweren Objekte auf dem Stuhl ab und benutzen Sie ihn nicht zu zweit oder als Leiter.
E) Geben Sie beim Justieren der Rückenlehne stets auf Ihre Finger acht.
F) Um eine Beschädigung zu vermeiden, betätigen Sie die Justierhebel niemals ruckartig.
G) Vermeiden Sie direkte Sonneneinwirkung, da die verbauten Plastikteile spröde werden können.
H) Verwenden Sie keine aggressiven Reinigungsmittel zum Reinigen des Stuhls.
ES Instrucciones de seguridad
A) Recomendamos el montaje de la silla con la ayuda de una segunda persona.
B) Para evitar que la silla caiga, asegúrese de que el peso sea uniformemente distribuido.
C) Mantenga los pies siempre en el suelo y no haga presión con la cabeza sobre el reposacabezas al reclinar la silla.
D) No coloque objetos pesados sobre la silla y tampoco la use como una escalera.
E) Cuando ajuste el respaldo, asegúrese de que sus dedos están seguros y fuera de peligro.
F) Para evitar daños, nunca tire rápido y fuerte de las asas.
G) Evite la luz solar directa sobre la silla para que los componentes de plástico no se vuelvan frágiles.
H) No use productos de limpieza agresivos sobre la silla.
CN 安全守則
A) 建議您在第二個人的協助下組裝椅子
B) 為了避免從椅子跌落,使用時請均衡分配重量
C) 請隨時將腳放於在地面上,若蜷曲於椅子上時請勿將頭部往椅背傾靠
D) 請勿將重物至於椅子上,或將其當作梯子使用
E) 在調整椅背時,請小心避免手指夾傷
F) 請勿用力拉扯調整桿,以免發生損害
G) 避免陽光直射以免加速塑料脆化
H) 請勿使用具腐蝕性的清潔劑擦拭椅子
PT Instruções de segurança
A) Recomendamos que a cadeira seja montada com a ajuda de uma outra pessoa.
B) Para evitar queda da cadeira, certifique-se de que o peso esteja uniformemente distribuído.
C) Certifique-se de sempre manter os pés no chão e não pressione a cabeça contra o encosto enquanto a cadeira estiver reclinável.
D) Não coloque objetos pesados sobre a cadeira e não a utilize a cadeira como escada.
E) Ao ajustar o encosto, certifique-se de que os dedos estejam seguros e fora de perigo.
F) Para evitar danos, nunca puxe as alavancas de forma rápida.
G) Evite espor a cadeira a luz solar para garantir que os componentes plásticos não se tornem frágeis.
H) Não utilizar agentes de limpeza agressivos para limpar a cadeira.
JP 安全上の注意事項
A) 2人で組み立てることを推奨します。
B) 転落防止に体重を均等に分散してご使用ください。
C) すわるときにいつも足を床につけておき、完全にリクライニングするとき、頭を背もたれ部に押さないでください。
D) チェアの上に重いものを置くこととはしごとして使用することをしないでください。
E) 背もたれ部を調整するとき、指をはさみ・怪我しないようにご注意ください。
F) 損害を避けるため、ハンドルに激しく引きつけないでください。
G) プラスチック部品がもろくならないように直射日光を避けてください。
H) 強い洗浄剤でクリーニングしないでください。
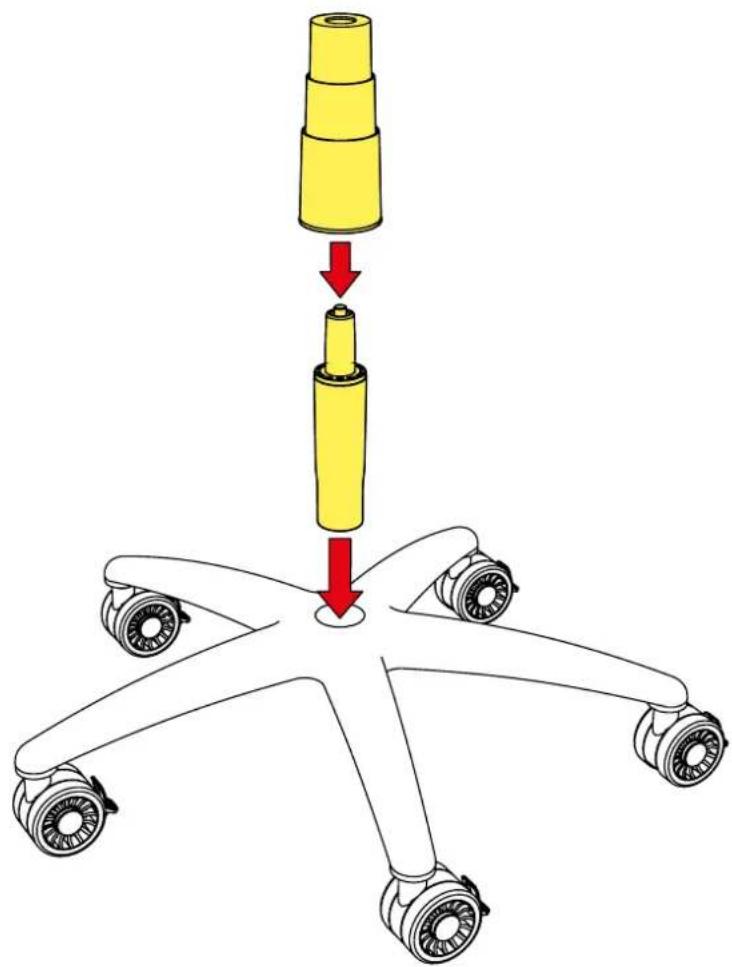
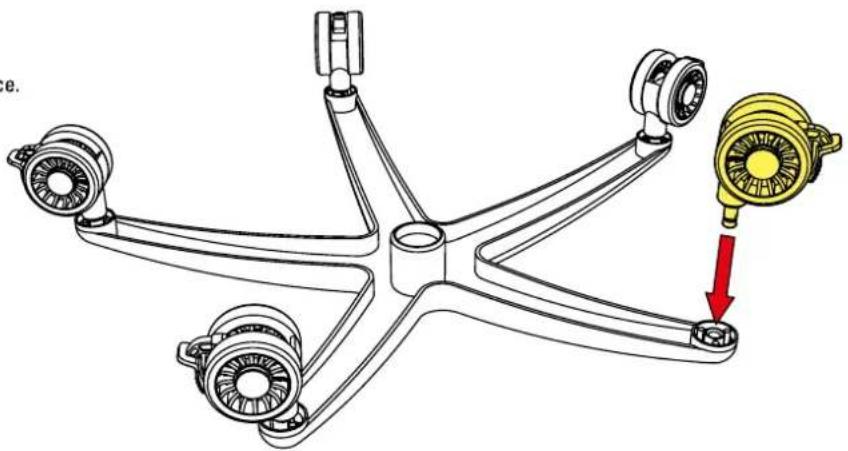
4 | Five-Star Base and Gas Lift Piston
EN Five-Star Base and Gas Lift Piston
Insert the wheels into the five-star base until they click into place.
DE Fußkreuz und Gasdruckfeder
Stecken Sie die Rollen in das Fußkreuz bis sie einrasten.
ES Base de cinco radios y pistón de gas
Inserte las ruedas en la base de cinco radios hasta que hagan clic en su lugar.
CN 鋁合金五星椅腳及氣桿
將輪子插入五星椅腳至卡榫位置
PT Base de cinco estrelas e pistão de elevação a gás
Insira as rodas na base de cinco estrelas até que se encaixem no lugar.
JP 五本足ベースとガスシリンダー
キャスターを五本足のそれぞれの穴に押し込んで取り付けます。
natural_image
Mechanical assembly diagram showing four components connected to a central hub with a yellow gear component, no text or symbols present.EN Five-Star Base and Gas Lift Piston
Insert the gas lift piston into the five-star base and then slide the piston cover over the gas lift.
DE Fußkreuz und Gasdruckfeder
Stecken Sie die Gasdruckfeder in das Fußkreuz und ziehen Sie anschließend die Teleskopabdeckung über die Gasdruckfeder.
ES Base de cinco radios y pistón de gas
Inserte el pistón de gas en la base de cinco radios y luego extienda la cubierta del pistón sobre el propio pistón.
CN 鋁合金五星椅腳及氣桿
將氣桿插入五星椅腳,並拉開三節防塵罩套住氣桿
PT Base de cinco estrelas e pistão de elevação a gás
Inserir o pistão de elevação de gás na base de cinco estrelas e, em seguida, deslize a tampa do pistão sobre o próprio pistão.
JP 五本足ベースとガスシリンダー
ガスシリンダーを五本足ベースへ差し込んでカバーを被せます。
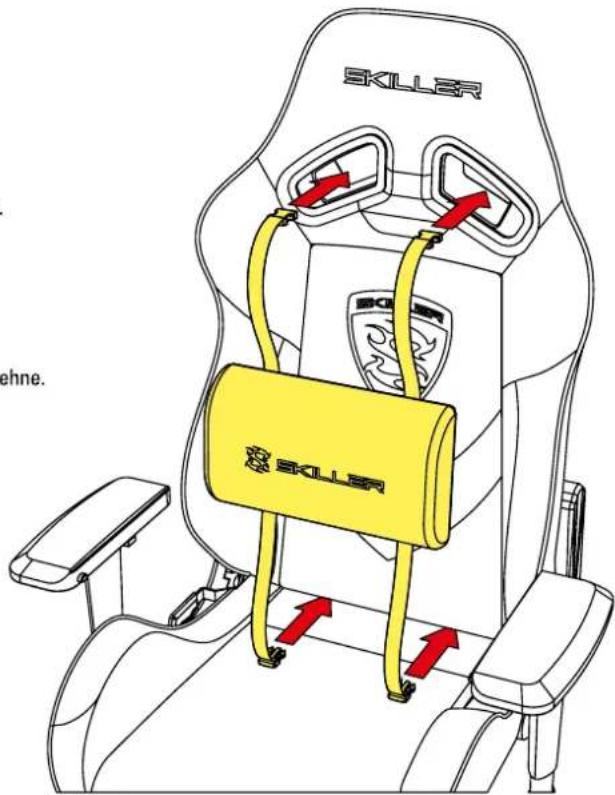
5 Optional Lumbar Cushion
EN Optional Lumbar Cushion
If desired, the provided lumbar cushion can be used.
To attach, pull the lumbar cushion straps through the backrest openings from front to back.
This can also be done after the chair is assembled.
DE Optionales Lendenkissen
Bei Bedarf kann das mitgelieferte Lendenkissen genutzt werden.
Ziehen Sie hierfür die Gurte des Lendenkissens von vorn durch die Öffnungen der Rückenlehne.
Dies ist ebenfalls bei bereits montiertem Stuhl möglich.
ES Cojín lumbar opcional
Si lo desea, puede usar el cojín lumbar proporcionado.
Para encajarlo, extienda las correas del cojín lumbar a través de las aperturas del respaldo, desde el frente hacia atrás.
Esto se puede hacer después de montar la silla.
CN 可拆卸式腰枕
如有需要,可使用随附的腰枕
請由前至後穿過椅背開孔並扣合
可在椅子組裝完畢之後進行
PT Almofada lombar opcional
Se desejado, a almofada lombar fornecida pode ser usada.
Para fixar, puxe as alças de almofada lombar através das aberturas do encosto da frente para trás.
Isso também pode ser feito depois que a cadeira estiver montada.

JP 取り外し可能なランバーサポートクッション
必要に応じて、付属のランバーサポートクッションを使用することができる。背もたれ部のホールと背もたれ部と座部の隙間に固定用バンドを通します。チェアを組み立てた後に行うことができます。
EN Optional Lumbar Cushion
To secure the cushion, connect both buckles from the bottom and top of the backrest.
DE Optionales Lendenkissen
Anschließend werden die Gurte von der Unterseite der Rückenlehne kommend mit denen auf der Rückseite verschlossen.
ES Cojín lumbar opcional
Para asegurar el cojín, conecte ambas hebillas por detrás del respaldo.
CN 可拆卸式腰枕
從椅背底部和頂部連接扣環以固定腰枕
PT Almofada lombar opcional
Para proteger a almofada, junte ambas as fivelas da parte inferior e superior do encosto.
JP 取り外し可能なランバーサポートクッション
背もたれの背面でバックルを止めてクッションを固定します。
6 Connect Seat Back with Seat Base
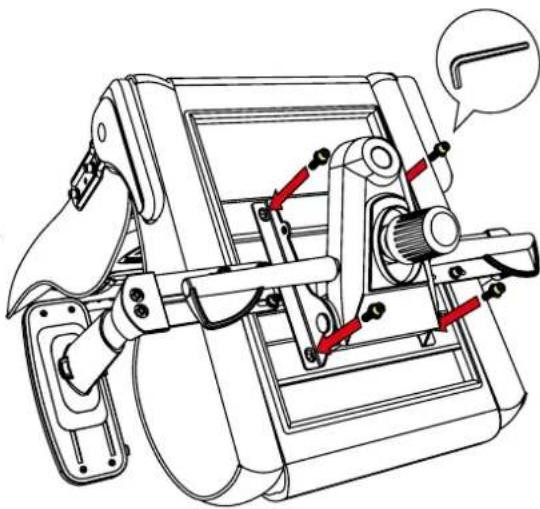
EN Connect Seat Back with Seat Base
Remove the four pre-installed M8 screws from the backrest using the M8 Allen wrench. Align the backrest and the rear of the seat base carefully according to the picture.
DE Rückenlehne und Sitzfläche verbinden
Drehen Sie die vier vorinstallierten M8 Schrauben mit dem M8 Innensechskantschlüssel aus der Rückenlehne. Richten Sie die Rückenlehne und die Sitzunterseite anschließend vorsichtig gemäß des Bildes aus.
ES Unión del respaldo del asiento con la base del asiento
Retire del respaldo los cuatro tornillos M8 preinstaladosusando la llave Allen hexagonal M8. Alinie el respaldo y la parte posterior de la base del asiento cuidadosamente de acuerdo con la imagen.
CN 連接椅背和坐墊
使用 M8 内六角板手從椅背上拆下預裝的四個 M8 螺絲根據圖片仔細將椅背和坐墊對齊
PT Juntar o assento com a base do assento
Remova os quatro parafusos M8 pré-instalados do encosto usando a chave Allen M8. Alinhe cuidadosamente o encosto a parte traseira da base do assento de acordo com a imagem.
JP 背もたれ部と座部の組み付け
アレンレンチで背もたれ部にある4つの仮止め M8 ネジを取り外します。図のように背もたれ部を座部の後部に慎重に合わせます。
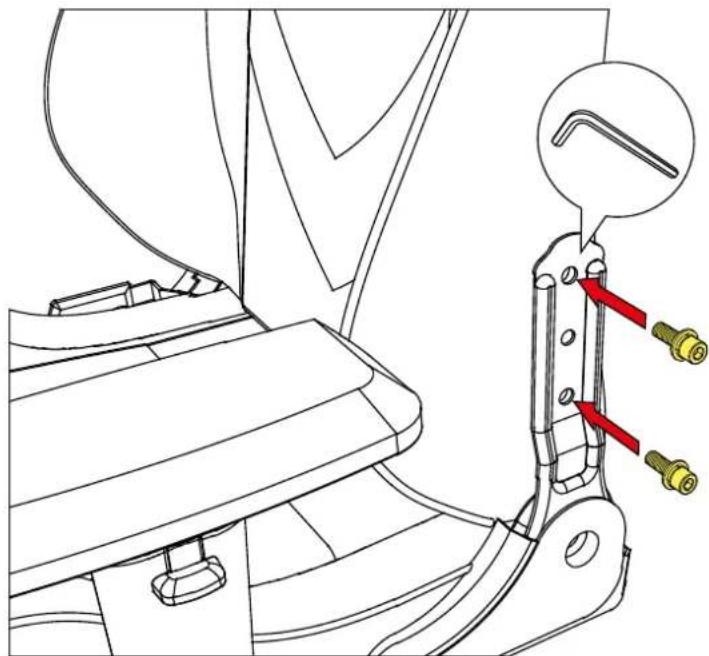
natural_image
Technical line drawing of a mechanical assembly with red arrows pointing to specific components (no text or symbols present)
EN Connect Seat Back with Seat Base
Now use the M8 Allen wrench and the previously removed M8 screws to attach the backrest to the seat base.
DE Rückenlehne und Sitzfläche verbinden
Benutzen Sie dann den M8 Innensechskantschlüssel und die herausgedrehten M8 Schrauben, um die Rückenlehne mit der Gelenkhalterung zu verschrauben.
ES Unión del respaldo del asiento con la base del asiento
Ahora, use la llave Allen hexagonal M8 y los tornillos M8 previamente retirados para unir el respaldo con la base del asiento.
CN 連接椅背和坐墊
使用 M8 内六角板手將之前拆下的 M8 螺絲鎖回以連接椅背和坐墊
PT Juntar o assento com a base do assento
Agora use a chave Allen M8 e os parafusos M8 removidos anteriormente para fixar o encosto à base do assento.
JP 背もたれ部と座部の組み付け
アレンレンチを使って座部と背もたれ部を前の手順で取り外したM8ネジで固定します。
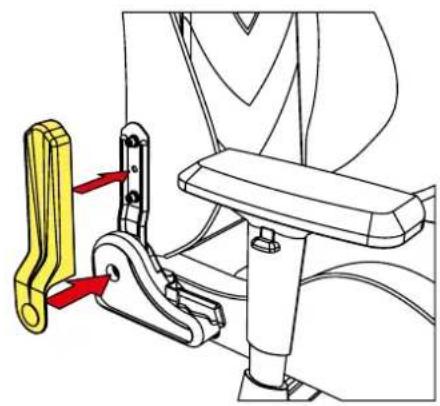
7 | Side Covers
natural_image
Mechanical assembly diagram showing a yellow bracket and mechanical components (no text or symbols)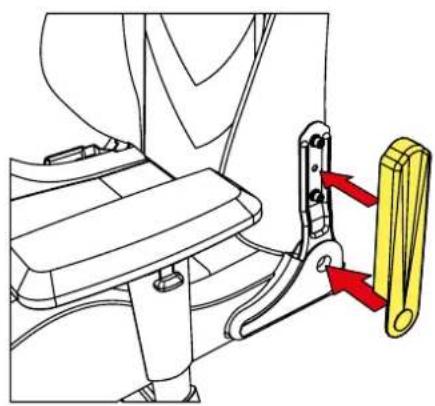
natural_image
Technical diagram of a vehicle seatbelt mechanism with a yellow clamp and red directional arrows indicating movement (no text or symbols present)EN Side Covers
Attach the side covers to the support brackets on the chair.
DE Seitenabdeckungen
Stecken Sie die Seitenabdeckungen anhand der dafür vorgesehenen Aussparungen auf die Gelenkhalterungen des Stuhls.
ES Cubiertas laterales
Adjunte las cubiertas laterales a las escuadras de soporte de la silla.
CN 側蓋
將側蓋裝到椅子上的托架上
PT Tampas laterais
Coloque as tampas laterais nos suportes da cadeira.
JP サイドカバー
チェアのサポートブラケットにサイドカバーを取り付けます。
8 Mechanism Mounting
EN Mechanism Mounting
Remove the four pre-installed M8 screws with the M8 Allen wrench from the bottom of the seat base. Align the chair mechanism according to the posted directions on the bottom of the seat base. Attach the chair mechanism by using the previously removed M8 screws.
DE Stuhlmechanik montieren
Drehen Sie die vier vorinstallierten M8 Schrauben mit dem M8 Innensechskantschlüssel aus der Sitzunterseite heraus. Richten Sie die Stuhlmechanik gemäß des Aufkebers auf der Sitzunterseite aus. Verschrauben Sie die Stuhlmechanik anschließend mit den herausgedrehten M8 Schrauben.
ES Mecanismo de montaje
Retire los cuatro tornillos M8 preinstalados usando la llave Allen hexagonal M8 desde la parte inferior de la base del asiento. Alinie el mecanismo de la silla de acuerdo a las direcciones especificadas en la parte inferior de la base del asiento. Adjunte el mecanismo de la silla usando los tornillos M8 previamente retirados.
CN 安装座椅調節機構
使用 M8 内六角板手從坐墊拆下預裝的四個 M8 螺絲根據圖片表示的方向將座椅調節機構和坐墊對齊將之前拆下的 M8 螺絲鎖回座椅調節機構上
natural_image
Technical line drawing of a mechanical device with red arrows indicating motion or force directions (no text or symbols present)PT Mecanismo de montagem
Remova os quatro parafusos M8 pré-instalados com a chave Allen M8 da parte inferior da base do assento. Alinhe o mecanismo da cadeira de acordo com as direções especificadas no fundo da base do assento. Fixe o mecanismo da cadeira usando os parafusos M8 removidos anteriormente.
JP 調整機構の取り付け
アレンレンチで座部隣側にある4つの仮止めM8ネジを取り外します。調整機構を所定の位置に合わせて座部隣側に固定します。調整機構を前の手順で取り外したM8ネジで取り付けます。
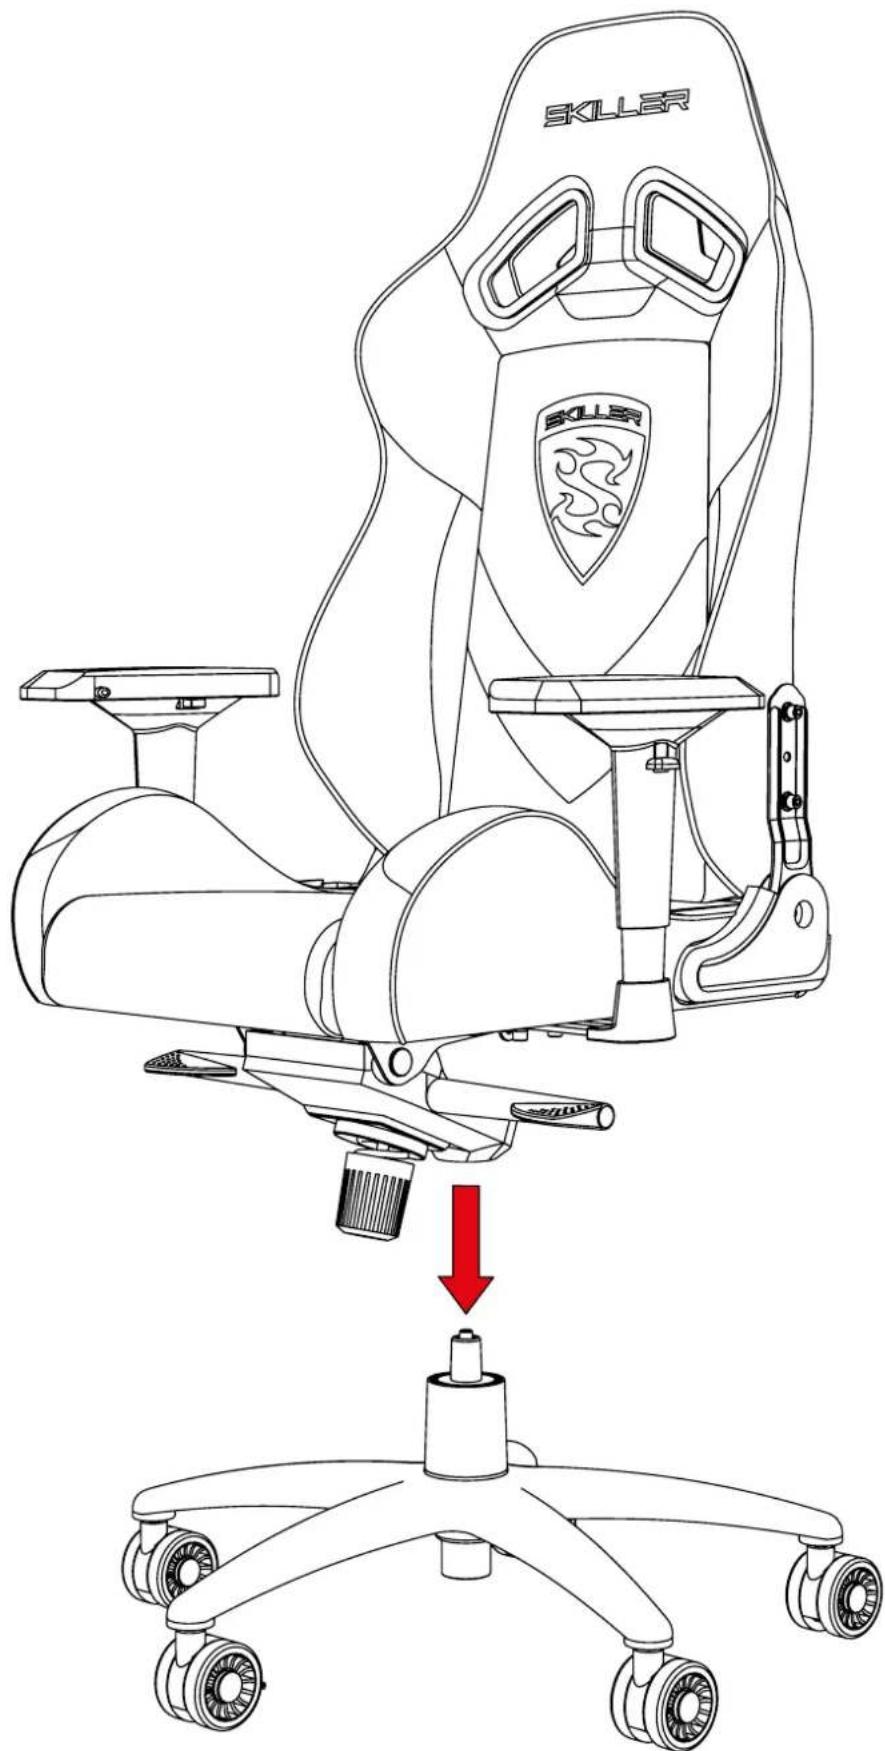
9 | Linking the Parts
EN Linking the Parts
Lastly, connect the base and chair by inserting the gas lift piston into the opening on the chair mechanism. The chair is now successfully assembled.
DE Teile zusammenführen
Stecken Sie abschließend die auf dem Fußkreuz montierte Gasdruckfeder in die vorgesehene Aussparung der Stuhlmechanik. Der Stuhl ist nun fertig zusammengebaut.
ES Uniendo las partes
Finalmente, conecte la base y la silla insertando el pistón de gas en la apertura del mecanismo de la silla. Ahora, el montaje de la silla ha finalizado por completo.
CN 組合部件
最後,將氣桿插入座椅調節機構的開口, 連接椅子和椅腳 這樣椅子就安裝完成了
PT Unindo as partes
Por último, encaixe a base e a cadeira, inserindo o pistão de elevação de gás na abertura do mecanismo. Agora, a montagem da cadeira está completa.
JP 部品の接合
最後にガスシリンダーを調整機構の穴に差し込んで取り付けます。 これでチェアの組み立ては完了です。
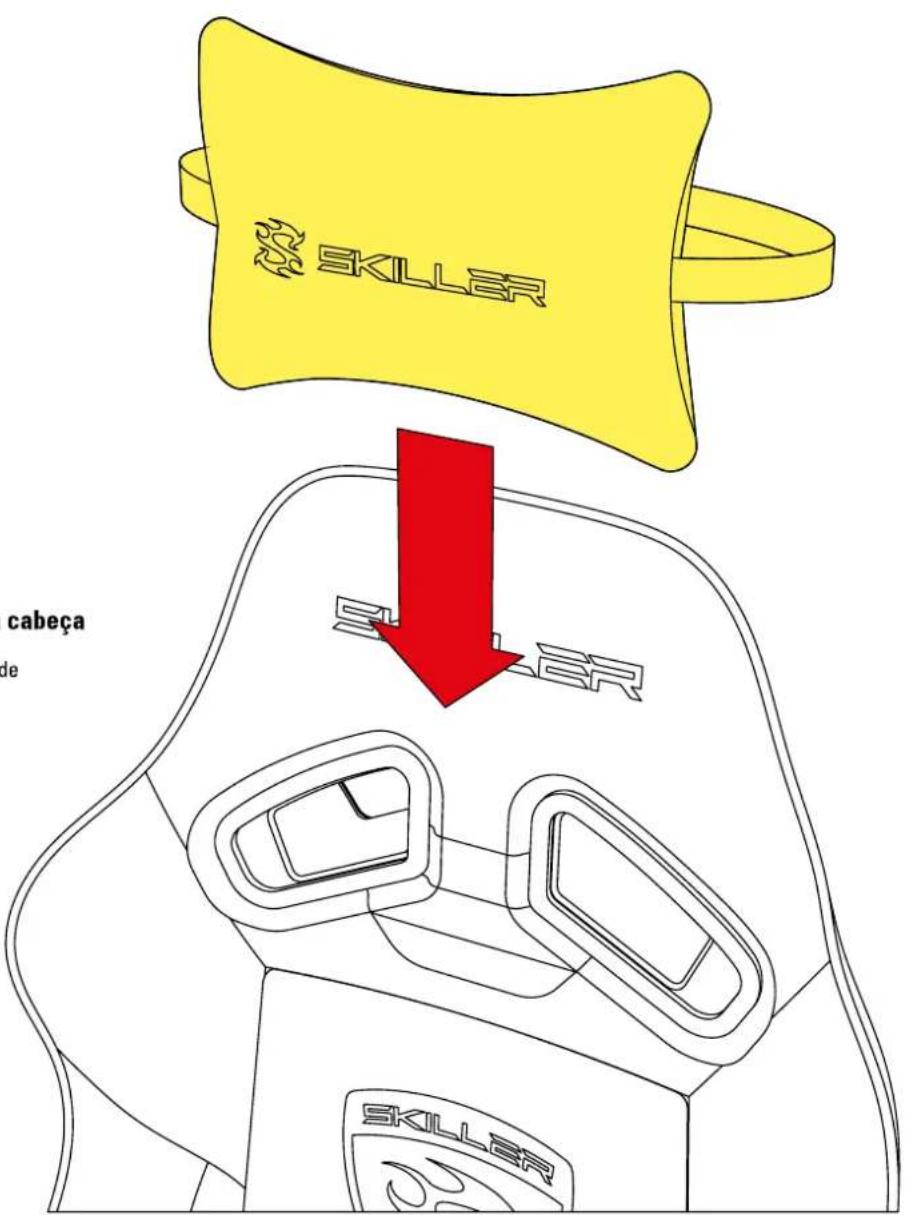
10 | Optional Headrest Cushion
EN Optional Headrest Cushion
If desired, the provided headrest cushion can be used. To do this, attach the cushion behind the backrest at the desired height.
DE Optionales Kopfkissen
Bei Bedarf kann das mitgelieferte Kopfkissen genutzt werden. Dazu befestigen Sie es auf gewünschter Höhe hinter der Rückenlehne.
ES Cojín reposacabezas opcional
Si lo desea, puede usar el cojín reposacabezas proporcionado. Para ello, encaje el cojín detrás del respaldo a la altura deseada.
CN 可拆卸式頭枕
如有需要,可以使用隨附的頭枕 將頭枕調整至想要的高度並在椅背後方固定
PT Almofada opcional de encosto para a cabeça
Se desejado, a almofada de encosto para a cabeça pode ser usada. Para fazer isso, coloque a almofada atrás do encosto na altura desejada.
JP 取り外し可能なヘッドクッション
必要に応じて、付属のヘッドクッションを使用することができる。 ヘッドクッションを取り付けます。 そのままかぶせてお好みの 位置に調整します。
11 Seat Backrest Adjustment
natural_image
Mechanical assembly diagram showing a yellow component inserted into a blue bracket with a red arrow indicating direction (no text or symbols)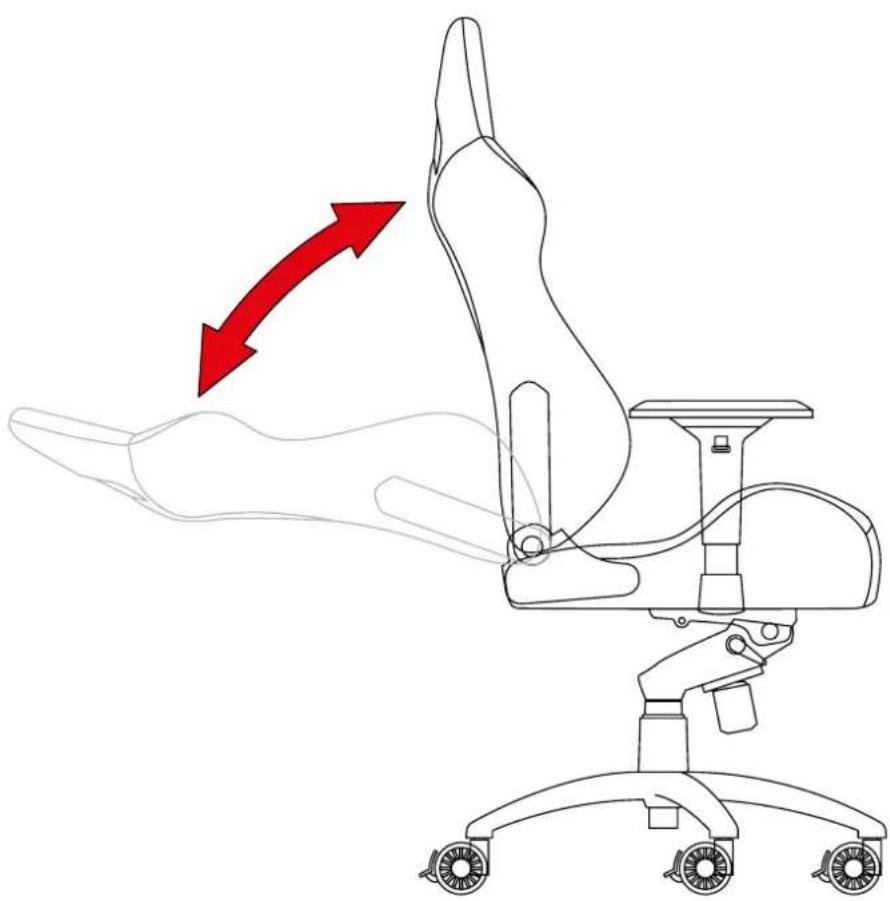
natural_image
Line drawing of an office chair with a red arrow indicating motion or movement, no text or symbols presentEN Seat Backrest Adjustment
To adjust the backrest, first pull the handle on the right-side of the seat base.
Lean forwards or backwards to tilt the backrest into the desired position.
Once the backrest is in the desired position, release the handle to lock the backrest into place.
DE Einstellen der Rückenlehne
Um die Rückenlehne anzupassen, ziehen Sie vorsichtig am Justierhebel an der rechten Gelenkhalterung.
Lehnen Sie sich entweder vor oder zurück, um die Rückenlehne in die jeweilige Position zu neigen. Lassen Sie den Justierhebel wieder los, wenn die Lehne in der gewünschten Position ist.
ES Ajuste del respaldo del asiento
Para ajustar el respaldo, primero tire del asa en la parte derecha de la base del asiento. Inclínese hacia adelante o hacia atrás para colocar el respaldo en la posición deseada. Una vez el respaldo está colocado en la posición deseada, suelte el asa para fijarlo en el lugar pertinente.
CN 調整椅背
要調整椅背的話,請拉起坐墊右側的調整桿向前或後傾斜椅背至所需的位置 當將椅背調整到想要的位置後, 鬆開調整桿使椅背定位
PT Ajuste do assento
Para ajustar o encosto, primeiro puxe a alavanca no lado direito da base da cadeira.
Incline para frente ou para trás para ajustar o encosto na posição desejada.
Uma vez que o encosto estiver na posição desejada, solte a alça para travar o encosto no lugar.
JP 背もたれの角度調整
背もたれの角度を調整したい場合、 まずは座部の右にあるハンドルを引きます。 背もたれを前方か後方かへ傾けて、 ご希望の位置に調整します。 ご希望の角度になったら、 ハンドルを離してそのままで固定します。
12 Seat Height Adjustment
EN Seat Height Adjustment
The seat height can be adjusted via the right handle underneath the seat base.
The chair will move into a lower position if simultaneous pressure is placed
on the seat base surface while the handle is pulled.
The chair will move into a higher position if no simultaneous pressure
is placed on the seat base surface while the handle is pulled.
Once the seat is at the desired height, release the handle to lock the seat into place.
DE Einstellen der Sitzhöhe
Die Höhe des Stuhls wird mittels des Justierhebels
rechts unterhalb der Sitzfläche angepasst.
Wird nach Betätigung des Justierhebels Druck auf
die Sitzfläche ausgeübt, fährt der Stuhl in eine tiefere Position.
Die Betätigung des Justierhebels, ohne gleichzeitigen Druck auf
der Sitzfläche, fährt den Stuhl in eine höhere Position.
Wenn der Stuhl in der gewünschten Höhe ist, lassen Sie
den Justierhebel los, um die Sitzfläche zu sperren.
ES Ajuste de la altura del asiento
La altura del asiento se puede ajustar a través del asa
derecho situado debajo de la base del asiento.
La silla desciende a una posición baja si aplicamos simultáneamente
presión sobre la superficie del asiento al tirar del asa.
La silla alcanza altura si no aplicamos simultáneamente presión
sobre la superficie del asiento al tirar del asa.
Una vez el asiento está colocado a la altura deseada,
suelte el asa para fijarlo en el lugar pertinente.
CN 坐墊高度調整
坐墊高度可藉由坐墊下方右側的調整桿來調整
如果再拉起調整桿時對坐墊表面施加壓力,坐墊將移動到較低的位置
如果再拉起調整桿時對坐墊表面不施加壓力,坐墊將移動到較高的位置
當坐墊調整到想要的位置後,鬆開調整桿讓坐墊定位
PT Ajuste da altura da cadeira
A altura da cadeira pode ser ajustada através da alavanca
do lado direito por baixo da base do assento.
A cadeira se move para uma posição mais baixa se aplicar
pressão sobre o assento, puxando a alavanca simultaneamente.
A cadeira vai para uma posição mais elevada se não houver pressão
simultânea no banco enquanto a alavanca é puxada.
Uma vez que a cadeira estiver na altura desejada,
solte a alavanca para travar o assento no lugar.
JP 座面の高さ調整
座部右下のレバーで座面の高さを調整します。
レバーを引きながら座面に圧力をかけると、チェアが低くなります。
圧力をかけない場合、チェアが高くなります。
ご希望の高さになったら、レバーを離して座面がそのままで止まります。
natural_image
Diagram of a mechanical assembly with a yellow component and red arrow indicating motion (no text or symbols)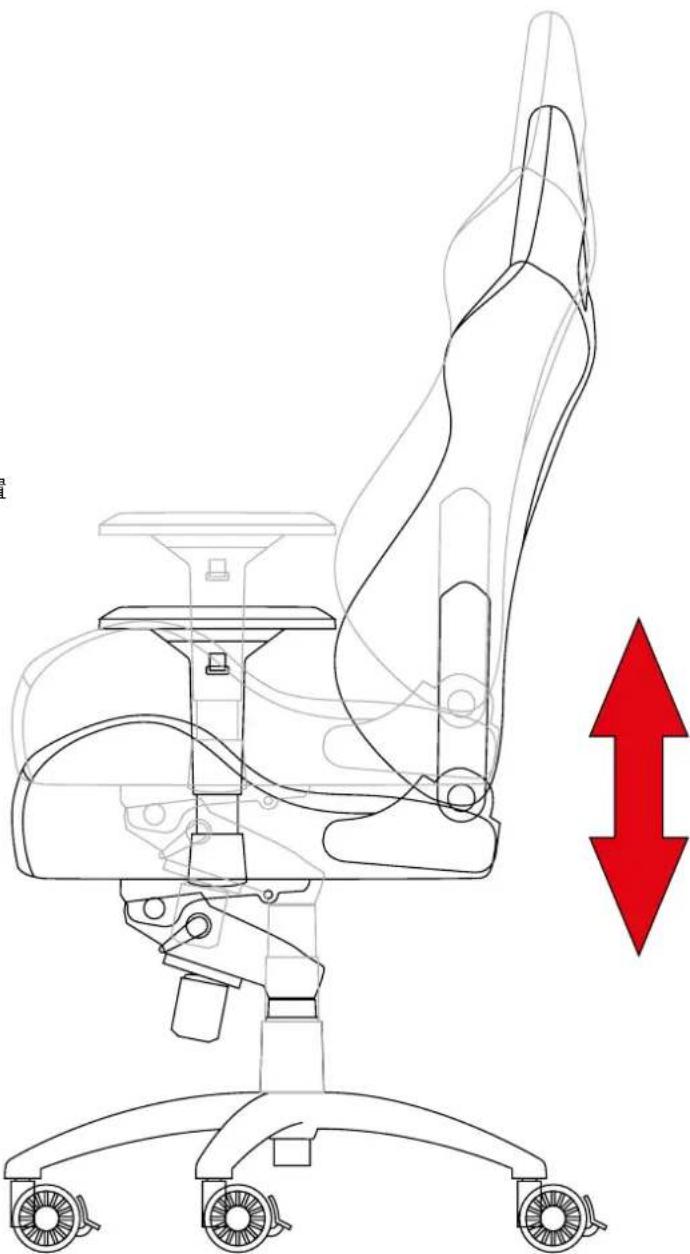
natural_image
Line drawing of an office chair with a red double-headed arrow indicating vertical motion (no text or symbols)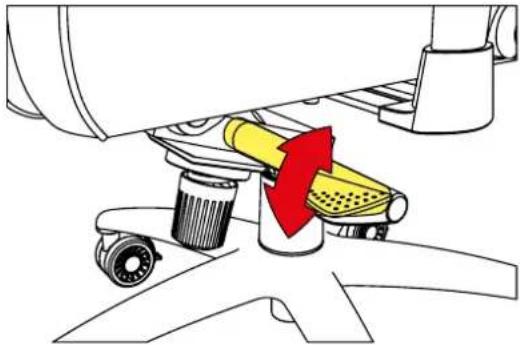
natural_image
Diagram of a mechanical device with a yellow component and red arrow indicating motion (no text or symbols)CN 傾斜機構調整
在調整傾斜機構時,可透過座椅下方左側的調整桿來調整 當調整桿向上扳時,傾斜機構將解鎖 當調整桿向下扳時,傾斜機構將鎖住 椅背可以固定在數個位置
PT Ajuste do mecanismo de inclinação
O mecanismo de inclinação pode ser ajustado através da alavanca esquerda debaixo da base do assento. O mecanismo de inclinação é destravado quando a alavanca for puxada para cima. O mecanismo de inclinação é travado quando a alavanca for puxada para baixo. A cadeira pode ser travada em várias posições.
JP ロッキング機能の調節
座部左下のレバーでロッキング機能を調整します。 レバーが上方向に引かれると、ロッキングのロックが解除されます。 レバーが下方向に引かれると、ロッキングがロックされます。 背もたれはいくつかの位置でロックされることが可能です。
natural_image
Diagram of a mechanical device with a yellow component and red directional arrows indicating motion (no text or symbols)PT Ajuste do mecanismo de inclinação
A resistência do mecanismo de inclinação também pode ser ajustada através do botão giratório localizado embaixo do assento. Enquanto estiver sentado na cadeira, gire o botão para a direita para diminuir a resistência ou para esquerda para aumentar a resistência.
JP ロッキング機能の調節
座部下の回転ノブでロッキング反力の調節ができます。チェアに座る状態で、ノブを右に回して反力を弱くさせ、左に回して反力を強くさせます。
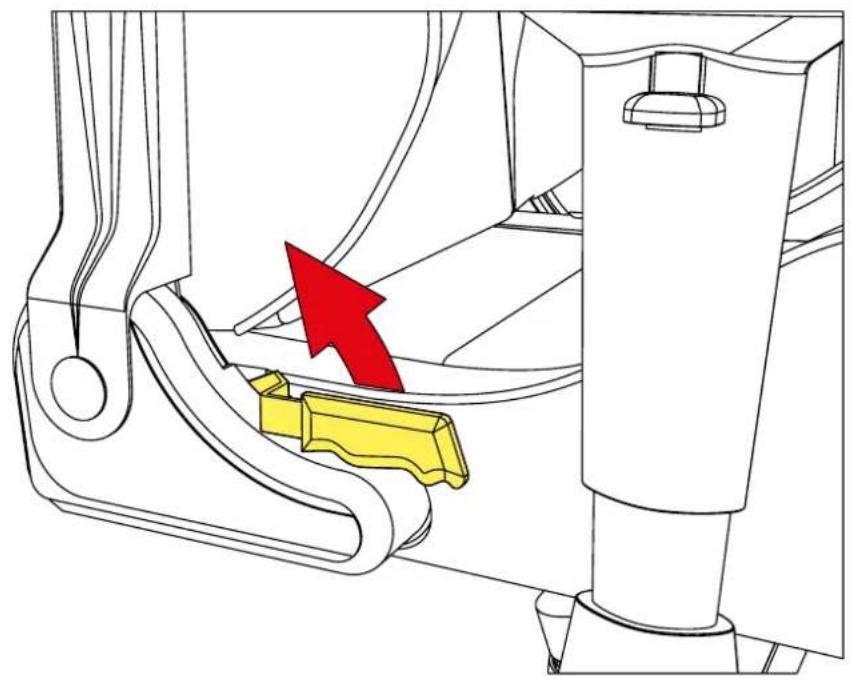
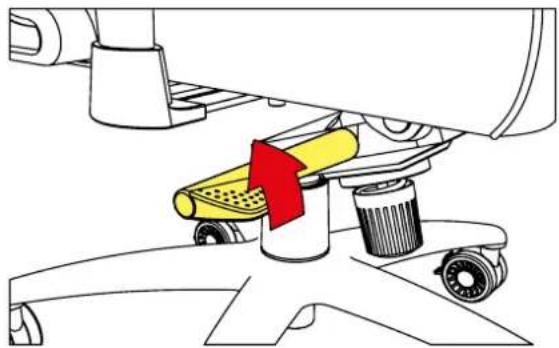
13 Tilt Mechanism Adjustment
EN Tilt Mechanism Adjustment
The tilt mechanism can be adjusted via the left handle underneath the seat base. The tilt mechanism is unlocked when the handle is pulled upwards. The tilt mechanism is locked when the handle is pulled downwards. The backrest can be locked into several positions.
DE Einstellen der Wippmechanik
Die Wippmechanik lässt sich am Justierhebel links unterhalb der Sitzfläche anpassen. Wird der Justierhebel nach oben gekippt, ist die Wippmechanik entsperrt. Wird der Justierhebel wieder nach unten gekippt, wird die Wippmechanik wieder gesperrt. Die Rückenlehne kann so in mehreren Positionen arretiert werden.
ES Ajuste del mecanismo de inclinación
El mecanismo de inclinación se puede ajustar a través del asa izquierdo situado debajo de la base del asiento. El mecanismo de inclinación se desbloquea al tirar del asa hacia arriba. El mecanismo de inclinación se bloquea al tirar del asa hacia abajo. El respaldo se puede bloquear en varias posiciones.
EN Tilt Mechanism Adjustment
Tilt mechanism resistance can also be adjusted via means of the rotary knob located underneath the seat. While sitting on the chair, turn the knob right to decrease the resistance and left to increase resistance.
DE Einstellen der Wippmechanik
Am Drehknopf auf der Sitzunterseite kann zusätzlich der Widerstand der Wippmechanik eingestellt werden. Drehen Sie den Knopf während des Sitzens auf dem Stuhl nach rechts, um den Widerstand zu verringern und nach links, um ihn zu erhöhen.
ES Ajuste del mecanismo de inclinación
La resistencia del mecanismo de inclinación se puede ajustar por medio del mando rotatorio situado debajo del asiento. Mientras está sentado en la silla, gire el mando hacia la derecha para disminuar la resistencia y a la izquierda para aumentar la resistencia.
CN 傾斜機構調整
傾斜機構的阻力可藉由坐墊下方的旋鈕調整當坐在椅子上時,向右旋轉旋鈕可減少阻力,向左旋轉則可增加阻力
14 Adjustment of Armrests
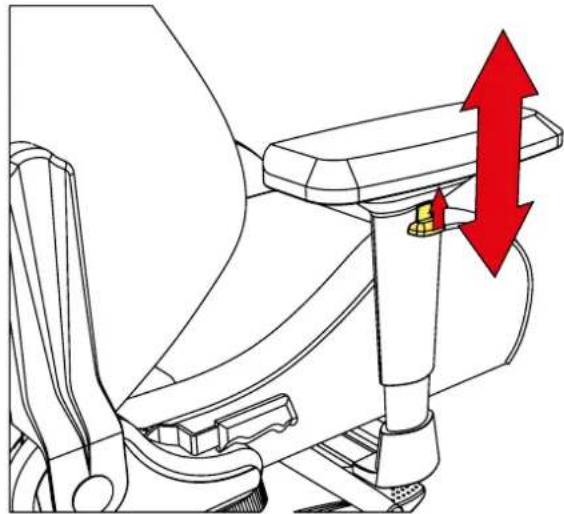
EN Adjustment of Armrests
To adjust the armrest height, pull the handle upwards. While holding the handle, the armrest can be moved upwards and downwards to the desired position. Once the armrest is in the desired position, release the handle to lock the armrest into place.
DE Einstellen der Armlehnen
Um die Höhe der Armlehne zu verstellen, ziehen Sie den Knopf an der äußeren Seite nach oben. Die Armlehne lässt sich nun bei gehaltenem Knopf vertikal auf die gewünschte Position verschieben. Lassen Sie den Knopf wieder los, wenn die Armlehne in der gewünschten Position ist, um sie zu sperren.
ES Ajuste de los reposabrazos
Para ajustar la altura del reposabrazos, tire del asa hacia arriba. Mientras sujeta el asa, el reposabrazos se puede mover hacia arriba y hacia abajo hacia la posición deseada. Una vez el reposabrazos está colocado en la posición deseada, suelte el asa para fijarlo en el lugar pertinente.
CN 調整扶手
如要調整扶手高度,請將調整桿向上拉 在拉起調整桿的同時,將扶手向上或下移動到想要的位置 當扶手調整到想要的位置後,鬆開調整桿讓扶手定位
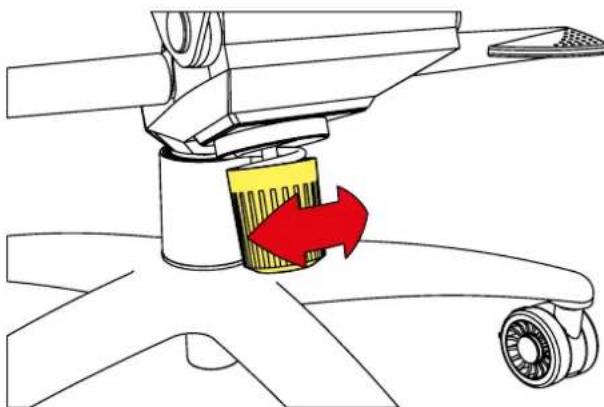
EN Adjustment of Armrests
The armrest can also be moved horizontally by pressing and holding the middle button located inside of the armrest. Release the button to lock the armrest into desired position.
DE Einstellen der Armlehnen
Horizontal lässt sich die Armlehne ebenso bei gedrücktem mittleren Knopf auf der Innenseite verschieben. Um die Armlehne in der gewünschten Position zu sperren, lassen Sie den Knopf wieder los.
ES Ajuste de los reposabrazos
El reposabrazos también se puede mover horizontalmente presionando continuamente el botón del medio situado dentro del reposabrazos, con el pulgar. Suelte el botón para fijar el reposabrazos en la posición deseada.
CN 調整扶手
藉由按下扶手內側中間的按鈕,可讓扶手水平移動當扶手調整到想要的位置後,鬆開按鈕讓扶手定位
natural_image
Technical diagram of a mechanical device with red directional arrows indicating movement or force (no text or symbols present)PT Ajuste do apoio para os braços
Para ajustar a altura do apoio de braço, puxe a alavanca para cima. Enquanto segura a alavanca, o apoio de braço pode ser movido para cima e para baixo para a posição desejada. Uma vez que o apoio de braço estiver na posição desejada, solte a alavanca para travar o apoio de braço.
JP アームレストの調整
ハンドルを上方向に引いてアームレストの高さを調整します。 ハンドルを引きながら、アームレストを上下に動かして高さを調整します。 お好みの高さになったら、ハンドルを離してアームレストの位置を固定します。
natural_image
Diagram of a car's seat and arm mechanism with red arrows indicating motion (no text or symbols)PT Ajuste do apoio para os braços
O apoio de braço também pode ser movido horizontalmente, pressionando e segurando o botão do meio localizada dentro do apoio de braços. Solte o botão para travar o braço na posição desejada.
JP アームレストの調整
アームレストの内側にある中央ボタンを押し続けて、 アームレストを水平に移動させることができます。 ボタンを離してアームレストをご希望の位置にロックします。
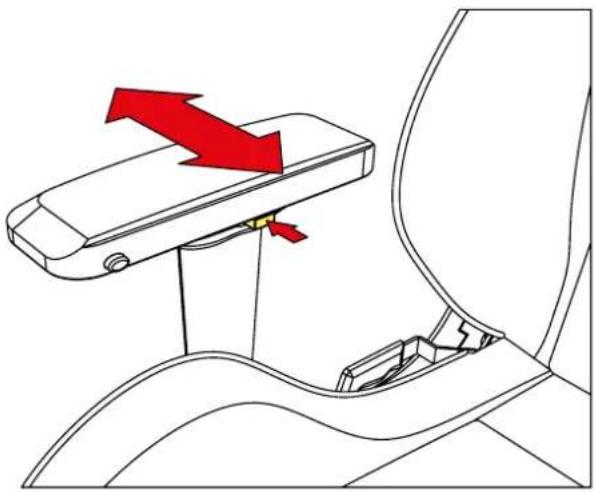
EN Adjustment of Armrests
The armrest can be moved back and forth by pressing and holding the front button located inside of the armrest. Release the button to lock the armrest into desired position.
DE Einstellen der Armlehnen
Wird der vordere Knopf auf der Innenseite gedrückt und gehalten, kann die Armlehne vor und zurück bewegt werden. Lassen Sie den Knopf los, wenn die Armlehne in der gewünschten Position ist.
ES Ajuste de los reposabrazos
El reposabrazos se puede mover hacia adelante y hacia atrás presionando continuamente el botón del frente situado dentro del reposabrazos. Suelte el botón para fijar el reposabrazos en la posición deseada.
CN 調整扶手
透過按下扶手內側前方的按鈕, 可以前後移動扶手位置 當扶手調整到想要的位置後, 鬆開按鈕讓扶手定位
natural_image
Line drawing of a car seatbelt mechanism with red arrows indicating motion direction (no text or symbols)PT Ajuste do apoio para os braços
O apoio do braço pode ser movido para trás e para frente, pressionando e segurando o botão frontal localizado dentro do apoio de braços. Solte o botão para travar o braço na posição desejada.
JP アームレストの調整
アームレストの内側にあるフロントボタンを押し続けて、 アームレストを前後に移動させることができます。 ボタンを離してアームレストをご希望の位置にロックします。
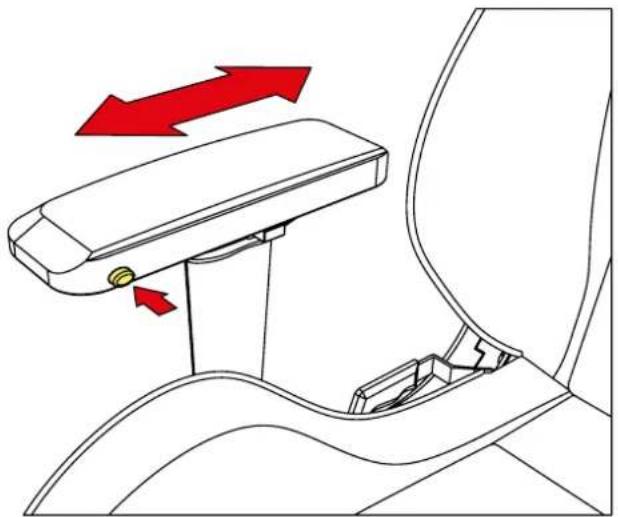
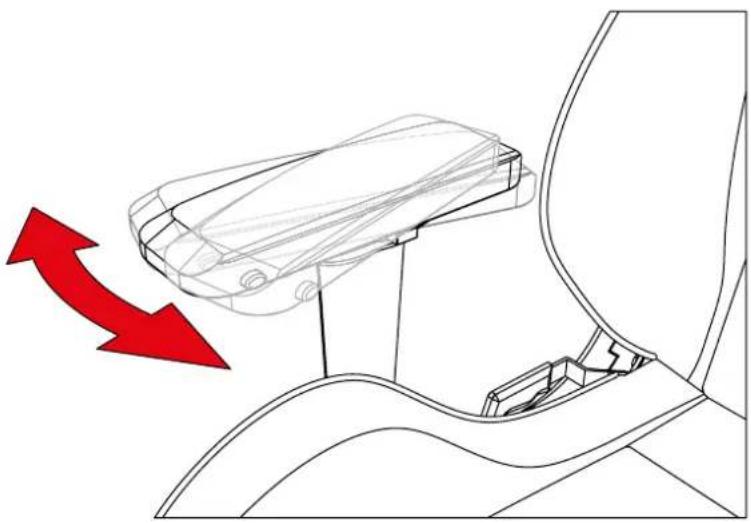
EN Adjustment of Armrests
The armrest can be tilted inwards and outwards without the use of a button.
DE Einstellen der Armlehnen
Es ist ohne die Betätigung eines Knopfes zudem jederzeit möglich, die Armlehnen weiter nach innen oder außen zu neigen.
ES Ajuste de los reposabrazos
El reposabrazos se puede inclinar hacia dentro o hacia afuera sin el uso de ningún botón.
CN 調整扶手
扶手可以調整向內或向外傾斜,不需使用按鈕
PT Ajuste do apoio para os braços
O apoio de braço pode ser inclinado para dentro e para fora sem o uso de um botão.
JP アームレストの調整
ボタンを使わずにアームレストの向きを調整することができます。内側・外側へと動かせます。
natural_image
Diagram of a car's seatbelt mechanism with red directional arrow indicating motion (no text or symbols)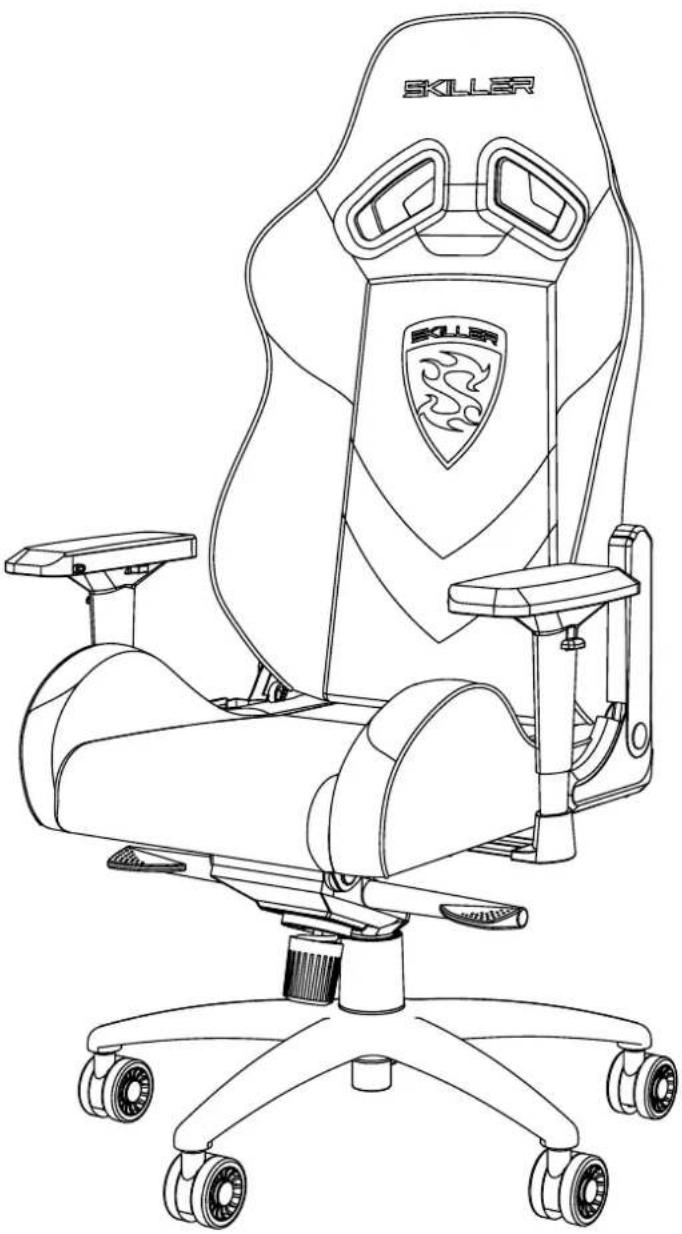
natural_image
Line drawing of a SKILLER VR head studio chair with two front seats and a shield emblem (no text or symbols on the chair body)SHARKOON Technologies GmbH
Siemensstraße 38
35440 Linden
Germany
© SHARKOON Technologies 2017
info@sharkoon.com
www.sharkoon.com