
BASF1415 - Ventilator BIONAIRE - Gratis brugsanvisning og manual
Find enhedens vejledning gratis BASF1415 BIONAIRE i PDF-format.


Brugerspørgsmål om BASF1415 BIONAIRE
0 spørgsmål om dette apparat. Besvar dem du kender, eller stil dit eget.
Stil et nyt spørgsmål om dette apparat
Download vejledningen til din Ventilator i PDF-format gratis! Find din vejledning BASF1415 - BIONAIRE og tag din elektroniske enhed tilbage i hånden. På denne side er alle dokumenter nødvendige for brugen af din enhed offentliggjort. BASF1415 af mærket BIONAIRE.
BRUGSANVISNING BASF1415 BIONAIRE
GUARANTEE
Please keep your receipt as this will be required for any claims under this guarantee.
This appliance is guaranteed for 3 years after your purchase as described in this document.
During this guaranteed period, if in the unlikely event the appliance no longer functions due to a design or manufacturing fault, please take it back to the place of purchase, with your till receipt and a copy of this guarantee.
The rights and benefits under this guarantee are additional to your statutory rights, which are not affected by this guarantee. Only Holmes Products (Europe) Ltd. ("Holmes") has the right to change these terms.
Holmes undertakes within the guarantee period to repair or replace the appliance, or any part of appliance found to be not working properly free of charge provided that:
- you promptly notify the place of purchase or Holmes of the problem; and
• the appliance has not been altered in any way or subjected to damage, misuse, abuse, repair or alteration by a person other than a person authorised by Helmer.
Faults that occur through, improper use, damage, abuse, use with incorrect voltage, acts of nature, events beyond the control of Holmes, repair or alteration by a person other than a person authorised by Holmes or failure to follow instructions for use are not covered by this guarantee. Additionally, normal wear and tear, including, but not limited to, minor discoloration and scratches are not covered by this guarantee.
The rights under this guarantee shall only apply to the original purchaser and shall not extend to commercial or communal use.
If your appliance includes a country-specific guarantee or warranty insert please refer to the terms and conditions of such guarantee or warranty in place of this guarantee or contact your local authorized dealer for more information.
Waste electrical products should not be disposed of with Household waste. Please recycle where facilities exist. E-mail us at enquiriesEurope@jardencs.com for further recycling and WEEE information.
Holmes Products (Europe) Limited
1 Francis Grove
London
SW19 4DT
UK


BIONAIRE
Holmes Products (Europe) Ltd.
1 Francis Grove
London SW19 4DT
England
Fax: +44 (0)20 8947 8272
Email: enquiriesEurope@jardencs.com
Website address: www.bionaire.com UK - Free phone Customer Service Helpline - 0800 052 3615
By Steven Bauer at 8:18 am, Jun 09, 2009
CE
© 2009 Sunbeam Products, Inc. doing business as Jarden Consumer Solutions. All rights reserved. Distributed by Holmes Products (Europe) Ltd., 1 Francis Grove, London SW19 4DT, United Kingdom. Printed in PRC
123632/9100010011103
BASF1415IUK09EM1

BIONAIRE®
pure indoor living

natural_image
Exterior view of a standing fan with visible blades and a model label (BASF1415) against a grassy background (no text on fan or stand)MODEL: BASF1415
INSTRUCTION MANUAL
BASF1415 Fig. 1
U.K. AND IRELAND
PLEASE READ AND SAVE THESE INSTRUCTIONS
IMPORTANT INSTRUCTIONS
When using electrical appliances, basic safety precautions should always be taken including the following:
- Use the fan only for purposes described in
the instruction manual. To protect against electrical shock, do not
• To protect against electrical shock, do not immerse the fan, plug or cord in water or
imniorse the ran, plug of cord in water or spray with liquids.
- Close supervision is necessary when any
appliance is used by or near children.
- Unplug from the electrical outlet when not in use, when moving the fan from one location
use, when moving the fan from one location to another, before putting on or taking off
parts and before cleaning.
- Avoid contact with any moving parts.
- Do not operate in the presence of explosive and/or flammable fumes
• Do not place the fan or any parts near an o
Do not place the ran or any parts near an open flame, cooking or other heating appliance.
- Do not operate any appliance with a damaged
cord, plug, after the appliance malfunctions,
or has been dropped/damaged in any manner. The use of attachments not recommended or
• The use of attachments not recommended or sold by the appliance manufacturer may
cause hazards.
- Do not use outdoors.
- Do not let the cord hang over the edge of a table
• To disconnect from the electrical supply, grip
To disconnect from the electrical supply, the plug and pull from the wall outlet.
DO NOT pull on the cord.
• Always use on a dry, level surface.
- Do not operate without the fan grills properly in place.
• This product is intended for household use
ONLY and not for commercial or industrial
applications.
• If the supply cord or plug is damaged, it must be replaced by the manufacturer or its service
be replaced by the manufacturer of its service agent or a similarly qualified person in order.
to avoid hazard.
• This appliance is not intended for use by
persons (including children) with reduced
physical, sensory or mental capabilities, or lack of experience and knowledge, unless
lack of experience and knowledge, unless they have been given supervision or
instruction concerning use of the appliance by
a person responsible for their safety. Children
should be supervised to ensure that they do not play with the appliance.
not play with the appliance.
MISSING A PART FOR YOUR FAN?
Please call 0800 052 3615 for assistance.
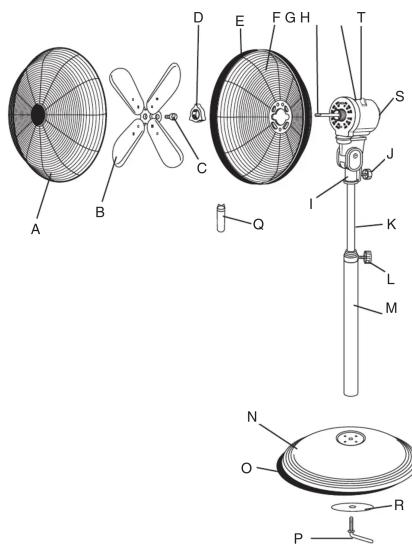
ASSEMBLY INSTRUCTIONS (See Fig 4)
ASSEMBLY INSTRUCTIONS (See Fig 1.)
Base/Pole assembly You will need the base cover (N) weight (O).
You will need the base cover (N), weight (O), pole (K, M), washer (R) and L-shaped locking
pole (R,M), wax lever (P).
- Turn the base cover upside down and place
the weight into the base cover.
- Insert the threaded end of the L-shaped
locking lever into the hole of the wa weight and through the hose cover
weight and through the base cover. 2. Whilst holding the base cover and weight with
- whilst holding the base cover and weight with one hand, connect the pole to the base, sliding
one hand, connect the pole to the base, sliding the L-shaped locking lever into the bottom of
the E-shaped looking lever into the pole (M) with your other hand.
- Turn the L-shaped locking lever clockwise to
securely attach the pole to the base.
- Set the base on the floor, weight side down.
Fan head assembly
You are now ready to assemble the fan head
- Unscrew rear grill mounting nut (D) before positioning the rear grill (E) over the motor
positioning the rear grill (F) over the motor shaft (G) making certain that the notches at
shall (G) making certain that the hotches at the top and bottom of the rear grill. fit over the
prongs on the motor housing (H).
- Secure the rear grill in its place using the rear
grill mounting nut (D). Turn this nut clockwise
and tighten firmly.
- Slide the fan blade (B) with the hollowed interior of the blade facing toward the rear
Interior of the blade facing toward the rear grill firmly onto the motor shaft. The top of the
grill, firmly broke the motor shaft. This top of the motor shaft should lie even with the centre of
the fan blade
- Now use the securing screw (C) (already
attached to the Fan Blade) to lock the blade into place. Tighten the screw into the side hole
into place. Tighten the screw into the side hole of the fan blade, against the motor shaft, until
both the blade and screw are secure.
- Centre the front grill (A) by aligning the Bionaire
logo on the logo plate so that it is horizontal
and parallel with the floor. Then, holding the front grill against the rear grill, push the black
front grill against the rear grill, push the black grill ring (E) into place at the top and bottom of
grilling (E) into place at the top and bottom of the fan. (Push directly on the black grill ring.
not on the grills themselves). Finish securing
the grill ring in the same manner until both
grills are joined underneath the black ring.
Final assembly
- Slide the inner pole extension (K) up from the
outer pole (M). Insert the pole locking knob (L) into the hole on the outer pole to securely.
into the hole on the outer pole, to securely hold this position.
- Place the fan hea
pole, inserting the neck of the fan into the pole
opening. Turn the fan head's neck until the
head is securely locked into place.
- Add the tilt adjustment knob (J) to the hole in the fan head's neck (I). Tighten when the fan
the fair head's neck (1). Tighten when the fair head is in your desired position.
Head is in your desired position. Converting to a table fan -
On model BASE1415 an additional short pole
(Q) is supplied which allows the fan to be
converted into a table fan. To change to this
short pole, remove the fan head assembly from its position on top of the inner pole and uparrow.
its position on top of the inner pole and unsure the L-shaped locking lever at the base. Remov
OPERATING INSTRUCTIONS
-
Set the fan base on a dry level surface
-
Make sure the Selector (Speed) Control (S) is
in the OFF(0) position. Selector (Speed) Control (S) is located on the top of the fan
Control (3) is to motor housing.
- Plug the cord into a suitable 220-240V, AC
outlet
- The SPEED is adjusted by turning the Selector
(Speed)
6-III-II-I.
- The OSCILLATION control (T) is located on
the top of the fan motor housing. To start oscillation, push the control knob down. To
oscillation, push the control knob down. Stop oscillation, pull the control knob up
ADJUST
ADJUSTMENT Tilt adjustment
Follow these instructions to tilt the fan head for
upward angle air movement
- To change the tilting angle of the fan head,
simply loosen the tilt adjustment knob (J)
- Move the fan head to the desired angle, the firmly tighter than the back to lock in glass.
firmly tighten the knob to lock in place.
Height adjustment
Follow these instructions to adjust the height of
the fan.
- Turn the pole locking knob (L) anti-clockwise
to loosen the pole.
- Adjust the pole to the desired height and firmly tighten the locking knob in a clock
himly tighten the looking knob in a clockwise direction.
CLEANING AND MAINTENANCE
CLEANING AND MAINTENANCE Follow these instructions to correctly at
I follow these instructions to correctly and safely care for your Bionaire® fan. Please remember:-
• Always unplug the fan before cleaning or
Always an assembly.
- Do not allow water to drip on or into the fan
motor housing.
- Be sure to use a soft cloth, moistened with a wild-ocean solution.
Mild soap solution.
• Do not use any of the following as a cleaner: petrol, thinners or benzene.
petrol, thinners of benzene
Fan Blade cleaning
(See instructions for fan head assembly)
-
To access the fan blade, remove the front grill and securing screw.
-
Clean the fan blad
-
Clean the fan blade, front and rear grills with a soft moist cloth.
-
Replace the fan blade, tighter
securely fasten the front grill.
Fan head, base and pole cleaning
Using a soft, moist cloth, with or without a mild
soap solution, carefully clean the fan base, pole and head. Please you caution around the pole
and head. Please use caution around the motor housing area. Do not allow the motor or other
electrical components to be exposed to water.
FAN STORAGE
Your fan can be stored either partially disassembled
or assembled.
It is important to keep it in a safe, dry location.
- If stored disassembled, we recommend the original (or appropriately sized) box
the original (or appropriately sized) box. If stored assembled or partially assembl
I stored assembled or partially assembled, remember to protect the fan head from dust
FOR UK AND IRELAND ONLY
FOR U.K. AND IRELAND ONLY
If the plug is not suitable for the socket outlets in
your home, it can be removed and replac
a plug of the correct type. Please refer to "Installation of a plug" below.
Installation of a plug below
Installation of a plug Applicable to
U.K. and Ireland

NOTE: If the terminals in the plug are not
marked or if you are unsure or in doubt about
the installation of the plug please contact a modified electrician.
qualified elec
If a 13A 3-pin plug is fitted, it must be an ASTA
approved plug, conforming to BS1363 standard.
Replacement 3A fuses must be BSI or
ASTABS1362 approved
This product is fitted with a 13A plug complying
to BS1363. If this plug is unsuitable or needs to be replaced, please note the following:
be replaced, please note the following:
The wires in the mains lead are coloured as such.
such:
BROWN - LIVE
BLUE - NEUTRAL
Please note that the colour of these mains wires
may not correspond with the colour markings
that identify the terminals in your plug. Please
proceed as follows
The BROWN coloured wire must be connected to the terminal which is marked with the letter.
to the terminal, which is marked with the letter "1" or in coloured RED.
L of is coloured RED
The BLUE coloured wire must be connected to
the terminal, which is marked with the letter "N
or is coloured BLACK.
DO NOT CONNECT either of these wires to the
earth terminal in the plug. The earth terminal
plug is marked with the letter "E", or with the earth symbol, or colored GREEN, as
earth symbol ⚙, or coloured GREEN, or GREEN and YELLOW



- GUARANTEE
- BIONAIRE
- CE
- BIONAIRE®
- INSTRUCTION MANUAL
- U.K. AND IRELAND
- PLEASE READ AND SAVE THESE INSTRUCTIONS
- IMPORTANT INSTRUCTIONS
- Final assembly
- OPERATING INSTRUCTIONS
- ADJUSTMENT Tilt adjustment
- Height adjustment
- CLEANING AND MAINTENANCE
- CLEANING AND MAINTENANCE Follow these instructions to correctly at
- Fan Blade cleaning
- FAN STORAGE
- FOR UK AND IRELAND ONLY
- FOR U.K. AND IRELAND ONLY
Mærke : BIONAIRE
Model : BASF1415
Kategori : Ventilator