
PS-LX22C - Pladespiller SONY - Gratis brugsanvisning og manual
Find enhedens vejledning gratis PS-LX22C SONY i PDF-format.


Brugerspørgsmål om PS-LX22C SONY
0 spørgsmål om dette apparat. Besvar dem du kender, eller stil dit eget.
Stil et nyt spørgsmål om dette apparat
Download vejledningen til din Pladespiller i PDF-format gratis! Find din vejledning PS-LX22C - SONY og tag din elektroniske enhed tilbage i hånden. På denne side er alle dokumenter nødvendige for brugen af din enhed offentliggjort. PS-LX22C af mærket SONY.
BRUGSANVISNING PS-LX22C SONY
SONY®
STEREO TURNTABLE SYSTEM
PS-LX22/LX22C
OPERATING INSTRUCTIONS
Before operating the unit, please read this manual thoroughly. This manual should be retained for future reference.
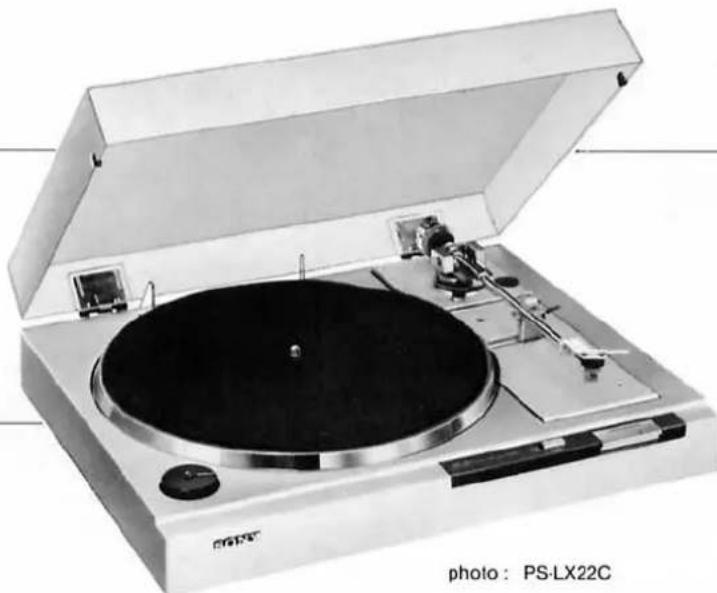
natural_image
Exterior view of a vintage typewriter with open lid and black disc (no visible text or symbols)photo: PS-LX22C
This instruction manual covers the PS-LX22 and PS-LX22C.
The PS-LX22 is not supplied with a cartridge, while the PS-LX22C is supplied with a VL-5 cartridge.
When differences occur, they are clearly described in the appropriate sections.
OWNER'S RECORD
The model and serial numbers are located at the rear. Record these numbers in the spaces provided below. Refer to them whenever you call upon your Sony dealer regarding this product.
Model No. ____ Serial No. ____
WARNING
To prevent fire or shock hazard, do not expose the unit to rain or moisture.


This symbol is intended to alert the user to the presence of uninsulated "dangerous voltage" within the product's enclosure that may be of sufficient magnitude to constitute a risk of electric shock to persons.

This symbol is intended to alert the user to the presence of important operating and maintenance (servicing) instructions in the literature accompanying the appliance.
TABLE OF CONTENTS
Features 2
Precautions 3
Parts identification 3
Turntable assembly 4
Cartridge installation 4
Tonearm assembly 5
Tonearm adjustment 5
Tonearm balance adjustment
Tracking force adjustment
Anti-skating compensation
Connections 6
Tips on record handling 6
Record playing 7
Preparation
To start playing
To lift up the stylus during play
To stop during play
Replacing the stylus 9
Maintenance 9
Specifications 10
Trouble checks 10
FEATURES
●The linear torque BSL (brushless and slotless) direct drive servo motor has a high signal-to-noise ratio.
●The low-mass tonearm and cartridge allow the stylus to track with greater accuracy.
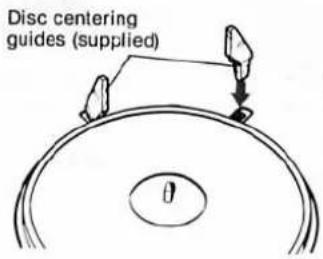
●Disc centering guides facilitate placing a 30 cm record over the center spindle.
●The turntable has resilient feet that isolate the mechanism from external shock and vibration.
PRECAUTIONS
On safety
● Operate the unit only on 120 V ac, 60 Hz.
● Should any solid object or liquid fall into the cabinet, unplug the unit and have it checked by qualified personnel before operating it any further.
● Unplug the unit from the wall outlet if it is not to be used for an extended period of time. To disconnect the cord, pull it out by the plug. Never pull the cord itself.
On installation
● Place the turntable on a level surface.
● Avoid placing the unit near electrical appliances (such as a television, hair dryer, or fluorescent lamp) which may cause hum or noise.
● Place the turntable where it will not be subject to any vibration, such as from speakers, slamming of doors, etc.
- Keep the unit away from direct sunlight, extremes of temperature, and excessive dust and moisture.
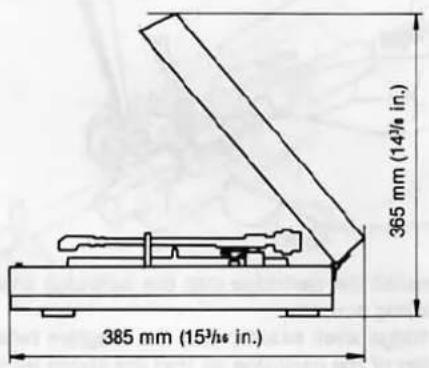
- Allow at least 10 cm (4 inches) clearance behind the unit so that the cover can be opened.
On dust cover removal
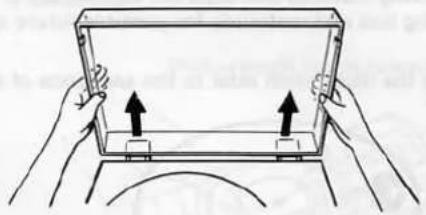
Open the dust cover fully and slide it upward with both hands.
natural_image
Illustration of two hands holding a transparent rectangular device with arrows indicating upward movement (no text or symbols)On repacking
Do not throw away the carton and packing materials. It is an ideal container in which to transport the unit. When shipping the unit to another location, secure the tonearm to the arm rest and repack it as illustrated on the carton box.
For the customers in the USA
For detailed safety precautions, see the leaflet "IMPORTANT SAFEGUARDS".
PARTS IDENTIFICATION
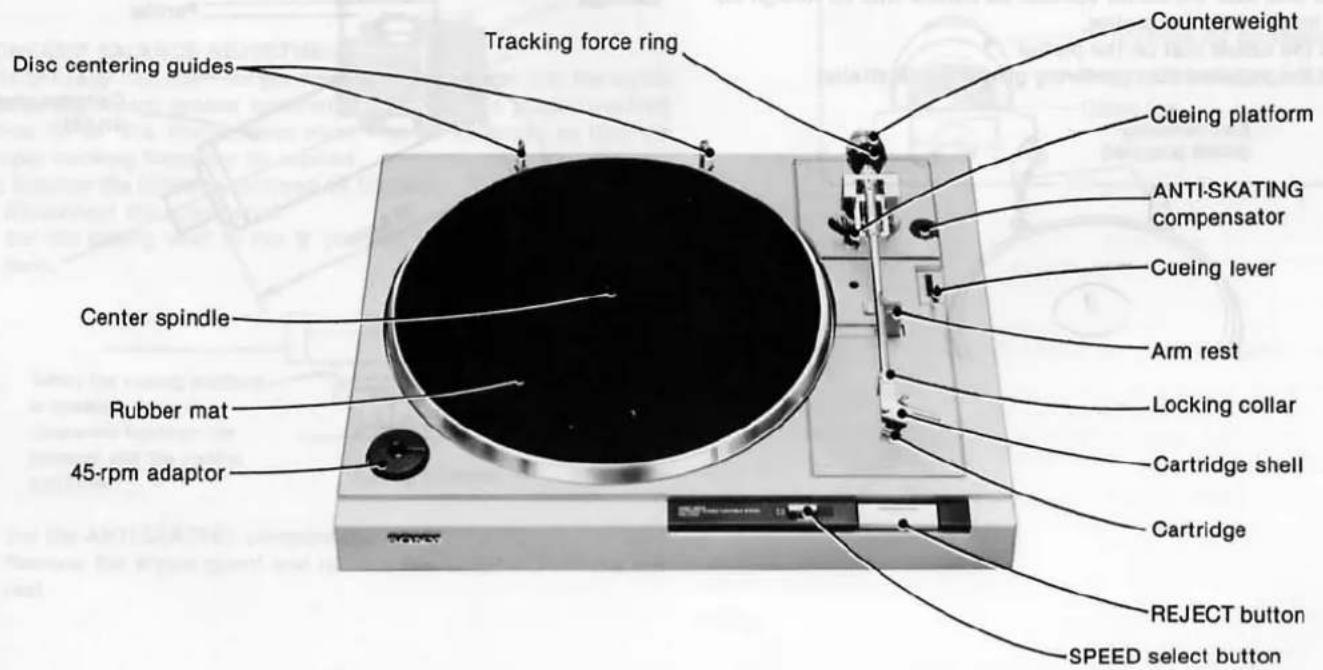
The picture below shows the appearance of the assembled PS-LX22C turntable.
TURNTABLE ASSEMBLY
Do not connect the power cord or the connecting cords until the turntable has been completely assembled. Remove all packing material and wipe the cabinet off. Save the packing box and materials for possible future use.
The numbers in the illustration refer to the sequence of assembly.
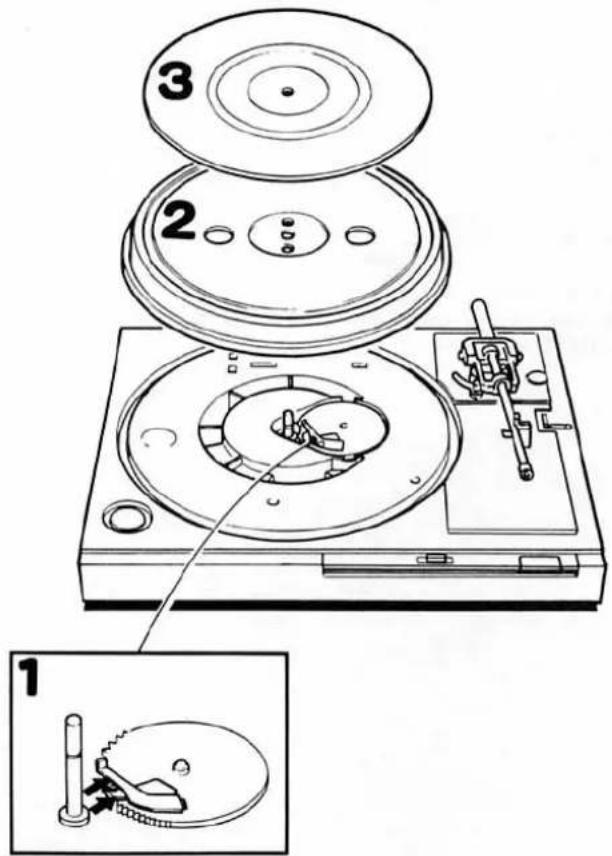
1 Keep the metallic parts indicated by the arrows in the illustration inside the large white gear.
2 Carefully place the platter on the motor board by fitting the center hole over the center spindle. Be careful that no foreign objects lodge under the platter.
3 Place the rubber mat on the platter.
4 Insert the supplied disc centering guides as illustrated.
CARTRIDGE INSTALLATION
For the PS-LX22
A cartridge weighing from 2.3 to 6.8 g can be mounted with the supplied SH-151 cartridge shell.
For the PS-LX22C
The supplied cartridge has been installed correctly on the cartridge shell at the factory. So the following procedures should be skipped unless you replace the cartridge. A different cartridge weighing from 2.3 to 6.8 g can be mounted with the supplied SH-151 cartridge shell.
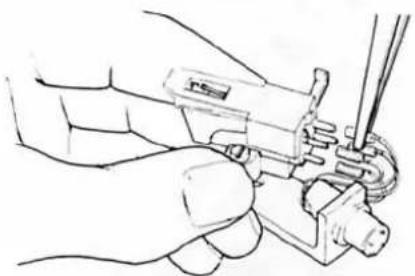
1 Connect the lead wires of the shell to the corresponding pins on the cartridge.
Wires Cartridge pins
White ...... White, L (Left channel signal)
Blue ...... Blue, LE or G (Left channel ground)
Red ...... Red, R (Right channel signal)
Green ...... Green, RE or G (Right channel ground)
natural_image
Hand holding a mechanical clamp or tool, no visible text or symbols2 Temporarily install the cartridge into the cartridge shell with the supplied mounting screws.
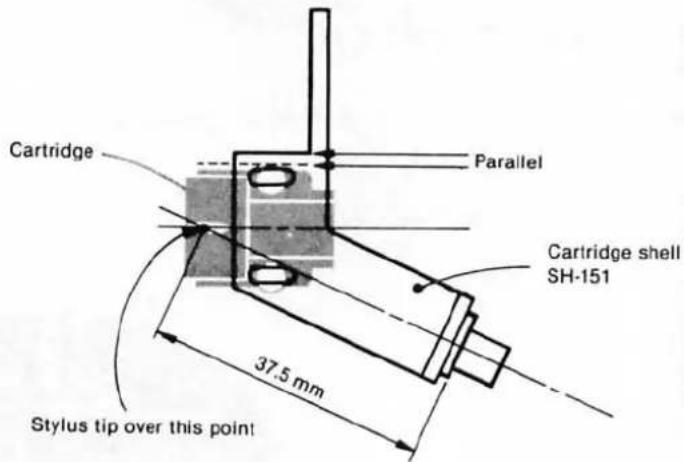
3 Place the cartridge shell exactly over the diagram below and adjust the position of the cartridge so that the stylus tip is just over the point where the lines cross. Then tighten the screws down.
TONEARM ASSEMBLY
1 Secure the tonearm to the arm rest.
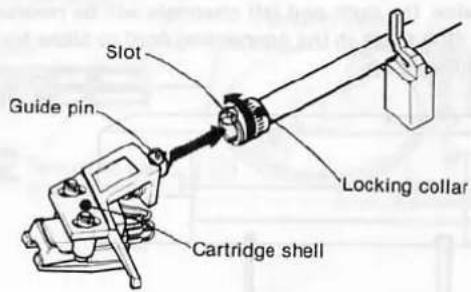
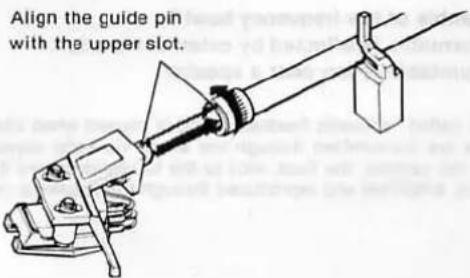
2 Plug the shell into the tonearm, fitting the guide pin on the shell with the upper slot of the tonearm. Turn the locking collar until the shell is firmly locked.
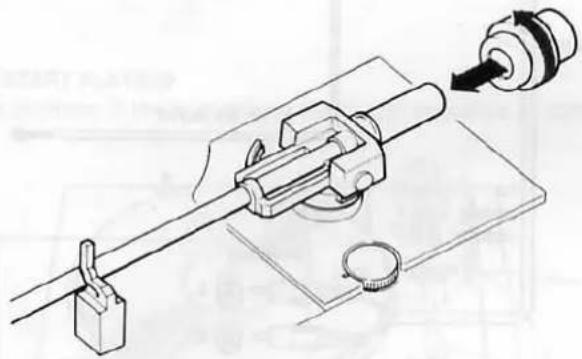
3 Insert the counterweight by turning it.
natural_image
Illustration of a hand using a tool to adjust a mechanical component, with no visible text or symbols.TONEARM ADJUSTMENT
The turntable must be on a level surface while the tonearm is being adjusted.
Be careful not to damage the stylus tip while making adjustments.
TONEARM BALANCE ADJUSTMENT
It is critically important for good sound reproduction that the stylus traces the record groove accurately and with the proper tracking force. To do this, the tonearm must first be balanced so that the proper tracking force can be applied.
To balance the tonearm, proceed as follows:
1 Disconnect the power cord.
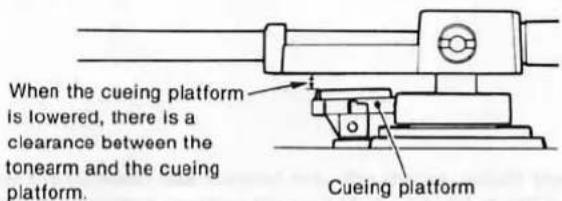
2 Set the cueing lever to the ▼ position to lower the cueing platform.
3 Set the ANTI-SKATING compensator to "0".
4 Remove the stylus guard and release the tonearm from the arm rest.
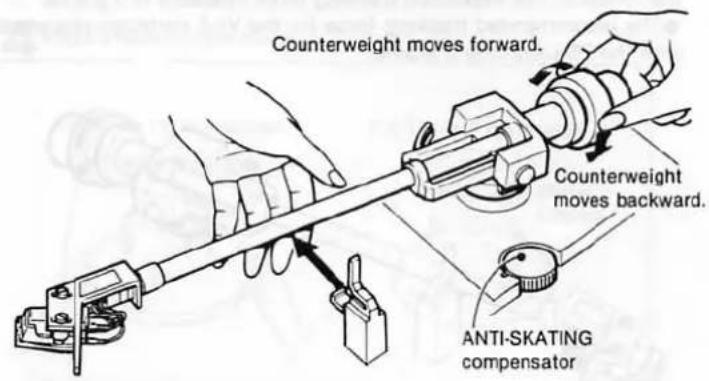
5 Adjust the position of the counterweight by turning it. Release the tonearm gently and check the balance. Repeat this step until the arm is balanced.

6 After the tonearm is balanced, replace the stylus guard and secure the tonearm to its rest.
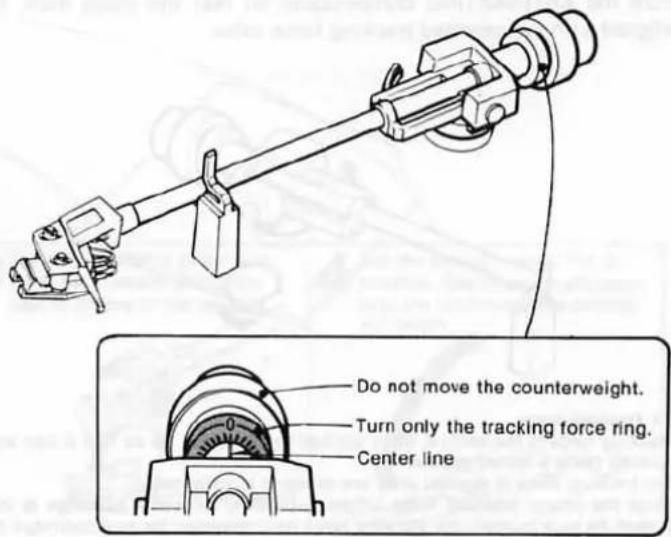
7 While making sure that the counterweight remains in the balanced position, carefully turn the tracking force ring until the "0" indication is aligned with the center line on the tonearm.
TRACKING FORCE\*1 ADJUSTMENT
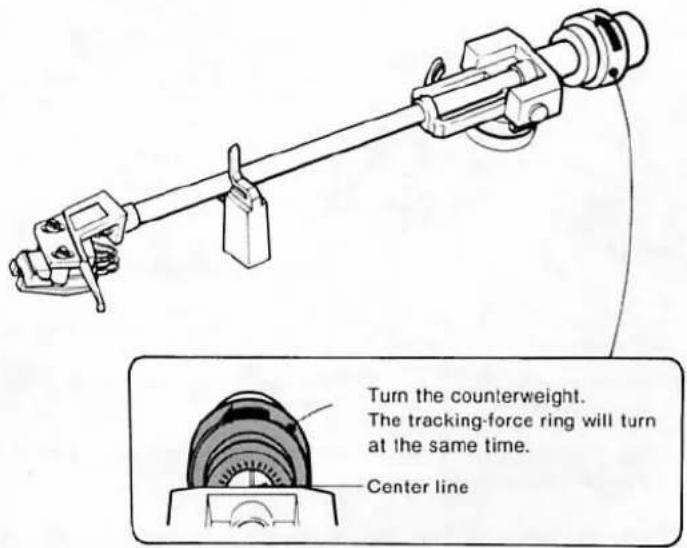
Turn the counterweight as illustrated so that the recommended tracking force for your cartridge is aligned with the center line on the tonearm. The maximum tracking force available is 3 grams.
● The recommended tracking force for the VL-5 cartridge (supplied with the PS-LX22C) is 2 grams.
ANTI-SKATING \*2 COMPENSATION
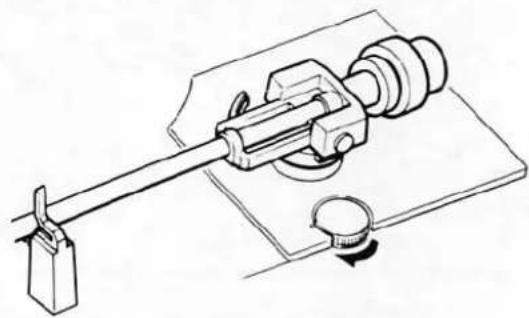
Turn the ANTI-SKATING compensator so that the guide mark is aligned with the selected tracking force value.
natural_image
Technical line drawing of a mechanical device with lever and knob (no text or symbols)\*1 Tracking force
Tracking force is the vertical force applied to the stylus tip so that it can accurately trace a record groove.
The tracking force is applied after the tonearm is balanced.
Since the proper tracking force differs depending on which cartridge is installed, be sure to apply the tracking force recommended for your cartridge. If the tracking force is too light, the stylus will skip grooves. When it is too heavy, the stylus tip and the record will wear excessively. Note that if you play a record at a temperature below 10^ C ( 50^ F), or if the record to be played is badly warped, the tracking force should be increased by 20%.
\*2 Anti-skating compensator
While the record is being played, friction between the record groove and the stylus produces a force that tends to drive the lonearm toward the center of the record.
The anti-skating compensator cancels this force. The anti-skating force should be the same value as the tracking force.
Incorrect adjustment of the anti-skating compensator results in sound distortion and uneven wear on both the stylus and the record.
CONNECTIONS
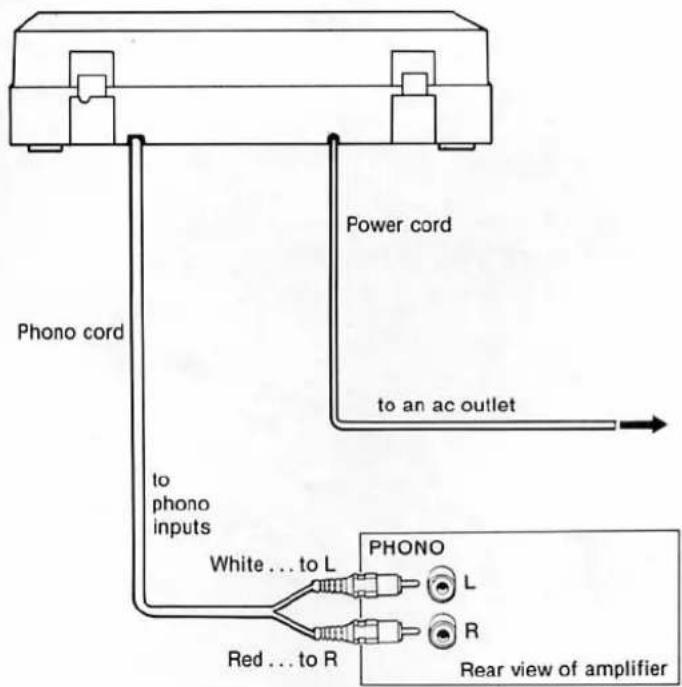
●Turn off the amplifier before making connections.
- Be sure to insert the cable connectors firmly into the jacks. Loose connections may cause hum and noise.
- Connect the red plug of the connecting cord to the right-channel jack [R] of the amplifier and the white plug to the left-channel jack [L]. Otherwise, the right and left channels will be reversed.
●Leave a little slack in the connecting cord to allow for inadvertent shock or vibration.
TIPS ON RECORD HANDLING
●Before playing, clean the record with a record cleaner or soft cloth. If a spray cleaner is used, make sure that it has dried completely before playing the record. Playing the record before the cleaner has dried may damage the record.
It is a good idea to clean the record again before putting it away.
● Handle a record by its edges and do not touch the grooves. Fingerprints on the record surface may encourage an accumulation of dust, resulting in impaired tone.
- Use a commercially available anti-static spray to neutralize the static electricity on a record.
●Avoid exposing a record to direct sunlight or sources of heat, such as a hot-air duct.
●Store your records vertically. They should not be compressed.
RECORD PLAYING
PREPARATION
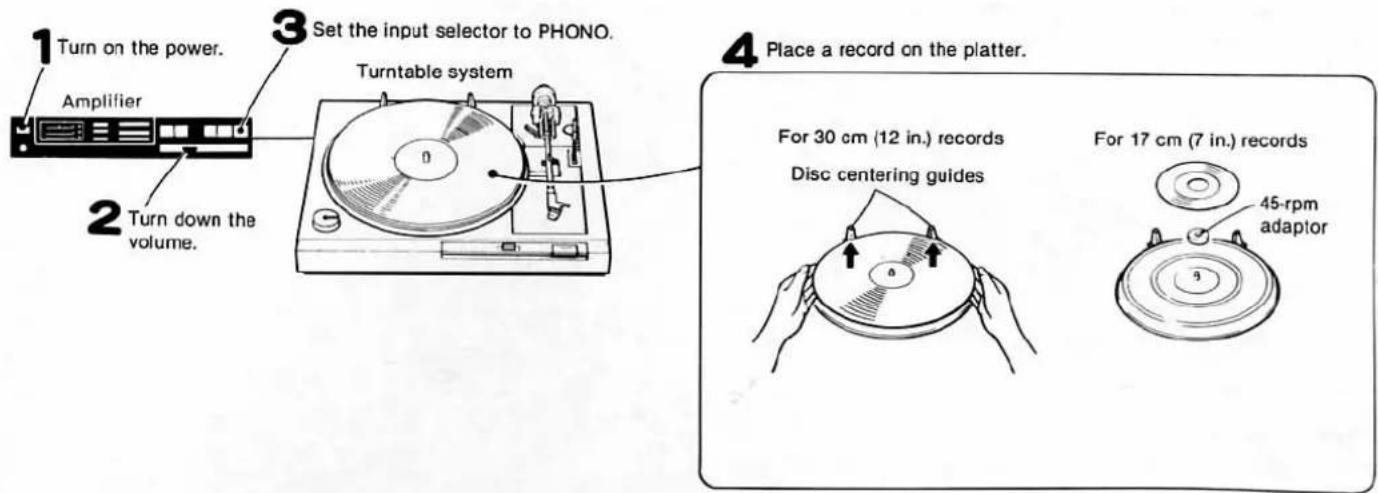
TO START PLAYING
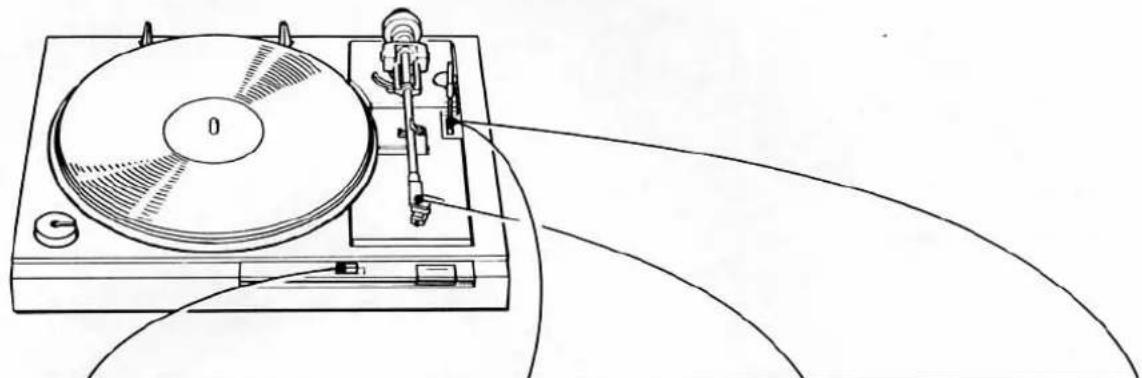
The numbers in the illustration refer to the sequence of operation.
natural_image
Line drawing of a CD or DVD machine with a scroll wheel and attached stand (no text or symbols)1 Set the SPEED select button according to the speed of a record to be played.

Depress for 45 rpm records.

Press again to release the button for 33 ^1/2 rpm records.
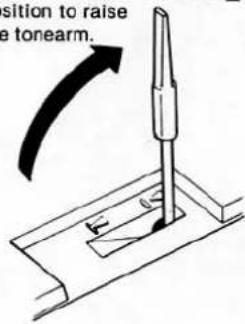
2 Set the cueing lever to the ▼ position to raise the tonearm.
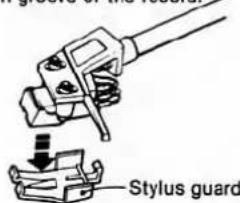
3 Remove the stylus guard and bring the tonearm above the lead-in groove of the record.
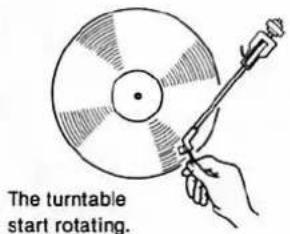
4 Set the cueing lever to the ▼ position. The tonearm will lower onto the record and the playing will begin.
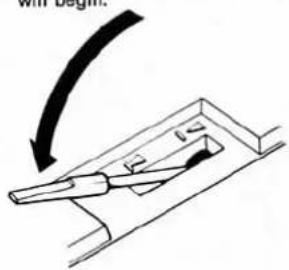
● After the tonearm has lowered onto the record, adjust the volume and tone of the amplifier.
- When the tonearm reaches the end of the record, it will be automatically raised, return to its rest, and then lower by itself.
The turntable will stop rotating and the power will be turned off automatically.
TO LIFT UP THE STYLUS DURING PLAY
To listen to another part of the record being played, or to lift up the stylus on a record for a brief moment and start playing from the same point, set the cueing lever to the ▼ position.
The tonearm will be lifted up. To lower it again, set the cueing lever to the ▼.
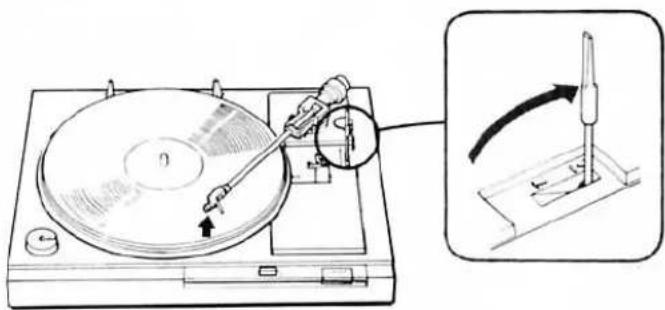
TO STOP DURING PLAY
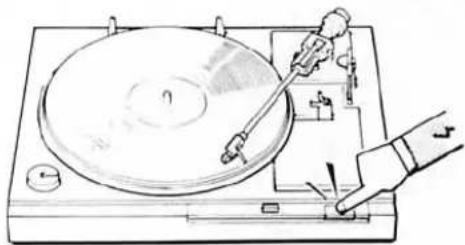
Press the REJECT button. The tonearm will lift up and automatically return to the arm rest.
The cueing platform will lower when the tonearm reaches the arm rest and the unit will be turned off.
natural_image
Line drawing of a CD/DVD machine with a hand operating the disc (no text or symbols)REPLACING THE STYLUS
The stylus will lose its effectiveness and begin to damage records after about 400 hours of use.
For the VL-5 cartridge (supplied with the PS-LX22C), an ND-5G replacement stylus is available at your Sony dealer.
Handle the stylus carefully as it is very delicate. Install the replacement stylus as follows.
1 Lower the sound level or turn the amplifier off.
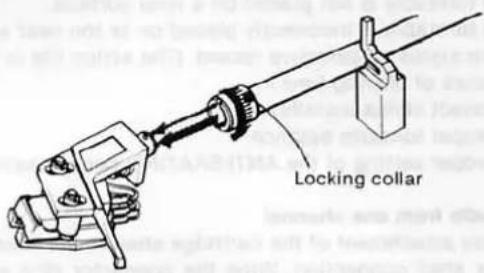
2 Secure the tonearm to the arm rest and separate the cartridge from the tonearm by turning the locking collar in the direction of the arrow.
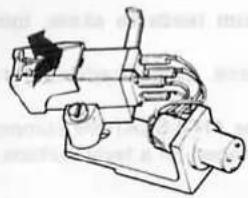
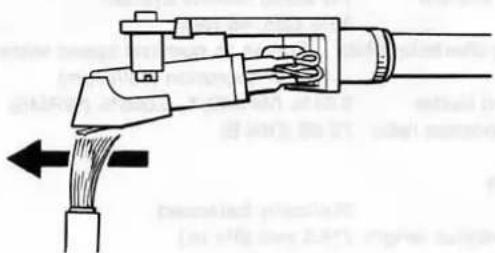
3 Detach the stylus assembly by grasping it between the thumb and forefinger and pulling gently in the direction of the arrow.
natural_image
Technical line drawing of a mechanical device with no visible text or symbols4 Insert the new stylus into the cartridge.
5 Plug the cartridge into the tonearm and turn the locking collar counterclockwise until the cartridge is locked.
MAINTENANCE
Stylus
Before playing a record, clean the stylus with a soft brush. Brush the stylus from back to front. Never attempt to clean the stylus with your finger tip. If a fluid stylus cleaner is used, make sure not to moisten the stylus too much.
natural_image
Diagram of a welding torch with attached cable and clamping mechanism (no text or labels)Cabinet
Clean the cabinet and dust cover periodically with a soft dry cloth. If the stains are difficult to remove, use a cloth moistened with a mild detergent solution. Do not use solvents such as alcohol, benzine or thinner, since they will damage the finish.
Rubber mat
When the rubber mat becomes dirty, wipe it gently with a soft cloth slightly dampened with water.
Lubrication
The turntable requires no periodic lubrication. The motor shaft is lubricated at the factory for the life of the turntable.
SPECIFICATIONS
Turntable
| Platter | 30.4 cm (12 in.), aluminum-alloy diecast |
| Motor | Linear torque BSL (brushless and slotless) motor |
| Drive system | Direct drive |
| Control system | FG servo control system |
| Speed | 33^1/3 rpm, 45 rpm |
| Starting characteristics | Comes to nominal speed within a half revolution ( 33^1/3 rpm) |
| Wow and flutter | 0.04% (WRMS)*, 0.055% (WRMS) |
| Signal-to-noise ratio | 72 dB (DIN-B) |
Tonearm
| Type | Statically balanced |
| Pivot-to-stylus length | 216.5 mm ( 8^5/_8 in.) |
| Overhang | 16.5 mm ( ^21/32 in.) |
| Stylus force adjustment range | 0 - 3 g |
| Cartridge shell weight | |
| 5.2 g | |
| Cartridge weight range (including a cartridge) | |
| 7.5 - 12 g | |
Cartridge VL-5 (supplied only with the PS-LX22C)
| Type | Moving magnet type |
| Frequency response | 10 Hz to 20 kHz |
| Channel separation | 20 dB at 1 kHz |
| Output voltage | 3.5 mV at 1 kHz, 5 cm/sec., 45° |
| Load impedance | 47 to 100 kilohms |
| Tracking force | 1.5 to 2.5 g (2.0 g recommended) |
| Stylus | Sony ND-5G(Conical 0.6 mil diamond) |
| Weight | 5.0 g |
General
| Power requirements | 120 V ac, 60 Hz |
| Power consumption | 5 W |
| Dimensions | Approx. 430 × 110 × 355 mm (w/h/d) ^* ( 17 × 4^3/_8 × 14 in.)including projecting parts and controls |
| Weight | Approx. 4 kg (8 lbs 13 oz), netApprox. 4.3 kg (9 lbs 8 oz), in shipping carton |
| Supplied accessories | |
| 45-rpm adaptor (1)Cartridge shell SH-151 (1)Cartridge VL-5 (1) (supplied with the PS-LX22C only)Disc centering guide (2) |
Design and specifications subject to change without notice.
* This new measuring method concerns only the turntable assembly, including the platter. It excludes wow and flutter caused by the tonearm, the cartridge, or the record. Measured by obtaining signal from magnetic pick-up head.
TROUBLE CHECKS
The following trouble checks will help you correct most common problems encountered with a turntable system. Should any problem persist after you have made these checks, consult your nearest Sony service facility.
Before proceeding with these trouble checks, first refer to the connections and the operating procedures.
Impaired tone quality
- Improper tracking force. See "Tracking force adjustment" on page 6.
●Dusty stylus.
●The turntable is not placed on a level surface.
●The turntable is incorrectly placed on or too near a speaker.
●Worn stylus or defective record. (The stylus life is approximately 400 hours of playing time.)
●Incorrect stylus installation.
●Improper tonearm balance. - Improper setting of the ANTI-SKATING compensator.
No audio from one channel
- Loose attachment of the cartridge shell to the tonearm.
●Poor shell connection. Wipe the connector pins with denatured alcohol.
● Loose connection of phono connecting cord.
●Low volume level setting for one channel of the amplifier.
Groove skipping, tonearm tends to skate, tonearm does not advance.
- Improper tracking force. See "Tracking force adjustment" on page 6.
- Improper setting of the ANTI-SKATING compensator.
●The turntable is not placed on a level surface.
●Defective record.
●External vibrations.
Steady low-pitched hum
● Loose connection between the cartridge shell and the tonearm.
- Loose connection of phono cord.
Loud rumble or low-frequency howl\*
●The turntable is affected by external vibration.
●The turntable is too near a speaker.
*This is called "acoustic feedback" and is caused when vibrations from the speakers are transmitted through the air or via solid objects (such as the shelves, the cabinet, the floor, etc.) to the turntable, where it is picked up by the stylus, amplified and reproduced through the speakers once again.
- SONY®
- PS-LX22/LX22C
- OPERATING INSTRUCTIONS
- OWNER'S RECORD
- WARNING
- TABLE OF CONTENTS
- FEATURES
- PRECAUTIONS
- On safety
- On installation
- On dust cover removal
- On repacking
- For the customers in the USA
- PARTS IDENTIFICATION
- TURNTABLE ASSEMBLY
- CARTRIDGE INSTALLATION
- TONEARM ASSEMBLY
- TONEARM ADJUSTMENT
- TONEARM BALANCE ADJUSTMENT
- TRACKING FORCE\*1 ADJUSTMENT
- ANTI-SKATING \*2 COMPENSATION
- \*1 Tracking force
- \*2 Anti-skating compensator
- CONNECTIONS
- TIPS ON RECORD HANDLING
- RECORD PLAYING
- TO START PLAYING
- TO LIFT UP THE STYLUS DURING PLAY
- TO STOP DURING PLAY
- REPLACING THE STYLUS
- MAINTENANCE
- Stylus
- Cabinet
- Rubber mat
- Lubrication
- SPECIFICATIONS
- TROUBLE CHECKS
- Impaired tone quality
- No audio from one channel
- Steady low-pitched hum
- Loud rumble or low-frequency howl\*
Mærke : SONY
Model : PS-LX22C
Kategori : Pladespiller