HR2034 - Blender PHILIPS - Gratis brugsanvisning og manual
Find enhedens vejledning gratis HR2034 PHILIPS i PDF-format.

Brugerspørgsmål om HR2034 PHILIPS
0 spørgsmål om dette apparat. Besvar dem du kender, eller stil dit eget.
Stil et nyt spørgsmål om dette apparat
Download vejledningen til din Blender i PDF-format gratis! Find din vejledning HR2034 - PHILIPS og tag din elektroniske enhed tilbage i hånden. På denne side er alle dokumenter nødvendige for brugen af din enhed offentliggjort. HR2034 af mærket PHILIPS.
BRUGSANVISNING HR2034 PHILIPS
ENGLISH
Introduction
Congratulations on your purchase and welcome to Philips! To fully benefit from the support that Philips offers, register your product at www.philips.com/welcome.
■ Important
Read this user manual carefully before you use the appliance and save it for future reference.
Danger
Never immerse the motor unit in water or any other liquid, nor rinse it under the tap. Only use a moist cloth to clean the motor unit.
Warning
Check if the voltage indicated on the appliance corresponds to the local mains voltage (110-120/127V or 220-230/240V) before you connect the appliance.
Do not use the appliance if the plug, the mains cord or other parts are damaged.
If the mains cord is damaged, you must have it replaced by Philips, a service centre authorised by Philips or similarly qualified persons in order to avoid a hazard.
Do not touch the blades, especially when the appliance is plugged in. The blades are very sharp.
Never reach into the blender jar with your fingers or an object while the appliance is running.
This appliance is not intended for use by persons (including children) with reduced physical, sensory or mental capabilities, or lack of experience and knowledge, unless they have been given supervision or instruction concerning use of the appliance by a person responsible for their safety.
Children should be supervised to ensure that they do not play with the appliance.
Never let the appliance run unattended.
If the blades get stuck, unplug the appliance before you remove the ingredients that block the blades.
Never use the blender jar to switch the appliance on and off.
Caution
- Always unplug the appliance from the mains before you assemble, disassemble or make adjustments to any of the parts.
Never use any accessories or parts from other manufacturers or that Philips does not specifically recommend. If you use such accessories or parts, your guarantee becomes invalid.
Do not exceed the maximum level indicated on the blender jar. Always make sure the lid is properly closed and the measuring cup is
inserted properly before you switch on the appliance.
Never fill the blender jar with ingredients hotter than 80°C/175°C
Electromagnetic fields (EMF)
This Philips appliance complies with all standards regarding electromagnetic fields (EMF). If handled properly and according to the instructions in this user manual, the appliance is safe to use based on scientific evidence available today.
Built-in safety lock
This feature ensures that you can only switch on the appliance if you have properly assembled the blender jar on the motor unit. If the jar is correctly assembled, the built-in safety lock will be unlocked.
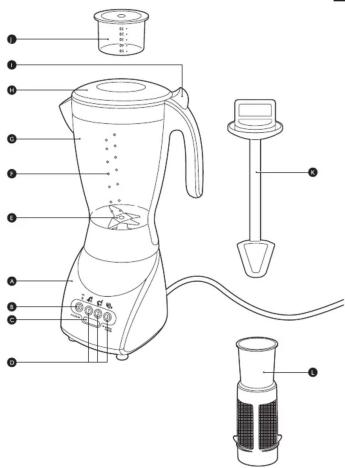
The blender (Fig. 1)
A Motor unit
B 0 = OFF button
C. PULSE/QUICK CLEAN button
D speed buttons (1 to 3
E Integrated Blade
C. Blonderion
H. Lid of blender jar
I. Lid opening lev
I Measuring cup
K Spatula
L Filter (HR2034 only)
1 Thoroughly clean the parts that come into contact with food before you use the appliance for the first time (see chapter 'Cleaning').
Using the blender
The blender is intended for:
- Blending fluids, e.g. dairy products, sauces, fruit juices, soups, mixed drinks, shakes.
Mixing soft ingredients, e.g. pancake batter or mayonnaise.
Pureeing cooked ingredients, e.g. for making baby food.
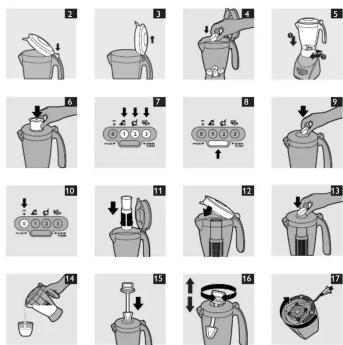
1 Press the lid opening lever to open the lid. (Fig. 2)
- You only need to remove the lid for cleaning purposes (Fig. 3)
2 Put the ingredients in the blender jar (Fig. 4).
To avoid spillage, do not put more than 1.5 litres of liquid in the blender jar, especially when you want to process at a high speed. Do not put more than 1.1 litres in the blender jar when you want to process hot liquids or ingredients that tend to foam.
Do not process more than one cup of dry ingredients at a time.
3 Place the jar on the motor unit (1) and turn it clockwise by the handle to fasten it (2). (Fig. 5)
4 Close the lid and insert the measuring cup into the lid (Fig. 6). To prevent spillage, always insert the measuring cup into the lid before you start processing.
5 Put the mains plug in the wall socket.
6 Press one of the speed buttons to switch on the appliance (Fig. 7).
Do not let the blender run for more than 3 minutes at a time. If you have not finished blending after 3 minutes, switch off the appliance for one minute before you continue blending.
Do not process dry ingredients for more than 1 minute.
7 If you want to process ingredients very briefly, press the PULSE/QUICK CLEAN button several times (Fig. 8).
Never press the PULSE/QUICK CLEAN button longer than a few seconds at a time.
8 You can use the opening in the lid to add ingredients while the appliance is running (Fig. 9).
9 Press the OFF button (0) to switch off the appliance. (Fig. 10)
- Do not prepare recipes that contain large quantities of oil or fat. - Cut solid ingredients into smaller pieces before you put them in the blender. Do not process a large quantity of dry ingredients at the same time. Process these ingredients in a series of small batches instead. - If you are not satisfied with the results when you blend solid ingredients, switch off the blender and press the PULSE/QUICK CLEAN button a few times to let the blender run briefly. You can also stir the ingredients with the provided spatula, as long as it rests on the lid (even when the blender is running). If you want to use the spatula without resting it on the lid, switch off the appliance, open the lid and then stir the ingredients. You can also remove some of the contents of the jar and process smaller amounts.
To crush ice cubes, put max. 5 cubes at a time in the jar and press the PULSE/QUICK CLEAN button a few times. Keep the lid on the jar during processing.
Filter (HR2034 only)
You can use the filter to obtain extra finely blended sauces, fresh fruit juices or cocktails. All pips and skins are caught in the filter.
Never fill the filter beyond its metal part.
Do not use the filter to process hot ingredients.
1 Remove the jar from the motor unit.
2 Open the lid (Fig. 2).
3 Put the filter in the blender jar (Fig. 11).
The grooves of the filter and the ribs inside the blender jar help you put the filter in the right position.
4 Close the lid to fix the filter in its proper position (Fig. 12).
5 Assemble the jar onto the motor unit.
6 Put the ingredients in the filter through the opening in the lid (Fig. 13). Cut fruits into smaller pieces and soak dried pulses, such as soy beans, before you process them in the filter.
7 Add water or another liquid.
8 Put the measuring cup in the lid, press speed button 3 (highest speed) and let the appliance run for max. 40 seconds.
9 Press the OFF button (0) to switch off the appliance (Fig. 10).
10 Pour out the drink through the spout of the blender jar (Fig. 14).
Make sure the lid is closed and the measuring cup is in the lid. This prevents pulp and skins from ending up in your drink.
11 For optimal results, put the jar with the remaining ingredients back onto the appliance with the lid closed. Then let the appliance run for a few more seconds.
12 Pour out the rest of the drink.
Tips
- Particularly when you process large quantities, we advise you not to put all the ingredients in the filter at the same time. Start to process a small quantity, let the appliance run for a moment, switch it off and then add another small quantity.
- To get the best result when you make fruit juices and cocktails, add approx. 300ml water to 150g fruit. You can also use other liquids, e.g. to make cocktails.
Spatula
You can use the spatula to prepare smoothies and other recipes which are difficult to blend.
1 Put the ingredients in the blender jar.
2 Close the lid and insert the spatula into the jar through the hole in the lid (Fig. 15).
Do not use any other spatula than the one provided with this appliance.
Do not use the spatula if the lid is open.
3 Press one of the speed buttons to switch on the appliance (Fig. 7).
4 Use the spatula when needed. Move it up and down or anticlockwise for thorough blending (Fig. 16).
Note: You can safely move the spatula while the blender is running as long as the spatula rests on the lid.
Cleaning
Always unplug the appliance before you clean it.
Never immerse the motor unit in water, nor rinse it under the tap. Do not clean the motor unit in the dishwasher.
Never use scouring pads, abrasive cleaning agents or aggressive liquids such as petrol or acetone to clean the appliance.
Tip: Cleaning the appliance and its parts is easiest immediately after use.
1 Make sure the appliance is unplugged.
2 Disassemble all removable parts from the motor unit.
3 Clean the motor unit with a moist cloth.
4 Clean the removable parts in hot water, if necessary with some
washing-up liquid, or in the dishwasher. All removable parts are dishwashes proof, except for the motor unit
Note: If you have to clean the mesh of the filter, use a very soft brush.
Quick-cleaning the blender jar
1 Fill the blender halfway with warm water and add a few drops of washing-up liquid.
2 Press the PULSE/QUICK CLEAN button a few times (Fig. 8).
3 Detach the blender jar, empty it and rinse it under the tap.
Storage
1 To store the mains cord, wind it round the reel in the bottom of the appliance (Fig. 17).
Replace
HR2030: You can order the filter from your Philips dealer.
Environment
Do not throw away the appliance with the normal household waste at the end of its life, but hand it in at an official collection point for recycling. By doing this, you help to preserve the environment. (Fig. 18)
Guarantee & service
If you need service or information or if you have a problem, please visit the Philips website at www.philips.com or contact the Philips Consumer Care Centre in your country (you find its phone number in the worldwide guarantee leaflet). If there is no Consumer Care Centre in your country, go to your local Philips dealer.
Recipes
Soy milk
Ingredients:
- 90g dried soy beans
SOOMI WATER
1 Soak the soy beans for 4 hours before you process them.
2 Pour the soaked soy beans and the water in the filter. Blend for 24 seconds at the highest speed.
Do not process more than 1 batch without interruption. Let the
appliance cool down to room temperature before continue processing.
3 Bring the soy milk to the boil in a pan, then add sugar and leave to simmer.
Frequently asked questions
This chapter lists the questions most frequently asked about the appliance. If you cannot find the answer to your question, contact the Customer Care Centre in your country.
Question Answer
Can I clean all removable Yes, except the motor unit. Only clean the motor unit with a moist cloth.
parts in the
What does 'PULSE/QUICK CLEAN' mean? When you press the PULSE/QUICK CLEAN button, the appliance runs at its highest speed until you release the button. Use the PULSE/QUICK CLEAN button when you want to have more control over the processing jobs. You can also use this button to quick-clean the blender jar (see chapter 'Cleaning').
Can I pour boiling hot liquids into No, let hot liquids cool down to 80°C/175°F to prevent damage to the jar.
the Dichard
Why does the motor produce an unpleasant smell during processing? It is normal for a new appliance to give off an unpleasant smell or emit some smoke the first few times it is used. This phenomenon stops after you have used the appliance a few times. If the appliance has been switched on too long, it may also give off an unpleasant smell or emit some smoke. In this case, switch off the appliance and let it cool down for 60 minutes.
The appliance stopped running because the Press the OFF button (0) and use a spatula to dislodge the ingredients that block the blade unit. We also advise you to process a smaller quantity.
blade unit is blocked. What should I do?
Why does the fruit juice or soy milk contain a lot of pulp or skins? To prevent pulp and skins from ending up in your drink, make sure that the filter is properly placed in the jar. Also make sure the lid is closed and the measuring cup is inserted in the lid.
Register your product and get support at
www.philips.com/welcome
HR2034, HR2030
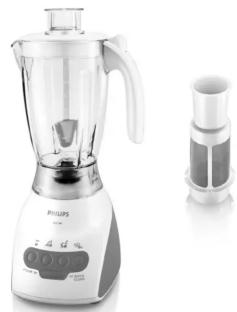
natural_image
Exterior view of a modern kitchen blender with a side view of its side dish (no visible text or symbols)PHILIPS

www.philips.com

1


ESPAÑOL
Introducción
Felicitaciones por su compra y bienvenido a Philips. Para disfrutar de todos los beneficios que Philips tiene para ofrecerle, registre su producto en www.philips.com/welcome.
■Importante■
Antes de usar la unidad, lea atentamente este manual del usuario y consérvelo para futuras consultas.
Peligro
- No sumerja la unidad de motor en agua u otros líquidos ni la coloque bajo el agua de la canilla. Utilice únicamente un paño húmedo para limpiarla.
Advertencia
Antes de enchufarlo, verifique que el voltaje indicado en el artefacto se corresponda con el de la red eléctrica local (110-120/ 127 V o 220-230/ 240 V).
No utilice el artefacto si el enchufe, el cable de alimentación u otras piezas están dañados.
- Si el cable de alimentación está dañado, deberá ser sustituido por Philips o un taller autorizado Philips para evitar riesgos.
No toque las cuchillas, sobre todo si el aparato está enchufado, ya que son extremadamente filosas.
No introduzca los dedos o un objeto en la jarra de la licuadora mientras está funcionando.
Este artefacto no debe ser utilizado por personas con capacidad física, mental o sensorial reducida (adultos o niños) o sin los conocimientos y la experiencia necesarios, a menos que sean supervisados o instruidos acerca del uso del artefacto por una persona responsable de su seguridad.
Asegúrese de que los niños no jueguen con este No dejo que el artefaste funciera sin suponisión
- Si las cuchillas se traban, desenchufe el artefacto antes de retirar los ingredientes que las obstruyen.
No utilice la jarra de la licuadora para encender o apagar el artefacto.
Precauciones
- Desenchufe siempre el artefacto antes de colocar, retirar o ajustar cualquiera de las piezas.
- No utilice nunca accesorios o piezas de otros fabricantes o que no hayan sido específicamente recomendados por Philips. De lo contrario, la garantía quedará anulada.
- No exceda el nivel máximo indicado en la jarra de la licuadora. - Antes de encender el aparato, asegúrese de que la tapa esté bien cerrada y de que el tapón medidor se haya insertado correctamente. - Nunca llene la jarra de la licuadora con ingredientes a más de 80 °C/ 175 °F de temperatura
Campos electromagnéticos (CEM)
Este producto Philips cumple con todas las normativas sobre campos electromagnéticos. Si se emplea correctamente y de conformidad con las instrucciones de este manual, el uso del artefacto es seguro de acuerdo con las evidencias científicas disponibles en la actualidad.
Bloqueo de seguridad incorporado
Esta característica garantiza que sólo se pueda encender el aparato si la jarra de la licuadora está correctamente montada en la unidad motora. Si la jarra está bien montada, se desactivará el bloqueo de seguridad.
La licuadora (Fig. 1)
A Unidad motora
B 0 = Botón OHF (apagar)
C Botón PULSE/QUICK CLEAN (pulsador/ autolimpieza)
D Botones de velocidad (1 a 3)
E Ofidad de cuchillas dentadas
F indicador de river de G. lava de la liquidar
H. Tapa de la jama de la licuadora
- Comando para abrir la tapa
I Tapón medidor
K Espátula integrada
L Filtro (sólo HR2034)
■Antes de empezar
1 Antes de usar el artefacto por primera vez, limpie a fondo las piezas que entrarán en contacto con los alimentos (consulte el capítulo "Limpieza").
Uso de la licuadora
La licuadora fue diseñada para:
- Licuar líquidos, por ejemplo, lácteos, salsas, jugos de fruta, sopas, tragos, batidos.
- Mezclar ingredientes blandos, como masa para panqueques o mayonesa. - Hacer puré con ingredientes cocidos, como por ejemplo comida para bebés.
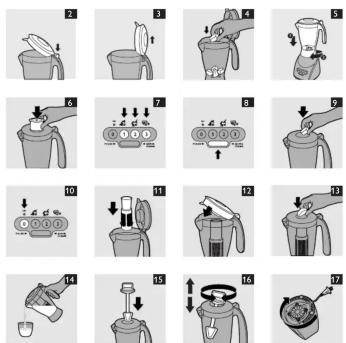
1 Para abrir la tapa, presione el comando para abrir la tapa (fig. 2). - Sólo es necesario quitar la tapa para limpiarla (fig. 3).
2 Ponga los ingredientes en la jarra de la licuadora (fig. 4).
No ponga más de 1,5 litros de líquido en la jarra de la licuadora para evitar que se derrame, especialmente si licúa a una velocidad alta. No ponga más de 1,1 litros en la jarra cuando licúe líquidos calientes o ingredientes que tienden a hacer espuma.
No procese más de una medida de ingredientes secos por vez.
3 Coloque la jarra en la unidad motora (1) y fijela girando el asa en el sentido de las agujas del reloj (2) (fig. 5).
4 Cierre la tapa e introduzca el tapón medidor en la misma (fig
Para evitar derrames, coloque siempre el tapón medidor en la tapa antes de comenzar a licuar.
5 Enchufe el aparato a la toma de corriente.
6 Presione uno de los botones de velocidad para encender el aparato (fig. 7).
No deje que la licuadora funcione durante más de 3 minutos seguidos. Si no terminó de licuar los alimentos después de 3 minutos, apáguela durante un minuto antes de continuar licuando.
No licúe ingredientes secos durante más de un minuto.
7 Si desea licuar los ingredientes por poco tiempo, presione el botón PULSE/QUICK CLEAN varias veces (fig. 8).
Oprima el botón PULSE/QUICK CLEAN sólo unos segundos por vez
8 Puede utilizar la apertura de la tapa para añadir ingredientes mientras el artefacto está funcionando (fig. 9).
9 Para apagar el artefacto, presione el botón OFF (0). (fig. 10)
Sugerencias
No prepare recetas que contengan gran cantidad de aceite o grasa.
Corte los ingredientes solidos en trozos pequeños antes de introduzidos en la liquidam. No lívión grandes certidades de
ingredientes secos al mismo tiempo. Lícielos en pequeños lotes
Si no queda satisfecho con los resultados al licuar ingredientes sólidos, apague la licuadora y presione el botón PULSE/QUICK CLEAN varias veces para que la licuadora funcione brevemente. También puede remover los ingredientes con la espática integrada, siempre que esté colocada sobre la tapa (incluso cuando la licuadora está en funcionamiento). Si desea utilizar la espátula integrada sin que esté colocada en la tapa, apague el aparato, abra la tapa y después remuev los ingredientes. También puede quitar alguno de los ingredientes de jarra y licuar cantidades más pequeñas.
Para picar cubitos de hielo, ponga un máximo de 5 cubitos a la vez en la jarra y presione el botón PULSE/QUICK CLEAN varias veces. Deje siempre puesta la tapa en la jarra al licuar los ingredientes.
Filtro (sólo modelos HR2034)
Puede utilizar el filtro para obtener salsas, jugos de frutas frescas o tragos frozen. Todas las pepitas y las cáscaras se quedarán en el filtro.
No llene nunca el filtro por encima de su parte metálica.
No utilice el filtro para licuar ingredientes calientes
1 Quite la jarra de la unidad motora.
2 Abra la tapa (fig. 2).
3 Ponga el filtro en la jarra de la licuadora (fig. 11).
Las ranuras del filtro y los resaltes del interior de la jarra de la licuadora le ayudarán a colocar el filtro en la posición correcta.
4 Cierre la tapa para ajustar el filtro en su posición correcta (fig. 12).
5 Monte la jarra en la unidad motora.
6 Eche los ingredientes en el filtro a través de la apertura del tapón medidor (fig. 13).
Corte las frutas en trozos pequeños y ponga en remojo las legumbres, como los granos de soja, antes de licuarlas en el filtro.
7 Añada agua u otro líquido.
8 Coloque el tapón medidor en la tapa, presione el botón de velocidad 3 (velocidad más alta) y deje que el aparato funcione durante un máximo de 40 segundos.
9 Para apagar el artefacto, presione el botón OFF (0) (fig. 10).
10 Sirva la bebida por la boquilla de la jarra de la licuadora (fig. 14). Asegúrese de que la tapa esté cerrada y de que el tapón medidor esté en la tapa. De esta manera se evita que la pulpa y las cáscaras caigan en la bebida.
11 Para lograr óptimos resultados, vuelva a poner la jarra con los ingredientes restantes en el aparato, sin abrir la tapa, y deje que funcione durante unos segundos más.
12 Sirva el resto de la bebida.
Sugerencias
- Especialmente cuando licúe cantidades grandes, le aconsejamos que no ponga todos los ingredientes en el filtro a la vez. Licúe primero una cantidad pequeña, deje que el aparato funcione un momento, apáguelo y luego añada otra medida pequeña.
- Para obtener los mejores resultados al hacer jugos de fruta y tragos frozen, añada unos 300 ml de agua por cada 150 g de fruta. También puede utilizar otros líquidos, por ejemplo, leche y crema para hacer tragos
Espátula integrada
Puede utilizar la espátula integrada para preparar licuados u otras recetas.
1 Ponga los ingredientes en la jarra de la licuadora.
2 Cierre la tapa e introduzca la espátula integrada en la jarra a través del orificio de la tapa (fig. 15).
No utilice otra espátula que no sea la que se suministra con el aparato. No utilice la espátula si la tapa está abierta.
3 Presione uno de los botones de velocidad para encender el aparato (fig. 7).
4 Utilice la espátula integrada cuando sea necesario. Muévala hacia arriba y hacia abajo o en sentido contrario a las agujas del reloj para licuar bien (fig. 16).
Nota: Puede mover la espátula integrada con seguridad mientras la licuadora está en funcionamiento siempre que la espátula integrada esté colocada en la tapa.
Limpieza
Desenchufe siempre el artefacto antes de limpiarlo
No sumerja la unidad del motor en agua ni la coloque bajo el agua de la canilla. Tampoco la limpie en el lavaplatos.
No utilice esponjas ni limpiadores o líquidos abrasivos como bencina o acetona para limpiar el artefacto.
Sugerencia: Es más fácil limpiar el artefacto y sus piezas inmediatamente después de usarlos.
1 Asegúrese de que el aparato esté desenchufado.
2 Retire todas las piezas desmontables de la unidad.
3 Limpie la unidad del motor con un paño humedecido.
4 Limpie las piezas desmontables con agua caliente y, de ser necesario, con un poco de detergente líquido o en el lavaplatos.
Todas las piezas desmontables son aptas para lavaplatos, excepto la unidad del motor.
Nota: Si necesita limpiar la malla del filtro, utilice un cepillo muy suave.
mpieza rápida de la jarra de la licuadora
1 Llene la licuadora hasta la mitad con agua caliente y añada unas gotas de detergente líquido.
2 Oprima el botón PULSE/QUICK CLEAN varias veces (fig. 8).
3 Desmonte la jarra de la licuadora, vacíela y enjuáguela con agua de la canilla.
Guardado
1 Para guardar el cable de alimentación, enróllelo en el carretel de la parte inferior del artefacto (Fig. 17).
Ree
HR2061: puede solicitar un filtro al distribuidor de Philips.
Medioambiente
Cuando finalice la vida útil del artefacto, no lo deseche junto con los residuos domésticos habituales. Llévelo a un centro de recolección oficial para su reciclado. De esta forma, ayudará a proteger el medio ambiente. (Fig. 18)
Garantía y servicio técnico
Si desea obtener información o solicitar asistencia técnica o si se presenta alguna dificultad, visite el sitio web de Philips en www.philips.com o comuníquese con el centro de atención al cliente de Philips correspondiente a su país (el número de teléfono figura en el folleto de la garantía internacional). Si no existe un centro de atención al cliente de Philips en su país, diríjase a su distribuidor local de Philips.
Recetas
Leche de almendras
Ingredientes
- 80 g de almendras
- 600 mía de agua
1 Coloque las almendras y el agua en el filtro.
2 Licúe por 30 segundos a la velocidad más alta
No licúe más de un lote sin interrupción. Deje que el aparato se enfríe hasta alcanzar temperatura ambiente antes de continuar licuando los ingredientes.
3 Ponga la leche de almendras a hervir en una cacerola. Cuando alcance el punto de ebullición, agréguele azúcar y deje que hierva a fuego lento.
Preguntas frecuentes
En este capítulo se exponen las preguntas más frecuentes sobre el aparato. Si no encuentra la respuesta a su pregunta, póngase en contacto con el Servicio de Atención al Cliente de su país.
Pregunta Respuesta
¿Puedo lavar todas las piezas Sí, excepto la unidad motora, que se debe limpiar con un paño húmedo.
desmontables el lavavajillas?
| ¿Qué significa "PULSE/QUICK CLEAN"? | Cuando presiona el botón PULSE/QUICK CLEAN (pulsador/ autolimpieza), el aparato funciona a la velocidad más alta mientras se pulsa el botón. Utilícelo para controlar la velocidad con mayor precisión. También puede utilizar este botón para realizar una limpieza rápida de la jarra de la licuadora (consulte el capítulo "Limpieza"). |
¿Puedo echar ingredientes No. Debe dejar que los líquidos calientes se enfríen hasta los 80 °C/ 175 °F para evitar dañar la jarra.
la jarra de la
licuadora?
| ¿Por quédesprendele motor un oloresagradabledurante elfuncionamiento? | Es normal que un aparato nuevo desprendra un oloresagradable o eche un poco de humo las primeraveseces que se usa. Dejará de ocumir cuando hayaulitizado el aparato vanas veces. También es possibleque desprendra un olor desagradable o eche humo sisse utiliza durante mucho tiempo seguido. En esecaso, deberá apagar el aparato y dejar que se enfríeat temperatura ambiente durante una hora. |
El aparato ha dejado de funcionar porque la unidad de Gire el selector de velocidad a OFF (0) y desenchufe el aparato. Utilice una espátula para retirar los ingredientes que bloquean la unidad de cuchillas. Le recomendamos que licúe cantidades más pequeñas.
cuchillas esta bloqueada. ¿Qué debo hacer?
| ¿Por qué el jugode fruta o la lechede almendrascontienen tanta pulpa o restos decáscaras? | Para evitar que la pulpa y los restos de cáscaracaigan en la bebida, asegúrese de que el filtro estécorrectamente colocado en la jarra. Tambiénverifique que la tapa esté cerrada y con el vasomedidor insertado. |