STILETTO PRO II - Lommelygte SureFire - Gratis brugsanvisning og manual
Find enhedens vejledning gratis STILETTO PRO II SureFire i PDF-format.

Brugerspørgsmål om STILETTO PRO II SureFire
0 spørgsmål om dette apparat. Besvar dem du kender, eller stil dit eget.
Stil et nyt spørgsmål om dette apparat
Download vejledningen til din Lommelygte i PDF-format gratis! Find din vejledning STILETTO PRO II - SureFire og tag din elektroniske enhed tilbage i hånden. På denne side er alle dokumenter nødvendige for brugen af din enhed offentliggjort. STILETTO PRO II af mærket SureFire.
BRUGSANVISNING STILETTO PRO II SureFire
THE SUREFIRE NO-HASSLE GUARANTEE
We'll do what it takes to keep your SureFire gear running smoothly. SureFire warrants that if you — our customer — purchase one of our products, and we determine that it is defective in material and/or workmanship during your lifetime, we will repair or replace it — no hassle!
The warranty does not cover any damages resulting from normal wear and tear, misuse, abuse, negligence, or unauthorized modifications or user repairs. In the event that an issue with a Sarsfire product is not covered under
this warranty Surefire can arrange to have the product repaired for a reasonable fee.
STANDARD DISCLAIMER
Except as specified above or prohibited by applicable law, all express or implied conditions and warranties, including, without limitation, any implied warranty or condition of merchantability or illness for a particular purpose, or accuracy of any informational content, are hereby excluded and disclaimed by Surefire; and in no event will Surefire be liable for any special, direct, indirect, consequential, incidental or punitive damages however arising and regardless of the theory or liability, even if advised of the possibility or such damages. Products, process, availability, specifications, and offers are subject to change or cancellation at any time without notice.
WARRANTY CLAIMS
For claims, contact Customer Service at 714-545-9444 to obtain a Return Merchandise Authorization number (RMA#). Then package the unit carefully and send to (no CDDs):
SureFire, LLC
Repairs Department, RMA#
17680 Newhope Street, Suite B
Fountain Valley, CA 92708
SureFire will pay any reasonable shipping costs to return the unit to you.

BATTERY INFORMATION & WARNING
Do not attempt to remove or replace the STILETTO PRO battery. Doing so will void the warranty. If the STILETTO PRO needs to be repaired, contact SureFire at 714-545-9444 or technicalsupport@surefire.com

Revision A 7-2023
71 01 1144
PLR C

STILETTO PRO II
MULTI-OUTPUT RECHARGEABLE POCKET LED FLASHLIGHT PLR-C
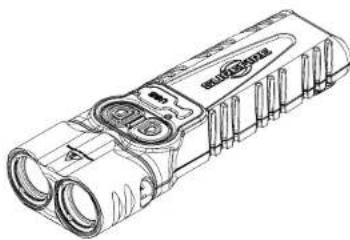
natural_image
Technical line drawing of a flashlight with two lenses and a handle (no text or symbols)| PLR-C | ||
| OUTPUT | Low: 25 Med: 500 High: 1,500 lumens | |
| RUNTIME | Low: 23.5 Med: 1.5 High: 1.0 hours | |
| STROSE RATE | Tactical Switch: 9 Emergency: 3-4 Hz | |
| PEAK BEAM INTENSITY | 35,000 candela | |
| DISTANCE | 375 meters | |
| CONSTRUCTION | Aluminum | |
| FINISH | Hard Anodized (MIL-A-B625 Type III, Class 2) | |
| WEIGHT (in batteries) | 5.0 oz (140 g) | |
| LENGTH | 4.87 in (12.4 cm) | |
| BEZEL DIAMETER | 2x0.88 in (2.2 cm) | |
| BATTERIES | Lithium polymer rechangable (integrated) | |
| SWITCHING | Primary, Tactical, and Programming | |
| LIQUID INGRESS PROTECTION | IPX7 | |
All performance claims tested to ANSI/PLATU FL 1 2019 Standard.
18300 MT. BALOY CIRCLE
FOUNTAIN VALLEY, CA 92708-6122
SUREFIRE.COM


USER MANUAL
STILETTO PROII
KIT CONTENTS
• SILETTO PRO
- USB-C cable
• IB Icn'Ateno
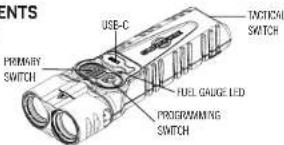
LIGHT OPERATION - PROFILE CONFIGURATION
PRIMPER switch activates the light in the various outputs.
PROGRESS switch-see "HOW TO CHANGE PROPERTY AND TAKTOL MODES"
TACTICAL switch: for momentary, strobe or constant-on output
Primary Switch Activation
Mode 1: Default. Press the PRIMARY switch to cycle from LOW to MEDIUM to HIGH to OFF. The cycle will repeat if the PRIMARY switch is pressed within two seconds. If the ST LETTO PRO II is activated on either LOW, MEDIUM or HIGH and the PRIMARY switch has not been pressed within two seconds, the next press shuts the light OFF. The last used output is not remembered.
Mode 2: Same as above, but with the cycle changed to HIGH in MEDIUM to LOW to OFF. Tactical Switch Activation
Mode 1: Default - TACTICAL & STROBE. Press and hold the TACTICAL switch for HIGH only; release the switch to shut OFF. For STROBE, rapidly tap the TACTICAL switch three or more times and hold down on the 3rd press. Release the switch to shut the STROBE OFF.
Mode 2 (Constant-on): Press the TACTICAL switch for constant-on in HIGH only. When the switch is pressed again, the light will shut off.
EMERGENCY MODE Activation
Press and hold the PROGRAMMING switch for five seconds or more to activate the MEDIUM frequency, MEDIUM output STROEL. Press the PRIMARY or tactical switch to shut EMERGENCY MODE OFF.
HOW TO CHANGE PRIMARY AND TACTICAL MODES
The PROGRAMMING switch is used to select the behavior of the PRIMARY and TACTICAL output buttons. The STLETTO PRO II must be off to change modes. The PRIMARY and TACTICAL switches are changed independently (Ex. PRIMARY switch can be on MODE 1 and TACTICAL switch can be on MODE 2.)
Changing the modes for either the PRIMARY or TACTICAL switches:
Step 1: Press and hold the PROGRAMMING switch for two to two seconds. The Fuel Gauge LED will illuminate BLUE to indicate programming more.
Step 2: While holding the PROGRAMNING switch and observing the BLUE LED Fuel Gauge, tap either the PRIMARY or TACTICAL switch cross and release the PROGRAMNING switch. Pressing the PRIMARY or TACTICAL switch more than ONCE sets the programming mode. Once the PROGRAMNING switch is released, the Fuel Gauge LED links GREEN three times for success or RED three times for error.
LOCKOUT MODE
To Enable Lockout Mode
- Press and hold the PRIMARY and TACTICAL switch simultaneously for four seconds. The Fuel Gauge LED will be BLUE while holding the buttons.
- Release the buttons when the Fuel Gauge LED blinks GREEN three times to confirm Lockout Mode is enabled. The FUEL Gauge will think RED three times for failure to enable Lockout mode
NOTE: The PRKARHY, TACHCAL and PROGRAMMING switches will not activate the STILETIO PRO D when Lockout Mode is enabled. The Fuel Gauge LED may think the when a button is pressed while Lockout mode is enabled.
To Disable Lockout Mode:
- Press the PRIMARY and TACTICAL switch simultaneously, then release
NOTE: The PRIMARY, TACTICAL and PROGRAMMING switches will be industly ready for use when
POCKET CLIP RELOCATION
- Rotate 18 Tin screws counter clockwise with supplied march to remove the
two pocket of p screws.
-
Place pocket clip on STLETTO PRO II body in desired position
-
Rotate 18 Iron screws chowse with supplied wrench. Tighten screws to 3.4 inch pounds of torque. If torque wrench is not available, tighten screws an additional .144 turn once resistant is felt. DO NOT OVERWITHEN. The STLETTO PROJ body is de cast aluminum. If the screws are overnight, the screw has become impossible, which could put the warranty.
FUEL GAUGE
The STLETTO PRO 1 is equipped with a LED that displays the battery status, both during use and while charging.
FUEL GAUGE LED INDICATOR
| CHARGING DISCHARGING | ||
| FLASHING GREEN | 90%-100% Charged | |
| SOLID GREEN | 70-90% Charged 70-100% Capacity | |
| SOLID YELLOW | 10-60% Capacity. Charging 30-95% Capacity | |
| SOLID RED | <25% Capacity. Charging | Recharge immediately |
| FLASHING RED | Pre-charge pressure | Battery Critically Low |
CHARGING THE STILETTO PRO II
The STLETHO PIG II is powered by an integral lithium polymer (LIPo) battery (1,600 mPa).
the SILETHO MO's US\$ Capitis for charging input only (Standard 56, IA max)
How to charge the LIPo rechargeable battery:
-
Insert the USB-C cable plug into STILEITO PRO 1 charging port.
-
Insert USB cable ping into a USB port of a computer or another device that will provide
power to the STLETTO PRO
- When the fuel gauge flashes green, the STLETTO PROC II is charged to more than 98%.
NOTE. The grid with function while charging at both the low and medium outputs. High output will not function while charging.
NOTE: Charging a fully electric battery can take up for three hours. The light may be left plugged into the charger without damaging the battery:
NOTE: When the SILLETIO PRO I will bring charged and the temperature is too cold (below 3.2°F/°C) or too hot (above 1.2°F/°C), the fuel gauge will hold yellow which indicates charging stopped. Once the temperature reaches 41°F/°C or 1.2°F/°C, it will continue charging. When the battery is dried below 3.6V, the SILLETIO PRO I was a two-average mode area connected to a charger. The Fuel Gauge will hold and rapidly cut the battery reaction 3.1V. Once the battery has a minimum of 3.1V, the Fuel Gauge continues above 0.5V/°C.
STROBE WARNING
Expense to finding lights may cause distress, disorientation and nausea. A very small percentage of people suffer from photosensitive epilepsy—approximately 90.025% of the population and may experience seizures or outbreaks triggered by finding lights. Visit www.splenipostudy.org for more information about this rare form of epilepsy. Anyone who has had symptoms linked to the condition should consult a doctor before using the product.