Milford 4037-07 - Belysning Livex Lighting - Gratis brugsanvisning og manual
Find enhedens vejledning gratis Milford 4037-07 Livex Lighting i PDF-format.

Brugerspørgsmål om Milford 4037-07 Livex Lighting
0 spørgsmål om dette apparat. Besvar dem du kender, eller stil dit eget.
Stil et nyt spørgsmål om dette apparat
Download vejledningen til din Belysning i PDF-format gratis! Find din vejledning Milford 4037-07 - Livex Lighting og tag din elektroniske enhed tilbage i hånden. På denne side er alle dokumenter nødvendige for brugen af din enhed offentliggjort. Milford 4037-07 af mærket Livex Lighting.
BRUGSANVISNING Milford 4037-07 Livex Lighting
ASSEMBLING & INSTALLATION INSTRUCTIONS PRODUCT# MILFORD SERIES
4037 4041 4045 4055 For Chain Hang OR Ceiling Mount Light Fixture
WARNING! SHUT POWER OFF AT FUSE OR CIRCUIT BREA
ASSEMBLING THE FIXTURE (Fig.2).
- Attach the socket sleeve (B) into the small cup of the lamp holder.
- Install the light bulbs in accordance with the fixture specifications NOTE: DO NOT EXCEED THE SPECIFIED WATTAGE!
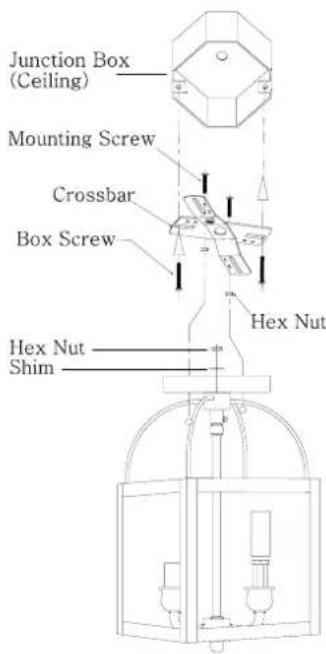
HANGING THE FIXTURE (Fig.1)
- Shut off the power at the circuit breaker and remove old fixture from ceiling, including the old single bar.
- Carefully unpack new fixture and lay all the parts on a clear surface.
- Attach the mounting screw part way into the side hole of the crook cross bar, then lock it securely with hex nut until becoming. Attach the cross bar to the junction box using two box screws. The side of the cross bar marked "GND" must face out.
- Using proper chain pliers to open one end link of the chain provided and connect to the fixture loop. Close the link.
- By measuring, determine correct number of links needed for proper hanging height. Using proper chain pliers disconnect and discard remaining chain.
- Lace the fixture wires through the chain.
- Open the other end link of the chain and hang the fixture on the loop at the ceiling. Close the link.
- Feed the fixture wires through the loop of the canopy and pull until taut.
- Slide canopy up flush to ceiling, lock it securely with ball nut.
\*\*If you not need assembly the fixture loop, please pause and refer to Fig 4.\*\*
- Take out the bottom loop of the canopy, then take the canopy to the fixture body, lock it with the shim and hex nut until tight.
- Attach the fixture body to the ceiling, lock it securely with the ball nut.
CONNECTING THE WIRES (Fig.3)
- Take the black wire from the ceiling junction box and the smooth wire leg from the fixture and twist bare ends together. Twist wire connector onto end of wire until snug.
- Repeat same process with white junction box wire and ribbed wire leg of fixture wire. NOTE: Twist wires together in the same direction you twist the wire connector onto wires.
- If your junction box has a grounding wire (green or bare copper), attach this wire and the bare copper wire from the fixture together as step 1. If junction box has no ground wire, attach the bare copper fixture wire to the green ground screw on the single bar.
- Tuck these wire connections neatly into the ceiling outlet box and then raise the canopy all the way to the ceiling. Raise the loop and thread onto ceiling loop protruding through canopy.
Your installation is now complete. Return power to the junction box and test the fixture.
Fig.3
FIXTURE
WIRES
Black or Smooth
HOUSE
WIRES
Black
(IIot)
FIXTURE
WIRES
White or Ribbed
HOUSE
WIRES
White
(Neutral)
FIXTURE
WIRES
Bare
Copper
(Ground)
HOUSE
WIRES
Green or
Bare Copper(Ground)
Fig.1
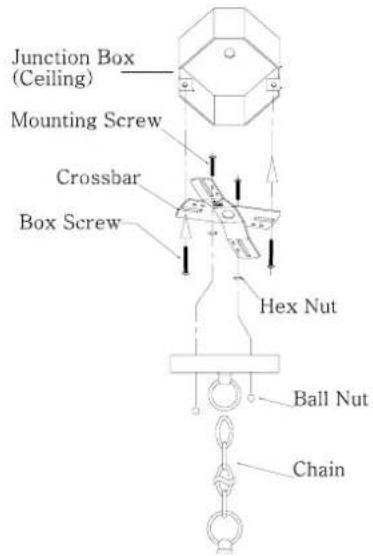
Fig.2
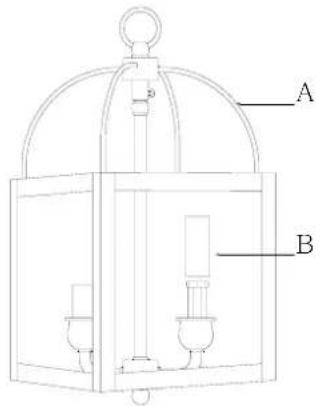
Fig.4