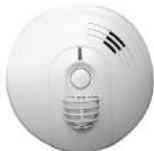
KF30R - Røgalarm KIDDE - Gratis brugsanvisning og manual
Find enhedens vejledning gratis KF30R KIDDE i PDF-format.

Brugerspørgsmål om KF30R KIDDE
0 spørgsmål om dette apparat. Besvar dem du kender, eller stil dit eget.
Stil et nyt spørgsmål om dette apparat
Download vejledningen til din Røgalarm i PDF-format gratis! Find din vejledning KF30R - KIDDE og tag din elektroniske enhed tilbage i hånden. På denne side er alle dokumenter nødvendige for brugen af din enhed offentliggjort. KF30R af mærket KIDDE.
BRUGSANVISNING KF30R KIDDE

KF30 KF30LL KF30R
USER GUIDE
57°C TEMPERATURE RATING
KF30 LOOSE BATTERY
KF30LL SEALED-IN LITHIUM BATTERY
KF3OR RECHARGEABLE

PLEASE READ AND SAVE THIS USER GUIDE
installer: Please leave this user guide with
the occupancy, the cost of the sale, and the sale price can be made.
NOTE: A new version of the 2015
CONTENTS
p.1 Paul Airm Feather 82
2.1 Specimenics 2.2 Investment Solutions
p.2 Inphelnet Sessly in cf murn p.3 East Asian cestine
1.3 East African Station
-4 How to Institute This
0.3 Interconnecting Heat Alarms
0.5 Red and Green LED Indicators
0.5 False Alarm Control
0.3 Testing the Heat Alarm
0.6 Maintenance, Cleaning, and Battery replacement KF30 only
2.7 Hedar
c.7 Fire Safety Rules and Provening Hazardous Situations
2.7 The Procedure 2.7 Way to Be in Section 5 for
-3. Toubleration
-3
WARNING: HAS ALAWING ALONE ARE NOT SURVE FOR LIFE SAFETY AS THEY ARE NOT DESIGNED TO BE
-
- 47 A: Kinhui, in British Columbia of 57 C. NATHA, 1986; 2013. 47 A: Kinhui, in British Columbia of 57 C. NATHA, 1986; 2013. 47 A: Kinhui, in British Columbia of 57 C. NATHA, 1986;
INCREASE) CINDUSTRY TEST AND DRY WOODING WILL BE FROMED AND SO EXCHANGE LT. SAFETY AND
FORCITY NOTIFICATION SEE HEAT ALARMS HAVE LIMITATIONS IN THE IMPORTANT SAFETY INFORMATION SECTION OF THIS LAWYSE
HEAT ALARM FEATURES
- This heat alarm is powered from a 230V AC supply, and has a DC battery back-up source. (EF21) heat alarm offers an electric protection in the power of a power source.
- Unique power connector prevents interconnecting with incompatible heat alarms, CO alarms, smoke alarms, or security systems
- Items KF50, KF50L and KF918 heat alarms can be interconnected with up to 23 other models as shown in the Specifications. On our connect to any other type or model of smoke, CO, or heat alarm.
- Hash quiets unwanted slums for up to 1 minute
- KF30R includes permanent rechargeable lithium batteries.
• Alarm memory identifies which alarm has activated
- Optional use tamper-resistant, fixture serves as a safeguard against tampering.
- The bus, alarm will sound a short beep about once every 40 seconds if the battery
15 OK!
- Multi-purpose green and red LEDs indicate that the heat alarm is connected to the ^1 F-type in words, respectively, or in words.
- Load alarm sounder - 35 records [d21A] at 30u - wall sound in start box in set
- Data team sounds: - as sociobics (SDA) at all - will sound as next post to emergency.
• Test button checks heat alarm operation.
- KF30LL is provided with a long-life lithium battery that lasts the full life of the alarm
and a temporal-prone option using some provided
SPECIFICATIONS
ITEMS MODEL NUMBER KFSO, CFSOL, KFSOE
LUCHEKAI KAINU
INFORMATION FOR SANSO AND FIRST AIRLINES [OR PARTNER WITH SEAVI]
2006 AC, 5014 DC BACK UP (P) 30: 99 REACHALL
K-30, ENE, 24, LME, K-30, K-30, K-30
OF 15 AND COMBINATION OF 20 OTHER ASSETS
4670 4001, 4973, 4955, 4092, 4599, 15CW, 15DW,
25W, 25W, 35W, 35W and (S120)
KF10, KF10L, KF10R, KF20, KF20L, KF20A, KF30, KF30U, and KF30T.
1946年07月RJ2055 5℃
| Makoula Amelini | 37.0°C |
| Temperia, Ar Boring | |
| Cricola La Temperielle | 3°C to 40°C |
| Cricola Ute. 93% (m/s) (kcal/min/m2) | |
| Rocumilena Corvulene | 50m3 |
| Rocumilena Scolara | 5.3m |
| Nakoula D'Arcey, New Wai | 7.7m |
| Nakoula Canio, Houtt | 6m |
IMPORTANT SAFETY INFORMATION
PLEASE READ AND SAVE THESE INSTRUCTIONS
WARNING
- The ICFIR requires constant 20W AC power AND fully charged batteries to operate properly. It requires 2 full days under main power to reach full back up capacity. The batteries are not replaceable. Do not connect near alarm to any other type of device except those listed in this user guide.
- The K930 and K931. Heat alarm requires constant 230V AC power A/D to achieve the 9V DC battery to operate properly. Removal of battery and loss or disconnection of AC power will transfer the alarm inspection. DO NOT use any other kind of battery except as specified in this user guide. Do not connect heat alarm to any other type of device except those tested in the user guide. - The TESTFALSE ALAM CONTROL button accurately tests all test amounts, DO NOT use any other best method for routine testing. Test heat alarm weekly to ensure power operation
- Higher ceilings will increase the time needed by the heat alarm to detect a fire. In most dwellings the ceiling height will keep the reaction time within acceptable limits. However, ceilings with a height of over 10 m may delay the reaction time of the heat alarm significantly. Advice from your local distributor or Fire Brigade should be obtained when installing a heat alarm on a ceiling higher than 10 m.
- This bus alarm should be installed only by a qualified electrician. The installation should comply with BS 7671 and all prevailing local, regional and national codes.
This heart alarm is designed to be used only as part of the protection of a single family dwelling or a house in multiple occupations (HMO) of no more than two scenes. It also may be used in conjunction with smoke alarms within individual hats or apartments in larger houses in multiple occupations, to provide or only warning to occupants of a flow in a room within the dwelling, but a surround the alarm system also should be provided in such cases. DO NOT install this heart alarm in any other buildings, such as hotels, motels, dormitories, hospitals, nursing homes or group homes of any kind. In these occupancies, a complete automobile fire detection and alarm system, completing with DS-1639. Part I, should be installed.
- Heat alarms should be used only in conjunction with smoke alarms, with which the heat alarms should be interconnected, in order to provide early warning of heat, smoke, or fire. Smoke alarms should be installed on every level of the dwelling
- Interconnected heat alarms and smoke alarms offer maximum protection. By interconnecting heat alarms and smoke alarms, when one unit sense heat smoke, or fire, and sounds its alarm, all others will sound as well. DQ NOT caused this heat alarm to any other type of alarm except those shot in this user guide or an apprized auxiliary device.
- Note alarms are connected with smoke alarms may not, air, every household member every time. The alarm sounder of the heat alarm is lost in order to select individuals of a potential danger. However, there may be limiting circumstances where an occupant may not hear the alarm [e.g., cutter or industrial noise, sounds sleepers, drug or alcohol usage, acquired wearing etc]. Household members must hear the alarm's warning sound and quickly respond to it to reduce the risk of damage, injury, or death that may result from fire.
+ Check carefully that, when any one device operates, the alarm signal given by interconnected devices is clearly and this throughput the building, particularly in bedrooms. Where it is essential that the alarm signal will wake sleeping occupants.
This heat alarm can sound an alarm only when it detects temperatures of 57°C or above. Heat alarms do not sense smoke or gas. In some times, hazardous levels of toxic chemicals and snacks can be able to below a heat alarm will operate. Temperatures may not reach 37°C to activate the heat alarm QUICKLY ENGLISH to ensure safe escape.
- Some lines are slow smouldering, low heat-producing, or are in a different room to that in which the heat alarm is located, or the heat from the fire may bypass the alarm – the heat alarm may not give a warning under these circumstances.
HEAT ALARMS HAVE LIMITATIONS. This heat alarm is not guaranteed to protect lives or property. Heat alarms are not a substitute for insurance. Householders should ensure their lives and property. In addition, as with any electronic device, it is possible for the heat alarm to kill at any time.
+ Never paint this heat alarm.
HEAT ALARM LOCATION
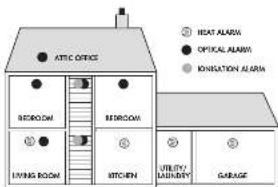
Heat alarms give an audible warning when the temperature at the alarm reaches 57°C. Heat alarms are ideal for kitchens, parages, collars, boiler rooms, athletics and other areas where there are normally high levels of humes, smoke or dust which preclude the use of smoke alarms due to the risk of heat alarms.
Guidance on the detection in dwellings is contained in BS 8631. Part 5. For normalized bungalows: two story houses, fluss and maintenance, the British Standard recommendations that the minimum work of protection should comprise smoke slums in the hallways and stairbeers. This minimum standard metabolites are a smoke alarm in the hallway of a typical bungalow or one smoke alarm on each level of a two-story house. Heat alarms should not be used in these circulation areas. If there are, for example, long hallways, sound the minimum standard may necessitate additional interconnected smoke slums.
If, however, the design of the dwelling does not comply with modern fine safety standards, or if factors such as the presence of several young children, or elderly occupants or disabled people, or of smokers, the use of portable heaters or solid fuel fires during the night, or the use of electric blankets, particularly by the elderly, the British Standard advises that additional detection devices, installed within means may be necessary.
The British Standard recommends that if the risk adjusts the provision of detectors in a kitchen boiler room, or other areas (eascape, circulation area) in which smoke alarms would be likely to give false alarms, heat alarms should be used. However, the Standard also advises that heat alarms may be installed in other rooms instead of smoke alarms, provided that the construction and using the room (including the door) can ensure fire for a sufficient time after operation of a heat room to escape equals. However, a heat alarm in unlikely or expensive early enough to save the life of every stove in the room in which this installed. Moreover, a heat alarm in the room of the origin may not be sufficient or featuring its occupants to escape safely if the door to that room is open. A Heat Alarm is also recommended in the Living Room.
HEAT ALARM SITING
FOR BEST PROTECTION, IT IS RECOMMENDED THAT YOU INSTALL A SMOKE OR HEAT ALARM IN EVERY ROOM. In addition, it is recommended that all smoke and heat alarms should be interconnected.
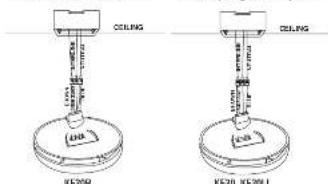
Instal heat alarm on a standard dry lining box or Tire apparatus as close to the centre of the ceiling as possible. If the centre is not practical, mount the heat alarm no closer than 300mm away from a wall or corner.
In rooms with open joints or beams, all ceiling mounted alarms should be located on the bottom or such joints or beams and not up in joint channels. Un shaped, peaked or pabled ceilings. Install heat alarm 95cm from higher point. If only wall placement is possible, install no further than 150mm low ceiling
DO NOT install heat alarms
• Directly over the cooker, stove or oven.
- In areas with high humidity, lico bathrooms or shower rooms, or areas near dishwashers or washing machines. Install heat alarms at least 10 m away from these areas if possible.
- Adjacent to, or directly above, heatera, air-conditioning vents or ceiling fans. - In an area where the temperature may fall below -30°C or rise above 37°C.
• In areas above 90% relative humidity (Rill), non-condensing.
- Near fluorescent lights. Electrical noise and flickering may affect the
operation of the heat alarm.
- Closer than 300mm to light fittings.
- In such a position that it is difficult or dangerous to reach for testing or main
[Unreadable]
- Do not site the alarm in an area where water or other liquids may enter the alarm.
HOW TO INSTALL THIS HEAT ALARM
DANGER: ELECTRIC SHOCK HAZARD, TRANSFERRED TO THE MEAT-DRUM SWITCH OF THE MANUEL TELLINGTON NO. BY ERNESTING THE BIG OF SWITCHING THE CIRCUIT PRIOR TO THE OFF PENSION AND PUBLIC
WARNING: The HAA ALAM SHOULD BE INSTALLED ONLY BY A GREEN ELECTRIC FIN ACTOR. NAME WITH THE RESOURCES FOR CHEMICAL INDUSTRY, ASSEMBLY THE INSTALLATION OF EQUITY (EXTRA-ING) 8576711 ANOOCHE MUSEUM, PERSONAL AND NATIONAL STUDY.
WARNING: HEAT ALARMS SHOULD BE CONNECTED ON A SINGLE INDEPENDENT DEDICATED CIRCUIT AT THE MAIN DISTRIBUTION BOARD, NO OTHER ELECTRICAL EQUIPMENT EXCEPT COMPARABLE SMOKE AND CO ALARMS. SHOULD BE CONNUCED TO IT IS CIRCUL IF YOUR ONE HAS INDIVID CURRENT LEVEL PROTECTION ON THE ELECTRICAL INSULATION OR ON INDIVIDUAL CIRCUITS, O LCK WITH A QUALIFIED ELECTRICAN TO MAKE SURE THAT RAETS ON CIRCUITS SERVING SOCKET OUTSETS OR PORTARE APPLICANTES CANNOT CAUSE INTRODUCTION TO THE SUPPLY TO THE LAT ALARMS.
- Route the household AC supply/interconnect cable into the dry lining box or
- 1. 2017年1月1日
- Using a standby-label thermal mode, called the neutral supply in the heat load of the conactor plug.
Standard Dry Living box or Fire pettines
Standard Dry Living bus on Fines pallives
-
Using a suitable-nated terminal block, supplied with Free patterned connection to the line supply to the brown load of the connector plug.
-
If interconnecting is desired, connect the orange or white of the connector plug to the designated interconnect conductor of the household cable. See note INTERCONNECTING HEAT ALARMS.
NOTE: If this is to be a single station host alarm, connect the orange or white wire to an unused terminal clock.
-
Insert the completed connector block onto the mounting pins of the Firex Pet press or recess into dry lining box.
-
Pass the connector pin through the mounting plots of the heat alarm, aligns bits and fasten mounting plots securely in the Paltress or dry-living bus. NOTE: If this is to be a single-station heat alarm, connect the orange or white wire to an unused terminal block.
-
Attach connector plug to give an shock of heat alarm. Plug will only be one way and will snap into place.
-
Hardening conductor to be sure it is attached securely.
NOTE: Steps 9 and 10 for Model's KF30, KF30LL only. These models contain a battery pull tab for your convenience. Battery pull tab must be removed to activate battery backup and provide power to the unit in the event of mains power loss.
-
Pull out the battery pull tab. Heat alarm may keep briefly when battery is activated.
-
Push button and hold button on front cover of heat alarm for five (5) seconds. Heat alarm should sound its alarm here if humidity is connected. NOTE: cover number sets with your hand or hold unit at arm's length during testing to avoid car discomfort.
-
Position best alarm to mounting plate and turn a clockwise to lock into place. Hour alarm will not mount to plate if battery is not installed (Models KF30, KF30LL only).
-
Turn on power at main fuse box or circuit breaker. The green LED on the cover should be illuminated.
-
Test heat alarm. See TESTING THE HEAT ALARM.
INTERCONNECTING HEAT ALARMS
Use 1.5mm2 minimum solid or stranded cable with a rating of 200V. When interconnecting heat alarms, CO alarms or smoke alarms, the maximum cable length between any two should be 450m for 1.5mm2 cable (20 arm loop resistance.)
DO NOT connect to any other type or model of heat alarm. CO alarms or smoke alarm. Connect all interconnected heat and smoke alarms to a single final circuit. Wiring must conform to I.E.E. Regulations for Electrical Installators (BS 7671).
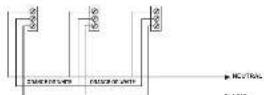
FOR INTERCONNECTING: USE A MINIMUM OF 1.5mm CABLE
RED AND GREEN LED INDICATORS
NOTE: Colors shown correspond to electrical codes in the United Kingdom. Colors may vary in other countries.
This heart alarm features a red and green LED indicator that can be seen through the clear light pipe on the top of alarm. The LEDs indicate the following:
GREEN
ON AC power is present.
OFF - AC power is no present.
RED
BLINKS ONCE EVERY 5 MINUTES AND 20 SECONDS - Maine power is present indicating normal operation.
BUNKS ONCE EVERY 10 SECONDS - Sales Alam Caneal activated
OFF - DC power is no, present.
BUNKS DRIVE A SECOND and unit is sounding alarm - senses 57°C
IFF and unit is sounding alarm - Another interconnected smokeheat alarm in the network has sorted results at 57°C and is sounding this alarm.
3 RAPID FLASHES AT 40 SECOND INTERVAL - Influstible achoch alarm bus previously detected an alarm condition
HUSH CONTROL
WARNING: AERROR IS NO THE ALAWA'S HLISH FEATURE. FULL IDENTITY THE SOURCE OF THE HFAT BUILD UP AND MAKE SLIFT THAT THE AREA IS SAFF. DO ACIRWAL CONTROL PUSH AND ALLIASE IT, I SLISH/TALE, ALAWA CONTROL BUTTON IN THE CENTER OF THE ALAWA. THE ALAWA WILL SLENCE INVED ATLY AND THE LED LIGHT LED WILL REIN APPLICATIVELY EVERY TO SECONDS FOR THE NEXT TO MINUTES. THIS FEATURE IS TO BE USED ONLY WHEN A SAFF CONDITION IS KNOWN TO USE.
The Bush feature will silence the alarm for approximately 9 minutes. A rapid rise in temperature will materials the Gauss Alarm Control and causes the write sound an alarm.
After 9 minutes the most alarm will reset to normal operation. If the unit still detects a dangerous situation the alarm will soon again.
If interconnected alarms are installed, the unit that detects the high temperature and sounds the alarm cannot be incidentally silenced by the TEST/Hush button of other units. In this case all of the alarms will continue to sound for as long as a dangerous situation is detected or until the TEST/Hush button of the incoming alarm is pressed.
If the alarm does not go into False Alarm Control and continues to sound its alarm, the heat in the area is too high and a dangerous situation may exist - take emergency action.
TESTING THE HEAT ALARM
WARNING: The HAD → HAD AND HAD → HAD → HAD → HAD → HAD → HAD → HAD → HAD → HAD → HAD → HAD → HAD → HAD → HAD → HAD → HAD → HAD → HAD → HAD → HAD → HAD → HAD → HAD → HAD → HAD → HAD → HAD → HAD → HAD → HAD → HAD → HAD → HAD → HAD →
Since a week's birth from the past week when testing, the annual season is too to ask you to an emergency and can be passive. You have Test the real alarm which and I don't miss and have a history of what the house has been in touch for more special days.
Test all heat a arms weekly by doing the following:
Check the TEST/HUSH button. If the green LED above the test button is ON, the heat alarm is receiving AC power.
-
Herely express and hold the TEST-Hush button for at least five (5) seconds. The heat alarm will sound 3 long heaps, pause, 3 longs keeps, repeating for up to 10 seconds after the TEST-Hush button is released. NOTE: If heat alarms are interconnected, all heat and smoke alarms should sound an alarm within three (3) seconds after any test button is pushed and the tested heat alarm sounds.
-
If the heat alarm does not sound, turn off the power to the heat alarm circuit at the main distribution board and check the wiring. Select the heat alarm.
WARNING: IT'S EAT ALARM SOLIDS, AND IT'S EAT ALARM SNOT BEING TESTED, THE EAT ALARM SENSIBLE VEGETURE OF 57°C OR 200V. THE ALARM SOLIND REQUIRES YOUR INVE- DATE ATTENTION AND ACTION: EVACILATE THE DWBUNG INMEDIATELY.
MAINTENANCE AND CLEANING
In addition to weekly testing, this heat alarm must be cleaned periodically to remove dust, dirt and debris.
DANGER: ELECTRIC SHOCK HAZARD
INVOICE THE AC SIVITY TO THE HEAD ALAIS AT THE MAIN DISTRIBION BOARD BY REACHING THE TEST OR SWITCHING THE APPROPRIATE CIRCUIT BREAKER TO THE OT POSITION BE RUTS CLEANING THE HEAD ALAIS.
WARNING: HEAT ALIMMS ARE UPBASING DEVICES AND SHOULD BE CALLS FOR FEDUCALLY CLEANING
Clean the heat alarm at least once annually to remove dust, dirt and debris. Always turn off the AC power in the heat alarm before cleaning it.
Using the soft brush or ward attachment to a vacuum cleaner, vacuum all sides and the cover of the heat alarm. Be sure that all vents are free from debris. If necessary, turn off the AC power and use a cloth demcened with warm water to clean the heat alarm case.
IMPORTANT: Do not attempt to remove the cover or clean inside the heat alarm. THIS WILL INVALIDATE YOUR GUARANTEE, failure to properly clean and minimize this heat alarm may result in impaired operation and possible failure and will invalidate the guarantee.
WARNING: BATTERIES NOT RELIACEABLE IN THE KT301, KT302. Also, KT303 HAS FORWARDLY MOUNTED RECAVANCE WITH AN ENTERED THAT ARE DESCRIBED TO LET THE LCKIN, UT OF 1 E AAMY.
BATTERY REPLACEMENT- KF30 ONLY
Always turn off the AC power to the heat alarm before replacing the battery. Replace the alarm at least once approximately 2 seconds after the low alarm, signal provided
the battery is almost always, or it is absolutely small the heat alarm signal is about once a minute, even though the heat alarm is receiving AC power. The low battery signal can be hushed for 8 hours by preasing and releasing the heat button. NOTE: current exposure in extreme temperature or humidity can reduce battery life. Use only the following batteries so replacements in this heat alarm Energyer b22 : Duracell MR1604 or MX 1604: FDCCP-VJJ; Ultralife UWVL J P.
A CAUTION: DANIEL OF BORDON'S FLOOR OF PEACH CYN OIL & CO., INC. THE ROLL SECURD IN THE EARNER GUIDE.
WARNING: DO NOT USE ANY OTHER TYPE OF BATTERY, ONLY AS SHOWN IN THE USB GUIDE. DO NOT USE EXCHOCABLE SWITCH. THE CROSSED-OUT WHEREIN SNVOLK INDICATES THE BATTERIES LISTED IN THIS USB GUIDE SHOULD BE DISPOSED OF SEPARATELY FROM HOUSEHOLD WASTE.
- Turn off the AC power supply to the heart alarm at the main distribution board.
-
Insert a small screwdriver into the slot in the mounting plate and turn the heart alarm occurclockwise to detach the alarm.
-
Gendy pull down the heat alarm. Do careful not to separate any wire connections.
- Pulling the connecting point from the back of the heat alarm.
b. From the back of the heat alarm, lift the tab to open the battery compartment floor.
-
Remove the battery from the compartment. Distressed, the drained battery from the battery compartment and discard.
-
Insert a fresh, 9-watt battery into battery pocket. The battery will fit only one way heat alarm may sound a short beep when battery is installed. This is normal and means the battery is installed correctly.
-
Close the battery compartment door, Push down until it snaps into place.
B. Using the TEST button, test the heat alarm to verify IV DC battery back-up.
-
Paplace the connector plug. The connector will snap into close. Bantiny the connector to be sure it is attached properly.
-
Set such the heat slams in the mounting plots by turning the heat slams clockwise until it snaps into place.
-
Turn on the AC power and sec the heat alarm using the TEST button. See TESTING THE HEAT ALARM.
REPAIR
CAUTIONS: DIAVAT OTRATO TO PROVE THE HEAT SMOO. ZONING SO THE EXCEPT YOUR GUARDEN. If the heat alarm is not operating property, see TROUBLESHOOTING. If necessary, and if the heat alarm is still under warrant, pack it in a well-padded center and send it, with Proof of Purchase postage prepaid, to the address given at the end of this user guide.
If the heat alarm is no longer under guarantee, have a qualified electrician replace the heat alarm immediately with a comparable Firex brand heat alarm.
FIRE SAFETY RULES AND PREVENTING
HAZARDOUS SITUATIONS
Sling, Lesing, and taking care of heat, and smoke alarm is just one step in helping to protect your family and home from fires. You must also reduce the chance that fires will start in your home and increase your chances of escaping if a fire does start. At a minimum, your home 174 safety program should include the following guidelines:
- Use smoking materials properly never smoke in bed or when sleeps or under the influence of alcohol or other drugs.
- Keep matches and other sources of ignition areas from children.
- Store flammable materials in proper containers and never store or use them near open flames or sparks.
- Keep electrical appliances and their leads in good working condition, and do not overload electrical circuits.
- Keep fireplaces, channels, and barbecue grills clean, and make sure they are properly sited away from combustible materials.
- Keep portable heaters and open flames such as candles away from combustible materials.
- Do no, allow to switch to accumulate
- Have the electrical wiring in your house checked by a qualified electrician at least every 10 years (or more often as it ages).
- Never leave cooling unattended.
FIRE PROCEDURE
If you hear the heat or smoke alarm sounding, and you have not pushed the next counter, it is scaming you of a dangerous situation. You will need to respectfully. To prepare for such occurrences, develop lately escape plans, discuss them well household members, and practice them regularly. For your safety, as a minimum, you should be the following to have more effective fire safety.
- Draw a floor plan of your home and find all ways to escape it there is a line. On the ground floor, consider whether windows can be used for escape. On upper floors, consider whether external rescue will be possible if escape routes are blocked by fire or smoke.
- Expose everyone to the sounds of the next alarm and of the smoke alarm and explain what the sounds mean. Show them how to check to see if doors are hot before opening them, how to stay close to the floor and crawl along the floor to stay be raw dangerous smoke, gases and gases, and how to see the alternative exit if a door is hot instruct them nor to open the door if the door is hot.
- Decide on a meeting place a safe distance from your house and make sure all members of your household understand they should go and wait for you there if there is a fine. Explain to children that they must be ready to leave the house by themselves if necessary.
- I had fire drills every six (6) months to make sure everyone, even small children, know what to do to escape safety.
- Know where to go to call the Fire Brigade from outside your house.
- Provide emergency equipment, such as fire extinguishers, and teach your family how and when to use this equipment.
WHAT TO DO IN CASE OF A FIRE
After you have prepared family escape plans and practiced them with your family, you have increased their chances of escaping safety. Review the following rules with your family when you have fired drills, so everyone will remember them in a real fire.
-
Don't panic, stay calm. Your safe escape may depend on thinking clearly and remembering what you have practiced.
-
Get out of the house, following your planned escape route, as quickly as
possible. Do not shop to collect anything or to get dressed.
-
Open doors carefully only after looting to see if they are hot. Do not open a door if it is hot, use an alternative escape route. If your escape route is blocked, go to a window and short for help. If necessary, shift clothing or other materials in the goes round the room door to stop smoke from entering until help arrives.
-
Stay close to the floor, stands and but goes closer toward the ceiling.
-
Keep doors and windows closed unless you open them to escape
-
Meet at your pre-arranged meeting place after leaving the house.
-
Call the fire Engage as soon as possible from outside your house, give your full address, including the name of the town or village.
3 Always call the Fire Drigede as soon as possible, even if a fire seems small.
- Never re-enter a burning or smoke-filled building.
These guidelines will assist you in the event of a fire. However, to reduce the chance that fires will start, practice fire safety rules and prevent hazardous situations. Contact your local fire Shivsde for more information.
TROUBLESHOOTING
| PROBLEM | SOLUTION |
| Heat alarm does not sound when tested. | 1. Check that AC power is turned on.2. Turn off power. Remove heat alarm from mounting pole and a. check that the starting power plug is securely attached.3. Check that buttons is installed in the first 40 seconds (RSELL only).4. Clean smoke alarm. |
| NOTE: Push and hold test gutton for at least five 40 seconds until testing. | |
| Heat alarm beepses about once every 40 seconds | KP308: Verify that unit has been under main operation for a minimum of 2 full days. The heating period shall be forced charging period, return the unit for service. KP308: This alarm has long life lithium battery to latch the full time of the alarm. If the alarm beepses every 40 seconds there is a small ball and it needs replacing KP308: Turn off AC power and replace battery. See "Security Repolument" in the MAINTENANCE CLEANING section. |
| Heat alarm sounds unwanted alarms. | 1. Hire an electric to move Heat alarm to a new location. See the HEAT ALARM SITING section of this user guide. |
| Interconnected heat alarms do not sounds when system is tested. | 2. Press and hold button for at least two seconds after the first unit session.2. Turn off AC power or circuit breaker and check the interconnected swing. See INTERCONNECTIVO HEAT ALARM section of this user guide. |
| 3 ohms every 40 seconds | 1. Before 10 years of operation, but in fault mode, contact customer service.2. After 10 years of operation, end of the warning. Aving must be replaced. REPLACE IMMEDIATELY. |
NOTE: Contact customer support at 03337 722227 if your alarm does not seem to operate correctly.
GUARANTEE
The manufacturer guarantees this product to be free from detects in nature and ownership under normal use and services ("Debacter") for a period of site (6) years from the date of purchases ("the Guarantee Period"). Should any Debacter be discovered within the Guarantee Period, the Company will, at its option, repair or replace the defective products provided that (a) is returned during the Guarantee Period with postage prepaid and with proof of purchase date to the address shown below and bid. The Company verifies that the claim is proper. This Guarantee does not cover damage resulting from accident, improper installation, maintenance or repair, misuse, abuse or product methylation. The Guarantee does not cover any rights other than those expressly use without abuse and does not cover any claims for consequential loss or damage. This Guarantee is offered as an equal benefit and does us affect your statutory rights as a consumer.
Iselium units in a pedded carton, postage prepared to:
FIREX PRODUCTS
KIDDE SAFETY EUROPE LIMITED
ASH HOUSE, Litter House, Ashfield, TW15 112, UK
18: 06009170722
www.smoke-claris.co.uk
Manufactured By
Wells Rock Portable Equipment Inc. 1016 Compass Park Drive, Guam, FL 1752-183
Muck in China
EU-Advanced Human Health
Calmi Fiv & Casa E, D.2. Kekranay T, 0933 Dill mand, Nl
1003-7204-19