SERIE 1-DW453W V - Opvaskemaskiner Sauber - Gratis brugsanvisning og manual
Find enhedens vejledning gratis SERIE 1-DW453W V Sauber i PDF-format.

Brugerspørgsmål om SERIE 1-DW453W V Sauber
0 spørgsmål om dette apparat. Besvar dem du kender, eller stil dit eget.
Stil et nyt spørgsmål om dette apparat
Download vejledningen til din Opvaskemaskiner i PDF-format gratis! Find din vejledning SERIE 1-DW453W V - Sauber og tag din elektroniske enhed tilbage i hånden. På denne side er alle dokumenter nødvendige for brugen af din enhed offentliggjort. SERIE 1-DW453W V af mærket Sauber.
BRUGSANVISNING SERIE 1-DW453W V Sauber
IeSmart
sauber
Lavavajillas Serie 1-DW45 3 W V/Serie 1-DW45 3 X V. Manual de usuario Dishwasher Serie 1-DW45 3 W V/Serie 1-DW45 3 X V. User manual.
useful
Ie efficient
Ie connected
sauber
ES Lavavajillas / Manual de usuario

natural_image
Simple line drawing of a rectangular container with a horizontal bar inside (no text or symbols)SERIE 1 -DW45 3 X V
SERIE 1-DW45 3 W V
Gracias por elegir este producto.
Este manual de usuario contiene información importante sobre seguridad e instrucciones que pretenden ayudarle con el manejo y mantenimiento del aparato.
Tome el tiempo que necesite para leer este Manual de usuario antes de usar el aparato y guarde este libro por si tuviese que consultarlo más adelante.
| Icono | Tipo | Significado |
 | ADVERTENCIA | Riesgo de lesión grave o muerte |
 | RIESGO DE DESCARGA ELÉCTRICA | Riesgo de voltaje peligroso |
 | INCENDIO | Riesgo de incendio |
 | PRECAUCIÓN | Riesgo de lesiones o daños materiales |
 | IMPORTANTE/NOTA | Uso correcto del sistema |
INHALT
1 INSTRUCCIONES DE SEGURIDAD 4
1.1 Advertencias generales de seguridad 4
1.2 Advertencias para la instalación 5
1.3 Durante el uso 6
2 INSTALACIÓN....9
2.1 Colocación de la máquina 9
2.2 Conexión de agua 9
2.3 Tubo de entrada de agua 9
2.4 Manguera de desagüe....10
2.5 Conexión eléctrica 10
2.6 Instalar la máquina bajo la encimera....11
3 ESPECIFICACIONES TÉCNICAS....12
3.1 Aspecto general 12
3.2 Especificaciones técnicas....12
4 ANTES DE UTILIZAR EL ELECTRODOMÉSTICO 14
4.1 Preparación del lavavajillas para el primer uso....14
4.2 Uso de sal (si está disponible)....14
4.3 Rellene de sal (si está disponible)....14
4.4 Tira de prueba 15
4.5 Tabla de dureza del agua 15
4.6 Sistema de descalcificación del agua....15
4.7 Ajuste 15
4.8 Uso de detergente 15
4.9 Llenado de detergente....16
4.10 Uso de detergentes combinados....16
4.11 Uso de abrillantador 16
4.12 Relleno y ajuste del abrillantador 16
5 CARGA DEL LAVAVAJILLAS 18
5.1 Recomendaciones 18
5.2 Cargas de cesta alternativa 20
6 TABLA DE PROGRAMAS....21
7 PANEL DE CONTROL 22
8 LIMPIEZA Y MANTENIMIENTO 24
8.1 Filtros 24
8.2 Brazos aspersores 24
8.3 Bomba de vaciado....25
9 RESOLUCIÓN DE PROBLEMAS 26
1 INSTRUCCIONES DE SEGURIDAD
1.1 Advertencias generales de seguridad
- Lea detenidamente todas las instrucciones antes de usar el aparato y guarde este manual para consultas futuras.
⚠️ Compruebe si la máquina y su embalaje tienen daños. Nunca use una máquina con daños, contacte inmediatamente con un servicio autorizado.
- Desembale el paquete como se indica y deséchelo según las reglas proporcionadas.
⚠️ Este aparato puede ser usado por niños de 8 años o más, y por personas con capacidades físicas, sensoriales o mentales reducidas o con fala de experiencia y conocimiento si son supervisados o reciben instrucciones concernientes al uso del aparato de una manera segura y entienden los peligros que conlleva. Los niños no deben jugar con el aparato.
⚠️ Retire el embalaje y póngalo fuera del alcance de los niños.
⚠️ No deje que los niños jueguen con la máquina. Mantenga a los niños alejados de detergentes y abrillantadores.
⚠️ Después de lavar en la máquina pueden quedar algunos residuos. Mantenga a los niños alejados de la máquina cuando esté abierta.
Asegure que las máquinas antiguas no pongan en peligro la seguridad de los niños. Los niños pueden quedar atrapados en máquinas antiguas. Para evitar esta situación, rompa la cerradura de la puerta y corte el cable de red.
1.2 Advertencias para la instalación
- Elija un lugar adecuado y seguro para instalar la máquina.
- Siga las instrucciones sobre la instalación y conexión de la máquina.
- Con la máquina solo se deben utilizar repuestos originales.
⚠️! Antes de la instalación desenchufe la máquina.
⚠️ La máquina debe ser instalada únicamente por un servicio autorizado.
⚠️Compruebe si el sistema de fusible eléctrico interior está conectado según los reglamentos.
⚠ Todas las conexiones eléctricas deben coincidir con los valores de la placa.
Asegúrese de que la máquina no pise el cable de suministro eléctrico.
⚠️ Nunca use un cable prolongador o una conexión de múltiples tomas.
⚠️ El enchufe debe ser accesible después de instalar la máquina.
- Después de la instalación, ponga en marcha la máquina sin carga la primera vez.
⚠️⚠️La máquina no debe estar enchufada durante la colocación.
⚠️ Use siempre el enchufe revestido suministrado con la máquina.
⚠️! Para evitar peligros, en caso de dañarse, el cable eléctrico de la máquina debe ser sustituido por un servicio autorizado o persona cualificada similar.
1.3 Durante el uso
- Esta máquina es únicamente para uso doméstico; no lo utilice con otras finalidades. El uso comercial invalidará la garantía.
⚠️No se ponga de pie, no se siente ni coloque cargas sobre la puerta abierta del lavavajillas.
⚠️Use únicamente detergentes y abrillantadores producidos específicamente para lavavajillas. Nuestra empresa no se responsabiliza de daños que puedan ocurrir debido a un uso incorrecto.
⚠️No beba agua de la máquina.
⚠️Debido a peligro de explosión, no coloque agentes disolventes químicos en la sección de lavado de la máquina.
- Compruebe la resistencia térmica de los artículos de plástico antes de lavarlos en la máquina.
⚠️Ningún niño debe realizar la limpieza ni el mantenimiento de usuario de este aparato sin supervisión.
⚠️No ponga artículos inadecuados para lavavajillas en la máquina y no llene las cestas por encima de su capacidad.
- Nuestra empresa no se responsabiliza de cualquier deformación interior de la máquina debida a mal uso.
⚠️No abra la puerta mientras la máquina está en funcionamiento, podría derramarse agua caliente. Dispositivos de seguridad aseguran que la máquina se detiene si se abre la puerta.
⚠️La puerta de la máquina no se debe dejar abierta. Podría provocar accidentes.
Coloque cuchillos y otros objetos afilados en la cesta para cubiertos en una posición con el filo hacia abajo.
⚠️ Para modelos con el sistema de apertura automática de puerta, cuando se activa la opción EnergySave, la puerta se abrirá al final de un programa. Para evitar daños al lavavajillas, no fuerce la puerta a cerrarse después de 1 minuto de la apertura automática. Para un secado eficaz, deje la puerta abierta durante 30 minutos después de que se complete un programa. No permanezca de pie delante de la puerta cuando suene la señal de apertura automática.
⚠ En caso de mal funcionamiento, la reparación únicamente debe ser realizada por personal de servicio autorizado. De lo contrario, se invalidará la garantía.
⚠️! Antes del trabajo de reparación, la máquina debe ser desconectada de la red. No tire del cable para desenchufar la máquina. Cierre el grifo de agua.
O El funcionamiento con poca tensión provocará que disminuya el rendimiento.
⚠️Por seguridad, desconecte el enchufe una vez haya finalizado el programa.
Para evitar una descarga eléctrica, no desenchufe la máquina con las manos mojadas.
⚠️! Para desconectar la máquina de la red, tire del enchufe, nunca tire del cable
2 INSTALACIÓN
2.1 Colocación de la máquina
Cuando coloque la máquina, póngala en una zona en la que los platos puedan ser cargados y descargados fácilmente. No ponga la máquina en una zona en la que la temperatura ambiente baja de 0 °C.
Lea todas las advertencias del embalaje antes de retirarlo y colocar la máquina.
Coloque la máquina cerca de un grito y un desagüe de agua. Tenga en cuenta que las conexiones no serán alteradas una vez la máquina esté en su posición.
No sostenga la máquina por su puerta o panel. Deje una distancia adecuada alrededor de la máquina para facilitar su movimiento cuando se limpie.

Asegure que los tubos de entrada y salida de agua no se chafan ni quedan atrapados y que la máquina no se posa sobre el cable eléctrico cuando es colocada.
Ajuste las patas de modo que la máquina quede a nivel y equilibrada. La máquina debe ser colocada en un suelo plano o de lo contrario estará inestable y la puerta de la máquina no se cerrará correctamente.
2.2 Conexión de agua
Recomendamos instalar un filtro en el suministro de agua a fin de evitar daños a la máquina debidos a contaminación (arena, óxido, etc.) de la fontanería interior. Esto también ayudará a evitar el amarilleo y la formación de depósitos tras el lavado.
Nota impresa en la manguera de entrada de agua!
Si los modelos están marcados con 25°, la temperatura del agua puede ser de máx. 25 °C (agua fría).
Para el resto de modelos:
Es preferible el agua fría; la temperatura máx. del agua caliente debe ser de 60 °C.
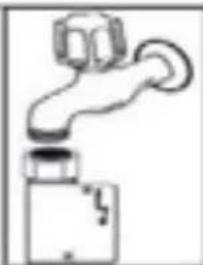
2.3 Tubo de entrada de agua

natural_image
Illustration of a hand holding a faucet with a handle, no text or symbols present
ADVERTENCIA: Use en nuevo tubo de entrada de agua suministrado con la máquina, no use un tubo de máquina antigua.

ADVERTENCIA: Deje correr agua a través del tubo nuevo antes de conectarlo.

ADVERTENCIA: Conecte el tubo directamente a la toma de entrada de agua. La presión suministrada por la toma debe ser como mínimo 0,03 MPa y como máximo 1 MPa. Si la presión supera 1 MPa, debe instalarse una válvula de alivio de presión entre la conexión.

ADVERTENCIA: Después de hacer las conexiones, abra el grifo completamente y compruebe si hay fugas de agua. Una vez finalizado un programa de lavado cierre siempre el grifo de entrada de agua.
natural_image
Simple line drawing of a faucet with a valve and handle (no text or symbols)
Con algunos modelos hay disponible un caño de agua Aquastop. No lo dañe ni permita que se retuerza ni pliegue.
2.4 Manguera de desagüe
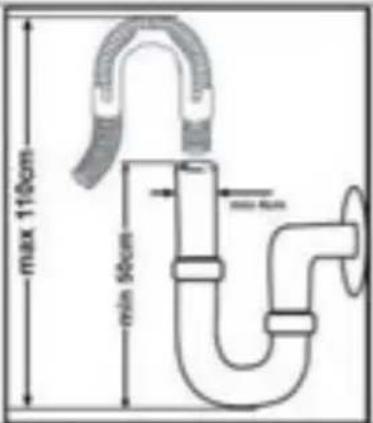
text_image
max 110cm min 90cmConecte el tubo de desagüe de agua directamente en el agujero de desagüe o en el grifo de salida del fregadero. Esta conexión debe estar como mínimo a 50 cm y como máximo a 110 cm del plano del suelo.
O IMPORTANTE: Los artículos no se lavarán correctamente si se usa un tubo de desagüe de más de 4 m.

text_image
0.6472m2.5 Conexión eléctrica
ADVERTENCIA: La máquina funciona a 220-240 V. Si el suministro de tensión de la red a la máquina es de 110 V, debe conectar un transformador de 110/220 V y 3000 W entre las conexiones eléctricas.
El enchufe con conexión a tierra de la máquina debe conectarse a la toma con conexión a tierra suministrada tensión o corriente adecuadas.
En ausencia de instalación con conexión a tierra, un electricista autorizado debe realizar una instalación con conexión a tierra. En caso de uso sin conexión a tierra, no seremos responsables de pérdidas de uso que pudieran ocurrir.
El enchufe de este aparato puede incorporar un fusible de 13A dependiendo del país de destino. (Por ejemplo, Reino Unido.) (Por ejemplo, Reino Unido, Arabia Saudi)
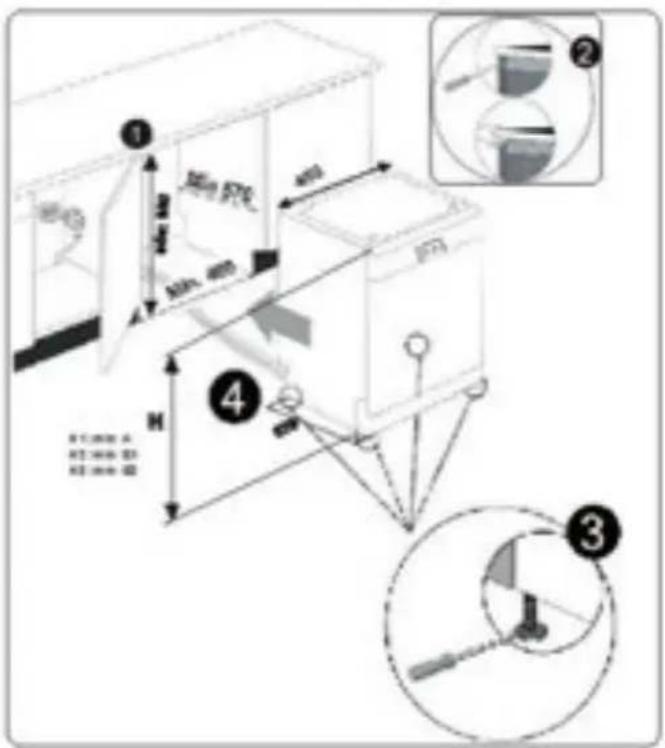
2.6 Instalar la máquina bajo la encimera
Si desea instalar la máquina bajo la encimera, debe haber suficiente espacio para hacerlo y cableado-fontanería deben ser adecuados para hacerlo (1). Si el espacio bajo la encimera es adecuado para encajar la máquina, retire la tapa superior como se muestra en la ilustración (2).

ADVERTENCIA: La encímera, bajo la de va a colocar la máquina, debe estar le a fin de evitar desequilibrios.
El panel superior del lavavajillas debe ser retirado para encajar la máquina bajo la encimera.
Para retirar el panel superior, retire los tornillos que lo sostiene, ubicados en la parte trasera de la máquina. Luego, empuje el panel 1 cm desde la parte delantera a la trasera y elévelo. Ajuste las patas de la máquina según la pendiente del suelo (3). Encaje la máquina empujándola bajo la encimera, teniendo cuidado que los tubos no queden aplastadas o doblados (4).

ADVERTENCIA: Después de
retirar el panel superior del lavavajillas, la máquina debe ser colocada en un espacio de las dimensiones mostradas en la siguiente figura.
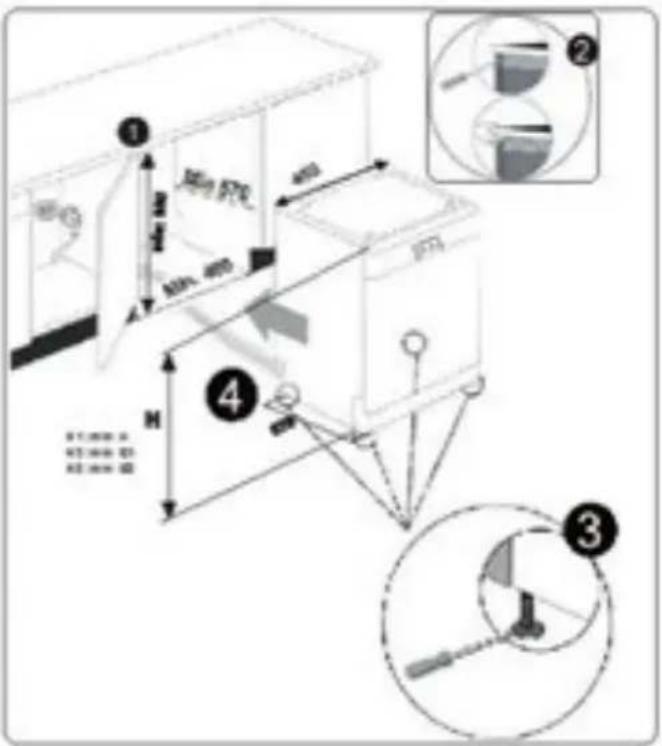
text_image
① 300mm 870 400 100mm 400 H ④ ST.200mm A ST.150mm B1 ST.100mm D2 ③| 45 cm | Sin panel superior | ||
| Sin fieltro | Sin fieltro | Sin fieltro | |
| Para la 2a cesta | Para la 3a cesta | ||
| Altura (H) (mm) | 820 mm | 825 mm | 835 mm |
3 ESPECIFICACIONES TÉCNICAS
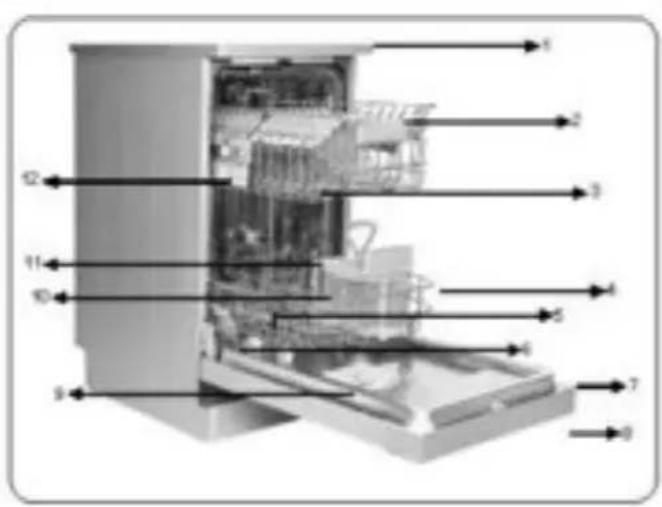
text_image
Labeled diagram of a refrigerator interior with numbered components for identification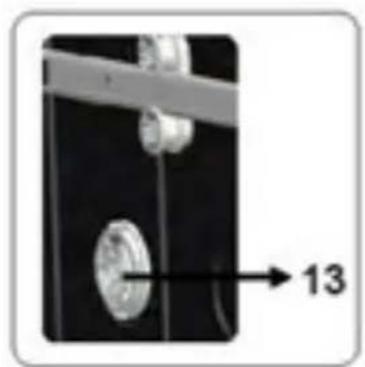
natural_image
Close-up of a mechanical component with a numbered arrow pointing to a circular feature (no text or symbols visible)3.1 Aspecto general
- Tapa superior
- Cesta superior con soportes
- Brazo rociador superior
- Cesta inferior
- Brazo rociador inferior
- Filtros
- Placa de datos
- Panel de control
- Dispensador de abrillantador y detergente
- Cesta para cubiertos
- Dispensador de sal
- Enganche de pista de cesta superior
- Mini secadora activa: Este sistema ofrece mejor rendimiento de secado para los platos.
3.2 Especificaciones técnicas
| Capacidad | 10 ajustes de lugar |
| Dimensiones (mm)AlturaAnchoProfundidad | 850 (mm)448 (mm)598 (mm) |
| Peso neto | 40 kg |
| Voltaje/frecuencia de funcionamiento | 220-240V50 Hz |
| Corriente total (A) | 10 (A) |
| Potencia total (W) | 1900(W) |
| Presión de suministro de agua | Máxima:1 (Mpa)Minima:0,03 (Mpa) |
RECICLAJE
- Algunos componentes de la máquina y el embalaje consisten en materiales reciclables.
- Los plásticos están marcados con las abreviaturas internacionales (>PE<, >PP<, etc.)
- Las piezas de cartón consisten en papel reciclado. Se pueden poner en contenedores de desperdicio en papel para reciclaje.
- Materiales no adecuados para la basura doméstica deben desecharse en centros de reciclaje.
- Contacte con un centro de reciclaje pertinente para obtener información acerca de la eliminación de materiales diferentes.
EMBALAJE Y EL MEDIOAMBIENTE
- Los materiales de embalaje protegen la máquina contra daños que podrían ocurrir durante el transporte. Los materiales de embalaje son respetuosos con el medioambiente, dado que son reciclables. El uso de material reciclado reduce al consumo de materias primas y por lo tanto disminuye la producción de desperdicios.
Declaración de conformidad de la CE
Declaramos que nuestros productos cumplen con las Directivas, Decisiones y Normativas europeas pertinentes y con los requisitos enumerados en los estándares mencionados.
Desecho de la máquina antigua

El símbolo que se muestra sobre el producto o su embalaje indica que este producto no se puede tratar como residuos domésticos. En su lugar, debe llevarse a un punto de recogida dedicado al reciclaje de equipos eléctricos y electrónicos. Al asegurarse de que este producto sea desechado debidamente, ayudará a evitar posibles consecuencias negativas para el medioambiente y la salud de las personas, que podrían producirse si los residuos de este producto se tratasen de manera incorrecta. Si desea obtener información detallada sobre el reciclaje de este producto, póngase en contacto con su oficina municipal, el servicio de desecho de residuos domésticos o la tienda en la que adquirió el producto.
4 ANTES DE UTILIZAR EL ELECTRODOMÉSTICO
4.1 Preparación del lavavajillas para el primer uso
- Asegúrese de que las especificaciones de electricidad y suministro de agua coinciden con los valores indicados en las instrucciones de instalación de la máquina.
- Retire todos los materiales de embalaje del interior de la máquina.
- Establezca el nivel del descalcificador de agua.
- Llene el compartimento del abrillantador.
4.2 Uso de sal (si está disponible)
Para que el lavado sea correcto, el lavavajillas necesita un agua blanda, es decir, con bajos niveles de cal. De lo contrario, quedarán restos blancos de cal en la vajilla y en el equipo interno. Esto afectará negativamente a las funciones de lavado, secado y abrillantado de la máquina. Cuando el agua fluye por el sistema de descalcificación, los iones que generan la dureza del agua son eliminados y el agua se ablanda al nivel necesario para obtener el mejor resultado de lavado. Dependiendo del nivel de dureza del agua entrante, estos iones que endurecen el agua se acumulan rápidamente en el interior del sistema de descalcificación. Por lo tanto, este sistema debe renovarse, de forma que tenga el mismo rendimiento durante el siguiente lavado. Para ello se utiliza sal.
La máquina solo se puede utilizar con sal de lavavajillas para ablandar el agua. No utilice ningún tipo de sales en grano pequeño o en polvo que se disuelvan fácilmente. El uso de otro tipo de sal puede añadir la máquina.
4.3 Rellene de sal (si está disponible)
Para añadir sal descalcificadora, abra el tapón del compartimento de la sal haciéndolo girar hacia la izquierda. (1) (2) En el primer uso, rellene el compartimento con 1 kg de sal y agua (3) hasta prácticamente el borde. Si es posible, utilice un embudo (4) para que la operación resulte más sencilla. Vuelva a colocar el tapón y ciérrelo. Después de cada 20 a 30 ciclos, añada sal en la máquina hasta que se rellene (aproximadamente 1 kg.).

Rellene el compartimento de sal con agua solo la primera vez que lo llene.
Utilice sal descalcificadora producida especificamente para usarla en lavavajillas. Cuando inicio el lavavajillas, el compartimento de sal se rellenará con agua. Por lo tanto, debe colocar la sal descalcificadora antes de poner en marcha la máquina.
Si se ha introducido demasiada sal descalcificadora y no tiene previsto utilizar la máquina inmediatamente, ejecute un programa de lavado corto para proteger la máquina contra la corrosión.
4.4 Tira de prueba
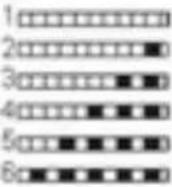
| Deje correr el agua del grifo durante 1 min. | Mantenga la tira en el agua durante 1 segundo. | Sacuda la tira. | Espere un minuto. | Establezca el nivel de dureza de la máquina. | |
 |  |  |  |  |  |
NOTA: El nivel de dureza se establece en 3 de manera predeterminada. Si el agua es agua de pozo o tiene un nivel de dureza por encima de 90 dF, le recomendamos que utilice dispositivos de filtro y refinamiento del agua.
4.5 Tabla de dureza del agua
| Nivel | dH alemana | dH francesa | dH británica | Indicador |
| 1 | 0-5 | 0-9 | 0-6 | El indicador de lavado esté encendido. |
| 2 | 8-11 | 10-20 | 7-14 | El indicador de secado está encendido. |
| 3 | 12-17 | 21-30 | 15-21 | El botón de fin está encendido. |
| 4 | 18-22 | 31-40 | 22-28 | Los indicadores de lavado y secado están encendidos. |
| 5 | 23-34 | 41-60 | 29-42 | Los indicadores de lavado y fin están encendidos. |
| 6 | 35-50 | 61-90 | 43-63 | Los indicadores de secado y fin están encendidos. |
4.6 Sistema de descalcificación del agua
El lavavajillas incorpora un sistema que reduce la dureza del suministro de agua. Para determinar el nivel de dureza del agua corriente, póngase en contacto con la empresa que le suministra el agua o utilice una tira de prueba (si está disponible).
4.7 Ajuste
- Encienda la máquina pulsando el botón de encendido/apagado.
- Pulse el botón Arriba durante al menos 3 segundos inmediatamente después de encender la máquina.
- Deje de pulsar el botón Arriba cuando todos los indicadores parpadeen una vez. Se muestra el último nivel de ajuste.
- Pulse el botón Amba o Abajo para aumentar o reducir el nivel de dureza respectivamente.
- Apague la máquina para guardar el ajuste.
4.8 Uso de detergente
Utilice solo detergentes diseñados específicamente para lavavajillas domésticos. Guarde los detergentes en un lugar fresco y seco, fuera del alcance de los niños. Añada detergente adecuado para el programa seleccionado a fin de garantizar los mejores
resultados. La cantidad de detergente necesaria depende del ciclo, el tamaño de la carga y el nivel de suciedad de los platos.
No rellene el compartimento de detergente más de lo requerido; de lo contrario, pueden aparecer rayas blanquecinas o capas azuladas sobre el cristal y los platos, y puede producirse corrosión en el cristal.
El uso continuado de demasiado detergente puede causar daños en la máquina.
El uso de poca cantidad de detergente puede dar lugar a lavados deficientes y a la aparición de rayas blanquecinas en agua dura.
Consulte las instrucciones de fabricante de detergente para obtener más información.
4.9 Llenado de detergente
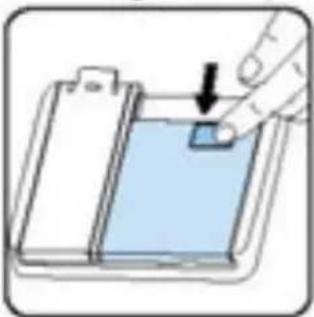
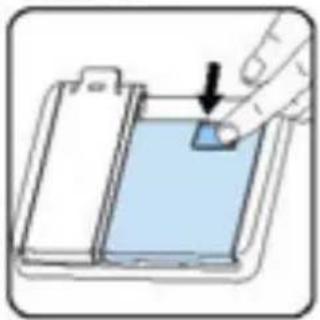
Empuje el cierre para abrir el dispensador y vierta el detergente.
Gire el tapón hasta que se cierre completamente. El dispensador debe rellenarse solo antes del principio de cada programa. Si los platos están muy sucios, vierta detergente adicional en el depósito de detergente de prelavado.
natural_image
Illustration of a hand placing a blue object into a clipboard (no text or symbols)
text_image
DE TE AGENT4.10 Uso de detergentes combinados
Estos productos deben usarse de acuerdo con las instrucciones del fabricante.
No introduzca detergentes combinados en la sección interior ni en la cesta para cubiertos.
Los detergentes combinados no solo contienen detergente, sino también abrillantador, sustancias para sustituir la sal y componentes adicionales dependiendo de la combinación.
Recomendamos que no utilice detergentes
combinados en programas cortos. Utilice detergentes en polvo en su lugar. Si surgen problemas al utilizar detergentes combinados, póngase en contacto con el fabricante del detergente.
Si deja de utilizar detergentes combinados, asegúrese de que el ajuste de la dureza del agua y el abrillantador están establecidos en el nivel correcto.
4.11 Uso de abrillantador
El abrillantador ayuda a secar los platos sin dejar rayas ni manchas. El abrillantador es necesario para que lograr utensilios libres de marcas y vasos brillantes. El abrillantador se libera automáticamente durante la fase de aclarado caliente. Si se establece una dosis de abrillantador demasiado baja, aparecerán marcas blanquecinas en los platos y no se secarán ni quedarán limpios.
Si se aplica una dosis de abrillantador demasiado alta, aparecerán capas azuladas en los vasos y los platos.
4.12 Relleno y ajuste del abrillantador
Para rellenar el compartimento del abrillantador, abra el tapón de su compartimento. Rellene el compartimento con abrillantador hasta el nivel MÁX y, a continuación, cierre el tapón. Tenga cuidado de no llenar en exceso el compartimiento del abrillantador y limpie cualquier líquido que se derrame.
Para cambiar el nivel del abrillantador, siga los pasos que se indican a continuación antes de encender el equipo:
- Encienda la máquina pulsando el botón de encendido/apagado.
- Pulse el botón Arriba durante al menos 5 segundos inmediatamente después de encender la máquina.
-
Deje de pulsar el botón Arriba cuando todos los indicadores parpadeen dos veces. Se muestra el último nivel de ajuste.
-
Pulse el botón Arriba o Abajo para aumentar o reducir el nivel de dureza.
- Apague la máquina para guardar el ajuste.
- El ajuste de fábrica es "4".
Si los platos no se secan adecuadamente o presentan manchas, aumente el nivel. Si aparecen manchas azules, reduzca el nivel.

natural_image
Illustration of a hand inserting a small object into a device (no text or symbols)
natural_image
Diagram of a mechanical assembly with a cylindrical component inserted into a housing (no text or symbols visible)| Nivel | Dosis de abrillantador | Indicador |
| 1 | El abril aritador no se dispensa | El indicador de lavado está encendido. |
| 2 | Se dispensa una dosis | El indicador de secado está encendido. |
| 3 | Se dispensan dos dosis | El indicador de fin está encendido. |
| 4 | Se dispensan 3 dosis | Los indicadores de lavado y secado están encendidos. |
| 5 | Se dispensan 4 dosis | Los indicadores de lavado y fin están encendidos. |
5 CARGA DEL LAVAVAJILLAS
Para obtener mejores resultados, siga estos consejos de carga.
Si carga el lavavajillas de uso doméstico hasta la capacidad indicada por el fabricante, ahorrará energía y agua.
El preaclarado manual de la vajilla conduce a un mayor consumo de agua y energía y no es recomendable. Puede colocar tazas, vasos, copas, platos pequeños, tazones, etc. en la cesta superior. Procure que las copas largas no toquen unas con otras, pues podrían no permanecer quietas y sufrir daños.
Al colocar copas de tallo largo, apóyelas sobre el borde de la cesta o sobre la rejilla, y no sobre otras piezas de la vajilla.
Coloque todos los recipientes como tazas, vasos y ollas en el lavavajillas con la abertura hacia abajo, de lo contrario el agua puede acumularse en su interior.
Si hay una cesta de cubiertos en la máquina, se recomienda utilizar la rejilla de cubiertos para obtener un mejor resultado.
Coloque todos los objetos grandes (ollas, sartenes, tapas, platos, cuencos, etc.) y los muy sucios en la rejilla inferior.
Los platos y los cubiertos no deben colocarse uno encima del otro.

ADVERTENCIA: Asegúrese de
no obstruir la rotación de los brazos aspersores.

ADVERTENCIA:Asegúrese de que
después de cargar los platos pueda abrir el dispensador de detergente.
5.1 Recomendaciones
Elimine cualquier residuo grueso de los platos antes de colocarlos en la máquina. Ponga en marcha la máquina con carga completa.

No sobrecargue las bandejas ni coloque los platos en la cesta
equivocada.

ADVERTENCIA: Para evitar cualquier posible lesión, coloque los cuchillos de mango largo y punta afilada con la parte afilada hacia abajo o en posición horizontal sobre las cestas.
Cesta superior
Ajuste de altura
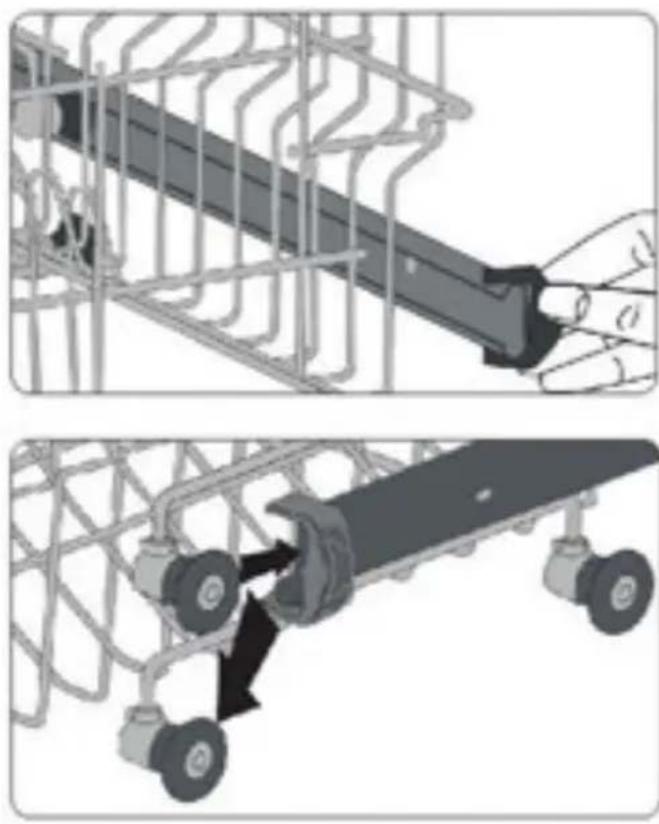
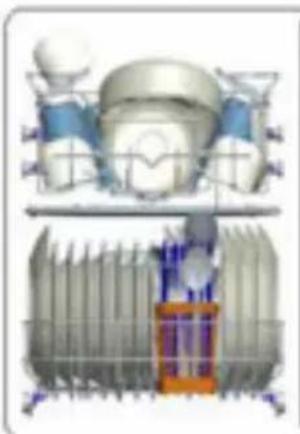
Gire las presillas de parada de carril, en los extremos de los carriles, a los lados para abrirlos (como se muestra en la siguiente imagen), luego extraiga y retire la cesta. Cambie la posición de las ruedas, luego reinstale la cesta en el carril, asegurándose de cerrar las presillas de parada de carril. Cuando la cesta superior esté en la posición más alta, artículos grandes como cacerolas se pueden colocar en la cesta inferior.
Soporte ajustable en altura (tipo pinza)
Los soportes plegables de la cesta superior permiten la colocación de artículos grandes tales como ollas y cacerolas. Cada sección puede plegarse por separado. Los soportes plegables se pueden subir o plegar hacia abajo.
natural_image
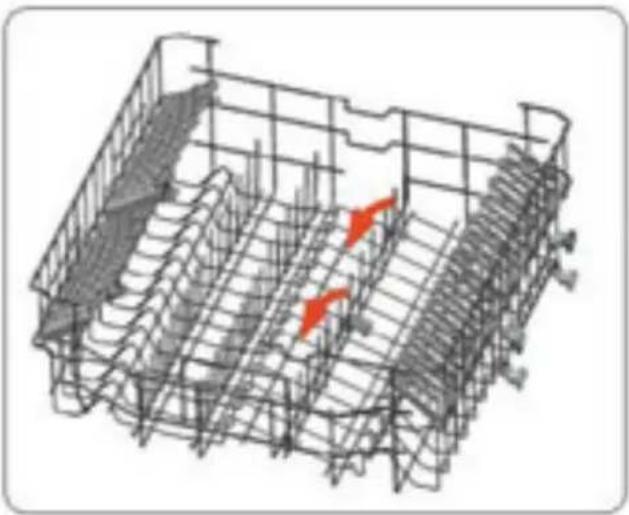
3D wireframe model of a structural grid with red directional arrows indicating flow or movement (no text or symbols)5.2 Cargas de cesta alternativa
Cesta inferior

natural_image
Two compact eyeshoes displayed on a grid background (no text or symbols visible)
natural_image
Illustration of two kitchen pots with a lid, placed on a grid background (no text or symbols)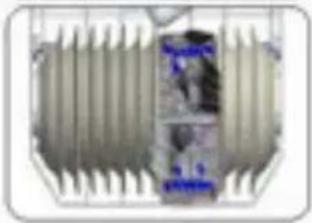
natural_image
Close-up of a metallic cooling fan with visible heat sinks and internal components (no text or symbols)Cesta superior

natural_image
Grid of medical or laboratory equipment components including electrodes, clamps, and a showerhead (no visible text or symbols)Cargas incorrectas
natural_image
3D technical illustration of a satellite or spacecraft system with a central tower and surrounding equipment (no visible text or symbols)
text_image
Diagram showing two 3D grid structures with 'X' symbols, likely representing a mathematical or physical concept.Nota importante para laboratorios de pruebas
Para información importante necesaria para las pruebas según las normativas EN y una
copia digital del manual, envíe el nombre de modelo y el número de serie a la siguiente dirección:
dishwasher@standardtest.info
6 TABLA DE PROGRAMAS
| P1 | P2 | P3 | P4 | |
| Nombre del programa: | Rápido 30° | Eco | Súper 50° | Intensivo 85 °C |
| Tipo de suciedad: | Adecuado para lavado rápido y vajillas con poca suciedad. | Programa estándar para uso diario con bajo consumo de energía y agua. | Adecuado para vajilla con suciedad normal de uso diario con un programa más rápido. | Adecuado para vajilla muy sucia. |
| Nivel de suciedad: | Bajo | Medio | Medio | Alto |
| "Cantidad de detergente:A: 25 cm3B: 15 cm3" | A | A | A | A |
| Duración del programa (h: min) | 00:30 | 03:18 | 00:50 | 01:57 |
| Consumo de energía eléctrica (kMv/ciclo): | 0.740 | 0.755 | 1.100 | 1.700 |
| Consumo de agua (litros/ciclo): | 10:2 | 11:0 | 11:2 | 17:8 |
- La duración del programa puede cambiar de acuerdo a la cantidad de vajilla, temperatura del agua, temperatura ambiente y las funciones adicionales seleccionadas.
- Los valores proporcionados para los programas que no sean el programa Eco solo son indicativos.
- El programa Eco es adecuado para limpiar vajillas normalmente sucias, cuyo programa es el más eficiente en cuanto a consumo combinado de energía y agua, y que se utiliza para evaluar el cumplimiento de la legislación de la UE en materia de ecodiseño.
- Lavar la vajilla en un lavavajillas de uso doméstico suele consumir menos energía y agua que el lavado manual cuando se utiliza el lavavajillas según las instrucciones del fabricante.
- Solo use detergente en polvo para los programas cortos.
- Los programas cortos no incluyen la fase de secado.
- Recomendamos dejar la puerta entreabierta una vez finalizado el ciclo de lavado para acelerar el secado.
- Puede acceder a la base de datos de productos donde se almacena la información del modelo escaneando el código QR de la etiqueta energética.

NOTA: De acuerdo con las regulaciones 1016/2010 y 1059/2010, los valores de sumo de energía del programa Eco pueden ser diferentes. Esta tabla se ajusta a los amentos 2019/2022 y 2017/2022.
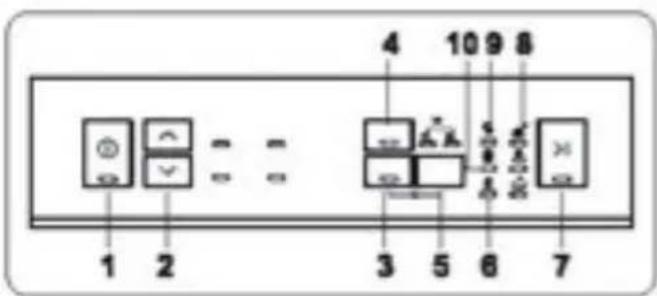
7 PANEL DE CONTROL

text_image
1 2 3 4 5 6 7 8 9 101. Botón On/Off
Encienda el lavavajillas presionando el botón On/Off. La luz LED On/Off iluminará una vez encendido.
2. Botón de selección de programa
Seleccione el programa adecuado presionando el botón de selección de programa.
3. Botón de Detergente
Este botón se utiliza para la opción de detergente. Si esta opción está activado, luz luz de detergente se enciende. Seleccione el opción de Detergente cuando utilice detergente combinado que contenga sal, abrillantador y otras características. El indicador de detergente permanecerá encendido depende de su selección.
4. Botón de Temporizador
Este botón se utiliza para el temporizador. Si presione una vez, se activa 3 horas de temporizador, si activa dos veces (6h) y si presiona 3 veces (9h). Si está todas las luces encendidas, significa que está activado el temporizador de 9 horas.
5. Indicador LED - Bloqueo Infantil
Esta función está activada cuando presiona el botón detergente y temporizador al mismo tiempo durante 3 segundos. Una vez que el modo bloqueo infantil está activado, si presiona los otros botones parpadeará con luz LED.
6. Botón Inicio / Pausa
Cuando presione el botón Inicio / Pausa, el programa que haya seleccionado con el botón de selección de programa empezará a operar y la luz se encenderá.
Una vez el programa iniciado, la luz Inicio / Pausa se apagará. En la posición Stop (Hold), Inicio / Pausa iluminará mientras que la luz de lavado está iluminado.
7. Indicador de fase de lavado
Podrá seguir el indicador con las luces de los siguientes programas:
- Lavado
- Aclarado
- Secado
- Finalizado
8. Indicador de Sal
Compruebe la luz del indicador de sal en el display para saber si tiene suficiente cantidad de sal en su lavavajillas. En caso que se encienda, rellene de nuevo el compartimento de sal.
9. Indicador de Abrillantador
Compruebe el indicador de abrillantador en el display para saber si tiene suficiente cantidad de abrillantador en su lavavajillas. En caso que se encienda, rellene de nuevo el compartimento del abrillantador.
10. Botón de media carga
Gracias a la función de media carga en su lavavajillas, puede acortar la duración del programa seleccionado y reducir el consumo energético y agua utilizando la electricidad y agua de media carga.
Cambio de programa
Siga los siguientes pasos para cambiar de programa mientras esté en funcionamiento.
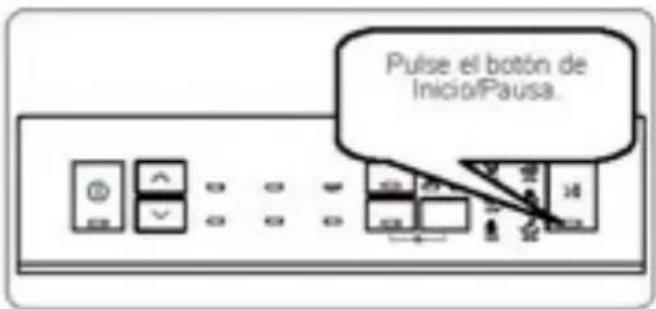
text_image
Pulse el botón de Inicio/Pausa.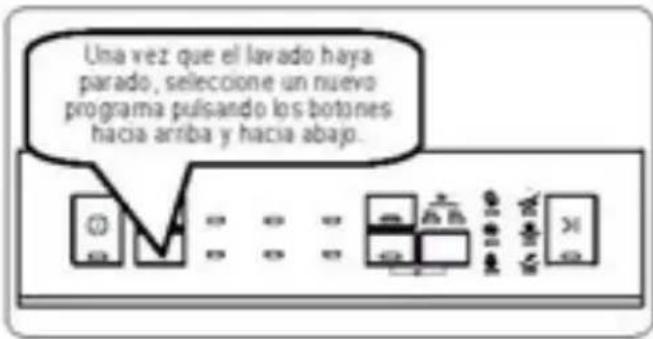
text_image
Una vez que el lavado haya parado, seleccione un nuevo programa pulsando los botones hacia arriba y hacia abajo.
text_image
Pulse la teda Inicio/Pausa para iniciar el programa recién seleccionado. El nuevo programa reanudará el lavado del programa anterior.Cancelar un programa
Siga los siguientes pasos para cancelar un programa mientras esté en funcionamiento.

text_image
Mantenga presionado el botón inicio/Pausa durante 3 segundos. Mientras que el programa se este cancelando, la luz de Finalización parpadeará. El proceso de descarga de agua comenzará y continuará por 30 segundos.
text_image
Cuando el programa ya esté cancelado, la luz de Finalización se iluminará.Apagar la máquina
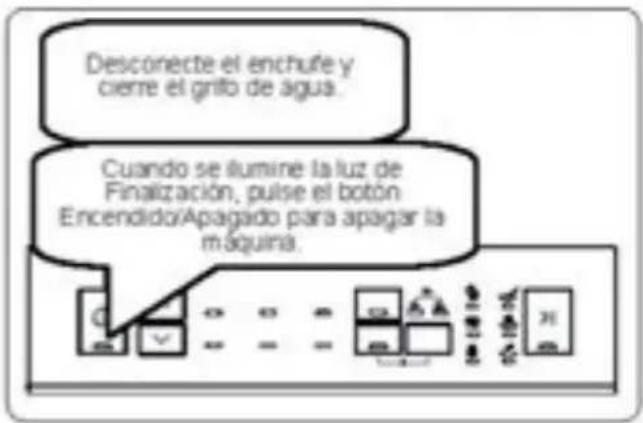
text_image
Desconecte el enchufe y cierre el grifo de agua. Cuando se ilumine la luz de Finalización, pulse el botón Encendido/Apagado para apagar la máquina.O NOTA: No abra la puerta antes de que el ciclo de lavado finalice.
O NOTA: Cuando finalice el programa, deje la puerta entreabierta para acelerar el proceso de secado.
O NOTA: Si se abre la puerta o se produce un corte eléctrico durante el ciclo de lavado, el ciclo continuará cuando la puerta se haya cerrado o la corriente se haya reestablecido.
O NOTA: Si la puerta de la máquina se abre o se produce un corte eléctrico durante el secado, el ciclo de lavado terminará y la máquina estará lista para volver a usarla.
8 LIMPIEZA Y MANTENIMIENTO
La limpieza del lavavajillas es importante para mantener la vida útil de la máquina Asegúrese de que el ajuste de ablandamiento de agua (si está disponible) se haya realizado correctamente y se utiliza la cantidad correcta de detergente para evitar la acumulación de cal. Rellene el compartimento de la sal cuando se encienda la luz del sensor de sal.
El aceite y la cal pueden acumularse en el lavavajillas con el tiempo. Si esto ocurre:
- Llene el compartimento de detergente pero no cargue ningún plato.
Seleccione un programa que funcione a alta temperatura y deje el lavavajillas vacío. Si esta operación no limpia suficientemente su lavavajillas, utilice un agente limpiador diseñado para su uso con lavavajillas. - Para prolongar la vida útil de su lavavajillas, limpie el aparato regularmente cada mes.
- Limpie las juntas de la puerta regularmente con un paño húmedo para eliminar cualquier residuo u objeto extraño acumulado.
8.1 Filtros
Limpie los filtros y los brazos pulverizadores al menos una vez a la semana. Si hay restos de comida u objetos extraños en los filtros gruesos y finos, retire los filtros y limpielos a fondo con agua.
a) Filtro micro
b) Filtro grueso
c) Filtro metálico

natural_image
Simple line drawing of a mechanical device with a gear and housing (no text or symbols)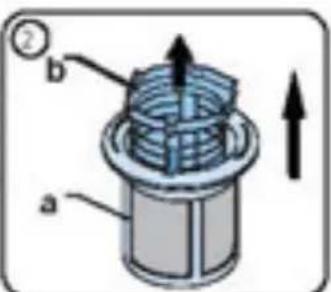
text_image
Diagram of a mechanical device with labeled parts a and b, showing directional arrows and a numbered component.
text_image
Diagram of a gasifier with labeled components and directional arrow indicating flow or movement
natural_image
Pure mechanical diagram showing a spring-loaded component with no text or symbolsPara extraer y limpiar el conjunto de filtros, gírelo en sentido contrario a las agujas del reloj y extráigalo levantándolo hacia arriba (1). Saque el filtro grueso del filtro micro (2). Luego saque y retire el filtro metálico (3). Aclare el filtro con abundante agua hasta que quede libre de residuos. Vuelva a montar los filtros. Coloque de nuevo el conjunto de filtros y gírelo en el sentido de las agujas del reloj. (4).
- Nunca use el lavavajillas sin ningún filtro.
- La efectividad del lavado se reducirá si el filtro se coloca de manera incorrecta.
- El uso de unos filtros limpios son necesarios para el correcto funcionamiento de la máquina.
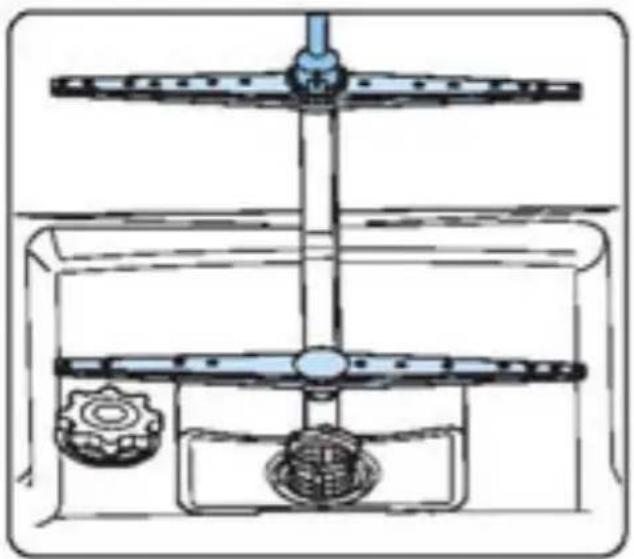
8.2 Brazos aspersores
Asegúrese de que los brazos aspersores no estén obstruidos y que no haya residuos de comida u objetos extraños pegados a los mismos. Si hay un atasco, retire los brazos aspersores y limpielos bajo el agua. Para extraer el brazo aspersor superior, afloje la tuerca que lo mantiene en su posición girándola en el sentido de las agujas del reloj y tirando de ella hacia abajo. Asegúrese de que la tuerca esté perfectamente apretada cuando vuelva a colocar
el brazo aspersor superior.
natural_image
Technical line drawing of a mechanical device with gears and a shaft (no text or symbols)8.3 Bomba de vaciado
Los grandes residuos de comida o los objetos extraños que no hayan recogido los filtros pueden bloquear la bomba de aguas residuales. El agua de aclarado estará entonces por encima del filtro.
Advertencia ¡Riesgo de cortes!
Al limpiar la bomba de aguas residuales, tenga cuidado de no cortarse con ningún trozo de vidrio roto o instrumento puntiagudo.
En ese caso:
- En primer lugar, siempre desconecte el aparato de la red eléctrica.
- Retire las cestas.
- Quite los filtros.
- Vacíe el agua, utilice una esponja en caso necesario.
- Revise el área y retire cualquier objeto extraño.
- Instale los filtros.
- Vuelva a colocar las cestas.
9 RESOLUCIÓN DE PROBLEMAS
| FAULT | CAUSA POSIBLE | RESOLUCIÓN DE PROBLEMAS |
| El programa no se inicia. | El lavavajillas no está enchufado. | Enchufe el lavavajillas. |
| El lavavajillas no está encendido. | Encienda el lavavajillas pulsando el botón de encendido/apagado. | |
| Fusible fundido. | Compruebe los fusibles internos. | |
| El grifo de entrada de agua está cerrado. | Abra el grifo de entrada de agua. | |
| La puerta del lavavajillas está abierta. | Cierre la puerta del lavavajillas. | |
| La manguera de entrada de agua y los filtros de la máquina están obstruidos. | Compruebe la manguera de entrada de agua y los filtros de la máquina, y asegúrese de que no están obstruidos. | |
| Queda agua dentro de la máquina. | El tubo de desagüe está obstruido o torcido. | Compruebe la manguera de desagüe y limpielo o enderécelo. |
| Los filtros están obstruidos. | Limpie los filtros. | |
| El programa todavía no ha terminado. | Espere hasta que el programa haya finalizado. | |
| La máquina se detiene durante el lavado. | Fallo de alimentación. | Compruebe la corriente. |
| Fallo de entrada de agua. | Compruebe el grifo del agua. | |
| Se escuchan ruidos de movimiento y golpes durante una operación de lavado. | El brazo de rociado golpea los platos de la cesta inferior. | Mueva o retire los elementos que bloquean el brazos de rociado. |
| Quedan restos de suciedad en los platos. | Platos colocado incorrectamente, lo que impide que el agua rociada llegue a los platos afectados. | No sobrecargue las cestas. |
| Platos apoyados entre sí. | Coloque los platos como se indica en la sección de carga del lavavajillas. | |
| Detergente insuficiente. | Utilice la cantidad correcta de detergente, como se indica en la tabla de programas. | |
| Programa incorrecto seleccionado. | Utilice la información de la tabla de programas para seleccionar el adecuado. | |
| El brazo de rociado se ha obstruido con restos de alimentos. | Limpie los orificios de los brazos de rociado con objetos finos. | |
| Filtros o bomba de desagüe obstruida, o filtro mal colocado. | Compruebe que la manguera de desagüe y los filtros están correctamente colocados. | |
| Manchas blancas en los platos. | Detergente insuficiente. | Utilice la cantidad correcta de detergente, como se indica en la tabla de programas. |
| Ajuste de descalcificador de agua o dosis de abrilantador establecida en un nivel demasiado bajo. | Aumente el nivel de descalcificador de agua o dosis de abrilantador. | |
| Nivel alto de dureza del agua. | Aumente el nivel de descalcificador de agua y añada sal. | |
| El tapón del compartimento de sal no se ha cerrado bien. | Compruebe que el tapón del compartimento de sal se ha cerrado bien. | |
| Los platos no se secan. | No se seleccionó la opción de secado. | Seleccione un programa con una opción de secado. |
| La dosificación de abrilantador es demasiado baja. | Aumente el ajuste de dosis de abrilantador. | |
| Manchas de óvido sobre los platos. | La calidad del acero inoxidable de la vajilla es insuficiente. | Utilice únicamente juegos aptos para el lavavajillas. |
| Hay una gran cantidad de sal en el agua de lavado. | Ajuste el nivel de dureza del agua con ayuda de la tabla de dureza del agua. | |
| El tapón del compartimento de sal no se ha cerrado bien. | Compruebe que el tapón del compartimento de sal se ha cerrado bien. | |
| Demasiada sal vertida en el lavavajillas al llenario con sal. | Utilice un embudo al llenar de sal el compartimento para evitar su demramamento. | |
| La toma a tierra es deficiente. | Consulte a un electricista inmediatamente. | |
| Queda detergente en el compartimento de detergente. | Se ha añadido detergente cuando el compartimento estaba mojado. | Asegúrese de que el compartimento de detergente está seco antes de utilizarlo. |
ADVERTENCIAS AUTOMÁTICAS DE FALLO Y QUÉ HACER
| CÓDIGO DEL PROBLEMA | POSIBLE ERROR | LO QUE HAY QUE HACER | |||
| Inicio/pausa | Lavado | Secado | Fin | ||
 | *Fallo del sistema de entrada de agua | Asegúrese de que el grifo de entrada del agua está abierto y de que el agua fluye. | |||
 | Retire la manguera de entrada del agua del grifo y limpie el filtro de la manguera. | ||||
| Póngase en contacto con el servicio técnico si el error no se resuelve. | |||||
 | Fallo del sistema de presión | Póngase en contacto con el servicio técnico. | |||
 | Error de entrada continua de agua | Cierre el grifo y póngase en contacto con el servicio técnico. | |||
 |  | El agua no se descarga | La manguera de descarga de agua y los filtros pueden estar obstruidos. | ||
| Cancelar el programa. | |||||
| Si el error continua, póngase en contacto con el servicio técnico. | |||||
| Póngase en contacto con el servicio técnico. | |||||
 |  | Calentador y sensor del calentador defectuosos | Póngase en contacto con el servicio técnico. | ||
 |  | Desbordamiento | Desenchufe la máquina y cierre el grifo. | ||
| Póngase en contacto con el servicio técnico. | |||||
 |  |  |  | Fallo de la tarjeta electrónica | Póngase en contacto con el servicio técnico. |
 |  |  | Póngase en contacto con el servicio técnico. | ||
 |  | Problema de calentamiento | Póngase en contacto con el servicio técnico. | ||
 |  |  | Alto voltaje | Póngase en contacto con el servicio técnico. | |
 |  |  | Bajo voltaje | Póngase en contacto con el servicio técnico. | |
*Nota: El indicador que muestra el fallo del sistema de entrada de agua varía en función del modelo.
Los procedimientos de instalación y reparación deben siempre llevarlos a cabo un agente de servicio autorizado para evitar posibles riesgos. El fabricante no será responsable de los daños que puedan derivarse si los procedimientos son llevados a cabo por personas no autorizadas. Las reparaciones solo pueden llevarlas a cabo personal técnico. Si es necesario sustituir un componente, asegúrese de que solo se utilizan piezas originales.
Las reparaciones o los usos no adecuados de piezas no originales pueden causar daños importantes y poner al usuario en un riesgo considerable.
Puede encontrar la información de contacto del servicio de atención al cliente en la parte posterior de este documento.
Se pueden obtener piezas originales adecuadas para la función de acuerdo con el pedido de Ecodesign correspondiente del servicio de atención al cliente durante un periodo de al menos 10 años a partir de la fecha de en la que el electrodoméstico empezó a comercializarse dentro de área económica europea.

text_image
CE5XXXX
sauber
EN Dishwasher / User Manual
natural_image
Simple line drawing of a rectangular box with a horizontal bar inside (no text or symbols)SERIE 1 -DW45 3 X V
SERIE 1-DW45 3 W V
Thank you for choosing this product.
This user manual contains important information on safety and instructions intended to assist you in the operation and maintenance of your appliance.
Please take the time to read this user manual before using your appliance and keep this book for future reference.
| Icon | Type | Meaning |
| WARNING | Serious injury or death risk | |
| RISK OF ELECTRIC SHOCK | Dangerous voltage risk | |
| FIRE | Warning; Risk of fire / flammable materials | |
| CAUTION | Injury or property damage risk | |
| IMPORTANT | Operating the system correctly |
CONTENTS
1 SAFETY INSTRUCTIONS ....4
1.1 General Safety Warnings 4
1.2 Installation Warnings 5
1.3 During Usage 6
2 INSTALLATION 8
2.1 Machine Positioning 8
2.2 Water Connection 8
2.3 Water Inlet Hose 8
2.4 Drain Hose (Model Depending) 9
2.5 Electrical Connection....9
2.6 Fitting The Machine Undercounter 10
3 TECHNICAL SPECIFICATIONS....11
3.1 General Appearance 11
3.2 Technical Specifications 11
4 BEFORE USING THE APPLIANCE 13
4.1 Preparing Your Dishwasher For First Use 13
4.2 Salt Usage (IF AVAILABLE) 13
4.3 Fill The Salt (IF AVAILABLE) 13
4.4 Test Strip 14
4.5 Water Hardness Table 14
4.6 Water Softener System....14
4.7 Setting 14
4.8 Detergent Usage 15
4.9 Filling The Detergent 15
4.10 Using Combined Detergents 15
4.11 Rinse-aid Usage 15
4.12 Filling The Rinse-aid And Setting 15
5 LOADING YOUR DISHWASHER....17
5.1 Recommendations 17
5.2 Alternative Basket Loads....19
6 PROGRAMME TABLE....20
7 THE CONTROL PANEL....21
7.1 Changing a Programme 22
7.2 Cancelling a Programme 22
7.3 Switching The Machine Off 22
8 CLEANING AND MAINTENANCE 24
8.1 Filters 24
8.2 Spray Arms 25
8.3 Drain Pump 25
9 TROUBLESHOOTING 26
1 SAFETY INSTRUCTIONS
1.1 General Safety Warnings
- Read these instructions carefully before using your appliance and keep this manual for future reference.
⚠️ Please check the packaging of your machine before installation and the outer surface of the machine once the packaging has been removed. Do not operate the machine if it appears damaged or if the packaging has been opened.
- Packaging materials protect your machine from any damage that might occur during transportation. The packaging materials are environmentally friendly as they are recyclable. Use of recycled material reduces raw material consumption and decreases waste production.
This appliance can be used by children aged from 8 years and above, and by persons with reduced physical, sensory or mental capabilities or lack of experience and knowledge if they have been given supervision or instruction concerning the use of the appliance in a safe way and understand hazards involved. Children should not be allowed to play with the appliance.
⚠️ Remove packaging and keep it out of reach of children.
⚠️ Keep children away from detergents and rinse aids.
There may be some residue left in the machine after washing. Keep children away from the machine when it is open.
1.2 Installation Warnings
- Choose a suitable and safe place to install your machine.
- Only original spare parts should be used with the machine.
⚠️! Unplug the machine before installation.
⚠️ Your machine must only be installed by an authorised service agent. Installation by anyone other than an authorised agent may cause your warranty to be void.
⚠️ Check that the indoor electrical fuse system is connected in line with safety regulations.
All electrical connections must match the values on the plate.
⚠️ Ensure the machine does not stand on the electrical supply cable.
⚠️Never use an extension cord or a multiple socket connection.
⚠️ The plug should be accessible after the machine is installed.
• After installation, run your machine unloaded for the first time.
The machine must not be plugged in during positioning.
△! Always use the coated plug supplied with your machine.
△If the electrical cable is damaged, it should only be replaced by a qualified electrician.
- Connect the hose directly to the water inlet tap. The pressure supplied by the tap should be a minimum of 0.03 MPa and a maximum of 1 MPa. If the pressure exceeds 1 MPa, a pressure relief valve must be fitted between the connection.
1.3 During Usage
- This machine is for domestic use only; do not use it for other purposes. Commercial use will void the guarantee.
Do not stand, sit or place loads on the open door the dishwasher.
⚠️ Only use detergents and rinse aids produced specifically for dishwashers. Our company is not responsible for any damage that may occur due to misuse.
⚠️ Do not drink water from the machine.
Due to the danger of explosion, do not place any chemical dissolving agents into the machine's washing section.
- Check the heat-resistance of plastic items before washing them in the machine.
△! Only put items in the machine which are suitable for dishwashing, and take care not to overfill the baskets.
Do not open the door while the machine is in operation, hot water may spill out. Safety devices ensure the machine stops if the door is opened.
⚠ The machine door should not be left open. It may cause accidents.
⚠️ Place knives and other sharp objects in the cutlery basket in a blade-down position.
⚠️! For models with the automatic door-opening system, when the EnergySave option is active, the door will open at the end of a program. To prevent damage to your dishwasher, do not attempt to close the door for one minute after it has opened. For effective drying, keep the door open for 30 minutes after a programme has ended. Do not stand in front of the door after the auto-open signal sounds.
⚠ In the case of a malfunction, repair should only be performed by an authorised service company, otherwise the warranty will be void.
⚠️! Before repair work, the machine should be disconnected from the mains. Do not pull the cable to unplug the machine. Switch off the water tap.
Operation at a low voltage will cause a decline in performance levels.
⚠ For safety, disconnect the plug once a program has finished.
To avoid an electric shock, do not unplug the machine with wet hands.
⚠️! Pull the plug to disconnect the machine from the mains, never pull on the cord.
2 INSTALLATION
2.1 Machine Positioning
When positioning the machine, place it in an area where dishes can be easily loaded and unloaded. Do not put the machine in an area where the ambient temperature falls below 0°C.
Read all warnings located on the packaging before removing the packaging and positioning the machine.
Place the machine close to a water tap and drain. Take into consideration that the connections will not be altered once the machine is in position.
Do not hold the machine by its door or panel.
Leave an adequate distance around the machine to allow ease of movement when cleaning.

Ensure the water inlet and outlet hoses are not squeezed or trapped and that the machine does not stand on the electrical cable while positioning.
Adjust the feet so the machine is level and balanced. The machine should be placed on flat ground otherwise it will be unstable and the door of the machine will not close properly.
2.2 Water Connection
We recommend fitting a filter to your water inlet supply in order to prevent damage to your machine due to contamination (sand, rust, etc.) from indoor plumbing. This will also help prevent yellowing and deposit formation after washing.
Note printing on the water inlet hose! If models are marked with 25°, the water temperature may be max. 25 °C (cold water).
For all other models:
Cold water preferred; hot water max. temperature 60 °C.
2.3 Water Inlet Hose

natural_image
Illustration of a hand holding a pipe with a valve, no text or symbols presentWARNING: Use the new water inlet hose supplied with your machine, do not use an old machine's hose.
WARNING: Run water through the new hose before connecting.
WARNING: Connect the hose directly to the water inlet tap. The pressure supplied by the tap should be a minimum of 0.03 MPa and a maximum of 1 MPa. If the pressure exceeds 1 MPa, a pressure relief valve must be fitted between the connection.
WARNING: After the connections are made, turn the tap on fully and check for water leaks. Always turn off the water inlet tap after a wash program has finished.

natural_image
Simple line drawing of a pipe with a valve and outlet (no text or symbols)An Aquastop water spout is available with some models. Do not damage it or allow it to become kinked or twisted.
2.4 Drain Hose (Model Depending)

text_image
max 110cm min 50cmConnect the water drain hose directly to water drain hole or to the sink outlet spigot. This connection should be minimum 50 cm and maximum 110 cm from floor that dishwasher is placed.
IMPORTANT: Items will not wash properly if a drain hose longer than 4 m is used.

text_image
R=0.17 m2.5 Electrical Connection
WARNING: Your machine is set to operate at 220-240 V. If the mains voltage supply to your machine is 110 V, connect a transformer of 110/220 V and 3000 W between the electrical connection.
Connect the product to a grounded outlet protected by a fuse complying with the values in the "Technical Specifications" table".
The earthed plug of the machine must be connected to an earthed outlet supplied by suitable voltage and current.
In the absence of earthing installation, an authorised electrician should carry out an earthing installation. In the case of use without earthing installed, we will not be responsible for any loss of use that may occur.
The plug on this appliance may incorporate 13A fuse depending on the target country. (For Example UK, Saudi Arabia)
2.6 Fitting The Machine Undercounter
If you wish to fit your machine undercounter, there must be sufficient space to do so and the wiring-plumbing must be suitable to do so (1). If the space under the countertop is suitable for fitting your machine, remove the worktop as shown in the illustration (2).
WARNING: The countertop, which the machine will be placed under, must be stable in order to prevent imbalance.
The top panel of the dishwasher must be removed to fit the machine under the countertop.
To remove the top panel, remove the screws that hold it on, located at the rear of the machine. Then, push the panel 1 cm from the front towards the rear and lift it. Adjust the machine feet according to the slope of the floor (3).
Fit your machine by pushing it under the counter taking care not to crush or bend the hoses (4).
WARNING: After removing the top panel of your dishwasher, the machine should be placed in a space of the dimensions shown in the figure below.
text_image
① 400 500 ④ H ② ③ R1:20mm A R1:30mm B3 R1:40mm C2| A | B | ||
| All Products | B_1 | B_2 | |
| Product's Height (±2 mm) | 820 mm | 825 mm | 835 mm |
A: If there is no felt on the top of the product; you should take into account this product's height.
B1: If there is felt on the top of the product with 2nd basket; you should take into account this product's height.
B2: If there is felt on the top of the product with 3rd basket; you should take into account this product's height.
3 TECHNICAL SPECIFICATIONS

text_image
Labeled diagram of a kitchen appliance with numbered parts for identification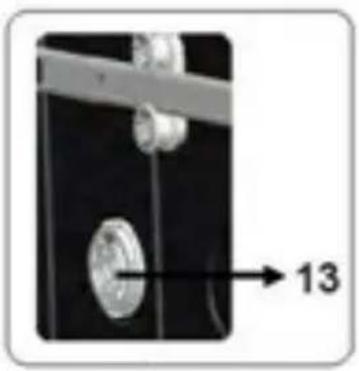
natural_image
Close-up of a mechanical component with a numbered arrow pointing to a circular feature (no text or symbols visible)3.1 General Appearance
- Worktop
- Upper basket with racks
- Upper spray arm
- Lower basket
- Lower spray arm
- Filters
- Rating plate
- Control panel
- Detergent and rinse-aid dispenser
- Cutlery basket
- Salt dispenser
- Upper basket track latch
- Mini Active Drying Unit: This system provides better drying performance your dishes.
3.2 Technical Specifications
| Capacity | 10 place settings |
| DimensionsHeightWidthDepth | 850(mm)448(mm)598(mm) |
| Net weight | 40 kg |
| Operating voltage / frequency | 220-240V50 Hz |
| Total current | 10(A) |
| Total power | 1900(W) |
| Water supply pressure | Maximum: 1 (Mpa)Minimum: 0.03 (Mpa) |
RECYCLING
• Some machine components and packaging consist of recyclable materials.
- Plastics are marked with the international abbreviations: (>PE<, >PP<, etc.)
- The cardboard parts consist of recycled paper. They can be put into waste paper containers for recycling.
- Material unsuitable for domestic waste must be disposed of at recycling centres.
- Contact a relevant recycling centre to obtain information about disposal of different materials.
PACKAGING AND THE ENVIRONMENT
- Packaging materials protect your machine from damage that may occur during transportation. The packaging materials are environmentally friendly as they are recyclable. The use of recycled material reduces raw material consumption and therefore decreases waste production.
CE Declaration of Conformity
We declare that our products meet the applicable European Directives, Decisions and Regulations and the requirements listed in the standards referenced.
Disposal of Your Old Machine
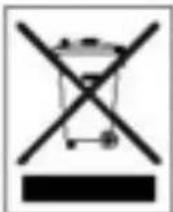
The symbol on the product or on its packaging indicates that this product may not be treated as household waste. Instead, it shall be taken to the applicable collection point for the recycling of electrical and electronic equipment. By ensuring
this product is disposed of correctly, you will help prevent potential negative consequences for the environment and human health, which could otherwise be caused by inappropriate waste handling of this product. For more detailed information about recycling this product, please contact your local city office, your household waste disposal service or the shop where the product was purchased.
4 BEFORE USING THE APPLIANCE
4.1 Preparing Your Dishwasher For First Use
• Make sure the electricity and supply water specifications match the values indicated in the installation instructions for the machine.
- Remove all packaging material inside the machine.
- Set the water softener level.
• Fill the rinse aid compartment..
4.2 Salt Usage (IF AVAILABLE)
For a good washing function, the dishwasher needs soft, i.e. less calcareous water. Otherwise, White lime residues will remain on the dishes and the interior equipment. This will negatively affect your machine's washing, drying and shining performance. When water flows through the softener system, the ions forming the hardness are removed from the water and the water reaches the softness required to obtain the best washing result. Depending on the level of hardness of the inflowing water, these ions that harden the water accumulate rapidly inside the softener system. Therefore, the softener system has to be refreshed so that it operates with the same performance also during the next wash. For this purpose, dishwasher salt is used.
Machine can only be used by special dishwasher salt to soften the water. Do not use any small grained or powdered type of salts which can easily soluble. Using any other type of salt can damage your machine.
4.3 Fill The Salt (IF AVAILABLE)
To add softener salt, open the salt compartment cap by turning it counter clockwise. (1) (2) At first use, fill the compartment with 1 kg salt and water (3) until it is almost overflowing. If available, using a funnel (4) will make filling easier. Replace the cap and close it. After every 20-30 Cycles add salt into your machine until it fills up (approx. 1 kg).

natural_image
Diagram showing a mechanical component with a rotating arrow and a gear-like shape, no text or symbols present.
natural_image
Technical diagram showing a mechanical assembly with a ruler and a circular component (no text or symbols)
natural_image
Illustration of a hand using a ruler to measure a circular object with a pointer, no text or symbols present
text_image
SALTOnly add water to the salt compartment on first use.
Use softener salt specifically produced for use in dishwashers.
When you start your dishwasher, the salt compartment is filled with water, therefore put the softener salt in prior to starting your machine.
If the softener salt has overflowed and you do not start the machine immediately, run a short washing program to protect your machine against corrosion.
4.4 Test Strip
| Run water through the tap (1min.) | Keep the strip in the water (1sec) | Shake the strip. | Wait (1min.) | Set the hardness level of your machine. | |
 |  | 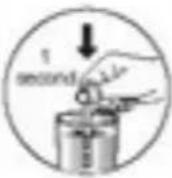 |  |  |  |
NOTE: The level is set to 3 as default. If the water is well water or has a hardness level above 90 dF, we recommend that you use filter and refinement devices.
4.5 Water Hardness Table
| Level | German dH | French dF | British dE | Indicator |
| 1 | 0-5 | 0-9 | 0-8 | Wash LED is on. |
| 2 | 6-11 | 10-20 | 7-14 | Dry LED is on. |
| 3 | 12-17 | 21-30 | 15-21 | End button is on. |
| 4 | 18-22 | 31-40 | 22-28 | Wash and Dry LEDs are on. |
| 5 | 23-34 | 41-60 | 29-42 | Wash and End LEDs are on. |
| 6 | 35-50 | 61-90 | 43-63 | Dry and End LEDs are on. |
4.6 Water Softener System
The dishwasher is equipped with a water softener which reduces the hardness in the mains water supply. To find out the hardness level of your tap water, contact your water company or use the test strip (if available).
4.7 Setting
- Turn on the machine by pressing the On/Off button.
- Press the Up button for at least 3" immediately after the machine is turned on.
- Release the Up button when all leds blink once. The last setting level is viewed.
- Press the Up or Down button to increase or decrease the hardness level respectively.
- Turn off the machine to save the setting.
4.8 Detergent Usage
Only use detergents specifically designed for domestic dishwashers. Keep your detergents in cool, dry places out of reach of children.
Add the proper detergent for the selected program to ensure the best performance. The amount of detergent needed depends on the cycle, load size, and soil level of dishes.
Do not fill detergent into the detergent compartment more than required; otherwise you can see whitish streaks or bluish layers on glass and dishes and may cause glass corrosion. Continued use of too much detergent may cause machine damage.
Using little detergent can result in poor cleaning and you can see whitish streaksin hard water.
See the detergent manufacturer's instructions for a further information.
4.9 Filling The Detergent
Push the latch to open the dispenser and pour in the detergent.
Close the lid and press it until it locks in place. The dispenser should be refilled just before the start of each programme. If the dishes are heavily soiled, place additional detergent in the pre-wash detergent chamber.
natural_image
Illustration of a hand placing a blue object into a container with liquid, no text or symbols present
text_image
OR TE NO GENT4.10 Using Combined Detergents
These products should be used according to the manufacturer's instructions.
Never put combined detergents into the interior section or the cutlery basket.
Combined detergents contain not only the detergent but also rinse-aid, salt replacement substances and additional components depending on the combination.
We recommend you do not use combined detergents in short programmes. Please use powder detergents instead. If you encounter problems when using combined detergents, please contact the detergent manufacturer.
When you stop using combined detergents, make sure that water hardness and rinse aid settings are set to correct level.
4.11 Rinse-aid Usage
The rinse aid helps to dry the dishes without streaks and stains. Rinse-aid is required for stain-free utensils and clear glasses. The rinse aid is automatically released during the hot rinse phase. If rinse aid dosage setting set too low, whitish stains remains on dishes and dishes do not dry and washed clean.
If rinse aid dosage setting set too height, you can see bluish layers on glass and dishes.
4.12 Filling The Rinse-aid And Setting
To fill the rinse aid compartment, open the rinse-aid compartment cap. Fill the compartment with rinse aid to the MAX level and then close the cap. Be careful not to overfill the rinse aid compartment and wipe up any spills.
In order to change the rinse aid level, follow the below steps before turning on the machine:
- Turn on the machine by pressing the On/Off button.
- Press the Up button for at least 5 seconds immediately after the machine is turned on.
- Release the Up button when all leds blinks twice. The last setting level is displayed.
- Press Up or Down button to increase or decrease the hardness level.
- Turn off the machine to save the setting. The factory setting is "4".
If the dishes are not drying properly or are spotted, increase the level. If blue stains form on your dishes, decrease the level.

natural_image
Illustration of a hand inserting a plug into a device (no text or symbols)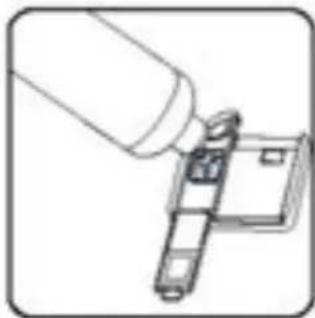
natural_image
Illustration of a hand inserting a small electronic component into a device (no text or symbols visible)| Level | Brightener Dose | Indicator |
| 1 | Rinse-aid not dispensed | Wash LED is on. |
| 2 | 1 dose is dispensed | Dry LED is on. |
| 3 | 2 doses are dispensed | End LED is on. |
| 4 | 3 doses are dispensed | Wash and Dry LEDs are on. |
| 5 | 4 doses are dispensed | Wash and End LEDs are on. |
5 LOADING YOUR DISHWASHER
For best results, follow these loading guidelines.
Loading the household dishwasher up to the capacity indicated by the manufacturer will contribute to energy and water savings.
Manual pre-rinsing of tableware items leads to increased water and energy consumption and is not recommended You can place cups, glasses, stemware, small plates, bowls, etc. in upper basket. Do not lean long glasses against one another or they cannot remain steady and may receive damage.
When placing long stem glasses and goblets, lean them against the basket edge or rack and not against other items.
Place all containers such as cups, glasses and pots into the dishwasher with the opening facing downwards otherwise water can collect on items.
If there is cutlery basket in machine, you are recommended to use the cutlery grid in order to obtain the best result. Place all large (pots, pans, lids, plates, bowls etc.) and very dirty items in the lower rack.
Dishes and cutlery should not be placed above each other.

WARNING: Take care not to obstruct station of spray arms.

WARNING: Make sure after loading
the dishes do not prevent opening the detergent dispenser.
5.1 Recommendations
Remove any coarse residue on dishes before placing the dishes in the machine. Start the machine with full load.

Do not overload the drawers or place dishes in the wrong basket.

WARNING: To avoid any possible injuries, place long-handle and sharp-pointed knives with their sharp points facing down or horizontally on the baskets.
Upper Basket
Height Adjustment
Turn the Rail Stop Clips, at the ends of the rails, to the sides to open them (as shown in the image below), then pull out and remove the basket. Change the position of the wheels, then reinstall the basket to the rail, making sure to close the Rail Stop Clips. When the upper basket is in the higher position, large items such as pans can be placed on the lower basket.

natural_image
Technical line drawing of a mechanical assembly with no visible text or symbols
natural_image
Diagram of a mechanical assembly with two wheels and a central shaft, showing motion direction (no text or symbols)Height Adjustable Rack (peg type)
The foldable racks in the upper basket enable the placement of large items such as pots and pans. Each section can be folded separately. The foldable racks can be either raised up or folded down.

natural_image
3D wireframe model of a building structure with internal grid lines and red directional arrows indicating movement or force (no text or symbols)5.2 Alternative Basket Loads
Lower Basket

natural_image
Two technical diagrams showing a lid and internal components, no visible text or symbols
natural_image
Illustration of two dark containers with lids placed on a grid background, no text or symbols visible.Top Basket

natural_image
Grid-based medical or laboratory equipment layout with multiple circular components and a central vertical rod (no visible text or symbols)Incorrect Loads
Incorrect loading can cause poor washing and drying performance. Please follow the manufacturer's recommendations for a good performans result.

natural_image
Technical illustration of a mechanical assembly with internal components and cross-sectional views (no text or symbols)O Important Note For Test Laboratories
For detailed information required for tests according to EN normatives and a softcopy of the manual, please send the model name and serial number to the following address:
dishwasher@standardtest.info
6 PROGRAMME TABLE
| P1 | P2 | P3 | P4 | |
| Program Name: | Quick 30' | Eco | Super 50' | Intensive 65°C |
| Type of Soil | Suitable for lightly soiled dishes and quick wash. | Standard program for normally soiled daily using dishes with reduced energy and water consumptions. | Suitable for normally soiled daily dishes with faster program. | Suitable for heavily soiled dishes. |
| Level of Soil | Light | Medium | Medium | Heavy |
| Amount of Detergent:A: 25 cm3B: 15 cm3" | A | A | A | A |
| Program Duration (h min) | 00:30 | 03:18 | 00:50 | 01:57 |
| Electricity consumption (kWh/cycle) | 0.740 | 0.755 | 1.100 | 1.700 |
| Water consumption (l/cycle) | 10.2 | 11.0 | 11.2 | 17.8 |
• The program duration may change according to the amount of dishes, the water temperature, the ambient temperature and selected additional functions.
• Values given for programmes other than the eco programme are indicative only.
- Eco programme is suitable to clean normally soiled tableware, that for this use, it is the most efficient programme in terms of its combined energy and water consumption, and that it is used to assess compliance with the EU ecodesign legislation.
- Washing tableware in a household dishwasher usually consumes less energy and water in the use phase than hand dishwashing when the household dishwasher is used according to the manufacturer's instructions.
• Only use powder detergent for short programs.
• Short programs do not include drying.
• To assist drying, we recommend slightly opening the door after a cycle is complete.
- You can access the product database where the model information is stored by reading the QR code on the energy label.

NOTE: According to regulations 1016/2010 and 1059/2010, Eco program energy sumption values may differ. This table is in line with regulations 2019/2022 and 7/2022.
7 THE CONTROL PANEL
text_image
1 2 3 4 5 6 7 8 9 10- On/Off Button
- Program Selection Buttons
- Tablet Option Button
- Half Load Button
- Delay Button
- Child Lock Feature Led
- Start/Pause Button
- Programme Monitoring Lights
- Salt Missing Warning Indicator
- Rinse Aid Missing Warning Indicator
1. On/Off Button
It turns off the energy of the machine when it is pushed, The On-Off lamp lights as long as the machine is on.
2. Program Selection Buttons
It is used for program selection with up/down buttons.
3. Tablet Option Button
It is used for selection for tablet option. If tablet option is activated, tablet lamp turns on. Select the Tablet Detergent option when using a combined detergent that contains salt, rinse aid or other extras. The Tablet Detergent Indicator will remain on for as long as it is selected.
4. Half Load Button
Thanks to the half load function in your machine, you can shorten the durations of the programmes that you have selected and reduce the energy and water consumption by using half load electricity and water.
5. Delay Button
It is used for activation of delay timer. When it is pushed once, 3h timer is activated. 6h and 9h delay timer is activated during consecutive pushes, respectively. If both delay leds are active, it means that 9h delay timer is active.
6. Child Lock Feature Led
This feature is activated by pressing both tablet and delay timer buttons at the same time during 3 seconds. If any button is pushed when the child lock feature is active, child lock led blinks.
7. Start/Pause Key
When you press the Start/Pause key, the programme you have selected with the programme selection button will start operating and the washing light will be on.
8. Programme Monitoring Lights
You can monitor the programme flow with the programme lights on the control panel.
Wash
Dry
• End
9. Salt Missing Warning Indicator
Check the salt missing warning indicator light on the display to have an idea whether the softening salt in your machine is enough. When the salt missing warning indicator is lit, fill the salt compartment.
10. Rinse Aid Missing Warning Indicator
Check the rinse aid missing warning indicator light on the display to have an idea whether the amount of the rinse aid in your machine is enough. When the rinse aid missing warning indicator is lit, fill the rinse aid compartment.
7.1 Changing a Programme
Follow the steps below to change a programme while in operation.

flowchart
graph TD
    A["Press the Start/Pause button."] --> B["After the programme stops, select a new programme using the Programme Selection Up/Down buttons."]
    B --> C["Press the Start/Pause button to start the newly selected programme."]
    C --> D["The new programme will resume the course of the old programme."]
7.2 Cancelling a Programme
Follow the steps below to cancel a programme while in operation.

text_image
Press and hold the Start/ Pause button for 3 seconds. While the programme is cancelling, the End led will blink. The water discharge process will start and continue for 30 seconds.
text_image
When the programme is cancelled, the End light will illuminate.7.3 Switching The Machine Off
text_image
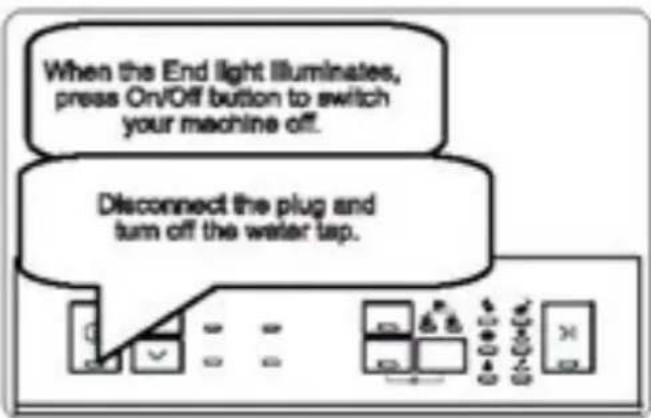
When the End light illuminates, press On/Off button to switch your machine off. Disconnect the plug and turn off the water tap.NOTE: Do not open the door before the programme is complete.
NOTE: Leave the door slightly open at the end of a wash programme to speed up the drying process.
NOTE: If the door of the machine is opened or the power is cut off during a wash programme, the programme will continue when the door is closed or when the power returns.
NOTE: If the power is interrupted or if the machine door is opened during the drying process, the programme will terminate and your machine will now be ready for a new programme selection.
NOTE: To save any program as favourite program, press Up and Down buttons (2) at the same time. To select favourite program, press Up button (2) for 3 seconds.
NOTE: Buzzer sounds 5 times each at 5 minutes intervals (in 0, 5, 10 and 15th minutes) in total 4 different times at the end of the program.(model depending)
Save Power Mode
To activate or deactivate save power mode, follow the below steps:
- Open the door and press Up (2) and Half Load (4) buttons simultaneously for 3 seconds.
- After 3 seconds, the machine will display last setting.
- When Save Power Mode is activated, Wash, Dry, End monitoring lights will be on. On this mode, interior lights will turn off 4 minutes after the door is opened, and the machine will turn off after 15 minutes of no activity in order to save energy.
- When Save Power Mode is deactivated Wash, Dry monitoring lights will be on. If Save Power Mode is deactivated, interior lights will be on as long as the door is open, and the machine will always be on unless it is turned off by user.
- To save the selected setting, turn off the machine.
In factory setting, Save Power Mode is active.
8 CLEANING AND MAINTENANCE
Cleaning your dishwasher is important to maintain the machine's service life. Make sure that the water softening setting (If available) is done correctly and correct amount of detergent is used to prevent limescale accumulation. Refill the salt compartment when the salt sensor light comes on. Oil and limescale may build up in your Dishwasher over time. If this occurs:
- Fill the detergent compartment but do not load any dishes. Select a programme which runs at high temperature and run the Dishwasher empty. If this does not clean your Dishwasher sufficiently, use a cleaning agent designed for use with dishwashers.
• To extend the life of your dishwasher, clean the appliance regularly on each month - Wipe the door seals regularly with a damp cloth to remove any accumulated residue or foreign objects.
8.1 Filters
Clean the filters and spray arms at least once a week. If any food waste remains or foreign objects on the coarse and fine filters, remove them and clean them thoroughly with water.
a) Micro Filter b) Coarse Filter c) Metal Filter

natural_image
Simple line drawing of a mechanical component with no visible text or symbols
text_image
Diagram of a mechanical component with labeled parts a and b, showing directional arrows indicating movement or force.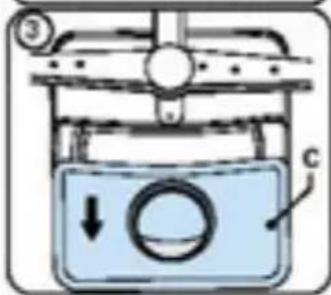
text_image
Diagram of a device with labeled components and directional arrow, likely illustrating a control or measurement setup.
natural_image
Mechanical assembly diagram showing a gear and housing component (no text or labels)To remove and clean the filter combination, turn it counter clockwise and remove it by lifting it upwards (1). Pull the coarse filter out of the micro filter (2). Then pull and remove the metal filter (3). Rinse the filter with lots of water until it is free of residue. Reassemble the filters. Replace the filter insert, and rotate it clockwise (4).
• Never use your dishwasher without a filter.
• Incorrect fitting of the filter will reduce the washing effectiveness.
- Clean filters are necessary for proper running of the machine.
8.2 Spray Arms
Make sure that the spray holes are not clogged and that no food waste or foreign object is stuck to the spray arms. If there is any clogging, remove the spray arms and clean them under water. To remove the upper spray arm undo the nut holding it in position by turning it clockwise and pulling it downwards. Make sure that the nut is properly tightened when refitting the upper spray arm.

natural_image
Technical line drawing of a mechanical device with gears and a fan assembly (no text or symbols)8.3 Drain Pump
Large food residues or foreign objects which were not captured by the filters may block the waste water pump. The rinsing water will then be above the filter.
Warning Risk of cuts!
When cleaning the waste water pump, ensure that you do not injure yourself on pieces of broken glass or pointed implements.
In this case:
- First always disconnect the appliance from the power supply.
- Take out baskets.
- Remove the filters.
- Scoop out water, use a sponge if required.
- Check the area and remove any foreign objects.
- Install filters.
- Re-insert baskets.
9 TROUBLESHOOTING
| FAULT | POSSIBLE CAUSE | TROUBLESHOOTING |
| The programme does not start. | Your Dishwasher is not plugged in. | Plug your Dishwasher in. |
| Your Dishwasher is not switched on. | Switch your Dishwasher on by pressing the On/Off button. | |
| Fuse blown | Check your indoor fuses. | |
| Water inlet tap is closed. | Turn on the water inlet tap. | |
| Your Dishwasher door is open. | Close the Dishwasher door. | |
| Water inlet hose and machine filters are clogged. | Check the water inlet hose and machine filters and make sure they are not clogged. | |
| Water remains inside the machine. | Water drain hose is clogged or twisted. | Check the drain hose, then either clean or untwist it. |
| The filters are clogged. | Clean the filters. | |
| The programme is not finished yet. | Wait until the programme is finished. | |
| Machine stops during washing. | Power failure. | Check mains power. |
| Water inlet failure. | Check water tap. | |
| Shaking and hitting noises are heard during a wash operation. | The spray arm is hitting the dishes in the lower basket. | Move or remove items blocking the spray arm. |
| Partial food wastes remain on the dishes. | Dishes placed incorrectly, sprayed water not reaching affected dishes. | Do not overload baskets. |
| Dishes leaning each another. | Place dishes as instructed in the section on loading your dishwasher. | |
| Not enough detergent used. | Use the correct amount of detergent, as instructed in the programme table. | |
| Wrong wash programme selected. | Use the information in the programme table to select the most appropriate programme. | |
| Spray arms clogged with food waste. | Clean the holes in the spray arms with thin objects. | |
| Filters or water drain pump clogged or filter misplaced. | Check the drain hose and filters are correctly fitted. | |
| Whitish stains remains on dishes. | Not enough detergent used. | Use the correct amount of detergent, as instructed in the programme table. |
| Rinse aid dosage and/or water softener setting set too low. | Increase rinse aid and/or water softener level. | |
| High water hardness level. | Increase water softerer level and add salt. | |
| Salt compartment cap not closed properly. | Check that the salt compartment cap is closed properly. | |
| Dishes do not dry. | Drying option is not selected. | Select a programme with a drying option. |
| Rinse aid dosage set too low. | Increase rinse aid dosage setting. | |
| Rust stains form on the dishes. | Stainless-steel quality of the dishes is insufficient. | Use only dishwasher-proof sets. |
| High level of salt in wash water. | Adjust the water hardness level using water hardness table. | |
| Salt compartment cap not closed properly. | Check that the salt compartment cap is closed properly. | |
| Too much salt spilled in the Dishwasher while filling it with salt. | Use funnel while filling salt to the compartment to avoid spillage. | |
| A poor mains grounding. | Consult a qualified electrician immediately. | |
| Detergent remains in the detergent compartment. | Detergent was added when the detergent compartment was wet. | Make sure detergent compartment is dry before use. |
AUTOMATIC FAULT WARNINGS AND WHAT TO DO
| TROUBLE CODE | POSSIBLE FAULT | WHAT TO DO | |||
| Start / Pause | Wash | Dry | End | ||
 | *Water inlet system failure | Make sure the water inlet tap is open and water is flowing. | |||
 | Separate the inlet hose from the tap and clean the filter of the hose | ||||
| Contact for service if the error continues. | |||||
 | Pressure system failure | Contact for service. | |||
 | Continuous water input | Close the tap and contact for service. | |||
 |  | Inability to discharge water | Water discharge hose and filters may be clogged. | ||
| Cancel the programme. | |||||
| If the error continues, contact for service. | |||||
| Contact for service. | |||||
 |  | Faulty heater and heater sensor | Contact for service. | ||
 |  | Overflow | Unplug the machine and close the tap | ||
| Contact for service. | |||||
 |  |  |  | Faulty electronic card | Contact for service. |
 |  | Overheating | Contact for service. | ||
 |  | Unsuccessful heating | Contact for service. | ||
 |  |  | Hihg voltage | Contact for service. | |
 |  |  | Low voltage | Contact for service. | |
*Note: The led showing water inlet system failure varies depending on the model.
The installation and repairing procedures should always carried out by the Authorised Service Agent in order to avoid possible risks. The manufacturer shall not be held liable for damages that may arise from procedures carried out by unauthorised persons. Repairs may be carried out by technicians only. If a component has to be replaced, ensure that only original spare parts are used.
Improper repairs or use of non-original spare parts may cause considerable damage and put the user at considerable risk.
Contact information for your customer service can be found on the back of this document.
Function-relevant genuine spare parts according to the corresponding Ecodesign order can be obtained from Customer Service for a period of at least 10 years from the date on which your appliance was placed on the market within the European Economic Area.

text_image
CE5XXXX
sauber
PT Máquina de lavar louça / Manual do usuário
natural_image
Simple line drawing of a rectangular container with a horizontal bar inside (no text or symbols)SERIE 1 -DW45 3 X V
SERIE 1-DW45 3 W V
Obrigado por escolher este produto.
Este Manual do Utilizador contém informações importantes sobre segurança e instruções que se destinam a auxiliá-lo no funcionamento e manutenção do seu eletrodoméstico.
Por favor, despenda algum tempo a ler este Manual de Utilizador antes de utilizar o seu eletrodoméstico e guarde-o para referência futura.
| Ícone | Tipo | Significado |
| AVISO | Risco de ferimento grave ou de morte | |
| RISCO DE CHOQUE ELÉTRICO | Risco de tensão perigosa | |
| INCÊNDIO | Aviso; risco de incêndio/materiais inflamáveis | |
| CUIDADO | Risco de danos materiais ou lesão | |
| IMPORTANTE / NOTA | Operar o sistema corretamente |
ÍNDICE
1 INSTRUÇÕES DE SEGURANÇA 4
1.1 Avisos Gerais de Segurança 4
1.2 Avisos de instalação 5
1.3 Durante a Utilização 6
2 INSTALAÇÃO 9
2.1 Posicionamento da máquina 9
2.2 Ligação da água 9
2.3 Mangueira de alimentação da água 9
2.4 Mangueira de descarga 10
2.5 Ligação Elétrica 10
2.6 Colocar a máquina encastrada....11
3 ESPECIFICAÇÕES TÉCNICAS....12
3.1 Aparência Geral 12
3.2 Especificações técnicas 12
4 ANTES DE USAR O ELETRODOMÉSTICO....14
4.1 Preparar a máquina de lavar loiça para a primeira utilização....14
4.2 Utilização do sal (SE DISPONÍVEL)....14
4.3 Encher o compartimento de sal (SE DISPONÍVEL) 14
4.4 Tiras de teste 15
4.5 Tabela de dureza da água 15
4.6 Sistema de descalcificação da água 15
4.7 Configuração 15
4.8 Utilização de detergente 16
4.9 Encher de detergente 16
4.10 Utilização de detergente combinado 16
4.11 Utilização de abrilhantador 16
4.12 Encher e definir o abrilhantador 16
5 CARREGAR A SUA MÁQUINA DE LAVAR LOIÇA 18
5.1 Recomendações 18
5.2 Cargas de cesto alternativas 20
6 TABELA DE PROGRAMAS 21
7 O PAINEL DE CONTROLE....22
7.1 Alterar um programa 23
7.2 Cancelar um programa 23
7.3 Desligar a máquina....23
8 LIMPEZA E MANUTENÇÃO 25
8.1 Filtros 25
8.2 Braços de aspersão 26
8.3 Bomba de drenagem 26
9 RESOLUÇÃO DE PROBLEMAS 27
1 INSTRUÇÕES DE SEGURANÇA
1.1 Avisos Gerais de Segurança
- Leia atentamente todas as instruções antes de utilizar o seu eletrodoméstico e guarde este manual para referência futura.
⚠️ Verifique a máquina e a sua embalagem em busca de quaisquer danos. Nunca comece a utilizar uma máquina danificada, contacte um serviço autorizado imediatamente.
- Desembrulhe a embalagem conforme o indicado e elimine-a de acordo com as regras fornecidas.
Este eletrodoméstico pode ser utilizado por crianças a partir dos 8 anos, bem como por pessoas com competências físicas, sensoriais ou mentais reduzidas ou com falta de experiência e conhecimento se lhes for dada supervisão ou lhes forem dadas instruções respeitantes à utilização do eletrodoméstico de forma segura, fazendo com que compreendam os perigos envolvidos. As crianças não devem brincar com o eletrodoméstico.
⚠️Remova a embalagem e mantenha-a fora do alcance das crianças.
⚠ Não deixe que crianças brinquem com a máquina. Mantenha as crianças longe dos detergentes e auxiliares de enxaguamento.
⚠ Poderá haver algum resíduo na máquina após a lavagem. Mantenha as crianças afastadas da máquina quando está aberta.
⚠ Certifique-se de que as máquinas antigas não ameaçam a segurança das crianças. As crianças podem trancar-se em máquinas antigas. Para prevenir uma situação dessas, parta o trinco da porta e corte o cabo da rede elétrica.
1.2 Avisos de instalação
- Escolha um local adequado e seguro para instalar a sua máquina.
- Siga as instruções sobre a instalação e ligação da máquina.
- Só devem ser utilizadas peças sobressalentes originais com a máquina.
⚠️ ⚠️ Desligue a máquina da tomada antes da instalação.
⚠️ A máquina deve ser instalada apenas por um serviço autorizado.
⚠️ Verifique se o sistema de fusíveis elétricos internos está ligado de acordo com as regulamentações.
⚠ Todas as ligações elétricas devem corresponder aos valores na placa.
⚠️ ⚠ Certifique-se de que a máquina não fica sobre o cabo da rede elétrica.
⚠️ Nunca utilize uma extensão ou ligação com várias tomadas.
⚠️ A ficha deve ficar acessível depois de a máquina ser instalada.
- Após a instalação, faça a sua máquina funcionar sem carga pela primeira vez.
A máquina não deve estar ligada à tomada durante o posicionamento.
⚠️ Utilize sempre a ficha revestida fornecida com a sua máquina.
Em caso de dano, o cabo elétrico da máquina deve ser substituído por um serviço autorizado ou por uma pessoa com uma qualificação semelhante, de modo a prevenir um perigo.
1.3 Durante a Utilização
- Esta máquina é apenas para utilização doméstica. Não a utilize para outros fins. A utilização comercial irá invalidar a garantia.
⚠️ Não fique sobre, se sente ou coloque cargas na porta aberta da máquina de lavar loiça.
⚠Utilize apenas detergentes e abrilhantadores produzidos especificamente para máquinas de lavar loiça. A nossa empresa não é responsável por qualquer dano que possa ocorrer devido a uma má utilização.
⚠️ Não beba água da máquina.
⚠ Devido ao perigo de uma explosão, não coloque quaisquer agentes de dissolução de químicos na secção de lavagem da máquina.
- Verifique a resistência térmica dos artigos de plástico antes de os lavar na máquina.
⚠️A limpeza e a manutenção do utilização não deverão ser efetuadas por crianças sem supervisão.
⚠️ Não coloque artigos que não são adequados para lavar na máquina na mesma, nem encha demais qualquer cesto acima da sua capacidade.
- A nossa empresa não será responsável por qualquer deformação no interior da máquina devido à má utilização.
⚠️ Não abra a porta enquanto a máquina se encontra a funcionar, pois poderá ser derramada água quente. Os dispositivos de segurança certificam que a máquina para se a porta for aberta.
A porta da máquina não deve ser deixada aberta. Poderá causar acidentes.
Coloque as facas e outros objetos afiados no cesto dos talheres numa posição de lâmina para baixo.
Para modelos com o sistema de abertura de porta automática, quando a opção EnergySave está ativa, a porta irá abrir no final de um programa. Para evitar danos na sua máquina de lavar loiça, não force o fecho da porta 1 minuto após a abertura automática. Para uma secagem eficiente, mantenha a porta
aberta durante 30 minutos após um programa estar terminado. Não fique em frente da porta depois de soar o sinal de abertura automática.
⚠ No caso de uma avaria, a reparação só deve ser executada por pessoal de serviço autorizado. De outro modo, a garantia será invalidada.
⚠️! Antes dos trabalhos de reparação, a máquina deve ser desligada da rede elétrica. Não puxe o cabo para desligar a máquina. Feche a torneira da água.
O funcionamento a baixa tensão irá causar um declínio nos níveis de desempenho.
⚠️Por uma questão de segurança, desligue a ficha assim que um programa tiver terminado.
Para evitar um choque elétrico, não desligue a máquina com as mãos molhadas.
⚠️! Puxe a fica para desligar a máquina da rede elétrica, nunca puxe o cabo.