ZIPK8WN2 - Overvågningskamera Speco Technologies - Gratis brugsanvisning og manual
Find enhedens vejledning gratis ZIPK8WN2 Speco Technologies i PDF-format.

Brugerspørgsmål om ZIPK8WN2 Speco Technologies
0 spørgsmål om dette apparat. Besvar dem du kender, eller stil dit eget.
Stil et nyt spørgsmål om dette apparat
Download vejledningen til din Overvågningskamera i PDF-format gratis! Find din vejledning ZIPK8WN2 - Speco Technologies og tag din elektroniske enhed tilbage i hånden. På denne side er alle dokumenter nødvendige for brugen af din enhed offentliggjort. ZIPK8WN2 af mærket Speco Technologies.
BRUGSANVISNING ZIPK8WN2 Speco Technologies

Quick Installation Guide
Speco Gray Viewer Series Surveillance System
1 Rear panel
□ Back
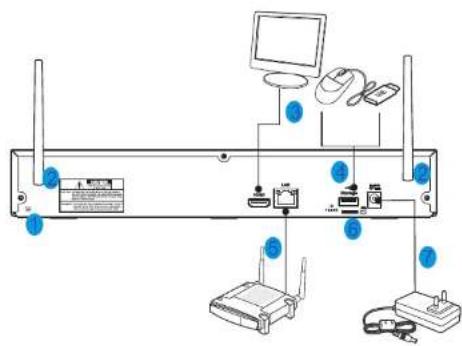
| NO Physical Interface Connection | ||
| Ground connection | A terminal to connect a separate ground cable. ^a Make sure to add a ground cable in order to use the equipment safely. | |
| Antenna | Receive signal from wireless camera. | |
| HDMI | Connect with HDMI display devices,such as PC monitor. | |
| USB port | Connect with USB. | |
| WAN:(RJ45)Network port | Connect with WAN,Ethernet cable. | |
| SD SD Port | ||
| Power port | Connect with the power supply DC12V 2A,included with the device. | |
2 Getting Started
flowchart
graph TD
    A["Camera 1"] --> B["Router"]
    C["Camera 2"] --> B
    D["Camera 3"] --> B
    B --> E["Data Bus"]
    E --> F["Computer"]
    F --> G["Server"]
    G --> H["Wireless Port"]
    H --> I["Mobile Device"]
    style A fill:#f9f,stroke:#333
    style C fill:#f9f,stroke:#333
    style D fill:#f9f,stroke:#333
    style E fill:#ccf,stroke:#333
    style F fill:#ccf,stroke:#333
    style G fill:#ccf,stroke:#333
    style H fill:#ccf,stroke:#333
    style I fill:#ccf,stroke:#333
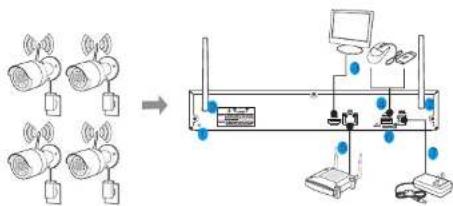
(1) Install the cameras on the walls and connect the power adapters to each camera. Tip: The recorder should be at the center of all the cameras for best performance.
(2) Plug in the Wireless NVR power adapter to the wall outlet. You may use the included power cable extensions for the cameras and/or recorder to desired power outlet if needed.
(3) Connect the Wireless NVR to your router using the LAN ports with the included Ethernet cable so that you may view the cameras from a web browser or mobile device (optional).
(4) When the Wireless NVR is powered on, it will automatically start the pairing process with the cameras. Once the process is complete, the Wireless NVR will display live video feeds from your cameras and then start recording.
(5) You will briefly see a live video on display before you start the Startup Wizard.
(6) To configure the advanced settings for device, please follow the Startup Wizard instructions to complete installation as shown below.
3 Startup Wizard
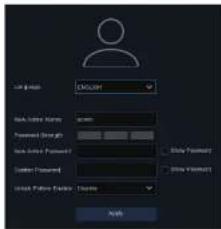
After Wireless NVR startup is completed, the Startup Wizard will be displayed. Wizard selling menu includes: Set Admin Password, Homepage, HDD Management, Network Configuration, Email Configuration. Record Schedule and General System Configuration.
1) Set Admin Password
Please create a user name and password for your device
2) Homepage and HDD Management
You can click "Cancel" to skip Start Wizard. Check "Don't show this window next time" if you don't want to display Start Wizard when system start-up.
The hard drive comes pre-formatted, if a new hard drive is installed for the first time, it will need to be reformatted. Select the HDD which you want to format, and then click "Format HDD" button to format the HDD.
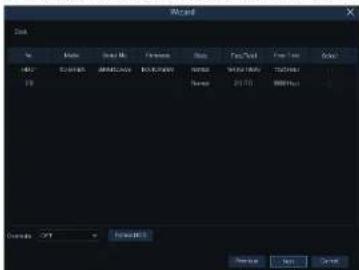
Overwrite: Use this option to overwrite the old recordings on the HDD when the HDD is full. For example, if you choose the option 7 days than only the last 7 days recordings are kept on the HDD. To prevent overwriting any old recordings, select Disable. If you have disabled this function, please check the HDD status regularly, to make sure the HDD is not full.
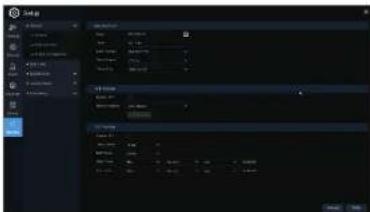
3) Network Configuration
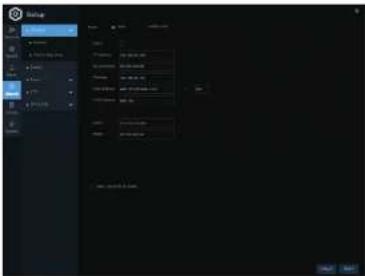
Please check the DHCP box if connecting to a network that assigns IP addresses automatically. A router will typically have DHCP capability.
: The IP address identifies the NVR in the network. It consists of four IP Address groups of numbers between 0 to 255, separated by periods. For example, '192.168.001.100'.
This address allows the NVR to access the Internet. The format of the Gateway Gateway address is the same as the IP Address. For example, "192.168.001.001". DNS1 is the primary DNS server and DNS2 is a backup DNS server. DNS1/DNS2 Usually should be enough just to enter the DNS1 server address.
Port
Web Port: This is the port that you will use to log in remotely to the NVR (e.g. using the Web Client). If the default port 80 is already taken by other applications, please change it. Client Port: This is the port that the NVR will use to send information through (e.g. using the mobile app). If the default port 9000 is already taken by other applications, please change it.
This is the port that the NVR uses to transmit real-time streaming to other RTSP Port devices (e.g. a streaming media player) UPNP: To log in remotely to the NVR using a web browser through DDNS, port forwarding must be set up in the router. Enable this option if the router supports UPnP.
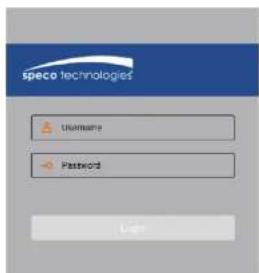
4 Remote Access via Web Client
The NVR can be accessed remotely in multiple ways on the PC. The simplest way is to access it using the Speco Gray Viewer application which is available for download on our website. If on the same network as the NVR, enter the LAN IP address of the NVR in Speco Gray Viewer. If the NVR is on a different network, enter the P2P IO of the NVR. Internet Explorer can also be used for remote access. There are 2 ways to access the NVR through Internet Explorer. First is with a LAN IP address if the NVR is on the same network as the PC. Second, if DDNS was set up, the NVR can be accessed through DDNS from a different network.
Login to Web Client
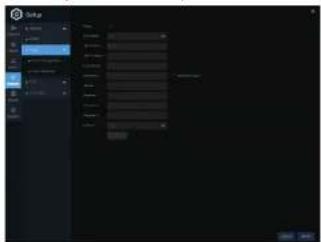
4) Email Configuration
This menu allows your recorder to send email notification on events such as motion is detected or error events. Obtain the correct server and port information from your email service provider.
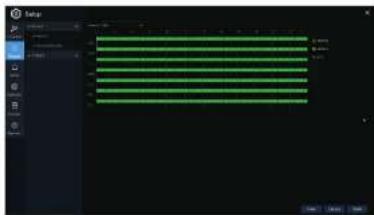
5) Record Schedule
This menu allows you to specify when the Wireless NVR records video and define the recording mode for each channel. The recording schedule lets you set up a schedule like, daily and hourly by Normal (continuous) recording, Motion recording, and Alarm recording. To set the recording mode, click first on the mode radio button (Normal, Motion, or Alarm), then drag the cursor to mark the slots.
5 Remote Live View on Mobile Devices
-
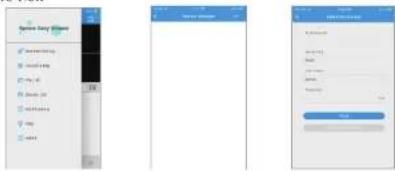
Open the App Store(iOS) or play store(Android).
-
Search for and install "Speco Gray Viewer".
-
Open the Speco Gray

-
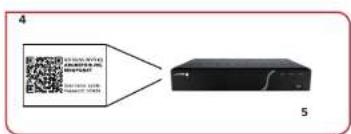
Go to Device. Press and choose Manual to add a new device. Press the QR code icon next to Device ID and scan the QR code on the NVR. Then enter the client port (default 9000), user name, and password. Press "Save" to finish setup.
-
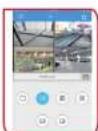
Live View
6) General System Configuration
This menu allows you to configure the general parameters of the system, such as Date, Time, Date Format, Time Format, Language, Menu Timeouts, Mode.
ATTENTION!
As we are continuing to update our products with the latest features, please download the latest manual and tools from the following link and QR code.
Scan this QR code or use the URL below to go to the product page below to download the manual..

https://specotech.com/product/zipk8wn2