PDWM3000 - 麦克风 Pyle - 免费用户手册
免费查找设备手册 PDWM3000 Pyle PDF格式.

| 产品类型 | 无线手持麦克风系统 |
| 品牌 | Pyle |
| 型号 | PDWM3000 |
| 频率范围 | UHF 500-900 MHz(具体因地区而异) |
| 工作距离 | 最远 30 米(空旷环境) |
| 麦克风类型 | 动圈式 |
| 指向性 | 心形 |
| 电池类型 | AA 电池(每个麦克风需 2 节) |
| 电池续航 | 约 8-10 小时(连续使用) |
| 接收机供电 | AC 适配器(100-240V) |
| 输出接口 | 6.35mm(1/4英寸)音频输出 |
| 频率响应 | 40 Hz - 18 kHz |
| 信噪比 | > 100 dB |
| 总谐波失真 | < 0.5% |
| 包含配件 | 2个手持麦克风、接收机、电源适配器、音频线、说明书 |
| 尺寸(接收机) | 约 20 x 15 x 5 cm |
| 重量(接收机) | 约 500 g |
| 工作温度 | -10°C 至 50°C |
| 保存温度 | -20°C 至 60°C |
| 清洁方法 | 用干布擦拭;避免液体进入 |
| 安全注意 | 请勿拆解或暴露于雨雪中 |
常见问题 - PDWM3000 Pyle
用户关于以下问题的提问 PDWM3000 Pyle
0 问题 关于此设备。回答您知道的问题或提出自己的问题。
提出关于此设备的新问题
下载您的设备说明 麦克风 免费PDF格式!查找您的手册 PDWM3000 - Pyle 并重新掌握您的电子设备。本页发布了使用您的设备所需的所有文档。 PDWM3000 品牌 Pyle.
用户手册 PDWM3000 Pyle

PDWM2300/PDWM3000
OPERATING INSTRUCTIONS
WIRELESS MICROPHONE SYSTEM
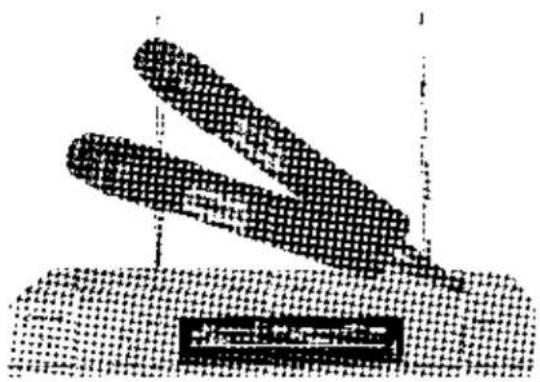
natural_image
Abstract geometric pattern with diagonal lines and a rectangular block, no text or symbols present- To be sure you take maximum advantage of the features, read this manual carefully before use.
■ For purposes of improvement, specifications and design are subject to change without notice.
This manual has been checked carefully, if any mistakes because of printing or other reason make you puzzle, please call the dealer.
SPECIFICATION
Receiver
receive mode crystal frequency lock
frequency range 180\~300MHz
frequency stability 15PPM
sensitivity 3uV 30dB S/N
signal to noise ratio 60dB
audio output 0\~0.5V/4.7K
dimension (LXWXH) 326X200X53mm
power AC90/240V (±10%)
Transmitter
frequency range: 180\~300MHz
frequency stability 15PPM
modulate mode FM
modulate depth 10KHz
emission power 30mV MAX
harmonic suppression 40dB
battery 9V
AA
antenna built in
battery current 25\~30mA
dimension 247X45mm
System specification
frequency range 180\~300MHz
frequency stability ±0.005%
modulate mode FM
frequency response 50-16000Hz
signal to noise ratio >60dB
maximum sound pressure ≥slant 120dB
distortion factor ≤slant1%
effective field 30m
operation temperature 10^ +50^
-7
TROUBLESHOOTING
Receiver
| Problem | Possible cause | solution |
| Fail to operate | Poor connecting of the receiver power or the power isn't correct | Check the operation power correct or not and plug it securely |
| No receive | The transmitter is out of the effective rangeThe frequency of the transmitter and the receiver isn't sameThe antenna hasn't be drug out | Operating it in the effective rangeSet the frequency to sameDrug out the antenna |
| Distorted sound | The volume of microphone is too loud | reduce the volume of the microphone |
Transmitter
| Problem | Possible cause | solution |
| Fail to operate | The battery voltage isn't enoughThe battery install isn't correct polarity | Replace the batteriesInstall the batteries correctly |
| No carrier signal | The transmitter is working out of effective fieldThe frequency of the transmitter and the receiver isn't same. | Operating it in effective fieldset the frequency to same |
| Noise and distorted sound | Disturb by other electric waveThe operation frequency of two transmitter is same.The batteries voltage of the transmitter isn't enough. | Shorten the operation distance of the transmitter and the receiver.Move the receiver far away interference.The same operation frequency of two transmitter should be avoid.Replace the batteries. |
RECEIVER

RECEIVER PANEL SKETCH
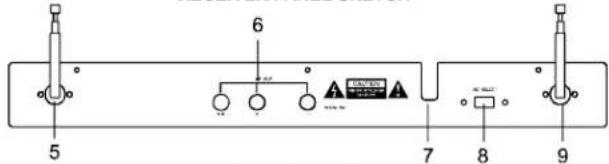
RECEIVER REAR PANEL SKETCH


SCREEN DISPLAY SKETCH
- Power on/off switch
- Channel A volume control knob
- Display
- Channel B volume control knob
- Channel B antenna
- Audio output jack
- Power cable
- AC input switch (110V/220V)
-
Channel A antenna
-
Channel A operating indicator
- Channel A operating frequency point
- Channel A volume control indicator
- Channel A audio indicator
- Channel B audio indicator
- Channel B volume control indicator
- Channel B operating frequency point
- Channel B operating indicator
ANTENNA
Fully pull out antennas 5 and 9; adjust the antennas to be perpendicular to the floor.
Antenna installation will directly affect the receiving effect.
INSTALLATION AND USE
- Better keep distances between the receiver and wall & floor to ensure good receiving signals.
- Don't put the receiver beside digital control equipments.
- Connect the receiver and tuner or corresponding amplifier inlet with audio transmission cables, adjust the corresponding signal channel volume knob to get suitable audio output.
- Switch the power to your local AV operating voltage; insert the power plug into the AV socket.
- Switch on the power, LCD 3 will light up. Adjust volume knobs 2.4 to the least.
PREFACE
Thank you for buying our excellent wireless microphone series products. Before you use our products, please read this Owner's Manual, so that you can enjoy it. Keep this Manual in a safety place for your future references.
MCC series professional wireless microphone system introduces a number of advanced technology and components, including the efficient low-consumption RF transmission technology, elimination of switching impact technology, slow changed output control technology, superb sensitive VHF narrowband receiver and superior 15ppm PLL etc..
EDA, online simulation accessorial design and strict quality control are applied to ensure each system with excellent electronic function.
Features:
- Desktop receiver and enhanced muting, high signal / noise ratio.
- Almost zero noise output when standby.
- Broad frequency response range, super low distortion.
- No impact on switching receiver, ensure safety of rear stage amplifier system and speaker.
- Perfect operative status signals, luxury LCD display.
- Long practical distance. Over 30 m in ideal circumstances; practical 20 m radius in complex circumstances.
- Dual frequency design. Be able to use two microphones at the same time without mutual interference.
- Applicable for medium & small stages, karaoke halls, and home entertainment etc.
Matters Needing Attention:
- Be sure to check whether the local voltage accord with operative voltage of the microphone before using, make correct selection. (Wrong selection may lead to burnout of the whole machine.)
- Please don't open or dismantle the machine on your own. For internal repair, please contact the local distributor or accepted service center.
- When the machine will not be used for a long time, please pull the power plug out of AC power socket.
Cleaning:
- Please make sure to cut off the power before repairing or cleaning this machine.
- The machine can be cleaned by soft cloth. To clean off stiff dirt, please use dry cloth dipping with neutral wash; clean the machine with dry cloth then.
- Please don't use volatile gasoline, diluents or other chemicals for the machine body, or the surface will be corrupted.
CHARGER
PDWM3000 uses AA recycle rechargeable batteries. It has the recharge equipment.
The recharge instructions are as below:
- When the handheld microphone is out of power during using, please recharge it in time.
- Plug in the receiver, screw out the antenna of the microphone, and connect the microphone into the recharge socket on top of the receiver, the recharge signal turns red and the system is in automatic recharge status. The signal will turn green when the batteries are recharged.
- In recharge status, the receiver will automatically close its display and audio output.
Special Warning:
This charger is applicable for AA recycle rechargeable batteries only. Non-rechargeable batteries are forbidden to be used to avoid any danger.
Application:
- Applicable batteries: AA 1.2V rechargeable batteries.
- Rated recharge power: 100mA +/-10%
- Rated recharge time: >4 hrs.
Hold The Transmitter With Care:
- Please don't let any objects (dust, raindrop, grit) fall into the machine to cause any damage to it.
- Please avoid the machine falling onto the ground. Keep it away from serious strike or shake.
■ The machine is not waterproof. Please avoid raindrop, tea etc. splattering onto the machine.
Ensuring:
Should this machine does not work as usual, please stop using, take out the batteries or cut off the AV power immediately. Please contact the local distributor or accepted service center to ensure your effective rights and interests.
Permission:
In most countries of the world, regulations for wireless system are generally stipulated by the governments. To get legal usage permission is a must. The local distributors may give you regulations for wireless system in your district.
TRANSMITTER
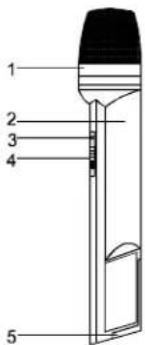
HAND-HOLD MICROPHONE
- Cartridge module
- Mic body
- Operating indicator
- Power switch
- Battery cover
- Audio switch
- Sensitivity adjustment
- Antenna

A
B
INSTALLATION AND USE
- Open the battery cover 5, put in 9V overlapped batteries for microphones A, B; 1.5V AA batteries for microphone C. Pay attention to the positive and negative pole signs of the batteries. Please fit on antenna 8 first for microphone C.
- Position the power switch 4 to ON, indicator light 3 will be on, and indicator 10 or 17 on the receiver display will be on, showing (✗), corresponding operating frequency point 11 or 16 will also be on synchronously, indicating the receiver is receiving effective signals from the microphone.
- Position the audio switch 6 to ON, make voices toward the microphone and adjust receiver volume control knobs 2 and 4, volume control display 12 and 15 will be on, indicating the volume you are adjusting, at the same time AF LEVEL display 13 or 14 will dance with the music.
- When the power indicator darkens, it indicates lack of power. Please change with new batteries in time.
- To make your singing more perfect, please keep the distance between microphone and sound source as 3-5cm.
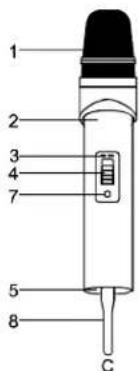
LAVALIER BODYPACK TRANSMITTER
- Cartridge module
- Power switch
- Battery cover
- Power indicator
- Cartridge sensitivity adjustment
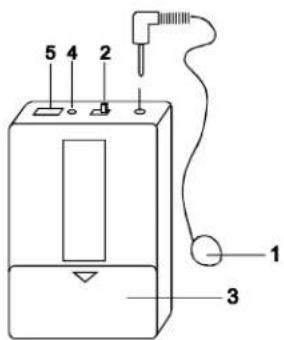
TRANSMITTER
- Open the batter cover 3, put in 9V overlapped batteries. Pay attention to the positive and negative pole signs of the batteries.
- Insert the transmitter cable and cartridge module to the cartridge socket.
- Position the power switch 2 to ON, indicator light 4 will be on, and indicator 10 or 17 on the receiver display will be on, showing ( ), corresponding operating frequency point 11 or 16 will also be on synchronously, indicating the receiver is receiving effective signals from the microphone.
- Make voices toward the microphone, adjust receiver volume control knobs 2 and 4, volume control display 12 and 15 will be on, indicating the volume you are adjusting, at the same time AF LEVEL display 13 or 14 will dance with the music.
- When the power indicator darkens, it indicates lack of power. Please change with new batteries in time.
CHANGING BETTERIES
- The transmitter must be switched off before changing batteries.
- If the transmitter will not be used for a long time, please take out batteries to avoid the parts of transmitter being destroyed by rotten batteries.
PREPARATION BEFORE SOUND TESTING
- Make sure the frequencies of transmitter and receiver conform to each other.
- Keep the distance between antenna and transmitter over 1 meter.
- Avoid whistling, especially when using the omnidirectional microphone.
OUR SUGGESTIONS:
● Decrease the system volume.
- Keep the transmitter away from the speakers.
- Tune down cartridge sensitivity of the transmitter.