
SL-PK26 - Hệ Thống Hi-Fi PANASONIC - Hướng dẫn sử dụng miễn phí
Tìm hướng dẫn sử dụng thiết bị miễn phí SL-PK26 PANASONIC ở định dạng PDF.


Câu hỏi của người dùng về SL-PK26 PANASONIC
0 câu hỏi về thiết bị này. Trả lời những câu bạn biết hoặc đặt câu hỏi riêng.
Đặt câu hỏi mới về thiết bị này
Tải xuống hướng dẫn cho thiết bị của bạn Hệ Thống Hi-Fi ở định dạng PDF miễn phí! Tìm hướng dẫn của bạn SL-PK26 - PANASONIC và lấy lại thiết bị điện tử của bạn. Trên trang này được đăng tải tất cả các tài liệu cần thiết để sử dụng thiết bị của bạn. SL-PK26 thương hiệu PANASONIC.
HƯỚNG DẪN NGƯỜI DÙNG SL-PK26 PANASONIC
Technics
Multi Compact Disc Player
SL-PK26
OPERATING INSTRUCTIONS

natural_image
Black-and-white photo of a compact electronic device with a remote control and a digital display showing 00:00:00 (no readable text or symbols on the device body)COMPACT disc DIGITAL AUDIO
Notes:
- Specifications differ according to the area code.
- The "EB" area code, for example, indicates United Kingdom specifications.
- The "EB" indication is shown on the packing case and serial number tag.
Year Stereo Fan
We want to thank you for selecting this product and to welcome you to the growing family of satisfied Technics product owners around the world.
We feel certain you will get maximum enjoyment
from this new addition to your home.
Please read these operating instructions carefully, and be sure to keep them handy for convenient reference.
Contents
For United Kingdom 2
Suggestions for Safety 3
Accessories 4
Installation 4
Connections 5
Location of Controls 6
Playing a Disc 9
c convenient Functions ....15
Recording from Compact Discs ..... 18
Remote Control Transmitter 22
Before Transporting the Unit 22
About Compact Discs 23
Maintenance 23
Technical Specifications 23
Troubleshooting Guide 24
For United Kingdom
("EB" area code model only)
The "EB" indication is shown on the serial number tag.
The plug of the AC power supply cord must only be connected to electronic apparatus equipped with suitable sockets.
Otherwise cut off and dispose of the plug, and fit an appropriate one in accordance with the instruction below.
Important
THE WIRES IN THIS MAINS LEAD ARE COLOURED IN ACCORDANCE WITH THE FOLLOWING CODE.
BLUE: NEUTRAL
BROWN: LIVE
As the colours of the wires in the mains lead of this apparatus may not correspond with the coloured markings identifying the terminals in your plug proceed as follows. The wire which is coloured BLUE must be connected to the terminal which is marked with the letter N or coloured BLACK.
The wire which is coloured BROWN must be connected to the terminal which is marked with the letter L or coloured RED.
Under no circumstances must either of the above wires be connected to the earth terminal of a three pin plug.
This apparatus was produced to BS 800.
CAUTION!
THIS PRODUCT UTILIZES A LASER. USE OF CONTROLS OR ADJUSTMENTS OR PERFORMANCE OF PROCEDURES OTHER THAN THOSE SPECIFIED HEREIN MAY RESULT IN HAZARDOUS RADIATION EXPOSURE.
DO NOT OPEN COVERS AND DO NOT REPAIR YOURSELF. REFER SERVICING TO QUALIFIED PERSONNEL.

18 of product)

(Back of product)
Note:
-
If the power supply cord supplied with this unit has both the appliance connector and the AC plug at its ends, the power supply cord is intended to be used with other system components, such as tuner or etc.
-
If you need to connect this power supply cord to the household AC outlet, follow the instruction below:
(1) Cut off and dispose the plug at the end where the caution label is attached.
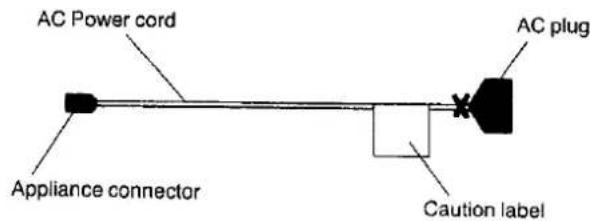
(2) Fit a suitable plug to the AC power supply cord following the instruction indicated on the caution label.
Suggestions for Safety
■ Use a standard AC wall outlet
- Use from an AC power source of high voltage, such as for an air conditioner, is very dangerous. There is the possibility that a fire might be caused by making such a connection.
- A DC power source cannot be used.
Be sure to check the power source carefully, especially on a ship or other place where DC is used.
■ Grasp the plug when disconnecting the power supply cord
- Wet hands are dangerous.
A dangerous electric shock may result if the plug is touched by wet hands. - Never place heavy items on top of the power supply cord, and never force it to bend sharply.
■ Place the unit where it will be well ventilated
Place this unit at least 10 cm (4") away from wall surfaces, etc.
)
L avoid places such as the following:
In direct sunlight or in other places where the temperature is high.
In places where there is excessive vibration or humidity.
Such conditions might damage the cabinet and/or other component parts and thereby shorten the unit's service life.
■ Be sure to place the unit on a flat, level surface
If the surface is inclined, a malfunction may result.
■ Never attempt to repair or reconstruct this unit
A serious electric shock might occur if this unit is repaired, disassembled or reconstructed by unauthorized persons, or if the internal parts are accidentally touched.
■ Take particular care if children are present
Never permit children to put anything, especially metal, inside this unit. A serious electric shock or malfunction could occur if articles such as coins, needles, screwdrivers, etc. are inserted through the ventilation holes, etc. of this unit.
■ If water is spilled on the unit
Be extremely careful if water is spilled on the unit, because a fire or serious electric shock might occur. Immediately disconnect the power cord plug, and consult with your dealer.
■ Avoid spray-type insecticides
Insecticides might cause cracks or "cloudiness" in the cabinet and plastic parts of this unit. The gas used in such sprays might, moreover, be ignited suddenly.
■ Never use alcohol or paint thinner
These and similar chemicals should never be used, because they might cause flaking or cloudiness of the cabinet finish.
■ Disconnect the power supply cord if the unit will not be used for a long time
If the unit is left for a long time with the power ON, this will not only shorten its useful operation life, but may also cause other troubles.
■ If trouble occurs
If, during operation, the sound is interrupted or indicators no longer illuminate, or if abnormal odor or smoke is detected, immediately disconnect the power cord plug, and contact your dealer or an Authorized Service Center.
C
Accessories
•AC power supply cord ... 1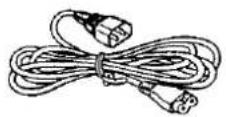 | •Stereo connection cable ...... 1 | •L-type cable ...... 2 |
•Remote control transmitter ...... 1(RAK-SL306E) | •Batteries ...... 2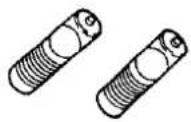 | •Dust cover and hinges ...... 1 and 2.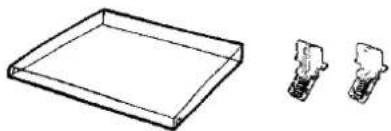 |
Note: The configuration of the AC power supply cord differs according to area.
Installation
Notes of placement
This unit is a precision instrument. Be sure to place it on a flat surface.
■ Avoid places such as the following:
- Near any equipment or device that generates strong magnetism.
- On any heat-generating equipment or device, or in any place where the temperature is high (35°C or higher).
- ‘remely cold places (5°C or below).
• ar a tuner or TV (It may cause noise in the broadcast, or disturbance of the TV picture.).
■ When carrying or storing the unit, handle it with care so it is not subjected to any strong bumps.
Always remove the disc before storing the unit for any period of time.
■ To avoid problems due to vibration.
- Do not place a book or similar object under this unit.
- Do not route the connection cables (of this or other units) across the operation panel, across the top, or under the unit.
Installation of the dust cover
- Insert the dust cover hinges (included) into the slots located at the rear of this unit.
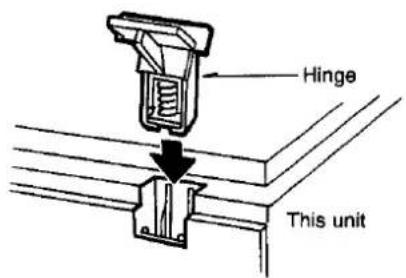
- Install the dust cover (included).

natural_image
Illustration of a hand inserting a CD into a drive case, with an inset showing a close-up of the cable being inserted (no text or symbols present)Connections
- Turn off all components before making connections.
• See the operating instructions of the tuner for details.


flowchart
graph TD
    A["CLASS 1 LASER PRODUCT"] --> B["Line OUT CONTROL TO DECK REMOTE"]
    B --> C["(red)"]
    B --> D["(white)"]
    B --> E["AC IN~"]
    B --> F["To the 'CONTROL' terminal of the Technics cassette deck"]
    B --> G["To the 'REMOTE OUT' terminal of the Technics tuner"]
    B --> H["To the 'AC OUTLET' of the graphic equalizer or the cassette deck or the amplifier"]
    B --> I["Rear of this unit"]
    J["To the 'CD' terminal of the amplifier"] --> K["(red)"]
    J --> L["(white)"]

1 Stereo connection cable (included)
2 L-type cable (included)
This cable can be used only with the Technics cassette deck having the appropriate "CONTROL" terminal.
3 L-type cable (included)
This cable can be used only with the Technics tuner having the appropriate "REMOTE OUT" terminal.
4 AC power supply cord (included)
Note:
The configuration of the AC power supply cord differs according to area.
Be careful of the following points when using this unit in combination with a Technics tuner (ST-X902L, ST-X901L, ST-X302L, ST-X301L).
- Presetting the volume when the timer is set (Refer to the instruction manual of the amplifier for details.) The volume cannot be preset, so set the volume level first then switch off the power.
- Timer play and image play (Refer to the instruction manual of the tuner for details.)
When you wish to play only a certain disc, load only that disc.
- Switching over to another program source while a program is being played on this unit
This unit will not stop, so stop play before switching over to another program source.
Location of Controls

Control section
The functions indicated by the numbers with black background (for example 4) can also be activated from the remote control transmitter. (See page 8.)
① Power "STANDBY ⏻/ON" switch (POWER ▲ STANDBY ⏻ ▲ ON)
This switch switches ON and OFF the secondary circuit power only. The unit is in the "standby" condition when this switch is set to the STANDBY ⏻ position. Regardless of the switch setting, the primary circuit is always "live" as long as the power cord is connected to an electrical outlet.
② Spiral button (SPIRAL)
Press this button to let this unit play the first tracts on all the loaded discs in sequence, followed by the second tracks on all the discs, and so on.
Press again to cancel the spiral play mode.
③ Random buttons (RANDOM)
•One disc random button (ONE DISC)
Press this button to let this unit play all the tracks at random on the disc selected at random, followed by all the tracks at random on the next disc selected at random, and so on. Press again to cancel the one disc random play mode.
●Full random button (FULL)
Press this button to let the microcomputer select the sequence of selections to be played from all of the loaded discs, in an exclusively random manner. Press again to cancel the random play mode.
4 Repeat button (REPEAT)
Press this button to activate the repeat mode. The repeat indicator illuminates. Press again to cancel the repeat mode. The repeat indicator will no longer illuminate.
⑤ Disc trays (1\~5)
One disc per tray can be loaded.
⑥ Remote control signal sensor (SENSOR)
⑦ Disc skip buttons (DISC SKIP ↩, DISC SKIP ↗)
These buttons are used to select the desired disc.
⑧ Disc buttons (DISC 1\~5)
These buttons are used to select the desired disc for continuous or program play.
9 Stop button (■ STOP)
⑩ Pause button (II PAUSE)
⑪ Play button (▷ PLAY)
⑫ Skip buttons ( ◀◀ SKIP ▶▶)
Press one of these buttons briefly to move the pickup (backward and forward) to the beginning of a specific track.
Pickup:
The pickup is a laser device that reads the information on the disc surface. The pickup moves across the disc as the disc is played, but it is not visible from outside the cabinet.
13 Search buttons (◀◀ SEARCH ▶▶)
Use these buttons to move the pickup forward and backward.
14 Program/continue button (PROGRAM/CONTINUE)
This button is used to select either the continuous play or program play mode.
The mode changes each time the button is pressed.
The continuous play mode is automatically selected when the power is switched on.
⑮ Buttons for edit function (SYNCHRO EDIT)
•Tape length button (TAPE LENGTH)
When compact discs are recorded on tape, this button can be used to select the tape length so that the CD player can then automatically calculate what tracks fit on each side of the tape, in a sequential manner.
●Auto link button (AUTO LINK)
In the "CD synchro-edit" recording mode this button can be used to link multiple number of discs.
16 Time mode button (TIME MODE)
Use this button to select the desired time mode. The display information will change as follows each time the button is pressed.
① Track number and its elapsed play time.
② Track number and remaining time of current track.
③ Total track numbers and playing time of the current disc.
④ Total elapsed play time of the current disc.

Display section
⑰ Disc indicators ( ◀1▶\~ ◀5▶ )
The indicator corresponding to the disc being played flashes during play.
When the unit is in the program mode, these indicators show the programmed discs.
⑱ Disc number/tape side display
Shows the number (1\~5) of the current disc, or shows the tape side (A or B) in the edit mode.
⑲ Track number display
Shows the number (up to 99) of the current track.
20 Time/programmed number display
This display shows the elapsed playing time of the track being played. When the unit is in the program play mode, this display shows the program sequence.
②1 Program play indicator (PGM)
Illuminates when the unit is in the programming or program play mode.
②2 Play mode indicators (▼▼▼)
Each indicator points following play modes:
SPIRAL: Spiral play
ONE: One disc random play
FULL: Full random play
②3 Repeat indicator (☐)
Illuminates when the repeat mode is activated.
② Compact disc edit indicator (EDIT)
Illuminates when the edit mode is activated.
⑲ Auto link indicator (LINK)
Illuminates when the unit is in the condition that the automatic disc link is possible.
②6 Pause indicator (II)
Illuminates when the pause mode is activated.
⑳ Play indicator (▶)
Illuminates when the play mode is activated.
Location of Controls (continued)
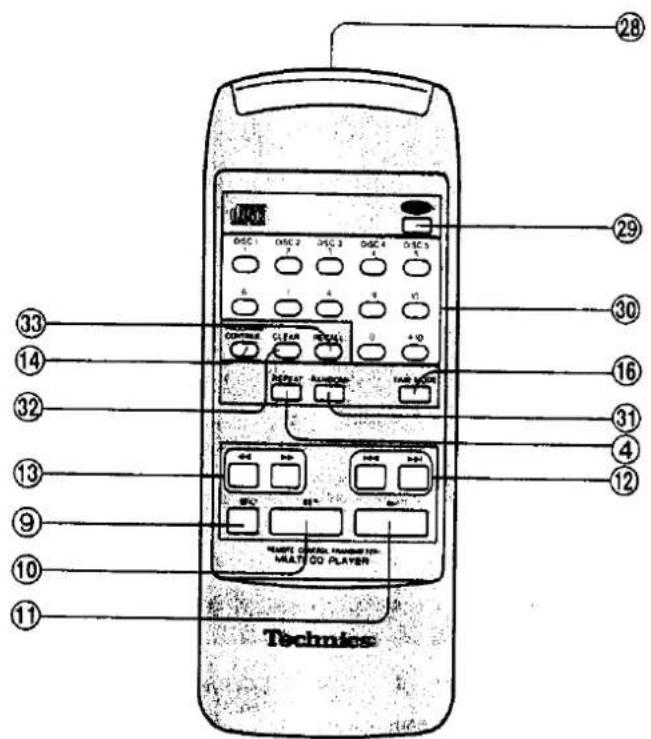
Remote control section
The function description of buttons 4, 9, 10, 11, 12, 13, 14 and 16 is as described under "Control section" on pages 6 and 7.
⑳ Remote control transmission window
Aim the transmission window toward the remote sensor of the main unit when operating the remote control.
③ Disc button (DISC)
Press this button only before selecting the disc number (1\~5) on the numeric keypad section.
③0 Numeric buttons (1\~10, 0, +10)
These buttons are used to specify the desired disc (1\~5, after pressing the disc button) or the track number.
③1 Random button (RANDOM)
This button can activate the full random play.
③2 Clear button (CLEAR)
Each time this button is pressed, the last entry in the program sequence is cancelled.
③3 Recall Button (RECALL)
Press this button to confirm the contents of the program. Each time the button is pressed, the next entry in the program sequence is displayed.
Note:
If the supplied L-type cable is connected to the REMOTE OUT terminal of the tuner, point the remote control at the tuner's remote control sensor when operating the unit.
Playing a Disc
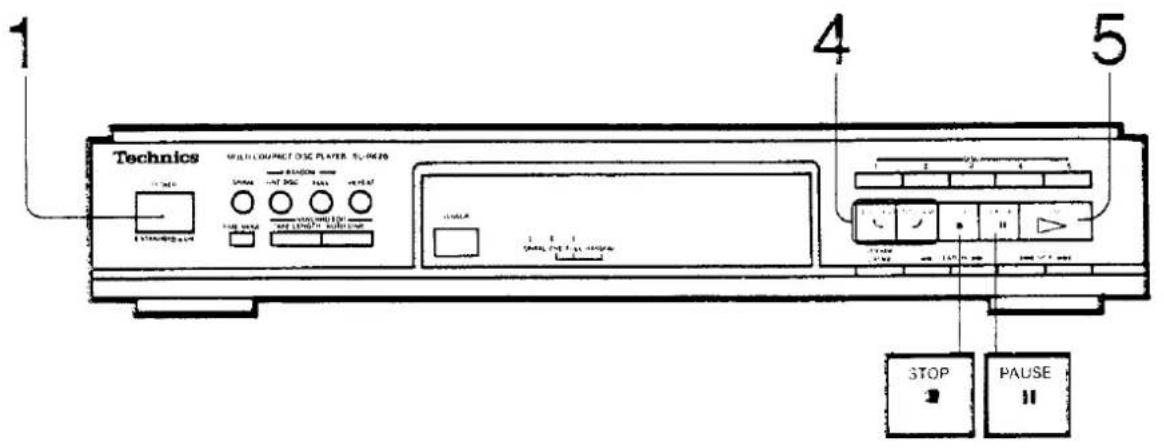
Continuous play
Continuous play involves playing all the five discs on the five-disc tray in a clockwise sequence starting from the first track on the disc at the play position.
1 Switch on the power "STANDBY ⏻ /ON" switch (■_■).
The display will illuminate as indicated below.

- Continuous play is automatically selected when the power is switched on.
Open the dust cover.
3 Load the disc(s) on the disc tray(s).

To place a disc on a tray beneath the clamp cover, move the tray with the disc skip button.
Notes:
- Do not touch the carousel while rotating.
- Discs of the 8 cm (3") size and 12 cm (5") size cannot be used together on the same disc tray.
- Do not turn the tray forcibly by hand because it may fail to operate normally.
4 Press the disc skip button to select the disc to be played.
Using the disc skip button, move the tray with the disc to be played beneath the clamp cover.

The tray turns clockwise.

The tray turns counterclockwise.
5 Press the play button.
The play indicator will illuminate and continuous play will start.
The disc indicator corresponding to the disc being played flashes.

Play indicator
During play, the dust cover can be opened to exchange the discs.
At the end of the last track of the last disc, the unit switches to the stop mode.
■ To briefly interrupt play
Press the pause button.
The unit switches to the pause mode and the pause indicator illuminates.
Play is stopped, but the pickup remains where it was at the time when the pause button was pressed. The disc rotates while the unit is in the pause mode.
Press the play button to resume play.
■ To stop play
Press the stop button.
In the stop mode the pickup is at its rest position; the disc does not rotate, and the display will show all zeros except a disc number.
Playing a Disc (continued)
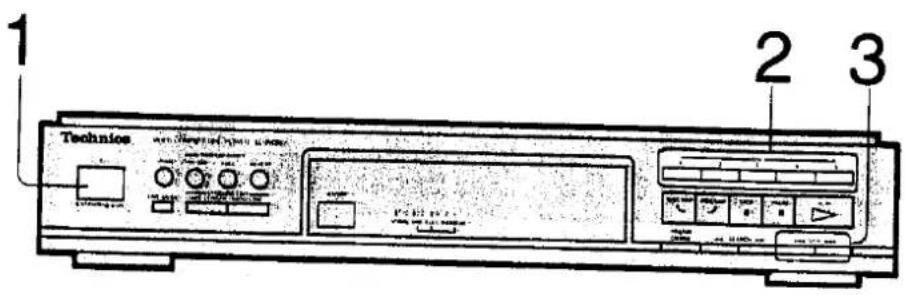

Direct access play
Direct access play involves starting play from a specific track on a specific disc and playing all discs on the five-disc tray in a clockwise sequence.
1 Switch on the power "STANDBY ⏻ /ON" switch and load the disc(s).
2 Press the disc button.
If the disc only is selected, play of all tracks on that disc (beginning from its first track) will begin in about ten seconds.
For example: To select the 3rd disc, press the ☐ button.
The selected disc indicator will flash.

Press the skip (☐) button to select the track number.
Play will start from the selected track.
For example: To select the 9th track, press the button 8 times (or keep pressing the button until the display shows "9").

If you pass the desired track, press the button to return to the desired track.
Play will start from the selected track.
■ By the remote control transmitter (See page 8.)
1 Switch on the power "STANDBY ⏻ /ON" switch and load the disc(s).
2 Press the disc button.
3 Press the numeric button (○ - ○) to specify the disc.
If the disc only is selected, play of all tracks on that disc (beginning from its first track) will begin in about ten seconds.
4 Press the numeric button to specify the track. To select a track between 1 and 10:
Press the appropriate numeric button ○ - ○ directly.
To select a two-digit track number over 10:
Press the ○ button to select the "tens" digit, and then press one of the ○ - ○ buttons to select the "units" digit.
Example: to select the 32nd track
Press the ○ button three times to select 3, and then press the ○ button.
Notes:
- If a disc number not on the disc tray is specified, the next disc in a clockwise sequence will be played.
- When a track number not on the disc is specified, the selection cannot be entered.

Random play
■ Full random play
The microcomputer will automatically select the sequence of selections to be played from all of the loaded discs in an exclusively random manner.
Press the full random button or the random button on the remote control transmitter.
The play mode indicator points to "FULL" and the full random play will start.

Selections will be played by randomly choosing a track from within a randomly selected disc. Once a selected track has been played, a new disc and track will be chosen randomly, excluding the tracks ady played.
The unit will stop automatically when all the tracks on all the loaded discs have been played.
Press the full random button again to cancel the full random play.
The "FULL" play mode indicator will no longer illuminate.
The unit will return to the continuous play mode from the current track on the current disc which has been playing.
■ One disc random play
The unit selects and plays all the tracks at random on the disc selected at random, followed by all the tracks at random on the next disc selected at random, and so on.
Press the one disc random button.
The play mode indicator points to "ONE" and the one disc random play will start.

The unit will stop automatically when all the tracks on all the loaded discs have been played.
Press the one disc random button again to cancel the one disc random play.
The "ONE" play mode indicator will no longer illuminate.
The unit will return to the continuous play mode from the current track on the current disc which has been playing.
Playing a Disc (continued)

Spiral play
The unit plays the first tracks on all the loaded discs in sequence, followed by the second tracks on all the discs, and so on.
Press the spiral button.
The play mode indicator points to "SPIRAL" and the spiral play will begin with the first track on the disc at the play position.

The unit will stop automatically when all the tracks on all the loaded discs have been played in this order.
Press the spiral button again to cancel spiral play.
The "SPIRAL" play mode indicator will no longer illuminate. The unit will return to the continuous play mode from the current 'ack on the current disc which has been playing.
■ Spiral random play
The unit selects and plays one selection at random on the first disc in, followed by the next selection selected at random on the second disc, and so on.
Press the spiral button during the full random play or press the full random button during the spiral play.
The play mode indicators point to "SPIRAL" and "FULL" and the spiral random play will begin with a randomly selected track on the disc at the play position.

The unit will stop automatically when all the tracks on all the loaded discs have been played in this manner.
Press the full random button to switch to the spiral play.
The "FULL" play mode indicator will no longer illuminate.
Press the spiral button to switch to the full random play.
The "SPIRAL" play mode indicator will no longer illuminate.
Program play
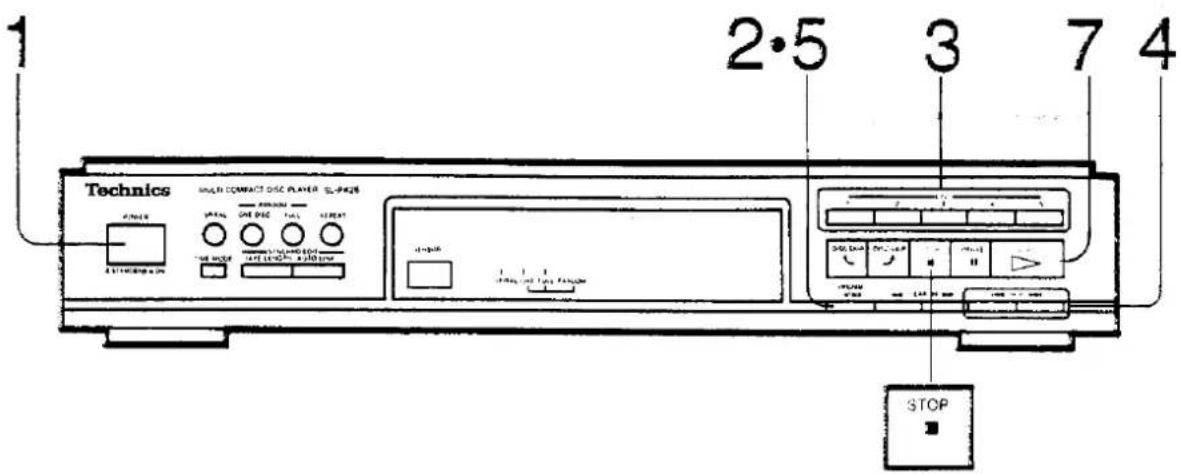
As many as 32 selections from the five discs can be selected and programmed to play in any desired sequence.
1 Switch on the power "STANDBY ⏻ /ON" switch and load the disc(s).
2 Press the program/continue button in the stop mode.
The play mode will then change from continuous play to program play.
3 Press the disc button.
For example: To select the 3rd disc, press the button.

The letters in the track display indicate that all tracks of the disc will be programmed unless a track is selected (see step 4).
Steps 4 and 5 are not necessary if selecting the disc only.
●The disc skip button cannot be used during program play.
4 Select the track number.
For example: To select the 9th track, press the ☐ button 9 times.

5 Press the program/continue button.

■ To specify the same track number
For example, to program track 5 two times:
① Press the button five times.
② Press the program/continue button.
③ Press the button.
4 Press the button.
⑤ Press the program/continue button.
- By the remote control transmitter, simply press the numeric button the same number of times as that track is to be played.
6 Repeat steps 3, 4 and 5 until the desired program is completed.
- Steps 4 and 5 are not necessary if selecting the disc only.
- Step 3 is not necessary to select the disc number if the next track selected is on the same disc.
Notes: - If selections of non-existing disc(s) or track(s) are programmed, the corresponding indicator (disc or track) will illuminate and the selection will be included in the program count. However, during play the selection(s) will be cancelled and the subsequent program selection will be played.
- If a 33rd selection is attempted, the -- (full) indication will be displayed.
7 Press the play button to start play.
To program additional selections during play, repeat steps 3, 4 and 5.
■ To resume continuous mode during play
1 Press the stop button.
2 Press the program/continue button.
3 Press the play button.
•The program will be retained in the unit's memory.
- Follow the same procedure to resume the program play mode.
■ To clear the entire program
Press the stop button.
- Press the button one time in the stop mode or two times while in the program play mode.
All programmed selections will be cleared from memory. - All programmed selections will be cancelled if the power is switched OFF.
Playing a Disc (continued)

Program play
■ By the remote control transmitter (See page 8.)
1 Switch on the power "STANDBY ⏻ /ON" switch and load the disc(s).
2 Press the program/continue button.
3 Press the disc button.
4 Press the numeric button ( ○ - ○ ) to specify the disc.
5 Press the numeric button to specify the track.
To select a track between 1 and 10: Press the appropriate numeric button ○ - ○ directly. To select a two-digit track number over 10:
Press the ○ button to select the "tens" digit, and then press one of the ○ - ○ buttons to select the "units" digit.
Example: to select the 32nd track
Press the ○ button three times to select 3; and then press the ○ button.
6 Repeat steps 3, 4 and 5 until the desired program is completed.
- Step 5 is not necessary if selecting the disc only.
- Steps 3 and 4 are not necessary to select the disc number if the next track selected is on the same disc.
Notes:
- If selections of non-existing disc(s) or track(s) are programmed, the corresponding indicator (disc or track) will illuminate and the selection will be included in the program count. However, during play the selection(s) will be cancelled and the subsequent program selection will be played.
- If a 33rd selection is attempted, the -F (full) indication will be displayed.
7 Press the play button to start play.
To program additional selections during play, repeat steps 3, 4 and 5.
■ To confirm the program
Press the recall button on the remote control transmitter.
- Each time the recall button is pressed, the next track in the programmed sequence is displayed.
- The diagram below shows track 3, track 5 and track 1 programmed in that order (on the 3rd disc).


- Recall pressed again.


- Recall pressed again.

■ To clear a program entry
Press the clear button on the remote control transmitter in the stop mode.
Each time the clear button is pressed, the last track in the programmed sequence will be cancelled.
For example, if you program the sequence: track 3, track 5, track 1 pressing the clear button once will cancel track 1.
Pressing the clear button again will cancel track 5, etc.
To clear a selection in the middle of the program sequence, press the recall button repeatedly until the display shows the selection to be cancelled: then press the clear button.
Convenient Functions

Skip play
To skip tracks
Press the forward or backward skip button momentarily until the desired track has been located.

Pickup skips forward.

Pickup skips backward.
•During Continuous play:

The pickup skips to the beginning of the next track.

The pickup skips to the beginning of the current track if tapped one time. If pressed again quickly, the pickup skips to the beginning of the previous track.
Remember that for backward skip, the current track is included in the count.
•During program play:

The pickup skips to the beginning of the next programmed track.

The pickup skips to the beginning of the current programmed track if tapped one time. If pressed again quickly, the pickup skips to the beginning of the previous programmed track.
•During random play:

The pickup skips to the beginning of a track randomly selected among the tracks that has not been played.

The pickup skips to the beginning of the current track.
•During spiral play:

The pickup skips to the beginning of a track of the next disc.

The pickup skips to the beginning of the current track.
■ To skip discs
This function is activated only in the stop mode, continuous play and one disc random mode.
Press one of the disc skip buttons momentarily until the desired disc has been located.

The tray turns clockwise.

The tray turns counterclockwise.
Convenient Functions (continued)

Search play
(During play or in the pause mode)
While watching the track number and time displays, press and hold □ or □ to move the pickup forward or backward. Release the button when the desired point has been reached.

Pickup moves forward.

Pickup moves backward.
■ Forward and backward search
Sound from the disc can be heard as the pickup moves. The output level at this time is decreased by 12 dB (1/4) compared with the normal level.
The pickup moves slowly at first and then rapidly if one of the buttons is held down for more than about 3 seconds.
In the pause mode no sound is heard; the pickup remains at the point where the button is released.
•During continuous play:
The pickup moves forward over discs, and backward within the disc now playing.
In the pause mode, the pickup moves forward or backward within the disc now playing.
•During other play modes:
The pickup moves forward or backward within the current track.
Repeat play
Press the repeat button before or during play.
The repeat indicator will illuminate to show that the repeat mode has been selected.
•During continuous play:
Play will continue to the last track of the fifth disc from the point where the repeat button was pressed. Then all tracks of all discs will be played repeatedly starting from the first disc.
•During program play:
The current track and the remaining programmed selections will be played in the programmed sequence. Then all programmed selections (the entire program) will be played repeatedly in the programmed sequence.
•During random play:
When all the tracks on all the loaded discs have been played, the unit will select a random sequence and play again. The sequence differs each time.
Press the repeat button again to cancel the repeat play.
The repeat indicator will no longer illuminate.

Time mode selection
Press the time mode button.
The information shown by the display will change (as described below) each time the button is pressed.
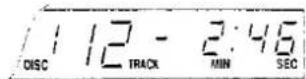
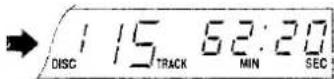
In the example, the first disc, with 15 tracks, 62 min. and 20 sec., is playing at a point 2 min. and 8 sec. after the beginning of track 12.
① The track number and its elapsed time (normal display).
④ The total elapsed play time of the current disc.

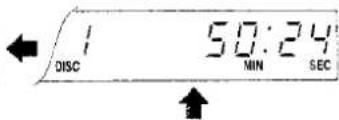
② The track number and remaining time of the current track.
③ The total track numbers and playing time of the current disc.
•During spiral play and random play:
The “--” indication will be shown when display ④ is viewed. If one of the search buttons is pressed, the display will change to that of display ① until the button is released.
•During program play:
The program selection's data (disc/track and selection number) will be shown when display ④is viewed. If one of the search buttons is pressed, the information will change to that of display ① until the button is released.
•During edit or automatic link play:
The tape side (A or B) on which the recording is now being done and tape travel time will be shown when display ④ is viewed.
Notes:
- If one of the search buttons is pressed while display ③ is viewed, the information will change to that of display ① until the button is released.
- During play of track 21 or greater, the “---:--” indication will be shown when display ② is viewed.
Recording from Compact Discs
The editing function is used when recording from compact discs to tape. Tracks can be recorded on the two sides (sides A and B) of the tape, considering the length of the tape used, to that there is no interruption of tracks at the end of one tape side. Note that this function is only used in combination with the Technics cassette deck which has the CD synchro edit recording function.

Automatic editing
The unit automatically calculates how many tracks will fit on a given tape side and programs them for you automatically.
1 Switch on the power "STANDBY ⏻ /ON" switch and load the disc(s).
2 Press the disc skip button to select the desired disc.

The tray turns clockwise.

The tray turns counterclockwise.

3 Prepare for recording on the cassette deck.
- Insert the cassette tape into the cassette holder of the "DECK 2".
- Select the noise-reduction system and the reverse mode (C).
- Check to be sure that the forward-side indicator (▶) of the "DECK 2" is illuminated.
- Set the input selector of the amplifier to CD.
- Start playing the compact disc to be recorded.
- Set the cassette deck on the recording standby mode.
- Adjust the recording level on the cassette deck.
- Stop playing the compact disc.
(Refer to the operating instructions for the cassette deck to be used.)
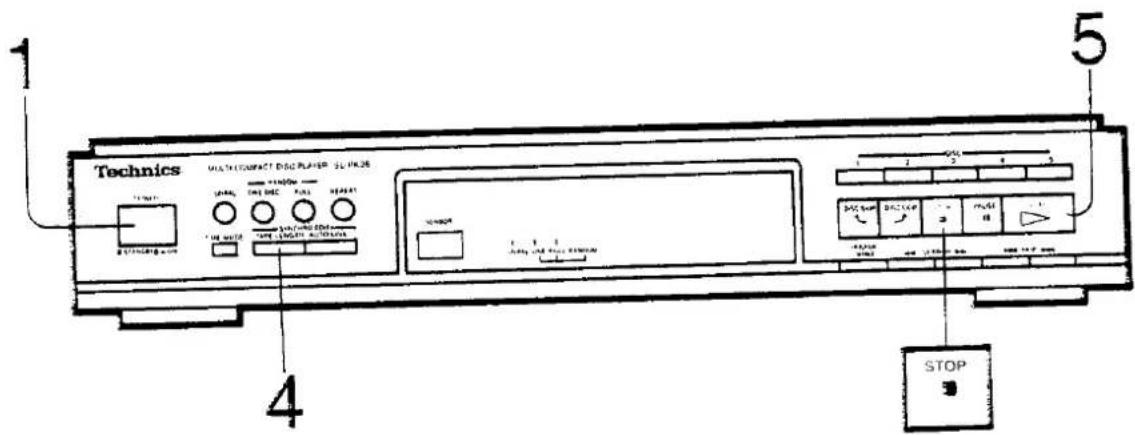
4 Press the tape length button to select the tape length.
Each time the button is pressed the tape length indicator changes as follows. Choose the length of the tape you will use.
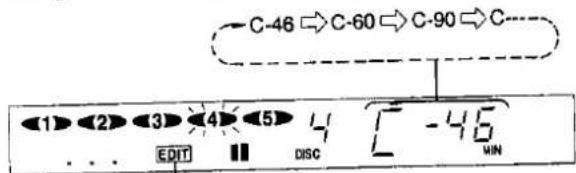
Compact disc edit indicator
Note:
The maximum allowable playing time for editing is 99 minutes.
■ To select your desired recording time
Select C--- if the recording time is to be other than 46, 60 or 90 minutes.
Use the skip button(s) to specify the total recording time in minutes (1\~99).
For example:
When the total recording time of the tape to be used is 52 minutes, keep pressing the skip button (▶▶1) until the display shows "C-52".
- To start pressing the skip buttons from each step C-46, C-60 or C-90 can also be possible.
- If you go past the desired number, return the number using the skip button (◀◀).
- The recording time can also be easily entered using the numeric buttons on the remote control transmitter.

The display shows the data of the tracks to be recorded as follows:

In this example, disc 4 is to be recorded with tracks 1\~5 on side A and tracks 6\~9 on side B of the cassette tape.
5 Press the play button. Recording will begin from side A.
- When the tracks programmed for tape side A have finished playing, the unit searches for the beginning of the first track to be recorded on side B and switches to the pause mode. When the auto reverse mechanism of the cassette deck works at the end of side A and the tape switches to side B, recording for side B starts automatically.
- During recording, silent gaps of approximately 3 seconds are inserted between tracks automatically (auto space function).
- Depending on the disc, a little sound of the beginning of the next track may be recorded onto the end of the track.
■ To stop recording Press the stop button then press the stop button on the cassette deck.
■ If the cassette deck to be used has no synchro edit terminal
Begin recording onto the cassette deck at the same time as pressing the play button of the CD player to start recording.
- When the recording for side A is finished, the CD player goes into the pause mode. Press the play button of the CD player to start recording for side B as soon as the tape switches to side B.
- When using the link function, be sure to stop the tape running after the recording of the first disc is completed.
Recording from Compact Discs (continued)
Program editing
If you program the desired tracks from the desired discs in advance, the program edit function enables an edit recording (on side A and side B of the cassette tape) of those tracks in the programmed order as far as the specified tape length permits.
1 Switch on the power "STANDBY ⏻ /ON" switch and load the disc(s).
2 Enter the desired disc numbers and track numbers following the programming procedure.
(See pages 13\~14.)
For example:
When using a 46-minute tape, you should calculate the total programming time to be recorded (including the total playing time and 3 seconds silent spaces) for each side A/B within 23 minutes and program the tracks.
- More than 32 selections cannot be edited.
3 Prepare for recording on the cassette deck.
(See step 3 on page 18 for details.)
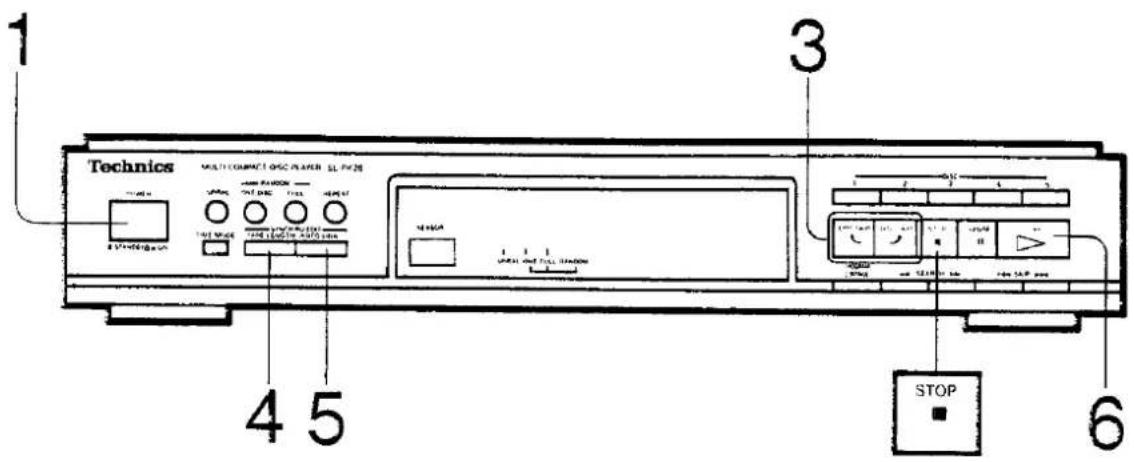
4 Press the tape length button to select the tape length. (See step 4 on page 18.)
For example, if you use a 46 minute tape:

The track number programmed first
Notes:
•The maximum allowable playing time for editing is 99 minutes.
Note that you can not get the information regarding the number of tracks to be recorded and the remaining time on side A and side B as in the automatic edit mode.
5 Press the play button.
Recording will begin from side A.

- When the tracks programmed for tape side A have finished playing, the unit searches for the beginning of the first track to be recorded on side B and switches to the pause mode. When the auto reverse mechanism of the cassette deck works at the end of side A and the tape switches to side B, recording for side B starts automatically. During recording, silent gaps of approximately 3 seconds are inserted between tracks automatically (auto space function).
- Depending on the disc, a little sound of the beginning of the next track may be recorded onto the end of track.
■ To stop recording
Press the stop button then press the stop button on cassette deck.
Automatic link function
While recording in the "CD synchro-edit" mode, the automatic link function allows you to link tracks, from a successive disc on the remainder of the tape left over while recording from the previous disc.
If there is still some tape left over even after all the five discs on the disc tray have been recorded, the disc on the first disc tray can be recorded again.
For example, the following recording can be made on 60 minute tape (2 tracks on disc A and 5 on disc B are accommodated):

flowchart
graph LR
    subgraph Left_Section
        direction LR
        A["1"] --> B["Disc A"]
        B --> C["Disc B"]
        C --> D["Disc C"]
        E["2"] --> F["Disc A"]
        F --> G["Disc B"]
        G --> H["Disc C"]
        I["3"] --> J["Disc A"]
        K["4"] --> L["Disc B"]
        M["5"] --> N["Disc A"]
        O["6"] --> P["Disc B"]
        Q["7"] --> R["Disc C"]
    end
    subgraph Right_Section
        direction LR
        S["1"] --> T["Disc A"]
        T --> U["Disc B"]
        U --> V["Disc C"]
        W["2"] --> X["Disc A"]
        Y["3"] --> Z["Disc B"]
        AA["4"] --> AB["Disc C"]
        AC["5"] --> AD["Disc A"]
        AE["6"] --> AF["Disc B"]
        AG["7"] --> AH["Disc C"]
        AI["8"] --> AJ["Disc A"]
        AK["9"] --> AL["Disc B"]
        AM["10"] --> AN["Disc C"]
1 Switch on the power "STANDBY ⏻ /ON" switch and load the disc(s).
2 Prepare for recording on the cassette deck.
(See step 3 on page 18 for details.)
3 Press the disc skip button to specify the disc to be recorded first.
4 Press the tape length button to select the tape length.
(See step 4 on page 18.)
5 Press the auto link button.
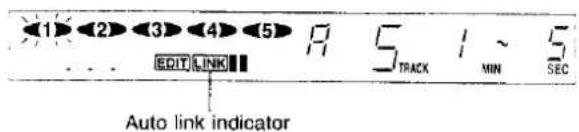
If the auto link button is pressed during play, this function is also activated.
6 Press the play button.
Recording will begin from side A.
When all the tracks on disc A have been recorded, disc B is automatically selected and played for recording.
■ To stop recording
Press the stop button then press the stop button on the cassette deck.
Remote Control Transmitter
Insertion of remote control transmitter batteries
BATTERY LIFE: About 1 year.

■ Notes concerning use of dry batteries
- Do not use re-chargeable batteries (Ni-Cd type).
- Be sure the batteries are inserted so that the positive (+) and negative (−) polarities are correct. Batteries installed with incorrect polarities may leak and damage the remote control transmitter.
- Never subject the batteries to excessive heat or flame; do not attempt to disassemble them; and be sure they are not short-circuited.
-
If the remote control transmitter is not to be used for a long time, remove the batteries and store them in a cool dark place.
●Always remove old, weak or worn-out batteries promptly and dispose of them. -
Never mix old and new batteries, nor batteries of different types (carbon or alkaline).
- Although battery life varies depending on how often the remote control transmitter is used, the batteries should be replaced about once every year on the average.
- The batteries should also be replaced if commands from the remote control transmitter are not received by this unit even when the transmitter is held close to the unit's front panel.
- If the batteries leak, clean the battery holder well before inserting new batteries.
Remote control transmitter operation notes
Note that operation may not be correct if direct sunlight or other strong light strikes the remote control signal sensor of this unit. If there is a problem, place the unit away from the direct sunlight or other strong light source.


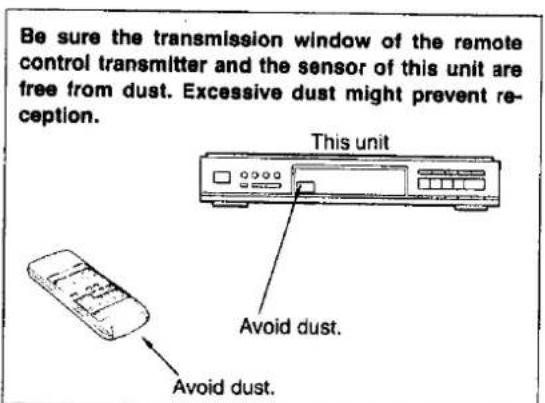
Notes: •The control panel of the remote control transmitter may be covered by a clear plastic protective sheet. This sheet may be removed if desired.
- Do not use remote control transmitter for TV sets, VTRs or other components at the same time as this unit's remote control transmitter since this could result in a mistaken operation.
Before Transporting the Unit
CAUTION:
Transporting the unit, be sure that the unit's power was not shut off while in the play mode. Doing so the mechanism will not be automatically locked and severe damage will result if transported.
1 Switch the power ON and remove all discs from the trays.
2 Press the stop button to assure that the unit is in the stop mode.
3 Switch the power OFF.
4 Check to be sure that the mark (○) is, visible on the lock window.
Note:
If the mark is not visible, follow steps 1-3 again.

About Compact Discs
Noise can be caused if the disc in dirty, scratched, warped, etc. Please note the following points.
Compact Disc identification...

Use compact discs bearing this mark.
Storage hints
■ Be sure to use the special case.
Avoid storing discs in following places:
- Near heating equipment and places where the temperature is high.
- Places where there is high humidity or excessive dust.
aces exposed to direct heat from heating equipment, etc.
Be especially careful not to leave discs near the front or rear windows in a vehicle, or inside the dashboard.
Handling cautions
■ On the label of compact discs
- Do not write with a ballpoint pen, etc. on the label.
- Do not attach any type of paper, label, etc.
Handling notes
Take care not to scratch the disc surface by a fingernail etc. when handling the disc.
■ Removal of the disc from the case
① Holding the top at both sides.
② Gently press the sides of the top to open.
③ Press the center holder.
④ Lift by the edges (Don't touch the recorded surface.).

Center holder

■ How to hold the disc
Hold the disc at its edges. (Don't touch the surface, because fingerprints will remain.)

■ When storing to the case
① Insert with label facing up.
② Press downward at the center.

Maintenance
■ if discs are dirty...
Clean with a soft, damp cloth, and wipe till dry.

Always from the center outward.

Noise can be caused by scratches.
■ If condensed moisture is on the disc surface...
if condensed moisture forms on the disc surface (such as when it is brought from a cold place to a warm place), wipe the moisture away by using a soft, dry cloth.
■ Don't use the following...
- Anti-static cleaners, etc. such as used on ordinary phonograph records.
- Benzine, paint thinner, or any other solvents.
●Never dry by using a hair dryer, etc.
Maintenance
To clean this unit, use a soft, dry cloth. If the surfaces are extremely dirty, use a soft cloth, dipped into a soap-and-water solution or a weak detergent solution. Wring the cloth well before wiping the unit. Wipe once again with a soft, dry cloth.
ver use alcohol, paint thinner, benzine, nor a chemically treated cloth to clean this unit.
ch chemicals may damage the finish of your unit.

Technical Specifications
Audio
No. of channels
Frequency response
Output voltage
Dynamic range
S/N ratio
Total harmonic distortion
Wow and flutter
Output impedance
Load impedance
2 (left and right, stereo)
2-20,000 Hz, ±1 dB
2 V (at 0 dB)
92 dB
100 dB
0.009% (1 kHz, 0 dB)
Below measurable limit
1 kΩ
More than 10 kΩ
Pickup
Wavelength
780 nm
General
Power consumption
17 W
Power supply
AC 50/60 Hz, 230-240 V
Dimensions (W×H×D)
360×102×364 mm
Weight
4.2 kg
Note:
Specifications are subject to change without notice.
Weight and dimensions are approximate.
Troubleshooting Guide
Before requesting service for this unit, check the chart below for a possible cause of the problem you are experiencing. Some simple checks or a minor adjustment on your part may eliminate the problem and restore proper operation. If you are in doubt about some of the check points, or if the remedies indicated in the chart do not solve the problem, refer to the directory of Authorized Service Centers (enclosed with this unit) to locate a convenient service center, or consult your dealer for instructions.
| Problem | Probable cause(s) | Suggested remedy |
| Playback of disc is not possible. | The disc(s) or any foreign object(s) is fallen inside of the unit. | ●Turn off the power and remove the object, then turn on the power. |
| Moisture has condensed in the unit. | ●Switch ON the unit and wait about one hour before using the unit. | |
| The specified disc does not play. | The disc is upside down. | ●Be sure the label is facing upward. |
| The disc is dirty. | ●Wipe it with a soft cloth. | |
| The disc is scratched. | ●Replace it with a new disc. | |
| The disc is warped. | ||
| The disc is not within specified standards. | ●Exchange the disc for another one. | |
| A certain MUSIC PASSAGE isn't be played correctly. | The disc is dirty. | ●Wipe it with a soft cloth. |
| The disc is scratched. | ●Replace it with a new disc. | |
| Operation by remote control transmitter is not correct. | No disc is loaded. | ●Insert the disc. |
| The remote control transmitter batteries are consumed. | ●Replace them with new batteries. | |
| The batteries have been inserted incorrectly.[The (+) and (−) polarities are reversed.] | ●Insert them so that the polarities are correct. | |
| There is an obstruction between the remote control transmitter and this unit. | ●Remove the obstruction. | |
Note:
When using the tuner with this unit;
If noise is excessive in the FM mode, turn off the power supply of this unit.
About moisture
Moisture may form on the lens in the following cases...
Immediately after a heater has been turned on. a steamy or very humid room.
- When the unit is suddenly moved from a cold environment to a warm one.
If moisture forms inside this unit, it may not operate properly. To correct this problem, turn on the power and wait about one hour for the moisture to evaporate.
- Technics
- SL-PK26
- OPERATING INSTRUCTIONS
- Notes:
- Year Stereo Fan
- Contents
- For United Kingdom
- Note:
- Suggestions for Safety
- ■ Use a standard AC wall outlet
- ■ Grasp the plug when disconnecting the power supply cord
- ■ Place the unit where it will be well ventilated
- )
- ■ Be sure to place the unit on a flat, level surface
- ■ Never attempt to repair or reconstruct this unit
- ■ Take particular care if children are present
- ■ If water is spilled on the unit
- ■ Avoid spray-type insecticides
- ■ Never use alcohol or paint thinner
- ■ Disconnect the power supply cord if the unit will not be used for a long time
- ■ If trouble occurs
- C
- Accessories
- Installation
- Notes of placement
- Installation of the dust cover
- Connections
- Location of Controls
- Control section
- ⑮ Buttons for edit function (SYNCHRO EDIT)
- •Tape length button (TAPE LENGTH)
- ●Auto link button (AUTO LINK)
- Time mode button (TIME MODE)
- Display section
- ⑰ Disc indicators ( ◀1▶\~ ◀5▶ )
- ⑱ Disc number/tape side display
- ⑲ Track number display
- Time/programmed number display
- ②1 Program play indicator (PGM)
- ②2 Play mode indicators (▼▼▼)
- ②3 Repeat indicator (☐)
- ② Compact disc edit indicator (EDIT)
- ⑲ Auto link indicator (LINK)
- ②6 Pause indicator (II)
- ⑳ Play indicator (▶)
- Location of Controls (continued)
- Remote control section
- Playing a Disc
- Continuous play
- Playing a Disc (continued)
- Direct access play
- Random play
- ■ Full random play
- Press the full random button or the random button on the remote control transmitter.
- Press the full random button again to cancel the full random play.
- ■ One disc random play
- Press the one disc random button.
- Press the one disc random button again to cancel the one disc random play.
- Spiral play
- Press the spiral button.
- Press the spiral button again to cancel spiral play.
- ■ Spiral random play
- Press the spiral button during the full random play or press the full random button during the spiral play.
- Press the full random button to switch to the spiral play.
- Press the spiral button to switch to the full random play.
- Program play
- Convenient Functions
- Skip play
- To skip tracks
- •During Continuous play:
- •During program play:
- •During random play:
- •During spiral play:
- ■ To skip discs
- Convenient Functions (continued)
- Search play
- (During play or in the pause mode)
- ■ Forward and backward search
- •During other play modes:
- Repeat play
- Press the repeat button before or during play.
- Press the repeat button again to cancel the repeat play.
- Time mode selection
- Press the time mode button.
- •During edit or automatic link play:
- Recording from Compact Discs
- Automatic editing
- Recording from Compact Discs (continued)
- Program editing
- Press the play button.
- ■ To stop recording
- Automatic link function
- Press the play button.
- Remote Control Transmitter
- Insertion of remote control transmitter batteries
- ■ Notes concerning use of dry batteries
- Remote control transmitter operation notes
- Before Transporting the Unit
- CAUTION:
- About Compact Discs
- Storage hints
- ■ Be sure to use the special case.
- Handling cautions
- ■ On the label of compact discs
- Handling notes
- ■ Removal of the disc from the case
- ■ How to hold the disc
- ■ When storing to the case
- Maintenance
- ■ if discs are dirty...
- ■ If condensed moisture is on the disc surface...
- ■ Don't use the following...
- Technical Specifications
- Audio
- Pickup
- General
- Troubleshooting Guide
- About moisture
- Moisture may form on the lens in the following cases...
Thương hiệu : PANASONIC
Mẫu : SL-PK26
Danh mục : Hệ Thống Hi-Fi