TM-5700 - Kategorize edilmemiş Tusa - Ücretsiz kullanım kılavuzu
Cihazın kılavuzunu ücretsiz bulun TM-5700 Tusa PDF formatında.

Kullanıcıların soruları hakkında TM-5700 Tusa
0 soru bu cihaz hakkında. Bildiklerinizi cevaplayın veya kendinizinki sorun.
Bu cihaz hakkında yeni bir soru sor
Cihazınız için talimatları indirin Kategorize edilmemiş PDF formatında ücretsiz! Kılavuzunuzu bulun TM-5700 - Tusa ve elektronik cihazınızı yeniden ele alın. Bu sayfada cihazınızın kullanımı için gerekli tüm belgeler yayınlanmaktadır. TM-5700 markasının Tusa.
KULLANIM KILAVUZU TM-5700 Tusa
Corrective Lens TUSA
TM-5700Q How to replace Corrective Lens
natural_image
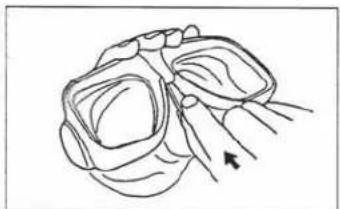
Line drawing of a stylized insect head with wings and antennae (no text or symbols)1 To remove center-piece, insert tool* between skirt and frame. Push on upper tab to lift up the center-piece

natural_image
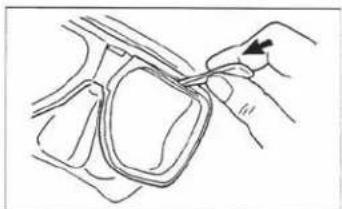
Line drawing of a hand adjusting a safety helmet with an arrow indicating motion (no text or symbols)2 Remove center-piece by pulling it towards you.

natural_image
Illustration of a hand holding a pair of eyeglasses with arrows indicating force application (no text or symbols)3 To remove color bar. insert tool in center notch. pull away from front of mask.
natural_image
Line drawing of a hand holding a coiled cable or wire, with no visible text or symbols4 To remove lens retainer: insert tool between main frame slot and lens retainer. Gently pry up to unlock lens retainer tab from the frame

natural_image
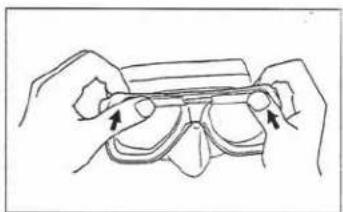
Line drawing of a hand holding a pair of eyeglasses with an arrow indicating the grip (no text or symbols)5 Remove lens retainer completely by using thumb as shown. IMPORTANT: When reinstalling lenses, make sure that skirt has a proper seal between lens and main frame.
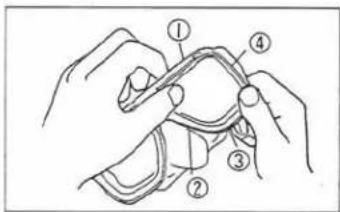
6 To reinstall lens retainer, start at the top (1), followed by the nose (2), bottom (3), and the side (4). (Press each section with tab until you hear the click.)
natural_image
Line drawing of hands holding a transparent object with arrows indicating movement (no text or symbols)7 To reinstall color bar, slide it onto the main frame grooves.
natural_image
Line drawing of a hand holding a pair of glasses with an arrow pointing to the glass (no text or symbols)8 To reinstall center piece, hook bottom to the main frame and push it in until the top tab clicks in place
* (Sold separately: — part =0764)
TM-7000Q How to replace Corrective Lens
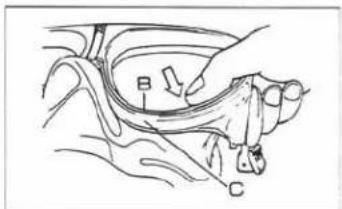
1 The lens retainer (B) is secured in place by 5 tabs (1) through (5). To remove lens retainer from main frame (C), insert "plastic tool" in slot located at the lower front (3) of main frame and gently pry down to release the clip as it lifts up the lens retainer. Do not remove center divider clip (A).
2 Hold the tool and lens retainer together and lift to the direction of the arrow. Lens retainer (B) will be removed.
3 Replace plain lenses with corrective lenses. Make sure that silicone skirt (D) has proper seal between lens and main frame. To reinstall lens retainer (B), start by sliding small tab (5) into center divider clip (A) until it snaps into place at (1), followed by (4), (2) and finally (3). You should hear a click when the proper assembly is achieved.
4 Be sure that there is no gap between lens retainer (B) and main frame C. Test it by trying on the mask and inhale through your nose to check for any leakage of air.
* (Sold separately, — part =0764)
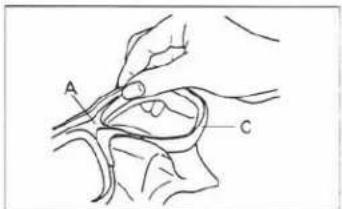
TM-7500Q How to replace Corrective Lens
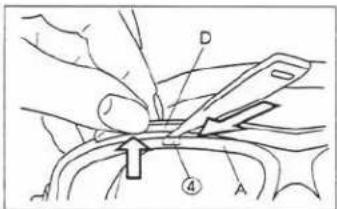
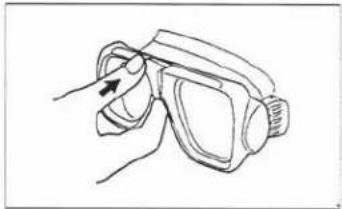
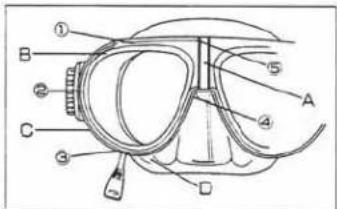
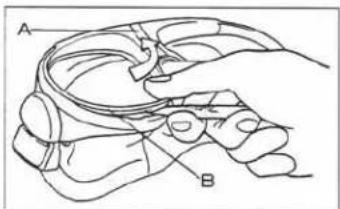
1 To remove lens retainer from main frame, insert plastic tool at (4) between lens retainer (A) and color bar (D) at the upper front.
2 Hold the tool and lens retainer together and gently pry to the direction of the arrow. Lift up the lens retainer with your thumb until clips (1). (2) & (3) are unlocked. Go to the other side and follow the same steps. Remove lens retainer (A).
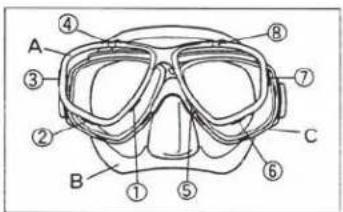
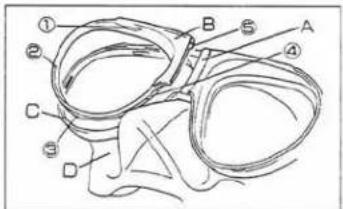
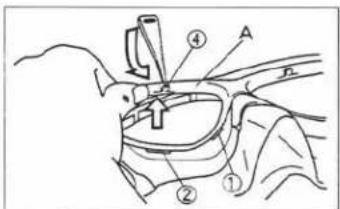
3 Remove plain lens and insert corrective lens. Make sure silicone skirt (B) has proper seal between lens and main frame(C). To reinstall lens retainer (A), start by locking the small tabs (1) until it snaps into place, followed by (2), (3), (4), (5), (6), (7) and finally (8).
4 Make sure there is a proper seal between lens retainer (A) and main frame(C). Test it by trying on the mask and inhale through your nose to check for any possible leakage of air.
* (Sold separately — part #0764)
Made in U.S.A.