WT-P150GX2 - ปั๊มน้ำ HITACHI - คู่มือผู้ใช้ฟรี
ค้นหาคู่มืออุปกรณ์ฟรี WT-P150GX2 HITACHI ในรูปแบบ PDF.

คำถามของผู้ใช้เกี่ยวกับ WT-P150GX2 HITACHI
0 คำถาม เกี่ยวกับอุปกรณ์นี้ ตอบคำถามที่คุณรู้หรือถามของคุณเอง
ถามคำถามใหม่เกี่ยวกับอุปกรณ์นี้
ดาวน์โหลดคำแนะนำสำหรับ ปั๊มน้ำ ในรูปแบบ PDF ฟรี! ค้นหาคู่มือของคุณ WT-P150GX2 - HITACHI และนำอุปกรณ์อิเล็กทรอนิกส์ของคุณกลับมาใช้งาน ในหน้านี้มีเผยแพร่เอกสารทั้งหมดที่จำเป็นสำหรับการใช้งานอุปกรณ์ของคุณ WT-P150GX2 ของแบรนด์ HITACHI.
คู่มือผู้ใช้ WT-P150GX2 HITACHI
Thank you for choosing to use the HITACHI pump and supporting the various products of the company. ขอบคุณที่ท่านได้กรุณาไว้วางใจเลือกใช้ผลิตภัณฑ์ปัมน้ำอิตาซิ และให้การสนับสนุนผลิตภัณฑ์ต่างๆ ของบริษัท ด้วยดีเสมอมา
- Please read and understand the manual before using the pump. กรุณาอ่านทำความเข้าใจคู่มือการใช้งานฉบับนี้ให้เข้าใจก่อนการใช้งาน
- Please keep this manual after reading it along with the warranty card as reference. หลังจากอ่านทําความเข้าใจดีแล้ว กรุณาเก็บคู่มือใช้งานนี้ไว้พร้อมกับใบรับประกันเป็นสำคัญต่อไป
WT-P TYPE
- Precautions on safe use ข้อควรระวังในการใช้งานอย่างปลอดภัย......2
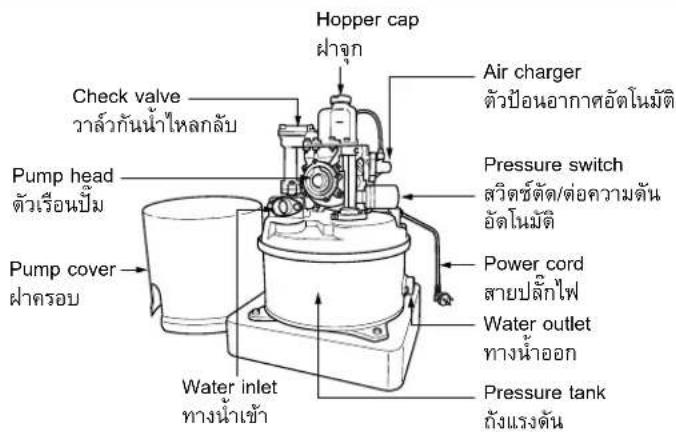
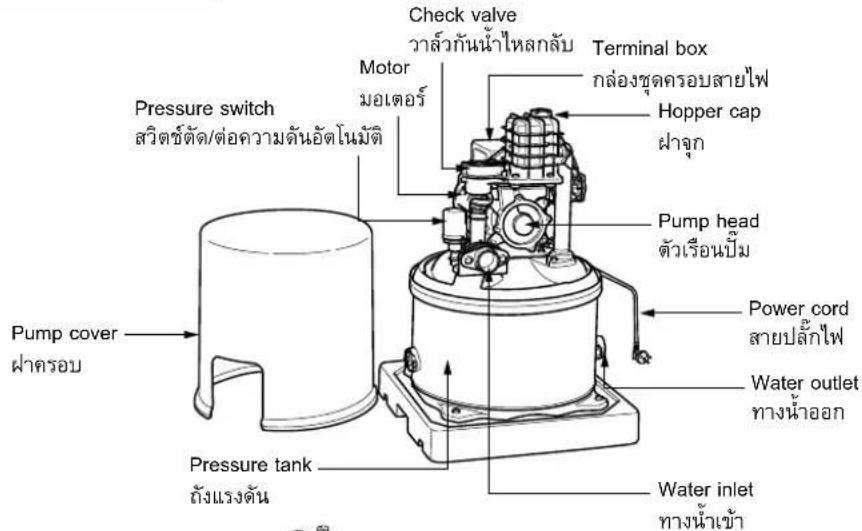
- Part names and structure ชื่อชิ้นส่วนและโครงสร้าง 5
- Caution ข้อควรระวัง 6
- Specifications ข้อมูลจำเพาะ......7
Installation
(For installation by the shops/distributors) การติดตั้ง (สำหรับร้านค้า/ตัวแทนจำหน่าย)
- Inspection before installation การตรวจสอบเช็คก่อนการติดตั้ง......8
- Precautions before installation ข้อควรระวังก่อนการติดตั้ง......9
- Installation routing the harness การติดตั้งเดินสายไฟ....10
- How to install the pump วิธีการติดตั้งปี่มน้ำ......11
-
Problems and repairs ปัญหาและการแก้ไข....12
● Wiring diagram วงจรไฟฟ้า.....12 -
In the installation of the pump it is necessary to implement it suitably, so the buyer should ask the seller to install it. Inการติดตั้งปิมน้ําจำเป็นต้องค่าเนินการให้เหมาะสม ดังนั้นให้ร้องของการติดตั้งจากกร้านค้า Captureหน่าย/ค่าเนินการติดตั้งต่อไป
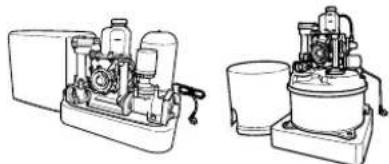
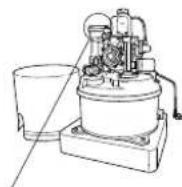
- Should you want to know the name of the pump model, please read it from the nameplate on the body or the case. Inการตรวจสอบชื่อรุ่นของปื้มน้ําที่ท่านเลือกซื้อไปนั้น โปรดเช็คจากแผ่นป้ายบริเวณตัวถัง หรือฟ้าครอบปื้ม
PRECAUTIONS ON SAFE USE
ข้อควรระวังในการใช้งานอย่างปลอดภัย
Before using, please try to understand [the precautions on the safe use] carefully and use the pump correctly. ก่อนใช้งานกรุณาอ่านเท่าความเข้าใจ (ข้อควรระวังในการใช้งานอย่างปลอดภัย) ให้ละเอียดก่อน และกรุณาใช้อย่างถูกวิธี

หัวข้อควรระวังที่แสดงไวต่อไปนี้
The level of damage and wear that may occur from abuse or ignorance of the warnings is shown in the table as follows. ระดับความเสียหายและอันตรายที่อาจจะเกิดขึ้นจากการใช้งานอย่างผิด ๆ หรือละเอยต่อเนื้อหาคําเตือนนั้น ดังที่แสดงไวในตารางต่อไปนี้
 | Warning Content in the symbol means [The danger may result in severe injury or death]ค่าเตือน | เนื้อหาข้อความในช่องสัญลักษณ์นี้คือ [เป็นอันตรายที่อาจก่อให้เกิดการบาดเจ็บสาหัส หรือถึงแก่เชีวิตได้] |
 | Precaution Content in the symbol means [The danger may cause damage to assets or injury]ข้อควรระวัง | เนื้อหาข้อความในช่องสัญลักษณ์นี้คือ [เป็นอันตรายอาจก่อให้เกิดความเสียหายต่อทรัพย์สินหรือบาดเจ็บได้] |
Examples of the symbols ตัวอย่างของการแสดงรูปภาพสัญลักษณ์
 | The content shows [warning or precaution]เป็นเนื้อหาที่แสดงเกี่ยวกับ [คําเตือน หรือข้อควรระวัง] |
 | The content shows prohibitions [Do not do it]เป็นเนื้อหาที่แสดงถึงสิ่งที่ต้องไม่ทำ [ข้อห้าม] |
 | The content shows a necessity that must always be done [Explanation]เป็นเนื้อหาที่แสดงถึงสิ่งจําเป็นต้องทำเสมอ [คําซี้แจง] |

WARNING
คำเตือน

Do not take it apart ห้ามแยก ชั้นส่วน
For the person not a serviceman, do not dismantle the pump. ผู้ที่ไม่ใช่ช่างช่อม ห้ามถอดแยกขึ้นส่วนช่อม หรือดัดแปลงโดยเด็ดขาด
It may cause combustion or decrepancy and cause injury. อาจทำให้เกิดการลูกใหม่ การทำงานผิดปกติ และก่อให้เกิดการเสียหายและการบาดเจ็บขึ้นได้

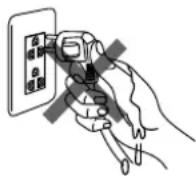
Do not touch with wet hands ห้ามจับขณะที่ มือเปียก
While repairing you must take off the plug or cut off the electricity, and do not use wet hands to plug or remove the plug. ขณะทำการซ่อมบำรุงต้องกดอดปลั้งหรือตัดไฟ และห้ามใช้มือที่เปียกเกอด/เสียบปลั้งไฟ
- It may cause a short circuit. อาจก่อให้เกิดไฟฟ้าช็อต หรือบาดเจ็บขึ้นได้

Grounding ต่อสายดิน
You must always ground the appliance, and install a circuit breaker specifically for it. ต้องต่อสายดินเสมอ, และติดตั้ง Leak Breaker เฉพาะ
- If there is a defect or power leak, it may cause a short circuit. For installation of an earth wire, please consult the distributor. เมื่อเกิดการชํารุด หรือกระแสไฟฟ้ารั่วอาจ ทำให้ไฟฟ้าซ้อตได้ การติดตั้งสายดิน กรุณาปรึกษาตัวแทนจำหน่าย
Earth wire สายดิน Earth rod แห่งสายดิน

Prohibition ห้าม
Do not use the pump while its cover is removed. ไม่ใช้งานในสภาพที่ถอดฝาครอบออก
- It may cause a short circuit or fire from dust or degenerated insulation. อาจก่อให้เกิดไฟฟ้าช้อตหรืออัคคีภัยจากผู้นผง หรือการเสื่อมสภาพของฉนวนได้
| WARNINGคําเตือน | |||
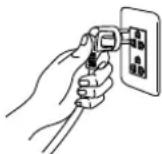
 Cleaningทําความสะอาด Cleaningทําความสะอาด | In case there is dust on the plug blades or surface,please clean it. กรณีที่มีฝุ่นจับที่ชาปลักไฟ และที่ผิวของชาปลักไฟ ให้ทําการเช็ดให้สะอาดIf not, it may cause a fire. อาจเป็นสาเหตุของการเกิดอัคคีภัย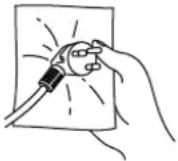 | Wiringงานเดินสายไฟ | Wiring should be made with correctness and safety according to the internal requirements on technical standards for electrical appliances. ในงานเดินสายไฟควรดําเนินการด้วยความถูกต้องปลอดภัย ตามข้อกําหนดเกี่ยวกับการเดินสายภายในและมาตรฐานเทคนิดงานเครื่องใช้ไฟฟ้าFaulty wiring may cause a short circuit or fire. งานเดินสายไฟที่บกพร่องผิดพลาด อาจก่อให้เกิดไฟฟ้าช้อตหรืออัคคีภัยได้ |
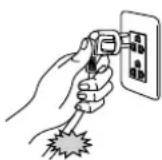
 Repairingการปฏิบัติขณะช่อม Repairingการปฏิบัติขณะช่อม | One should pull the plug or turn off the switchimmediately to prevent an accident. In case thepump works abnormally or does not work, callthe distributor for inspection and repair. ควรดึงปลักออก หรือปิดสวิตซ์ (Power) ทันที เพื่อป้องกันอุบัติเหตุกรณีเครื่องผิดปกติหรือปัมน้ําไม่ทํางานให้แจ้งตัวแทนจําหน่ายให้มatarตรวจสอบ - ช่อม ทันทีThere is a risk of fire, short-circuit, power leak, andelectric shock. มีความเสี่ยงที่จะเกิดการลูกไหม้จากการช้อต, ไฟฟ้ารั่ว, ไฟฟ้าดูดได้ | Prohibitionห้าม | Do not roll, close, pull, bend, or modify the power cord or cause a mark or damage on it. Do not put heavy things on it, clip, or modify the cord. ห้ามม้วน, บิด, ดึง, ฝืนงอ, ตัดแปลงสายไฟ (Power cord) หรือทําให้เกิดรอย, ความเสียหาย ห้ามน่าของหนักวางทับ, ห้ามหนีบ, ห้ามแปรรูปสายไฟThe power cord may be damaged and cause a short circuit. สายไฟ (Power cord) อาจเกิดความเสียหายทําให้เกิดอัคคีภัย - ไฟฟ้าช้อตได้ |


PRECAUTIONS ข้อควรระวัง
In the event of not using it for a long time, remove the plug out of the outlet or turn off the switch. กรณี ที่ไม่ได้ใช้งานเป็นเวลานาน ๆ ควรดึงปลั้งออกจาก เต้าเสียบหรือปิดสวิตช์ไฟ
- If not, it may cause a fire from a power leak or short circuit due to degenerated insulation. เนื่องจากอาจเกิดอัคคีภัยจากไฟรัวหรือไฟข้อต เนื่องจากคนวนเสื่อมได้
While removing the plug, pull the plug body. ขณะถอดปลักออก ควรจับที่ตัวปลัก
- If not, it may cause a short circuit and a fire. - อาจทำให้เกิดไฟฟ้าชื่อตและเกิดไฟฟ้าลังวงจรได้
- If the supply cord is damaged, it must be replaced by the manufacturer, its service agent or similarly qualified persons in order to avoid a hazard. หากสายออนเป่อนกำลังไฟฟ้าชั่วรุตต้องให้ผู้ทําหรือตัวแทนฝ่ายบริการหรือบุคคลที่มีคุณสมบัติเหมือนกัน เป็นผู้เปลี่ยน เพื่อหลีกเลี่ยงอันตราย


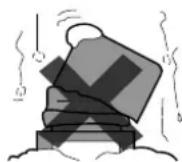
Do not place objects on the pump. ห้ามน้ำวัตถุวาง บนปื้ม
- It may cause an injury from a cave-in of the pump. อาจเกิดการบาดเจ็บ จากการยุบเสียทรงของปัมน้ำได้
| PRECAUTIONSข้อควรระวัง | |||
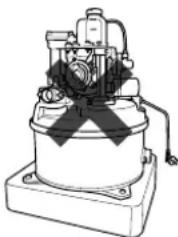
 Prohibitionห้าม Prohibitionห้าม | Do not touch the pump motor while the pump is running. ห้ามสัมผัส Motor ปีมน้ําในขณะเดินเครื่องDue to the high temperature, it may cause a scald.เนื่องจากอุณหภูมิสูงอาจทําให้เกิดการพุพองได้ | Cautionระวัง | While maintaining this product you should wear gloves. การบํารุงรักษาผลิตภัณฑ์นี้ ควรรวมถุงมือในขณะปฏิบัติงานTo prevent possible injury. เพื่อป้องกันการบาดเจ็บที่อาจเกิดขึ้นได้ |
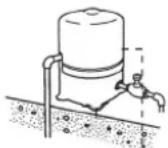
 Cautionระวัง Cautionระวัง | Check the ground whether it has good water drainage. ตรวจสอบดว่าที่พื้นมีการป้องกันน้ําหรือการระบายน้ําดีหรือไม่Otherwise, in the case of a water leak, it may cause damage to the pump. กรณีเกิดน้ําร่ว อาจ ส่งผลให้เกิดความเสียหายได้COVERWATER-PROTECTING TRAY ลาดกั้นน้ําDRAIN PIPEท่อระบายน้ํา | Prohibitionห้าม | Do not dry run it. ห้ามเดินเครื่องโดยไม่มีน้ํา (Dry Run)The water left in the pump may overheat and cause damage. น้ําที่ค้างอยู่ภายในตัวปี้จะZR้อนทําให้เป็นสาเหตุของความเสียหายได้เช่นชิ้นส่วนพลาสติกCheck valve วาล้ว |
| * When installation of the pump is made, please check for leaking water. เมื่อทําการติดตั้งกรุณาตรวจสอบว่าไม่มีน้ํารั่วเกิดขึ้น | |||
 Prohibitionห้าม Prohibitionห้าม | Do not use the pump with other liquids except clean water such as oil, thinner or hot water at 40°C or more. ห้ามน้ําบั้มนี้ไปใช้กับของเหลวอื่น นอกจาก น้ําสะอาด เช่น น้ํามัน, ทินเนอร์ หรือนน้ําร้อนที่อุณหภูมิมากกว่า 40°COtherwise, it may cause injury or a short circuit.อาจเกิดการบาดเจ็บหรือไฟฟ้าช้อตจากการเสียหายได้Components of the pump,such as plastic, rubber parts, can be damaged.อาจทําให้ชิ้นส่วนได้รับความเสียหายได้ เช่นพลาสติก, ยาง | Cautionระวัง | Check the site of installation. ตรวจสอบพื้นที่การติดตั้งปั่มน้ํAvoid sites that are easily flooded, as it may cause damage to the pump. หลีกเลี่ยงบริเวณพื้นที่มีน้ําท่วมขังได้ง่าย เพาะอาจทําให้เกิดความเสียหายกับปิ่มThe area wherethere is stagnantwater บริเวณน้ําขัง |
Please read the operational manual with understanding before installing and using Pump. โปรดอ่านคู่มือให้เข้าใจ ก่อนทำการติดตั้งปัมน้ำและก่อนการใช้งาน
CAUTION
ข้อควรระวัง
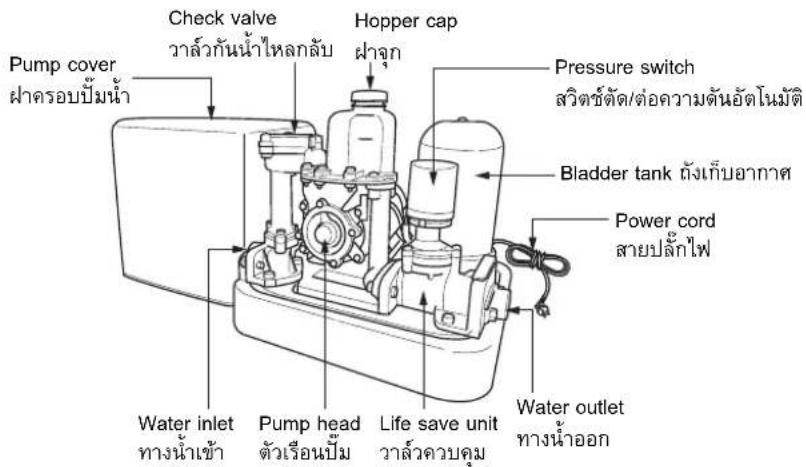
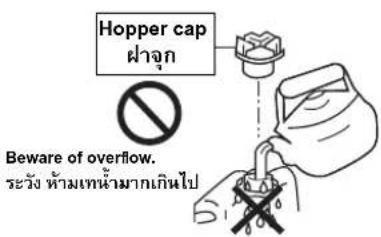
1 Be careful after filling water, tighten the hopper cap to prevent leaking water. ระมัดระวัง หลังจากเติมน้ำล่อเสร็จแล้ว ควรชันฝากปิด (Hopper cap) ให้นแน่นไม่ให้เกิดน้ำรั่วออกมา

2 Check the possibility of leaking in step of installing pump (by turning on pump) with certainty before closing the cover. ควรทำการเช็ครอยรั่วที่อาจเกิดขึ้น จากการติดตั้งของปัมหน้า (โดยเดินเครื่องปัมหน้า) ให้แน่ใจก่อนทำการปิดฝากอบปัมหน้า
3 Do not open the cover while using. ไม่ควรเปิดฝากรอบปั้มน้ำออกขณะใช้งาน
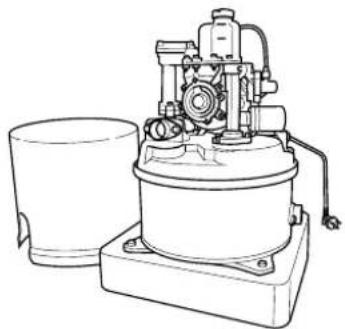
ชิ้นส่วนและโครงสร้าง
MODEL :
0GX2, 150GX2, 200GX2, 250GX2, 300GX2
MODEL :
0GX, 400GX
Procedures
ข้อควรปฏิบัติ
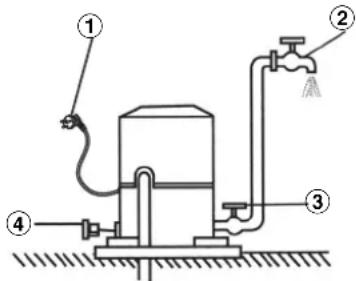
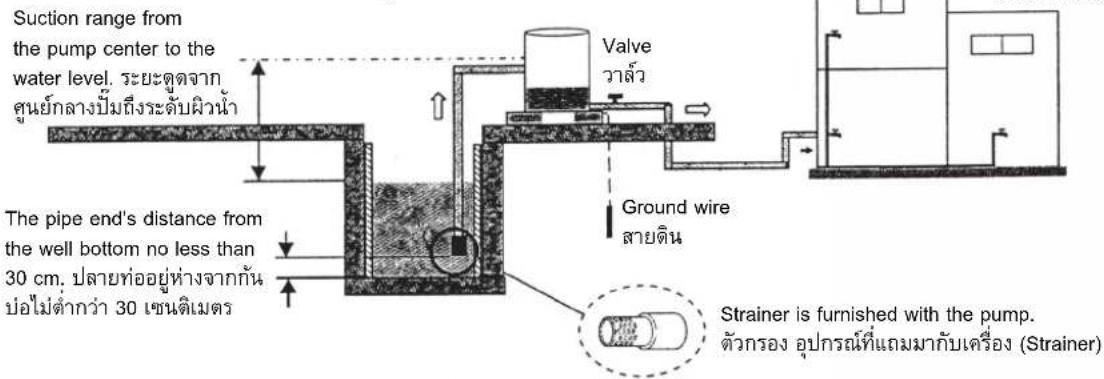
When pumping water from a well or flowing water, please place the pump 3m high from the water source. สำหรับการใช้เครื่องนี้ สบน้ำประปาหรือ บ่อน้ำดื้นที่ระดับน้ำลึกไม่เกิน 3 เมตร
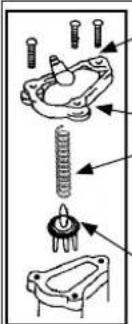
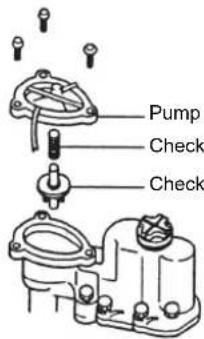
① Unscrew the screw from the cover (follow the position in circled picture). ถอดนี้อดที่ยึ่ตปิดฝากรอบออก (ตามตําแหน่งในรูปวงกลม) ② Remove the cover. เปิดฝากรอบออก ③ Get the check spring (which is included with the product) and place on top of the check valve. นําสปริงพิเศษ (อุปกรณ์เพิ่มที่ให้มากับเครื่อง) ในส่วนบนของแท่งวาล์ว ④ When the assembly of the check valve is finished, close the pump cover and secure with screw as before. แห่งวาล์วทองเหลือง (ที่มีอยู่เดิม) เมื่อเรียบร้อยแล้ว ให้ปิดฝากรอบและยืดนี้อดติดฝากอบตามเติม
ACCESSORY
อุปกรณ์เสริม
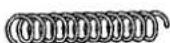
Check spring (เช็ดสปริง)
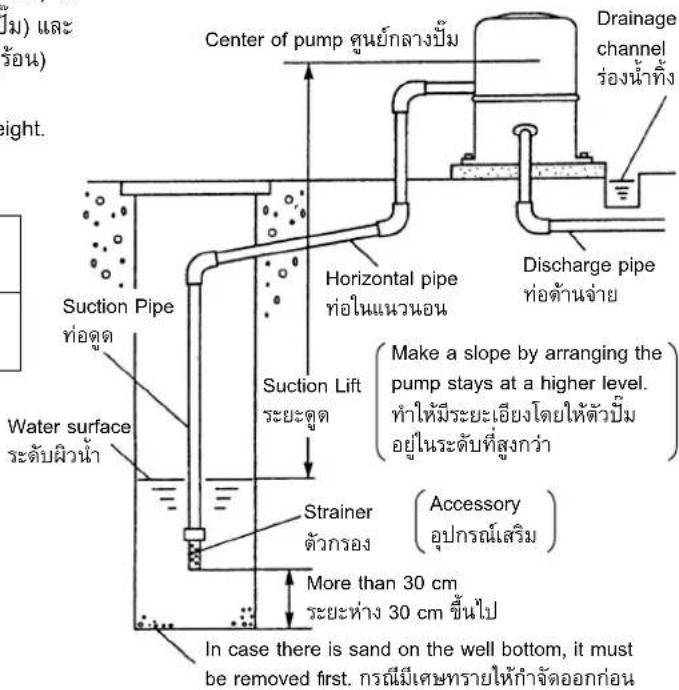
- In the event the suction is less than 3m or the water level is higher than the pump, put the check springs in the check valve. กรณี ระยะดูตน้อยกว่า 3 เมตร หรือในการณีที่ระดับน้ํา สูงกว่าตัวปัมเกิน 2 เมตร ให้ใส่เชัดสริงเข้าไปใน ด้านบนของวาล์วกันน้ําไหลกลับ
Strainer (ตัวกรอง)
- In the event of sucking from a well or a reservoir tank, put on the filter pipe end to strain waste from entering the pump. กรณี ที่ดูดจากปอน้ําหรือถังพักน้ํารวมตัวกรองที่ปลาย ท่อ เพื่อกันเศษสิ่งสกปรกเข้าไปในตัวปี้ม

MODEL :
50GX2, 200GX2, 250GX2, 300GX2, 350GX2
Bladder Tank (Pressure Tank)
(ถังเก็บอากาศ)
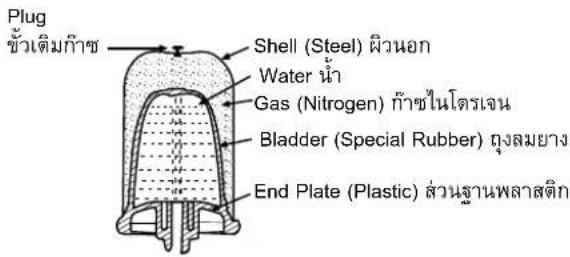
Caution ข้อควรระวัง

* Only the surface of the rubber and plastic are exposed to water. ผิวของยางและพลาสติกสัมผัสกับน้ำเท่านั้น
ACCESSORY อุปกรณ์เสริม
Strainer ตัวกรอง
In the event of sucking from a well or a reservoir tank, put on the filter pipe end to strain waste from entering the pump. กรณีที่ดูจากบ่อน้ําหรือถังพักน้ํา สวมตัวกรองที่ปลายท่อ เพื่อกันเศษสิ่งสกปรกเข้าไปในตัวปัม
* This pump model does not require the check spring. สำหรับรุ่นเนื้อไม่ต้องใส่เช็คสริ่ง (Check spring)

Prohibition
ห้าม
- Modification pressure switch may cause malfunction of machine and pump parts damage. The warranty will be terminated instantly if you modify pressure switch. การปรับแต่งสวิตช์ความต้น อาจทำให้ปัมน้ำท่างานผิดปกติเป็นสาเหตุทําให้ชั้นส่วนเสียหายหรือช่ารุด การรับประกัน สินค้าจะสิ้นสุดลงทั่นที่ หากมีการปรับสวิตช์แรงดัน
CAUTION ข้อควรระวัง
How to prime it วิธีการล่อน้ำ
After installation on the first run, open the hopper cap and pour in some water. หลังจากทำการติดตั้งในการเดินเครื่องครั้งแรก ให้เปิดฝาก (Hopper cap) แล้วใส่น้ํา
- While filling water, if must not be overflow and be careful the water touching any electrical element such as motor, electronic parts, etc. (For Pump lower than 300W, water must be filled approximately 200cc) (For Pump lower than 350W, water must be filled approximately 600cc) ขณะทําการเติมน้ำจะต้องไม่หู้น้ําลัน密切相关และต้องระมดระวังไม่ให้น้ําไปถูกขึ้นส่วนอุปกรณีไฟฟ้า เช่น มอเตอร์, ชั้นส่วนอิเล็กทรอนิกส์ เป็นต้น (ปัมน้ํารุ่น 300W ลงมา จะต้องเติมน้ำประมาณ 200cc) (ปัมน้ํารุ่น 350W ขึ้นไป จะต้องเติมน้ำประมาณ 600cc)
- When finishing, close the lid off tightly. Then check the leak on the pump. เมื่อเติมน้ำเสร็จแล้ว จะต้องปิด事先ให้สนิทและตรวจสอบ รอยร่วม บริเวณตัวปีม
- If the pump does not draw any water for 7 minutes, please pour water in again. ถ้าเวลาผ่านไปประมาณ 7 นาทีแล้ว ปัมยังสูบน้ำไม่ชึ้นให้ทำการเติมน้ำล่ออีกครั้ง
* When pumping from deep water or if the pump lines are laid horizontally for a great distance, please allow the pump more time to draw water. Inกรณีที่ดูตน์ลึกหรือเดินท่อนวนอนยาวเกินไป อาจจะส่งผลต่อเวลาในการจูดน้ํา
SPECIFICATIONS
ข้อมูลจำเพาะ
WT-P
| MODEL (รุ่น) | WT-P100GX2 | WT-P150GX2 | WT-P200GX2 | WT-P250GX2 | WT-P300GX2 | WT-P350GX WT | P400GX | ||
| MOTOR (มอเตอร์) | Type (ชนิด) SINGLE PHASE CONDENSER-RUN | ||||||||
| Output (กําลังของมอเตอร์) | W (วัตต์) | 100W | 150W | 200W | 250W | 300W | 350W | 400W | |
| Rate Voltage (แรงดันไฟฟ้า) | V (โวลท์) 220 V | ||||||||
| Frequency (ความถี่) Hz (เอิริต) 50 Hz | |||||||||
| PUMP (ปีม) | Suction Lift(ระยะดูด (เมตร)) | Normal (ปกติ) | 7 | m 8 | m | 8 | m | 7 | |
| Max. (สูงสุด) | 8 m | 9 | m | 9 | m | 8 | |||
| Discharge head(ระยะส่งน้ําแนวดัง) | m (เมตร) | 12m | 12m | 18m | 20m | 20m | 20m | 20m | |
| Discharge Capacity(at Total head 12m)(ปริมาณน้ําที่ 12 เมตร) | l/min (ลิตร/นาที) | 25 l/min | 31 l/min | 39 l/min | 43 l/min | 47 l/min | 51 l/min | 56 l/min | |
| Pressure sw.(สวิตช์ความตัน) | ON (เปิด) | 140kPa(1.4kgf/cm2) | 140kPa(1.4kgf/cm2) | 200kPa(2.0kgf/cm2) | 220kPa(2.2kgf/cm2) | 220kPa(2.2kgf/cm2) | 220kPa(2.2kgf/cm2) | 220kPa(2.2kgf/cm2) | |
| OFF (ปีด) | 180kPa(1.8kgf/cm2) | 180kPa(1.8kgf/cm2) | 260kPa(2.6kgf/cm2) | 280kPa(2.8kgf/cm2) | 280kPa(2.8kgf/cm2) | 280kPa(2.8kgf/cm2) | 280kPa(2.8kgf/cm2) | ||
| Suction Pipe (ท่อดูด) | mm (in) (ม.ม. (นี้ว)) | 20mm (3/4 in) | 25mm (1 in) | 35 mm (1 1/4 in) | |||||
| Discharge Pipe (ท่อจ่าย) | mm (in) (ม.ม. (นี้ว)) | 20mm (3/4 in) | 25mm (1 in) | 35 mm (1 1/4 in) | |||||
m m
WM-P
| MODEL (รุ่น) | WM-P150GX2 | WM-P200GX2 | WM-P250GX2 | WM-P300GX2 | WM-P350GX2 | ||
| MOTOR (มอเตอร์) | Type (ชนิด) | SINGLE PHASE CONDENSER-RUN | |||||
| Output (กําลังของมอเตอร์) | W (วัตต์) | 150W | 200W | 250W | 300W | 350W | |
| Rate Voltage (แรงดันไฟฟ้า) | V (โวลท์) | 220 V | |||||
| Frequency (ความถี่) | Hz (เอิร์ต) | 50 Hz | |||||
| PUMP (ปั้ม) | Suction Lift(ระยะดูด (เมตร) ) | Normal (ปกติ) | 8m | 8m | 8m | 8m | 7m |
| Max. (สูงสุด) | 9m | 9m | 9m | 9m | 8m | ||
| Discharge head(ระยะส่งน้ําแนวตั้ง) | m (เมตร) | 12m | 14m | 18m | 18m | 18m | |
| Discharge Capacity(at Total head 12m)(ปริมาณน้ําที่ 12 เมตร) | l/min (ลิตร/นาที) | 32 l/min | 40 l/min | 44 l/min | 48 l/min | 51 l/min | |
| Pressure sw.(สวิตธ์ความต้น) | ON (เปิด) | 140kPa(1.4kgf/cm2) | 160kPa(1.6kgf/cm2) | 200kPa(2.0kgf/cm2) | 200kPa(2.0kgf/cm2) | 200kPa(2.0kgf/cm2) | |
| OFF (ปิด) | Quantity <4 l/min (ปริมาณน้ํา<4 l/min) | ||||||
| Suction Pipe (ท่อดูด) | mm (in) (ม.ม. (นิว) ) | 25mm (1 in) | |||||
| Discharge Pipe (ท่อจ่าย) | mm (in) (ม.ม. (นิว) ) | 25mm (1 in) | |||||
| Discharge Pressure(แรงดันด้านจ่าย) | Constant (คงที่) | ||||||
* When you buy a pump, check to see the specifications of each model to correspond with them, if there is a problem, please contact the distributor immediately. เมื่อท่านซื้อปัมน้ำให้พิจารณาข้อมูลจำเพาะของแต่ละครุ่นตรงกับสเปคที่กำหนดมาหรือไม่ ถ้ามีปัญหาให้แจ้งกับตัวแทนจำหน่ายทันที่
INSPECTIONS BEFORE INSTALLATION
การตรวจสอบเช็คก่อนการติดตั้ง
1 Check the installation site. ตรวจสอบเซคสถานที่ที่จะ ทำการติดตั้ง
- Choose the place that can easily be accessed for maintenance. เลือก ติดตั้งในสถานที่ ที่สามารถทำการตรวจสอบเช็คหรือช่อมได้ง่าย
- It should be installed near the well as much as possible. ควรจะติดตั้งใกล้ กับบ่อน้ำมากที่สุด
- Horizontal piping (from the well to the pump) is restricted by the suction height. (From the water surface level to the pump center) set the suction range considering the water level is reduced at the dry period (during the summer time). ระยะของการเดินท่อในแนวนอน (จากปอน้ําถึงตัวปืม) จะ ถูกจํากัดตามความสูงของระยะดูด (จากระตับของผิวน้ําถึงศูนย์กลางปืม) และ ให้กําหนดระยะดูด โดยค่านึ่งถึง ระดับน้ําที่ลดลงตอนน้ําแห้ง (ช่วงฤตูร้อน)
Limit of the pipe in horizontal lengths is based on the suction height. ข้อจํากัดความยาวของท่อที่เดินในแนวนอนตามความสูงของระยะดูด
| Maximum suction (m)ความสูงระยะดูด (m) | 8 | 7 | 6 | 5 | 4 |
| Pipe in horizontal length (m)ความยาวท่อในแนวนอน (m) | 3 14 | 5 26 37 | 5 49 |
2 Check the sand ตรวจสอบเซ็คทราย
- In case it is a newly dug well, eliminate the sand in the well completely before piping. กรณีมีการชุดบ่อใหม่ ให้กําจัดทราย ในบ่อให้หมดเสียก่อน แล้วจึงค่อยทําการเดินท่อ
PRECAUTIONS
ข้อควรคำนึง
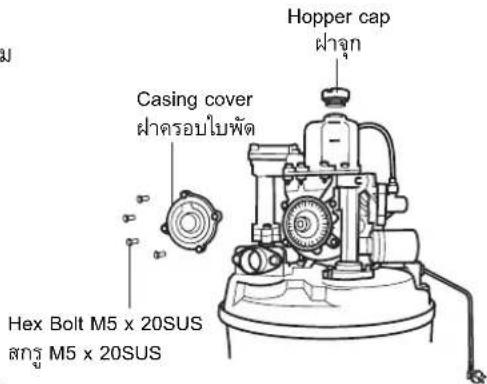
In the event that there is debris or PVC waste stuck in the impeller, causing the motor to lock, check as follows: กรณีที่มีเศษทราย หรือเศษท่อพีวีซี เข้าไปติดในตัวใบพัดทำให้มอเตอร์ล็อด ไม่หมุน ให้ทำการตรวจสอบเซ็ดปฏิบัติตั้งนี้ Hopper cap
- Remove the power plug before a repair. ตอดปลักไฟออกก่อนทำการแก้ไขหรือช่อมแซม
- Drain water out of the pump first. ระบายนําออกจากตัวปัมให้หมดก่อน
- Use a wrench to remove the Hex Bolt M5 x 20SUS. ใช้ประแจขัน คลายสกรู
M5 x 20SUS ออก
Take off the casing cover. เปิดฝากรอบใบพัด (Casing cover)ออก - Check for sand or PVC debris and clean it up. ตรวจสอบเซ็คดูว่ามีเศษทราย หรือเศษท่อ พืวีซีติดค้างหรือไม่ ทำความสะอาดออกให้หมด
- Clean up before replacing the casing cover. ประกอบฝากใบพัลเช้าไปเหมือนเดิมค่อยๆ ขันนื้อตเข้าไป
- Put the plug on to see if the motor rotates normally. If there is a breakdown, consult the selling shop or distributor. เสียบปลัก ตรวจสอบเซ็คมอเตอร์หมุนตามปกติหรือไม่ ถ้ามีเหตุขัดข้องให้ปรึกษาร้านค้าหรือตัวแทนจำหน่าย
PRECAUTIONS BEFORE INSTALLATION
ข้อควรระวังก่อนการติดตั้ง

Check the installation site to make sure that It has good drainage. ตรวจสอบเซ็คดูว่าพื้นที่การติดตั้งมีการ ดำเนินการป้องกันน้ํามีการระบายน้ําไว้หรือไม่
- If leakage occurs, it can result in serious damage. กรณีเกิดน้ําร่วม อาจส่งผลให้ได้รับความเสียหายรุ่นแรง ได้
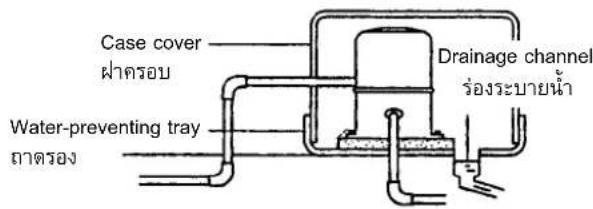
* Please make an air permeable lid to allow ventilation. ทำฝากรอบที่สามารถให้ลมผ่านเข้าออกได้ง่าย
* Please make it a habit to regularly check the pump for water leaks. กรุณาตรวจสอบว่ามีน้ําร์ว้ออกมาจากปัมหรือไม่เป็นประจํา
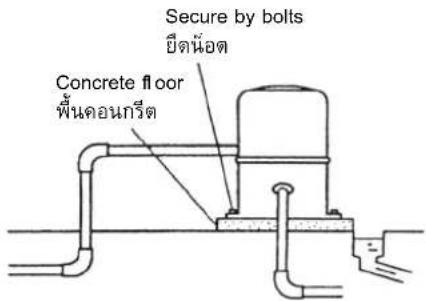
Put the pump on a plane and secure it with the nuts and bolts. To prevent the floor from subsiding, it is recommended to make the platform concrete. ติดตั้งปัมให้อยู่ในแนวทางบยืดให้แข็งแรงด้วยนื้อต เพื่อป้องกันพื้นทรุดตัว แนะนำให้ทำพื้นด้วยคอนกรีต
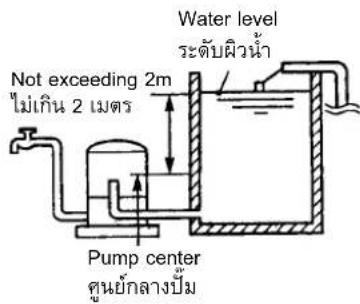
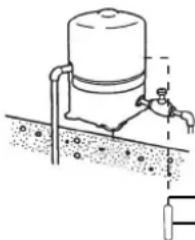
In case the suction range is less than 3 m or the water pump is higher than the pump head (not exceeding 2 m) put the check spring in the check valve. กรณีที่ระดับน้ำในระยะดูดน้อยกว่า 3 เมตร หรือระดับน้ำที่สูบอยู่สูงกว่าตัวปัม (Pump head ไม่เกิน 2 เมตร) ให้ใส่เช็ดสริงเข้าไปในตัวเช็ดวาล่ว
- Only model WT-P เฉพาะรุ่น WT-P เท่านั้น
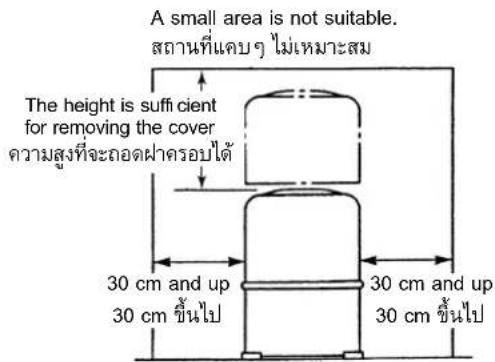
- It can be stalled outdoors, but the site must not be exposed to wind, rain, or direct sunlight. ควรติดตั้งในสถานที่ที่ไม่ถกลม, ฝน หรือแสงแวดส่องโดยตรง
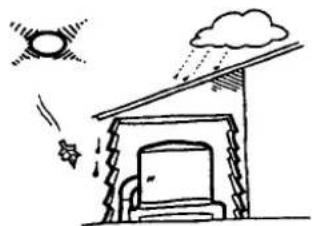
* Build the shed securely. ควรทำที่ครอบป้องกันให้แน่นหนา
If the water level is higher than the pump, it should not be higher than 2 meters to prevent damage to the pump parts or leaks caused by the water hammer. กรณีที่ระดับน้ำสูงกว่าตัว บั้มจะสูงได้ไม่เกิน 2 เมตร เพื่อป้องกันการชํารุดเสียหายของชั้น ส่วน หรือป้องกันน้ําร่วงที่มีสาเหตุมาจากแรงกระแทกน้ํา (Water Hammer)
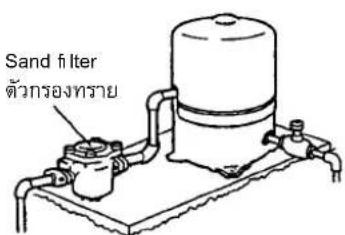
For the well that easily sucks up sand, install a sand filter that is sold separately. สำหรับบ่อน้ำที่มีการดูดทรายขึ้นมาด้วย ได้งายนั้น ให้ติดตั้ง (ตัวกรองทราย) ที่แยกขายต่างหาก
- Install a sand filter on the suction side to prevent corrosion of the inside parts. ติดตั้งตัวกรองทรายที่ด้านดูดเข้าของปัมเพื่อป้องกันการสึกกร่อนของขึ้นส่วนภายในตัวปัม
INSTALLATION ROUTING THE HARNESS
การติดตั้งเดินสายไฟ

WARNING
คำเตือน

Wiring should be considered a safety priority and comply with the technical standard of the electrical appliance or internal wiring to the house. การเดินสายไฟให้ค่านึ่งถึงความปลอดภัย และปฏิบัติตามมาตรฐานด้านเทคนิคอุปกรณ์เครื่องใช้ไฟฟ้า หรือข้อกําหนดการเดินสายไฟภายใน
● Faulty wiring may cause a fire or short circuit. การก่อสร้างเพื่อเดินสายไฟแบบผิดๆ อาจก่อให้เกิดอัคคีภัยหรือถูกไฟฟ้าดูดได้
1 Please make the ground wire and install a leakage circuit breaker. กรุณาต่อสายดินและติดตั้ง Leakage Circuit Breaker

WARNING
คำเตือน

You must make a ground wire and install a leakage circuit breaker specifically for this job. ต้องทำการต่อสายดิน และ ติดตั้ง Leakage Circuit Breaker สำหรับใช้งานโดยเฉพาะ
- You may have an electrical shock when the pump is defective or leaking. อาจจะถูกกระแสไฟฟ้าดูด เมื่อปีมน้ำชํารุตหรือกระแสไฟฟ้ารั่ว
It is installed to prevent an accident from an electric shock when there is an electrical leak. The earth wire and the leakage circuit breaker require a licensed electrical to do it, start by removing the plug of the outlet before making the connections. ให้ทําการติดตั้งไว้เพื่อป้องกัน อุบัติเหตุจากกระแสไฟฟ้าดูด เมื่อเกิดกระแสไฟฟ้าร่ว การติดตั้งที่เกี่ยวกับสายดินและ Leakage Circuit Breaker จําเป็นต้องให้ผู้เชี่ยวชาญเฉพาะในทางไฟฟ้า เป็นผู้ตําเนินการให้ทําการติดตั้ง โดยให้อดอปลักไฟออกจากเต้าเสียบเสียก่อน แล้วจึงให้ทําการติดตั้ง
Precautions ข้อควรระวัง
It is prohibited from grounding in the following places (forbidden by law). ห้ามต่อสายดินในสถานที่จะกล่าวต่อไปนี้ (เป็นข้อห้ามโดยกฎหมาย)
- Where there is a gas pipe, telephone line, lightning rod and plumbing. ที่ที่มีท่อ Gas, สายโทรศัพท์, สายล่อฟ้า, ท่อประปา
- Connecting the leakage circuit breaker. เกี่ยวกับ Leakage Curuit Breaker
1). Please install a circuit breaker with the working current less than 15 mA. กรุณาติดตั้งเครื่องป้องกระแสไฟฟ้าร่วม (Leakage Circuit Breaker) โดยกระแสไฟฟ้าทํางานอยู่ที่น้อยกว่า 15 mA ลงมา
2). In the case where there is an existing circuit breaker, check as specified above. กรณีที่มี Circuit Breaker ติดตั้งอยู่แล้วให้ตรวจสอบเซ็คตามที่กําหนดไว้ข้างต้น
Earth wire
สายดิน
Earth rod
แห่งสายดิน
PROCEDURES
ข้อควรปฏิบัติ
Water drainage from the pump การระบายน้ำออกจากตัวถังปัม
Cause and Trouble Shooting สาเหตุและอาการ
In case the water level at the suction side is higher than the pump for about 2 meters, the air in the tank of pump is gradually reduced, it makes the pump often start and stop, so the service life of the pump would be shorter (pressure switch, tank, others). Inการมีที่ระดับน้ําทางด้านดูดสูงกว่าตัวปัมประมาณ 2 เมตร อากาศภายในตัวถังของปื้มจะค่อยๆ ลดลงที่ละน้อย จะทำให้ปื้มสตาร์ท-หยุด บ่อย ซึ่งจะทำให้อายุการ
ใช้งานของชิ้นส่วนปัมสั้นลง (สวิตช์ความดัน, ตัวถัง, อื่นๆ)
Problem Solving วิธีแก้ไข
- Remove the power plug from its source. ถอดปลักไฟออกจากแหล่งจ่าย
- Drain water out of the pump at the nearest point. เปิดก็อกน้ำจุดที่ไกลที่สุด
- Close valve at supply point. ปิดวาล์ทางต้านจ่าย
- Take off the casing cover to drain water from the tank. ถอดฟ้าอุดออกเพื่อระบายน้ำในถัง
- When the procedures are finished, close the cover and run the machine as usual เมื่อเสร็จขั้นตอนให้ปิดฝากตามเดิมแล้วทำการเดินเครื่องใหม่ตามปกติ
วิธีการติดตั้งปัมน้ำ
Installation of the pump depends on suitability of the house or building using the following characteristics: การติดตั้งปิ้มน้ำมีหลายลักษณะ ขึ้นอยู่กับความเหมาะสมของบ้าน หรืออาคารที่อยู่อาศัย ดังลักษณะตัวอย่างด้านล่างนี้
In case the reservoir tank is on the floor. กรณีดูดจากถังพักนำที่อยู่บนดิน
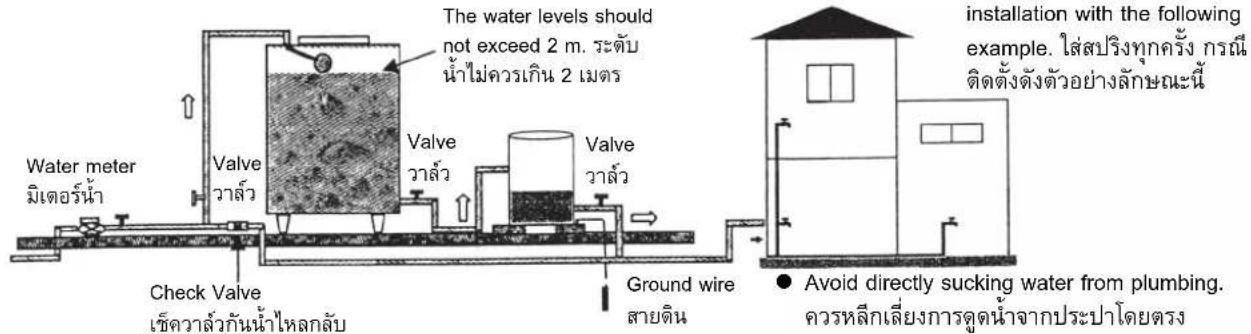
- In the case of pumping water from a well (should install near the well as much as possible). กรณีดูดจากบ่อน้ำ (ควรติดตั้งใกล้บ่อน้ำมากที่สุด)
- Remove the spring on a suction of water deeper than 3 m. ถอด สร้างออกทุกครั้ง กรณีที่ดูดน้ําลึก มากกว่า 3 เมตร
● Precaution on laying PVC pipes ข้อควรระวังในการเดินท่อ PVC
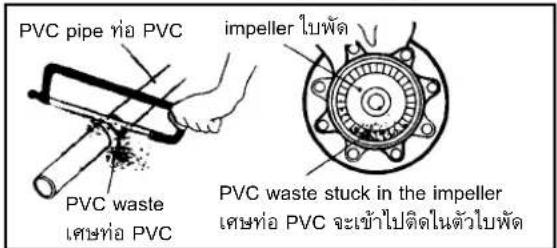
1). Using a tool (saw blade) to cut it will produce PVC waste. การใช้เครื่องมือ (ใบเล่อย) ทำการตัดจะมีเศษ PVC ติดอยู่
2). Cleaning the PVC waste with sandpaper or similar material. ทำความสะอาดเศษ PVC ด้วยกระดาษทรายหรืออย่างอื่นออกให้หมด
3). The cause of pump breakdown (motor lock) usually is from PVC waste stuck in the impeller. สาเหตุที่ทำให้ปั่มน้ำ (มอเตอร์ล็อด) เพราะมีเศษ PVC เข้าไปติดในตัวใบพัด
Preparations for the installation ข้อควรปฏิบัติก่อนการติดตั้ง
1). The suction and delivering ranges can be found on the specification of the pump for each model. ระยะการดูดนําและระยะการส่งให้พิจารณาจากคุณลักษณะเฉพาะของปัมน้ำแต่ละรุ่นที่กําหนดไว้ (ข้อมลจําเพาะ)
2). The installation should avoid using connectors and elbows or minimizing it so as to not loose efficiency of water delivery. การติดตั้งใช้อข้อต่อ, ข้องอ จำนวนน้อยที่สด เพื่อไม่ให้เสียประสิทธิภาพในการส่งน้ำ
3). Never adjust the pressure switch because it can damage the pump. ห้ามปรับแต่งสวัตช์ความดัน เพาะอาจทำให้ระบบการทำงานของเครื่องผิดปกติ หรือได้รับความเสียหาย
4). If the pump is pumping water from a reservoir or a shallow well, there's is no need to put on a foot valve at the pipe end, as the pump already has a check valve. ในลักษณะการติดตั้ง ดูตน้จากบ่อพักใต้ิน หรือจากบอน้ําดื่น ไม่ควรใส่ฟุตวาส์วไว้ที่ปลายท่อ เพราะปัมมี ว่าล้วกันน้ําไหลย้อนกลับอยู่แล้ว
5). The installation should include a ground wire to prevent danger in case the insulation deteriorates. การติดตั้งบั้มน้ำควรติดตั้งสายดิน ทุกครั้ง เพื่อป้องกันอันตรายกรณีที่ฉนวนเกิดการเสื่อมโทรม
6). In case of breakdown during the installation or use, contact the serviceman or distributor. กรณีเกิดข้อขัดข้องระหว่างการติดตั้ง หรือปัมน้ํามีปัญหา กรณาติดต่อช่างบริการ หรือตัวแทนเจ้าหน่ายปั่มน้ํา
When there is a problem during usage, you should stop the pump, remove the plug, and check to find the cause or consult your distributor. เมื่อเกิดความผิดปกติระหว่างการใช้งาน ควรหยุดการใช้งานและถอดปลั้นไฟออก ตรวจสอบและหาลาเหตุ หรือปรึกษาตัวแทนจำหน่าย
| Trouble อาการที่เสีย | Cause สาเหตุ | Correction การแก้ไข |
| The pump cannot pump water(Motor cannot run and makes no noise)ปัมน้ําสูบน้ําไม่ขึ้น(มอเตอร์ไม่หมุน และไม่มีเสียงลัง) | The plug is loose or the main switch is broken.ปลักเฟหลวมหรือเมนสวัตช์ขาด | - Keep the plug tight and check the main switch.เสียบปลักให้แน่และเชัดเมนสวัตช์ |
| The coil in the motor or pressure switch is out of order.ขดลวดในมอเตอร์หรือสวัตช์ความดันแลีย | - Repair or replace the pressure or the motor switch.ซ่อมสวัตช์ความดันหรือมอเตอร์หรือเปลี่ยนใหม่ | |
| The impeller is locked may be due to the scale.ใบฟัดล็อก อาจเกิดจากทรายหรือตะกรันน้ํา | - Remove the brass cover for cleaning.ดลายฝ่าครอบทองเหลืองออก ท้าความสะอาด | |
| The capacitor has leaked or melted.ตัวเก็บประจุร่วงหรือหลอมละลาย | - Replace.เปลี่ยนใหม่ | |
| The pump cannot pump up(Motor ratates normally)ปัมน้ําสูบน้ําไม่ขึ้น(มอเตอร์หมุนปกติ) | Water supply is dried, or the suction pipe has leaked.น้ําในแหล่งสูบน้ําแห้งหรือ ท่อทางด้านดูตรั่ว | - Check the water supply and make sure the connections are tight.เช็ดแหล่งน้ําและเช็ดท่อตามข้อต่อแน่นหรือไม่ |
| The check valve cannot be closed tightly.การปิดต้าของเชิความล์ไม่สนิท | - Remove for cleaning and check the rubber seal.ถอดทําความสะอาดและตรวจสอบเช็ดชี้ลยาง | |
| Insufficient water in the pump for priming.น้ําในตัวเรือนปัมน้ําที่ใช้อ่อไม่เพียงพอ | - Refill the priming water.เดิมน้ําล่อใหม่อีกครั้ง | |
| The pump can pump up(the pump works all the time)ปัมน้ําสูบน้ําขึ้น(ปิมน้ําทํางานตลอดเวลา) | The suction pipe is clogged up.ท่อทางด้านดูดตัน | - Check and clean the pipe.เช็ดและทําความสะอาดท่อใหม่ |
| Water level is lower than the suction pipe end.ระดับน้ําต่ํากว่าปลายท่อด้านดูด | - Adjust the level of the suction pipe to be lower than the water level.ปรับระดับของท่อดูดใหม่ให้ต่ํากว่าระดับน้ํา | |
| The pressure switch is broken.สวิตขความดันแลีย | - Repair or replace.ซ่อมหรือเปลี่ยนใหม่ | |
| The pump can pump up(The pump cuts off too often)ปัมน้ําสูบน้ําขึ้น(ปิมน้ําตัด-ต่อบ่อยเกินไป) | Air volume in the pressure tank is reduced.ปริมาณอากาศในถังความดันลดลง | - Remove water out of the tank and clean the aerator.ถ่ายน้ําออกจากถังและทําความสะอาดตัวป้อนอากาศ |
| Water volume use is too low.ปริมาณการใช้น้ําอย | - Turn on the faucet for the suitable volume.เปิดกิอกน้ําใช้ในปริมาณที่เหมาะสม | |
| The delivery pipe is leaked or other equipment is broken down.ท่อทางด้านจ่ายรัว หรืออุปกรณ์อื่นๆ เสีย | - Repair the pipe or check the electrical equipment in the house.ซ่อมแซมท่อใหม่หรือตรวจสอบเช็ดอุปกรณ์ภายในบ้าน | |
| The gas has leaked out of the bladder tank (Model WM-P).กําร์ว้ออกจาก Bladder Tank (รุ่น WM-P) หรือ | - Replace.เปลี่ยนใหม่ | |
| Life safe unit has a problem with some debris left inside.ชุด Life save unit ผิดปกติหรือมีเศษต่างภายใน | - Remove for checking and cleaning.ถอดทําการตรวจสอบเช็ดและทําความสะอาด |
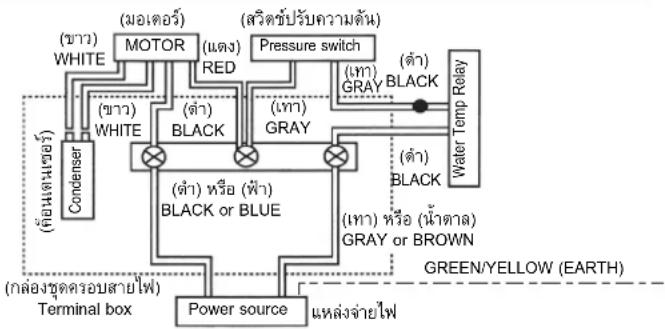
WIRING DIAGRAM
วงจรไฟฟ้า
● WT-P100GX2, 150GX2, 200GX2, 250GX2, 300GX2
WT-P350GX, 400GX
● WM-P150GX2, 200GX2, 250GX2, 300GX2, 350GX2
flowchart
graph TD
    A["Condenser"] --> B["(海水) WHITE"]
    A --> C["(海水) WHITE"]
    B --> D["MOTOR"]
    C --> E["(海水) BLACK"]
    D --> F["(MW/1000)"]
    E --> G["(MW/1000)"]
    F --> H["(MW/1000)"]
    G --> I["(MW/1000)"]
    H --> J["(MW/1000)"]
    I --> K["(MW/1000)"]
    J --> L["(MW/1000)"]
    K --> M["(MW/1000)"]
    L --> N["(MW/1000)"]
    M --> O["(MW/1000)"]
    N --> P["(MW/1000)"]
    O --> Q["(MW/1000)"]
    P --> R["(MW/1000)"]
    Q --> S["(MW/1000)"]
    R --> T["(MW/1000)"]
    S --> U["(MW/1000)"]
    T --> V["(MW/1000)"]
    U --> W["(MW/1000)"]
    V --> X["(MW/1000)"]
    W --> Y["(MW/1000)"]
    X --> Z["(MW/1000)"]
    Y --> AA["(MW/1000)"]
    Z --> AB["(MW/1000)"]
    AA --> AC["(MW/1000)"]
    AB --> AD["(MW/1000)"]
    AC --> AE["(MW/1000)"]
    AD --> AF["(MW/1000)"]
    AE --> AG["(MW/1000)"]
    AF --> AH["(MW/1000)"]
    AG --> AI["(MW/1000)"]
    AH --> AJ["(MW/1000)"]
    AI --> AK["(MW/1000)"]
    AJ --> AL["(MW/1000)"]
    AK --> AM["(MW/1000)"]
    AL --> AN["(MW/1000)"]
    AM --> AO["(MW/1000)"]
    AN --> AP["(MW/1000)"]
    AO --> AQ["(MW/1000)"]
    AP --> AR["(MW/1000)"]
    AQ --> AS["(MW/1000)"]
    AR --> AT["(MW/1000)"]
    AS --> AU["(MW/1000)"]
    AT --> AV["(MW/1000)"]
    AU --> AW["(MW/1000)"]
    AV --> AX["(MW/1000)"]
    AW --> AY["(MW/1000)"]
    AX --> AZ["(MW/1000)"]
    AY --> BA["(MW/1000)"]
    AZ --> BB["(MW/1000)"]
    BA --> BC["(MW/1000)"]
    BB --> BD["(MW/1000)"]
    BC --> BE["(MW/1000)"]
    BD --> BF["(MW/1000)"]
    BE --> BG["(MW/1000)"]
    BF --> BH["(MW/1000)"]
    BG --> BI["(MW/1000)"]
    BH --> BJ["(MW/1000)"]
    BI --> BK["(MW/1000)"]
    BJ --> BL["(MW/1000)"]
    BK --> BM["(MW/1000)"]
    BL --> BN["(MW/1000)"]
    BM --> BO["(MW/1000)"]
    BN --> BP["(MW/1000)"]
    BO --> BQ["(MW/1000)"]
    BP --> BR["(MW/1000)"]
    BQ --> BS["(MW/1000)"]
    BS --> BT["(MW/1000)"]
    BT --> BU["(MW/1000)"]
    BU --> BV["(MW/1000)"]
    BV --> BW["(MW/1O"]
    BW --> BX["(MW/1O)"]
    BX --> BY["(MW/1O)"]
    BY --> BZ["(MW/1O)"]
    BX --> CA["(MW/1O)"]
    CA --> CB["(MW/1O)"]
    CA --> CC["(MW/1O)"]
    CC --> CD["(MW/1O)"]
    CD --> CE["(MW/1O)"]
    CE --> CF["(MW/1O)"]
    CF --> CG["Power source"]
    CG --> CH["Terminal box"]

    subgraph Power Source
        direction LR
        D <--> E
        D <--> F
        D <--> G
        D <--> H
        D <--> I
        D <--> J
        D <--> K
        D <--> L
        D <--> M
        D <--> N
        D <--> O
        D <--> P
        D <--> Q
        D <--> R
        D <--> S
        D <--> T
        D <--> U
        D <--> V
        D <--> W
        D <--> X
        D <--> Y
        D <--> Z
        D <--> AA
        D <--> AB
        D <--> AC
        D <--> AD
        D <--> AE
        D <--> AF
        D <--> AG
        D <--> AH
        D <--> AI
        D <--> AJ
        D <--> AK
        D <--> AL
        D <--> AM
        D <--> AN
        D <--> AO
        D <--> AP
        D <--> AQ
        D <--> AR
        D <--> AS
        D <--> AT
        D <--> AU
        D <--> AV
        D <--> AW
        D <--> AX
        D <--> AY
        D <--> AZ
        D <--> BA
        D <--> BB
        D <--> BC
        D <--> BD
        D <--> BE
        D <--> BF
        D <--> BG
        D <--> BH
        D <--> BI
        D <--> BJ
        D <--> BK
        D <--> BL
        D <--> BM
        D <--> BN
        D <--> BO
        D <--> BP
        D <--> BPB
        D <--> BPW
        D <--> BPW
        D <--> BPN
        D <--> BPN
        D <--> BPN
        D <--> BPN
        D <--> BPN
        D <--> BPN
        D <--> BPN
        D <--> BPN
        D <--> BPN
        D <--> BPN
        D <--> BPN
        D <--> BPN
        D <--> BPN
        D <--> BPN
        D <--> BPN
    end
จัดจำหน่ายโดย : บริษัท อิตาซิเชลส์ (ประเทศไทย) จำกัด
ที่อยู่ : เลขที่ 994, 996 ซอยทองหล่อ ถนนสุขมวิท 55
แขวงคลองต้นเหนือ เขตวัฒนา กรุงเทพฯ 10110
โทรศัพท์:0-2381-8381-98 โทรสาร:0-2391-0210,0-2391-0021
website : www.hitachi-th.com E-mail : service.h@hst.hitachi.co.th
ราคาขายปลีก รุ่น :
| WT-P100GX2 | 5,300 บาท | WT-P400GX | 14,850 บาท |
| WT-P150GX2 | 6,150 บาท | WM-P150GX2 | 6,150 บาท |
| WT-P200GX2 | 7,200 บาท | WM-P200GX2 | 7,200 บาท |
| WT-P250GX2 | 7,750 บาท | WM-P250GX2 | 7,750 บาท |
| WT-P300GX2 | 8,550 บาท | WM-P300GX2 | 8,550 บาท |
| WT-P350GX | 12,150 บาท | WM-P350GX2 | 9,900 บาท |
DISTRIBUTED BY : Hitachi Sales (Thailand), Ltd.
ADDRESS : 994, 996 Soi Thonglor, Sukhumvit 55 Rd.,
Klongtonnua, Vadhana, Bangkok 10110
Tel. 0-2381-8381-98 Fax.: 0-2391-0210, 0-2391-0021
website : www.hitachi-th.com E-mail : service.h@hst.hitachi.co.th
SELLING PRICE:
