Heartwood 8063-15L BUS - Lampa Golden Lighting - Gratis bruksanvisning och manual
Hitta enhetens manual gratis Heartwood 8063-15L BUS Golden Lighting i PDF-format.

Användarfrågor om Heartwood 8063-15L BUS Golden Lighting
0 fråga om denna apparat. Svara på dem du kan eller ställ din egen.
Ställ en ny fråga om denna apparat
Ladda ner instruktionerna för din Lampa i PDF-format gratis! Hitta din manual Heartwood 8063-15L BUS - Golden Lighting och ta tillbaka ditt elektroniska enhet i hand. På denna sida publiceras alla dokument som behövs för att använda din enhet. Heartwood 8063-15L BUS av märket Golden Lighting.
BRUKSANVISNING Heartwood 8063-15L BUS Golden Lighting

natural_image
Abstract black and white graphic with curved white lines forming a stylized 'S' shape (no text or symbols)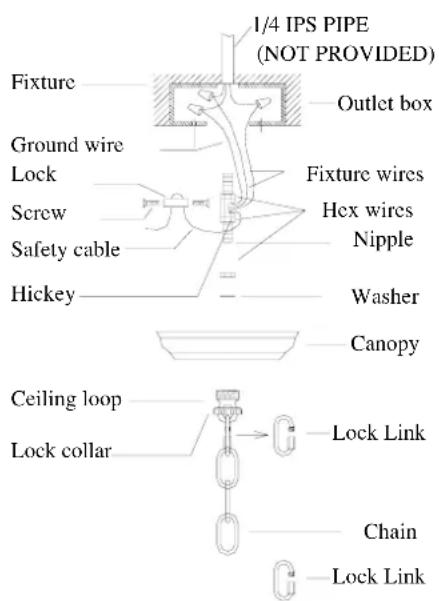
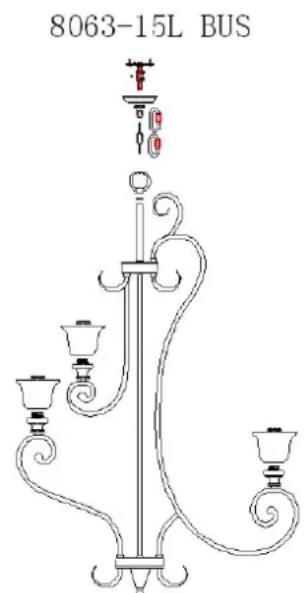
Lighting Fixture
ITEM#: 8063-15L BUS
Installation Instruction
Warning
Before installing fixture, be sure the electricity to the wires you are working with is shut off--either by removing the fuse or by setting the circuit breaker off.
General Information
You don't need special tools to install this fixture. Be sure to follow the steps in the order given.
Under no circumstances should the fixture be hung on house electrical wires. The fixture must be installed by means of support that is independent of the outlet box. A swag type fixture should not be installed on a ceiling which contains a radiant type heating system.
Remember that a fuse or circuit breaker protects wires from becoming overheated. Overheated wires created an overload and cause the fuse to blow or the circuit breaker to trip should such an event occur, replace the fuse, or reset the circuit breaker, locate and correct the cause of the overload--usually too many appliances on the same line or a short circuit.
Before tracing the wires for a short circuit, be sure to shut off the electricity at the main switch.
If you must replace a blown fuse be sure to replace it with one rated for the ampere capacity the circuit. For example, if a 15--AMP fuse blows, do not replace it with a 30--AMP fuse.
Use only one hand to screw out a fuse, and keep your other hand away from the wall or any other object, while you are touching the fuse.
Assembly the fixture
Carefully remove the fixture from the carton and check that all parts are included, as shown in figure 1. Be careful not to inisplace any of the screws or wire connectors which are needed for installing the fixture.
- As shown in figure 1. Suggested installation.
Provide a 1/4 IPS pipe with one and secure mounted to a beam or a structural member. The other end should protrude through the center or the outlet box as shown.
Assembly the ceiling loop, nipple, nuts, and hickey to center 1/4 IPS support pipe and adjust overall length to allow the ring to hold the canopy flush to the ceiling. When the adjustments have been completed, secure the three (3) nuts, as shown.
Attach the chain to the fixture loop. Slip the lock collar and canopy over the upper end of the chain, loose the lock link to connect to the end link of chain with the fixture loop and hang the fixture on the loop at the ceiling. Secure the lock link.
Lace the fixture wires, ground and safety cable through the chain and loop, exiting through the side of hickey. Place the safety cable through the lock and coil the hickey twice in circle, through the top of the outlet box and secure to structural member.
- Installed properly rated light bulbs.
Your installation is now complete. Return power to the junction box and test the fixture
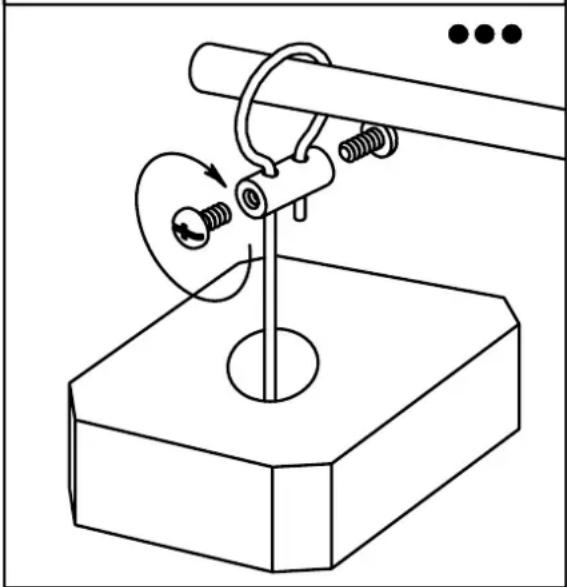
SAFETY CABLE INSTALLTION INSTRUCTION
IMPORTANT: FOR A SAFE AND SECURE INSTALLTION, THESE FIXTURES MUST BE INSTALLED BY MEANS OF SUPPORTS THAT ARE INDEPENDENT OF THE OUTLET BOX.
- Loosen the lock screw and take out the safety cable.
- Lace the safety cable and fixture wires through the chain and canopy, exiting through the side of crossbar.
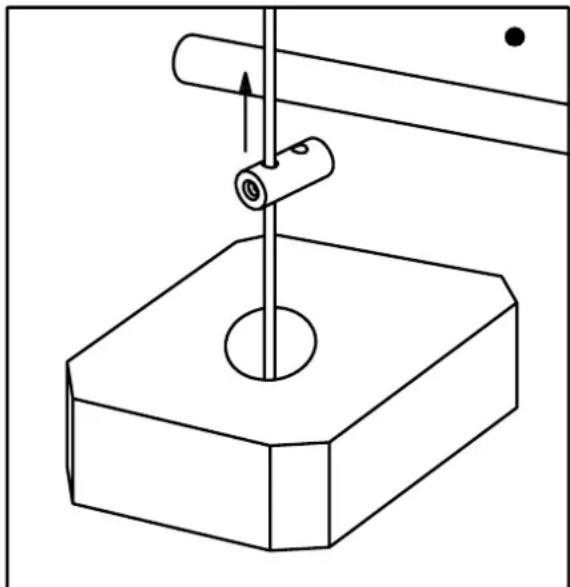
- Place the safety cable through the lock, through the lock again; tightens it with screw into lock. Run cable through the top of the outlet box and secure to structural member before connecting the wires.
natural_image
Technical line drawing of a mechanical setup with a cylindrical component mounted on a base, no text or symbols present
natural_image
Simple line drawing of a mechanical setup with a square base, ring, and rod (no text or symbols)