EF204VFSS - Köksfläkt Euro Appliances - Gratis bruksanvisning och manual
Hitta enhetens manual gratis EF204VFSS Euro Appliances i PDF-format.

Användarfrågor om EF204VFSS Euro Appliances
0 fråga om denna apparat. Svara på dem du kan eller ställ din egen.
Ställ en ny fråga om denna apparat
Ladda ner instruktionerna för din Köksfläkt i PDF-format gratis! Hitta din manual EF204VFSS - Euro Appliances och ta tillbaka ditt elektroniska enhet i hand. På denna sida publiceras alla dokument som behövs för att använda din enhet. EF204VFSS av märket Euro Appliances.
BRUKSANVISNING EF204VFSS Euro Appliances

natural_image
Abstract black-and-white graphic with two curved white lines inside a partial square frame (no text or symbols)eurø
appliances
refrigeration
USER AND
CARE GUIDE
Product Code:
EVF204SL
EF204VFSS
natural_image
Plain gray surface with no visible text, symbols, or markings
Safety information
( \bar{A} \bar{A}" # \bar{A} ) !#%#&( \bar{A} ) (( \bar{A} ))%( \bar{A} )&+(#!)( \bar{A} )+, ( \bar{A}' ) ( \bar{A} )#&%#( \bar{A}" ) #( \bar{A}' )%%-!( \bar{A} )&#.( \bar{A} ) #('%#( \bar{A} ) \&!+00( )1, ( ) %& 1( \bar{A}" ) #( \bar{A} )+220\+ #.( )#+, ( " )8&&#°( \bar{A} ) + +0 ( \bar{A} )+%#(00.( \bar{A} ) -0,( 1\bar{A} )!&!&( )+%, ( )+% ( 1\&' ) ( )+7',( ) #-#&&+963&!+8#&( \bar{A} ), ( \bar{A} )+--, # !&.( )832'%!+ !( ' ) ( )#&%#( " )+! ( )+0( )#'20#( )& 1( \bar{A}" ) #( \bar{A} )+220\+ #( )+%#( " )%'1"0 )( )+(3\0\+( )!”( )!&2 #%+!\’( \bar{A} ), ( \bar{A} )+(#!)( \bar{A} )(#+!%#&( \bar{A} )+7#( \bar{A} )!" #&#( \bar{A} ) &!%-!\’ &( ), ( )+8 #&%#( " )+! ( " )#) ( )#3+ ( \bar{A} )!"( " ) #( )+220\+ #( \bar{A} ) ( \bar{A} )8'7#, ( %&'0,.\&' ) ( " )+! ( )#%’ #( )& 1( \bar{A} )“%'*1” ( \bar{A}!8) (#4\00#( )2%‘2#%)( ) (%3#, ( ) ( )+220\+ #( \bar{A} )&#( \bar{A} ), ( \bar{A} )+(#!)5 :' % ( \bar{A}" #\&+(#!)( \bar{A} ( A) \$#\text{(\text{(\text{(\text{(\text{(\text{(\text{(\text{(\text{(\text{(\text{(\text{(\text{(\text{(\text{(\text{(\text{(\text{(\text{(\text{(\text{(\text{(\text{(\text{(\text{(\text{(\text{(\text{(\text{(\text{(\text{(\text{(\text{(\text{(\begin{-}}}}\}}\}}\}}\}}\}}\}}\}}\}}\}}\}}\}}\}}\}}\}}\}}\}}\}}\}}\}}\}}\}}\}}\}}\}}\}}\}}\}}\}}\}}\}}\}}\}}\}}\}}\}}\}}\}}\}}\}}\}}\}}\}}\}}\}}\}}\}}\}}\}}\}}\}} \
Children and vulnerable people safety
- This appliance is not intended for use by persons (including children) with reduced physical, sensory or mental capabilities, or lack of experience and knowledge, unless they have been given supervision or instruction concerning use of the appliance by a person responsible for their safety.
• ? "\0, % \\bar{A}\"*0, \\bar{A}\#\\bar{A}\*2#%7\& \'\ \\#&*%#\"+! \\bar{A} \" #) \\bar{A}'\\\bar{A}'\! \ \0+\)\4\!"\\ !" #\+220\+ #5
• A?G# + \1 A+, A&#°A\+ \! # + - #A&"+0A! A #A\+, #A)A"\$0,%# A - @#2A0A2+-8+1\1A #0A4+)A(%'3A"\0,%# 5A6" #%#A\&%\&8(A &*(('-!\$' 5
• ()^* + % & - + %, " # 220\+ #\bar{A}* 0\bar{A}" #\bar{A}20*1\bar{A}*!\bar{A}(\bar{A}" #\bar{A}&' -8 #!.\bar{A}*!\bar{A}!" #\bar{A}' #-!\' +/0 # A& 0' & # ' " # 220\+ #\bar{A}&\bar{A})*\bar{A}+ B\bar{A},\bar{A}%#3'7 #\bar{A}" #\bar{A}"%\bar{A}'\bar{A}%#7# !\bar{A}20+) \ 1 "\0,%#\bar{A}'\bar{A}& *((#%\bar{A}##-!%\\&" " -8 % !' 0' & # " #3& #07#& \ !'\bar{A}$ !5
• Ã "\8\bar{A}+220\+ # #+!*%\\bar{A}3+1 #!\- ,"% #+0 " #20+-# - 0, #° +220\+ #\bar{A}+7\ 1 - &2%\\bar{A}0'-8\bar{A}0+!-"B'\bar{A}" #\bar{A},"%\bar{A}%\bar{A},\bar{A}#&*%#\bar{A}'\bar{A}3+8 #\bar{A}"+!\bar{A}&2%\ 0+-8 *&+/0 # #('%# )* \&-+%\bar{A}" #\bar{A}0,\bar{A}-220\+ #5 6" $\& \0\bar{A}%7# !\bar{A}\bar{A}%’3\bar{A}#-'3\ 1 - #+!" %+ (% - "\$0,5
General safety
⚠ WARNING! @##2 # !\0+!\' 2 # \1&.\bar{A}\ " # -220\+ #\bar{A}#-0' &*%#\bar{A}'%\bar{A}" #\bar{A}*\0!C \\bar{A}&!%*-!*%.\bar{A}0#+°\bar{A}(\bar{A}&!%*-!\' 5
⚠ WARNING!ÃD Ã'! Ã&#Ã# -"+ \-+0Ã, #7\#&Ã%Ã!" #°Ã# + &Ã'Ã +-- #G#%+#Ã" #Ã, #(%'&!\$ 12%'-#&&Ã" #°Ã"+ Ã"'& #Ã#-'33 # , #,Ã / )Ã" #Ã3+ * (+-!*%#%5
⚠ WARNING! ( \bar{A}D ) ( \bar{A}'! ) ( \bar{A}+3+1 ) # ( \bar{A}" ) # ( \bar{A} ) #(%( # )% + ) ( \bar{A} )% - * \$!5 )

Safety information
⚠ WARNING! D' Ā'! Ā&#A!" #°Ã##-!%\-+0220\ + #&Ã&A*-" Ā+&\$ #Ã -%#+3Ã+8#%BÃ&\#Ã (Ã#(%\#%+!\4220\ + #&Ã 0#&8Ã" #)Ã+%#Ã +22%'7#, Ā(°Ã"'&2*%2'#Ã )Ã" #Ã3+ * (+-!*%#5Ã
⚠ WARNING! D' '! '*-" " # \1"\bar{A}*0/\bar{A}\bar{A}+&\bar{A}##\bar{A}\bar{A}'(\% \bar{A}+\bar{A})' 1\bar{A}2#%'\bar{A}(\bar{A}\3# #-+* & # ' *0, # #% '!5^EB )
• D' '! !' % # # 20' & \#\bar{A}& * / & ! + - # &\bar{A}& * - "\bar{A}&\bar{A}# % ' & '\bar{A}+ &\bar{A}\!" (0+33+/0 # % '2#00+ \\bar{A}220\+ #5
• 6" #A#(%\#1%+ A\&'/*!+ #AFGHHB\A' !+\ #, A\!"\ A" #A#(%\#%+ A -\%-*A (A" #A-220\+ #.A-A+!*%+O!&A\!"A-A\1" A#7#0A (A # 7\%' 3 # !+0A'32+!\/0\!).A-" \- " A\ & #7#%!#0#&&A0+33+/0#5
- It is hazardous for anyone other than an Authorised Service Person to service this appliance. In Queensland - the authorised Service Person MUST hold a Gas Work Authorisation for hydrocarbon refrigerants to carry out servicing or repairs where the gas system is being opened or charged.
• D*%\\bar{A}\% + \&2'\%!+!\'A+ , &!+00+!\\bar{A}(\bar{A}" #\bar{A}+ 220\+ #. # #%!+ !"+! ' # ( " # '32' # !& ( " # #(%\#%+\bar{A}%-*\bar{A}#-'3 #\bar{A}$ ,+3+1 #,5
,2# 0+3#\&+, '%-#\&( \1 \! \'\bar{A}\bar{A}\bar{A}C\bar{C}\bar{A}'1"0 )\bar{A}7#!\0+#"#\/%"3 \\bar{A} "\-" "#220\+ \ #\bar{A} \\&\!*+#,$
• Ã\\&A+ 1 #%'* &Ã' A-0#%Ã" #Ã&2#-( \-+! \' &Ã%Ã3', \ ()Ã"\8Ã2%', *-! Ã\\ A+ )Ã 4+) 5Ã| )Ã+3+1 #Ã' Ã" #Ã'%, Ã3+ )Ã+* & #Ã-Ã&'''% |Ã\%-* \Ã\#Ã-, J%Ã #0#-!% \-Ã&'''-85
• 6“( &A+220 + #A\&!# , #, A' A #A&#, A\ A'*& #"0, A+, A\3\0A% +220\-+!\' &&*-" A&
\&(\! - " # \bar{A}+\%+8\\&""2\&.((\#8\bar{A}+, \bar{A}!" #^0\bar{A}'\%8\1 # 7 %'3 #!&K
'*\& #&+, )0#!&'! #0&'! #0&!, '' #%&#\&#!\+0!!)2#\bar{A}#7\%\'3#!&K$
+ , % # + 8(+&) 2# #7\$ %' 3 # !&K
# % + , \& 3\0\bar{A}\%C#!+\bar{A}220\-+! ' &5
WARNING! ! )A#G#-!%\$-+032' # !& A20*1 A2'4 #°A'%, . A -'32% #&&'%+, A#-5B A*&! A#A#20+#, A)A+A#% (\#, A&#%7 \#A+1#!A ' %AL*+0 \#, A&#%7 \#A#%&' #05
⚠ WARNING! 6" #Ã\1"Ã*0/ Â&*220\, Ã4\!"Ã"\8Ã-220\+ #Ã\8Ã&Â2#-\$+Ã *&#Ã0+32Ã*0/ O'Ã&+/0#Ã0 )Ã4\!"Ã" #Ã+220\+ #Ã&*220\,5Ã6"\8Ã&Â2#-\$+Ã *&#Ã0+32OÃÃ' ! Ã&+/0#Ã(%,Ã'3 #&!\Ã\1"!\$ 15

Safety information
• T'4 #°A'%, A\$*&! A'! A#A# 1!" # #,5
• U+8# & *%# "+! " # '4 #° 20*1 &'! &L *+ &" #, % +3+1 #, ) " # /+-8 (A" # +220\+ #5\bar{A}&L *+ &" #,\bar{A}%\bar{A}+3+1 #,\bar{A}'4 #°\bar{A}20*1\bar{A}+ )\bar{A}'7 #%#+!\bar{A},\bar{A}+* &#\bar{A}&\bar{A}$ %5
• U+8#A&*%#A"+!A)* A+ A'3 #A' A" #A\&A20*1A (A" #A+220\+ #5
• D' A'! A2*0A" #A\+ \ &A+/0#5
• À(A" #A'4 #°0*1&'-8#!\80"& #.A' A'! A\ 8#%A" #A'4 #°20*156" #%A \8+A% \88(A##-!%\8&''-8 A%A\5
• V" * 3* &! '! 2 #% +# " #A+220 + #A4 \!""*!\bar{A}"$ #A0+325
• 6“\&A+220\+ #A\8A#+7)5A?+%#A&”*0, A#A+8# A4" # A3'7\ 1 A\$!5
• D' A'! A#3'7 #A' % A'*-" A\#3&A'%'3A" #A###>#°A'32+%!3 #! A\(A)* A "+ ,& A+%#A+32 J4 #!.A&A''\&A'*0, A+*& #A&8\A+/%+&\$' &A%A (%'&U(##>#°A*% &5
• I 7'\, A2% '0' 1#, A#2'&*%#A (A" #A-220\+ #A' A,\%#-! A&* 0\1"!5
Daily use
• D' A'! A2*! A'! A A" #A20+&!\2+%!A A" #A-220\+ #5
• D' A'! A20+#A( ', A2 %', *-!& A\%-!0)A+1+\ &A" #A#+%A+005
• :%'># ' , ^ &! ' ! # #C%># - # +& ## # " +4 #, ^ !5 ^EB
• 9!%# 0#C2+-8#, %># ' , --'%,+ - # \!"\bar{A}"#\bar{A}%>#\bar{A}',\bar{A}3+ * (+-!*%# &\bar{A}&!%*-!\' & 5
• 1220\+ # &B+ * (+-!*%#&&!%+1#A#-'33 # ,+!\' & A&""*0, A#A &!%\)-A-, " ##, A'5A##(#°A' A#G#7+ !A\ &!%*-!\$' &5
• D' A'! A20+ #A+%/' +! #, A (A\>>)A,%\ 8& \A" #A(##>#%A'32+%!3 # ! A&A \A%#+!#&A2%&&*%A A" #A' !+\#%A"\-" A3+)A+*& #A\A' A#=20', #.A %#&*0! \ A\A+3+1 #A' A" #A+220\+ #5 ^E
• À#ÑO'0G&A+ ̅A+*& #A%'&Ä*% &Ä(A'A' &*3 #, Ä%!%+\1Ä%'3Ä" #Ä +220\+ -#5 ^B
Care and cleaning
• P#('%#A\+ \ ! # + - #.A&4\!-"A ((A" #A+220\+ #A+, A,\&-' #-!A" #A 3+\ &A20*1A%'3A" #A\+ \ &A&'-8#!5
• D' A'! A0#+ 'A" #A+220\+ #A\!"A3#!+0A Q#!&5
• D' A'! A&#A&"+%A/ Q#!&A' A#3'7 #A%'&A%'3 A" #A+220\$+ #5AR&#A+A 20+&!&-%+#%5
• F# 1*0+%( \bar{A} )#=+3\#( )" #( )%+\( \bar{A} )" #( \bar{A} )#(%( # )%+!' %)%( \bar{A} ) #(%,'&#, ( \bar{A} )+!#%( \bar{A} ) #-#&&+%( \bar{A} )0#+ ( \bar{A} )" #( \bar{A} )%+\( )(( )" #( )%+\( \bar{A} )&0'-8 #,. ( \bar{A} )+!#%( \bar{A} )\000#-!( ) ( ) !#( )!!'3 ( ) (( )" #( )+220\+ #5( ^{MB} ))

Safety information
Installation
Important! :' % A##-! % \-+0 #-! \' A+%#(*00A(00'4 A" #A\&!%*-! \' &A 1\7# A\ A&2#-\$( -A2+%+1%+2"&5
• R 2+-8 " # 220\+ #\bar{A},\bar{A}" #-8\bar{A}" #%#\bar{A}%\bar{A}+3+1 #&\bar{A}\bar{A}!\bar{A}D\bar{A}!'\bar{A}-' #-!\bar{A}" #\bar{A}220\+ # ( ) +3+1 #,5 #2' % '&&\/0#\bar{A}+3+1 #&\bar{A}\33 #,\+!#0\bar{A}'\bar{A}" #\bar{A}20+-#\bar{A}*\bar{A}'*1"!\bar{A}!\bar{A}\bar{A}"+!\bar{A}+&#\bar{A}#!+\ 2+-8\15\bar{A}$
• Ã\\\\4,7\\&+/0#Ã'Ã1+\Ã!Ã#+&Ã(*%Ã"*%&Ã#('%#Ã' #-!\1Ã" #Ã +220\+ #Ã'Ã00'4Ã" #Ã\\0Ã'Ã0'4Ã+-8Ã\\Ã" #Ã'32% #&&'5
• I , #L*+!#A(A)%-*0+!(A\&""*0, A #A-%"*, A" #A-220\+ #.A0+-8( 1A"( &A 0#+, &A' A7 #%#+!( 156' A-"( #7#A&*(( -\ ! A# !\0+!( 'A'(00'4 A" #A ( &!%*-!( ' &A#G#7+ ! A' A\ &!+00+!( ' 5
• X " #0%7#0A2'&&\/G#A" #A&2+-#0%A (A" #A2%', *-! A&""*0, A#A+1+\ &A+A 4+0A' A-7'\, A'*-"\ 1 A%A+!-"\1 A4+%3A2+%!A32% #&&'0A' C , # �B/A2%7#!A2'&&\/G#A*5
• 6" #A+220\+ #A*&! A'! A#A'-+!#, A0'&#A' A%+, \+!'%A&A"8 #%&5
• U + 8#A&*0%A"+!A" #A3 + \&A20*1A\8A-- #&&\/A+(!#°A" #A\ &!+00+!A(A!" #A+220\$+ -#5A
Service
• I )A#G#-!%\-+0' %8A#L* \%, A' A' A" #A#%7\-\A (A" #A+220\+ #A &""*0, A#A+%%\A*! A)A+AL*+0\#, A#G#-!%\-\$+A%A'32 #!#!A#%&' 5A
• 6" ( & \bar{2} \%', *-! \bar{3} * &! \bar{A} # \bar{8} # \%7 \#, ) + *!"' % > #, # %7 \# \bar{A}?# ! # \% \bar{A}, \bar{A}' 0) \bar{A} 1# *( # \bar{8} \& 2 + \% \bar{2} + \%! \bar{3} * &! \bar{A} # \bar{A} \& #, 5)
Energy saving
• D' ;! ^* ! ' ! ' , #A-220\$+ #K
• D' ;!A2+-8A(, ' A0'&#A'1 #!" #%A&A"\&2%#7# !&A\%\%-*0+!\K
• U + 8# &*%# ' , ' ;! ' *-" " # +-8 ( " # ' 32+%!3 # ! A&BK
• ÀA##-!%\-\A1' #&A ((.A';!A2 # A" #A" % A&BK
• D' ;!A2 # 'A" #A,% 'A&B A#L* # !0)K
• D' :! A ##2 A " # A "% A&B A # A A % A " A 0' 1 A 3#K
• D' ;!Ã#!Ã" #Ã" #%3'&!+!Ã ̅A#-##,\$ 1 Ā'0, ̅A#32 #%+!*#&K
• 9'3 #A--#&&+%& &*-" A&A,%+4#%8A+ A#A#3'7 #, A' A1#!A0+%#%A
&!%'+1#A'0*3 #5A

Safety information
Environment Protection
A8A+220+ #A' #&A'! A' !+A1+&#&4"-" A'*0, A+3+1 #A" #A
'>' #A+)# %A A#!"#%A!&#(%#%+ A%-*A%&*0+! 'A3+! #%$+O&5#A
+220+ #&"+0A'! A #A&-+%#, A'1#!" #oA$!"A" #A%/+ A#(*&#A+, A
%*//&"5" #A&*0+! 'A(+3 A' !+& AQ+33+/0 #A+&#YIA#A+220+ #A
&"+0A #A&2'&#, A--'%, 1 A' A" #A+220+ #A#1*0+! ' &A' A/!+$ A(%3A
)'*%A'-+0A*!"%!&A17', A+3+1 1 A" #A"01 A!.A#&2#-$+0O" #A
" #+!A#-" + 1 #%5" #A3+! #%+A&#, A A"&+220$+ #A3+%#, A)A" #A
&) 3/'0 A(A.A.A.R#-) -0+/0#5
A A A A A A A A A A A O A A " # A 2 %', * -! A % A A ! & 2 + -8 + 1 1 A , - + ! # & A " + ! A " & A A A A 2 %', * -! A3 + )A' ! A # A 0 # + ! #, A + & A"* & #"0, A4 + & ! #5 A & # +, A S A & ""*0, A #A + 8# A' A" #A 22%'2% #A'00# -! ' A2' ! A(%A" #
%#-) -01A (A##-!% -+0 , A##-!%-A#*23 # !5A P A# &* %1A "8A 2%', *-! A8A&2' &#, A (A'%%#-!0) .A)* A4 00 #022%#7# ! A2' ! # ! +0 A #1+!7#A' & #L* # - #8A(%%A" #A#7%' 3 # ! A+, A*3+ A#+0!" A4 "-" A -'*0, A!" #%48A #A+* & #, A) A+22% '2%##A+ &!#A+, 01 A (A"8A 2%', *-!5 A'%%A'%% #A #!+0, A ('%3+!' A/'*! A#-) -0 1A (A" 82%', *-!. A 2G#+&#A' !+-! A)'%A0'-+0A'* -0. A)'%A'* & #"'0, A4+&!#A,&2'&+0A&#%7#A%A" #A&""2 A4" #%#A)* A2*%-"+8#, A" #A2%', *-!5
T+-8+11\bar{A}3+! #%+0&
6" #A+! #% +A!"A" #A&) 3/'0 A-#A#-) -0+/0#5A&2'8#A" #A2+-8+11A A +A*!+/0#A'00#-!' A' !+ #%A' A#-) -0#A$!5
D \&2'\&+ ( ' # +220$+ #
E5A&-' #-! A" #A+ &A20*1A%3A" #A+ $ &A&'-8 #!5
M6A?*! A ((A" #A+ &A+/0#A+, A&-+%A!5
Note: Above picture is for reference only. Real appliance probably is different.
Space Requirement
- Select a location without direct exposure to sunlight;
- Select a location with enough space for the refrigerator doors to open easily;
- Select a location with level (or nearly level) flooring;
- Allow sufficient space to install the refrigerator on a flat surface;
- Allow clearance to the right, left, back and top when installing. This will help reduce power consumption and keep your energy bills lower.
- It is advisable to keep at least 50mm gap at two sides.
Positioning
Install this appliance at a location where the ambient temperature corresponds to the climate class indicated on the rating plate of the appliance:
for refrigerating appliances with climate class:
- extended temperate: this refrigerating appliance is intended to be used at ambient temperatures ranging from 10 °C to 32 °C (SN);
- temperate: this refrigerating appliance is intended to be used at ambient temperatures ranging from 16 °C to 32 °C (N);
- subtropical: this refrigerating appliance is intended to be used at ambient temperatures ranging from 16 °C to 38 °C (ST);
- tropical: this refrigerating appliance is intended to be used at ambient temperatures ranging from 16 °C to 43 °C (T);
Location
The appliance should be installed well away from sources of heat such as radiators, boilers, direct sunlight etc. Ensure that air can circulate freely around the back of the cabinet. To ensure best performance, if the appliance is positioned below an overhanging wall unit, the minimum distance between the top of the cabi-net and the wall unit must be at least 50 mm. Ideally, however, the appliance should not be positioned below overhanging wall units. Accurate leveling is ensured by one or more adjustable feet at the base of the cabinet.
This refrigerating appliance is not intended to be used as a built-in appliance;
Warning! It must be possible to disconnect the appliance from the mains power supply; the plug must therefore be easily accessible after installation.
Electrical connection
Before plugging in, ensure that the voltage and frequency shown on the rating plate correspond to your domestic power supply. The appliance must be earthed. The power supply cable plug is provided with a contact for this purpose. If the domestic power supply socket is not earthed, connect the appliance to a separate earth in compliance with current regulations, consulting a qualified electrician. The manufacturer declines all responsibility if the above safety precautions are not observed. This appliance complies with the E.E.C. Directives.
Tool required: Philips screwdriver, Flat bladed screwdriver, Hexagonal spanner.
- Ensure the unit is unplugged and empty.
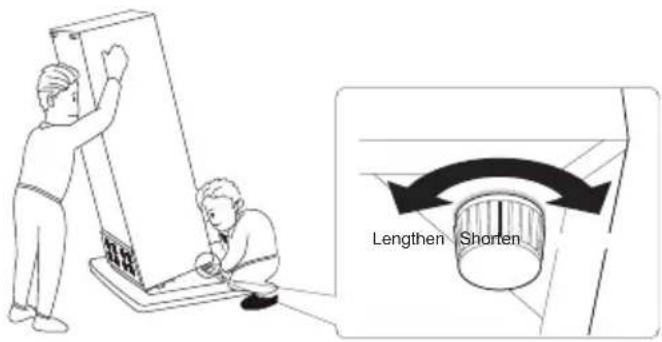
- To take the door off, it is necessary to tilt the unit backwards. You should rest the unit on something solid so that it will not slip during the door reversing process.
- All parts removed must be saved to do the reinstallation of the door.
- Do not lay the unit flat as this may damage the coolant system.
-
It's better that 2 people handle the unit during assembly.
• This refrigerating appliance is not intended to be used as a built-in appliance. -
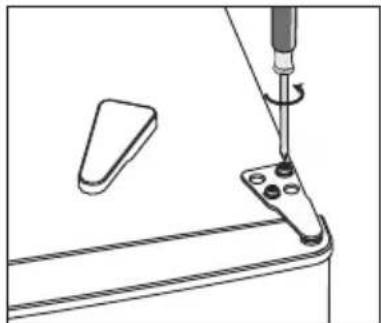
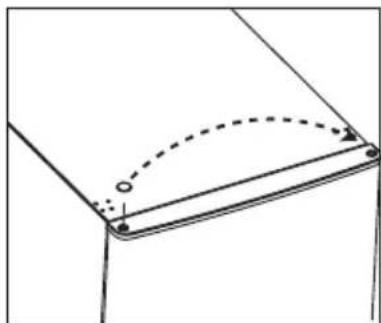
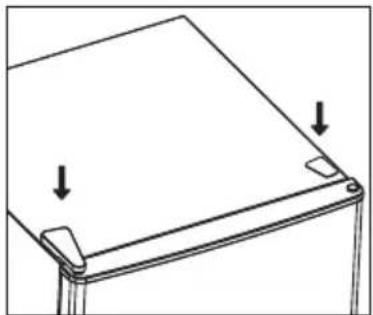
Remove the top right hinge cover.

natural_image
Diagram of a tool being adjusted to form a cylindrical object with a downward arrow (no text or symbols)
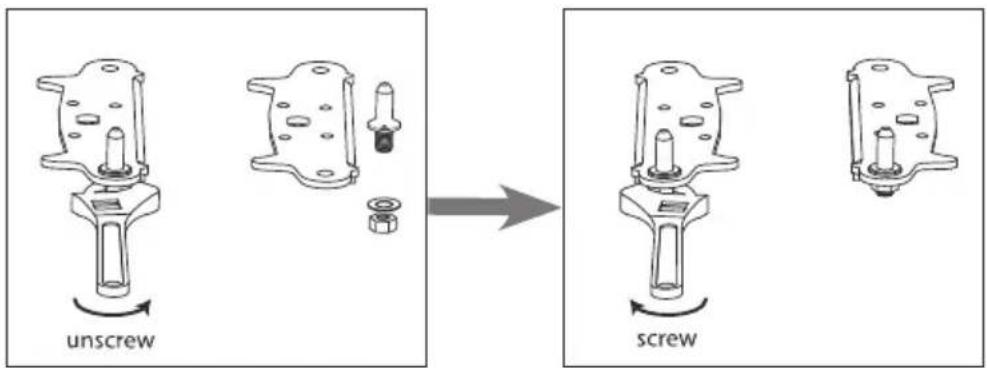
- Undo the screws. Then remove the hinge bracket.
natural_image
Line drawing of a screwdriver inserted into a small electronic component (no text or symbols)
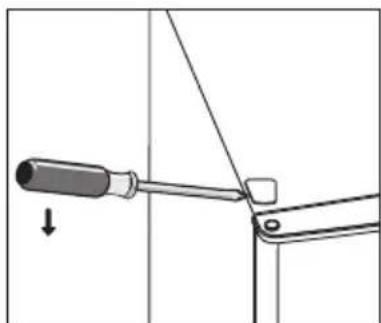
- Remove the top left screw cover.
natural_image
Diagram of a screwdriver holding a tool, with an arrow indicating direction (no text or symbols present)
- Move the core cover from left side to right side. And then lift the upper door and place it on a padded surface to prevent it from scratching.
natural_image
Pure technical line drawing of a mechanical component with no text or symbols
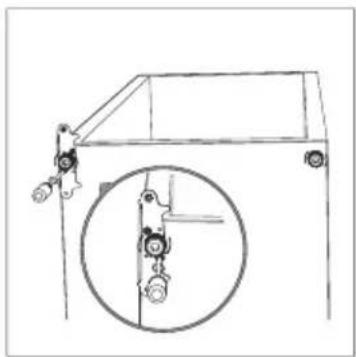
- Unscrew and remove the bottom hinge pin, turn the bracket over and replace it.
- Refit the bracket fitting the bottom hinge pin. Replace both adjustable feet.
natural_image
Technical line drawing of a vehicle suspension system with an inset circular detail showing mechanical components (no text or labels)
-
Place the upper door back on. Ensure the door is aligned horizontally and vertically so that the seals are closed on all sides before finally tightening the top hinge.
-
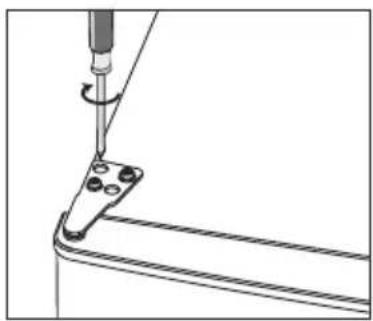
Insert the hinge bracket and screw it to the top of the unit.
-
Use a spanner to tighten it if necessary.
-
Put the hinge cover and the screw cover back.
-
With the doors closed, check that the doors are aligned horizontally and vertically and that the seal is closed on all sides before finally tightening the bottom hinge. Re-adjust the levelling feet as needed.
natural_image
Technical line drawing of a mechanical assembly with a tool and bracket (no text or symbols)
natural_image
Simple line drawing of a flat panel or shelf with two downward arrows indicating measurement or alignment (no text or symbols)
Installation
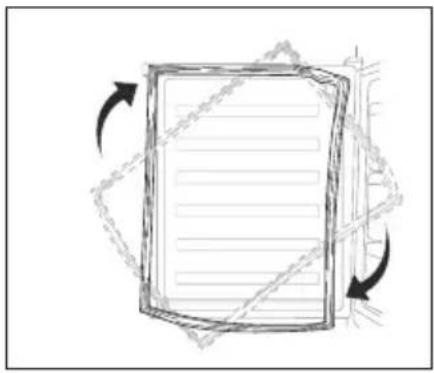
- Detach the Fridge and the Freezer door gaskets and then attach them after rotating.
natural_image
Abstract diagram showing a document frame with arrows indicating rotational movement (no text or symbols)
Space Requirement
- Keep enough space of door open.
- It is advisable to keep at least 10mm gap at two sides.
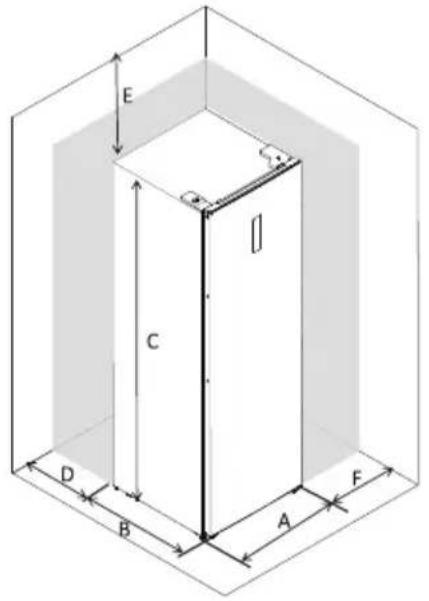
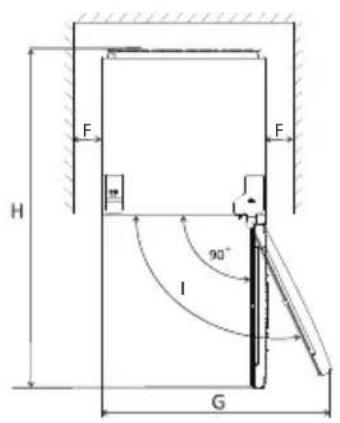
| A | 540 |
| B | 600 |
| C | 1705 |
| D | min=50 |
| E | min=50 |
| F | min=50 |
| G | 840 |
| H | 150 |
| I | 115° |
Note: this refrigerating appliance is not intended to be used as a built-in appliance.
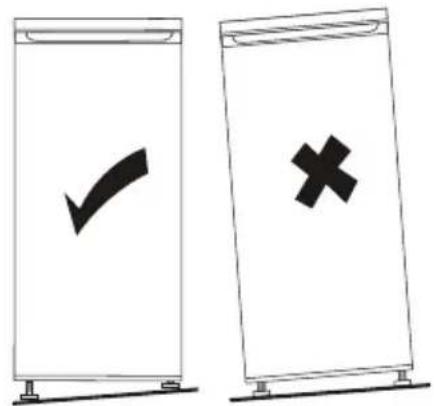
Levelling the unit
To do this adjust the two levelling feet at front of the unit.
If the unit is not level, the doors and magnetic seal alignments will not be covered properly.
First use
Cleaning the Interior
Before using the appliance for the first time, wash the interior and all internal accessories with lukewarm water and some neutral soap so as to remove the typical smell of a brand new product, then dry thoroughly.
Important! Do not use detergents or abrasive powders, as these will damage the finish.
Temperature and mode setting
- The temperature in the cabinet is controlled by the main control board, and the display board shows the current gear and mode. There are five gears to choose.
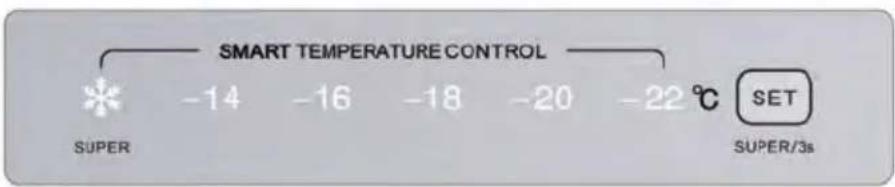
- User self setting mode: press the "setting" key, the LED gear indicator will flash, and the gear can be adjusted at this time. Each time you press this key, the temperature setting cycle will be -14 C, -16 C, -18 C, -20 C, and -22 C. After flashing for 5 seconds, it will be determined. Normally, -18 C is recommended.
- Super freezing mode: press and hold the "setting" key for 3S to enter the super freezing mode, and the "super" indicator light is on; Press the "setting" key for 3S again to exit the quick freezing mode, and the "super" indicator light goes out. Freezer will exit this mode automatically after 50h.
Dally use
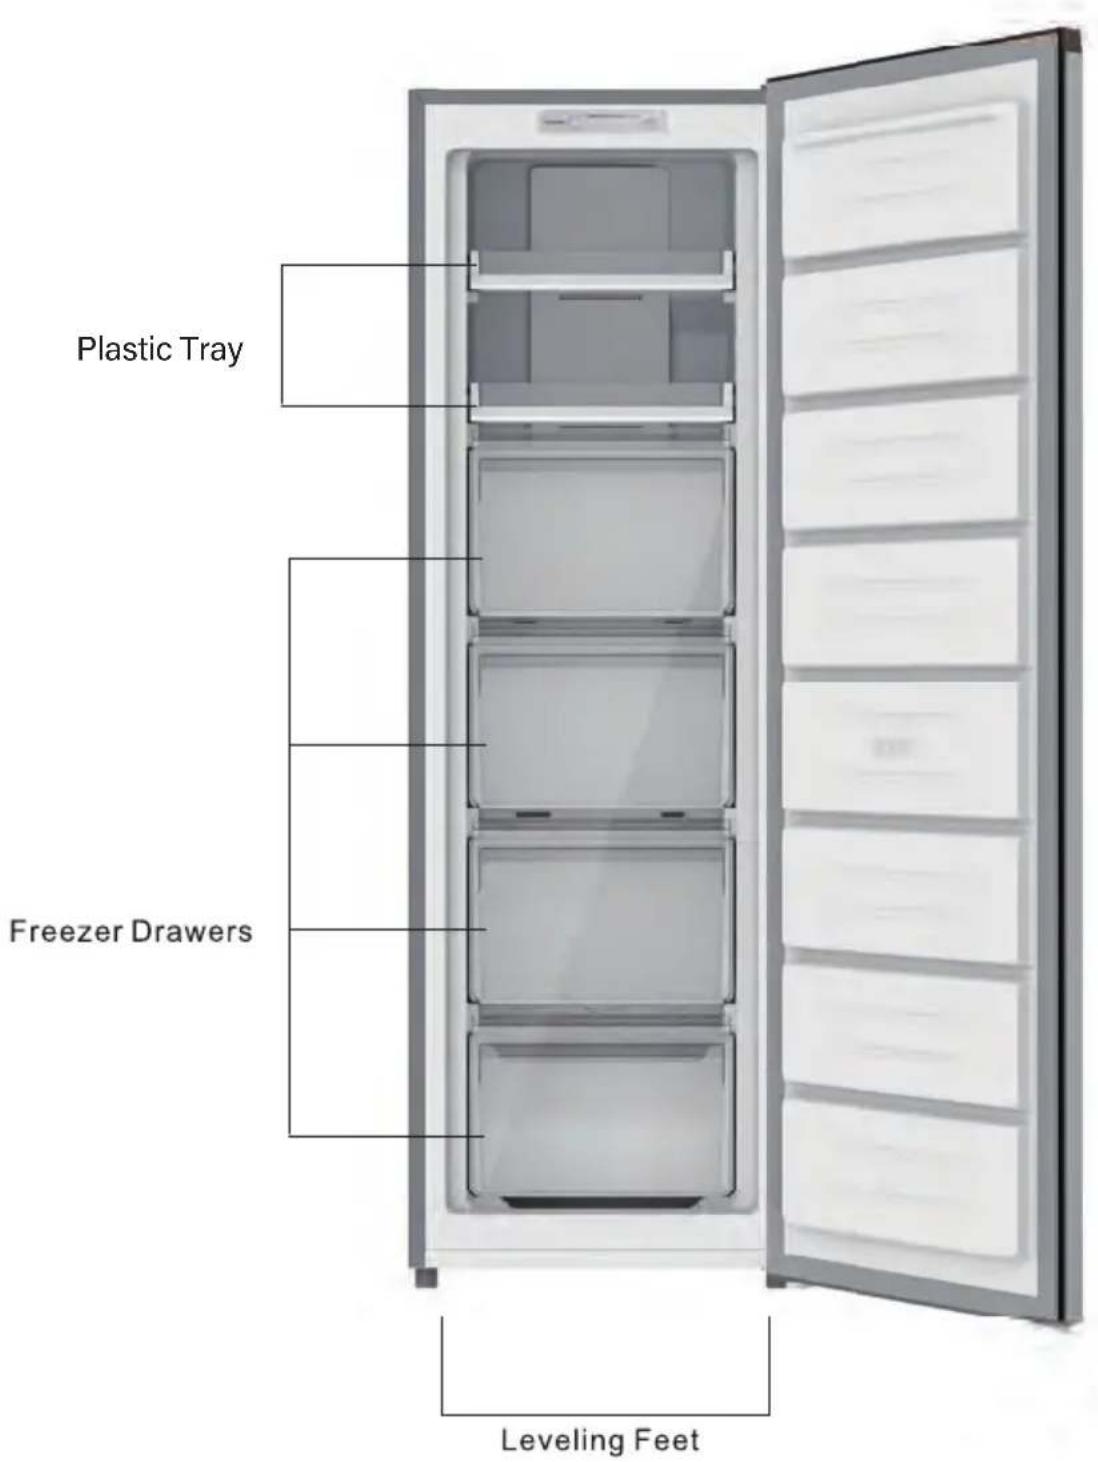
Freezing fresh food
- The freezer compartment is suitable for freezing fresh food and storing frozen and deep-frozen food for a long time.
- Place the fresh food to be frozen in the bottom compartment.
• The maximum amount of food that can be frozen in 24 hours is specified on the rating plate.
• The freezing process lasts 24 hours: during this period do not add other food to be frozen.
Storing frozen food
When first starting-up or after a period out of use, before putting the product in the compartment let the appliance run at least 2 hours on the higher settings.
Important! In the event of accidental defrosting, for example the power has been off for longer than the value shown in the technical characteristics chart under "rising time", the defrosted food must be consumed quickly or cooked immediately and then re-frozen (after cooked).
Temperature setting recommendation: -18°C is recommended.
Under recommended setting, the best storage time of freezer is no more than 1 month.
The best storage time may reduce under other settings.
Thawing
Deep-frozen or frozen food, prior to be used, can be thawed in the fridge compartment or at room temperature, depending on the time available for this operation.
Small pieces may even be cooked still frozen, directly from the freezer. In this case, cooking will take longer.
Ice-cube
This appliance may be equipped with one or more trays for the production of ice-cubes.
Helpful hints and tips
Hints for freezing
To help you make the most of the freezing process, here are some important hints:
• the maximum quantity of food which can be frozen in 24 hrs. is shown on the rating plate;
• the freezing process takes 24 hours. No further food to be frozen should be added during this period;
- only freeze top quality, fresh and thoroughly cleaned, foodstuffs;
- prepare food in small portions to enable it to be rapidly and completely frozen and to make it possible subsequently to thaw only the quantity required;
- wrap up the food in aluminium foil or polythene and make sure that the packages are airtight;
- do not allow fresh, unfrozen food to touch food which is already frozen, thus avoiding a rise in temperature of the latter;
- lean foods store better and longer than fatty ones; salt reduces the storage life of food;
- water ices, if consumed immediately after removal from the freezer compartment, can possibly cause the skin to be freeze burnt;
- it is advisable to show the freezing in date on each individual pack to enable you removal from the freezer compartment, can possibly cause the skin to be freeze burnt;
- it is advisable to show the freezing in date on each individual pack to enable you to keep tab of the storage time.
Hints for storage of frozen food
To obtain the best performance from this appliance, you should:
• make sure that the commercially frozen foodstuffs were adequately stored by the retailer;
- be sure that frozen foodstuffs are transferred from the food store to the freezer in the shortest possible time:
• not open the door frequently or leave it open longer than absolutely necessary.
• Once defrosted, food deteriorates rapidly and cannot be refrozen.
- Do not exceed the storage period indicated by the food manufacture.
Cleaning
For hygienic reasons the appliance interior, including interior accessories, should be cleaned regularly.

Caution! The appliance may not be connected to the mains during cleaning. Danger of electrical shock! Before cleaning switch the appliance off and remove the plug from the mains, or switch off or turn out the circuit breaker or fuse. Never clean the appliance with a steam cleaner. Moisture could accumulate in electrical components, danger of electrical shock! Hot vapors can lead to the damage of plastic parts. The appliance must be dry before it is placed back into service.
Important! Ethereal oils and organic solvents can attack plastic parts, e.g. lemon juice or the juice form orange peel, butyric acid, cleanser that contain acetic acid.
- Do not allow such substances to come into contact the appliance parts.
- Do not use any abrasive cleaners
- Remove the food from the freezer. Store them in a cool place, well covered.
- Switch the appliance off and remove the plug from the mains, or switch off or turn out the circuit breaker of fuse.
- Clean the appliance and the interior accessories with a cloth and lukewarm water. After cleaning wipe with fresh water and rub dry.
- Accumulation of dust at the condenser increases energy consumption. For this reason carefully clean the condenser at the back of the appliance once a year with a soft brush or a vacuum cleaner. ^1
• After everything is dry place appliance back into service.
Door open alarm
If the door is not closed for 90 seconds, an open door alarm will be triggered.
The alarm can be cancelled by pressing the SET key or closing the door.
High temperature alarm
If high internal temperature of the appliance is detected, a high temperature alarm will be triggered.
5 LEDs showing the settings will flash.
The alarm can be cancelled by pressing the SET key.
Troubleshooting

Caution! Before troubleshooting, disconnect the power supply. Only a qualified electrician of competent person must do the troubleshooting that is not in this manual.
Important! There are some sounds during normal use (compressor, refrigerant circulation).
| Problem | Possible cause | Solution |
| Appliance does not work | Mains plug is not plugged in or is loose | Insert mains plug. |
| Fuse has blown or is defective | Check fuse, replace if necessary. | |
| Socket is defective | Mains malfunctions are to be corrected by an electrician. | |
| Appliance freezes too much | Temperature is set too cold or the appliance runs at MAX setting. | Turn the temperature regulator to a warmer setting temporarily. |
| The food is not frozen enough. | Temperature is not properly adjusted. | Please look in the initial Temperature Setting section. |
| Door was open for an extended period. | Open the door only as long as necessary. | |
| A large quantity of warm food was placed in the appliance within the last 24 hours. | Turn the temperature regulation to a colder setting temporarily. | |
| The appliance is near a heat source. | Please look in the installation location section. | |
| Heavy build-up of frost on the door seal. | Door seal is not air-tight. | Carefully warm the leaking sections of the door seal with a hair dryer (on a cool setting). At the same time shape the warmed door seal by hand such that it sits correctly. |
| Unusual noises | Appliance is not level. | Re-adjust the feet. |
| The appliance is touching the wall or other objects. | Move the appliance slightly. | |
| A component, e.g. a pipe, on the rear of the appliance is touching another part of the appliance or the wall. | If necessary, carefully bend the component out of the way. |
If the malfunction shows again, contact the Service Center.
These data are necessary to help you quickly and correctly. Write the necessary data here, refer to the rating plate.
WARRANTY – EURO APPLIANCES
Warranty
Subject to the exclusions and limitations set out below we warrant to you that if you purchase Euro Appliances from one of our authorised retailers that they will not contain defects as a result of faulty manufacturer workmanship or materials.
This warranty subsists for the following periods: Euro Appliances warranty applies for a period of 36 months (3 Years) from the original date of purchase. Proof of purchase must be produced upon request to obtain benefit of this warranty.
Where any product is used for commercial purposes by the purchaser the warranty period is strictly 90 days (3 months) from the date of purchase. This warranty only applies to the original purchaser of the product and is not transferrable to any other person or party under any circumstances.
Exclusions and Limitations
No warranty is offered and Eurostyle Group Pty Ltd (Eurostyle) will not be liable for any damage caused by foreign objects (e.g. coins, underwire, nails, buttons or jewellery), any wearable component, factors beyond its control, unauthorised alteration, modification or substitution of any parts of the appliance, installation or use not in accordance with the instructions provided with the product, abnormal, unauthorised or negligent use.
Eurostyle will not be liable for any special, indirect, consequential or economic loss or damage or loss of profits (in contract or tort or arising from any other cause of action) suffered by you or any other person resulting from any act or omission by Eurostyle including, but not limited to, food loss or loss and damage as a result of non-operational appliances.
Total Liability
Eurostyle's total liability in respect of this warranty is limited, at its option to, the replacement of the goods or repair of the goods.
Making a Claim
If your Eurostyle product is defective and covered by this warranty please contact Eurostyle on 1800 440 335. You must provide proof of purchase to Eurostyle to make a claim under this warranty. Eurostyle may request that you return the defective product to Eurostyle or an Authorised Service Agent for assessment. Eurostyle is not liable for any costs, loss or damage incurred in connection with transportation or delivery of the product to Eurostyle or the cost of returning a new or repaired product to you. Eurostyle may organise for an Authorised Service Agent to assess the product at your nominated address. In such circumstances you are liable for the reasonable travel costs of the Authorised Service Agent to travel to your nominated address.
Statutory Guarantees
If you are a consumer for the purposes of the Australian Consumer Law this warranty is provided in addition to other rights you have at law. Our goods come with guarantees that cannot be excluded under the Australian Consumer Law. You are entitled to a replacement or refund for a major failure and for compensation for any other foreseeable loss or damage. You are also entitled to have the goods repaired or replaced if the goods fail to be of acceptable quality and the failure does not amount to a major failure.
Appliance Service
Should you consider that your appliance requires service, please contact euro appliances directly on 1800 440 335. In case of service or product enquiry, we suggest you record the following information shown on both the outside of the carton, and on the rating plate. Please complete below and keep in a safe place. Attach your original receipt to this form.
Model Name: Serial Number:
Model Number : ....
Note: Euro Appliances reserves the right to alter this at any time.
Pronto Service + Support: 1800 440 335
Email: service@eurostylegroup.com.au
HEAD OFFICE
65 Glynburn Road, Glynde SA 5070
Ph: 08 8165 1012
www.euroappliances.com.au