First Mate II HM 307XP+ - Kamera FLIR - Gratis bruksanvisning och manual
Hitta enhetens manual gratis First Mate II HM 307XP+ FLIR i PDF-format.

Användarfrågor om First Mate II HM 307XP+ FLIR
0 fråga om denna apparat. Svara på dem du kan eller ställ din egen.
Ställ en ny fråga om denna apparat
Ladda ner instruktionerna för din Kamera i PDF-format gratis! Hitta din manual First Mate II HM 307XP+ - FLIR och ta tillbaka ditt elektroniska enhet i hand. På denna sida publiceras alla dokument som behövs för att använda din enhet. First Mate II HM 307XP+ av märket FLIR.
BRUKSANVISNING First Mate II HM 307XP+ FLIR
HM-Series Quick Start Guide
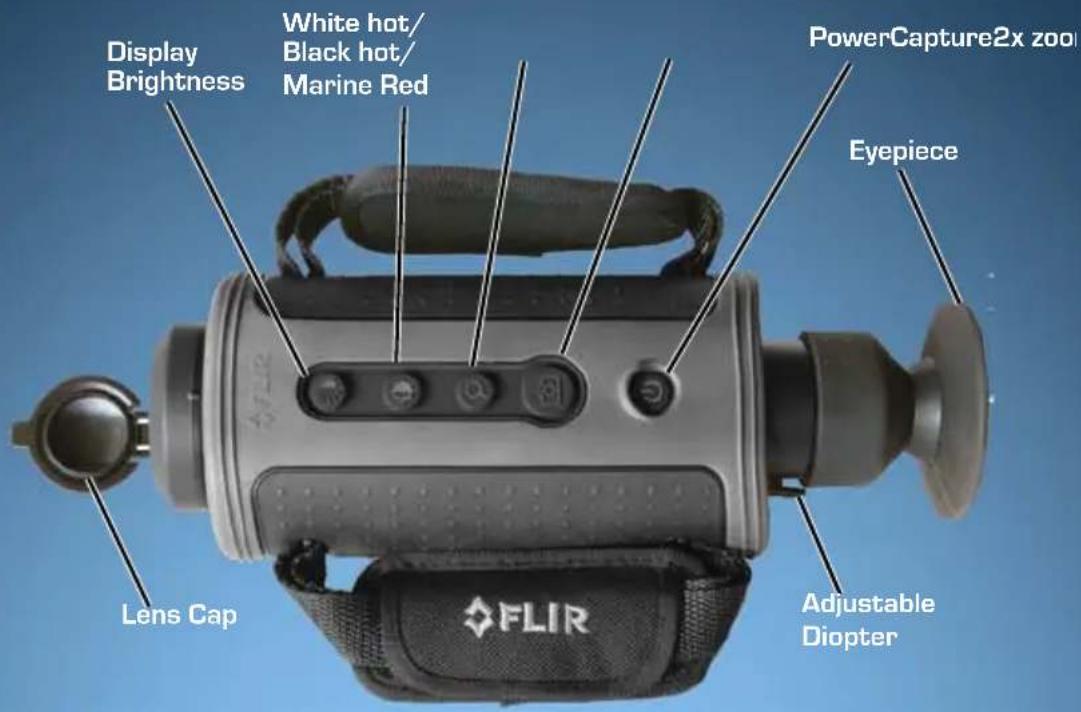
Power Button - The HM-Series camera has 3 power modes: On, Off, and Standby.
- On - Takes approximately 90 seconds (during bootup there is a fast-flashing red LED on the eyepiece display).
- Standby - After the camera is on, pressing the Power button will toggle the camera between On and Standby mode. (In Standby there is a slow-flashing red LED on the eyepiece display).
- Off - Push and hold the power button for 8 sec. to turn off.
Capture Button - Some models only; take snapshots (press and release) or video clips (press and hold) to the SD memory card.
Display Brightness - Toggle through five brightness settings.
White/Black Hot/Instalert - In White Hot mode, hotter items appear as white or light grey. In Black Hot, hotter items appear as black or dark grey. In Instalert, hotter items in a scene are highlighted in red.
2× Zoom - Some models only; causes the image to zoom to 2X.
Diopter Control – Adjust the diopter setting for the sharpest image in the viewfinder.
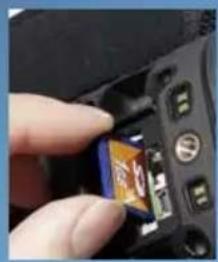
Installing the Batteries and SD Card
The batteries must be installed and charged before using your camera. Install your SD card.
- Remove the small SD card door. No tools are required.
- Install the SD card.
natural_image
Close-up of a hand holding a smartphone with an open screen, showing the screen area and control buttons (no readable text or symbols)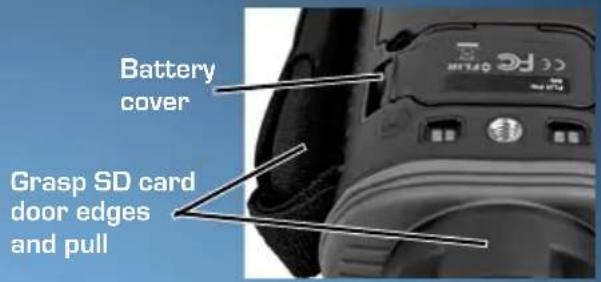
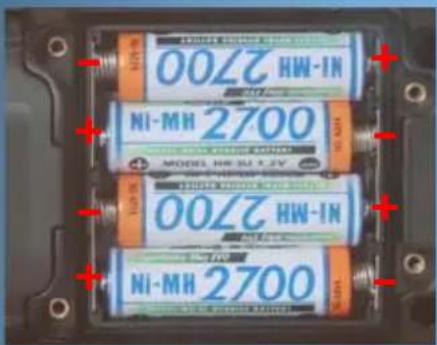
- Loosen the four captive screws securing the battery cover.
- Remove the battery cover by grasping the front edge where the SD card door was removed.
- Install the batteries as shown.
- Snap the SD card door back into place and re-install the battery cover—it only fits one way.
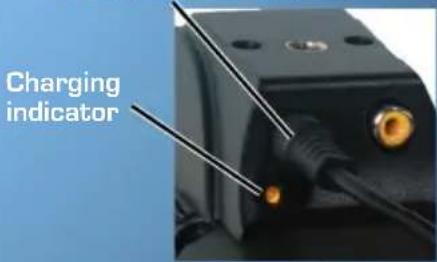
Charging the Camera
The batteries in the camera must be charged prior to their first use.
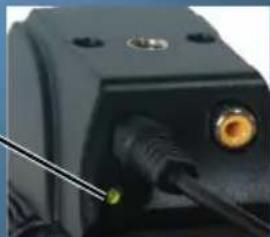
- Connect the Hot Shoe to your camera.
- Ensure that the plug is fully seated in the Hot Shoe.
When charging correctly, the charging indicator will be lit yellow and will blink green for one second within about 35 seconds.
The charging indicator will continue to blink at decreasing intervals until the batteries are fully charged.
When fully charged, the charging indicator will be lit solid green. The initial charge time is approximately 4 hours.
Plug from power adapter
Solid green