GCF20W - Köksfläkt GEMINI - Gratis bruksanvisning och manual
Hitta enhetens manual gratis GCF20W GEMINI i PDF-format.

Användarfrågor om GCF20W GEMINI
0 fråga om denna apparat. Svara på dem du kan eller ställ din egen.
Ställ en ny fråga om denna apparat
Ladda ner instruktionerna för din Köksfläkt i PDF-format gratis! Hitta din manual GCF20W - GEMINI och ta tillbaka ditt elektroniska enhet i hand. På denna sida publiceras alla dokument som behövs för att använda din enhet. GCF20W av märket GEMINI.
BRUKSANVISNING GCF20W GEMINI
gemini ITALY
12 INCH 3D AIR CIRCULATION ENERGY SAVING FAN
12寸多角度循環節能風扇 MODEL NO. / 型號: GCF20W 20W
SAFETY INSTRUCTION
Attention! When using electric tools, basic safety precautions should be followed to reduce the risk of fire, electric shock and personal injury, including the following,
Read all these instructions before operating this product and keep these instructions for easy reference.
- Read and save these instruction.
- Check the voltage indicated on the rating plate. This fan is designed for a 220-240V\~50/60Hz electric supply.
- Do not use electrical extension cord with this fan.
- Cleaning and user maintenance shall not be made by children without supervision.
- The appliance is only to be used with the power supply unit provided with the appliance.
- Incorrect operation and improper handling can lead to faults on the appliance and injuries to the user
- In the event of improper use or incorrect handling, no liability can be accepted for any damage that may occur.
- Do not operate the appliance if the mains cable or the mains plug show signs of damage, if the appliance has fallen on the floor or has been otherwise damaged. In such cases take the appliance to a specialist for checking and repair if necessary.
- Never remove the mains plug from the socket by pulling on the mains cable, or with wet hands.
- Ensure that the mains cable does not hang over sharp edges or allow it to become trapped.
- Keep the appliance away from damp, and protect from splashes.
- Keep the appliance and its cord out of reach of children less than 8 years.
- Use the appliance on a flat, dry and heat resistance surface.
- Do not operate the fan in an area where gasoline painting or such flammable liquids is used or stocked.
- Do not let hair, curtains, tablecloth, clothes or other objects next to the air outlet of the fan. They could be sucked into the fan, causing damage or injuries.
-
Do not use this fan in a damp area such as bathroom.
-
Do not use this fan on a window.
-
The fan must be unplugged when not in-use. To unplug the fan, all the switches must be on the position "OFF", and then the plug could be disconnected.
-
Use this fan only as it is describe in this manual.
-
Do not try to disassemble this fan and fix it by user, If you need maintenance, please send back the fan to our After-sales Service Center.
-
All components of this fan must not be replaced by the user.
WARNING:
-
This appliance can be used by children aged from 8 years and above and persons with reduced physical, sensory or mental capabilities or lack of experience and knowledge if they have been given supervision or instruction concerning use of the appliance in a safe way and understand the hazards involved.
-
Children shall not play with the appliance. Cleaning and user maintenance shall not be made by children without supervised.
NOTE:
There are no serviceable parts in this unit. Do not attempt to disassemble.
WARNING: Never use this fan with any solid-state speed control device. Doing so will create fire and/or shock hazards.
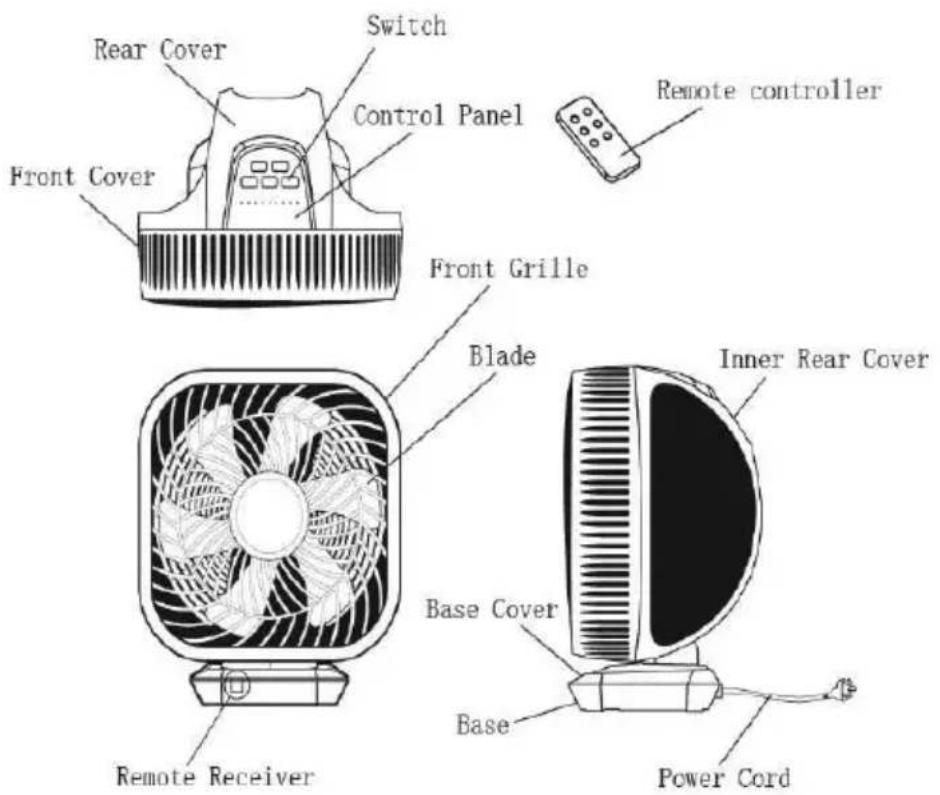
APPLIANCE COMPONENTS
CAUTION: THIS FAN MUST OPERATE IN THE UPRIGHT POSITION ONLY. DO NOT LAY FAN ON ITS SIDE OR IN ANY OTHER POSITION. DOING SO MAY CAUSE DAMAGE TO THE FAN AND/OR PERSONAL PROPERTY. DO NOT USE THIS FAN WITHOUT ITS BASE.
OPERATION

The fan can be operated by the control panel located on the top of the Fan or by the remote controller.
-
Place the Fan on a stable and flat surface. Plug the power cord into A.C. 220 - 240V electrical outlet.
-
POWER: Turn the Fan ON by pressing the POWER button. The default setting at MED speed and its indicate light will turn on.
-
SPEED: Adjust the Fan speed to the desired level : LOW-MED-HIGH by pressing SPEED button on control panel of fan. The selected speed indicate light will turn on (The 1^st time to turn on the fan, it's under default setting MED speed)
(CAUTION: The remote controller can adjust the speed in 8 speed levels, please refer the details in the section of "REMOTE CONTROLLER" on page 5.)
- MODE: Press the MODE button on control panel of fan to set the fan to Normal / Natural or Sleeping wind mode.
When the fan turn on at the 1^st time, the fan is on Normal wind mode as default, the indicate light on control panel will not ON;
Press the button once time, the Natural wind mode start working, the red light will be ON;
Press the button twice times, the Sleep wind mode start working, the blue light will be ON.
- SWING: Press the SWING button on control panel to allow the fan to oscillate the wind direction.
Press once time to set the Left and Right oscillation, the "L/R" indicate light is ON;
Press twice times to set the Up and Down oscillation, the "U/D" indicate light is ON;
Press three times to set both Left and right plus Up and Down oscillation together, the "L/R" & "U/D" indicate lights are both ON;
Press fourth times to stop the oscillation. All above two indicate lights are OFF.
- TIMER: Turn the fan on, press the TIMER button on control panel to set the desired auto power off time. The max hour is 8 hours, they are: 1-2-3-5-6-7-8. The selected timer indication light will turn ON (For example: 1Hour setting: the indicate light "1H" will be ON; 2Hours setting: the indicate light "2H" will be ON; 3Hours setting: the indicate light "1H" and "2H" will be ON; 5Hours
setting: the indicate light "5H" will be ON; 6Hours setting: the indicate light "1H" and "5H" will be ON; 7Hours setting: the indicate light "2H" and "5H" will be ON; 8Hours setting: the indicate light "1H" and "2H" and "5H" will be ON. There is no 4 hours setting in the fan.)
CAUTION : The SPEED, MODE and SWING setting of this fan with memory function, it will keep the last setting when you turn on the fan next time. But the TIMER setting without this memory function. All the memory function will be deleted in 10second after removing the plug from the power outlet
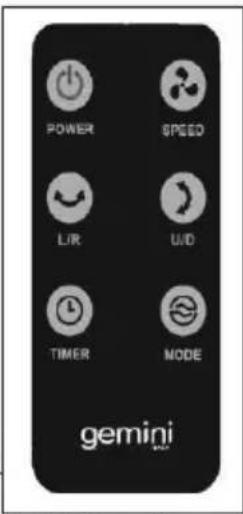
REMOTE CONTROLLER
-
Before using the remote controller, remove the plastic protection sheet from the battery.
● All the functions performed on the Remote Controller works Identically to the main control panel (except the SPEED and SWING functions) -
Speed: Adjust the Fan speed to the desired level : 1-2-3-4-5-6-7-8
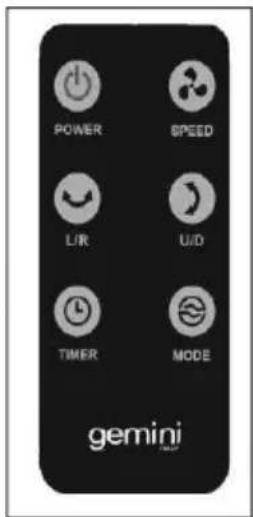
speed by pressing SPEED 📋 button. The selected speed indicate
light will turn ON ( For example: press speed button setting from 1-2-3-4 times, the "LOW" speed indicator on control panel will be ON, press speed button setting from 5-6-7 times, the "MED" speed indicator on control panel will be ON , press speed button setting from the 8 times, the "HIGH" speed indicator on control panel will be ON.)
- Press "L/R" to set left and right oscillation, the "L/R" indicate light is ON, press again to stop this function;
Press "U/D" to set up or down oscillation, the "U/D" indicate light is ON, press again to stop this function;
Press "L/R" & "U/D" to set left & right plus up & down oscillation together, the "L/R" & "U/D" indicate lights are ON, press them again to stop both function.
● The remote controller uses one battery of: CR2025.
CLEANING & MAINTENANCE
● Always disconnect the fan from the mains by switching it off and removing the plug from the power outlet before cleaning.
- Do not allow water to penetrate into the motor during cleaning.
● Disassemble 4 screws from the rear cover, then pull out the front cover for cleaning the blade and cover, do not disassemble and clean other parts of the fan by yourself.
It is advisable to use a neutral detergent and a soft cloth and to rub dry. Do not use solvents, acidic detergents, petrol or alcohol etc. to clean the plastic parts, as these could cause deformed or damaged.
● After clean the fan, fix the front cover to the rear cover by tighten the 4 screws back.
● Pack the fan in the original box and place it in a dry, well-ventilated place when it is not to be used for a long period of time.
CAUTION
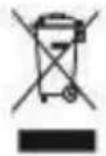
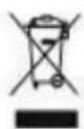
Recycling - European Directive 2012/19/EU
This marking indicates that this product should not be disposed with other household wastes. To prevent possible harm to the environment or human health from uncontrolled waste disposal, recycle it responsibly to promote the sustainable reuse of material resources. To return your used device, please use the return and collection systems or contact the retailer where the product was purchased. They can take this product for environmental safe recycling.
TECHNICAL DATA
Model No. GCF20W
Power supply: 220-240V\~
Frequency: 50/60Hz
Power consumption: 20W
Product Dimensions: 340(W) x 256(H) x 398(D)mm (with base)
Net Weight: 2.8kg
重要安全事項
注意:當使用此產品時,應遵循基本的安全預防措施,以減少火災,觸電和人身傷害的風險,包括以下內容:
首次操作本產品前,先閱讀所有說明書,並保存各有指示標誌:
- 閱讀並保存這些指示。
- 檢查銘牌上標示的電壓。本產品應在 220-240V\~50/60Hz 的電力供應中使用。
- 不要使用電源延長線。
- 兒童不得在沒有監督的情況下進行清潔和用戶維護。
- 本產品只可與該產品所設置的供電裝置一起使用。
- 不正確的操作和不當的操作可能會導致設備故障和用戶受傷。
- 如果使用不當或操作不當,任何可能發生的損壞都不承擔任何責任。
- 如電線或插頭有損壞痕跡,則不要操作該設備。在這種情況下,如有必要,可將本產品交給專業人員進行檢查和維修。
- 切勿拉扯電線或用濕手將電源插頭從插座上拔下。
- 確保電源線不懸掛在有鋒利邊緣的地方。
- 防止本產品受潮,本產品不能被水濺濕。
- 不要讓 8 歲以下的兒童接觸到設備及電源線。
- 該產品請在平坦、乾燥和燥熱的表面使用。
- 不要在有汽油、油漆或易燃液體的地方使用。
- 不要讓頭髮、窗簾、桌布、衣服或其他物品靠近風扇的出風口。他們有可能被吸進風扇而造成損傷或受傷。
- 不要在浴室等潮濕地方使用該產品。
- 不要在窗戶上用該產品。
- 風扇不使用時必須拔掉插頭。要拔掉風扇時,必須確保本產品處於“關閉”位置。
- 請按此手冊使用該產品。
-
不要試圖拆卸此產品進行維修,如果要維修,請將該產品送回我們的售後服務中心。
-
該產品所有部件不能隨意讓用戶自行替換。
警告:
8 歲以上的兒童、身體、感觀、智力比較弱、欠經驗和知識的人仕,在經過指導說明安全使用方法和知道可能的危險後,可以使用本機。兒童不可以把玩本產品,清潔和維修不可給兒童處理。
注意:
此產品沒有可移除部件。請不要自行拆卸。
警告:此產品切勿與任何固態速度控制裝置使用,以免造成火災和/或斷路危險。
部件名稱
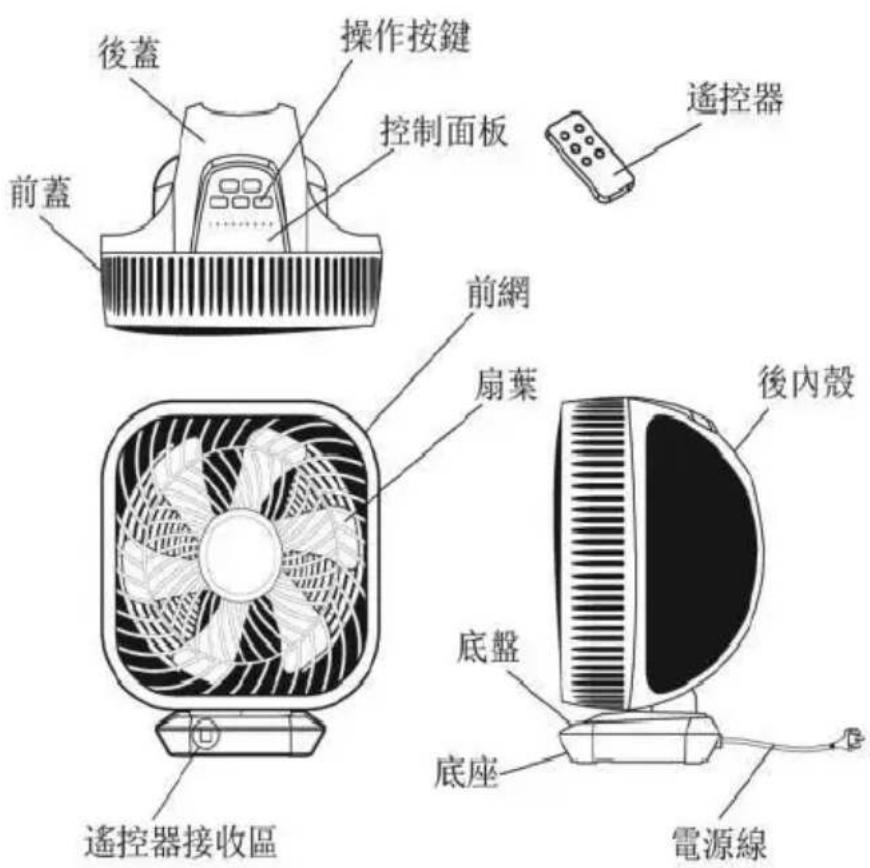
警告:此風扇必須只在垂直位置操作。不能側放此產品或傾倒擺放,這樣可能會對產品和或個人財產造成損害。不要在沒有底座的情況下使用。
使用方法

此風扇可以由位於風扇頂部的控制面板或由配備的遙控器操作。
- 把風扇放在一個穩定而平坦的表面上。將電源線插入 220-240V\~的電源插座上。
- 當插上電源,按下控制面板上開關按鈕,風速中檔指示燈“MED”會亮起來,是第一次開機的預設模式。
- 風速:按下控制面板上風速按鈕,來設定理想風檔。此產品配了 3 個可設風速檔位,分別是:低-中-高檔,設定檔位後,相應的指示燈會亮起來。
警告:遙控器按鈕與產品機身的控制面板上的按鈕操作不相同,遙控器供8段風力可按需要自行設定,詳細操作說明請參考“遙控器”第10頁部分。
- 風量模式:按下控制面板上模式按鈕,按需求可以將風扇設置為自然或睡眠風量模式。
第一次開機的設定風量模式為正常風量模式,此時控制面板上的風量模式燈不會亮起。
按第一次風量模式鍵,開啟自然風 NATURAL 模式,此時指示燈會亮紅色燈。
按第二次風量模式鍵,開啟睡眠風 SLEEP 模式,此時指示燈會亮藍色燈。
按第三次風量模式鍵,回復到正常風 NORMAL 模式,此時指示燈熄滅。
- 摇擺送風:按控制面板上 SWING 按钮,設定需要的風扇送風方向。
按一下 SWING 按键,左/右送風運作,在控制板面的“L/R”指示燈亮起; 按兩下 SWING 按鍵,上/下送風運作,在控制板面的“U/D”指示燈亮起;
按三下 SWING 按鍵,左/右及上/下送風同時運作,在控制板面的“L/R”和“U/D”指示燈同時亮起
按四下 SWING 按鍵,停止送風功能。
- 定時:在開機狀態下,按控制面板的定時器 按鈕設置所需自動關機的定時時間。最多可設定時間為 8 小時,分別可設定為:1-2-3-5-6-7-8 小時。設置後,相應指示燈亮起(例如:設置 1 小時,指示燈 “1H” 亮起;設置 2 小時,指示燈 “2H” 亮起;設置 3 小時,指示燈 “1H” 和 “2H” 亮起;設置 5 小時,指示燈 “5H” 亮起;設置 6 小時,指示燈 “1H” 和 “5H” 兩燈同時亮起;設置 7 小時,指示燈 “2H” 和 “5H” 兩燈同時亮起;設置 8 小時,指示燈 “1H”、“2H” 和 “5H” 三燈同時亮起)。此產品不供預設 4 小時後關機功能。
注意:此風扇設有記憶功能:風速、風量及送風三個設置帶有記憶功能,停止工作時的狀態,在下次開啟時會繼續上一次的設置狀態工作。但定時設置不帶有記憶功能,當電源線拔離插座10秒後,則所有設置記憶取消。
遥控器
- 在使用遙控器之前,從電池上拆下塑料保護片。
-
遙控器上執行的所有功能與機身控制面板上的操作基本一致,除了以下描述的風速功能和送風功能外。
-
風速:按下風速按鈕,可根據個人需求調節風速,遙控器可供調校8個風力:1-2-3-4-5-6-7-8段。控制面板上
的指示燈會相應亮起(例如:在遙控器按第1-2-3-4下的風速按鈕,指示燈“LOW”會亮起;再按第5-6-7下的風速按鈕,指示燈“MED”會亮起;再按第8下的風速按鈕,指示燈“HIGH”會亮起。)
- 搖擺送風:按遙控器上的“L/R”左/右或“U/D”上/下按鈕設置送風方向功能,機頂控制面板相應的指示燈會亮起。
按“L/R”按钮设置左右送風方向,這時“L/R”指示燈亮起,再按一下此按鈕停止此功能;
按“U/D”按钮设置上下送風方向,這時“U/D”指示燈亮起,再按一下此按鈕停止此功能;
按“L/R”和“U/D”按钮设置左右和上下同時啟動送風功能,這時“L/R”和“U/D”兩燈同時亮起,再按一下兩個鍵停止此兩種功能
- 此遙控器已包括一顆電池(型號:CR2025)
清潔與保養
- 清潔前必須先關掉本機並拔除電源插頭。
- 清潔時切勿將此機浸於水或其他液體中。
- 拆卸前蓋時請先使用螺絲刀卸下後蓋4顆螺絲,即可將前蓋取下清潔扇葉和網罩,但不能自行拆卸其他部位進行清洗及保養。
- 可使用濕布加入少許溫和的清潔劑擦淨本產品表面。切勿使用任何腐蝕性的物品洗刷本產品,因為可能因此損壞本產品的塑料部件。
- 清潔完畢後,將前蓋裝到產品上,使用螺絲刀重新裝上4顆螺絲。
如長時間不需要被使用風扇時,把風扇裝在原來的包裝里,保存在一個乾燥、通風良好的地方。
警告
回收標誌-歐洲指令 2012/19/EU
此標記表明,本產品不應與其他家庭廢物一起處置。為防止不受控制的廢物處置可能對環境或人類健康造成損害,對其進行負責任的回收,以促進物質資源的可持續再利用。若要退回您的舊設備,請使用返回和收集系統,或聯繫採購此產品的零售商。他們可以把這種產品用於環境安全回收。
產品規格
型號:GCF20W
電壓:220-240V\~
頻率:50/60Hz
功率:20W
產品尺寸:340(闊)×256(高)×398(深)毫米(連底座)
淨重重量:2.8 公斤
請記錄下列產品資料
- 型號
- 機身編號
• 經銷商名稱
• 購買日期
本產品不斷改進中,如功能有所更改,恕不另行通知,如有疑問,請與客戶服務中心聯絡,不便之處,敬請原諒。
說明書內容以英文版本為準
ToolBox Customer Service Centre 客戶服務中心:
4/F, DCH Building, 20 Kai Cheung Road, Kowloon Bay, Hong Kong 香港九龍灣啓祥道20號大昌行集團大廈4樓
Customer Service Hotline 客戶服務熱線:(852) 8210 8210
Service E-mail 電郵地址:8210service@gilman-group.com
Please register now at 請即上網登記:www Equilbox.hk
Website 網址:www.gilman-group.com
Gilman
since 1841
Proudly Serviced by:
a Gilman Group Company