
P8071R3F - Tvättmaskin LG - Gratis bruksanvisning och manual
Hitta enhetens manual gratis P8071R3F LG i PDF-format.


Användarfrågor om P8071R3F LG
0 fråga om denna apparat. Svara på dem du kan eller ställ din egen.
Ställ en ny fråga om denna apparat
Ladda ner instruktionerna för din Tvättmaskin i PDF-format gratis! Hitta din manual P8071R3F - LG och ta tillbaka ditt elektroniska enhet i hand. På denna sida publiceras alla dokument som behövs för att använda din enhet. P8071R3F av märket LG.
BRUKSANVISNING P8071R3F LG
OWNER'S MANUAL
WASHING MACHINE
Please read this manual carefully before operating your set and retain it for future reference
| P7251N1F | P7556R3F | P8037R3F | P8539R3S | P1515R3S |
| P7254N1F | P7555R3F | P8040R3S | P8540R3F | P8071R3F |
| P7255R3F | P7853R3S | P8237R3S | P8837R3S | P8072R3F |
| P7258N1F | P7857R3F | P8238R3F | P9032R3S | |
| P7555P3F | P8030R3F | P8239R3S | P9561R3S | |
| P7556N3F | P8036R3F | P8537R3S | P9562R3S |
CONTENTS / विषय-सूची
Page No.
IMPORTANT INSTRUCTIONS/महत्वपूर्ण निर्देश 3
SAFETY MEASURE/सुरक्षा उपाय 3
INSTALLATION/मशीन स्थापना 5
PARTS IDENTIFICATION/पुर्जों की पहचान 7
PREPARATION BEFORE WASHING/धुलाई से पहले की तैयारी 9
HOW TO WASH/धुलाई का तरीका 10
HOW TO RINSE/खंगालने (रिन्स) का तरीका 11
CARE AND MAINTENANCE/देखभाल और रखरखाव 13
TROUBLESHOOTING GUIDE/समस्या निवारण निर्देश 15
Disposal of your old appliance / अपने पुराने उपकरण का निपटान 15
SPECIFICATIONS/विशिष्ट विवरण 16
REFERENCE/संदर्भ 17
IMPORTANT INSTRUCTIONS / महत्वपूर्ण निर्देश
- Before operating machine read the Instruction manual carefully. मशीन चलाने से पहले निर्देश पुस्तिका को सावधानीपूर्वक पढ़ लें।
- Always keep the machine on the floor level. मशीन को हमेशा समतल सतह पर ही रखें ।
- During operation, machine should be kept perpendicular to the slope of the floor to avoid motion. मशीन चलाने के दौरान उसे फर्श के ढाल पर समकोण स्थिति में रखें ताकि वह हिले नहीं।
- Before operating properly earth the machine, to avoid electric shock. मशीन को चलाने से पहले उसे अच्छी प्रकार से 'अर्थ' कर देना चाहिए ताकि बिजली के झटके से बचा जा सके ।
- When not in use take the power cord out from the socket. जब मशीन इस्तेमाल न हो रही हो तो पावर कोर्ड को सॉकेट से बाहर निकाल देना चाहिए।
- During washing spinning & drain, check that drain hose is lowered. मशीन के वाशिंग स्पिनिंग और पानी बाहर निकलने के दौरान जाँच कर लें कि ड्रेन हौज नीचे है।
- Before putting clothes in the Wash Tub, check the pockets thoroughly for Coins, Keys and other objects. कपड़ों को वॉश टब में डालने से पहले जेबों की अच्छी तरह जाँच कर लें कि उनमें सिक्के, चाबियाँ या अन्य वस्तुएं तो नहीं हैं ।
- Transfer the clothes from Wash Tub to Spin Dryer Basket one by one. वॉश टब से कपड़े स्पिन ड्रायर बास्केट में एक-एक करके स्थानान्तरित करें ।
- In case you notice excessive vibration or abnormal noise during spinning, immediately open the Spin Dryer Cover and rearrange the laundry evenly. यदि आपको दिखाई दे कि स्पिनिंग के समय अत्यधिक कम्पन या असामान्य आवाज हो रहीं है तो तुरन्त ही स्पिन झायर कवर को खोल दें और दुबारा से कपड़ों को बराबर से सैट करें ।
- In case of any doubt contact the nearest service center or Dealer. यदि आपको कोई सन्देह है तो नजदीकी सर्विस सैन्टर या डीलर से सम्पर्क करें ।

: This is a warning sign specifying user's applications which might be dangerous. यह एक चेतावनी का संकेत है जिसमें उपयोगकर्ता की कार्यपद्धतियाँ जो खतरनाक हो सकती हैं, का विवरण दिया गया है।

: This is a sign specifying 'Strictly Forbidden' applications. यह एक संकेत है जिसमें 'सख्ती से वर्जित' कार्यपद्धतियों का विवरण दिया गया है।

WARNING

CAUTION
: Failure to comply with the instructions under this sign may result in major physical injuries or death.
इस संकेत के तहल निर्देशों के पालन करने में विफलता से प्रमुख शारीरिक घोट या मौत हो सकती है।
: Failure to comply with the instructions under this sign may result in minor physical injuries or damages to the product.
इस संकेत के तहत निर्देशों के पालन करने में विफलता से मामूली शारीरिक चोट या उत्पाद में नुकसान हो सकता है।
SAFETY MEASURE / सुरक्षा उपाय
Manufacturer is not responsible for accidents caused by the user as a result of not following the Instruction Manual.
अगर मशीन का इस्तेमाल निर्देश पुस्तिका में दिए गए निर्देशों के अनुसार न किया जाए तो उससे होने वाली दुर्घटना के लिए निर्माता जिम्मेदार नहीं होगा।
SAFETY MEASURE / सुरक्षा उपाय

WARNING / चेतावनी
In Operation
- Do not insert the hand inside the spin dryer basket while the machine is in operation. Do not let children climb on the machine or climb into the tub. Injury may occur.

natural_image
Simple line drawing of a beaker with a floating object inside, no text or symbols presentInstallation Area
● Avoid area exposed to snow, rain, or where humidity is high. It may cause electric shock.

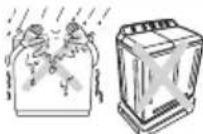
Machine to be used without Packing Base मर्शीन को बिना पैकिंग बेस के इस्तोमाल करें।
∅ चलाने में
- चलती मशीन में स्पिन ड्वायर बास्केट के भीतर हाथ न डालै। बच्चों को मशीन के ऊपर या टब में न चढ़ने दैं। इससे चोट लग सकती है।
मशीन रखने का स्थान
● मशीन ऐसी जगह न रखें जहांं बर्फ या वर्षा आती हो या नमी ज्यादा हो। इससे बिजली का झटका लग सकता है।
Switch Area
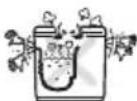
● Avoid watering on the switch area. It may cause electric shock or fire.


Electric Outlet
● Avoid connecting several electric devices to single outlet. It may cause fire.

स्विच का स्थान
- स्विच के आस-पास पानी न गिरने दें। इसरो बिजली का झटका लग सकता है या आग भी लग सकती हैं।
बिजली का प्लग लगाने का स्थान
- एक ही सांकेट में बिजली के कई उपकरण एक साथ न लगाएं। इससे आग लग सकती है।
Volatile Material
- Do not use volatile material such as Benzene, Gasoline, bug killer. Do not leave strong alkaline substance such as bleach inside the tub. Damage on plastic surface and rubber parts may occur.

Heat
- Avoid electric heater, candle light, cigarette light, bug smoker, etc. near the machine. It may ignite or deform plastic part

ज्वलनशील (वाष्पशील पदार्थ)
● बेन्जीन, गैसोलीन या कीटनाशक जैसे ज्वलनशील पदार्थाँं का उपयोग न करें। ब्लीच जैसे तेज क्षारीय पदार्थ टब में न छोड़े। इनसे प्लास्टिक की सतह और रबढ़ा वाले हिस्सों को नुकसान हो सकता है।
ताप
- मशीन के पास बिजली का हीटर, मोमबत्ती, जलती हुई सिंगरेट या कीड़े भगाने के लिए घुआ करने वाला उपकरण आदि न रखें। इससे चिगारी भड़क सकती है और प्लास्टिक के पुजों की आकृति भी बिंगड़ सकती है।
Power Cord
● Properly ground the washer. (Follow details in installation instructions).
- If the power supply cord is damaged, it must only be replaced by a repair shop appointed by the manufacturer because special purpose tools are required.
बिजली का तार
● मशीन को ठीक से अर्थ करें। (इन्सटॉलेशन के विस्तृत निर्देशों का अनुसरण करें)
- अगर मशीन से जुड़ा बिजली का तार (पावर कॉर्ड) खराब हो जाए तो निर्माता द्वारा नियुक्त दुकान से ही बदलवायें क्योंकि उसके लिए विशेष उपकरणों की आवश्यकता पड़ती है।
● Do not treat the power supply cord with your wet hand.
● बिजली के तार को गीले हाथ से न घुएं।

● Plug out the power supply cord, when cleaning or not using the washing machine for a long time.
● मशीनं को साफ करने से पहले या लम्बे समय तक इस्तेमाल न करने पर बिजली के तार को बाहर निकाल दें।

It may cause electric shock or fire / इससे विद्युत आघात या आग लग सकती है।

Hot Water
● Avoid using hot water over 50°C. It may deform plastic parts or cause malfunction.
Installation
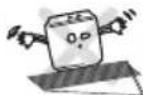
● Install the washing machine on a horizontal support. Otherwise, it may cause vibration and noise
गर्म पानी
- 50° से० से अधिक गर्म पानी का उपयोग न करें। इससे च्लास्टिक के हिस्त्सों का रूप बिगड़ सकता है या खराबी भी हो सकती है।
मशीन लगाना
● वाशिंग मशीन को समतल जगह पर रखें। अन्यथा उसमें कम्पन और शोर हो सकता है।
Drain Hose/ड़ेन हाँज
● The level of the drain should be slightly lower than the lowest part of the washing machine in order to ensure proper and complete drainage and to avoid falling of overflowing water on electrical parts.
निकास नली वाशिंग मशीन के सबसे निचले हिस्से से कुछ नीची होनी चाहिए ताकि पानी सहीं ठंग से पूरी तरह निकल सके और विद्युत भागों पर फालतू बहते हुए पानी को गिरने से रोका जा सके। It may cause electric shock.
इससे विद्युत आघात लग सकता है


natural_image
Simple line drawing of a mechanical setup with a cylinder and base, no text or symbols present.INSTALLATION / मशीन स्थापना
Connecting the earth wire (Only for models with two prong plug) / अर्थ का तार जोड़ना (केवल दो पिन के प्लग वाले माँडल के लिए)
● Install the earth wire to prevent short-circuit due to leaking current and electric shock.
अर्थ का तार अवश्य जोड़ दें ताकि करंट लीक होने पर शॉर्ट सर्किंट न हो और बिजली का झटका न लगे।
- It is attached at the back of the washer. Connect it to the metal water pipe. If the water pipe is made of plastic, it does not have the earth effect.
यह तार वॉशर सर्किट के पीछे लगा है। इसे पानी के धातु के पाइप से जोड़ दें। अगर पाइप प्लास्टिक का है तो अर्थ नहीं होगा।
● Never connect the earth wire to the gas pipe, lightning arrester, telephone connector etc. अर्थ के तार को गैस पाइप, लाइटनिंग अरेस्टर (तड़ित चालक) या टेलीफोन कनेक्टर से न जोडें।

Warning-the appliance with two-pronged plug must be grounded चेतावनी-दो पिन के प्लग वाले उपकरण की अर्थिंग अवश्य करनी च्राहिए।
Other earthing method / अर्थ करने के अन्य तरीके
- After connecting the earth wire to the earth copper plate, bury it at least 75 cm deep under the wet ground. अर्थ के तार को अर्थ की ताँबे की प्लेट से जोड़ने के बाद गीली जमीन में कम से कम 75 सें0मी0 नीचे गाङ्ड दें।

- Connect to the earthing-only outlet. सिंर्फ अर्थिंग वाले स्विच से जोड़ दैं।
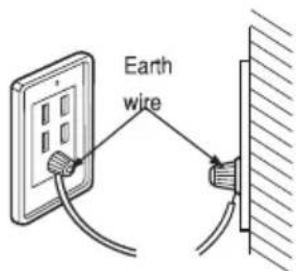
- If grounding methods described above are not possible, a separate circuit breaker should be employed and installed by a qualified electrician. यदि ऊरोक्त ग्राउन्डिंग तरीके संभव नहीं हैं तो एक अलग से सर्किट ब्रेकर योग्य इलैक्ट्रीशियन द्वारा लगवाना चाहिए।

Connecting the power plug / बिजली का प्लग लगाना
- Check if the voltage setting of the machine matches the outlet voltage.
जॉच लें कि वॉर्शिंग मशीन की वोल्टेज सेटिंग, सॉकेट की वोल्टेज के अनुरूप हो। - Insert the power plug into the outlet. पावर फ्लग को सॉकेट में लगा दें ।
- If AC outlet with ground terminal is used, grounding is not needed. If not, never forget earthing (earthing method above) अगर ग्राउंड टर्मिनल वाले ए सी आउटलेट का इस्तेमाल कर रहे हों तो अर्थिंग आवश्यक नहीं है। अगर ऐसा नहीं है तो अर्थिंग करना न भूलें। (ऊपर बताए गए तरीके के अनुसार)

INSTALLATION / मशीन स्थापना
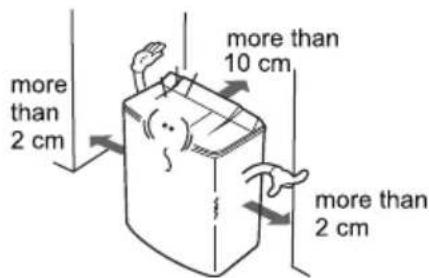
Installation area / मशीन लगाने का स्थान
- Select flat and firm floor. कोई टोस, समतल जगह चुन लै।
- Incorrect installation may cause severe noise and break down. गलत दंग से लगाने पर भारी कम्पन और खराबी हो सकती है ।

● The base openings must not be obstructed by carpeting when the washing machine is installed on a carpeted floor. अगर फर्श पर कालीन बिछा हो तो वाशिंग मशीन के नीचे का खुला हिस्सा कालीन से बंद न होने पाये।
● Maintain more than 10 cm gap between the side of drain hose and the wall. निकासी पाइप और दीवार के बीच कम से कम 10 सैं०मी० की दूरी रखें।
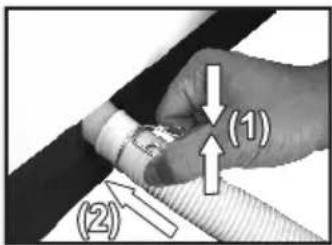
Drain Hose Installation / निकासी पाइप लगाना
- Press the clamp as shown in the direction (1). दिशा (1) में बताए गए तरीके से क्लैम्प को दबाएं।
- Push the hose towards the body of the washing machine as shown in the direction (2).
हौज को मशीन की बाँडी की ओर दबाएं, जैसा कि चित्र (2) में दर्शाया गया है।
● Release the Clamp. क्लैम्प को छोड़ दें ।
Notes / टिप्पणी :
● Be sure to re-route the drain hose so that it is not kinked or has sharp rods which will prevent proper drainage.
निकास नली को सीधा कर ले ताकि उसमें ऐंत्तन या तीखे मोड़ न रह जाएं। इनसे सही निकासी में रूकावट आ सकती है।
Use only new hose set provided with the machine.
हमेशा मशीन के साथ दी गई नई नली का ही उपयोग करें ।

natural_image
Illustration of a child peeking through a door while connected to a refrigerator (no text or symbols)
natural_image
Simple line drawing of a mechanical setup with a container and pipe, no text or symbols present.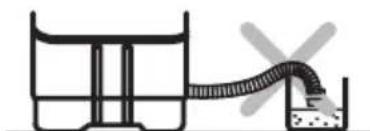
natural_image
Simple line drawing of a container with a pipe and liquid, no text or symbols presentPARTS IDENTIFICATION / पुर्जों की पहचान
Accessories\*/ अन्य उपकरण
Inlet Hose इनलेट पाइप
Safety Cover सेफटी कवर
Drain Hose द्रेन होंज
Snap Ring रैप रिंग
• Rotation Filter-C • रोटेशन किल्टर-C


- Accessories may be different according to the model.

(Please do not match this figure with model as it may be different from your model. These are schematic diagrams only.) (कृपया इस वित्र को अपने माँडल से न मिलायें क्यांकि यह आपके माँडल से मित्र हो सकता है। ये केवल रेखाचित्रा हैं।
Wash Timer / वॉश टाइमर
For Features and Specifications of your purchased model, please refer Table "A" on page 16.
अपने खरीदे गये मॉडल की विशेषताएं और विशिष्ट विवरण के लिए कृपया पृष्ठ 16 पर दी गई तालिका "A" देखें।

L Wash Timer
The wash timer can be used for SOAK, WASH and RINSE operations. Following combinations can be selected/वॉश टाइमर को सोक, वॉश और रिन्स क्रियाओं के लिए भी इस्तेमाल किया जा सकता है। इसके लिए निम्नलिखित संयोग या संसर्ग चुने जा सकते है।
a) Soak + Wash : Select the desired soak time by setting the timer between 15\~40 min. Then total wash time will be selected soak time + 15 min. of wash time / सोक + वॉश : टाइमर को 15\~40 मिनट के मध्य सैट करके इच्छित सोक टाइम को चुनें। इससे कुल वॉश टाइम निर्धारित हो जायेगा - सोक टाइम + वॉश टाइम की 15 मिनट |
b) Wash/Rinse : Any Wash/Rinse time 1\~15 min. can be selected by setting the timer between 1\~15 min. / वॉश / रिन्स : टाइमर को 1\~15 मिनाट के मध्य सैट करके कोई भी वॉश / रिन्स टाइम 1\~15 मिनाट के मध्य निर्घारित किया जा सकता है।
Washing will take place for the set period, then machine stops automatically / निर्धारिति अवधि के लिए धुलाई चालू हो जायेगी और फिर मशीन स्वतः ही बन्द हो जायेगी ।
c) In Soak option, machine operates for 1.5 min. & remains off for 5 min. This cycle continues for selected soak time / एच्छिक सोक में, मशीन 1.5 मिनट चलती है और 5 मिनट बन्द्र रहती है। यह क्रम निर्धारित सोक टाइम तक चालू रहता है।
★ Soak Function
Soaking is provided for better cleaning of clothes as detergent water goes to inner pores of clothes resulting dirt removal in better way.
सांक सुविधा कपड़ों की उत्तम सफाई के लिए दी गई है क्योंकि डिटर्जेट का पानी कपड़ों के आन्तरिक छिद्रों में प्रविष्ट होकर गन्दगी को अच्छी तरह बाहर निकाल देता है।
PARTS IDENTIFICATION / पुर्जों की पहचान
Control Panel / कन्ट्रोल पैनल
Fig. 1
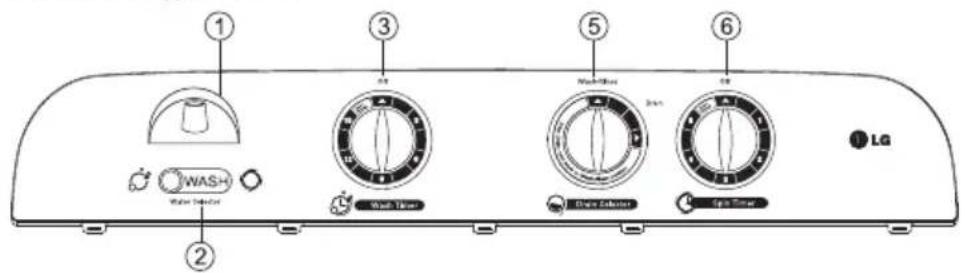
Fig. 2

Fig. 3

For Features and Specifications of your purchased model, please refer Table "A" on page 16.
अपने खरीदे गये मॉडल की विशेषताएं और विशिष्ट विवरण के लिए कृपया पृष्ठ 16 पर दी गई तालिका "A" देखें।
Description / विवरण :
1. Water Supply Inlet
Connect here with the inlet hose from the water tap to feed water to the tub.
2. Water Selector
Select "WASH" to supply water for washing and rinsing and "SPIN" for spin shower rinse.
3. Wash Timer
Select the desired time for soaking, washing or rinsing. For Wash Timer please refer Table "A" on page 16 for your purchased model.
4. Wash Selector
Set the Selector to "GENTLE", "NORMAL", "STRONG" according to kinds and quantity of the laundry. (Not available in P7251N1F/P7254N1F/P7258N1F)
5. Drain Selector
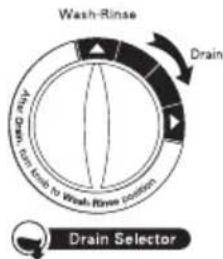
Select "WASH RINSE" for washing and rinsing, and "DRAIN" to drain the water from the tub.
6. Spin Timer
Select the desired time for spinning. Don't rotate the knob more than prescribed limit.
1. जल आपूर्ति का इनलेट
टब में पानी भरने के लिए पानी की नली को इनलेट हॉँज से जोड़े।
2. वॉटर सलेक्टर
धुलाई या खंगालने के लिए पानी भरने से पहले "वॉंश" और रिपन शॉंकर रिन्स के लिए "स्पिन" पर करें।
3. वौश टाइमर
सॉकिंग, पुलाई या खंगालने के लिए अपेक्षित समय सैट करें । आपके खरीदे गये मॉँडल के वॉंश टाइमर के लिए कृपया पृष्ठ 16 पर दी गई तालिका "A" देखें ।
4. वाँश सलेक्टर
कपड़ों की किस्म और मात्रा के अनुसार सलेक्टर नोब को (जैन्टिल, नार्मल या स्ट्रांग पर रखें। (P7251N1F/P7254N1F/P7258N1F में उपलब्ध नहीं है)
5. ड्रेन सलेक्टर
टब का पानी निकालने के लिए नोब "ट्रेन" और घुलाई तथा खंगालने के लिए "बॉश.रिन्स" पर रखॉ।
6. स्थिन टाइमर
निचोड़ने (स्पिर्निंग के लिए अपेक्षित समय सलेक्ट करें। नॉंब को उससे आगे न घुमाएं।
(Please do not match this figure with model as it may be different from your model. These are schematic diagrams only.)
(कृपया इस चित्र को अपने माँडल से न मिलायें क्योंकि यह आपके माँडल से भिन्न हो सकता है। ये केवल रेखाचित्र हैं।
PREPARATION BEFORE WASHING / धुलाई से पहले की तैयारी
Preparation / तैयारी
■ Connect the water supply hose to the water supply inlet.
पानी के पाइप को बॉटर सप्लाई इनलेट से जोड दें ।
■ Set the water selector lever to "WASH" for washing and rinsing to "SPIN" for interim spin rinse.
"वॉश" सलेक्टर लीवर को धुलाई और खंगालने के लिए "WASH" पर और स्पिन रिन्स के लिए "SPIN" पर रखें।
● Note : The water Selector lever should not be placed near the center (as shown in Fig. A otherwise water flows to the wash and spin tub simultaneously).
वाटर सलेक्टर लीवर को बीचोंबीच न रखें (जैसा चित्र ए में दर्शाया गया है) अन्यथा पानी वॉश और स्पिन टब दोनों में एक साथ भरेगा।

natural_image
Line drawing of a washing machine with control panel and power outlet (no text or symbols)
(Fig. A)
■ Use new inlet hose available with machine/
■ मशीन के साथ दी गई नई नली का उपयोग करें ।
■ Connect the power cord to the electrical outlet.
बिजली के तार को सॉकेट में लगा दें।
■ Drain Hose / झेन होज (निकास नली)
● Always keep the level of drain hose slightly lower than the lowest part of the washing machine
● निकास नली हमेशा वाशिंग मशीन के साबरे निचले हिस्सो रो कुछ नीची होनी चाहिए |
- For your convenience hang up the wash cover on the right side of the washing machine tub when not in use. आपकी सुविधा के लिए वॉश कवर को मशीन के दार्यी तरफ लटका लें, जब वह प्रयोग में न हो।
Before washing / धुलाई से पहले
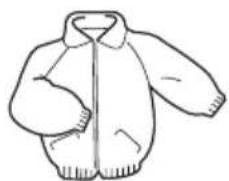
1 Check the washing instructions labels on the clothing to be washed. कपड़ों पर लगे धुलाई निर्देश लेबल अच्छी तरह पढ़ लें।
natural_image
Line drawing of a jacket with collar and front pockets (no text or symbols)2 Don't forget to remove any objects from the pockets of the clothing. Object left in the pockets will damage the clothing or washing machine (especially cause clogging of the drain hose).
कपड़ों की जेबें खाली करना न भूलें। उनमें पड़ी चीजें वाशिंग मर्शीन या कपड़ों को विकृत कर देगी। (खासकर निकासी पाइप में रुकावट हो सकती है)।

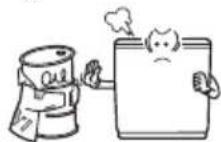
3 Start washing after separating an oiled or dyed laundry.
तेल अथवा रंगे हुए कपड़ों को अलग छाँटने के बाद धुलाई शुरू करें ।
HOW TO WASH / धुलाई का तरीका
1 Set the drain selector to "Wash - Rinse" position. ड़ेन सलेक्टर को"Wash - Rinse" स्थिति में रखें ।

DRAIN SELECTOR ड़न सलेक्टर
2 Set the water selector to "WASH". बॉटर सलेक्टर को "WASH" पर रखें ।

WATER SELECTOR
बॉटर सलेक्टर
3 Open the water tap and fill water in the wash tub about halfway to the desired water level.
नल खोलकर वॉश टब में निर्घारित स्तर से करीब आधा पानी भर लें ।

natural_image
Line drawing of a showerhead with shower spray and water spray, no text or symbols presentHOW TO WASH / धुलाई का तरीका
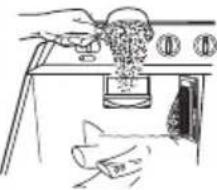
4 Put the appropriate amount of detergent and the laundry into the wash tub. And add water to the desired water level. अब वांश टब में निर्शित मात्रा में डिटजैंट और कपड़े डाल दें। पानी को निर्धारित स्तर तक भर लें।

For model without detergent box
- Put the appropriate amount of detergent into detergent box and the laundry into the wash tub. And add water to the desired water level which you want.
उचित 'मात्रा में डिटर्जैट को डिटर्जैट बाक्सा मे डाले एवं वांछित स्तर तक पानी भर लैं ।
natural_image
Illustration of a hand using a tool to press or clean a surface, with control buttons and a device (no text or symbols visible)For model with detergent box
- For degergent & water level refer to Tables for Reference on page 17. / डिटजैट एवं जल स्तर के लिए पृष्ठ 17 पर संदर्भ के लिए दी गई तालिका देखे।
5 Select the wash selector to "Gentle", "Normal", "Strong" according to kinds and quantity of the laundry. वॉश सलेक्टर को कपड़ों की किस्म और मात्रा के हिसाब से "Gentle", "Normal" या "Strong" पर रखें।
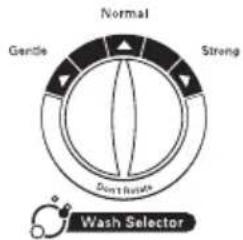
- For Features and Specifications of your purchased model, please refer Table "A" on page 16. अपने खरीदे गये माँडल की विशेषताए और विशिष्ट विवरण के लिए कृपया पृष्ठ 16 पर दी गई तालिका "A" देखें।
6 Set the desired wash time. अब धुलाई का समय सेट कर लें।


- Refer to TABLES for REFERENCE on page 17 for information on how to select the appropriate washing time. घुलाई का सही समय तय करने की जानकारी के लिए पृष्ठ 17 पर संदर्भ के लिए दी गई तालिका देखे।
- For Features and Specifications of your purchased model, please refer Table "A" on page 16. अपने खरीदे गये मॉडल की विशेषताएँ और विशिष्ट विवरण के लिए कृपया पृष्ठ 16 पर दी गई तालिका "A" देखें।
7 When washing is finished, select the drain selector to "Drain" position and drain the water out. धुलाई के बाद "Drain Selector" को "Drain" पर कर दें और पानी निकाल दें।
HOW TO RINSE / खंगालने (रिन्स) का तरीका
Continuous water supply rinse / चलते पानी में कपड़े खंगालना (रिन्स)
■ The course is to rinse while feeding water continuously / इस तरीके में कपड़े चलते पानी में खंगाले जाते हैं।
1 Set the drain selector to "Wash - Rinse" position. ड़ेन सलेक्टर को स्थिति में रखें।

2 Put the laundry into the wash tub and open the water tap. बॉश टब में घुले हुए कपड़े भरकर नल खोल दें।
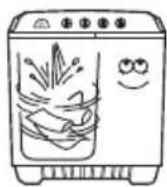
3 Set the rinse time with the wash timer and feed water continuously. पानी चलता रहने दें और वॉश टाइमर से समय निश्चित कर दें।

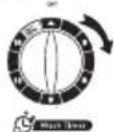
For Features and Specifications of your purchased model, please refer Table 'A' on page 16. अपने खरोदे गये मॉड्ल की विशेषताएं और विशिष्ट विवरण के लिए कृपया पूच 16 पर दी गई तालिका "A" देखें।
HOW TO SPIN / स्पिन का तरीका
- Put the laundry evenly into the spin dryer basket. कपड़ों को बराबर फैलाकर स्पिन झायर बारकेट में भर दें।
- Put the laundry down lightly. कपडों को धीरे से नीचे द्वायें।
- Place the safety cover horizontally on the top of the laundry. उस पर सेफटी कवर को समतल रख दें।
- Close the spin dryer cover. स्थिन झायर का ढक्कन ढक दें।
- Set the spin timer according to the following table. निम्नलिखित तालिका के अनुसार स्पिन टाइमर से समय तय कर दें।

SPIN TIME GUIDE / स्पिन समय तालिका\*
| Type of clothing / कपड़ों के प्रकार | Spin Time / स्पिन समय |
| Thin fabrics (synthetic fabrics, mixed fabrics) Sweaters / बारीक कपड़े (सिन्थेटिक, मिश्रित धागे वाले) स्वेटर | 1 minute / मिनट |
| Silk (synthetic fabrics) / सिल्क (सिन्थेटिक धागे वाले) | 1~3 minutes / मिनट |
| Cotton underwear / सूती अंडरवीयर | 3~5 minutes / मिनट |
| Sheets, towels / चादरें, तौलिए | 5~10 minutes / मिनट ** |
- Do not drain the water out of the wash tub while the spin dryer basket is in operation. Otherwise the spin motor could be damaged.
स्पिन झायर बास्केट के प्रयोग के समय वॉश टब के पानी को न निकालें, अन्यथा स्पिन मोटर के खराब होने की सभावना है।
- If the spin dryer basket is off-balance and vibrates excessively, stop the spinning, rearrange the clothes evenly, and then resume spinning. अगर स्पिन झायर बारकेट का संतुलन ठीक न हो और वो जोर से हिलती हो तो स्पिनिंग रोक दें। कपड़ों को बराबर फैलाकर दोबारा शूरू करें।
- If the spinning fail to stop when the spin dryer cover is opened, the brake is out of order. Immediately stop using the machine and request repair service. अगर स्पिन ड्वायर कवर का ढक्कन खुलने पर बास्केट का घूमना बंद न हो तो इसका अर्थ है कि ब्रेक खराब है। मशीन का इस्तेमाल तुरंत बंद कर दें और मैकॉनिक बुलाएं।
IMPORTANT INSTRUCTION : For woollen clothes, spin for 1 min. only for clothes protection. महत्वपूर्ण निर्देश : ऊनी कपड़ों की सुरक्षा के लिए स्पिर्जिंग 1 मिनट तक ही करें।
** 10 min. Spin Timer available with selected models only. For Spin Timer please refer table "A" on page - 16 for your purchased model.
10 मिन्ट स्पिन टाईमर केवल चूनिदा मॉडल्स में ही उपलब्ध है। आपके खरीदे गये मॉडल के स्पिन टाइमर के लिए कृपया पृष्ठ 16 पर दी गई तालिका "A" देखें।
AFTER FINISHING WASH / धुलाई पूरी होने के बाद
- Remove the laundry from the spin dryer basket and close the spin dryer cover / कपड़ो को स्पिन झायर बास्केट से निकालकर उसका दक्कन बंद कर दें। 2. If there is water in the wash tub, set the drain selector to "DRAIN" in order to drain it out. / अगर वौश टब में पानी हो तो उसे निकालने के लिए झेन सलेक्टर "ड्रेन" पर कर दें। 3. Disconnect the power cord from the electrical outlet. / बिज्ली का तार सॉकेट में से निकाल दें। 4. Clean the washing machine. (Refer to CARE AND MAINTENANCE on page 13\~14).18-चॉशिंग मशीन साफ कर दें। (इसके लिए पृष्च पर देखभाल निर्देश पढ़े)
HOW TO RINSE / खंगालने (रिन्स) का तरीका
Interim spin rinse / थोड़ा स्पिन रिन्स (रिन्स से थोड़ा खंगालना)
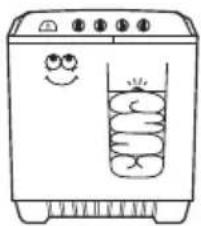
Interim spin rinse prior to regular rinsing will remove sudsy water from the laundry and improve rinsing efficiency. पूरी तरह खंगालने से पहले कपड़ों को थोड़ा स्पिन रिन्स करने से साबुन का पानी निकल जाएगा और उन्हें बेहतर ढंग से खंगाला जा सकेगा।
1 After washing
● Put the laundry into the spin dryer basket.
- Place the safety cover horizontally on the laundry.
घुलाई के बाद
- कपड़ों को स्पिन झायर बास्केट
में डाल दें ।
- सेफटी कवर को उन पर
समतल रख्व दें।
natural_image
Simple line drawing of a washing machine with a smiling face and water-filled chambers (no text or symbols)2 Set the water selector to "SPIN" & open the tap.
वॉटर सलेक्टर को "SPIN" पर करके नल को खोल दें ।

WATER SELECTOR
बॉटर सलेक्टर
3 Supply water for about 1 minute. Adjust the water flow to prevent overflow from the wash tub.
लगभग 1 मिनट तक पानी चलाएं।
वाश टब से पानी के निकलने को
रोकने के लिए जल प्रवाह को
व्यवस्थित करें।
4 Turn off the water supply, close the safety cover-2 and spin dryer cover.
पानी की सप्लाई बन्द करके सेफ्टी कवर-2 और स्पिन ड्रायर कवर ढक दें।

5 Set the desired spin time with the spin timer स्पिन टाइमर से समय तय कर दें ।
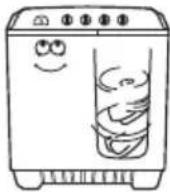
6 After spinning
● Put the laundry into the wash tub and rinse
स्पिनिंग के बाद
● कपड़ों को फिर वॉश टब में डाल कर खंगाल लें।

CARE AND MAINTENANCE / देखभाल और रखरखाव
● Be sure to disconnect the power cord from the electric outlet before starting care and maintenance. मशीन की देखभाल और सफाई करने से पहले बिजली का तार सॉकेट से निकाल लें।
Lint Filter ^* / लिंट फिल्टर ^*
1

- Pull out lint filter in the shown direction. लिंट फिल्टर को दिखाई गई दिशा में बाहर खीचे।
2

- Turn the net over and rinse in water जाली के शीतरी भाग को बाहर की ओर पल्टें और पानी के साथ घोकर साफ करें।
3

- Fit the filter to its original position. Press the filter until you hear a click sound.
फिल्टर को उसाकी वास्तविक जगह पर लगाएं। फिल्टर के मूँह को तब तक दबाएं जब तक किलक की आवाज न सुनाई दै।
Magic Filter\*/ मैजिक फिल्टर\*
1
Pull out the Magic Filter from the tub in the direction as shown in figure. चित्र में दर्शाई गई दिशा में टब से मैजिक फिल्टर को खीचें।

3
Pull out the inner filter in the direction shown in figure. चित्र में दर्शाई गई दिशा में आन्तारिक फिल्टर को खीचें।

5
Rinse the filter with water. फिल्टर को पानी में रगड़े।

2
Open the back cover of the filter in the direction as shown in figure. चित्र में दर्शाई गई दिशा में फिल्टर के पिछले कवर को खोले।

4
Remove lint. लिन्ट को हटाएं।

6
Place the filter to the original location. Push the filter until a click sound is heard. किल्टर को उसकी मूल स्थिति में लगाए। फिल्टर को तब तक दवाए जब तक किल्क की आवाज सुनाई न दें।

Overflow filter & Rotation filter-C\*/ ओवर फ्लो फिल्टर व रोटेशन फिल्टर-सी\*
1
- Lift up the area Ⓐ of the overflow filter. ओवर पलो फिल्टर के Ⓐहित्से को ऊपर उठायें - Take out the rotation filter-C by pulling in direction shown. दिखाई गई दिशा में खौंचकर रोटेशन फिल्टर-सी को निकाल लें।

2
- Pull the overflow filter forward from the wash tub in the direction of the arrow. ओवर फ्लो फिल्टर को तीर की दिशा में वॉश टब से आगे खौंच लें।

3
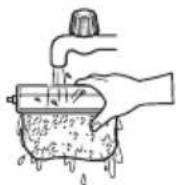
- Turn the net over and rinse in water. जाली को पलट कर पानी से धो लें।
4
- Use a brush or your hand to remove all of the lints which has adhered to the overflow filter. ओवर फ्लो फिल्टर में फैंसी सारी गंदगी को ब्रश या हाथ से निकाल दें ।

5
- Insert the overflow filter back into the wash tub. ओवर फ्लो फिल्टर को वापस वॉश टब में लगा दें।

6
- Insert the rotation filter-C back into the overflow filter. रोटेशन फिल्टर-सी को वापस ओवर फ्लो फिल्टर में लगा दें ।

- If only rotation filter-C need washing, proceed the process 1 > 3 > 6 on the upper figure. अगर सिफ्रे रोटेशन फिल्टर-सी को घौना हो तो 1 > 3 > 6 की प्रक्रिया अपनाएं।
For Features and Specifications of your purchased model, please refer Table "A" on page 16. अपने खरीदे गये मॉडल की विशेषताएं और विशिष्ट विकरण के लिए कृपया पृष्ठ 16 पर दी गई तालिका "A" देखें।
Washing machine / वाशिंग मशीन
■ If the washing machine itself becomes dirty / अगर वॉशिंग मशीन गंदी हो जाए।
● The washing machine can be cleaned with a mild liquid detergent. Never use abrasive cleaner or chemicals such as benzene or thinner to clean the washing machine, because these materials will damage both the painted surfaces and the plastic parts.
वॉर्शिंग मशीन को हल्के तरल डिर्जेट से साफ किया जा सकता है। वॉर्शिंग मशीन साफ करने के लिए अपघर्षक कलीनर या बैन्जीन या थिनर जैसे रसायनों का प्रयोग कभी न करें क्योंकि इनसे चीजों से पेंट की हुई सतह और प्लास्टिक पुर्जों को क्षति पहूँच सकती है।
Pulsator / पल्सेटर
If a button or some other object gets caught in the pulsator / अगर पल्सेटर में बटन या कुछ और चीज फॉस जाए।
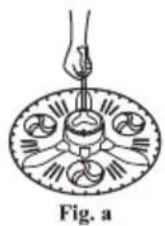
- Take out the pulsator cap with "-" type screw driver. (Fig. a) पल्सेटर का ढक्कन "-" टाइप पेंचकस से उता लै।
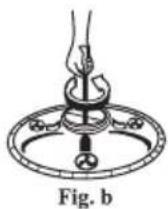
- Use a screwdriver to unscrew the screw in the center of the pulsator and lift the pulsator straight up in order to remove the button or other object. (Fig.b) पल्सेटर के बीघ का पेंच खोल लैं और पल्सेटर को सीध ऊपर उठाकर बटन या कुछ और चीज निकाल लैं।
- Place the pulsator at its original position and tighten the screw. पल्सेटर को उसकी मूल स्थिति में लगाकर पेंच कस दें।
- Place the pulsator cap at its original position. पल्सेटर की कैप को उसकी मूल स्थिति में लगा दें।
Detergent Box\*/ डिटर्जेंट बॉक्स\*
- Pull the detergent box as shown in picture 1. डिटर्जेट बॉक्स को चित्र 1 मे दिखाई गई दिशा के अनुसार खीचे।
- Press at side of detergent box and rotate downwards following the arrow direction in picture 2. डिटर्जेट बॉक्स को साईड से दबाएं और चित्र 2 मे दिखाए गये तीर की दिशा के अनुसार नीचे की और घुमाएं।
- Clean detergent box with water.
डिटर्जैट बॉक्स को पानी से साफ करें।
* For Features and Specifications of your purchased model, please refer Table "A" on page 16. अपने खरीदे गये मॉडल की विशेषताएं और विशिष्ट विवरण के लिए कृपया पृष्ठ 16 पर दी गई तालिका "A" देखें।

Spin dryer basket / स्पिन झायर बास्केट
If clothing becomes trapped between the spin dryer basket and the spin tub. अगर स्पिन झायर बास्केट और स्पिन टब के बीच कपड़े फैस जाएं –
- Take hold of the front of the safety cover-1 सेफटी कवर-1 के सामने का हिस्ता पकड़े।
- Firmly hold the tub by the other hand. दूसरे हाथ से टब को पकड़ कर रखें।
- Pull the safety cover-1 upward. सेफ्टी कवर-1 को ऊपर खींघ लैं।
- Remove the clothing. कपड़ा निकाल लैं।
- Close the safety cover-1, pressing down on it so that it fits securely into the spin tub. सेपटी कवर-1 को नीचे दबाकर बंद कर दें। यह स्पिन टब पर पूरी तरह फिट हो जाना चाहिए।

natural_image
Cartoon illustration of a washing machine with arms and legs, showing facial expressions (no text or symbols)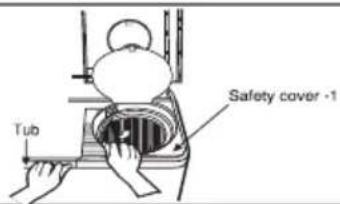
TROUBLESHOOTING GUIDE / समस्या निवारण निर्देश
Before Requesting Service / सेवा अनुरोध करने से पहले
| Troubles / गड़बड़ी | Checking points / जौच करें |
| Motor does not operateमोटर नहीं चलती | Is the power cord firmly plugged in? / क्या बिजली का तार ठीक से लगा है?Is a household fuse blown? / घर का पयूज तो नहीं उड़ा है?Is the spin timer turned to a suitable point except "OFF"? (Spin Motor) क्या स्पिन टाइमर "ऑफ" के सिवा उचित स्थान तक घूमा है?(स्पिन मोटर)Is the wash timer set to a suitable position except "OFF"? (wash motor) क्या वॉश टाइमर "ऑफ" के सिवा उचित स्थान की और है?(वॉश मोटर) |
| Spin dryer basket does not operateस्पिन झ्रायर बास्केट नहीं चलती | Is the spin dryer cover closed completely? / क्या स्पिन झ्रायर का ढव्ककन पूरा बंद है?Are laundry (socks, etc.) falling out of the spin dryer basket and clinging to the axle? क्या कपड़े (सॉक्स इत्यादि) स्पिन झ्रायर बास्केट से बाहर गिर कर धुरी से तो नहीं विपट रहे। |
| Water does not enter washerवॉशर में पानी नहीं आता | Is the water tap opened up? / क्या पानी का नल खुला है?Is the water tap frozen? / क्या नल का पानी जम गया है? |
| No drainingपानी नहीं निकलता | Is the drain hose laid down? / क्या निकास नली नीचे रखी हुई है?Is the drain hose twisted? / क्या निकास नली मुडी हुई है? |
Disposal of your old appliance (as per e-waste Rules)
- When this crossed out wheeled bin symbol is depicted on the product and its instruction manualt means the product is covered by the e-waste Management and Handling Rules, 2011 and are meant to be recycled, dismantled, refurbished or disposed off.
2. Dos
a. The product is required to be handed over only to the authorized recycler for disposal.
b. Keep the product in isolated area, after it becomes non-functional/un-repairable so as to prevent its accidental breakage.
Don't
a. The product should not be opened by the user himself/herself, but only by authorized service personnel.
b. The product is not meant for re-sale to any unauthorized agencies/scrap dealer/kaban/walah.
c. The product is not meant for mixing into household waste stream.
d. Do not keep any replaced spare part(s) from the product in exposed area.
- Any disposal through unauthorized agencies/person will attract action under Environment (Protection) Act 1986.
- To locate a nearest collection centre or call for pick-up (limited area only) for disposal of this appliance, please contact Toll Free No. 1800-180-9999 for details. All collection centre and pick up facilities are done by third parties with LG Electronics India Pvt. Ltd. merely as a facilitator.
For more detailed information, please visit: http://www.lg.com/in
अपने पुराने उपकरण का निपटान (ई-अपशिष्ट नियम के अनुसार)
- जब इस काटे गये पहिये वाले बिन का चिंटन किसी उपकरण और इसके निर्देश पूर्सितका के साथ संलग्न होता हैं तो इसका मतलब है कि इसे "ई—अपशिष्ट" (प्रबंधन और हधालन) नियम 2011के अन्तर्गत सामिलित किया गया है। और इसे नवीनीकरण, विघटन और निपटाना के लिए बनाया गया है।
2. करें-
क- उपकरण को सिर्फ अधिकृत पून: नवीनीकरणकर्ता को ही निप्टारण करने हेतु हस्तांतरित करे।
ख— जब उपकरण कार्यारत न हो इसे अलग क्षेत्र में रखे ताकि उपकरण से होने वाली दुर्घटनाओ से बचा जा सके।
ना करें-
क- इस उपकरण को स्वयं/खुद नही खोलना चाहिए, उपकरण को केवल अधिकृत अधिकारी के द्वारा ही खोला जाना चाहिए।
ख-इस उपकरण को पुन: बिक्री के लिए किसी भी कबाड़ीवाला/भंगार वाला/अनाधिकृत संस्था को न दें।
ग- इस उपकरण को किसी घरेलू अनशिष्ट सामान के साथ मिलाकर न रखें।
घ- उपकरण के बदले हुए या आतारिक पूर्जों को खुले क्षेत्र में न रखें।
- यदि किसी अनाधिकृत विभाग या व्यक्ति के द्वारा निप्टारण किया जाता है तो यह पर्यावरण (सुरक्षा) घारा 1986 के अन्तर्गत झाता है।
- उपरोक्त पदार्थों के विप्तटारन के लिए नजदीकी विप्तटारन संस्थान (संकीर्ण क्षेत्र) में कॉल करे। अधिक जानकाती के लिए हमारे टोल फ्री नब्बर 1800—180—9999 पर कॉल करे। सभी संग्रहण केन्द्र व पिक-अप की सुक्षिए़ि किंसी धर्ड-पाटी जो "LG Electronics India Pvt. Ltd" को अपनी सेवाए प्रदान कर रही हो, से करवाए।
अधिक जानकारी के लिए देखें वेबसाइट : http://www.lg.com/in

natural_image
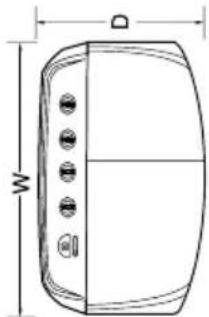
Technical line drawing of a cylindrical device with height dimension labeled H (no text or symbols on the diagram itself)TABLE "A"
| Model | Features | Guide for Washing(page-17) | Specification | |||||||||||
| Wash Timer(Min.) | Spin Timer(Min.) | Soak Timer(Y/N) | Control Panel(Page-8) | Wash Selector(Y/N) | Filter(Qty) | DT Box(Y/N) | Buzzer(Y/N) | Power Source | Water Level(Ltr.) | Water Pressure | Dimensions(WxDxH)(mm) | Weight(net)(kg) | ||
| P7251N1F | 15 5 N | Fig(1) N | No N N | TABLE 1. | On Specification Label | 60 | Less Than 100kPa ( 1kgf/cm^2 ) | 795 x 470 x 975 | 24 | |||||
| P7258N1F | 15 5 N Fig | 1) N No N | N N | |||||||||||
| P7254N1F | 15 5 N Fig | 1) N No N | Y | |||||||||||
| P7255R3F | 15 5 N Fig | 2) Y Lint Filter (1) Y | Y | TABLE 2.(A) | ||||||||||
| P7556N3F | 15 5 N Fig | 2) Y No Y | N | |||||||||||
| P7556R3F | 15 5 N Fig | 2) Y Lint Filter (1) Y | N | |||||||||||
| P7555P3F | 15 5 N Fig | 2) Y Lint Filter (1) Y | Y | |||||||||||
| P7555R3F | 15 5 N Fig | 2) Y Lint Filter (1) Y | Y | |||||||||||
| P7857R3F | 15 5 N Fig | 2) Y Lint Filter (1) Y | Y | |||||||||||
| P7853R3S | 15+25 10 Y | Fig(3) Y | Lint Filter (1) Y Y | TABLE 3.(A) | ||||||||||
| P8030R3FP8071R3F | 15 5 N | Fig(2) | Y Lint Filter (2) N N | TABLE 2.(B) | 66 | 805 x 478 x 975 | 26 | |||||||
| P8036R3F | 15 5 N Fig | 2) Y Lint | Filter (2) N Y | |||||||||||
| P8037R3FP8072R3F | 15 5 N | Fig(2) Y Lint Filter (2) N Y | ||||||||||||
| P8238R3F | 15 5 N Fig | 2) Y Magc | Filter (2) N Y | 27 | ||||||||||
| P8540R3F | 15 5 N Fig | 2) Y Magc | Filter (2) N Y | 26 | ||||||||||
| P8040R3S | 15+25 5 Y | Fig(3) Y | Magic Filter (2) N Y | TABLE 3.(B) | ||||||||||
| P8237R3S | 15+25 10 Y | Fig(3) Y | Magic Filter (2) N Y | 27 | ||||||||||
| P8239R3S | 15+25 10 Y | Fig(3) Y | Magic Filter (2) N Y | |||||||||||
| P8537R3S | 15+25 10 Y | Fig(3) Y | Magic Filter (2) N Y | |||||||||||
| P8539R3S | 15+25 10 Y | Fig(3) Y | Magic Filter (2) N Y | |||||||||||
| P8837R3S | 15+25 10 Y | Fig(3) Y | Magic Filter (2) N Y | |||||||||||
| P9032R3S | 15+25 10 Y | Fig(3) Y | Magic Filter (2) N Y | 84 | 880 x530 x1025 | 32 | ||||||||
| P9561R3S | 15+25 5 Y | Fig(3) Y | Lint Filter (1) N Y | TABLE 3.(C) | 35 | |||||||||
| P9562R3S | 15+25 5 Y | Fig(3) Y | Lint Filter (1) N Y | |||||||||||
| P1515R3S | 5+25 5 Y | Fig(3) Y | Lint Filter (1) N Y | |||||||||||
REFERENCE / संदर्भ
WEIGHT GUIDE FOR CLOTHES / कपड़ों के वजन के निर्देश
| Type of clothing / कपड़े | Type of fabric / घागे की किरम | Weight per piece / वजन प्रति नग |
| Under shirt / बनियान | Cotton / सूली | 150 g / ग्राम |
| Handkerchief / रुभाल | Cotton / सूली | 50 g / ग्राम |
| Bath towel / नहाने का तौलिया | Cotton / सूली | 300 g / ग्राम |
| Shirt / शर्ट | Mixed fabric / मिश्रित | 200 g / ग्राम |
| Socks (1 pair) / मोजे (1 जोडी) | Mixed fabric / मिश्रित | 50 g / ग्राम |
| Pajama (shirt and pants) / पाजागा (शर्ट द पैट) | Cotton / सूली | 500 g / ग्राम |
| Winter undershirt / सर्दियों की बनियान | Woollen / ऊनी | 600 g / ग्राम |
| Workclothes / मजदूरी काम के कपड़े | Mixed fabric / मिश्रित | 800 g / ग्राम |
| Blouse / ब्लाउज | Mixed fabric / मिश्रित | 200 g / ग्राम |
TABLE 1. GUIDE FOR WASHING / धुलाई के निर्देश
| Type of fabricकपड़े की किस्म | Wash timeबॉश टाइम | Amount of laundryकपड़ी की मात्रा | Water levelजल स्तर | Amount of waterपानी की मात्रा | Amount of detergentडिटर्जेट की मात्रा |
| Woollen, Knits / कनी, बुनाई वाले | 5 min./मिनट | 0.5~1.2 kg | H | 60 Ltr. | 45~49 g |
| Synthetics, Silk, Woolen, Knitsसिन्धेटिक, रेशमी, कनी, बुनाई वाले | 2~5 min.2-5 मिनट | 0.5~4.0 kg | L | 50 Ltr. | 45~49 g |
| 4.0~4.6 kg | M | 55 Ltr. | 51~55 g | ||
| 4.6~6.2 Kg | H | 60 Ltr. | 56~60 g | ||
| Cotton, Linenसूती चादरे आदि | 5~10 min.5-10 मिनट | 0.5~4.0 kg | L | 50 Ltr. | 45~49 g |
| 4.0~4.6 kg | M | 55 Ltr. | 51~55 g | ||
| 4.6~6.2 Kg | H | 60 Ltr. | 56~60 g | ||
| Very soiled cotton and linenबहुत गंदे सूती और चादरे आदि | 10~15 min.10~15 मिनट | 0.5~4.0 kg | L | 50 Ltr. | 45~49 g |
| 4.0~4.6 kg | M | 55 Ltr. | 51~55 g | ||
| 4.6~6.2 Kg | H | 60 Ltr. | 56~60 g |
TABLE 2. GUIDE FOR WASHING (WITHOUT SOAK / धुलाई के निर्देश (सोक रहित)
| Type of fabricकपड़े की किस्म | Wash Selector वौश सलेक्टर | Wash time वौश टाइन | Amount of laundry (kg)कपड़ों की मात्रा | Water level | Amount of water (Ltr)पानी की मात्रा | Amount of detergent (gms)डिटर्जेट की मात्रा | ||||||
| A | B | C | A | B | C | A | B | C | ||||
| Woollen, Knts / उनी, बुनाई वाले | Gentle/जेनिल | ~5 min./निं | 0.5-1.2 | 0.5-1.5 | 0.5-2.0 | H | 60 | 66 | 84 | 60-70 | 65-70 | 70-85 |
| Synthetcs, Sik सिथ्टिक, सिल्क | GENTLE जेनिल | 8-12 min. 8-12 मि० | - | - | 4.0-5.0 | S | - | - | 51 | - | - | 55-60 |
| 0.5-4.0 | 4.0-5.0 | 5.0-6.0 | L | 50 | 54 | 61 | 45-51 | 51-55 | 61-70 | |||
| 4.0-4.6 | 5.0-6.5 | 6.0-7.0 | M | 55 | 60 | 73 | 54-58 | 56-60 | 70-75 | |||
| 4.6-6.6 6.5 | -7.5 | 7.0-8.5 | H | 60 | 66 | 84 | 60-70 | 65-70 | 75-85 | |||
| Cotton, Linen सूती भादरे आदि | NORMAL नौर्वत | 12-15 min. 12-15 मि० | - | - | 4.0-5.0 | S | - | - | 51 | - | - | 55-60 |
| 0.5-4.0 | 4.0-5.0 | 5.0-6.0 | L | 50 | 54 | 61 | 45-51 | 51-55 | 61-70 | |||
| 4.0 - 4.6 | 5.0-6.5 | 6.0-7.0 | M | 55 | 60 | 73 | 54-58 | 56-60 | 70-75 | |||
| 4.6-6.6 6.5 | -7.5 | 7.0-8.5 | H | 60 | 66 | 84 | 60-70 | 65-70 | 75 - 85 | |||
| Very soiled cotton and linen बढ़ा गंदे सूती और चादरे आदि | STRONG स्ट्राण | 12-15 min. 12-15 मि० | - | - | 4.0-5.0 | S | - | - | 51 | - | - | 55-60 |
| 0.5-4.0 | 4.0-5.0 | 5.0-6.0 | L | 50 | 54 | 61 | 45-51 | 51- 55 | 61-70 | |||
| 4.0-4.6 | 5.0-6.5 | 6.0-7.0 | M | 55 | 60 | 73 | 54-58 | 56-60 | 70-75 | |||
| 4.6-6.6 6.5 | -7.5 | 7.0-8.5 | H | 50 | 66 | 84 | 60-70 | 65-70 | 75-85 | |||
TABLE 3. GUIDE FOR WASHING (WITH SOAK / धुलाई के निर्देश (सोक सहित)
| Type of fabric कपर्डे की किरम | Wash Selector वांश सलेकटर | Wash time वांश टाद्म | Amount of laundry (kg) कपर्डों की मात्रा | Water level जल सार | Amount of water (Ltr) पानी की मात्रा | Amount of detergent (gms) बिटजेंट की मात्रा | ||||||
| A | B | C | A | B | C | A | B | C | ||||
| Woolen, Knits / कनी, बुनई वाले | Gentia/पौर्टित | -5 min./मि० | 0.5-1.2 | 0.5-1.5 | 0.5-2.0 | H | 60 | 66 | 84 | 0-70 | 5-70 | 70-85 |
| Synthetics, Silk सिप्प्तेटिक, शिल्क | Soak-Gerde सोक-वोपित | 15+15 min. 15+15 मि० | 0.5-4.0 | 4.0-5.0 | 5.0-6.0 | L | 50 | 54 | 61 | 45-51 | 56-60 | 61-70 |
| 4.0-4.6 | 5.0-6.5 | 6.0-7.0 | M | 55 | 60 | 73 | 54-58 | 61-70 | 70-75 | |||
| 4.6-6.8 6.5-9.0 | 7.0-9.5 | H | 60 | 66 | 84 | 60-70 | 70-75 | 75-95 | ||||
| Soiled/गन्दे | Soak-Normal सोक-नोर्गल | 20+15 min. 20+15 मि० | - | - | 4.0-5.0 | S | - | - | 51 | - | - | 55-60 |
| Cotton, Linen सूली चादरे जादि | 0.5-4.0 | 4.0-5.0 | 5.0-6.0 | L | 50 | 54 | 61 | 45-51 | 56-60 | 61-70 | ||
| 4.0-4.6 | 5.0-6.5 | 6.0-7.0 | M | 55 | 60 | 73 | 54-58 | 70-75 | ||||
| 4.6-6.8 6.5-9.0 | 7.0-9.5 | H | 60 | 66 | 84 | 60-70 | 70-75 | 75-95 | ||||
| Worst Condition/ बहद गन्दे | Soak-Strong सोक-च्छ्राण | 25+15 min. 25+15 मि० | - | - | 4.0-5.0 | S | - | - | 51 | - | - | 55-60 |
| Very soiled cotton and linen बहुत गन्दे सूली और चादरे आदि | 0.5-4.0 | 4.0-5.0 | 5.0-6.0 | L | 50 | 54 | 61 | 45-51 | 56-60 | 61-70 | ||
| 4.0-4.6 | 5.0-6.5 | 6.0-7.0 | M | 55 | 60 | 73 | 54 -58 | 61-70 | 70-75 | |||
| 4.6-6.8 6.5-9.0 | 7.0-9.5 | H | 60 | 66 | 84 | 60-70 | 70-75 | 75-95 | ||||
For washing guide of your purchased model please refer Table "A" on Page 16.
अपने खरीदे गये माँडल के धुलाई निर्देश के लिए कृपया पृष्ठ 16 पर दी गई तालिका "A" देखें।
Notes / टिप्पणी :
- Amount of laundry is a weight of dry laundry / कपड़ों की मात्रा का अर्थ सूखे कपड़ों के वजन से है।
- Detergent is a general synthetic detergent / डिटर्जेंट कोई भी सामान्य सिन्थेटिक डिटर्जेंट हो सकता है।
IMPORTANT INSTRUCTION : Fill in wash to height 20mm above / tap marking* of the level you desire. When washing will start water level will automatically come to level you desire.
महत्वपूर्ण निर्देश : वॉंश टब को अपनी जस्तर के पानी स्तर से 20 मि.मी. ऊपर / नल के निशान* तक भर लें। अब वॉंशिंग शुरू होगी तो पानी का स्तर अपने आप आपके जस्तर के स्तर तक आ जाएगा।
Installation Check sheet
Customer Copy
Model No.: ____ Job No.: ____ Dt. of pur.: ____
Name Of Customer : ____ M/C. S.No.: ____
Address: ____ Tel/ Mob: ____
| S.No. | Check Point | Yes/No | Remarks |
| 1 | Physical Condition of the Machine is Satisfied? | ||
| 2 | Electrical condition of House hold wiring/Earthing for washing machine is proper? | ||
| 3 | Explained Cleaning of Lint Filter/Tub/Pulsator and Required Cleaning Frequency? | ||
| 4 | Explained Water Level Selector & Water Overflow During Wash Mode? | ||
| 5 | Explained Regular check up & Safety Instructions? | ||
| 6 | Explained to hang the drain Pipe & Drain Knob in Off Position, After Drain? | ||
| 7 | Inlet Hose and drain hose checked for water leakage after Connection? | ||
| 8 | Explained Clothes Balancing, Proper Cloth Seperation for best Wash? | ||
| 9 | Explained all Features of the machine & Demo Given? |
Signature Of Customer
Date :
Time:
Company Copy
Model No.: ____ Job No.: ____ Dt. of pur.: ____
Name Of Customer : ____ M/C. S.No.: ____
Address: ____ Tel/ Mob: ____
| S.No. | Check Point | Yes/No | Remarks |
| 1 | Physical Condition of the Machine is Satisfied? | ||
| 2 | Electrical condition of House hold wiring/Earthing for washing machine is proper? | ||
| 3 | Explained Cleaning of Lint Filter/Tub/Pulsator and Required Cleaning Frequency? | ||
| 4 | Explained Water Level Selector & Water Overflow During Wash Mode? | ||
| 5 | Explained Regular check up & Safety Instructions? | ||
| 6 | Explained to hang the drain Pipe & Drain Knob in Off Position, After Drain? | ||
| 7 | Inlet Hose and drain hose checked for water leakage after Connection? | ||
| 8 | Explained Clothes Balancing, Proper Cloth Seperation for best Wash? | ||
| 9 | Explained all Features of the machine & Demo Given? |
Name Of ASC.: ____ Installation. Dt: ____ Installed By: ____
Customer Remarks If Any:
I Here by express my Satisfaction over the Installation & Demonstration of the Machine and agree to take care of the Machine by Following the above points.
Signature Of Customer
Date :
Time:
For Best Use, Please Read the User's Manual Properly.
This LG Washing Machine comes with 2 year warranty, from the date of purchase, that comprises of a 2 year warranty on all Parts except Lint filter, knobs, inlet/outlet hose & Top Cover, subject to that the warranty card bears the rubber stamp, date and signature of our Authorized Dealer.
Terms & Condition
- The warranty is confined to the first purchaser of the Washing Machine only & is non-transferable.
- Repairs & replacements will be carried out by the dealer from whom the product has been purchased, or through the Authorized Service Centers of LGEIL. In case the customer shifts the place of residence during warranty period, it is advised to contact Authorized Service Centre directly or call our help line.
-
Repairs under warranty shall be carried out by an authorized service personnel only. The details of centralized help lines are attached.
-
For units installed beyond municipal limits of the jurisdiction of company's Authorized Service Center, it is responsibility of the purchaser to contact the nearest authorized service center and bring the unit to the authorized service center at its own cost and risk. All expenses incurred in collecting the units or parts thereof from the company's authorized service center, as well as expenses incurred with deputizing of service personnel/technicians towards conveyance and other incidentals etc. will be borne by the customer. Local Charges for transportation and handling charges may vary from location to location. Customers are advised to verify before. In case the customer desires to bring the unit on its own to the Authorized Service Centre, the same shall be at its own risks & consequences.
-
The concerned authorized service center will advise the customer whether to effect the repairs at site or at the authorized service center.
-
Call registered with the centralized helpline/Authorized service center, wherein only cleaning of the unit/parts in the unit due to dust accumulation on portions of the unit, general explanations/returning, are not to be considered as defects.
-
In case of repairs or replacement of any part/s of the unit, this warranty will thereafter continue and remain in force only for the unexpired period of the warranty. Replacement of parts would be purely at the discretion of LGEIL alone. In case the replacement of the entire unit is being made, (subject to the sole discretion of LGEIL), the same model shall be replaced and in the event such model has been discontinued, it shall be replaced with the model of price equivalent at the time of purchase.
-
In case of any damage to the product / customer abuse/ repairs by un-authorised personnel's/ misuse detected/ by the Authorized Service Center personnel, the warranty conditions are not applicable and repairs will be done subject to availability of parts and on a chargeable basis only.
-
This warranty shall not cover any consequential or resulting liability, damage or loss to property or life arising directly or indirectly out of any defect in the Washing Machine. The company's obligation under this warranty shall be limited to repair or providing replacement of defective parts only under the warranty period.
-
The company or its Authorized Service Center reserves the right to retain any part/s or component replaced at its discretion, in the event of a defect being noticed in the equipment during warranty period.
-
While the company will make every effort to carry out repairs at the earliest, it however is made expressly clear that the company is under no obligation to do so in a specified period of time.
-
Warranty does not cover accessories external to the equipment supplied by the dealer.
-
If any coloured internal or external components are replaced, there will be commitment to ensure that the shades match with the original or other components. The replaced shades, patterns, tints may vary from the customer's unit due to continuous usage of the unit. Any matching components changed at customer's request will be on chargeable basis except the component which actually needed
Warranty is not applicable in any of the following cases:
- The warranty card is not completed properly at the time of purchase. 2. The completed warranty card is not presented to authorized service personnel at the time of service of the product. 3. The product is not operated according to instructions given in the Operating Instruction Booklet. 4. Defects are caused by improper or reckless use, which shall be determined by the company personnel. 5. Any repair work is carried out by persons other than authorized service personnel. 6. Defects are caused by due to causes beyond control like lightening, abnormal voltage, acts of God or while in transit to service center or purchaser's residence. 7. The warranty is not valid in case, the serial number is deleted, defected or altered. 8. Damage to the product or any part/s due to transportation or shifting is not covered by warranty. 9. This warranty will automatically terminate on the expiry of the warranty period of 24 months, even if the Washing Machine may not be in use for any time during the warranty period for any reason. 10. Only courts in state of Delhi and places where LGEIL has it's branch office shall have the jurisdiction for settling any claims, disputes arising under the warranty
CUSTOMER'S COPY
MODEL No.:
DATE OF PURCHASE :
UNIT SERIAL No.:
Customer's Signature
Dealer's Signature
This Card is valid only if it is filled in and stamped by our authorised dealer on the date of purchase.

LG
Life's Good

MFL68505401
| LG 24 x 7 CALL CENTER | |||
| CALL 1800-180-9999 (Toll Free) | 5757554 (Send SMS) | www.lg.comserviceindia@lge.com | www.facebook.com/lghomeapplianceswww.twitter.com/LGIndiaTweets |
Regd. Office: LG Electronics India Pvt. Ltd., A Wing (3rd Floor) D-3, District Center Saket, New Delhi-110017

- OWNER'S MANUAL
- WASHING MACHINE
- CONTENTS / विषय-सूची
- Page No.
- IMPORTANT INSTRUCTIONS / महत्वपूर्ण निर्देश
- WARNING
- CAUTION
- SAFETY MEASURE / सुरक्षा उपाय
- Manufacturer is not responsible for accidents caused by the user as a result of not following the Instruction Manual.
- WARNING / चेतावनी
- In Operation
- Installation Area
- ∅ चलाने में
- मशीन रखने का स्थान
- Switch Area
- Electric Outlet
- स्विच का स्थान
- बिजली का प्लग लगाने का स्थान
- Volatile Material
- Heat
- ज्वलनशील (वाष्पशील पदार्थ)
- ताप
- Power Cord
- बिजली का तार
- Hot Water
- Installation
- गर्म पानी
- मशीन लगाना
- Drain Hose/ड़ेन हाँज
- INSTALLATION / मशीन स्थापना
- Connecting the earth wire (Only for models with two prong plug) / अर्थ का तार जोड़ना (केवल दो पिन के प्लग वाले माँडल के लिए)
- Other earthing method / अर्थ करने के अन्य तरीके
- Connecting the power plug / बिजली का प्लग लगाना
- Installation area / मशीन लगाने का स्थान
- Drain Hose Installation / निकासी पाइप लगाना
- Notes / टिप्पणी :
- PARTS IDENTIFICATION / पुर्जों की पहचान
- Accessories\*/ अन्य उपकरण
- Wash Timer / वॉश टाइमर
- Description / विवरण :
- Water Supply Inlet
- Water Selector
- Wash Timer
- Wash Selector
- Drain Selector
- Spin Timer
- जल आपूर्ति का इनलेट
- वॉटर सलेक्टर
- वौश टाइमर
- वाँश सलेक्टर
- ड्रेन सलेक्टर
- स्थिन टाइमर
- PREPARATION BEFORE WASHING / धुलाई से पहले की तैयारी
- Preparation / तैयारी
- Before washing / धुलाई से पहले
- HOW TO WASH / धुलाई का तरीका
- HOW TO RINSE / खंगालने (रिन्स) का तरीका
- Continuous water supply rinse / चलते पानी में कपड़े खंगालना (रिन्स)
- HOW TO SPIN / स्पिन का तरीका
- SPIN TIME GUIDE / स्पिन समय तालिका\*
- AFTER FINISHING WASH / धुलाई पूरी होने के बाद
- Interim spin rinse / थोड़ा स्पिन रिन्स (रिन्स से थोड़ा खंगालना)
- After washing
- After spinning
- CARE AND MAINTENANCE / देखभाल और रखरखाव
- Lint Filter * / लिंट फिल्टर *
- 1
- 2
- 3
- Magic Filter\*/ मैजिक फिल्टर\*
- 5
- 4
- 6
- Overflow filter & Rotation filter-C\*/ ओवर फ्लो फिल्टर व रोटेशन फिल्टर-सी\*
- Washing machine / वाशिंग मशीन
- Pulsator / पल्सेटर
- Detergent Box\*/ डिटर्जेंट बॉक्स\*
- Spin dryer basket / स्पिन झायर बास्केट
- TROUBLESHOOTING GUIDE / समस्या निवारण निर्देश
- Before Requesting Service / सेवा अनुरोध करने से पहले
- Disposal of your old appliance (as per e-waste Rules)
- Dos
- Don't
- अपने पुराने उपकरण का निपटान (ई-अपशिष्ट नियम के अनुसार)
- करें-
- ना करें-
- REFERENCE / संदर्भ
- Installation Check sheet
- Customer Copy
- Company Copy
- Terms & Condition
- Warranty is not applicable in any of the following cases:
- CUSTOMER'S COPY
Märke : LG
Modell : P8071R3F
Kategori : Tvättmaskin