Twig Beacon - Smartphone Benefon - Gratis bruksanvisning och manual
Hitta enhetens manual gratis Twig Beacon Benefon i PDF-format.

Användarfrågor om Twig Beacon Benefon
0 fråga om denna apparat. Svara på dem du kan eller ställ din egen.
Ställ en ny fråga om denna apparat
Ladda ner instruktionerna för din Smartphone i PDF-format gratis! Hitta din manual Twig Beacon - Benefon och ta tillbaka ditt elektroniska enhet i hand. På denna sida publiceras alla dokument som behövs för att använda din enhet. Twig Beacon av märket Benefon.
BRUKSANVISNING Twig Beacon Benefon
TWIG Beacon Configuration & Installation guide
All rights reserved. © Twig Com Ltd, 2012.
Due to differences in use, installation and hardware, all settings and functions may not be applicable to each device version.
For any further questions please contact Twig Com support at support@twigcom.com or +358 40 510 5058.
1. Installation of Beacons
Beacons can have different power supply options. Typical version has integrated Lithium primary battery giving typical 2-3 years operating time.
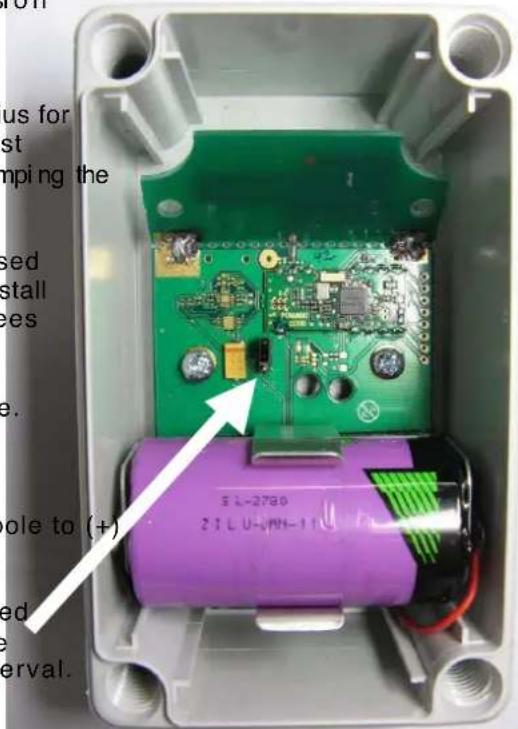
Mount the Beacon to suitable place based on desired radius for operation. Mounting of the Beacon should not be done against metal wall or behind other metal materials as they are damping signal and can even totally block them is certain directions.
If the Beacon must be installed to metal wall, there should be used 25mm thick non metal spacer between Beacon and wall or install the Beacon sideways unless the model is with antenna 90-degrees tilted like in the picture
Installation direction must be battery downside like in the picture. Battery direction must not be positive pole downwards in any installation due to damaging the damage.
Make sure the battery is installed correctly with positive pole to (+) sign in holder.
Once the Beacon is mounted to desired position it can be turned on by inserting the jumper. Once the jumper is connected the Beacon is operational. The LED will blink on transmission interval. If the Beacon is configuration mode it will blink in 2 seconds interval with two colours.
2. Installing software and drivers
TWG Beacon configuration tool doesn't require dedicated USB drivers, as it uses Windows HID. (Human interface drivers)
Connect TWIG Beacon configuration device to your computer USB port. Allow Windows to install drivers.
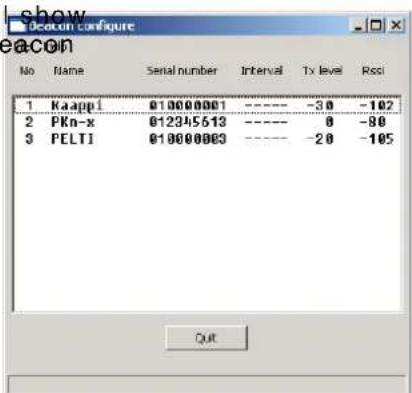
Once drivers are loaded run the program Beacon Configure. Program v each TWIG Beacon it can currently hear. Note that the location of the configuration box, that has inside similar transceiver as Beacon hassignificant effect. Do not place it on metal tables of close to metal shelves.
No = Position number to indicate how many beacons are "visible" to the configuration program
Name= ID programmed to the unit. If no name is programmed the field will be empty
Serial number is factory programmed non erasable ID.
Publication number: YZ 3415-03
Interval is the programmed transmitting interval. Default value is 4 seconds. The interval is only shown in programming mode. Changing interval longer preserves battery but may result in loss of signal noticed by Protectorin some cases.
TxLevel = The level of transmission programmed to the Beacon. Default value is -20dBm
Rssi = The level of transmission the Configuration unit and also Protector can hear the Beacon.
Once the Beacon is in configuration mode selecting a beacon from the list simply by clicking pops up the editor below.
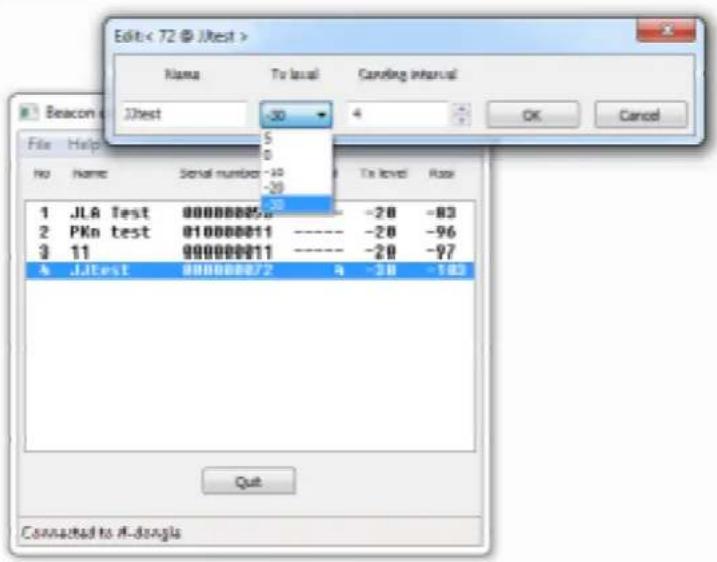
Beacon will remain in configuration mode for 10 minutes from start or after last configuration. If the configuration is not done during the time, Beacon must be restarted with the jumper in the main PCB.
3. Protocols & messaging
TWIG Beacon transfers its data via ISM band. The relevant data is being transferred to system backend via MPTP messaging. Please refer to TWIG MPTP v3.24 or later for details.
4. Safety & recycling
Usage: -20°C to +50°C
Storage: -30°C to +70°C
Do not open the device or battery by yourself or pierce holes in it. Rough handling may break the circuitry inside the device. Do not drop, knock, twist or shake the device or its battery. Keep the device dry, liquids contain minerals which could corrode electronic circuits. If the device gets wet, turn it off and dry the device and the battery immediately. Put the device into an upright position and let it dry. It is recommended that a dealer or service personnel check that the device functions properly. Even though the device is waterproof, do not wet the device unnecessarily or immerse it in water. Protect the device from heat. High temperatures may shorten the life of the electronic devices, melt or warp plastics and damage batteries. Do not warm up the device or battery or use it near fire. Do not short-circuit the battery or battery contacts. Exposing the metal strips of the battery to a close contact with a metallic object, such as a coin, a clip or a set of keyscan cause accidental short-circuiting and damage the battery. Use the battery only for the purpose it is intended. Clean the device with a soft cloth, dampened slightly with mild soapy water. Do not clean the device with harsh chemicals, solvents or other corrosive substances. Only allow service personnel authorised by the dealer to service the device.
Recycle the batteries according to the country-specific regulations.