STV-250 - Väggfäste Steren - Gratis bruksanvisning och manual
Hitta enhetens manual gratis STV-250 Steren i PDF-format.

Användarfrågor om STV-250 Steren
0 fråga om denna apparat. Svara på dem du kan eller ställ din egen.
Ställ en ny fråga om denna apparat
Ladda ner instruktionerna för din Väggfäste i PDF-format gratis! Hitta din manual STV-250 - Steren och ta tillbaka ditt elektroniska enhet i hand. På denna sida publiceras alla dokument som behövs för att använda din enhet. STV-250 av märket Steren.
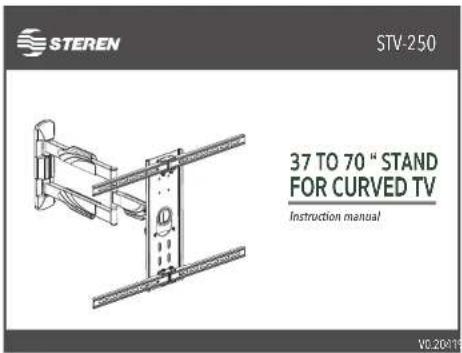
BRUKSANVISNING STV-250 Steren
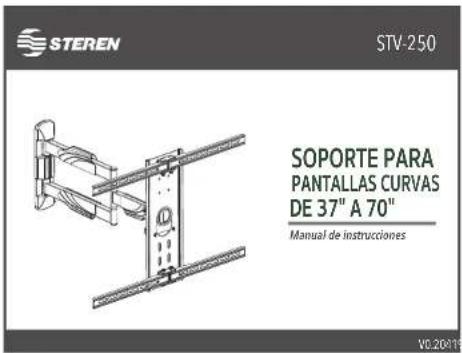
IMPORTANTE CONTENIDO
Antes de utilizar el producto, lee cuidadosamente este instructivo para evitar cualquier mal funcionamiento.
La información presentada sirve únicamente como referencia sobre el producto. Debido a actualizaciones pueden existir diferencias.
Consulta nuestra página web www.steren.com para obtener la versión más reciente de este manual.
PRECAUCIONES
- Este aparato no se destina para utilizarse por personas (incluyendo niños) cuyas capacidades físicas, sensoriales o menta es sean diferentes o estén reducidas, o carezcan de experiencia o conocimiento.
- Los niños deben supervisarse para asegurarse de que no empleen el aparato como juguete.
- Este producto está diseñado para uso en interiores.
- El soporte debe fijarse sobre una superficie sólida.
- No deben excederse ni el peso máximo soportado (35 kg), ni las dimensiones mínimas o máximos (37" a 70").
INSTALACIÓN
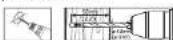
HERRAMIENTAS NECESARIAS INSTALACIÓN DEL SOPORTE

Steven no se hace responsable por donos materiales ni personales causados por mol uso o mala instalación. Es
PREPARATIVOS
1 Selecciona el lugar donde deseas instalar la pantalla.
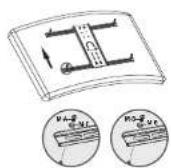
2 Coloca el soporte sobre la superficie y realiza las marcas de los puntos para perforar. Utiliza un nivel de gota para asegurante de que el soporte este nivelado.
Asegutate de que no existan tuberos acultes con cableando eléctrica, gas o agua
a) Sobre concreto
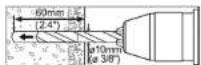
1 Usa una broca de 10 mm para perforar sobre las marcas realizadas, a una profundidad de 60 mm.


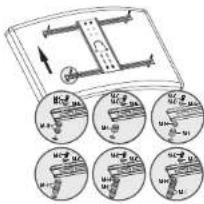
2 Inserta los taquetes (W-B) en las perforaciones. Utiliza las pijas (W-A) y las rondenas (W-C) para fijar el soporte.
b) Sobre madera
1 Use una broca de 4,5 mm para perforar sobre las marcas realizadas, a una profundidad de 55 mm.
2 Utiliza las pijes (W-A) y las rondanos (W-C) para fijar el soporte.
3 Coloca las tapas (E) sobre la base.

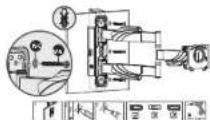
INSTALACIÓN DE LA PANTALLA

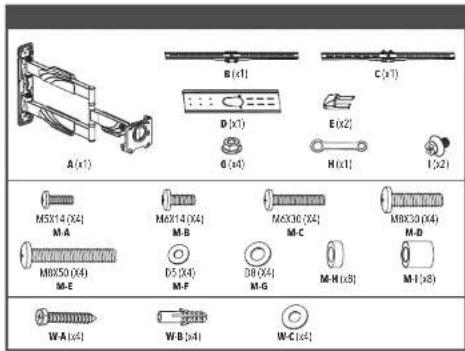
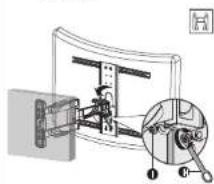
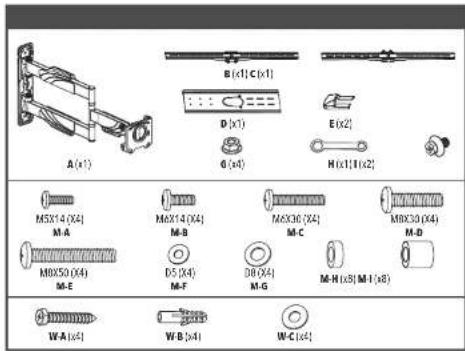
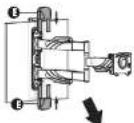
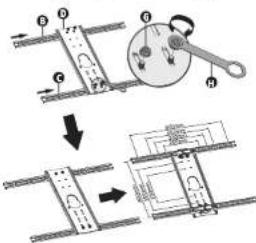
1 Fija las barras (B y C) a la placa (D) usando las tuencas (G). Auxiliate con la llave (H).
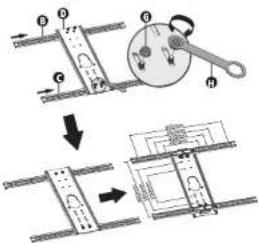
2 Coloca la estructura en la parte posterior de la pantalla y, dependiendo de la profundidad de los orificios de montaje, usa los tornillos, arandelas y bujes indicados en la opción A o B* para fijala.


*Los tarrales existentes son de medida sucesir. La Switzerland consider el mania de institución de la partida para obtener información encales los tarrales accertes para mantelos en un square.
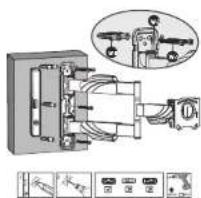
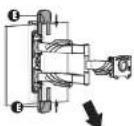
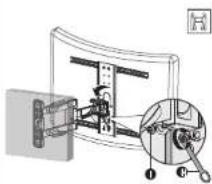
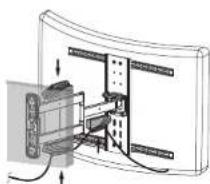
3 Monta la pantalla en el brazo del sogorte, haciendo coincidir los círculos de ambas estructuras; baja la estructura para que embone el círculo pequeño. Al finalizar, coloca los tomillas (I).
natural_image
Mechanical assembly diagram showing a motor and gear mechanism (no text or labels)4 Pasa el cable de la pantalla a través de los ducios.

natural_image
Diagram of a device mounted on a curved panel with cables and connectors (no text or symbols visible)AJUSTE
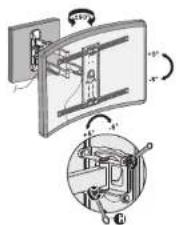
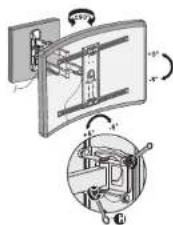
Estira o retra el brazo de forma frontal y lateral hasta lograr la posición deseada. También, realiza los ajustes de indinación y rotación; cuando hayes terminado estos últimos, aprieta nuevamente los tornillos para evitar movimientos no deseados.
natural_image
Mechanical assembly diagram showing a rotating frame and a close-up of a mechanical component (no text or symbols)IMPORTADO POR:
ELECTRÓNICA STEREN S.A. DE C.V.
Biólogo Maximino Martínez No. 3408, San Salvador Aochimanca, Ciudad de
México.02870 RFC.EST850628-K51
En caso de que su producto presente alguna falta, acuda al centro de distribución más
ceintan a su domicilio y en caso de tener alguna duda o pregunta por favor lamo a nuestro
Centro de Atención a Cilienes, en donde con gusto le atenderemas en todo lo relacionado
con su producto Stevan
Centro de Atención a Clientos
01.200.500.000
01.800 305 9000
In caso de que su producto presente aquí, cada al centro de debudía no
catalo a su demiciela y en caso de tener alguna duda o pregura per bader lamo nueste
Centro de Alemón a Cierres, en donde con gusio le blendereras en todo lo reordenado
¿Me si conducte Stean
Contrat de Departamento Clante
Cairo de Pachoville Crenso
01.800.500.9000
[Non-Text]
STEREN PRODUCTO EMPACADO S.A. DE C.V.
Autopista México: Oueretaro. Km 26.5 Sin número, Nave Industrial 3-A, Col.
Lomas de Boulearas, Tlalnepantla de Gaz. Estado de México, C.P. 54020.
[Non-Text]
[Non-Text]
[Non-Text]
[Non-Text]
[Non-Text]
[Non-Text]
[Non-Text]
[Non-Text]
[Non-Text]
[Non-Text]
[Non-Text]
[Non-Text]
[Non-Text]
[Non-Text]
[Non-Text]
[Non-Text]
[Non-Text]
[Non-Text]
[Non-Text]
IMPORTADO POR:
[Unreadable]
ELECTRÓNICA STEREN S.A. DE C.V.
Bidiogo Maximino Martinez No. 3406
México. 02870 19FC: E5T850628-KS
[Non-Text]
[Non-Text]
[Non-Text]
[Non-Text]
[Non-Text]
[Non-Text]
[Non-Text]
[Non-Text]
[Non-Text]
[Non-Text]
[Non-Text]
[Non-Text]
IMPORTADO POR:
STEREN PRODUCTO EMPACADO S.A. DE C.V.
STEREN PRODUCTO EMPACADO S.A. DE C.V.
STEREN PRODUCTO EMPACADO S.A. DE C.V.
STEREN PRODUCTO EMPACADO S.A. DE C.V.
STEREN PRODUCTO EMPACADO S.A. DE C.V.
STEREN PRODUCTO EMPACADO S.A. DE C.V.
STEREN PRODUCTO EMPACADO S.A. DE C.V.
STEREN PRODUCTO EMPACADO S.A. DE C.V.
STEREN PRODUCTO EMPACADO S.A. DE C.V.
STEREN PRODUCTO EMPACADO S.A. DE C.V.
STEREN PRODUCTO EMPACADO S.A. DE C.V.
STEREN PRODUCTO EMPACADO S.A. DE C.V.
STEREN PRODUCTO EMPACADO S.A. DE C.V.
IMPORTANT CONTENT
Before using the product, carefully read this instruction manual to avoid any malfunction. The information presented serves only as a reference on the product. Due to updates there may be differences. Check our website www.steren.com for the latest version of this manual.
CAUTIONS
- This device is not intended for use by persons (including children) whose physical, sensory or mental abilities are different or reduced, or who lack experience or knowledge.
• Children should be supervised to make sure they do not use the device as a toy.
• This product is designed for indoor use.
• The stand must be fixed on a solid surface. - The maximum weight supported (35 kg), or the minimum or maximum dimensions (37° to 70°) must not be exceeded.
INSTALLATION
NECESSARY TOOLS TV STAND INSTALLATION

Steven is not responsible for material or personal damages caused by misuse or improper installation. N is the responsibility of me over to ensure the correct installation and use of the product, as well as its periodic review.
PREPARATIONS
1 Select the place where you want to install the TV.
2 Place the stand on the surface and make the marks of the points to drill. Use a drop level to make sure the support is level.
Make sure there are no hiddler pipes with electrical gas or water within
a) On concrete
1 Use a 10 mm drill bit to drill on the marks made, at a depth of 60 mm.
2 Insert the dowels (W-B) into the holes. Use the brackets (W-A) and the washers (W-C) to fix the bracket.

b) On wood
1 Use a 4.5 mm drill bit to drill on the marks made, to a depth of 55 mm.
2 Use the brackets (W-A) and the washers (W-C) to fix the TV stand.

3 Place the covers (E) on the base.
TV SCREEN INSTALLING

1 Fix the bars (B and C) to the plate (D) using the nuts (G). Help yourself with the key (H).
2 Place the structure on the back of the screen and, depending on the depth of the mounting holes, use the screws, washers and bushings indicated in option A or B* to fix it.
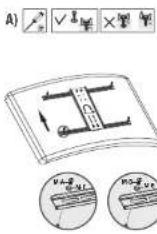
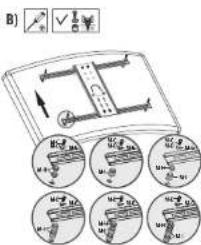
* The some applied are several sites. We answered you must the interactive manual of your 7/ screen to maintain information about the some necessary subject to the 7/ screen.
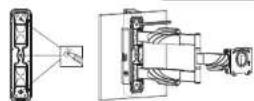
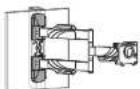
3 Mount the screen on the stand arm, matching the circles of both structures; get down the structure so that it fits the small circle. When finished, place the screws (I).
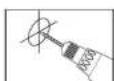
4 Pass the TV screen cable through the ducts.
natural_image
Diagram of a device mounted on a curved panel with cables and connectors (no text or symbols visible)ADJUSTING
Stretch or retract the arm frontally and laterally to achieve the desired position. Also, make the tilt and rotation settings: When you have finished the latter, tighten the screws again to avoid unwanted movements.
IMPORTED BY:
Call Center
01 800 500 9000
Autopista México-Querétém. Km 26.5 Sin número, Nave Industrial-3-A, Col Lomas de Boolevares. Talmapenta de Bag, Estado de México, C.P. 54020, RFC: SPE-941215.H43
In case your products or have questions, please contact your nearest dealer. If you are in Mexico, please call to your Call Center.
STEREN PRODUCTO EMPACADO S.A. DE C.V.