R320C - Lampa Ledgo - Gratis bruksanvisning och manual
Hitta enhetens manual gratis R320C Ledgo i PDF-format.

Användarfrågor om R320C Ledgo
0 fråga om denna apparat. Svara på dem du kan eller ställ din egen.
Ställ en ny fråga om denna apparat
Ladda ner instruktionerna för din Lampa i PDF-format gratis! Hitta din manual R320C - Ledgo och ta tillbaka ditt elektroniska enhet i hand. På denna sida publiceras alla dokument som behövs för att använda din enhet. R320C av märket Ledgo.
BRUKSANVISNING R320C Ledgo
Notice:
- Before using, please read the instruction sheet carefully and then install the product according to the instruction sheet.
- The product should be operated within the normal voltage.
- Using two batteries that the power level are as similar as possible at the same time.
- The batteries and the DC power could be used at the same time.
- The output voltage and current of the USB port is 5V/1A, while too much current output could damage the circuit.
- Keep the product in dry and ventilated place to avoid the circuit wet which will cause short circuit.
- Cut off the power after using to avoid shorten LED service life and reducing the battery loss.
? General Breakdown Service
The question mentioned below is not certainly caused by the breakdown, please check the lighting again before contact with the distributor and manufacturer, eliminate the following problems before send out the light for reparation.
Breakdown 1: The lamp can not start up normally.
Measurement:1)Check if the batteries and the adapter are installed in place.
2) Press the power switch and watch the digital display could light up or not.
If couldn't light up, please change to other batteries or adapter to test.
3) Check if the connection of the adapter and the lamp is loose, or whether
the power/voltage of the adapter is too low.
Breakdown 2: The lamp is flickering.
Measurement:1) Check whether the battery level is enough or not. Change another one with enough battery level and test again.
2)Check whether the power adapter is suitable.
3) Check if there is any high temperature object near the lighting to cause the operating environment temperature is too high.
Breakdown 3: The digital display shows normal but the lamp bulbs couldn't light up.
Measurement: Press the Battery balance testing button and observe if the battery capacity is less than 1 which means low battery level.
LEDGO TECHNOLOGY LIMITED
Add: Zhanglin Section, Highway 324, Dongli, Chenghai, Shantou City, Guangdong Province, China
Tel:0086-754-85354187 Fax:0086-754-85300887
E-mail:info@ledgo.hk http://www.ledgo.hk
LG-R320C RING LED LIGHT
Instruction Sheet
natural_image
Circular ring light fixture with a small car silhouette on the base (no text or symbols visible)Extra Parameters:
LED Bulbs Amount: 320 PCS
Total Power: 64W
CRI(Ra):95
Voltage:DC 12V-18V
Color Temperature: 3200K-5600K
www.ledgo.hk

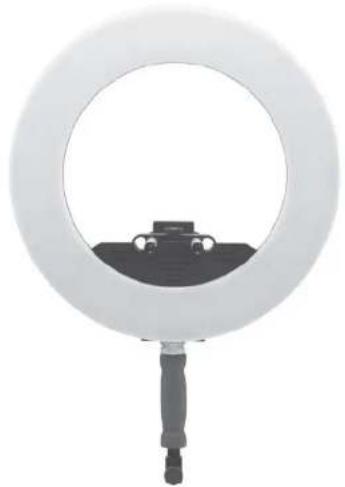
Components:

- Hand holder: For holding the lamp by hand.
②. Camera bracket fixing seat: Can be installed and adjusting camera bracket. - Connecting base of spring handle: For installing the spring handle.
- Battery lock button: Fix and lock the battery to prevent the battery falling off when shaking.
- Battery plate: Suitable for mounting Sony Li-ion battery (NP-F, NP-FM series battery), or mount the adapter for Panasonic/Canon/Nikon battery (battery and battery adapter could be bought additionally).
⑥. Power Switch: For on/off the lamp. - USB output interface: For outputting the max current of 5V/1A to peripheral devices.
⑧.DC power socket: For connecting DC 12-18V adapter. - Digital display: It can display brightness, color temperature, lighting address and battery power level and other data.
- NO.1 battery balance testing button: When users press this NO.1 button, the digital display screen will display the No.1 battery power level. (The rank 0-10 means the current battery power level, the bigger number in the display means more power)
- No.2 battery balance testing button: When users press this No.2 button, the digital display screen will display the No.2 battery power level. (The rank 0-10 means the current battery power level, the bigger number in the display means more power)
- Lighting address ▼ adjusting button: Press the ▲ button, the light address number increase; press the button, the light address number decrease. The digital display will show the lightings' address number that are between A001-A512. These two buttons could be clicked or long press.
Note: The ring light could be controlled by 2.4G remote controller or WiFi, which should be bought additionally.
⑬. Dimmer knob: For adjusting the lighting brightness.
14.Color temperature knob: For adjusting the lighting color temperature.
15
16

17
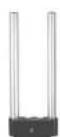
- Camera bracket: For fixing the camera, could be unloaded when not in use.
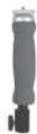
- Spring handle: For Fixing the ring light into the light stand and adjust the illumination angle, could be unloaded when not in use.
⑰. Power Adapter: 15V/3A adapter to supply the power for the lighting.

Instructions:
- Please install the LED ring light on the floor light stand or handheld, and then adjust to the best illumination direction: Pic. 1 (The floor light stand should be bought additionally)
- Powered by power adapter or installing the batteries.
- Turn on the power switch.
- Adjusting to the best lighting situation by the brightness knob and color temperature knob according to your demands.
- When operating the lighting, it could be single lighting or multiple lighting together. When operate the single light as portrait eyelight, the ring LED light could be placed to the right ahead of the camera lens, and shooting portrait from the middle of the light. While using multi-lighting together, you could arrange the lights supplement according to your demands.
- When using the camera bracket fixing seat, please loosen it, and then insert the camera bracket (the knob is down and the screw is up) into fixing seat behind the ring light, adjust to the appropriate distance and lock the camera bracket fixing seat. Fix the camera on the lighting through the camera bracket.


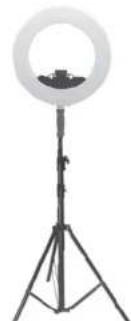
natural_image
Ritardo setup with ring light mounted on a tripod stand (no text or symbols visible)Pic. 1
- Turn off the power switch when stop using.