R1 - Stativ Takeway - Gratis bruksanvisning och manual
Hitta enhetens manual gratis R1 Takeway i PDF-format.

Användarfrågor om R1 Takeway
0 fråga om denna apparat. Svara på dem du kan eller ställ din egen.
Ställ en ny fråga om denna apparat
Ladda ner instruktionerna för din Stativ i PDF-format gratis! Hitta din manual R1 - Takeway och ta tillbaka ditt elektroniska enhet i hand. På denna sida publiceras alla dokument som behövs för att använda din enhet. R1 av märket Takeway.
BRUKSANVISNING R1 Takeway


RANGER
USER GUIDE
Before using the product for the first time, please read through the user guide. Please use this product correctly after fully understanding the content of the user guide.

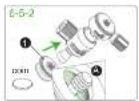
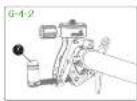
8-5-2: Attach the 1 quick release clip to the Ballhead with a coin or a flathead screwdriver. Please make sure that the locking mechanism at the base of the Ballhead is lined up with the 2 secure grooves on the quick release plate to prevent the Ballhead from loosening and causing items to fall.
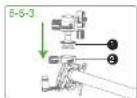
6-5-3. Line the installation mark with the quick release clip with the attached Ballhead (please refer to 6-2: The installation mark on the security groove) and side in the amounting platform.
6-6: Mounting and using the T-PH02 use smartphone holder (optional accessory)
The T-PH02 use smartphone holder in the following instruction is an optional accessory that is sold separately. We recommend purchasing and using it with the T-B01 Ballhead for more flexible angle use.
6-6-1: Clamp and secure the H1 Ranger Clampod on the object. Please refer to 6-4: Instructions for clampod usage. Lonsan the
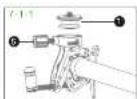
⑤ quick release knob and remove the ① quick release clip.
6-6-2: Attach the ① sport smartphone holder on the ② mounting platform and adjust it to a proper position, then tighten the ⑤ quick release knob. It is now ready for use.
6-7: Mounting and using the T-FN01 Flex neck (optional accessory)
T-FN01 goose neck in this instruction is an optional accessory. The following instructions are only recommended to be used in a static environment or in a vehicle.
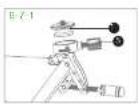
6-7-1: Clamp and secure the Hanger Clamped on the object. Please refer to 6-4; Instructions for clamped usage. Loosen the
⑤ quick release knob and remove the ① quick release clip
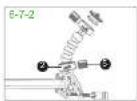
6-7-2: Attach the ② quick release clip of the flex neck to the
5 mounting platform. Tighten the
2 quick release knob to finish the mounting. Use with other accessories can extend the length and add more shooting angles.
7 Mounting and operating action camera
7-1: Mounting a action camera
The T-PC03 action camera quick release plate in this instruction is an optional accessory that is sold separately.
7-1-1: To secure the R1 Ranger Clampod on the clamped object, please refer to 6-4: Instructors for clamped usage. Loosen the 5 quick release knob and remove the 1 quick release clip
7-1-2: Mount the T-RC03 quick release clip on the base of the action camera case. Secure with a screwdriver. Please certain that it is firmly installed to prevent the product from loosening during intense movement.
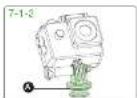
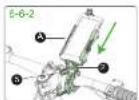
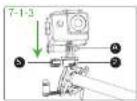
7-1-3: Install the action camera mounted with the T-RO03 quick release clip to the mounting platform (please refer to 6.2; The installation mark on the security groove). After adjusting the clip to the proper location, tightening the quick release knob. Now it is ready for use.
10 Optional Accessories
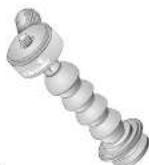
T-B01 Ballhead
Phone Holder For Sports
8 Safety warning
8-1: Please follow the operation notes. The company takes no responsibility for any man made damage.
8-2: Please do not take your hands away from the clampod before it is fully stabilised, or your electronic product might be damaged from falling.
B-3: The product has a strong clamping force. Please do not screw too tight, so that it will not damage the clamped object.
B-4: Do not apply any volatile solvents (kerosene, paint thinner) on the product surface.
8-5: If the product is damaged or deformed from failing or impact, please stop using the product anymore, so that your electronic product will be damaged from any malfunction.
8-8: An adult must accompany when children under the age of 12 are using the product.
8-7: For your safety, please do not use any electronic device while driving a vehicle.
9 Specifications of the product
Model number: R1
Size: 7.5(L)x6.5(W)x3.2(H)cm
Weight: 73g
Materials: Aerospace-grade Aluminium Alloy, Nylon
Screw of the quick release plate: 1/4"
Clamping range: 010 - 032mm. Clamping Flat Surface: 5-32mm
Clamp Load Capacity
For dynamic:300g
For static: it depends on the optional accessory's own design.
T-RC03 Action Camera Quick Release Plate

T-FN01 Flex Neck
T-TH01
Tablet Holder

natural_image
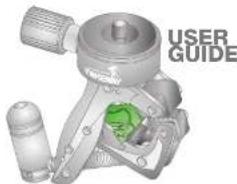
3D mechanical assembly diagram showing a green component inside a housing (no text or symbols)Before using the product for the first time, please read through the user guide.
Please use this product correctly after fully understanding the content of the user guide.
All information described in this user guide is based on the test standard of Takeway. Sorry for the inconvenience caused if there are any errors. The design and specifications of this product are subject to change without notice.
Copyright: All Rights Reserved
EHOMA INDUSTRIAL CORPORATION
TEL: +896 4 2406 5031 info@takeway.tw www.takeway.tw
1 Our sincere gratitude
Takeaway® R1 Ranger Clampod is another revolutionary breakthrough after T1 Clampod. The ultra-lightweight R1 Ranger Clampod is built for the "outdoor enthusiasts" group. The R1 Ranger Clampod weighs only 75g and is portable and convenient to use for consumer electronics such as can be cameras, smartphones and tablets. R1 Ranger Clampod can be easily discolored without tools and has a maximum load capacity of 10kg. The R1 will not loosen even when it is used while moving around, and can be matched with different accessories. This provides us on versatility based on user requirements. Not only can it be clamped on to tubes, it can also be secured on flat surfaces and be placed in pockets. Even extreme sports will not affect its function, so enjoy every moment and explore new experiences with Takeaway® R1 Ranger Clampod!
2. Please test the relevant components and read responsibility statement before using this product
Before using this product on your consumer electronic products, please check Takeaway® P1 ranger clamped and its accessories for damage or deformity. If there is any, please contact the salesperson to exchange your product to prevent damage of your consumer electronic products or personal injury caused by the flawed product. The company takes no responsibility and assumes no liability for the loss or inconvenience caused by user's own negligence.
3 Product components
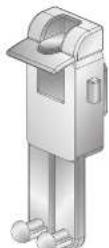
Clamp body with T-U32 Inner jaw


Llear guideAnt-slip met
5 Parts name
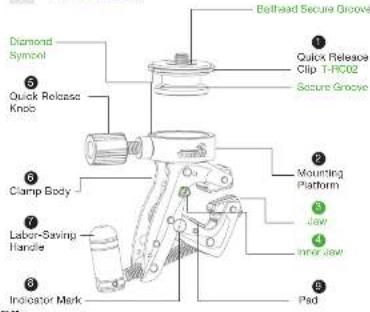
4 Operation notes
4-1. When using on a flat surface, use the grid side of the clampod for stability or use the smooth side of the clamp to protect the surface from damaging.
4-2. When clamping on a smooth cylindrical surface, place the anti-slip mat between the surface and the clamped to increase grip.
4-3. The body of the clamp is made of aluminium alloy, but do not place the product in a humid environment for a long time to avoid product being damaged.
4-4: Do not place the product near heat or open flame which will damage the plastic components.


used on a slippery surface
used on a cylinder surface

used on a flat surface


The inner jaw can be easily deployed and stored; it allows users to clamp it on a small cylinder or a poll firmly. Its range is between 010mm to 15mm.

used on a slippery end cylinder surface
6 Assembly and operation
6-1: Anti-slip mat assembly, disassembly and storage
Assemble and place the ① anti-slip mat in between a smooth cylindrical surface and the R1 Ranger Clamped to increase stability of the clamped and to avoid sliding. The mat can also be stored between the Quick release knob and the mounting platform to prevent it from getting lost.
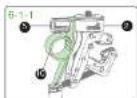
6-1-1: Storing the anti-slip mat
As the figure shows, store the
⑩ anti-slip mat between the
5 quick release knob and the
7 mounting platform
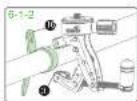
6-1-2: Using the anti-slip met
As the figure shows, wrap the
⑩ anti-slip mat on the 6-1-2
cylinder to be gripped. Then use
the ① square jaw to clamp the
anti-slip mat to increase grip.
6-2: The installation marks on the secure groove
The secure groove is designed to increase stability and to prevent the quick release slip from loosening. Installation marks are marked on the quick release parts to ensure fast and accurate installation.
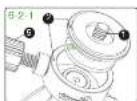
8-2-1: Line up the installation marks on both the ① quick release clip and the ② mounting platform (attached to the accessories or electronic devices) and light on the
- quick release knob to complete
installation.
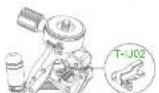
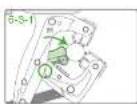
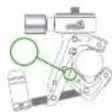
6-3: Use of the inner jaw
For better convenience and stability, use the inner jaw to secure the object when clamping the R1 Ranger Clampod on small tubes. The inner jaw is made of high-grade, high-strength reinforced plastic. The jaw comes installed in the clamp from the factory. Do not remove inner jaw unless necessary to prevent the jaw from being lost.
Move the securing position of the inner jaw downward to the center to attach to cylinders. After securing, shake gently to make sure it is tight to prevent items from coming loose and falling.
8-3-2: Clamping range
This product comes with a clamp indicator mark. When clamping exceeds the mark as shown in the below diagram, the inner jaw can be used to clamp the cylinder and maintain stability.
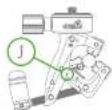
* When you see the "J" indicator mark (∅10 - ∅16mm), use the jaw and the inner jaw to make a "3 J-point clamp" (please note the "J" mark on the jaw).
When you can't see the 'J' indicator mark (2017-032mm), use the inner parts of the clamp body for clamping. At this time the inner jaw should be toded
6-4: Instructions for clampod usage
To choose a proper usage for clamping, please refer to 6-3-2: Clamping Hange. When clamping smooth cylindrical surface, please refer to 6-1-2: Using the anti-slip met.
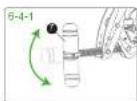
6.4.1: Clamp and secura the clampod on the object to be gripped. As shown in the figure,
the convenient handle fixing point can be bent for more flexible application in limited space. This also can be rapidly and conveniently done with less effort.
6-4-2: Clamp the R1 Fanger
Clamped to a proper location
and shake gently to make sure it
is firmly secured to prevent items
from loosening and falling.
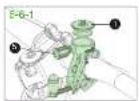
6-5: T-B01 Ballhead installation and use (optional accessories)
The T-B01 Railhead in this installation instruction is an accessory designed for T1 Clampod and is sold separately.
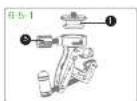
6-5-1: Loosen the ⑤ quick release knob and remove the ① quick release clip.