Turtle Beach Ear Force XLS - Hörlurar MAD CATZ - Gratis bruksanvisning och manual
Hitta enhetens manual gratis Turtle Beach Ear Force XLS MAD CATZ i PDF-format.

Användarfrågor om Turtle Beach Ear Force XLS MAD CATZ
0 fråga om denna apparat. Svara på dem du kan eller ställ din egen.
Ställ en ny fråga om denna apparat
Ladda ner instruktionerna för din Hörlurar i PDF-format gratis! Hitta din manual Turtle Beach Ear Force XLS - MAD CATZ och ta tillbaka ditt elektroniska enhet i hand. På denna sida publiceras alla dokument som behövs för att använda din enhet. Turtle Beach Ear Force XLS av märket MAD CATZ.
BRUKSANVISNING Turtle Beach Ear Force XLS MAD CATZ
Configuring XBOX Settings
IMPORTANT: In order to hear other players you must make sure that the following is set from the XBOX 360® Dashboard.
-
Press the XBOX guide button (the X button in the center of your controller) to access your XBOX Dashboard.
-
Navigate to the right and locate the "Settings" tab and scroll to "Preferences" in the menu. Press the "A" button on your controller.
-
On the Preferences screen, select the "Voice" option from the menu and press "A".
-
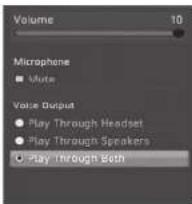
Select the "Play Through Both" option and set the Volume level to 10.
text_image
Volume 10 Microphone ■ Note Value Output ● Play Through Headset ● Play Through Speakers ○ Play Through BothBalancing Game & Chat Levels
The XLC in-line volume control adjusts both the game and chat volume levels at the same time. The TV volume determines the maximum volume level.
If you want to hear less game sound and more chat, you'll need to decrease the game volume so it's lower than the chat volume and then turn up the TV volume to a comfortable level.
Follow these instructions to balance the game and chat levels when using XBOX LIVE:
-
Follow the instructions in the previous section "Configuring XBOX Settings" to configure the XBOX Voice settings to "Play Through Both" and set the XBOX LIVE chat Volume to 10 (maximum).
-
Find the audio settings menu in your game and lower the game volume to about 50% - 75% of maximum. Reducing the game sound will keep it from drowning out the chat sounds.
-
After setting the volume from inside the game, turn up the TV volume control to a comfortable level.
-
During the game, you can adjust the game and chat volume with the XLC in-line volume control.
-
If the chat volume is too loud, go back into the game, turn up the game volume, then turn down the TV volume. Repeat as necessary.
About the XLC Headset
The Ear Force XLC headset for the XBOX 360 combines XBOX LIVE chat and stereo game audio for an immersive gaming experience.
The XLC features twist-style ear cups and a multi-pivot headband which folds into a compact design for easy portability. The XLC's unique noise-reduction ear cushions help block out distractions so you can concentrate on the game. The combination of chat plus game sound in the XLC overcomes the limitation of communicator headsets that block game sound from one ear. Another advantage is eliminating voice chat interference caused by the communicator headset microphone picking up sound from external speakers.
With the XLC, you can turn up the volume without disturbing friends, family or neighbors. Best of all, you'll hear every nuance of the game - from an opponent sneaking up behind you to your teammates' voices right next to you. This helps you to become a better player and enjoy a superior gaming experience.
PLEASE NOTE: For optimal performance, the XLC should be connected to the headphone jack on a TV or sound system. If your TV or sound system doesn't have a headphone jack, this package includes a stereo splitter cable that lets you connect the XLC directly to the XBOX AV cable. The game volume and chat levels will be slightly lower when the XLC is connected to the XBOX rather than the TV or sound system headphone output.
EAR FORCE®

XBOX® Headset with Stereo Game Sound and XBOX LIVE® Chat
User's Guide
Important Information
-
Before placing the headphones over your ears, set the volume control to minimum, then slowly increase until you reach a comfortable level.
-
Like any speakers, over driving headphones may cause damage to both the headphones and your ears. Please listen at moderate levels.
-
WARNING: Long term exposure to loud music or other sounds in a headset may cause hearing damage. It is best to avoid extreme volume levels when using a headset, especially for extended periods. Over time, your ears adapt to the volume level, so a level that may not cause initial discomfort might still damage your hearing.
For warranty information please visit www.turtlebeach.com/support
Package Contents
· Ear Force XLC headset
- Stereo audio splitter cable
· This User's Guide

For more products, accessories, and our support knowledge base, visit TurtleBeach.com
Copyright © 2009, Voyetra Turtle Beach, Inc. (VTB). All rights reserved. No part of this document may be reproduced without permission. Turtle Beach, the Turtle Beach logo and Ear Force are registered trademarks of VTB. Inc. XBOX and XBOX LIVE are registered trademarks of Microsoft Corporation. All other trademarks are properties of their respective companies and are hereby acknowledged. Product features, visual design, package contents and specifications are subject to change without notice. Product TBS-2049-01 V2
Connecting the XLC to your TV Headphone Jack
Follow these instructions to connect your XLC headset to a TV or sound system that has a headphone jack.
The XLC has two connections on the cable: one is for the game sound and the other is for the microphone.
The microphone connects to the XBOX® controller and lets you communicate with other players during XBOX LIVE® multi-player gaming sessions. The game sound and chat voices from other players come from the TV or XBOX connection, as shown in the illustration.
Step 1:
Connect the XBOX audio cables (red/white) to the TV (or sound system). This lets you hear the game sound and chat from other players on the TV or sound system.
Step 2:
Connect the XLC's 3.5mm plug to the headphone output on the TV (or sound system). This lets you hear the game sound in the headset and, on most TVs, will shut off the TV speakers so others won't be disturbed by the game sound.
Step 3:
Connect the XLC's 2.5mm plug to the XBOX game controller. This allows the mic to be used for XBOX LIVE chat.
Step 4:
Configure your XBOX settings to send the chat signal to the speakers, as described in the "Configuring the XBOX Settings" section on the other side of this user guide.

text_image
If you are using an HDMI cable to connect the XBOX to your TV, then the red, white and yellow RCA plugs are not needed. For more info on HDMI please visit Turtlebeach.com/support Yellow RCA plug (video) Red and white RCA plugs (stereo audio) TV headphone jack 3.5mm plug Game sound and chat from other players 2.5mm plug Mic sound for chatting with other players in-line controller Slide the microphone switch on the in-line controller to the MUTE position when you don't want to be heard by other players. Slide it to the ON position when you want to talk to other players. Use the volume dial on the in-line controller to adjust the game and chat volumes, which must be properly balanced as described previously in the 'Balancing Game & Chat Levels' section of this User's Guide.Connecting the XLC to a TV that DOES NOT have a Headphone Jack
Follow these instructions only if your TV or sound system does not have a headphone jack.
If your TV or sound system does not have a headphone jack, you can connect the XLC headset to the XBOX audio outputs using the included splitter cable as follows:
Step 1:
Connect the XBOX audio cables (red/white) to the XLC splitter cable (red/white).
Step 2:
Connect the XLC 3.5mm plug to the 3.5mm input on the splitter cable (green), then connect the XLC splitter cable (red/white) to the TV audio input (red/white). This lets you hear the game sound and chat from other players in the headset. If you don't want to hear the game on your TV speakers while you're playing, just turn down the volume on your TV.
Step 3:
Connect the XLC's 2.5mm plug to the XBOX game controller. This connects the microphone to the XBOX LIVE feature.
Step 4:
Configure your XBOX settings to send the chat signal to the speakers, as described in the "Configuring the XBOX Settings" section on the other side of this user guide.