
V-C7070CEU - Dammsugare LG - Gratis bruksanvisning och manual
Hitta enhetens manual gratis V-C7070CEU LG i PDF-format.


Användarfrågor om V-C7070CEU LG
0 fråga om denna apparat. Svara på dem du kan eller ställ din egen.
Ställ en ny fråga om denna apparat
Ladda ner instruktionerna för din Dammsugare i PDF-format gratis! Hitta din manual V-C7070CEU - LG och ta tillbaka ditt elektroniska enhet i hand. På denna sida publiceras alla dokument som behövs för att använda din enhet. V-C7070CEU av märket LG.
BRUKSANVISNING V-C7070CEU LG
OWNER'S MANUAL
V-C7070CT
V-C7070CEU
Bagless vacuum cleaner
natural_image
Blurred grayscale image with no discernible text, symbols, or identifiable objectsTable of contents
Information for your safety.... 3
How to use 4
Assembling cleaner 4
Elobow tube (V-7070CEU Only) 6
Using the cleaning head and Accessory Nozzles 7
Emptying the dust chamber....9
Operation.... 10
Adjusting the power level 10
How to plug in and use 10
Park-System.... 10
Cleaning the motor filter / Air Cleaner.... 11
Cleaning the dust chamber.... 12
Cleaning the exhaust filter.... 12
User's guide for ultra punch vacuum nozzle 13
Features 13
Cleaning Vacuum Nozzle for Bedding 15
What to do if your appliance does not work 17
What to do when the suction performance reduces? 17
Information for your safety
Please read all the following information, which contains important instructions for the safety, the use and the maintenance of the appliance. This appliance complies with the following EC Directives: -73/23/EEC, 93/68/EEC-Low Voltage Directive-89/336EEC -EMC Directive.
□ Never allow children to use the appliance unsupervised.
☐ Do not use the appliance If the mains lead is damaged or faulty.
□ If the mains lead is damaged, it must be replaced by an approved LG Electronics Service Agent to avoid a hazard.
□ Always switch the vacuum cleaner off before:
• Emptying the dust chamber.
- Cleaning or changing the filters.
☐ Do not vacuum flammable or explosive substances(liquids or gases).
☐ Do not vacuum hot ash, embers etc. nor sharp objects.
☐ Do not vacuum water or other liquids.
☐ When you vacuum with an attachment appliance that has a rotating brush roller:
- Do not reach into the running brush roller.
Important for users in the UK.
The wires in the mains lead of this appliance are coloured in accordance with the following code:
BLUE-neutral
BROWN - live
VERY IMPORTANT:
Neither wire is to be connected to the earth terminal of a 3 pin plug. If a 13 amp plug is fitted, fit a 13 amp BS 1362 fuse. If any other type of plug is used, protect with a 15 amp fuse at the distribution board.
For appliance which include a mains lead with a moulded-on plug, the moulded-on plug incorporates a fuse.
For replacement use a 13 amp BS 1362 fuse. Only ASTA approved or certified fuses should be used.
The fuse cover/carrier must be replaced in the event of changing the fuse. The plug must not be used if the fuse cover/carrier is lost.
A replacement cover carrier must be obtained from authorized electrical goods retailers.
How to use Assembling Cleaner
Fit the large cleaning head onto the end of the tube.
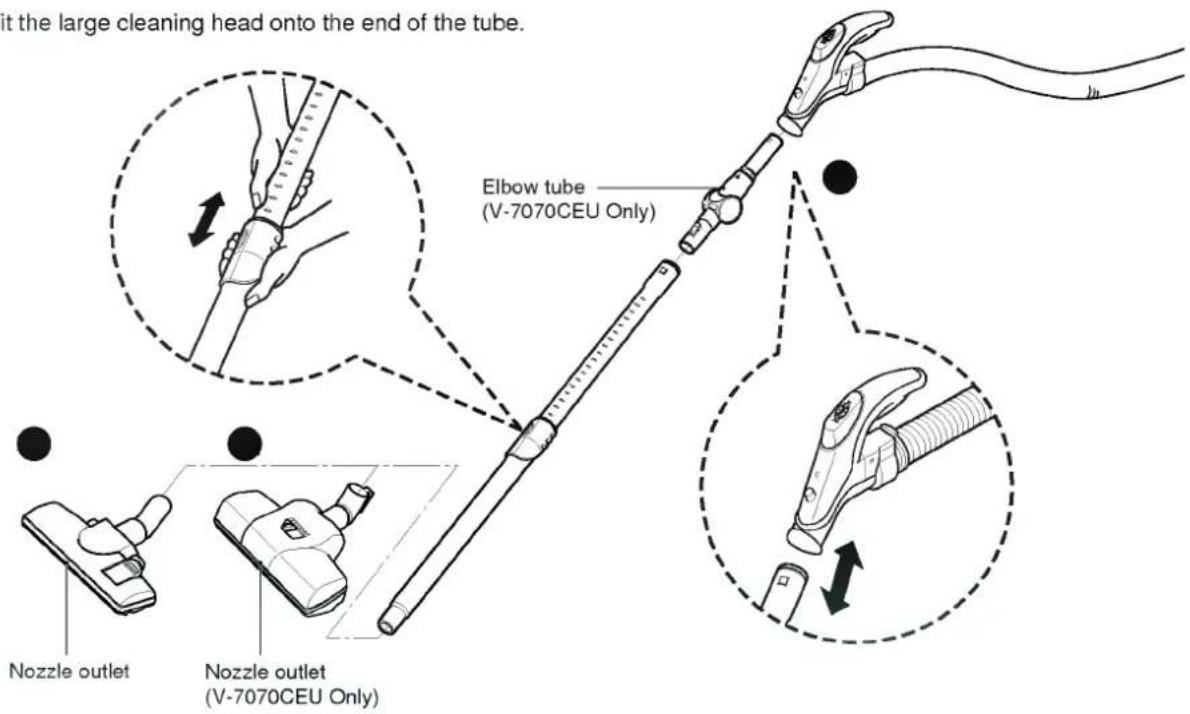
Push telescopic tube into nozzle outlet.
Push telescopic tube into nozzle outlet.
Push telescopic tube into hose handle until catch clicks.
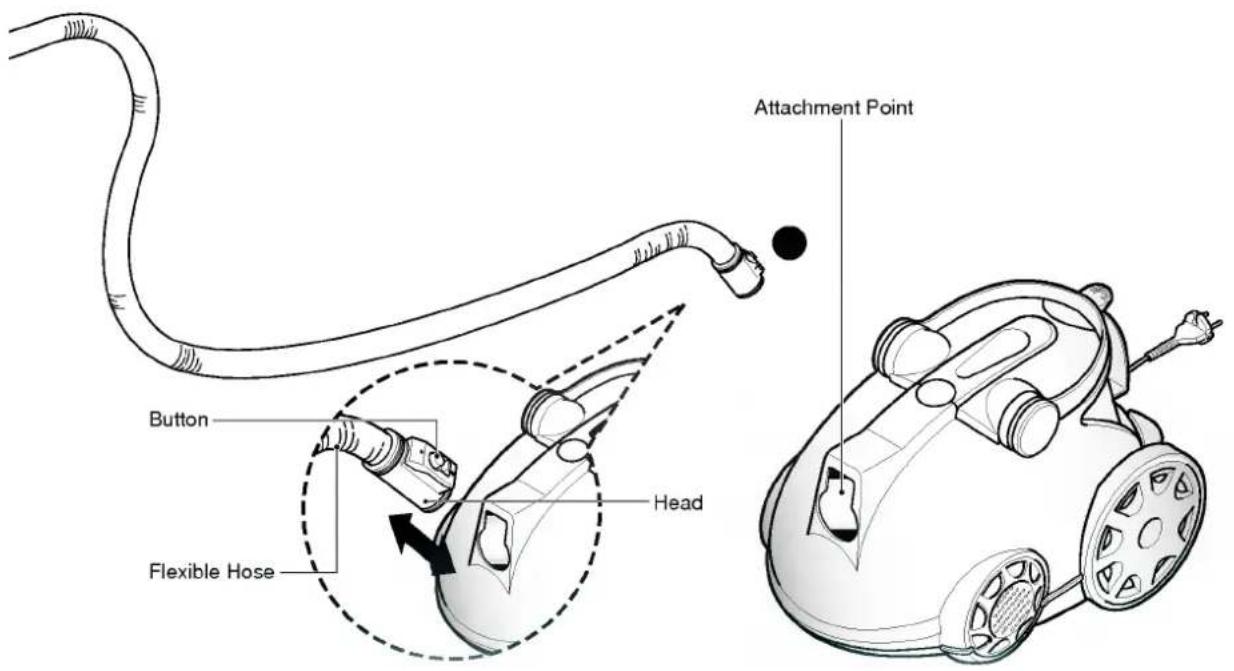
Push the end of the head on the flexible hose into the attachment point on the vacuum cleaner. To remove the flexible hose from the vacuum cleaner, press on the button situated on the head, then pull forward.
How to use Elbow tube (V-C7070CEU Only)
flowchart
graph TD
    A["Button"] --> B["Flexible Hose"]
    B --> C["Elbow Tube"]
    C --> D["Button"]
    D --> E["Telescopic Tube"]
    E --> F["Hold Latch"]
    F --> G["Elbow Tube"]
    G --> H["Downward arrow"]
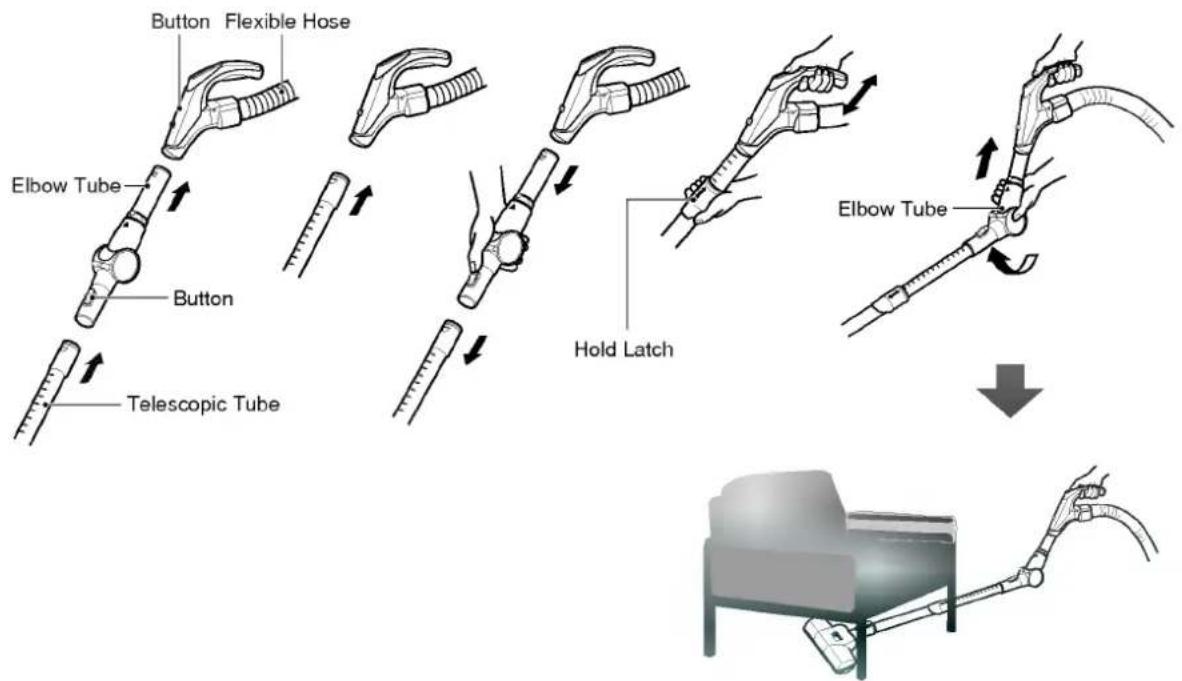
- Connect the elbow tube to the flexible hose and, connect the telescopic tube to the elbow tube. (You can connect the telescopic tube to the flexible hose without the elbow tube.)
- When the tubes are to be disconnected from another part, press the release button and disconnect each other.
• To control the length of the telescopic tube, hold latch and pull out the tube to required length. - If you use the elbow tube, you can clean under the sofa, table and bed easily.
How to use
Using the cleaning head and Accessory Nozzles
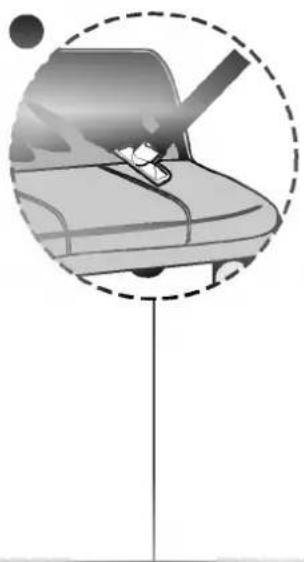
Open the accessory cover and pull out accessory you want.
Fit the cleaning head onto the end of the tube.
natural_image
Diagram of a car steering wheel with a lever, enclosed in a dashed circle (no text or symbols)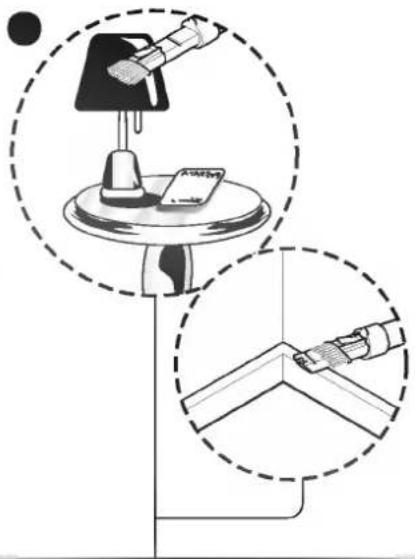
natural_image
Diagram showing a desk lamp and a chair with a tool, enclosed in dashed circular outlines (no text or symbols)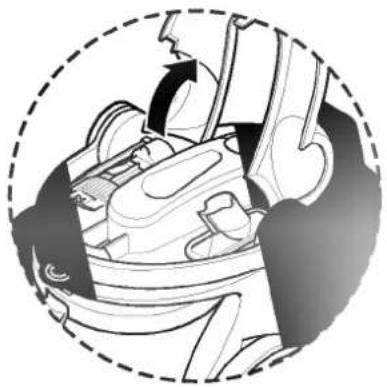
natural_image
Cross-sectional diagram of a car's internal components, showing dashboard and seat assembly (no text or labels)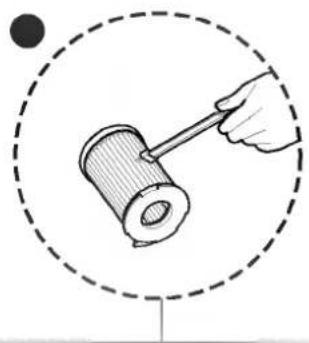
natural_image
Simple line drawing of a hand using a tool to lift a cylindrical object inside a dashed circle (no text or symbols)Uphoistery Nozzle is for
vacuuming upholstery,
mattresses, etc.
The thread collectors
help to pick up
the threads and lint.
Dusting Brush is for vacuuming picture
frames, furniture outlines, books and other
uneven objects.
Crevice Tool is for vacuuming in those
normally inaccessible places i.e.
reaching cobwebs, or down the side of a sofa!
Brush is for cleaning
motor filter.(Air cleaner)

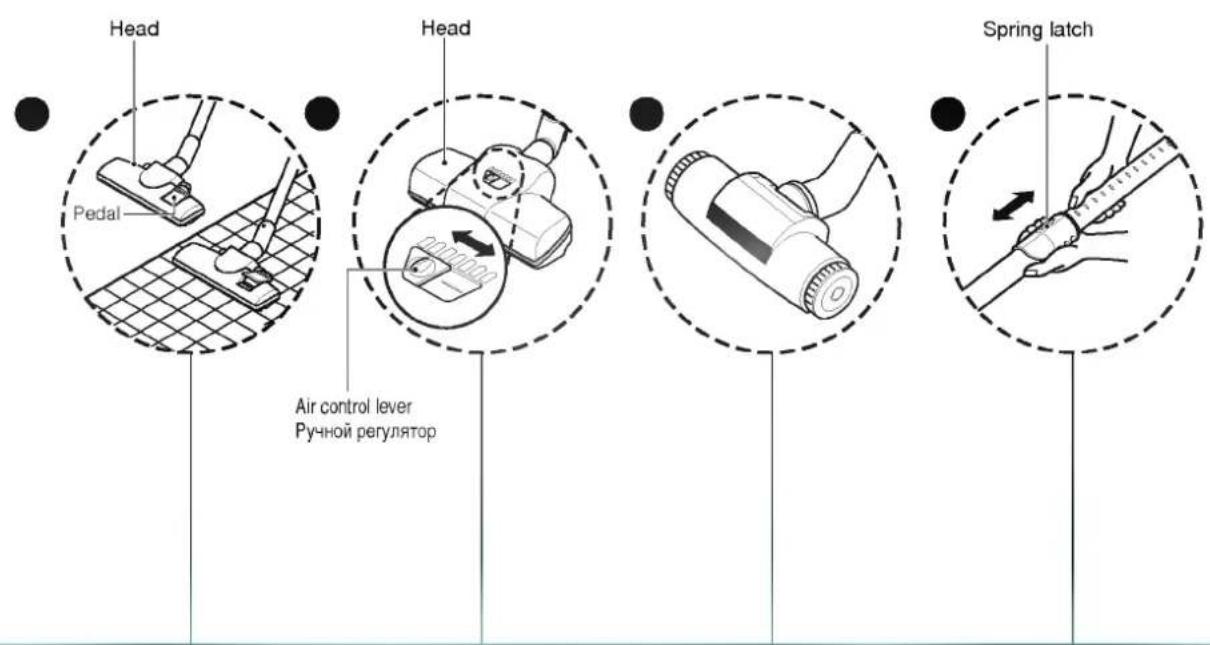
• The 2 position heads equipped with a pedal which allows you to alter its position according to the type offloor to be cleaned.
- Hard floor position (tiles, parquets floor)
Press the pedal to lower brush.
- Carpet or rug position
Press the pedal to lift the brush up.
- Easy & Powerful celaning through adjusting the air-control lever.
www use for hard floor & short type.
carpet use for long type carpet.
Refer to Page 13\~15.
Telescopic tube
- Pull out tube to required length.
- Release spring latch.
How to use Emptying the dust chamber
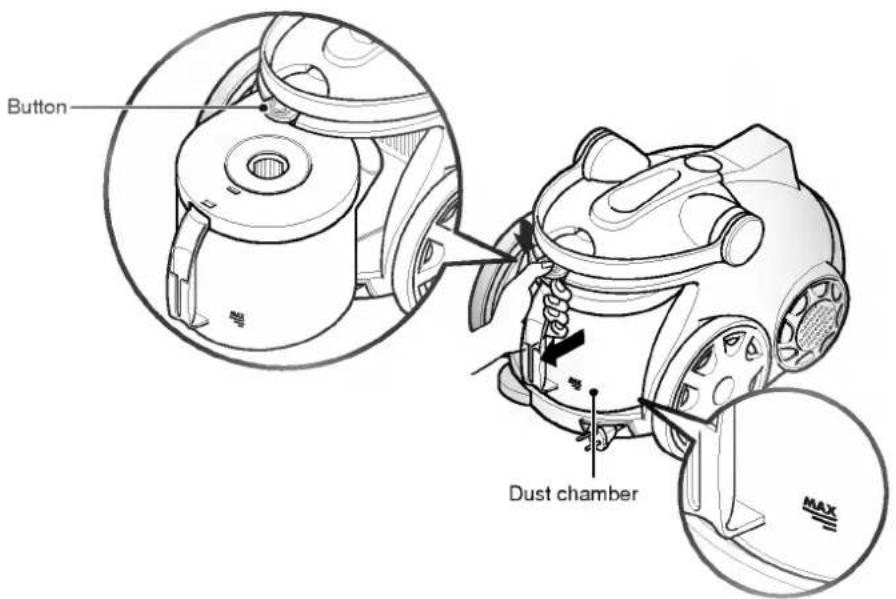
The dust chamber needs emptying when the dust is full by MAX which is marked on the dust chamber.
• Turn off the appliance and unplug it.
- Your appliance is equipped with both the dust chamber and the motor filter.
Press the button of the cover and pull the dust chamber forward. Remove the dust chamber cap and empty the dust chamber.
• To refit the dust chamber, push the dust chamber into the tank mount until it will go no further.
Operation
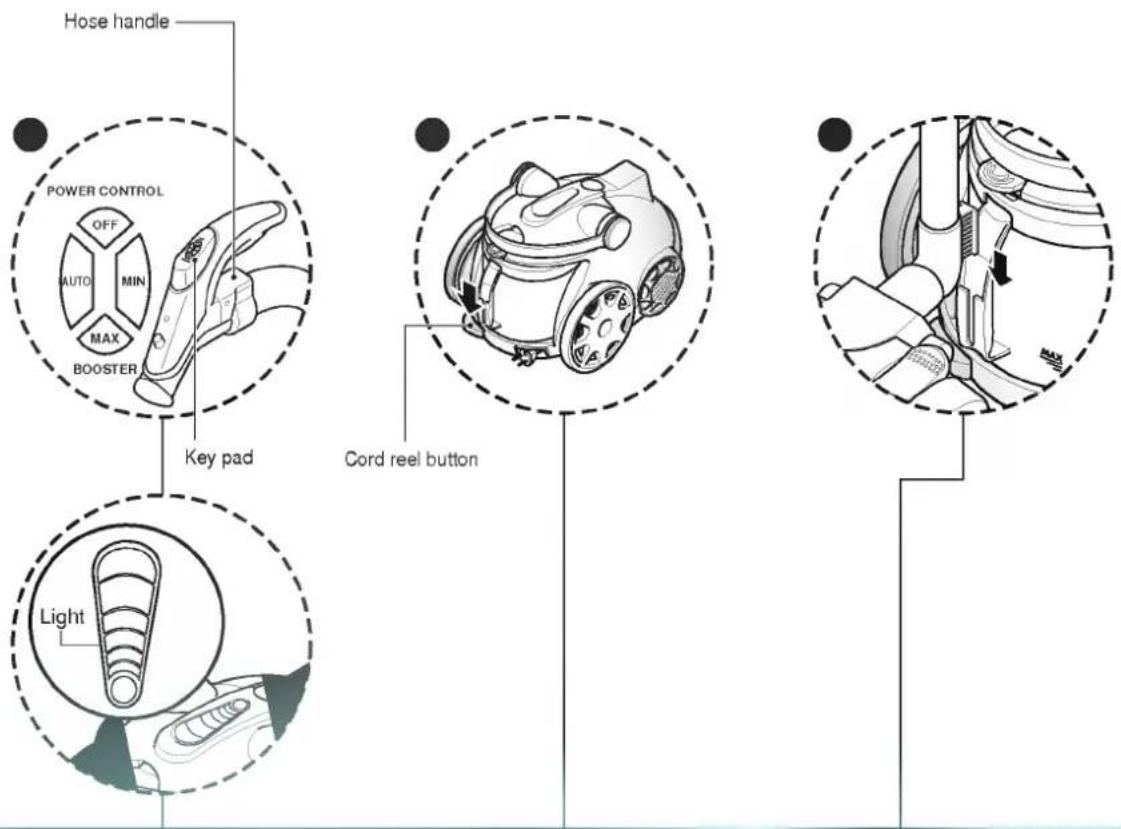
- Adjust power with the power control switch in the handle.
-
If you press the key that you want, the light which is located on body is on differently.
• In case of auto, the power and light is controlled by the amount of dust. -
Pull out the mains lead to the desired length and plug into the socket.
- Press key pad(AUTO, MIN, MAX) to start the vacuum cleaner.
• To stop it, press the key pad(OFF). - Depress the cord reel lever to retract the power cord after use.
- For deposit after vacuuming, for example to move a small piece of furniture or a rug, use the Park system to support the flexible hose and cleaning head.
- Slide the hook attached to the large cleaning head into the slot on the rear of the appliance.
How to use Cleaning the motor filter/Air cleaner
flowchart
graph TD
    A["Boiling with Washer"] --> B["Actuator with Washer"]
    B --> C["Reinjection of Washer"]
    C --> D["Assembly with Washer"]
    D --> E["Final Finishing"]
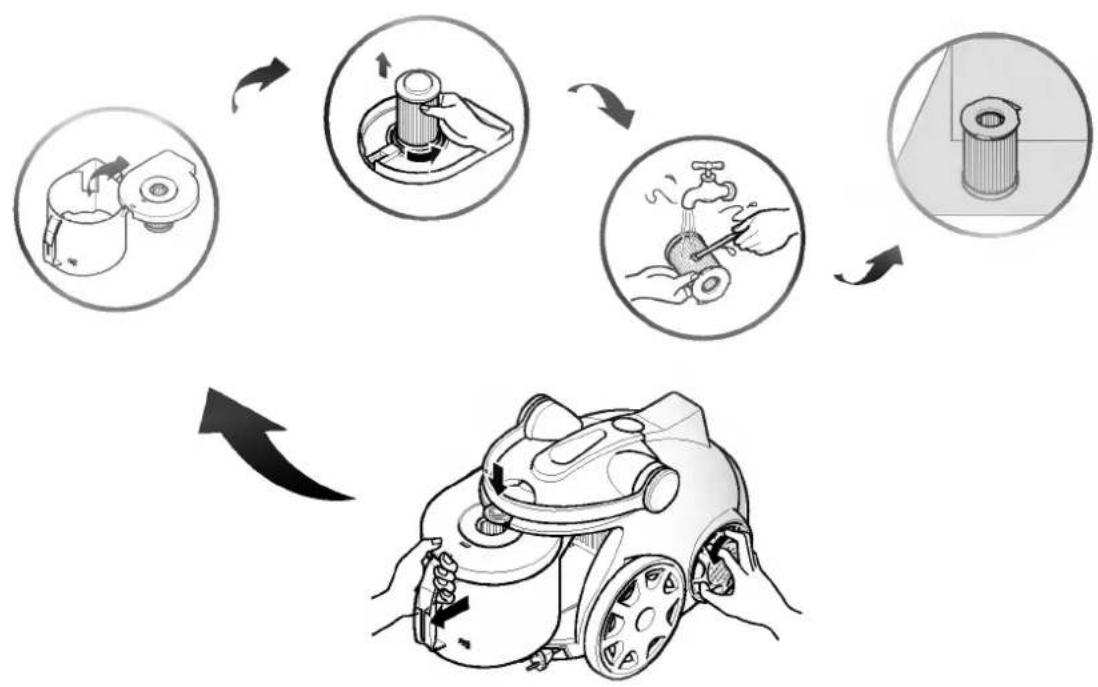
The motor filter is situated under the tank cap and you can use it permanently.
Each time the light is on and off, clean the motor filter with water and brush and then replace it in the vacuum cleaner.
- Press the button of cover and pull the dust chamber forward.
- Open the chamber cap.
- Separate the motor filter by rotaing it counter-clockwise.
- Clean the motor filter with the brush under a running tap.
• Dry it in shade for a day.
Even if the light is not on, wash motor filter at least once 6 months.
! WARNING!
Gently rinse both parts separately under a cold running tap until the water runs clear. Do not use detergent or a washing machine or dishwasher.
Your filter may discolour with use, however this will not affect its filtration efficiency. Shake off excess water from the filter.
Do not tumble/spindry, microwave or place in oven or on direct heat. Ensure the filter is completely dry.
Re-assemble the filter and reinstall it in the vacuum cleaner.
If the filter is damaged, do not place them in the machine. Please call the Helpline.
Cleaning the dust chamber
Cleaning the exhaust filters
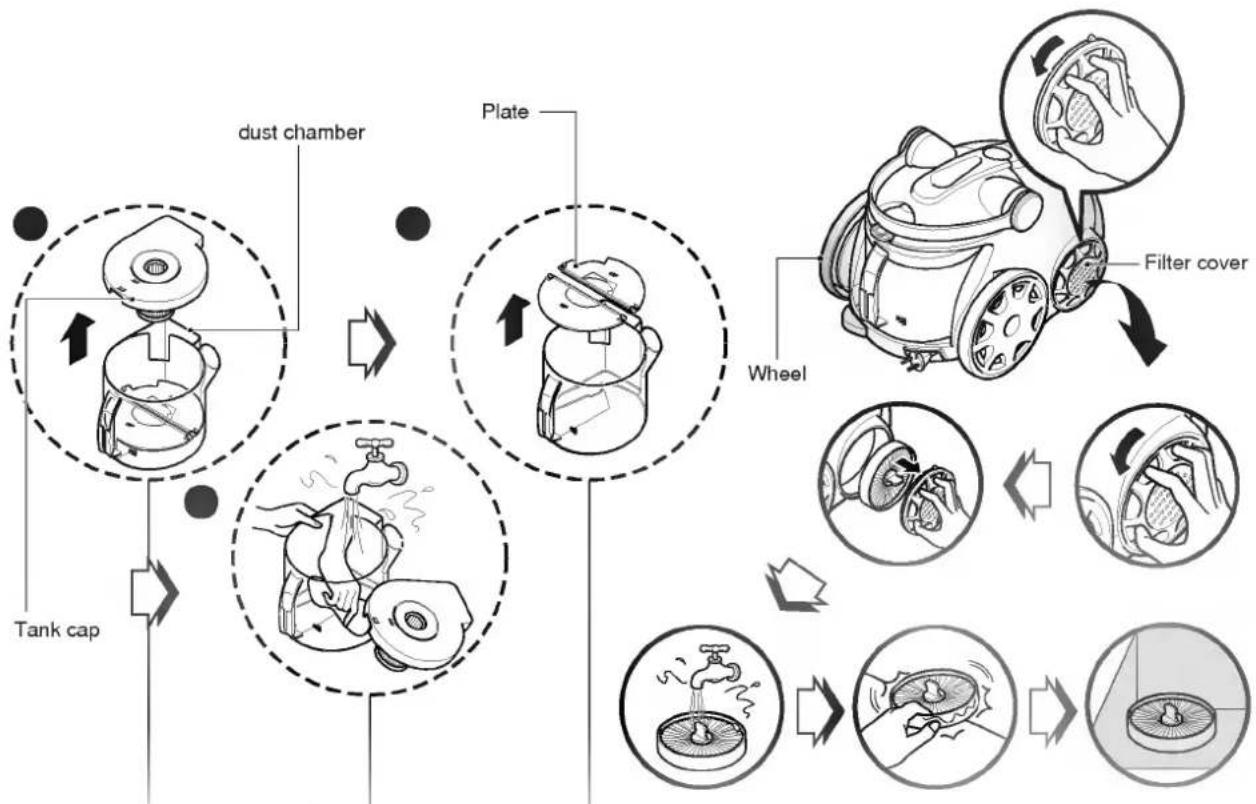
flowchart
graph TD
    A["Tank cap"] --> B["duft chamber"]
    B --> C["Plate"]
    C --> D["Filter cover"]
    D --> E["Wheel"]
    E --> F["Final packaging with dust"]

Open the tank cap.
● Wash both parts with soft material. Gently rinse both parts under a cold running tap.

Remove two plates from the dust chamber.
- The exhaust filter is washable HEPA filter. so you can use it permanently.
• To change the exhaust filter, remove the filter cover on the body by rotating the filter cover counter-clockwise. - Pull out the exhaust filter. Clean it with water. You must not use brush.
-This will cause permanently damage allowing dust to by-pass the filter. - You filter may discolour with use, however this will not affect its filtration efficiency.
- Shake off excess water from the filter.
• Dry it in shade for a day.
• We advise you to clean it at least once a year.
User's guide for ultra punch vacuum nozzle
Features
This nozzle picks up even dust inside through beating.
The bottom part can be separated to be cleaned.
Since the bottom does not stick to the surface, vacuuming is easy.
How to use
Follow the directions below for proper use.
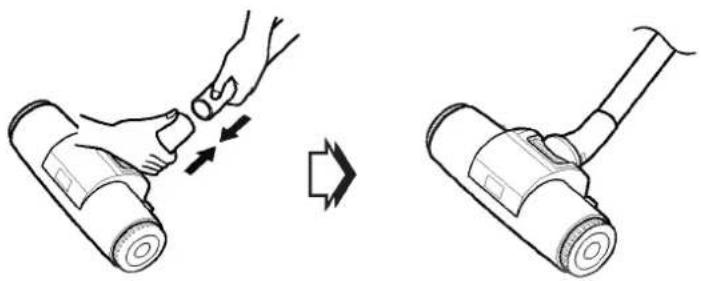
Assembly
Connect the nozzle to the telescopic tube.
natural_image
Illustration of a hand using a vacuum cleaner to lift a device, showing the process (no text or symbols present)Set the suction power control switch to MAX POWER before vacuuming.
According to the type of bedding, handling may be awkward or it may cause a lot of noise.
If this case occur, adjust the sunction power control switch to a lower setting.
If the punch bar does not move, lift the nozzle slightly off the surface.
If it dose not move, even after doing so, check if the suction power is too low or if the nozzle base is clogged with a foreign object.
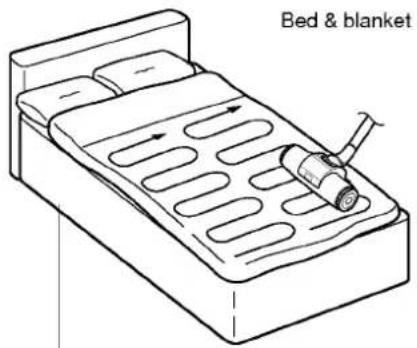
This Ultra Punch nozzle is for effective cleaning of beds and blankets to remove mites and dust.
Effective cleaning
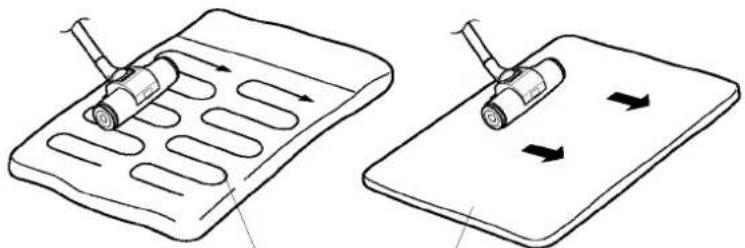
Bulky & heavy blanket
Light blanket & sheet
natural_image
Two-step diagram showing a battery being inserted into a slide with arrows indicating motion (no text or symbols)Lay out the blanket and vacuum it on the bed
It is easier to clean light blanket or sheet by pushing the nozzle to the direction of the arrow. To increase cleaning efficiency for light blankets, lay on top of a bulky blanket and then clean.
User's guide for ultra punch vacuum nozzle Cleaning Vacuum Nozzle for Bedding
For simple cleaning of the vacuum nozzle, detach the Ultra Punch nozzle from the telescopic tube and attach the crevice tool to vacuum dust.
Top
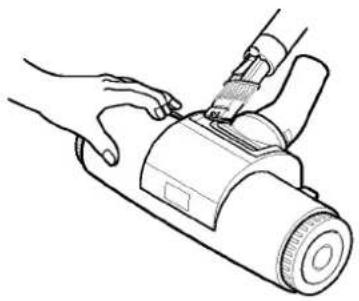
natural_image
Line drawing of a hand using a handheld device to measure a cylindrical object (no text or symbols present)Bottom
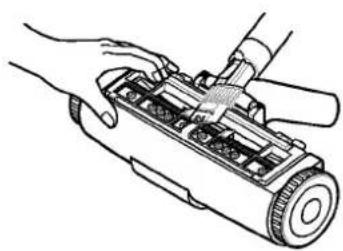
natural_image
Line drawing of hands using a handheld device to adjust internal components (no text or symbols)Since the vibrator inside is composed of precision parts, never disassemble the body. Be careful not to let foreign objects clog the air suction part on top of the vacuum nozzle. Since removal of the punch bar may cause performance problems, do not warp or remove it. Attach the bottom plate properly before using. Without this bottom plate, it may not function.
Since this vacuum nozzle has been made exclusively for cleaning beds, blankets and upholstery, use it only for these cleaning purposes. (Using it to clean the floor may result soiling it or drop in performance, do not use it for such purposes.)
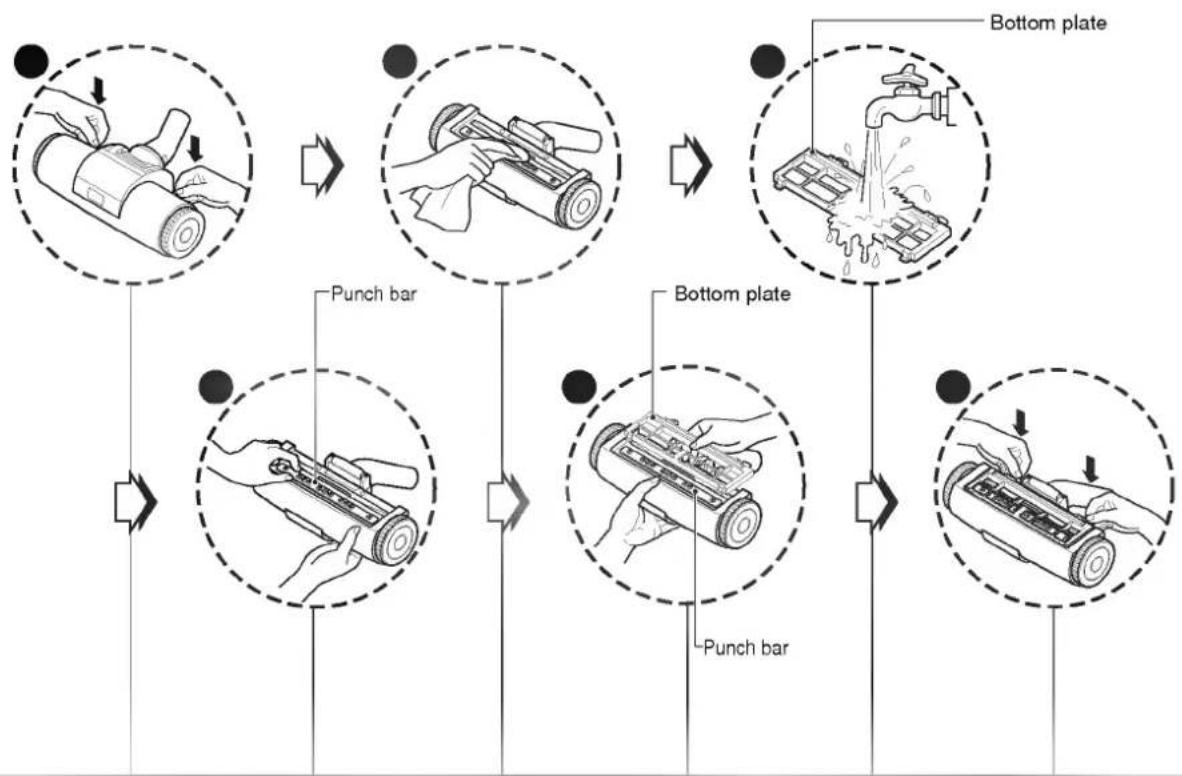
Follow the instruction below for through washing
(Do not soak the entire body of the vacuum nozzle in water, it may cause the vibrator to malfunction)
flowchart
graph TD
    A["Device with roller roller"] --> B["Punch bar"]
    B --> C["Device with roller roller"]
    C --> D["Bottom plate with water displacement"]
    D --> E["Punch bar"]
    E --> F["Device with roller roller"]
- Press the button on the rear side of the vacuum nozzle to separate the bottom plate.
● Wipe all the soiled parts of the vacuum nozzle body with a cloth.
- Wash the removed bottom plate with water and dry it.
● Straighten the punch bar on the lower section.
- Insert the attachment projections on bottom plate to the vacuum nozzle grooves.
● Push down the tabs to secure.
What to do if your appliance does not work
Check that the appliance is correctly plugged in and that the electrical socket is working.
What to do when the suction performance reduces?
- Stop the appliance and unplug it.
- Check that the tubes, flexible hose and cleaning tool.
- Check that the dust chamber is not full. Empty if necessary.
- Check that the light is not on because of motor filter's blockage.
- Check that the exhaust filter is not blocked.
Clean the filter.

WARNING!
If ti becomes necessary to replace the moulded-on plug, destroy the defective plug so that it cannot create a possible shock hazard by being inserted into a wall socket.
Note
natural_image
Decorative border frame with leaf motifs and dotted lines, no text or symbols present
LG Electronics Inc.
- OWNER'S MANUAL
- Table of contents
- Information for your safety
- Important for users in the UK.
- VERY IMPORTANT:
- How to use Assembling Cleaner
- How to use Elbow tube (V-C7070CEU Only)
- How to use
- Using the cleaning head and Accessory Nozzles
- How to use Emptying the dust chamber
- Operation
- How to use Cleaning the motor filter/Air cleaner
- ! WARNING!
- Cleaning the dust chamber
- Cleaning the exhaust filters
- User's guide for ultra punch vacuum nozzle
- Features
- User's guide for ultra punch vacuum nozzle Cleaning Vacuum Nozzle for Bedding
- What to do if your appliance does not work
- What to do when the suction performance reduces?
- WARNING!
- Note
Märke : LG
Modell : V-C7070CEU
Kategori : Dammsugare