
EU7117C - Fryser ELECTROLUX - Gratis bruksanvisning och manual
Hitta enhetens manual gratis EU7117C ELECTROLUX i PDF-format.


Användarfrågor om EU7117C ELECTROLUX
0 fråga om denna apparat. Svara på dem du kan eller ställ din egen.
Ställ en ny fråga om denna apparat
Ladda ner instruktionerna för din Fryser i PDF-format gratis! Hitta din manual EU7117C - ELECTROLUX och ta tillbaka ditt elektroniska enhet i hand. På denna sida publiceras alla dokument som behövs för att använda din enhet. EU7117C av märket ELECTROLUX.
BRUKSANVISNING EU7117C ELECTROLUX
INSTRUCTION BOOKLET GEBRAUCHSANWEISUNG NOTICE D'UTILISATION ISTRUZIONI D'USO GEBRUIKSAANWIJZING BRUGSANVISNING

natural_image
Simple line drawing of a smartphone door (no text or symbols)EU 2115C, EU 2503C, EU 7115C, EU 7117C, EU 7305C, EU 7503C, EU 7717C, EU 8216C
821 39 11-02/0
Electrolux


IMPORTANT SAFETY INFORMATION
Read carefully the user instructions, with the directions, advice and cautionary notes, before installing the cabinet and using it. It will then perform satisfactorily and give maximum benefit.
Anyone using the cabinet must be familiar with how it should be used.
Save these user instructions. Keep them where they are easy to find. They contain many items of advice that will enable you to use the cabinet correctly.
The user instructions should accompany the cabinet if it is moved to some other place or is transferred to a different owner, so that the user will always be able to find out about the various functions and safety rules.
The cabinet is designed only for storing foodstuffs for normal domestic use and in accordance with these instructions. If it is used for any other purpose, it could possibly cause injuries or damage to property.
The cabinet must be handled by adults. Don't let children play with it or touch the controls and movable or moving parts.
.1 All installation work and other work on the product, including arrangements for extending the power supply cable, must be carried out by an authorized serviceman. Work carried out by persons with insufficient knowledge may impair the performance of the product, and cause injury and damage to property.
1. Service and repairs must be carried out by a service company authorized by the supplier. Use only spare parts supplied by them.
Don't make any modifications to the cabinet, since this may cause damage or injury.
1. Make sure that there is sufficient ventilation space around the cabinet, so that the compressor will not overheat and stop.
If possible, install the cabinet with its back against a wall so that hot parts at the rear will not be accessible, but leave sufficient ventilation space.
When installing or moving cabinet, make sure that the power supply cable is not nipped.
Before cleaning or servicing the cabinet, always switch it off and pull the power supply plug out of the socket. To do this, always grip the plug - never pull the cable. If the plug is inaccessible, remove the fuse supplying the cabinet.
The refrigeration system behind and inside the cabinet contains refrigerant. If the refrigeration system is punctured, the cabinet may be damaged and the food inside it may be harmed. So never let sharp objects come into contact with the evaporator plate and tubes inside and behind the cabinet.
Before plugging the power supply plug into the socket and starting the cabinet for the first time, leave it to stabi-
lize for about 30 minutes or, if it was transported horizontally, for about 4 hours. This will give the oil in the compressor time to run back to the appropriate place.
Check that the cabinet performs satisfactorily and maintains the preset temperature for 24 hours after it has been switched on for the first time. Not until then should the freezer be used for freezing fresh foods.
Don't put ice cream and ice cubes directly from the freezer into your mouth. They may be so cold that they could cause frost burns in your mouth.
! The cabinet is heavy. Projecting metal parts at the rear and the edges behind and below the cabinet may be sharp. Take care when moving the cabinet. Use gloves.
WARNING. Never store explosive gases and liquids in the fridge or freezer. The container could explode and cause injuries or damage to property. Never store carbonated (fizzy) drinks or glass bottles and jars in the freezer. The glass may crack and shatter.
SCRAPPING.
Child safety. Remove the doors before scrapping the cabinet, so that playing children will not be trapped in it. After the cabinet has been removed and the power supply plug has been pulled out of the socket, cut off the power supply cable as close as possible to the cabinet.
Environmental concerns - refrigerant
The insulation and the refrigerant in the refrigeration system of the old appliance may contain ozone depleting substances. When the appliance is scrapped, it is therefore important to hand it over to an appropriate recovery plant, and to ensure that the refrigeration system inside and behind the cabinet is not damaged.
The new appliance is entirely free from ozone depleting substances. The refrigerant used is specified on the data plate inside the cabinet.
CONTENTS
Important safety information 2
Environmental concerns 3
Energy saving advice 3
Installation 4
Using the freezer 6
Care and maintenance 9
If the appliance does not perform correctly 10
Service and spare parts 11
ENVIRONMENTAL CONCERNS
- The insulation and refrigerant in the unit are completely free from ozone depleting chlorine and totally harmless to the ozone layer.
• All parts of the packaging can be recycled. - The cabinets are manufactured so that they can easily be dismantled for recovery.
- Hand over the scrapped fridges and freezers to a recycling company. Check with your local Council or Environmental Health Officer to see if there are facilities in your area for collecting the gas in the appliance for re-cycling. Consult your local authority or dealer for further information.
Help to keep your countryside tidy - use authorised disposal sites for your old appliances.
In use:
- Store the foods in cans, containers and cartons that can be reused.
- Don't use disposable materials unnecessarily.
- Follow the advice under "Energy saving advice".
• Use gentle cleaning agents.
ENERGY SAVING ADVICE
- Don't install the cabinet close to devices that emit heat, such as cooker, dishwasher or radiator.
- Don't locate the cabinet where it could be exposed to direct solar heat.
- Locate the cabinet in a cool, well-ventilated room, and make sure that the air openings below, behind and above the cabinet are not obstructed.
- Avoid unnecessary frosting in the cabinet by packing all foodstuffs into airtight packages before placing them in the freezer.
- Always leave warm food to cool down to room temperature before placing it in the fridge or freezer.
-
Food which is to be frozen should be cooled in the fridge before being transferred to the freezer. This will speed up the freezing process.
-
Place foods which are to be frozen directly on the top freezer shelf. This will speed up the freezing process.
- Thaw frozen foods in the fridge. This will be of benefit to the fridge by reducing the work of the refrigeration unit.
- Don't keep the door open too long, and don't open it too often.
- Defrost the freezer when a 3–5 mm thick layer of frost has formed.
• Make sure that nothing in the cabinet prevents the door from being properly closed.
• Vacuum-clean the compressor and refrigeration system at the rear of the cabinet every year or every other year.
The user instructions are common for models which have the same basic functions, but which are of different sizes and have different specification levels and interior fittings.
The pictures marked ○ are collected at the end of the user instructions. Fold out the page so that you will be able to read the text and study the picture at the same time.
INSTALLATION
Unpacking and damage in transit
Inspect the cabinet for damage. Immediately advise your local dealer of any damage that may have occurred in transit.
Hand the packaging over for recycling.
! Don't let children play with the packaging. The plastic film has been known to cause suffocation.
Cleaning
First wash the inside of the cabinet with a mild washing-up detergent. Don't use strong or abrasive cleaning agents, steel wool, abrasive sponges or solvents. Leave the cabinet to dry thoroughly.
Positioning, Installation ① ② ③ ④
To ensure that the cabinet will perform satisfactorily, it must be correctly installed, and the electrical connection must be properly made.
Locate the cabinet in a dry, cool place. Place it in a dry room, and make sure that it is not exposed to direct sunlight or any other source of heat, such as a cooker or dishwasher. The performance of the appliance will be best if the room temperature is between +16°C and +32°C.
Transport supports. Remove the transport supports on the inside of the lower door hinge and on the door sides ①
Silencing pad. Some models are fitted with a silencing pad under the cabinet. Don't remove it. The pad holders are intended mainly as transport supports, but they need not be removed ②.
Distance from surrounding cabinets/walls. The cabinet may be pushed up against the wall at the rear. The distance to the side wall on the hinge side must be min 10 mm. The cabinet may be placed next to a cabinet from the same manufacturer, without allowing extra space.
Levelling the cabinet. Make sure that the cabinet is level and is firmly supported at all four corners. The feet are adjustable. An adjusting spanner is supplied. Adjust the feet so that the cabinet is level. Make sure that the cabinet does not lean against an adjacent cabinet ③.
Self-closing doors. If the door is left slightly ajar, it will close automatically, provided that the cabinet has been properly levelled.
Good ventilation. Good air circulation around the cabinet is essential if the cabinet is to perform correctly. Don't obstruct the air passages below and behind the cabinet.
The ventilation area above the cabinet should be at least 200 cm². The ventilation passage should be located directly above the cabinet or behind and above the wall cabinet. This depends on the type of wall cabinet used. The ventilation passage behind a wall cabinet located directly above the refrigeration unit should be at least 50 mm deep ④.
Correct installation will reduce the risk of unnecessary noise and vibrations.
Electrical connections ④ Electrical requirements
Before switching on, make sure that the voltage of your electricity supply is the same as that indicated on the rating plate, located inside the cabinet.
WARNING THIS APPLIANCE MUST BE EARTHED.
For your convenience, this appliance comes complete with either a moulded-on or re-wireable 13 amp (BS 1363) plug, protected by a 13 amp ASTA approved (BS 1362) fuse.
In the event of having to change the fuse in the plug supplied, a replacement 13 amp ASTA approved (BS 1362) fuse must be used.
In the case of a moulded-on plug, the fuse cover MUST be refitted after changing fuse. If the fuse cover is lost or damaged the plug MUST NOT be used until a replacement is obtained.
Replacement covers are available from your local electricity shop or nearest customer service centre. The colour of the replacement fuse must match the colour insert or emboss on the base of the plug.
In the case of a re-wireable plug care must be taken to ensure that the top cover is refitted without causing damage to either the top cover or base. In the event of the plug becoming damaged or cracked, it must be replaced with an equivalent 13 amp. BS 1363, approved plug and rewired using the following procedure.
IMPORTANT
The wires in the mains lead are coloured in accordance with the following code:
Green and Yellow: EARTH
Blue: NEUTRAL
Brown: LIVE

The wire coloured green and yellow must be connected to the terminal marked with the letter 'E' or by the Earth symbol 12 or coloured green or green and yellow. The wire coloured Blue must be connected to the terminal marked with the letter 'N' or coloured black. The wire coloured Brown must be connected to the terminal marked 'L' or coloured red.
Upon completion there must be no cut, loose or stray strands of wire present and the cord clamp must be secure over the outer sheath and firmly tightened.
If a 13 amp. (BS 1363) plug is unsuitable for your sockets, the plug should be removed. (cut-off in the case of a moulded-on plug) and an appropriate plug fitted.
NOTE: Moulded plug cannot be re-used and should be discarded if cut from a mains lead, as insertion into a 13A socket could prove fatal.
If a non-fused plug is fitted, the wiring must follow the above procedure and the appliance must be protected by the use of a 15amp fuse either in the adaptor or at the distribution board.
If at any time a replacement supply cord is required, the cross sectional area of its conductors must not be less than 0.75mm2 and the cable clamp must be tightened so as to fully retain the new cord.
We recommend that this type of installation be checked by a fully qualified electrician, prior to use.
Before pushing the power supply plug into the socket and starting the cabinet for the first time, leave it standing upright for about 30 minutes or for about 4 hours if it was transported horizontally. The liquid in the refrigeration system will then have time to stabilize. If this is not observed, the compressor may sustain damage.
This appliance conforms to the provisions of EC Directive 89/336/EEC relative to radio interference suppression
- The cabinet will be de-energized only after the plug has been pulled out of the wall socket.
Rehanging the door ⑤
The door can be hung on the right-hand or left-hand side. Make sure that the cabinet is de-energized when the door is rehung. Rehanging will be simplified if the cabinet is laid on its back. Place it on a soft support to make the cabinet easier to lift. When rehanging the door with the cabinet upright, hold the door firmly so that it will not drop when the hinges are removed. N.B. Take care not to damage or scratch the door during rehanging.
A flat screwdriver, a cross-recess screwdriver and the adjusting spanner supplied with the cabinet will be needed for re-hanging the door.
- Pull the plug out of the wall socket.
- Remove the ventilation grille.
- Remove the lower hinge (A).
- Remove the door
- Remove the upper hinge (B) pin and move it to the other side.
6 Refit the door - Remove the door closing fittings on the underside of the door, and the lower hinge. Save them for later use (C).
Move the hinge pin to the other side (D).
Secure the accompanying new fittings to the other side of the door and hinge.
8.Secure the lower hinge to the other side.
Raise the cabinet
Handles on the side of the door: Remove the handles. Carefully press in the plastic plugs on the opposite side, using a 3 mm diameter drift. Secure the handles to the other side. Press the plastic plugs supplied into the holes to which the handles were previously fitted (E).
Move the cover washers in the ventilation grille and refit the grille.
Place the cabinet in its intended place. Check that it is level. See under "INSTALLATION".
Leave the cabinet for about 30 minutes before starting it.
USING THE FREEZER
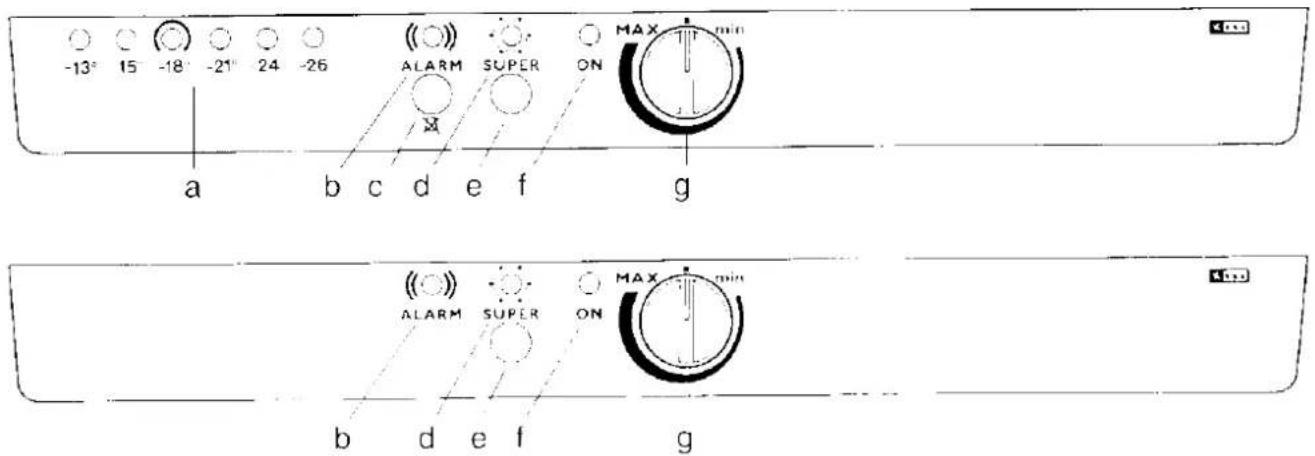
a. Thermometer
The thermometer shows the temperature corresponding to the temperature in the warmest food.
When the freezer is started, the lamp for 13 C in the thermometer will light up for a moment
b. Red warning lamp, temperature alarm
Lights up to indicate high temperature.
c. Reset button, temperature alarm
The alarm starts when it is warmer than about -12^ . The alarm therefore starts when the freezer is started.
Press the button to silence the audible alarm.
The red warning lamp will remain alight until the temperature has reverted to the value preset on the thermostat.
d. Yellow fast-freezing lamp
The yellow lamp lights up when fast freezing S-Super is switched on.
e. Fast-freezing button, S-Super
Press the button to switch on or off the fast-freezing function.
f. Green indicator lamp
Lights up when the freezer is operating.
g. Thermostat control. stepless regulation
Lowest setting, minimum cold
Min
Highest setting, maximum cold
Max
Off
■
Starting, setting the temperature
Start the freezer by turning the thermostat knob to a medium position, i.e. until the marking on it points straight down.
Then set it to the desired temperature by trial and error. Each time you change the temperature setting, let the cabinet run for 24 hours so that the temperature inside it and that of the food packages will have time to adapt to the new setting.
The temperature set on the thermostat will then be maintained automatically.
Room temperature, the amount of food, etc, stored inside, and how often the door is opened all have an effect on the temperature in the cabinet.
It is normal for the temperature to vary somewhat at different places in the cabinet, since the air in the cabinet circulates.
A suitable temperature range for storing foods in the freezer is -18 C to -20°C.
If the temperature setting is colder, the energy consumption will increase.
If the temperature setting is warmer, the quality of the foods will deteriorate and their storage life will be shortened.
NB. If an ordinary separate thermometer is used to measure the temperature, the reading will differ somewhat from the actual temperature in the food. This is because an ordinary thermometer measures the temperature in the cabinet just where the thermometer is located, and not the temperature in the food. The temperature in the food changes more slowly than the air temperature.
Switching off
Switch off the cabinet by turning the thermostat knob to "■". NOTE. To make sure that the appliance is not switched off inadvertently, there is some resistance before the stop position. Press right up to "■".
Pull the power supply plug out of the wall socket.
The appliance will not be de-energized until the power supply plug has been pulled out of the socket. Grasp the plug to withdraw it, not the cable.
Suitable storage periods
Different foods can be stored for different periods in the freezer without their quality being impaired.
Precooked frozen foods: Follow the advice on the maximum storage period given on the packaging.
Food frozen at home: Fatty, salty and very spicy foods generally have a shorter storage life than lean and non-spicy foods. This applies to both fresh foods and cooked foods.
Fatty and salty foods should not be stored for longer than about 3 months.
Cooked foods and foods with a certain amount of fat can be stored for about 6 months.
Lean foods and fruit can be stored for about 1 year.
Freezer drawers
The freezer cabinet has withdrawable drawers which make it quick and easy to find the food packet you want. If large quantities of food or bulky packages are to be stored in the freezer, the drawers, except the drawer at the bottom, can be removed and the goods can be stored directly on the shelves in order to put the space available to maximum use.
Defrosting will be easier if the drawers are removed with the frozen foods in them.
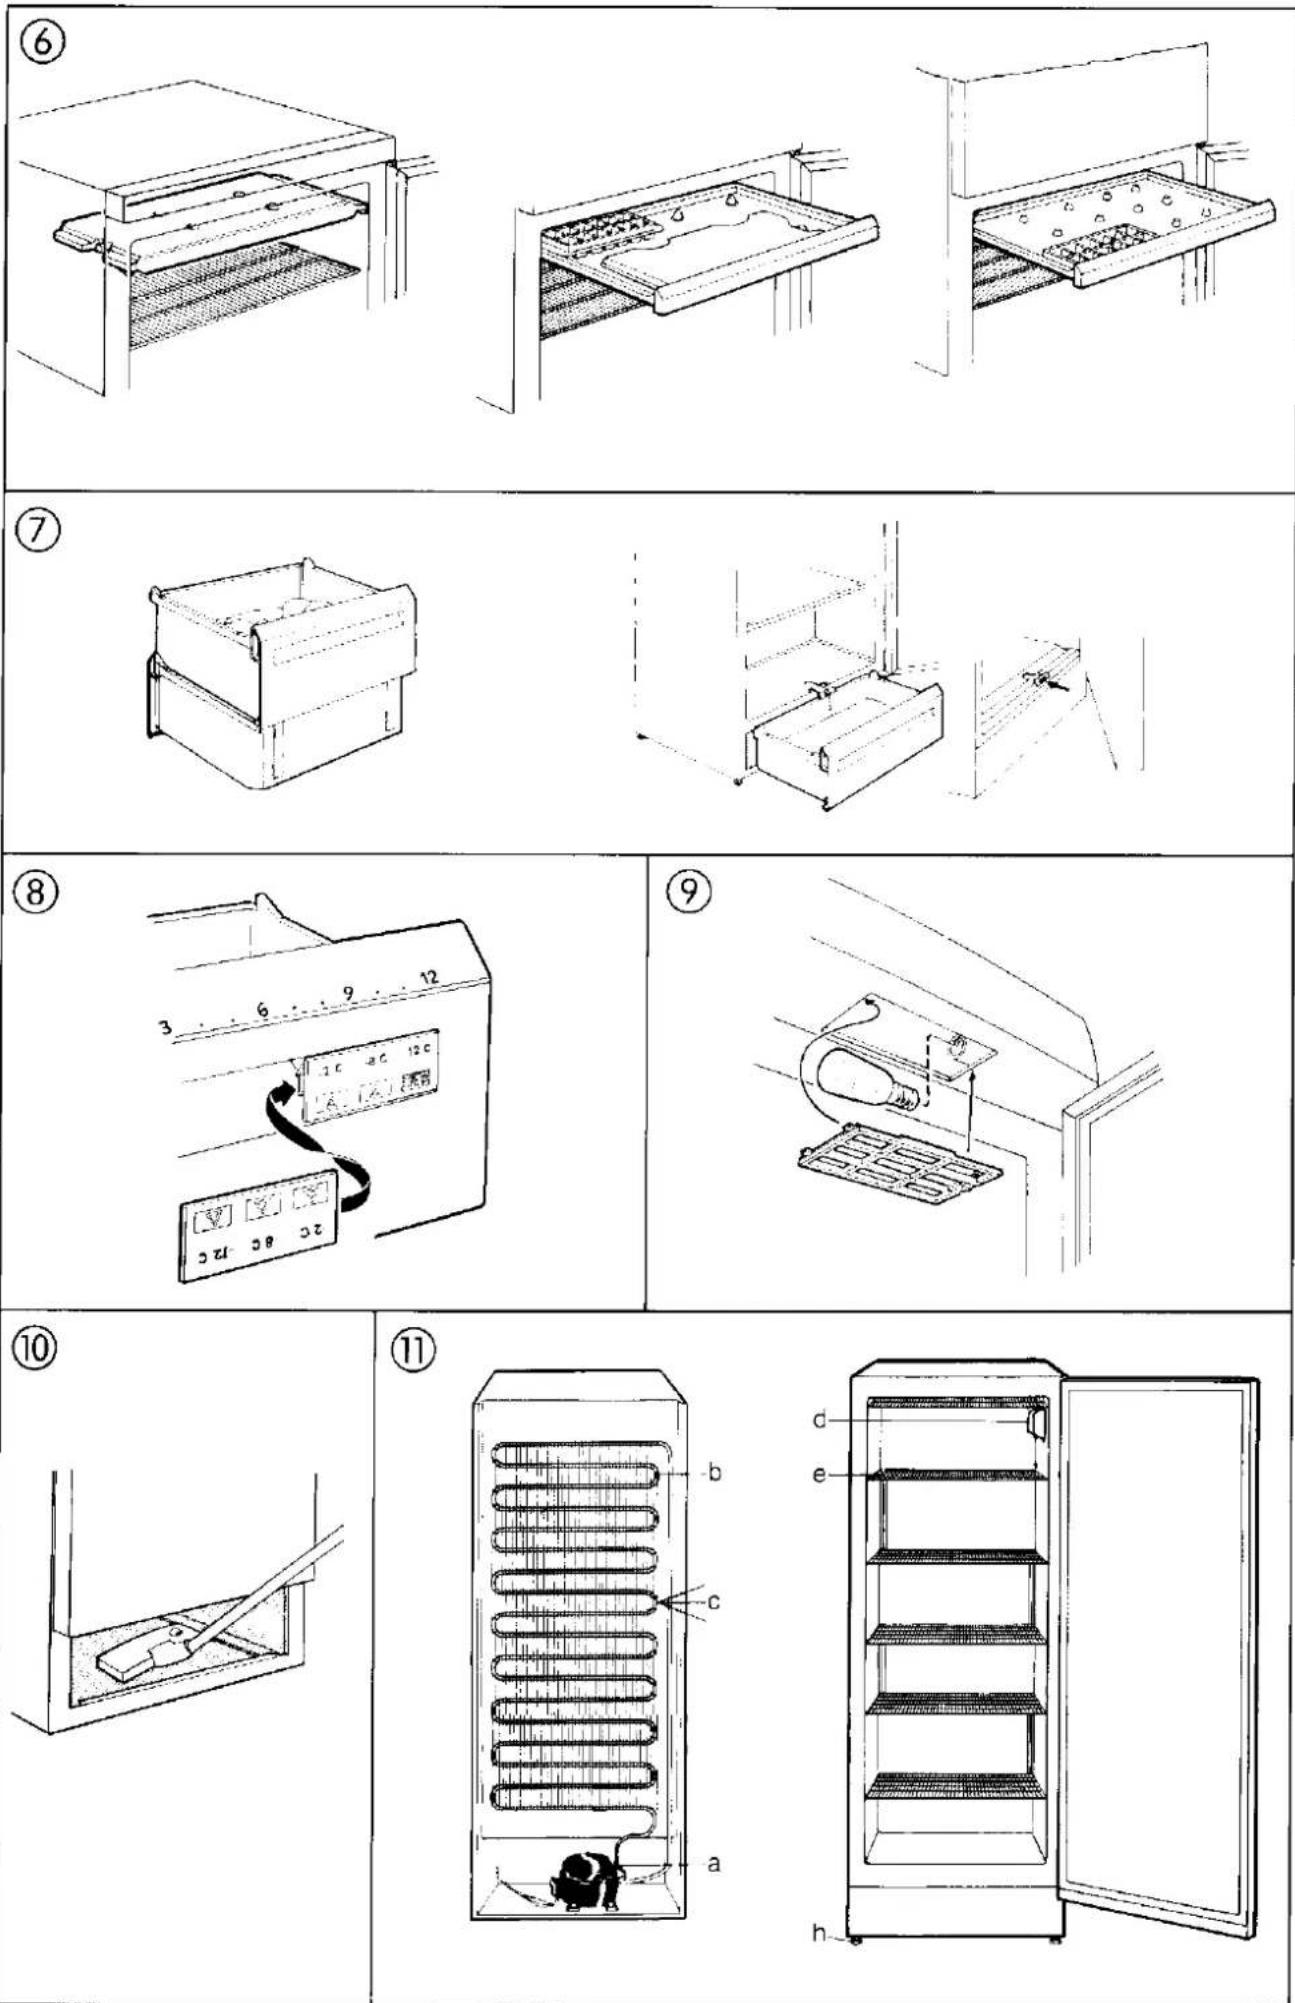
Temperature control ⑧
(Certain models)
The freezer temperature control is located on a freezer drawer in the middle of the cabinet.
After a temporary power failure, the indicator will show the highest temperature reached during the power failure, even if the freezer has come back again.
The temperature indicator is based on a system using three types of fluid with different freezing points at -12°C (green), -8°C (yellow) and -2°C (red), respectively. As the freezer temperature rises above each of these symbols, a warning triangle of the appropriate colour is displayed as the fluid thaws and drops down.
When starting the freezer, the indicator should be frozen upside-down, then turned.
Using the temperature indicator:
-
Take out the indicator and start the freezer.
-
Insert the indicator upside down.
Wait about 24 hours until it has frozen.
- Take out the indicator and put it back it upright position
In case of power failure
At -12^ (green) most food can be refrozen to -18^ .
E.g. ice-cream is extremely sensitive to temperatures warmer than -18°C.
At -8^ C (yellow) freezer contents should be used without delay.
At -2°C (red) food must be consumed or cooked before refreezing. See "Breakdowns".
Fast freezing, S-SUPER
Foodstuffs will preserve their quality best if they are frozen as quickly as possible.
If freezing takes place slowly, the foods are very likely to lose their juiciness, and will be dry when they are later thawed and cooked. This applies particularly to raw meat and fresh frozen berries.
The thermostat setting need never be altered for fast freezing.
Press the fast-freezing button S-SUPER ahead of time to prevent the already frozen foods from warming up when the next batch of food at room temperature is placed in the freezer.
- If less than 3 kg of food a day is frozen, the fast-freezing button need not be used.
• If larger quantities are frozen:
Press the fast-freezing button 24 hours before the foods are placed in the freezer. The yellow lamp will remain alight as long as the fast-freezing function is in operation. Interrupt the fast-freezing by pressing the button again about 24 hours after placing the food in the freezer. The yellow fast-freezing lamp will then be switched off.
• Use the topmost shelves for fast freezing.
- Place the foods directly on the freezer shelf, with some space between them, so that air will be able to circulate between the packets. Freezing will then be faster and the results will be better.
- Don't place foods which are to be frozen against already frozen foods. This will avoid heat from the new food from spreading to the already frozen food.
- Once foods have been frozen, they should be re-arranged and packed as closely together as possible. The foods will then stay cold longer in the event of a power failure. Arrange the foods so that space will be available on the top shelf for fast freezing of new packets.
Practical advice for fast freezing
Foods which are to be frozen should not be warmer than at room temperature. Foods should preferably be cooled in the fridge before freezing.
Freeze foods in portions which are sufficient for one meal, since the quality will be impaired if the food has to be frozen again.
Freeze only fresh and undamaged foods.
Mark all packages with the contents and date of freezing. This will make it easier to use up the foods while they are at their best.
If possible, make flat packets. They will then freeze and thaw more quickly. The bread you freeze should preferably be sliced. You will then be able to take only as many slices as you need.
Salt shortens the storage life. Salt and spice the food sparingly before freezing. It is preferable to leave the final salting and spicing of the food to just before you serve it.
Hard cheese for cooking is best if it is grated and frozen in moderate-sized packages.
Always use airtight plastic bags and packages which are intended specifically for freezing. Wrap sharp projecting edges, such as chicken legs, so that they will not puncture the freezer packaging.
If foodstuffs are properly wrapped, they will retain their quality, their storage life will increase, and the risk of frosting in the freezer cabinet will be reduced.
For environmental reasons, foodstuffs should be stored in re-usable packages, if possible. Don't use disposable packaging unnecessarily.
Thawing
Most foodstuffs can be thawed at room temperature or in the fridge.
However, raw meat should be allowed to thaw slowly in the fridge. The meat will then be better able to retain its juices. Place the meat package in a container with raised edges, so that the liquid will not run out into the cabinet.
When thawing foodstuffs in a microwave oven, follow the advice in the user instructions for the microwave oven.
Ice trays
Fill the ice trays no more than 3/4 full, since water expands as it freezes.
Release the ice cubes by twisting the ice tray slightly. Ice cubes dry out and their taste may be tainted if they are stored too long.
So throw away old ice cubes and freeze a new batch whenever you need them.
Freezer tray ⑥
(Certain models)
To freeze berries and vegetables, spread them on the freezer tray.
After about 4 hours, they will be thoroughly frozen and can then be packaged in the usual way. Foods that are frozen loosely in this way will not stick together, and you will be able to use them a little at a time, as the need arises.
Cold accumulator ⑥
(Certain models)
The cold accumulator will keep the food cold for longer after a power failure, for instance.
The cold accumulator will be most effective if it is placed at the front of the fast-freezing tray or (models without fast-freezing tray) at the front towards the door.
Place the cold accumulator over the frozen foodstuffs when the cabinet is being defrosted. This will help to keep them cold.
CARE AND MAINTENANCE
Defrosting ⑦
A certain amount of frost will always form on the freezer drawers and around the top compartment when the freezer is in use. Defrost the freezer when the layer of frost is 3 - 5 mm thick. Wait until there is little food in the freezer before defrosting it. Avoid defrosting on warm summer days
- Switch off the freezer.
- Remove the drawers together with the foodstuffs. Turn alternate drawers through half a turn so that the drawer above acts as a lid for the drawer below.
Place the cold accumulator (if any) on top and wrap some insulating material, such as blankets or newspapers, around the drawers.
Foodstuffs can also be packed closely in some other way and stored as cold as possible, e.g. in the fridge. - Defrosting will be speeded up if one or more bowls of hot, but not boiling, water are placed in the freezer. Use containers which will not scratch the interior, and don't allow them to come into direct contact with plastic surfaces.
- Remove the ventilation grille. This is provided with snap fasteners.
- Withdraw the drain spout and place the lowest freezer drawer or some other receptacle, such as an oven dish, under the spout. Leave the door open.
- As the ice begins to thaw and work loose, carefully scrape it away using a plastic or wooden scraper. Never use sharp or pointed tools since they could easily damage the interior.
- When all the ice has melted, wipe the freezer dry and push the spout back in again
- Switch the freezer on again. Return the food packages into the freezer when the interior is cold again.
! WARNING. Never use a hair dryer or any other heater to speed up defrosting.
Avoid frosting inside the freezer by not opening the doors more often or for longer than necessary.
Cleaning ⑩
Clean the cabinet at regular intervals. First switch off the appliance. Remove the removable parts and wash them. Clean the inside of the cabinet, the interior fittings and the door gasket. Use a mild washing-up detergent.
Don't use strong or abrasive cleaning agents, scouring powder, abrasive sponges, steel wool or solvents. These may damage the cabinet. Don't close the door before the interior is dry.
The ventilation grille can be removed for cleaning and vacuuming under the cabinet. The grille has a snap fastening
The cabinet will not be de-energized until the power supply plug has been pulled out of the socket..
Lighting - Changing the light bulb ⑨
(Certain models)
The light is switched on automatically when the door is opened. Before changing the bulb, disconnect the appliance from the power supply.
Use a bulb of the same type, with base E14 and a maximum rating of 25 W.
! The cabinet will not be de-energized until the power supply plug has been pulled out of the socket.
If you are away from home for some time
Arrange for someone to check the cabinet at regular intervals, so that the food will not spoil because of a power failure.
When the cabinet is not in use for some time
- Switch off the thermostat
• Pull the power supply plug out of the socket
• Empty the cabinet and wash it - Leave the door ajar
If the door is closed before all moisture has dried out, the inside of the cabinet will acquire a stale, musty smell. If so, wash the cabinet again and leave the door open.
IF THE APPLIANCE DOES NOT PERFORM CORRECTLY
If the unit does not appear to work correctly, you may be able to attend to the fault yourself.
Before calling a serviceman, carefully read and follow the information and advice below, to make sure that you will not be calling out the serviceman unnecessarily.
If it is not cold enough
- Reset the thermostat to a lower temperature (colder) position
- Food for fast freezing may have been placed too closely together. Spread out the packets so that the air can circulate freely.
- Large quantities of food may have been placed in for fast freezing or may have been placed before they have cooled down sufficiently. Wait for a few hours and then check the temperature again
- Check that the door is properly closed. Don't leave the door open too long and don't open it more often than necessary
If it is too cold
- Reset the thermostat to a higher temperature (warmer) position.
The compressor runs continuously
- Check that the temperature selector has not been set to a temperature which is too low (cold)
- The compressor always runs continuously when fast freezing is switched on.
- Check that the door is closed.
• Large quantities of food have been placed in the cabinet before they have cooled down sufficiently.
Too much frost and ice are formed
Check that:
- the door is not being opened unnecessarily long or too often
• the door gasket is clean and undamaged
• nothing prevents the door from closing
• the drain spout in the freezer is fully inserted - the temperature has been correctly preset, and that the setting is not unnecessarily low (cold) over a long period of time
• all foods have been properly wrapped or covered
The cabinet does not work at all Before calling a serviceman,
check that:
• the thermostat button is switched on
• the plug has been securely inserted into the wall socket
- the fuse in the electrical distribution box of the house has not blown, and power is being supplied to the cabinet - test by connecting some other unit to the socket.
Noise ⑪
The inside of the cabinet is kept cold by a refrigeration system consisting of a compressor (motor) and tube coils at the rear of the cabinet and inside it. Various noises are therefore perfectly normal (a). (b), (d), (e).
The sound level varies depending on how the unit is installed, how it is being used and how old it is.
If the noise level is considered to be high.
If you think the sound level is too high, follow the advice under the heading "Installation" at the beginning of the user instructions and the advice given below, and then let the cabinet run for a time.
To avoid disturbing noise or vibrations. It is important to ensure that:
- the cabinet is level and is standing firmly with all four feet/wheels on the floor. Use a spirit level (h) to check.
- the cabinet is clear of surrounding cabinets and does not lean against them, which could cause vibrations between them.
- the tube coils at the rear are not in contact with one another. Replace the spacer pads if they have dropped out, or carefully bend the tubes so that they are not in contact with one another (c).
- any spice shelves above the cabinet are correctly mounted, that there are no bottles, cans, etc. that vibrate against one another, and that any ventilation grille/cover strip is securely mounted in position.
- the unit has been installed in a well ventilated room at normal room temperature, that it is not exposed to direct sunlight or other heat, and that the doors are not being opened unnecessarily. The noise level may be perceived as being more disturbing if the compressor must run for a long period of time or must start more frequently to maintain the preset temperature.
- the cabinet is not standing directly on a hard floor of concrete or the like. Place the cabinet on a softer surface to reduce the risk of disturbing noise.
Breakdowns
Don't open the doors unnecessarily. If the breakdown appears to be of longer duration, i.e. more than 15 hours or more than 20 hours if the freezer has a cold accumulator, move the contents to another fridge or freezer, if possible.
Place sensitive foods in the fridge or keep them cold in some other way.
If the frozen foods are still hard inside, they can be re-frozen directly.
If the foods have thawed but they still look and smell fresh, they can be used provided that they are cooked before being re-frozen or consumed.
Try to find out how long the breakdown has lasted, so that you will be able to assess whether the foodstuffs have thawed out or have been at room temperature for such a length of time that they should not be eaten.
N.B. Shellfish that have thawed out should never be re-frozen. They may be consumed only if they have not been thawed longer than in normal thawing.
GUARANTEE, SERVICE AND SPARE PARTS
Read the user instructions and follow the advice and directives given. In many cases, you will be able to clarify any doubts yourself and thus avoid unnecessary service calls. The preceding section entitled "If the appliance does not perform correctly" includes suggestions for what should be checked before a serviceman is called.
If, after the above check, there is still a fault call your nearest Electrolux Service Centre
Please make sure you give the model and serial number of the appliance. This information can be found on the data plate inside the cabinet.
Original spare parts can be purchased from Electrolux Service Force Centers.
Guarantee Condition
We, Electrolux, undertake that within 12 months of the date of the purchase this Electrolux appliance or any parts thereof is proved to be defective by reason only of faulty workmanship or materials, we will, at our option repair or replace the same FREE OF CHARGE for labour, materials or carriage on the condition that.
The appliance has been correctly installed and used only on the electricity supply stated on the rating plate.
- The appliance has been used for normal domestic purposes only, and in accordance with the manufacturer's operating and maintenance instructions.
- The appliance has not been serviced, maintained, repaired, taken apart or tampered with, by any person not authorised by us.
- All service work under this guarantee must be undertaken by an Electrolux service representative or authorised agent.
- Any appliance or defective part replaced shall become our property.
- This guarantee is in addition to your statutory or other legal rights.
- Home visits are made between 8.30 am and 5.30 pm Mon - Fri. Visits may be available outside these hours in which case a charge will be made.
EXCLUSIONS - This guarantee does not cover:
- Damage or calls resulting from transportation, improper use or neglect, the replacement of any light bulbs, removable parts of glass or plastic, or vacuum cleaner drive belts, brushes or dustbags.
- Costs incurred for calls to put right any appliance which is improperly installed or calls to appliances outside the United Kingdom.
Appliances found to be in use within a commercial environment, plus those which are subject to rental agreements. - Products of Electrolux manufacture which are not marketed by Electrolux.
- EEC countries. The standard guarantee is applicable but not subject to the owner's responsibility and cost to ensure the appliance meets the standards set by the Country to which the product is taken. Proof of purchase may be required.
Model
Product Number
Serial Number
SAFETY
Read the safety and warning texts at the beginning of the user instructions. The manufacturer is not responsible for faults caused by the product being used incorrectly or for purposes other than those specified in the user instructions.
WARNING
Don't use the fridge/freezer unit for storing explosive gases or liquids, e.g. cigarette lighter gas, petrol (gasoline), ether, acetone.

CE
Electrolux


- INSTRUCTION BOOKLET GEBRAUCHSANWEISUNG NOTICE D'UTILISATION ISTRUZIONI D'USO GEBRUIKSAANWIJZING BRUGSANVISNING
- IMPORTANT SAFETY INFORMATION
- SCRAPPING.
- Environmental concerns - refrigerant
- CONTENTS
- ENVIRONMENTAL CONCERNS
- In use:
- ENERGY SAVING ADVICE
- INSTALLATION
- Unpacking and damage in transit
- Cleaning
- Positioning, Installation ① ② ③ ④
- Electrical connections ④ Electrical requirements
- WARNING THIS APPLIANCE MUST BE EARTHED.
- IMPORTANT
- Rehanging the door ⑤
- USING THE FREEZER
- a. Thermometer
- b. Red warning lamp, temperature alarm
- c. Reset button, temperature alarm
- d. Yellow fast-freezing lamp
- e. Fast-freezing button, S-Super
- f. Green indicator lamp
- g. Thermostat control. stepless regulation
- Starting, setting the temperature
- Switching off
- Suitable storage periods
- Freezer drawers
- Temperature control ⑧
- Using the temperature indicator:
- In case of power failure
- Fast freezing, S-SUPER
- Practical advice for fast freezing
- Thawing
- Ice trays
- Freezer tray ⑥
- Cold accumulator ⑥
- CARE AND MAINTENANCE
- Defrosting ⑦
- Cleaning ⑩
- Lighting - Changing the light bulb ⑨
- If you are away from home for some time
- When the cabinet is not in use for some time
- IF THE APPLIANCE DOES NOT PERFORM CORRECTLY
- If it is not cold enough
- If it is too cold
- The compressor runs continuously
- Too much frost and ice are formed
- The cabinet does not work at all Before calling a serviceman,
- Noise ⑪
- If the noise level is considered to be high.
- Breakdowns
- GUARANTEE, SERVICE AND SPARE PARTS
- Guarantee Condition
- SAFETY
- WARNING
Märke : ELECTROLUX
Modell : EU7117C
Kategori : Fryser