Solomente AS - Tält Sierra Designs - Gratis bruksanvisning och manual
Hitta enhetens manual gratis Solomente AS Sierra Designs i PDF-format.

Användarfrågor om Solomente AS Sierra Designs
0 fråga om denna apparat. Svara på dem du kan eller ställ din egen.
Ställ en ny fråga om denna apparat
Ladda ner instruktionerna för din Tält i PDF-format gratis! Hitta din manual Solomente AS - Sierra Designs och ta tillbaka ditt elektroniska enhet i hand. På denna sida publiceras alla dokument som behövs för att använda din enhet. Solomente AS av märket Sierra Designs.
BRUKSANVISNING Solomente AS Sierra Designs
SIERRADA DESIGNS
SOLOMENTE AST
SIERRA
DESIGNS
Your Sierra Designs SOLOMENTE AST tent is very easy to pitch and maintain. Follow these instructions to pitch your tent quickly, safely and easily.
SOLOMENTE AST TENT CONTENTS
Tent Body: 1 Line Tighteners: 2
Tent Poles: 1 Pitching Instructions: 1
Jake's Corner's: 1 Stake Sack: 1
Tent Stakes: 6* Pole Sack: 1
Guy Cords: 3
* Sierra Design tests include stakes for pitching the body under normal conditions. Additional stakes may be required in severe conditions.
First Pitch
In order to familiarize yourself with your new tent, we suggest that you "test pitch" it before embarking on a wilderness trip.
Select a Site
Look for a level spot that is protected from the wind in order to ensure sleeping comfort. Clear the area of debris such as sharp stones and sticks which might abrade or puncture the tent floor. Choose an area that will drain well when it rains.
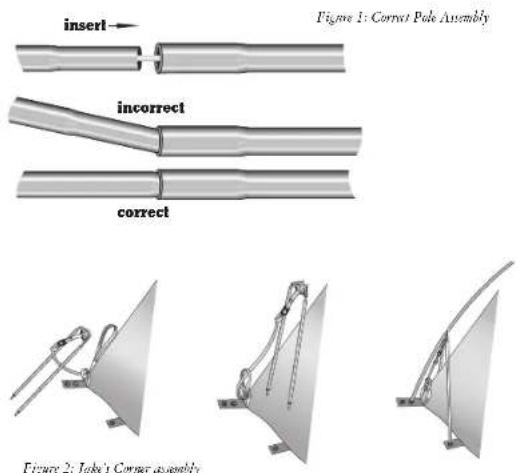
Unfurl the Tent and Assemble the Poles
The Solomente AST comes with a unique one pole design and a Jake's Corner (Figure 2). The main pole sections are all connected via the hub. Once completely assembled the main pole will take the shape of the letter "Y" with the hub at the intersection. Carefully unfold the shock corded pole sections and allow them to slide together. Do not allow the poles to snap together, this can lead to serious pole damage. Make certain that the insert of each pole section is fully inserted into the next pole section (Figure 1).
Stake Out the Tent Floor
Start by staking out point D. Now move to the front of the tent and stake out points A & B so that the floor is taut. Do not stake out points C & E until the Jake's Corner is fully assembled.
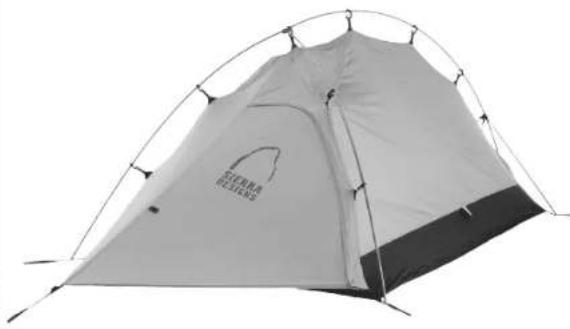
natural_image
Exterior view of a simple camping tent with a curved roof and black base (no text or symbols visible)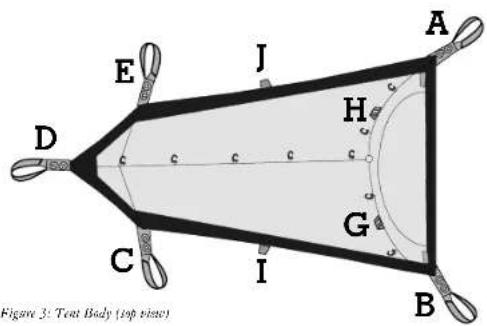
Erect the Tent
Take the main pole and line it up with the with the rent body, which will have the wide part of the "Y" at the front of the tent. Starting at the back of the tent insert the pole tip into the stake loop grommet at point D. Now do the same for the pole tips at points A & B. Now attach the Swift Clips the pole structure. Finally, following the instructions in Figure 2, girth hitch the Jake's Corner assembly to the small grey loop at point D and insert the Jake's Corner pole tips into the grommets at points C & E (Figure 3).
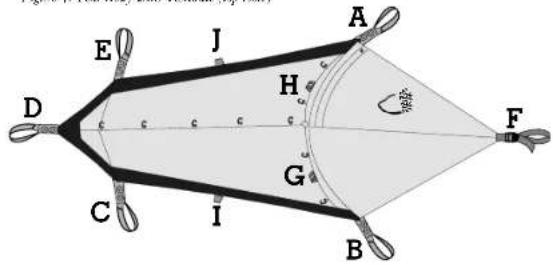
Figure 4: Test Body with Vestibule (top view)
Vestibule
Because the Solomente AST is a single wall rent there is no rainfly. To complete the set-up pull out point F (Figure 4) until taut and then stake out. For increased stability and strength in high winds, points G, H, I, & J can be guyed out.
Ventilation
Proper ventilation is essential for creating a comfortable living space inside your tent. The vestibule door panel can be rolled away for maximum ventilation. Because the vestibule forms an awning over the door, you can often leave the door tied open in a rainstorm, provided the door faces away from the wind. In addition to the above the Solomente AST has been built with four vents, two in the front and two in the rear of the tent. By opening these vents and using the zipper at the top of the vestibule you can regulate the ventilation.