ETS25 - Väderstation IROX - Gratis bruksanvisning och manual
Hitta enhetens manual gratis ETS25 IROX i PDF-format.

Användarfrågor om ETS25 IROX
0 fråga om denna apparat. Svara på dem du kan eller ställ din egen.
Ställ en ny fråga om denna apparat
Ladda ner instruktionerna för din Väderstation i PDF-format gratis! Hitta din manual ETS25 - IROX och ta tillbaka ditt elektroniska enhet i hand. På denna sida publiceras alla dokument som behövs för att använda din enhet. ETS25 av märket IROX.
BRUKSANVISNING ETS25 IROX

ETS25/TTX302
Manual

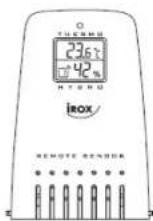
Description of buttons
The remote sensor has 2 function buttons inside the battery compartment:
- [CH] button
After the battery installation, the LED blinks slowly every 1.5 seconds to indicate it is now under channel setting mode and is set to channel 1 by default. If the user presses no key within ten seconds the unit will auto-exit the channel setting.
If the user press [CH] button once during the channel setting, the LED will blink twice every 1.6 seconds to indicate the unit is set to channel 2. If the user presses the [CH] button again, the channel number will be advanced to channel 3 and the LED will blink three times and so on.
Channel number will be advanced to channel 3 and the LED will blink three times and so on. The maximum channel number is '5' and the unit will be scrolled back to channel '1' at the 5th press of the [CH] button.
- [ RESET ] Button
Pressing this button resets the unit to factory setting.
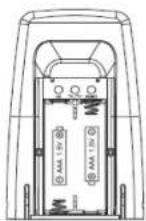
Setting procedure to link up with a receiving unit
This device is designed for easy set up within a wireless system. The following steps are to be performed in proper sequence in order to link up with a receiving unit (e.g. Model AQUA from Irox). Please insert batteries in the receiving unit before doing so in the remote unit.
-
Remove the bracket stand.
-
Unlock two latches in the bottom to release the semi-transparent jackets.
-
Slide down the battery door in the back.
-
Insert 2 pieces AAA size batteries according to the indicated polarity in the battery compartment.
-
The LED blinks slowly to indicate it is set to channel one and the user can set it to other channels by press [CH] key.
-
Thereafter, you have to start immediately a new synchronisation between the receiver and the remote unit by pressing and holding for 2 sec the [ CHANNEL ] key on the receiver (after this, the "--:" display on the receiving unit starts to blink until the sensor is registered)
-0.7
(ENG)
-
The temperature of the sensor will then appear in the display of the receiving unit once it has linked up with the receiving unit successfully.
-
Close the battery door and use the two latches in the bottom to lock it with the semi-transparent jackets. Follow the same procedure (1 to 7) to register other remote sensors.
NOTE: If you are using more than one remote sensor, you must set the sensors to different channels in the start up procedure to avoid conflicts in the transmission
Specifications
Outdoor temperature range
Resolution
Rel. Humidity measuring range
Resolution
RF transmission frequency
RF transmission range
Power
Dimensions
:-20.0°C to +60.0°C (-4.0°F to 140.0°F)
: 0.1°C (0.2°F)
: 20% to 99%
: 1% rel. F
: 433 MHz
: Max. 30 to 75m, subject to receiver
: 2x AAA 1,5V battery
: 90 × 55 × 20mm
(ENG)
\~P.B\~
071-TH0301-004002