
L2000CN-BF - Ekran LG - Manual falas për përdoruesin
Gjeni manualet e pajisjes falas L2000CN-BF LG në format PDF.
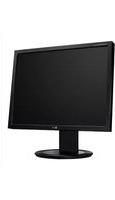


Pyetjet e përdoruesve rreth L2000CN-BF LG
0 pyetje rreth kësaj pajisjeje. Përgjigjuni atyre që njihni ose bëni tuajin.
Bëni një pyetje të re rreth kësaj pajisjeje
Shkarko udhëzimet për tuajin Ekran në format PDF falas! Gjeni manualin tuaj L2000CN-BF - LG dhe merrni pajisjen tuaj elektronike sërish në duar. Në këtë faqe janë publikuar të gjitha dokumentet e nevojshme për përdorimin e pajisjes suaj. L2000CN-BF e markës LG.
MANUAL I PËRDORUESIT L2000CN-BF LG
L2000C L2000CN L2000CE
Sigurohuni që të lexoni masat e rëndësishme paraprake përpara se të përdorni produktin. Mbajeni diskun e udhëzimeve të përdoruesit në një vend lehtësisht të arritshëm për ta përdorur si referencë në të ardhmen. Gjeni etiketën në produkt dhe jepini këtë informacion shitësit kur kërkoni shërbim.
Kjo njësi është projektuar dhe prodhuar për të garantuar sigurinë tuaj, megjithatë përdorimi i gabuar mund të shkaktojë goditje elektrike ose rrezik zjarri. Ndiqni udhëzimet themelore të mëposhtme për instalimin, përdorimin dhe servisimin për të lejuar funksionimin e duhur të masave mbrojtëse të përfshira në ekran.
Siguria
Përdorni vetëm kabllon e rrymës që vjen me njësinë. (Nëse përdorni një kabllo tjetër rryme, sigurohuni që ajo të përputhet me standardet lokale të përshtatshme nëse furnizuesi nuk e ka siguruar.) Nëse kablloja e rrymës ka defekte, ju lutemi kontaktoni prodhuesin ose një ofrues të autorizuar shërbimi riparimi për të marrë një kabllo zëvendësuese.
Kablloja e rrymës përdoret si mjeti kryesor për shkëputjen nga rryma. Sigurohuni që priza të jetë lehtësisht e arritshme pas instalimit.
Mos e përdorni ekranin me një burim energjie të ndryshëm nga ai i specifikuar në këtë manual ose i treguar në ekran. Nëse nuk jeni i sigurt për llojin e burimit të energjisë në shtëpinë tuaj, kontaktoni shitësin.
Priza AC dhe kabllot lidhëse paraqesin rrezik të madh, si dhe kabllot e konsumuara dhe prizat e thyera. Këto gjëra mund të shkaktojnë goditje elektrike ose zjarr. Ju lutemi kontaktoni një teknik të kualifikuar për t'i zëvendësuar ato.
Mos e hapni ekranin:
Nuk ka përbërës brenda ekranit që mund të riparohen nga përdoruesi. Mos u përpiqni ta hapni ekranin, edhe nëse është i fikur (OFF). Kontaktoni shitësin nëse ekrani nuk funksionon siç duhet.
Për të shmangur lëndimet:
Mos e vendosni ekranin në një raft të pjerrët nëse nuk është siguruar siç duhet.
Përdorni vetëm mbajtësen e rekomanduar nga prodhuesi.
Për të parandaluar zjarret ose rreziqet:
Fikeni gjithmonë ekranin (OFF) kur dilni nga dhoma për një kohë të gjatë. Mos e lini ekranin ndezur (ON) kur dilni nga shtëpia.
Mos i lini fëmijët të vendosin sende në vrimat e ekranit. Disa pjesë të brendshme mbajnë tensione të rrezikshme të larta.
Mos përdorni pajisje shtesë që nuk janë projektuar për këtë ekran.
■ Shkëputeni ekranin nga priza e murit gjatë stuhive me bubullima ose kur nuk do ta përdorni për një kohë të gjatë.
shumë kohë.
Rreth instalimit
Mos lejoni që asgjë të mbështetet mbi kabllon e rrymës ose të mbështillet rreth tij, dhe mos e vendosni ekranin në mënyrë që kablloja e rrymës të dëmtohet.
Mos e përdorni ekranin pranë ujit, si p.sh. pranë vaskës, lavamanit, lavamanit të kuzhinës, lavanderisë ose
dhome të lagësht, ose pranë pishinës.
Kjo sepse ekranet kanë vrima ajrimi në kapakun e jashtëm për të shpërndarë nxehtësinë gjatë punës. Nëse këto
vrima bllokohen, nxehtësia e rritur mund të shkaktojë defekt në funksionimin e ekranit, duke ju ekspozuar ndaj rrezikut të zjarrit. Prandaj:
Mos i bllokoni vrimat e poshtme të ajrimit duke e vendosur ekranin mbi shtrat, divan, qilim etj.
■ Mos e vendosni ekranin në një vend të mbyllur pa siguruar ajrim të mirë.
■ Mos i mbuloni vrimat me leckë ose ndonjë material tjetër.
■ Mos e vendosni ekranin pranë tubave të ngrohjes ose burimeve të nxehtësisë.
Mos e fshini ekranin Active Matrix LCD me asgjë të fortë, sepse mund të shkaktojë gërvishtje, deformime ose dëmtime në ekran.
Mos i mbani gishtat në ekranin LCD për një kohë të gjatë, pasi kjo mund të lërë gjurmë gishtash në ekran.
Mund të shfaqen disa njolla të vogla në formën e pikave të kuqe, jeshile ose blu në ekran. Por ato nuk do të kenë asnjë ndikim në performancën
e ekranit.
Përdorni rezolucionin e rekomanduar për të marrë cilësinë më të mirë të ekranit LCD. Nëse përdoret në një rezolucion të ndryshëm nga ai i rekomanduar, mund të shfaqen imazhe me madhësi të ndryshme ose të përpunuara në ekran. Megjithatë,
kjo është një karakteristikë e veçantë e panelit LCD me rezolucion fiks.
Rreth pastrimit
Shkëputeni spinën e ekranit përpara se të pastroni sipërfaqen e ekranit.
■ Përdorni një leckë të butë (jo të lagur). Mos spërkatni lëng pastrues direkt në ekran, sepse spërkatja e tepërt mund të shkaktojë
goditje elektrike.
Rreth ripaketimit
■ Mos e hidhni kutinë e kartonit dhe materialet e paketimit. Ato janë mjetet më të mira për transportimin e kësaj njësie. Kur ta lëvizni njësinë
në një vend tjetër, ripaketojeni me materialet e saj origjinale.
Hedhja e sigurt e pajisjes
■ Llamba fluoreshente e përdorur në këtë pajisje përmban një sasi të vogël të merkurit.
Mos e hidhni këtë pajisje me mbeturinat e zakonshme shtëpiake.
Ky pajisje duhet të hidhet në përputhje me rregulloret e autoriteteve lokale.
▪ Para se të instaloni monitorin, sigurohuni që monitori, kompjuteri dhe pajisjet e lidhura të jenë të fikura.
Lidhja e bazës së mbajtëses / Heqja e bazës së mbajtëses
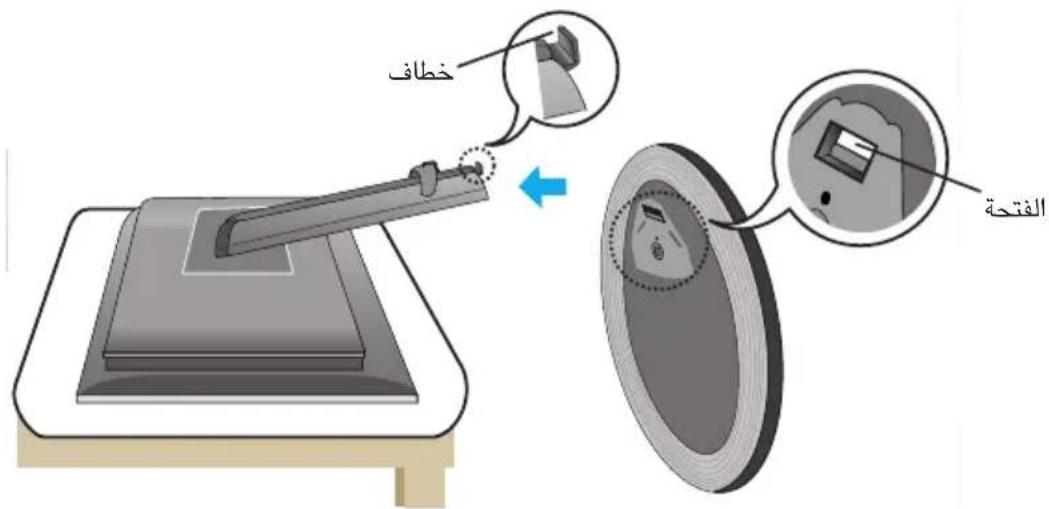
- Vendoseni monitorin me pjesën e përparme poshtë mbi një jastëk ose leckë të butë.
Rreshtoni kllapat në bazën e mbajtëses me vrimat përkatëse në bazën e monitorit.
- Futni kllapat në vrimat.
Paralajmërim: Gjuha dhe kunji i mbylljes mund të hiqen vetëm nga monitorët me bazë mbajtëse kur ato tërhiqen lart.
Lart.
Përndryshe, mund të lëndoheni nga pjesët e zgjatura të mbajtëses.
- Përdorni një kaçavidë për të shtrënguar vidhat në pjesën e pasme të bazës së mbajtëses në drejtim të akrepave të orës për të fiksuar mbajtësen.
Për të fiksuar mbajtësen.
- Kur dëshironi të ndani monitorin nga baza e mbajtëses, përdorni një kaçavidë për të liruar vidhat duke i rrotulluar në drejtim të kundërt të akrepave të orës.
Në drejtim të kundërt të akrepave të orës.
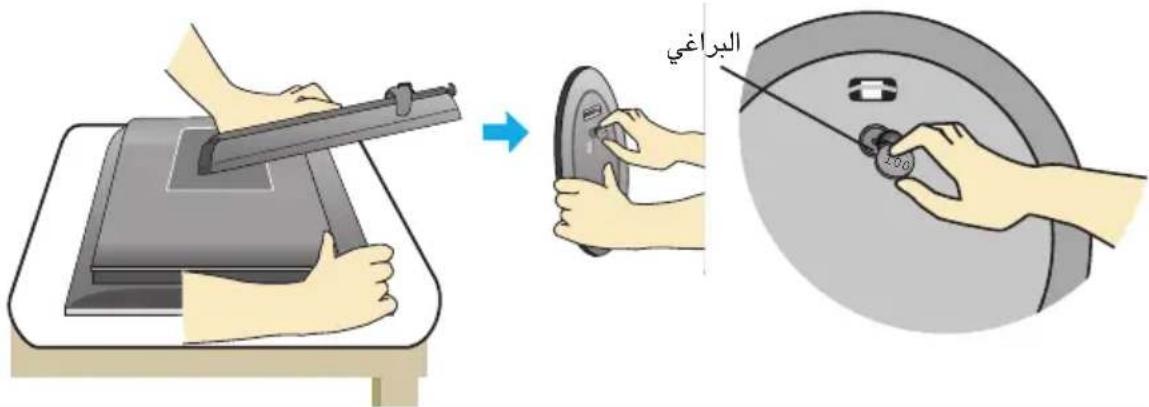
Ky ilustrim tregon modelin e përgjithshëm të lidhjes. Monitori juaj mund të ndryshojë nga elementët e paraqitur në figurë.
Pasi të keni fiksuar bazën e mbajtëses, mos u përpiqni ta hiqni përsëri. Mos e mbani produktin me kokë poshtë duke e kapur vetëm nga mbajtësja. Produkti mund të bjerë dhe të dëmtohet ose të shkaktojë lëndim.
E rëndësishme
▪ Para se të vendosni monitorin, sigurohuni që monitori, kompjuteri dhe pajisjet e tjera të lidhura të jenë të fikura.
të tjera.
Vendosja e monitorit
- Rregulloni panelin në mënyra të ndryshme derisa të arrini pozicionin më të rehatshëm për ju. Lartësia: 250 - 50 gradë
-5°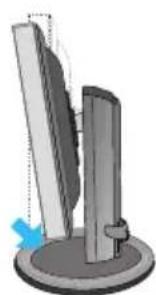
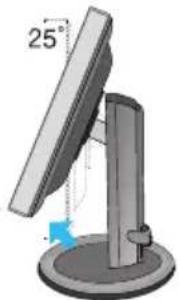
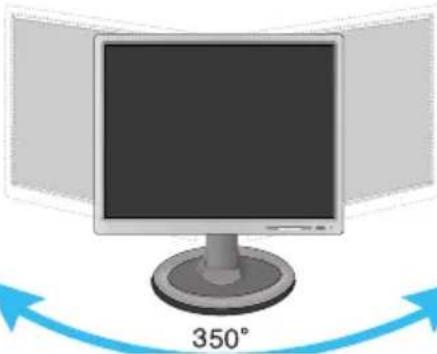
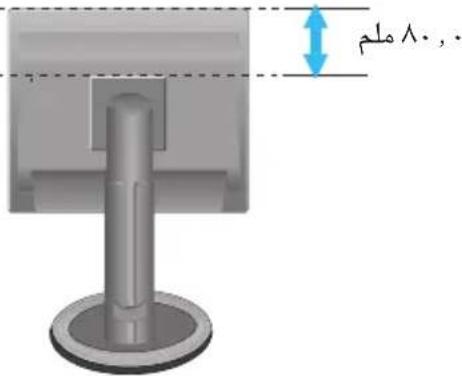
■ Rregullimi i animit: maksimumi 2,15 inç (80,0)
Fillimisht lironi vidën e kyçjes
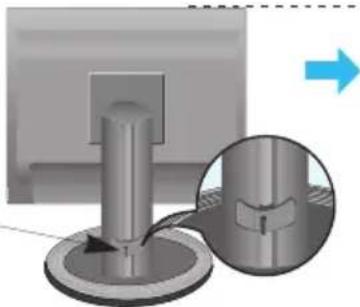
▪ Horizontale dhe vertikale: mund ta rrotulloni panelin 90 gradë në drejtim të akrepave të orës.
* Për informacion të detajuar, ju lutemi referojuni udhëzuesit të shpejtë të softuerit që është dhënë.
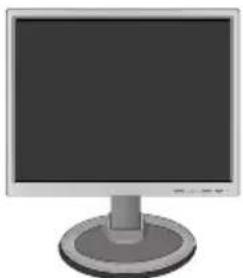
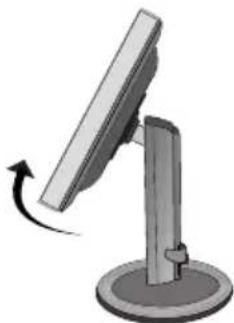
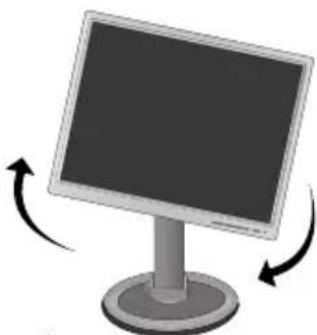
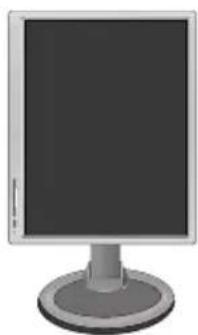
* Sigurohuni që të mos prekni bazën gjatë
rrotullimit të kokës kur përdorni funksionin
e rrotullimit.
Pozicioni i mëparshëm
Rekomandohet të mos e kaloni këndin e animit të monitorit më shumë se disa gradë për të arritur një pozicion shikimi optimal dhe të rehatshëm.
Përdorimi i kompjuterit
- Vendoseni monitorin në një vend të përshtatshëm, të ajrosur mirë, pranë kompjuterit. Për të rregulluar lartësinë e monitorit, hapni bllokimin
e sipërm të treguar më lart.
- Lidhni kabllon e sinjalit. Pasi ta keni bërë këtë, shtrëngoni vidhat e lidhësve.
- Lidhni kabllon e rrymës në një prizë të përshtatshme, lehtësisht të arritshme dhe pranë monitorit.
![graph TD A["PC"] --> B["DVI - 1A-D"] C["MAC"] --> D["D-sub"] E["PC"] --> F["Mac"] G["DVI"] --> H["PC"] I["D-sub"] --> J["PC"] K["PC"] --> L["DVI"] M["PC"] --> N["D-sub"] O["PC"] --> P["D-sub"] Q["PC"] --> R["D-sub"] S["PC"] --> T["D-sub"] U["PC"] --> V["D-sub"] W["PC"] --> X["D-sub"] Y["PC"] --> Z["…](/content/2026/05/1137536/images/9c674b9dd9465fad7df72e634ba10ea29e622ac7267ff664ea36be5ea23bc3f6.jpg)
- Shtypni butonin në tastierë për të filluar funksionimin. Kur monitori të jetë në punë, funksioni i vendosjes së imazhit ('Function Setting Image Self') do të aktivizohet automatikisht.
Shënim
"Function Setting Image" (Funksioni i vendosjes së imazhit): Ky funksion i siguron përdoruesit cilësimet më të mira të ekranit.
Kur përdoruesi e lidh monitorin për herë të parë, ky funksion rregullon automatikisht ekranin në cilësimet më të mira për sinjalet individuale hyrëse. Nëse dëshironi të rregulloni monitorin gjatë përdorimit, ose nëse dëshironi ta aktivizoni këtë funksion manualisht në një kohë tjetër, shtypni butonin "AUTO/SET" në panelin e përparmë (OSD) dhe zgjidhni "reset Factory" (rivendosja në cilësimet e fabrikës) në menynë e cilësimeve (gjuha).
"Language" (Gjuha).
Elementet e kontrollit të panelit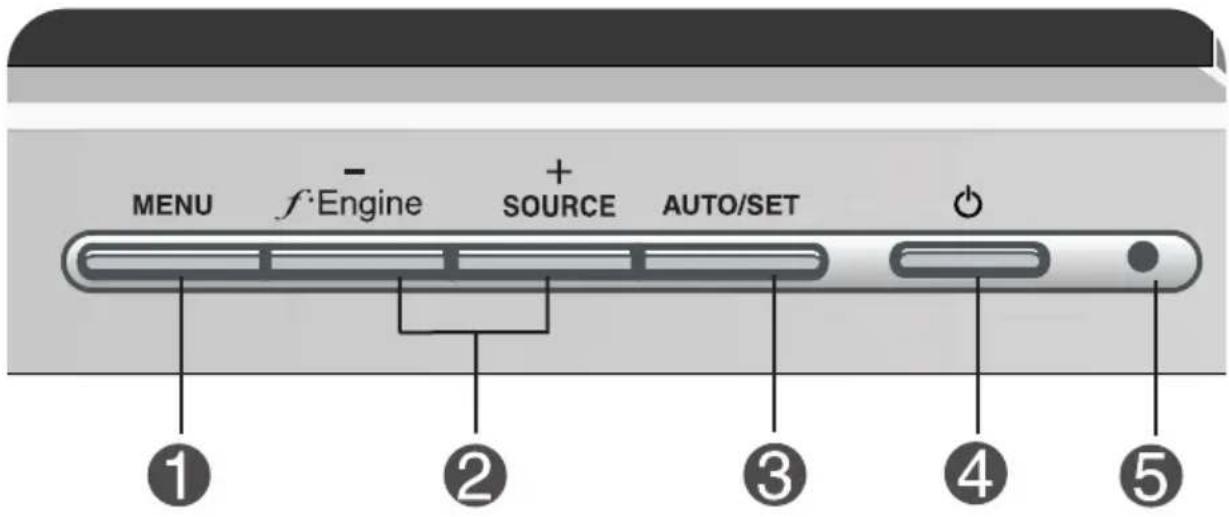
| عنصر التحكم الوظيفة | |
| استخدام هذا الزر للدخول إلى نظام العرض على الشاشة أو الخروج منه. | MENUالزر# |
| OSD LOCKED/UNLOCKEDتسمح لك هذه الوظيفة بتأمين إعدادات التحكم الحالية، وذلك حتى لا يتم تغييرها بشكل غير مقصود.(القائمة)Marketاضغط باستمرار على زر (تم تأمين "OSD LOCKED المفترض أن تظهر الرسالة (OSD)ال Thiyarات الموجودة على الشاشة)يمكنك الغاء تأمين عناصر تحكم-expيرات الموجودة على الشاشة (القائمة)MENU(ÖSD)UNLOCKED"لعدة ثوان. من المفترض أن تظهر الرسالة ((OSD)"OSD | OSD LOCKEDOSD UNLOCKED |
| استخدام هذين الزرین لتحديد الوظAAF الموجودة في قائمة-expيرات الموجودة على الشاشة أو ض-popها. | - + alزران |
| ل bloss Paul على مزيد من المعلومات، ارجع إلى صفحة ۱۳ | f·ENGINEFLATRON f·ENGINEUSERNORMALMENU - + SET |
| SOURCE(المصدر)مفتاح اختصار-expير(_ | |
| استخدم هذا الزر للاختيار من قائمة العرض على الشاشة. | AUTO/SET زر |
| ضبط الصورة تلقائيّAAUTO/SETönدا تقوم بضبط إعداد الشاشة، اضغط على الزردائمً قبل الدخول إلى نظام العرض علىالشاهشة (OSD). سيقوم هذا الإجراء بتعديل صورة الشاشة تلقائيّا إلىالإعدادita الأفضل لحجم دقة الشاشة الحالي (وضع العرض).أفضل وضع للعرض هو1200 x 1600 :L2000C/L2000CNShareaisha1050 x 1400 :L2000CEShareaisha | PROCESSING AUTOIMAGE ADJUSTMENT |
| استخدم هذا الزر لتشغيل الشاشة أو إيقاف تشغيلها. | زر التشفيل |
| ⁱしてください هذا المؤشر باللون الأزرق عندما تعمل الشاشة بشكل طبيعي(وضع التشفيل) أزرق( إذا كانت الشاشة في وضع النوم كززعاً (توفير الطاقة) : فإن lớn المؤشريتغير إلى الكهرماني. | مؤسسة الطاقة |
Rregullimi i monitorit
Duke përdorur sistemin e kontrollit të ekranit (OSD), bërja e rregullimeve në madhësinë e figurës, pozicionin dhe vlerat e funksionimit të ekranit bëhet më e shpejtë dhe më e lehtë.
Shënim
■ Lëreni ekranin të ftohet për të paktën 30 minuta përpara se të bëni ndonjë rregullim në figurë.
Për të bërë rregullime duke përdorur sistemin e ekranit, ndiqni hapat e mëposhtëm:
MENU ← - + ← AUTO/SET ← - + ← MENU
Shtypni butonin MENU (OSD), shfaqet menyja kryesore e sistemit të ekranit.
- Për të arritur te një element kontrolli, përdorni butonin + ose -. Kur të zgjidhet simboli që dëshironi, shtypni butonin AUTO/SET (Auto/Vendos).
2. Përdorni butonat + / - për të rregulluar figurën në nivelin e dëshiruar. Përdorni butonin AUTO/SET (Vendos/Auto) për të zgjedhur elementë të tjerë të nënmenysë.
Shtypni një herë butonin MENU (Meny) për t'u kthyer në menynë kryesore për të zgjedhur një funksion tjetër. Shtypni dy herë butonin MENU (Meny) për të dalë nga opsionet e ekranit (OSD).
Tabela e mëposhtme tregon listat e kontrollit, rregullimit dhe konfigurimit në sistemin e ekranit.
| القائمة الرئيسية الفرعية تر الوظيفة | PICTURE | ||||
| لضبط نصوع الشاشة والtbاين | ● | ● | BRIGHTNESS | ||
| ● | ● | CONTRAST | |||
| ● | ● | GAMMA | |||
| ل Tall Tall Tall Tall Tall Tall Tall Tall Tall Tall Tall Tall Tall Tall Tall Tall Tall Tall Tall Tall Tall Tall Tall Tall Tall Tall Tall Tall Tall Tall Tall Tall Tall Tall Tall Tall Tall Tall Tall Tall Tall Tall Tall Tall Tall Tall Tall Tall Tall Tall Tall Tall Tall Tall Tall Tall Tall Tall Tall Tall Tall Tall Tall Tall Tall Tall Tall Tall Tall Tall Tall Tall Tall Tall Tall Tall Tall Tall Tall Tall Tall Tall Tall Tall Tall Tall Tall Tall Tall Tall Tall Tall Tall Tall Tall Tall Tall Tall Tall Tall | |||||
| ● | ● | sRGB | PRESET | COLOR | |
| ● | ● | 6500K | |||
| ● | ● | 9300K | |||
| ● | ● | RED | |||
| ● | ● | GREEN | |||
| ● | ● | BLUE | |||
| ل Tall Tall Tall Tall Tall Tall Tall Tall Tall Tall Tall Tall Tall Tall Tall Tall Tall Tall Tall Tall Tall Tall Tall Tall Tall Tall Tall Tall Tall Tall Tall Tall Tall Tall Tall Tall Tall Tall Tall Tall Tall Tall Tall Tall Tall Tall Tall Tall Tall Tall Tall Tall Tall Tall Tall Tall Tall Tall Tall Tall Tall Tall Tall Tall Tall Tall Tall Tall Tall Tall Tall Tall Tall Tall Tall Tall Tall Tall Tall Tall Tall Tall Tall Tall Tall Tall Tall Tall Tall Tall Tall Tall Tall | |||||
Shënim
Renditja e simboleve mund të ndryshojë sipas modelit (13~9)
Pasi të njiheni me procedurat e zgjedhjes dhe rregullimit të elementeve duke përdorur sistemin e ekranit (OSD), më poshtë janë simbolet, emrat dhe përshkrimet e tyre për të gjithë elementët e menysë.
Shtypni butonin MENU (Meny), atëherë shfaqen opsionet e ekranit (OSD).
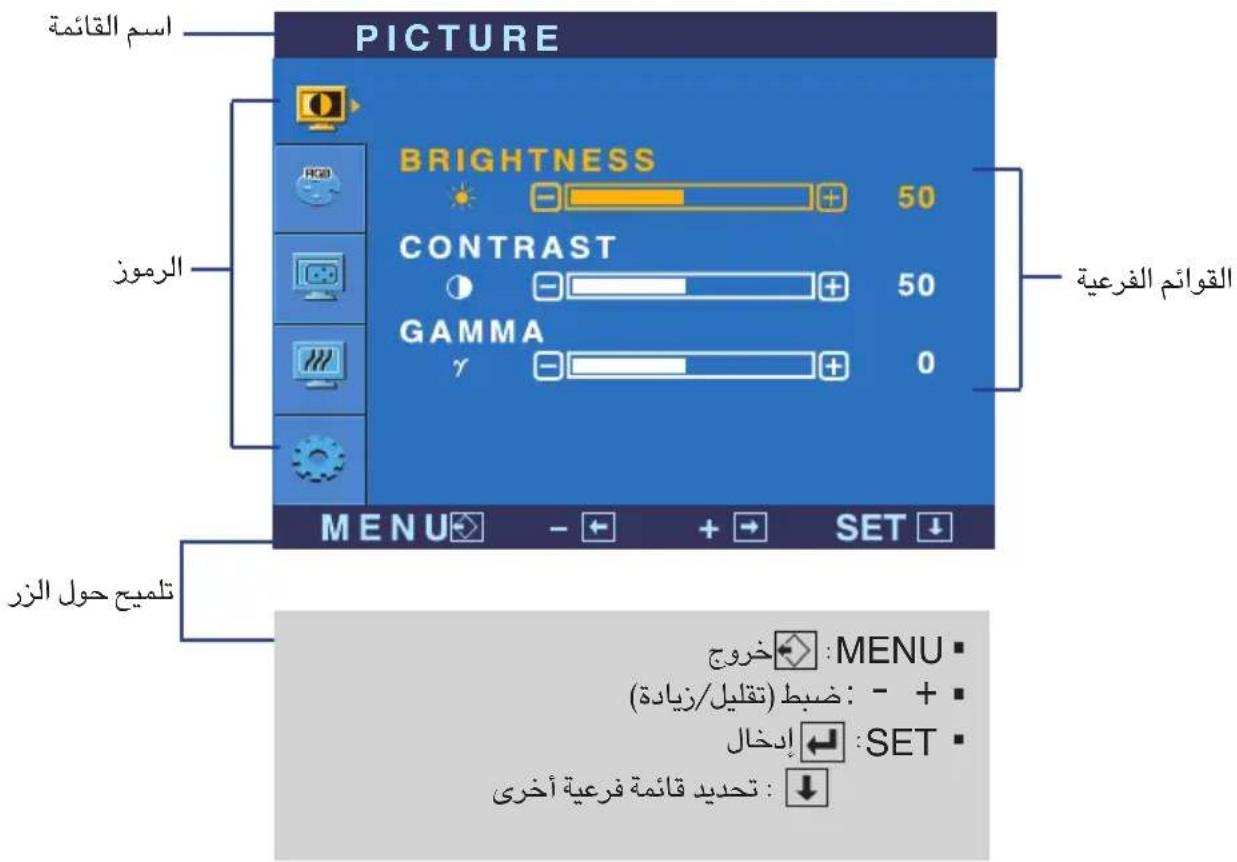
Shënim
Linguet e listës OSD (On-Screen Display) që shfaqen në ekran mund të ndryshojnë nga ato të përmendura në manual.
Menu kryesore Nënmenu Përshkrimi
PICTURE

Për të rregulluar ndriçimin e ekranit.
BRIGHTNESS
(Ndriçimi)
Për të rregulluar kontrastin e ekranit.
CONTRAST
(Kontrasti)
GAMMA
(Gama)

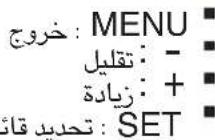
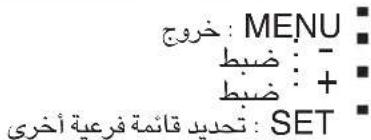
Dalje: MENU
- Ndrysho
Rritje: +
: Zgjidh një nënmenu tjetër SET
Cakto ngjyrën e ekranit.
: Rregullo ngjyrat e ekranit që të përputhen me :sBGB •
sRGB specifikimet e ngjyrave
6500K: Rregullo ngjyrat e ekranit që të përputhen me
specifikimet standarde të ngjyrave.
9300K • E bardhë pak e kaltërt.
Cakto nivelet e tua të ngjyrës së kuqe.
Cakto nivelet e tua të ngjyrës së gjelbër.
Cakto nivelet e tua të ngjyrës së kaltër.
NGJYRA

PARACAKTIMI
E KUQE
E GJELBËR
E KALTËR
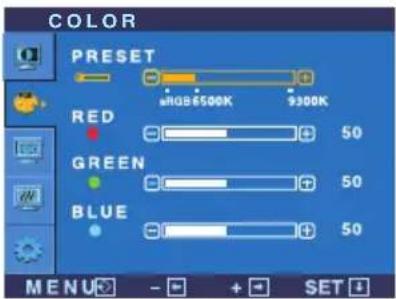
Dalje: MENU
Zvogëlimi
Rritja: +
Përcaktimi i një nënmenuje tjetër: SET
POZICIONI

Për të lëvizur imazhin djathtas dhe majtas.
Për të lëvizur imazhin lart dhe poshtë.
HORIZONTAL
VERTIKAL
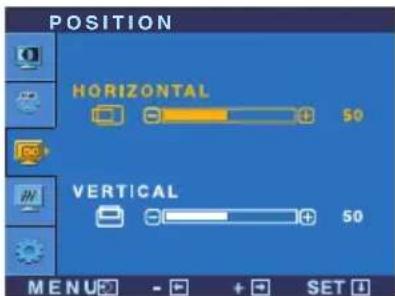
Dalja: MENU
Zvogëlimi
Rritja: +
: Teknike nënmenuja tjetër SET
Menuja kryesore Nënmenuja Përshkrimi
TRACKING
Për të reduktuar çdo shirit vertikal ose vija që shfaqen në sfondin e ekranit. Madhësia horizontale e ekranit do të ndryshohet gjithashtu.
Ky buton rregullon fokusin e ekranit. Ky funksion ju lejon të eliminoni çdo turbullirë horizontale dhe vertikale ose të qartësoni imazhin e shkronjave.
FAZA E ORËS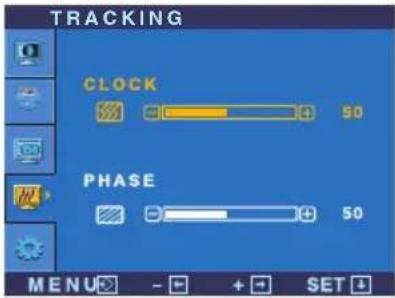
KONFIGURIMI
Zgjidhni gjuhën në të cilën shfaqen emrat e elementeve të kontrollit.
GJUHA
Për të rregulluar pozicionin e një kornize në ekran.
POZICIONI I OSD-së
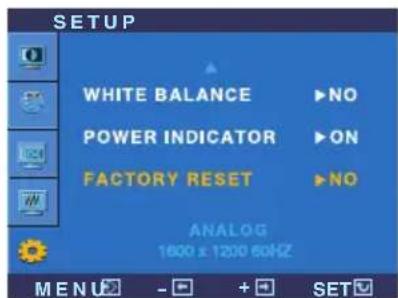
Nëse dalja e kartës video është e ndryshme nga specifikimet e kërkuara, niveli i ngjyrave mund të përkeqësohet për shkak të deformimit të sinjalit video. Duke përdorur këtë funksion, niveli i sinjalit rregullohet që të përputhet me nivelin standard të daljes së kartës video për të marrë imazhin më të mirë.
BILANCI I BARDHË
Përdorni këtë funksion për të ndezur ose fikur treguesin e energjisë në pjesën e përparme të ekranit. Nëse e vendosni në OFF (fikur), treguesi i energjisë do të fiket. Nëse e vendosni në ON (ndezur), treguesi i energjisë do të ndizet automatikisht.
TREGUESI I ENERGJISË
Kthehen të gjitha cilësimet e fabrikës në vlerat e paracaktuara, përveç "GJUHA". Shtypni butonin e rivendosjes shpejt.
RIVENDOSJA E FABRIKËS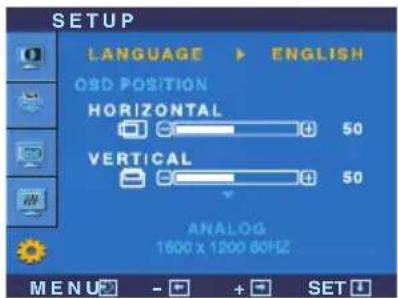
Aktivizoni këtë funksion kur shfaqen ngjyrat e bardha dhe të zeza në ekran. Nëse kjo nuk përmirëson imazhin e ekranit, rivendosni cilësimet e fabrikës. Nëse është e nevojshme, kryeni përsëri funksionin e bilancit të bardhë. Ky funksion aktivizohet vetëm kur sinjali hyrës është analog.
Shfaqet ekrani i OSD-së (menyja në ekran) (lëvizja) (–) i vendosur në pjesën e përparme.
Nga ekrani.
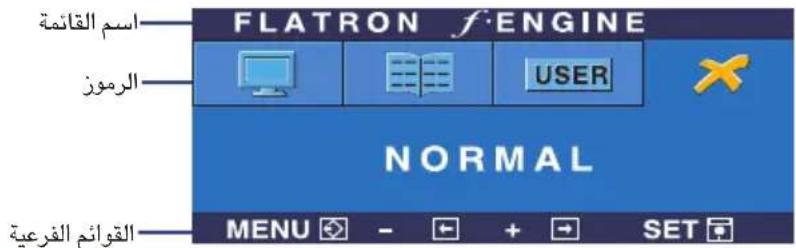
Ekrani Estonia enë aplikimi i vlerës së ekranit kur vlera nuk aplikohet
FLATRON F-ENGINE
F-ENGINE: Në ekran shfaqen dy nivele ngjyrash siç duket qartë. Ekrani i përdorur shfaqet në anën e majtë, ndërsa ekrani i papërdorur shfaqet në anën e djathtë. Përdorni butonin (Rregullo) për të "përdorur ekranin që është vendosur".
Menuja kryesore, nënmenuja, përshkrimi
Kjo veçori ju lejon të zgjidhni cilësimet e nevojshme për të shfaqur imazhin sipas mjedisit
përreth (ndriçimi i ambientit dhe llojet e imazheve, etj.)
(Film): për animacion në video ose filma. MOVIE
(Tekst): për tekstin (në programet e formatimit të tekstit dhe të tjera) TEXT
MOVIE TEXT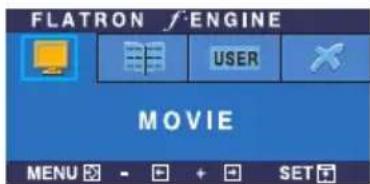
Përdoruesi Mund të rregulloni ndriçimin manualisht: RCM ose ACE. Mund të ruani vlerën e caktuar edhe kur përdorni një mjedis të ndryshëm rregullimi.
(Ndriçimi Brightness) •… (Adaptive Clarity Enhancer) ACE…
Përcaktimi i modalitetit të ngjyrave. (Real Color Management) RCM…
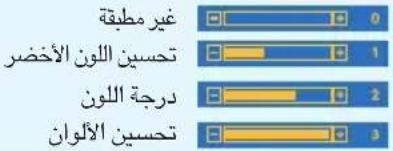
PËRDORUESI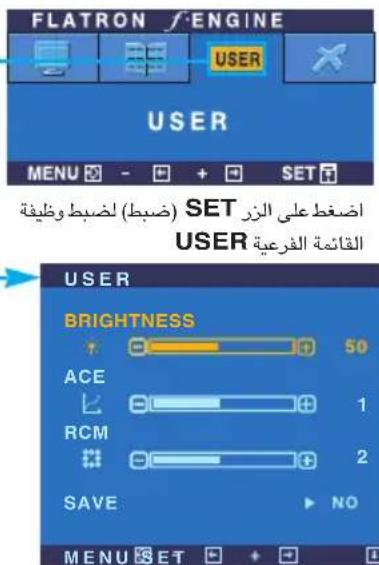
Zgjidhni nënmenunë (Rregullo) dhe ruani vlerën SET duke përdorur butonin SAVE (NG) duke përdorur butonat YES
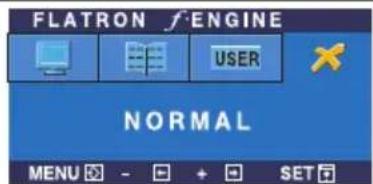
Kjo në kushte normale funksionimi.
NORMAL
(Normal)
Referojuni këtij seksioni përpara se të thirrni shërbimin e mirëmbajtjes.
| لا تظهر الصورة | |
| • افحص كامل الطاقة وتناكد من إيصاله بشكل صحيحömأخذالطاقة.• اضغط على زر الطاقة.• اضبط نصوع الشاشة والتباين.• إذا كانت الشاشة في وضع حفظ الطاقة، فحاول تحريك الماوس• أو الضغط على أي مفتاح في لوحة المفاتيع لتنشيط الشاشة.• جرب تشغيل الكميويتر.• ظظهر هذه الرسالة عندما تكون الإشارة القادمة من الكميويتر(بطاقة الفيديو) خارج)ntheast التردد الأفقي أو الرأسي للشاه.• راجع قسم"المواصفات"في هذا الكتب وقم بتهيئة الشاشة مرة Agricultural Agricultural Workers - Agricultural Workers (العربية)مُلْتَرَىٍ،مُلْتَرَىٍ،مُلْتَرَىٍ،مُلْتَرَىٍ،مُلْتَرَىٍ،مُلْتَرَىٍ،مُلْتَرَىٍ،مُلْتَرَىٍ،مُلْتَرَىٍ،مُل 1 الاشاشة متصلاً. افحص cervical الإشارة ثم hoawl مرة أخرى. | ● هل کابل الطاقة الخاصة بالشاهشة موصول?● هل مؤشر الطاقة مضاء?● هل تم تشغيل الطاقة? وهل مؤشر الطاقة أزرق أو أخضر?● هل مؤشر الطاقة أصرر اللون?● هل ترى رسالة (إشرة الدخل OF RANGE " Chariج Nunطاق " OUT " )تَلْرَىٍ،مُلْتَرَىٍ،مُلْتَرَىٍ،مُلْتَرَىٍ،مُلْتَرَىٍ،مُلْتَرَىٍ،مُلْتَرَىٍ،مُلْتَرَىٍ،مُلْتَرَى(_ )CHECK SIGNAL CABLE " |
| "OSD LOCKED" على الشاشة? | |
| • يمكن تأمين إعدادات التحكم الحالية بحيث لا يمكن تغييرها بشكل غير مقصود. يمكنك إلغاء تأمين عناصر تحكمMPIارات الموجودةMENU (OSD) في أي وقت بال Forgط على الزر (القائمة) لمدة لعدة ثوان من المفترض أن تظهر الرسالة (تم إلغاء تأمين MPIارات الموجودة OSD UNLOCKED . ((OSD) على الشاشة) | •-panel هل تظهر الرسالة OSD LOCKED (أدوات) LinkedIn مقالة (عند الضغط MENU (القائمة) على زر |
| صورة الشاشسة غير صحیحة | |
| (телقائي) لضبط صورة الشاشةAUTO/SET▪ اضغط على الز ● تلقائياً إلى أفضل إعداد Ireland: Ireland : Ireland : Ireland : Ireland : Ireland : Ireland : Ireland : Ireland : Ireland : Ireland : Ireland : Ireland : Ireland : Ireland : Ireland : Ireland : Ireland : Ireland : Ireland : Ireland : Ireland : Ireland : Ireland : Ireland : Ireland : Ireland : Ireland : Ireland : Ireland : Ireland : Ireland : Ireland : Ireland : Ireland : Ireland : Ireland : Ireland : Ireland : Ireland : Ireland : Ireland : Ireland : Ireland : Ireland : Ireland : Ireland : Ireland : Ireland : Ireland : Ireland : Ireland: Ireland : Ireland : Ireland : Ireland : Ireland : Ireland : Ireland : Ireland : Ireland : Ireland : Ireland : Ireland : Ireland : Ireland : Ireland : Ireland : Ireland : Ireland : Ireland : Ireland : Ireland : Ireland : Ireland : Ireland : Ireland : Ireland : Ireland : Ireland : Ireland : Ireland : Ireland : Ireland : Ireland : Ireland : Ireland : Ireland : Ireland : Ireland : Ireland : Ireland : Ireland : Ireland : Ireland : Ireland : Ireland : Ireland : Ireland : Ireland : Ireland: Ireland: Ireland : Ireland : Ireland : Ireland : Ireland : Ireland : Ireland : Ireland : Ireland : Ireland : Ireland : Ireland : Ireland : Ireland : Ireland : Ireland : Ireland : Ireland : Ireland : Ireland : Ireland : Ireland : Ireland : Ireland : Ireland : Ireland : Ireland : Ireland : Ireland : Ireland : Ireland : Ireland : Ireland : Ireland : Ireland : Ireland : Ireland : Ireland : Ireland : Ireland : Ireland : Ireland : Ireland : Ireland : Ireland : Ireland : Ireland : Ireland : Ireland | |
| (تحديد) لضبط صورة الشاشةAUTO/SET▪ اضغط على الز ● تلقائياً إلى أفضل إعداد Ireland : Ireland : Ireland : Ireland : Ireland : Ireland : Ireland : Ireland : Ireland : Ireland : Ireland : Ireland : Ireland : Ireland : Ireland : Ireland : Ireland : Ireland : Ireland : Ireland : Ireland : Ireland : Ireland : Ireland : Ireland : Ireland : Ireland : Ireland : Ireland : Ireland : Ireland : Ireland : Ireland : Ireland : Ireland : Ireland : Ireland : Ireland : Ireland : Ireland : Ireland : Ireland : Ireland : Ireland : Ireland : Ireland : Ireland : Ireland : Ireland : Ireland .العرض على الشاشةAUTO/SET▪ اضغط على الز ● تلقائياً إلى أفضل إعداد Ireland : Ireland : Ireland : Ireland : Ireland : Ireland : Ireland : Ireland : Ireland : Ireland : Ireland : Ireland : Ireland : Ireland : Ireland : Ireland : Ireland : Ireland : Ireland : Ireland : Ireland : Ireland : Ireland : Ireland : Ireland : Ireland : Ireland : Ireland : Ireland : Ireland : Ireland : Ireland : Ireland : Ireland : Ireland : Ireland : Ireland : Ireland: Ireland : Ireland : Ireland : Ireland : Ireland : Ireland : Ireland : Ireland : Ireland : Ireland : Ireland : Ireland: Ireland : Ireland : Ireland : Ireland : Ireland : Ireland : Ireland : Ireland : Ireland : Ireland : Ireland : Ireland : Ireland : Ireland : Ireland : Ireland : Ireland : Ireland : Ireland : Ireland : Ireland : Ireland : Ireland : Ireland : Ireland : Ireland : Ireland : Ireland : Ireland : Ireland : Ireland : Ireland : Ireland : Ireland : Ireland : Ireland : Ireland : Ireland: Ireland : Ireland : Ireland : Ireland : Ireland : Ireland : Ireland : Ireland : Ireland : Ireland : Ireland : Ireland .الشاشة.▪ افحص لوحة التحكم - « عرض - « » : Ireland : Ireland : Ireland : Ireland : Ireland : Ireland : Ireland : Ireland : Ireland : Ireland : Ireland : Ireland : Ireland : Ireland : Ireland : Ireland : Ireland : Ireland : Ireland : Ireland : Ireland : Ireland : Ireland : Ireland : Ireland : Ireland : Ireland : Ireland : Ireland : Ireland : Ireland : Ireland : Ireland : Ireland : Ireland : Ireland : Ireland : Ireland : Ireland : Ireland : Ireland : Ireland : Ireland : Ireland : Ireland : Ireland : Ireland : Ireland : Ireland : IECO : Ireland : Ireland : Ireland : Ireland : Ireland : Ireland : Ireland : Ireland : Ireland : Ireland : Ireland : Ireland : Ireland : Ireland : Ireland : Ireland : Ireland : Ireland : Ireland : Ireland : Ireland : Ireland : Ireland : Ireland : Ireland : Ireland : Ireland : Ireland : Ireland : Ireland : Ireland : Ireland : Ireland : Ireland : Ireland : Ireland : Ireland : Ireland : Ireland : Ireland : Ireland : Ireland : Ireland : Ireland : Ireland : Ireland : Ireland : Ireland : Ireland : Irish : Ireland : Ireland : Ireland : Ireland : Ireland : Ireland : Ireland : Ireland : Ireland : Ireland : Ireland : Ireland : Ireland : Ireland : Ireland : Ireland : Ireland : Ireland : Ireland : Ireland : Ireland : Ireland : Ireland : Ireland : Ireland : Ireland : Ireland : Ireland : Ireland : Ireland : Ireland : Ireland : Ireland : Ireland : Ireland : Ireland : Ireland : Ireland : Ireland : Ireland : Ireland : Ireland : Ireland : Ireland : Ireland : Ireland : Ireland : Ireland : Ireland : IVIE : Ireland : Ireland : Ireland : Ireland : Ireland : Ireland : Ireland : Ireland : Ireland : Ireland : Ireland : Ireland : Ireland : Ireland : Ireland : Ireland : Ireland : Ireland : Ireland : Ireland : Ireland : Ireland : Ireland : Ireland : Ireland : Ireland : Ireland : Ireland : Ireland : Ireland : Ireland : Ireland : Ireland : Ireland : Ireland : Ireland : Ireland : Ireland : Ireland : Ireland : Ireland : Ireland : Ireland : Ireland : Ireland : Ireland : Ireland : Ireland : Ireland : IRIE : Ireland : Ireland : Ireland : Ireland : Ireland : Ireland : Ireland : Ireland : Ireland : Ireland : Ireland : Ireland : Ireland : Ireland : Ireland : Ireland : Ireland : Ireland : Ireland : Ireland : Ireland : Ireland : Ireland : Ireland : Ireland : Ireland : Ireland : Ireland : Ireland : Ireland : Ireland : Ireland : Ireland : Ireland : Ireland : Ireland : Ireland : Ireland : Ireland : Ireland : Ireland : Ireland : Ireland : Ireland : Ireland : Ireland : Ireland : Ireland : Ireland: Irish : Ireland : Ireland : Ireland : Ireland : Ireland : Ireland : Ireland : Ireland : Ireland : Ireland : Ireland : Ireland : Ireland : Ireland : Ireland : Ireland : Ireland : Ireland : Ireland : Ireland : Ireland : Ireland : Ireland : Ireland : Ireland : Ireland : Ireland : Ireland : Ireland : Ireland : Ireland : Ireland : Ireland : Ireland : Ireland : Ireland : Ireland : Ireland : Ireland : Ireland : Ireland : Ireland : Ireland : Ireland : Ireland : Ireland : Ireland : Ireland : Ireland: IECO : Ireland : Ireland : Ireland : Ireland : Ireland : Ireland : Ireland : Ireland : Ireland : Ireland : Ireland : Ireland : Ireland : Ireland : Ireland : Ireland : Ireland : Ireland : Ireland : Ireland : Ireland : Ireland : Ireland : Ireland : Ireland : Ireland : Ireland : Ireland : Ireland : Ireland : Ireland : Ireland : Ireland : Ireland : Ireland : Ireland : Ireland : Ireland : Ireland : Ireland : Ireland : Ireland : Ireland : Ireland : Ireland : Ireland : Ireland : Ireland: IEC O : Ireland : Ireland : Ireland : Ireland : Ireland : Ireland : Ireland : Ireland : Ireland : Ireland : Ireland : Ireland : Ireland : Ireland : Ireland : Ireland : Ireland : Ireland : Ireland : Ireland : Ireland : Ireland : Ireland : Ireland : Ireland : Ireland : Ireland : Ireland : Ireland : Ireland : Ireland : Ireland : Ireland : Ireland : Ireland : Ireland : Ireland : Ireland : Ireland : Ireland : Ireland : Ireland : Ireland : Ireland : Ireland : Ireland : Ireland : Ireland : Ireland : Ir E C O : Ireland : Ireland : Ireland : Ireland : Ireland : Ireland : Ireland : Ireland : Ireland : Ireland : Ireland : Ireland : Ireland : Ireland : Ireland : Ireland : Ireland : Ireland : Ireland : Ireland : Ireland : Ireland : Ireland : Ireland : Ireland : Ireland : Ireland : Ireland : Ireland : Ireland : Ireland : Ireland : Ireland : Ireland : Ireland : Ireland : Ireland : Ireland : Ireland : Ireland : Ireland : Ireland : Ireland : Ireland : Ireland : Ireland : Ireland : Ireland : Ireland: Ir E C O : Ireland : Ireland : Ireland : Ireland : Ireland : Ireland : Ireland : Ireland : Ireland : Ireland : Ireland : Ireland : Ireland : Ireland : Ireland : Ireland : Ireland : Ireland : Ireland : Ireland : Ireland : Ireland : Ireland : Ireland : Ireland : Ireland : Ireland : Ireland : Ireland : Ireland : Ireland : Ireland : Ireland : Ireland : Ireland : Ireland : Ireland : Ireland : Ireland : Ireland : Ireland : Ireland : Ireland : Ireland : Ireland : Ireland : Ireland : Irish O : Ireland : Ireland : Ireland : Ireland : Ireland : Ireland : Ireland : Ireland : Ireland : Ireland : Ireland : Ireland : Ireland : Ireland : Ireland : Ireland : Ireland : Ireland : Ireland : Ireland : Ireland : Ireland : Ireland : Ireland : Ireland : Ireland : Ireland : Ireland : Ireland : Ireland : Ireland : Ireland : Ireland : Ireland : Ireland : Ireland : Ireland : Ireland : Ireland : Ireland : Ireland : Ireland : Ireland : Ireland : Ireland : Ireland : Ireland : Ireland : Ireland O : Ireland O : Ireland O : Ireland O : Ireland O : Ireland O : Ireland O : Ireland O : Ireland O : Ireland O : Ireland O : Ireland O : Ireland O : Ireland O : Ireland O : Ireland O : Ireland O : Ireland O : Ireland O : Ireland O : Ireland O : Ireland O : Ireland O : Ireland O : Ireland O : Ireland O : Ireland O : Ireland O : Ireland O : Ireland O : Ireland O : Ireland O : Ireland O : Ireland O: Ir E C O : Ireland O: Ir E C O : Ireland O: Ir E C O : Ireland O: Ir E C O : Ireland O: Ir E C O : Ireland O: Ir E C O : Ireland O: Ir E C O : Ireland O: Ir E C O : Ireland O: Ir E C O : Ireland O: Ir E C O : Ireland O: Ir E C O : Ireland O: Ir E C O : Ireland O: Ir E C O : Ireland N O O O O O O O O O O O O O O O O O O O O O O O O O O O O O O O O O O O O O O O O O O O O O O O O O O O O O O O O O O O O O O O O O O O O O O O O O O O O O O O O O O O O O O O O O O O O O O O O O O O O IECO: Ir E C O : Ireland O: Ir E C O : Ireland O: Ir E C O : Ireland O: Ir E C O : Ireland O: Ir E C O : Ireland O: Ir E C O : Ireland O: Ir E C O : Ireland O: Ir E C O : Ireland O: Ir E C O : Ireland O: Ir E C O : Ireland O: Ir E C O : Ireland O: Ir E C O : Ireland O: Ir E E O O O O O O O O O O O O O O O O O O O O O O O O O O O O O O O O O O O O O O O O O O O O O O O O O O O O O O O O O O O O O O O O O O O O O O O O O O O O O O O O O O O O O O O O O O O O O O O O O O O N O O O O O O O O O O O O O O O O O O O O O O O O O O O O O O O O O O O O O O O O O O O O O O O O O O O O O O O O O O O O O O O O O O O O O O O O O O O O O O O O O O O O O O O O O O O O O O O O O O I E C O : I E C O : I E C O : I E C O : I E C O : I E C O : I E C O : I E C O : I E C O : I E C O : I E C O : I E C O : I E C O : I E C O : I E C O : I E C O : I E C O : I E C O : I E C O : I E C O : I E C O | | | | | | | | | | | | | | | | | | | | | | | | | | | | | | | | | | | | | | | | | | | | | | | | | | | | | | | | | | | | | | | | | | | | | | | | | | | | | | | | | | | | | | | | | | | | | | | | | | | | | | | | | | | | | | | | | | | | | | | | | | | | | | | | | | | | | | | | | | | | | | | | | | | | | | | | | > > > > > > > > > > > > > > > > > > > > > > > > > > > > > > > > > > > > > > > > > > > > > > > > > > > < img src="images/12" > > < img src="images/12" > > < img src="images/12" > > < img src="images/12" > > < img src="images/12" > > < img src="images/12" > > < img src="images/12" > > < img src="images/12" > > < img src="images/12" > > < img src="images/12" > > < img src="images/12"> > < img src="images/12" > > < img src="images/12" > > < img src="images/12" > > < img src="images/12" > > < img src="images/12" > > < img src="images/12" > > < img src="images/12" > > < img src="images/12" > > < img src="images/12" > > < img src="images/12"I > > < img src="images/12"I > > < img src="images/12"I > > < img src="images/12"I > > < img src="images/12"I > > < img src="images/12"I > > < img src="images/12"I > > < img src="images/12"I > > < img src="images/12"I > > < img src="images/12"I > > < img src="images/12" > > < img src="images/12"I > > < img src="images/12"I > > < img src="images/12"I > > < img src="images/12"I > > < img src="images/12"I > > < img src="images/12"I > > < img src="images/12"I > > < img src="images/12"I > > < img src="images/12" > > < img src="images/12" > > < img src="images/12" > > < img src="images/12" > > < img src="images/12" > > < img src="images/12" > > < img src="images/12" > > < img src="images/12" > > < img src="images/12" > > < img src="images/12"I> > < img src="images/12"I> > < img src="images/12"I> > < img src="images/12"I> > < img src="images/12"I> > < img src="images/12"I> > < img src="images/12"I> > < img src="images/12"I> > < img src="images/12"I> > < img src="images/12"I> > < img src="images/12"I>< img src="images/12"I> > < img src="images/12"I> > < img src="images/12"I> > < img src="images/12"I> > < img src="images/12"I> > < img src="images/12"I> > < img src="images/12"I> > < img src="images/12"I> > < img src="images/12"I> > < img src="images/12"I> >< img src="images/12"I> > < img src="images/12"I> > < img src="images/12"I> > < img src="images/12"I> > < img src="images/12"I> > < img src="images/12"I> > < img src="images/12"I> > < img src="images/12"I> > < img src="images/12"I> > < img src="images/12"I> > </ img src="images/12"I> > </ img src="images/12"I> > </ img src="images/12"I> > </ img src="images/12"I> > </ img src="images/12"I> > </ img src="images/12"I> > </ img src="images/12"I> > </ img src="images/12"I> > </ img src="images/12"I> > </ img src="images/12"I> > < img src="images/12"I> > < img src="images/12"I> > < img src="images/12"I> > < img src="images/12"I> > < img src="images/12"I> > < img src="images/12"I> > < img src="images/12"I> > < img src="images/12"I> > < img src="images/12"I> > <| img src="images/12"I> > < img src="images/12"I> > < img src="images/12"I> > < img src="images/12"I> > < img src="images/12"I> > < img src="images/12"I> > < img src="images/12"I> > < img src="images/12"I> > < img src="images/12"I> > < img src="images/12"I> ></ img src="images/12"I> > </ img src="images/12"I> > </ img src="images/12"I> > </ img src="images/12"I> > </ img src="images/12"I> > </ img src="images/12"I> > </ img src="images/12"I> > </ img src="images/12"I> > </ img src="images/12"I> > </ img src="images/12"I> > <| img src="images/12"I> > </ img src="images/12"I> > </ img src="images/12"I> > </ img src="images/12"I> > </ img src="images/12"I> > </ img src="images/12"I> > </ img src="images/12"I> > </ img src="images/12"I> > </ img src="images/12"I> > </ img src="images/12"I> ></ img src="images/12"I> > </ img src="images/12"I> > </ img src="images/12"I> > </ img src="images/12"I> > </ img src="images/12"I> > </ img src="images/12"I> > </ img src="images/12"I> > </ img src="images/12"I> > </ img src="images/12"I> ></ img src="images/12"I> > <| img src="images/12"I> > </ img src="images/12"I> > </ img src="images/12"I> > </ img src="images/12"I> > </ img src="images/12"I> > </ img src="images/12"I> > </ img src="images/12"I> > </ img src="images/12"I> > </ img src="images/12"I> > <| img src="images/12"I> > <| img src="images/12"I> > </ img src="images/12"I> > </ img src="images/12"I> > </ img src="images/12"I> > </ img src="images/12"I> > </ img src="images/12"I> > </ img src="images/12"I> > </ img src="images/12"I> > </ img src="images/12"I> > < img src="images/12"I> > </ img src="images/12"I> > </ img src="images/12"I> > </ img src="images/12"I> > </ img src="images/12"I> > </ img src="images/12"I> > </ img src="images/12"I> > </ img src="images/12"I> > </ img src="images/12"I> > < img src="images/12"I> > <| img src="images/12"I> > <| img src="images/12"I> > <| img src="images/12"I> > </ img src="images/12"I> > </ img src="images/12"I> > </ img src="images/12"I> > </ img src="images/12"I> > </ img src="images/12"I> > </ img src="images/12"I> > </ img src="images/12"I> > <| img src="images/12"I> > </ img src="images/12"I> > <| img src="images/12"I> > </ img src="images/12"I> > </ img src="images/12"I> > </ img src="images/12"I> > </ img src="images/12"I> > </ img src="images/12"I> > </ img src="images/12"I> > </ img src="images/12"I> > <| img src="images/12"I> > <| img src="images/12"I> > <| img src="images/12"I> > </ img src="images/12"I> > </ img src="images/12"I> > </ img src="images/12"I> > </ img src="images/12"I> > </ img src="images/12"I> > </ img src="images/12"I> > <| img src="images/12"I> > </ img src="images/12"I> > </ img src="images/12"I> > <| img src="images/12"I> > </ img src="images/12"I> > </ img src="images/12"I> > </ img src="images/12"I> > </ img src="images/12"I> > </ img src="images/12"I> > </ img src="images/12"I> > <| img src="images/12"I> > </ img src="images/12"I> > <| img src="images/12"I> > <| img src="images/12"I> > </ img src="images/12"I> > </ img src="images/12"I> > </ img src="images/12"I> > </ img src="images/12"I> > </ img src="images/12"I> > </ img src="images/12"I> > <| img src="images/12"I> > <| img src="images/12"I> > </ img src="images/12"I> > <| img src="images/12"I> > </ img src="images/12"I> > </ img src="images/12"I> > </ img src="images/12"I> > </ img src="images/12"I> > </ img src="images/12"I> > </ img src="images/12"I> > <| img src="images/12"I> > <| img src="images/12"I> > <| img src="images/12"I> > <| img src="images/12"I> > </ img src="images/12"I> > </ img src="images/12"I> > </ img src="images/12"I> > </ img src="images/12"I> > </ img src="images/12"I> > </ img src="images/12"I> > < img src="images/12"I> > </ img src="images/12"I> > </ img src="images/12"I> > <| img src="images/12"I> > </ img src="images/12"I> > </ img src="images/12"I> > </ img src="images/12"I> > </ img src="images/12"I> > </ img src="images/12"I> > </ img src="images/12"I> > < img src="images/12"I> > </ img src="images/12"I> > < img src="images/12"I> > </ img src="images/12"I> > </ img src="images/12"I> > </ img src="images/12"I> > </ img src="images/12"I> > </ img src="images/12"I> > </ img src="images/12"I> > </ img src="images/12"I> > <| img src="images/12"I> > </ img src="images/12"I> > < img src="images/12"I> > </ img src="images/12"I> > </ img src="images/12"I> > </ img src="images/12"I> > </ img src="images/12"I> > </ img src="images/12"I> > </ img src="images/12"I> > </ img src="images/12"I> > < img src="images/12"I> > </ img src="images/12"I> > < img src="images/12"I> > < img src="images/12"I> > </ img src="images/12"I> > </ img src="images/12"I> > </ img src="images/12"I> > </ img src="images/12"I> > </ img src="images/12"I> > </ img src="images/12"I> > </ img src="images/12"I> > < img src="images/12"I> > < img src="images/12"I> > </ img src="images/12"I> > </ img src="images/12"I> > </ img src="images/12"I> > </ img src="images/12"I> > </ img src="images/12"I> > </ img src="images/12"I> > < img src="images/12"I> > </ img src="images/12"I> > </ img src="images/12"I> > < img src="images/12"I> > </ img src="images/12"I> > </ img src="images/12"I> > </ img src="images/12"I> > </ img src="images/12"I> > </ img src="images/12"I> > </ img src="images/12"I> > < img src="images/12"I> > </ img src="images/12"I> > < img src="images/12"I> > <| img src="images/12"I> > </ img src="images/12"I> > </ img src="images/12"I> > </ img src="images/12"I> > </ img src="images/12"I> > </ img src="images/12"I> > </ img src="images/12"I> > </ img src="images/12"I> > </ img src="images/12"I> ></ img src="images/12"I> > < img src="images/12"I> > </ img src="images/12"I> > </ img src="images/12"I> > </ img src="images/12"I> > </ img src="images/12"I> > </ img src="images/12"I> > </ img src="images/12"I> > </ img src="images/12"I> > </ img src="images/12"I> > <| img src="images/12"I> > < img src="images/12"I> > </ img src="images/12"I> | |
| هل قمت بعتبیت برنامج تشغیل الشاشة؟ | |
| تأکد من تثبیت برنامج تشغیل الشاشة من القرص المarseف http://www.lge.com.الوب: تحقق ما Estonia بطاقة الفيديو تدهم وظيفه التوصیل والتشغیل. | هل قمت بعتبیت برنامج تشغیل الشاشة؟ |
| هل تطهر الرسالة شاشة غير متعرف علیها، تم العثور على شاشة التوصیل والتشغیل (DDC VESA) ? | |
L2000CE
| ٢٠٤١٠٥٧. قَمْسَالَ قَدَ تَيْعَتَّسِهِ يُغَةٌ مُحْطَا رِيْقَأً بِيْمَتَ شَبْعِيٍ٤٠٠٠٠٠٠٠٠٠٠٠٠٠٠٠٠٠٠٠٠٠٠٠٠٠٠٠٠٠٠٠٠٠٠٠٠٠٠٠٠٠٠٠٠٠٠٠٠٠٠١٠٠٠٠٠٠٠٠٠٠٠٠٠٠٠٠٠٠٠٠٠٠٠٠٠٠٠٠٠٠٠٠٠٠٠٠٠٠٠٠٠٠٠٠٠٠٠٠٠٢٢٠١٢٨. مُفْقَوَدَة عَنَدَ الْحَافَةَ الْعَلِياَ أَوَ الْحَافَةَ السَفْلِيةَ لِلَّشَاشَةِ. | |
| ▪ Honduras هي الحالة العادية للصورة. وَيَتمَ تَنْفَيَذْ هِذَا الأَمْرَ لَتَجَنَبْ حَدُوَثِ بِهَtanَالْحَرْفَ الْذِي يِنْشَأَ عَنَ التَدْرِيَجِ فِي دِرِجَةِ الْدَقَةِ مِنَ ١٠٢٤٠١٢٨. | ▪ Honduras مُنْطَقَةَ أَفْقِيمَةِ سُودَاءَ أَوَ صورة مُفْقَوَدَةَ عَنَدَ الْحَافَةَ الْعَلِياَ أَوَ الْحَافَةَ السَفْلِيةَ لِلَّشَاشَةِ. |
| الشاشة | ||
| التردد الأفقي تمثيلي : ۲۸ - ۲۸ : تلقاني (۸۳ - ۲۸ : كيلوهرتز) (telقاني)رقمي : ۸۳ - ۲۸ : كيلوهرتز (telقاني) | دخل التزامن | |
| التردد الرأسي : ۷۰ - ۷۰ هرتز (telقاني) | ||
| هيئة الدخل : موحب/ سالب TTL منفصل , موجب/ سالب (الTZامن على اللون الأخضر) SOG رقمي | ||
| D-Sub دخل الإشارة موصل ۱۵成分 ۱۵ DVI -D موصل (رقمي) RGB تمثيلي (۷۵/۷۶-p,۷۶) رقمي | دخل الفيديو | |
| Hz ۱. @ ۱۲... × ۱۷... VESA : تمثيلي D-Sub (النوم) SleepWest Hz ۱. @ ۱۲... × ۱۷... VESA : DVI | الدقة | |
| Hz ۱. @ ۱۲... × ۱۷... VESA المفضل | ||
| DDC 2B | التوصيل والتشغيل | |
| وضع التشغيل : ۵۸ وات (النوم) عضع (Sleep) | استهلاك الطاقة | |
| وضع إيقاف التشغيل ≥ ۱ وات | ||
| الحامل مضمن تم استبعاد الحامل | الأبعاد والوزن | |
| 17,۴۷ / ۶۴,۴۹ بوصة ۱۷,۴۷ / ۶۴,۴۹ بوصة ۱۳,۵۸ / ۶۴,۵۱ بوصة ۲,۷۸ / ۷,۸۷ | العرض ۱۷,۴۷ / ۶۴,۴۹ بوصة ۱۷,۴۸ / ۶۴,۸۸ بوصة (الحد الأدنى) (الطول ۹ / ۱۷,۴۸ / ۶۴,۸۸ بوصة ۲,۵۸ / ۶۴,۸۹ بوصة (الحد الأقصى) (العمق ۹ / ۶۴,۲۷ بوصة ۲۴,۲۷) | الصافي ۷,۷ کجم |
| مدي الميل درجة ۲۰ ~ ۵- ۴۷ درجة ۴۰. مدي الدوران حول المحور ۳,۱۵ / ۴,۱۵ بوصة ۳,۱۵ / ۴,۱۵ بوصة ۴,۱۵ / ۴,۱۵ بوصة (أفقي - رأسي) في اتجاه حركة عقارب Satisfaction (أفقي - رأسي) | Granatic الميل / الدوران | |
| تيار متردد ۲۴-۱۰۰ / ۷۰ هرتز ۲۴ فولت | دخل الطاقة | |
| ظروف التشغيل درجة الحراリア ۲۰ مئوية ۲۰ مئوية surrounded مكتف | الظروف البيئية | |
| ظروف التخزين درجة الحراリア ۲۰ مئوية surrounded مكتف surrounded مكتف | ||
| الشاشسة | ||
| التردد الأفقي تمثيلي : ۲۸ - ۲۸ : کيلوهرتز (تلقاني)۸۳ - ۲۸ : رقي : ۸۳ - ۲۸ : کيلوهرتز (تلقاني) | الatreد الراسي - ۷۰ - ۷۰ ترعتز (تلقاني) | |
| التردد Darسی - ۷۰ هرترز (رقيم) | ||
| هيئة الدخل منفصل , موجب/ سالب TTL التزامن على اللون الأخضر SOG | ||
| رقيم | ||
| D-Sub دخل الإشارة موصل ۱۰ سن ۱۰ DVI -D (رقيم) | الدستهلاك الطاقة | |
| رقيم ۷۰/Vp-p -v (رقيم) | ||
| RGB هيئة الدخل | ||
| Hz ۷. @ ۱.۴. × ۱.۰. VESA : تمثيلي : D-Sub | الدستهلاك الطاقة | |
| Hz ۷. @ ۱۴. × ۱.۰. VESA : رقيم DVI | ||
| Hz ۷. @ ۱۴. × ۱.۰. VESA المفضل | ||
| DDC 2B | الابعاد والوزن | |
| 疾ضع التشغيل : ۵۸ وات (النوم) | التوصيل والتشغيل | |
| 疾ضع إيقاف التشغيل ≥ ۱۰ وات | ||
| الحامل مضمن تم استبعاد الحامل | استهلاك الطاقة | |
| الصافي ۷,۵ بوصة ۱۷,۴۷ / سم ۴۴,۴۹ | العرض ۱۷,۴۷ / سم ۴۴,۴۹ | الابعاد والوزن |
| الطول ۱۷,۴۸ / سم ۴۴,۸۹ | الصافي ۱۷,۴۸ / سم ۴۴,۸۹ | الابعاد والوزن |
| الصافي ۲,۷۰ / بوصة ۲,۷۰ / سم ۷,۸۷ | مدي الميل ۲۰ - ۰۰ درجة ۲۰ - ۰۰ درجة ۲۰ - ۰۰ درجة ۲,۱۰ / بوصة ۲,۱۰ / بوصة ۲,۱۰ / بوصة ۲,۱۰ / بوصة ۲,۱۰ / بوصة ۲,۱۰ / بوصة ۲,۱۰ / بوصة ۲,۱۰ / بوصة ۲,۱۰ / بوصة ۲ | الابعاد والوزن |
| الاستدارية | ||
| تيار متردد ۲۴. - ۱۰ - ۱۰ / مز ۲ أُمْبِير | الابعاد والوزن | |
| ظروف التشغيل درجة الحرارة | الابعاد والوزن | |
| الرطوبة ۲۰ - ۱۰ مئوية | ||
| ظروف التخزين درجة الحرارة | ||
| الرطوبة ۲. - مئوية إلى ۲. مئوية | ||
| ( O) مرفق ( ) ، غير مرفق ( ) | Visual principal/ cooperation | |
| ( O) مرفق ( ) ، غير مرفق ( ) | Visual principal/ cooperation | |
| من نوع مأخذ الطاقة أو نوع مأخذ الكمبيوتر | Visual principal/ cooperation | |
Shënim
■ Informacioni në këtë libër është subjekt i ndryshimit pa njoftim paraprak
Mënyrat e paracaktuara (rezolucioni) L2000C/L2000CN
| (التردد الرأسي (هرتز) | (التردد الأفقي (كيلوهرتز) | (الدقة) | (أضاء العرض) |
| ۷. , .۹ | ۳۱, ε۷ | 7 · x ۲۰. | ۱ |
| ۶۹, ۹\varepsilon | ۳۱, ε۷ | 7 · x ε۸. | ۲ |
| ۷۰ | ۳۷, ۵. | 7 · x ε۸. | ۴ |
| ۷. , .۸ | ۳۱, ε۷ | 7γ · x ε.. | ε |
| ۳. , ۳۲ | ۳۷,۸۸ | ۸.. × 7.. | ۵ |
| ۷۰ | ε۳,۸۸ | ۸.. × 7.. | ۶ |
| ۷\varepsilon , ۵۵ | ε۹,۷۲ | ۸۳۲ × 7۳ | ۷ |
| ۳. | ε۸,۳۳ | 1.۳ × 7γ | ۸ |
| ۷۰, .۳ | ۳. , .۳ | 1.۳ × 7γ | ۹ |
| ۷۰, .۳ | ۷۸, ۷۸ | 110γ × ۸۷. | ۱. |
| ۷۵, ۹۷ | ۷۱,۸. | 110γ × 9.. | ۱۱ |
| ۳. , .۲ | ۳۳, ۹۸ | 17۸. × 1.۳ | ۱۲ |
| ۷۵, .۲ | ۷۹, ۹۸ | 17۸. × 1.۳ | ۱۳ |
| ۷. | ۷۵, .. | 17.. × 17.. | ۱\varepsilon * |
Preferuar *
L2000CE
| (التردد الرأسي (هرTZ) | (التردد الأفقي (كيلوهرتز) | (الدقة) | (أوضاع العرض) |
| V.,.9 | ٢١,٤٧ | ٦٤. × ٣٥. | ١ |
| ٥٩,٩٤ | ٢١,٤٧ | ٦٤. × ٤٨. | ٢ |
| V0 | ٢٧,٥. | ٦٤. × ٤٨. | ٢ |
| V.,.٨ | ٢١,٤٧ | ٧٢. × ٤.. | ٤ |
| ٦.,٢٢ | ٢٧,٨١ | ٨.. × ٦.. | ٥ |
| V0 | ٤٦,٨١ | ٨.. × ٦.. | ٦ |
| ٧٤,٥٥ | ٤٩,٧٢ | ٨٣٢ × ٦٣٤ | ٧ |
| ٦. | ٤٨,٣٦ | ١.٢٤ × ٧٦٨ | ٨ |
| V0,.٢ | ٦.,.٢ | ١.٢٤ × ٧٦٨ | ٩ |
| V0,.٦ | ٦٨,٦٨ | ١١٥٢ × ٨٧. | ١. |
| 70,٩٦ | ٦١,٨. | ١١٥٢ × ٩.. | ١١ |
| ٦.,.٢ | ٦٣,٩٨ | ١٣٨. × ١.٣٤ | ١٢ |
| V0,.٢ | ٧٩,٩٨ | ١٣٨. × ١.٣٤ | ١٣ |
| ٦. | ٦٥,٣ | ١٤.. × ١.٥. | ١٤ * |
Preferuar *
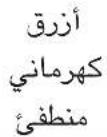
Treguesi
Ngjyra e treguesit funksion

Lidhësi DVI-D ■
DVI-D sinjal kinez
| اكتشف التوصيل المباشر | 16 |
| T.M.D.S Data.- | 17 |
| T.M.D.S Data.+ | 18 |
| T.M.D.S Data./◦ Shield | 19 |
| T.M.D.S Data◦- | 20 |
| T.M.D.S Data◦+ | 21 |
| T.M.D.S Data Clock Shield | 22 |
| T.M.D.S Clock + | 23 |
| T.M.D.S Clock - | 24 |
DVI-D sinjal kinez
| T.M.D.S Data 2 - | 1 |
| T.M.D.S Data 2 + | 2 |
| T.M.D.S Data 2 / 3 Shield | 3 |
| T.M.D.S Data 3 - | 4 |
| T.M.D.S Data 3 + | 5 |
| DDC Clock | 6 |
| DDC Data | 7 |
| تزامن رأسی تمثیلی | 8 |
| T.M.D.S Data 1- | 9 |
| T.M.D.S Data 1+ | 10 |
| T.M.D.S Data 1/2 Shield | 11 |
| T.M.D.S Data 2- | 12 |
| T.M.D.S Data 2+ | 13 |
| +5V Power | 14 |
| (ارضی (إرجاع +5V تزامن آفقي ورأسی) | 15 |
T.M.D.S, (transmetim sinjali diferencial i miniaturizuar)
Digitally yours


LG
Marka : LG
Modeli : L2000CN-BF
Kategori : Ekran