
LCD19W57CA - Televizor HISENSE - Manual de utilizare gratuit
Găsiți gratuit manualul dispozitivului LCD19W57CA HISENSE în format PDF.

Întrebările utilizatorilor despre LCD19W57CA HISENSE
0 întrebare despre acest aparat. Răspundeți la cele pe care le cunoașteți sau puneți-vă propria.
Pune o întrebare nouă despre acest aparat
Descărcați instrucțiunile pentru Televizor în format PDF gratuit! Găsiți manualul dvs. LCD19W57CA - HISENSE și luați din nou în mână dispozitivul dvs. electronic. Pe această pagină sunt publicate toate documentele necesare pentru utilizarea dispozitivului dvs. LCD19W57CA mărcii HISENSE.
MANUAL DE UTILIZARE LCD19W57CA HISENSE
Hisense®
LCD COLOUR TV
USER'S MANUAL
LCD15W57CA
LCD19W57CA
LCD32W57CA
English
Contents
Specifications 3
Important Information 4
TV Controls and Locations 6
Remote control 7
Remote Control Operation 8
Connections 10
TV Operations 12
Turning on/off 12
Changing Channels/Volume 12
Using the menu 12
Channel setting 13
Auto Install 13
Colour System setting 13
Fine Tune channel setting 13
Picture setting 14
Brightness/Contrast/Colour/Sharpness setting 14
Colour temperature setting 14
Enhanced setting 14
Sound setting 15
Balance setting 15
Equalizer setting 15
Screen adjusting 16
Image Position 16
H Size/V Size 16
Auto Adjust 16
Function setting 17
OSD language/Blue screen 17
OSD setting 17
CC setting 17
Parental control setting 17
Factory reset 19
Contents
PC setting 20
PC software setting 20
Phase 20
Clock 20
Automatic Adjust 20
Troubleshooting 21
Accessories 21
Appendix 22
Specifications
| Model | LCD15W57CA | LCD19W57CA | LCD32W57CA | |
| Product dimension (W x H x D) (mm) | not including base | 400X277X61 | 468X356.5X75 | 800X545X106.5 |
| including base | 400X312 X140 | 468X399X178 | 800X596X240 | |
| Product weight (lb/kg) | not including base | 6.2/2.8 | 11/5 | 26.4/12 |
| including base | 6.8/3.1 | 12.1/5.5 | 30.8/14 | |
| Display screen min size of diagonal of visual pictures(cm ) | 39 48 | 80 | ||
| Display screen Resolution | 1366X768 | 1440X900 | 1366X768 | |
| Unit power consumption | Refer to the rating label | |||
| Sound-matching power | 1.5W+1.5W | 1.5W+1.5W | 5W+5W | |
| Power (input) | Refer to the rating label | |||
| Receiving system | RF | NTSC | ||
| AV | NTSC | |||
| Environmental conditions | Operating temperature 5°C~35°C/41F~95F Operating humidity : 20%-80%RH Atmospheric pressure: 86kPa-106kPa | |||
Interface storage battery features:
| Interface name | Interface type | Terminal(jack) | Storage battery | Impedance |
| Video input | Compound video | Video | 1.0Vp-p | 75 Ω |
| S-VIDEO | Brightness and colour separation video | Y | 1.0Vp-p | 75 Ω |
| C | 0.286Vp-p | 75 Ω | ||
| Component input | Analog component video | Y | 1.0Vp-p | 75 Ω |
| PB.PR | 0.7Vp-p | 75 Ω | ||
| VGA | VGA | R.G.B | 0.7Vp-p | 75 Ω |
| HD.VD | TTL | High impedance | ||
| Audio input | Analog audio | Left.right | 1Vrms | More than 10kΩ |
Video signal format with component input:
50HZ 576i,576p,720p,1080i;
60HZ 480i,480p,720p,1080i.
PC signal format with VGA interface:
60HZ 640×480,800×600,1024×768.
Video signal format with HDMI input:
RGB 60HZ 640×480,800×600,1024×768;
YUV 50HZ 576p,720p,1080i;
YUV 60HZ 480p,720p,1080i.
 | CAUTIONRISK OF ELECTRIC SHODO NOT OPEN |  |  | The lightning flash symbol with an arrowhead inside a triangle alerts the user about an uninsulated dangerous voltage that may be of sufficient magnitude to constitute risk of electric shock. |
| CAUTION: TO REDUCE THE RISK OF AN ELECTRIC DO NOT REMOVE THE COVER (OR BACK).THERE ARE NO USER SERVICEABLE PARTS INSIDE. FOR ANY REQUIRED SERVICING, PLEASE CONTACT QUALIFIED SERVICE PERSONNEL. | SHOCK, | The flash with the symbol of an exclamation point inside a triangle alerts the user about important operating and maintenance instructions related to the product. | ||
CAUTION: CHANGES OR MODIFICATIONS NOT EXPRESSLY APPROVED BY THE PARTY RESPONSIBLE FOR COMPLIANCE WITH THE FCC RULES COULD VOID THE USERS AUTHORITY TO OPERATE THIS EQUIPMENT.
WARNING: TO PREVENT FIRE OR SHOCK HAZARD, DO NOT EXPOSE THIS APPLIANCE TO RA MOISTURE.
Important safety instructions
- Read these instructions
- Keep these instructions
- Heed all warnings
- Follow all instructions
- Do not use this apparatus near water
- Clean only with dry cloth
- Do not block any ventilation openings
-
Do not install near any heat sources
-
Do not defeat the safety purpose of the polarized or grounding-type plug
-
Protect the power cord from being damaged particularly at plugs, convenience receptacles, and at p which they exit from the apparatus.
-
Only use attachments/accessories specified by the manufacturer.
-
Use only with cart, stand, tripod, bracket, or table specified by the manufacturer or sold with the apparatus. When a cart is used, use caution when moving the cart/apparatus combination to avoid injury from tip-over.
-
Unplug this apparatus during lightning storms or when unused for long periods over time.
-
Refer all servicing to qualified service personnel. Servicing is required when the apparatus has been damaged in any way, such as when the power-supply card or plug is damaged, when liquid has been spilled or when objects have fallen into the apparatus, or when the apparatus has been exposed to rain or moisture, so it does not operate normally, or has been dropped. S3126A

Important Information
- POWER SOURCE This TV should be operated only from the type of power source indicated on the label. If you are not sure of the type of power supply to your home, consult your appliance dealer or local power company. For TVs intended to operate from battery power, or other sources, refer to the instructions.
- POWER CORD PROTECTION power-supply cords should be routed so that they are not likely to be on or pinched by items placed upon or against them, paying particular attention to cords at plug receptacles, and the point where they exit from the appliance.
- OUTDOOR ANTENNA GROUNDING an outside antenna or cable system is connected to the TV,
the antenna or cable system is grounded to provide some protection against voltage surges and built-up ^E static charges. Section 810 of the National Electrical
Code, ANSI/NFPA NO.70, provides information with respect to proper grounding of the mast and supporting structure, grounding of the lead-in wire to an antenna discharge unit, size of grounding conductors, location of antenna discharge unit, connection to grounding electrodes, and requirements for the grounding electrode. (Fig.A)
FIGURE A
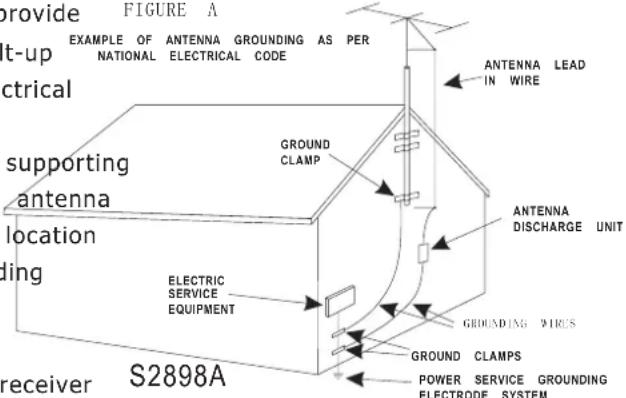
- LIGHTNINGFor added protection for this TV receiver S2898A POWER SERVICE GROUNDIELECTRODE SYSTEM during a lightning storm, or when it is left unattended and unused for long periods of time, unplug it from the wall outlet and disconnect the antenna or cable system.
This will prevent damage to the TV due to lightning and power line surges. - POWER LINES: outside antenna system should not be located in the vicinity of overhead power other electric light or power circuits, or where it can fall into such power lines or circuits. Whe outside antenna system, extreme care should be taken to keep from touching such power lines or contact with them might be fatal.
- OVERLOADING Do not overload wall outlets and extension cords as this can result in a risk of fire or electric shock.
- OBJECT AND LIQUID ENTER: push objects of any kind into this TV through openings as they touch dangerous voltage points or short out parts that could result in fire or electric shock. Never spill liquid of any kind into the TV.
- SERVICINGDo not attempt to service this TV yourself as opening or removing covers may expos dangerous voltage or other hazards. Refer all servicing to qualified service personnel.
- REPLACEMENT PARTShen replacement parts are required, be sure that the service technician use replacement parts with the same characteristics as the original parts specified by the manufacturer. Unauthorized substitutions may result in fire, electric shock, injury to persons or other hazards.
- SAFETY CHECKpon completion of any service or repairs to this TV, ask the service technician t routine safety checks to determine that the TV is in proper operating condition.
- The apparatus should not be exposed to any dripping or splashing, and no objects filled with vase) should be placed on the apparatus.
- WARNINGPlug the power cord into a power outlet where access to a power cord connector is re accessible, in case if the power needs to be immediately disconnected.
- ATTENTION: This device complies with Part 15 of the FCC Rules. Operation is subject to the following two conditions: (1) this device may not cause harmful interference, and (2) this device must accept a interference received, including interference that may cause undesired operation.
TV Controls and Locations
Note: ◆ When adjusting any of the controls, press the buttons slightly instead of pressing them very hard.
◆ The design of this product is subject to change without notice.


IR angle for the remote control
flowchart
graph TD
    A["screen"] --> B["6m"]
    A --> C["8m"]
    A --> D["5m"]
    B --> E["m'"]
    C --> F["m'"]
    D --> G["5m"]
    style A fill:#f9f,stroke:#333
    style B fill:#ccf,stroke:#333
    style C fill:#ccf,stroke:#333
    style D fill:#ccf,stroke:#333
    style E fill:#dfd,stroke:#333
    style F fill:#dfd,stroke:#333
    style G fill:#dfd,stroke:#333
A1(32)


natural_image
Technical line drawing of a computer monitor with labeled component A3 (no text or symbols beyond label)B1(32)


B2(19)

Component ,Video,S-video Audio input
A2(19)


1 Menu button : activate OSD menu
3 VOL▼ : Volume decrease / Left button
5 CH▼ : Previous channel / Down button
7 POWER indicator
9 AC Power socket
- Source button : activate OSD source select
4 VOL▲: Volume increase / Right button
6 CH▲: Next channel / Up button
8 Remote sensing window
10 Power switch(standby)
Note: The above figures are for reference only, please refer to the actual units to determine the appearances.
Remote control

Note: The above figure is for reference only. Please refer to the actual units to determine the appearance.
Remote Control Operation
Change the batteries
1 Open the battery cover on the back of the remote control.
2 Install two AAA size (1.5V) batteries. Match the + and - signs on the batteries to the signs on the battery compartment.
3 Close the battery cover.
Note
1 If the remote still does not function normally or cannot control the TV, try replacing the batteries again with new batteries. If it still does not operate correctly, contact our customer support number.
2 If you do not intend to use the remote control for a long time, remove the batteries.
3 Dispose the batteries in accordance with local laws and regulations.
4 Keep the batteries away from children and pets.
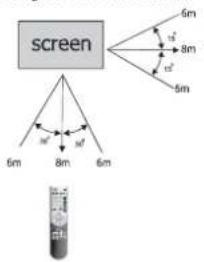
The effective range of remote control
1 The remote control distance:30 feet in front of the TV set.
2 The remote control angle: taking the television infrared light receiver window as an apx, 19 feet away, its controlled angle (left to right) is within 30 degrees, while the vertical angle (up to down) is within 30 degrees.
Quick function operation of the remote control
19/32
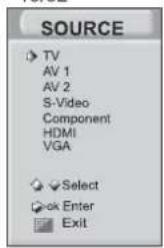
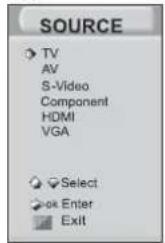
1 Source: Choose the current input signal of the main picture with Menu mode. First press this button to display all the signal input modes, including TV, Video, S-Video, Component, HDMI, VGA. Then press the OK button or VOL\ button to confirm.
Note: For LCD15W57CA, there is only one AV input.
2 Mute: Press Mute to turn off the sound. Press Mute again to turn the sound back on.
15
3 Still: Press this button to freeze the picture on the screen. Press again to restore.
4 Sleep: The sleep timer automatically shuts off the TV after a preset time (10,20,30,...120 minutes). Press this button repeatedly to select the sleep time. The clock will tell you the remaining minutes before turning off.

Remote Control Operation
Picture Mode
| Mode | Picture feature |
| Bright | Enhanced picture bright and contrast |
| Standard | Normal picture |
| Soft | Soft and film-like picture |
| User | The picture feature you set |
Sound Mode
| Mode | Sound feature |
| Music | Suitable to listening to various music |
| Standard | Standard music |
| Speech | Enhance the dialogue effect |
| User | The sound feature you set |
Full Screen Mode

5 Picture Mode: It can be set as Bright, Standard, Soft and User. This mode achieves a certain image display effect by setting the brightness, contrast and colour, etc.
6 Sound Mode: The options for sound mode are Music, Standard, Speech, and User. This mode achieves a special sound effect by setting the equalizer.
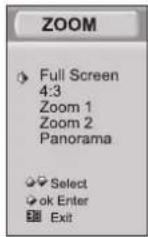
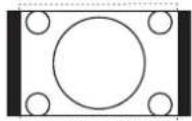
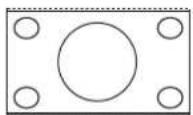
7 Zoom: For the various Sources, this unit has several display modes. First, press the Zoom button to display the Zoom Menu. Next, press the CH/V button to select the proper display mode, including "Full Screen " " 4:3 " "Zoom1", "Zoom 2", "Panorama". Finally press the OK button or VOLA to confirm the selected display mode.
Full Screen: This mode displays the picture in an expanded screen.
◇ 4: 3 mode: Shows the standard 4:3 ratio picture image in the center of the TV with dark bars on the left and right.
◇ ZOOM1: Proportionally stretches the TV picture, but clips the top and bottom of the image to fit the screen. Eliminates black bars.
◇ ZOOM2: Zooms further into the middle of the screen and clips off more from the top and bottom.
◇ Panorama: Similar to 16:9 mode, but shows more of the sides.
Note: The option of zoom mode is changed in the different source.
4:3 Mode

Zoom1 Mode
Zoom2 Mode

Panorama Mode
Connections
Connecting the broadcast antenna or the cable
Recommendations
For optimal picture quality, it is strongly recommended that you use cable, satellite, or an external antenna to receive your TV signal. Contact your local TV signal providers for advice.
Be sure to use a high quality coaxial cable in order to receive the best quality signal.

S-Video
Selecting the Y/C
➢ Press the [Source] button to display the source selector, and then select s-video item.

Video CVBS
Selecting the CVBS (composite input)
➢ Press the [SOURCE] button to display the source selector, and then select AV.

Headphone connection
Connect the headphone to the socket located at the side of the IN1 socket.
The volume of the headphone is automatically adjusted with the main volume of the TV set.
Connections
HDMI
| Info HDMI offers the best signal quality. A single HDMI cable transfers both the digital video and audio signal. | ||
| Video format : | RGB 60Hz | 640 x 480 |
| 800 x 600 | ||
| 1024 x 768 | ||
| YUV 50Hz | 576p / 720p / 1080i | |
| YUV 60Hz | 480p / 720p / 1080i | |

YPBPR (progressive YUV)
| Note The YUV progressive input is also known as component input. | ||
| Video format : | 50Hz | 576i / 576p / 720p / 1080i |
| 60Hz | 480i / 480p / 720p / 1080i | |

VGA (DB15 VGA analog input)
| Video format : | 60Hz | 640 x 480 |
| 800 x 600 | ||
| 1024 x 768 |

TV Operations
Turning on/off
1 Connect the TV power line to the AC outlet.
2 Press the Power button on the TV set.
When the TV is switched on, press the Power button on the remote controller to enter a Standby state. Press this button again for a normal view.
3 Press the Power button again to turn off the TV.
Note:
◆ In order to reduce power consumption, you can set the TV in a Standby state.
◆ After the TV is turned off, please turn it on after at least 5 seconds in case if any abnormal operations may occur.
Changing Channels/ Volume
1 Press the CH/V button on the remote control to change the channels (Press the VOL/V button to raise or lower the volume).
2 Press the CH button on the front panel of the TV set for an alternate way to change the channels (Press the VOL/V button to raise or lower the volume).
Note:
Changing the channels can also be achieved by directly pressing the Program No. If you want to choose the program No. from 1 to 9, press the digital buttons directly. If you want to select the program No. from 10 to 200, do not press the two digits over a period of 3 seconds.
Using the menu
Use the menu function to adjust the picture settings to your liking.

1 Press the Menu button.
2 Press the CH/V button to select the menu.
3 Press the VOLA or OK button to enter.
4 Press the CH/V button to select items on the menu.
5 Press the VOLA or OK button to adjust the items or enter the sub-menu.
6 Press the Menu button to return to the previous menu.
7 Press the Menu button to exit.
Channel setting

Setting the CHANNEL
Installing channels automatically
1 Press the [Menu] button to display the main OSD.
2 Press the [CHV] or [CH A] button to choose CHANNEL.
3 Press the [VOLΛ] to enter.
4 Use the [CHV] or [CHA] button to choose the RF input.
5 Press the [VOLV] or [VOLA] button to choose Air or Cable according to the RF signal in your house.
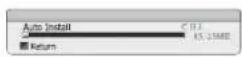
6 Use the [CHV] or [CHA] button to choose Auto Install.
7 Press the [VOLA] button to enter, the TV begins to install the channels, and then the Auto Install OSD appears.
Setting the Color System

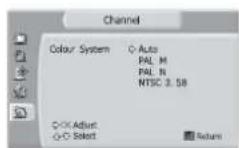
1 Press the [Menu] button to display the main menu.
2 Press the [CHV] or [CH ∧ ] button to choose CHANNEL.
3 Press the [VOLA] button to enter CHANNEL OSD.
4 USE the [CHV] or [CHA] button to choose Color System.
5 Press the [VOLA]button to enter.
6 Use the [CHA] or [CHV] button to choose the correct Color System.
7 Press the [VOLA] button to enter.
8 Press the [Menu] button until all the OSD disappears.
Fine Tune Channel Reception
Select the channel that you want to fine.

1 Press the [Menu] button to display the main OSD.
2 Use the [CHV] or [CHA] button to choose CHANNEL.
3 Press the [VOLA]button to enter CHANNEL OSD.
4 Use the [CHV] or [CHΛ] button to choose Fine Tune.
5 Press the [VOLA] or [VOLV] button to adjust the frequency of current programs.
6 Press the [Menu] button until all the OSD disappears.
Picture setting
Brightness/ Contrast/ Colour/Sharpness setting: Adjust the brightness of the picture/ the sense of depth / Colour brightness/Picture sharpness


1 Press the Menu button to display the main menu.
2 Press the CHA/V button to select PICTURE item.
^3 Press the VOL/ button or OK button to enter PICTURE menu, and press the CH/V button to select Brightness/Contrast/Colour/Sharpness.
4 Reset the proper value by pressing the VOL∧/∨ button according to personal preference.
5 Press the Menu button to exit.
Note: There is a Hue option under the N system, and its operation is the same as that of Brightness.
Colour temperature setting: Adjust the sense of cool and warm of the picture


1 Press the Menu button to display the main menu.
2 Press the CHA/V button to select PICTURE item.
^3 Press the VOL∧ button or OK button to enter PICTURE menu, and press the CH∧/V button to select Colour Temp.
4 Press the VOL∧ button or OK button to enter Colour Temp menu, and the 5 Colour Temp.modes are Warmer, Warm, Standard, Cool and Cooler. Press the VOL∧ button or OK button to confirm.
5 Press the Menu button to exit.
Enhanced setting: Use advanced picture editing technology

1 Press the Menu button to display the main menu.
2 Press the CH/V button to select PICTURE item.
3 Press the VOL∧ button or OK button to enter PICTURE menu, and press the CH∧/∨ button to select Enhanced Setting.
4 Press the VOL button or OK button to enter Enhanced Setting and press the CH/V button to select the item to be adjusted. The items of the Enhanced Setting is DNR.

DNR: It can optimize the picture signal from time and space. It can also reduce the outside noise interference and return a pure initial signal. It has three ratings: Minimum, Medium, and Maximum.
Sound setting
Balance setting: Adjusting the volume levels between the left and right speakers

1 Press the Menu button to display the main menu.
2 Press the CHA/V button to select SOUND item.
3 Press the VOLA button or OK button to enter SOUND menu.
4 Press the VOLΛ/V button to set the balance of the left and right tracks to the suitable positions.
5 Press the Menu button to exit.
Equalizer setting: Adjusting the Equalizer Settings

1 Press the Menu button to display the main menu.
2 Press the CHA/V button to select SOUND item.
3 Press the VOL/ button or OK button to enter SOUND menu; Press the CH/V button to select Equalizer item.
4 Press the VOL button or OK button to enter Equalizer menu. Press the VOL/V button to select the sound component of 120HZ, 500HZ, 1.5KHZ, 5KHZ, and 10KHZ. Press the CH/V button to decrease or increase the sound to the proper value.
5 Press the Menu button to exit.

Screen adjusting
Image Position: Adjust the H size and V size of the image


1 Press the Menu button to display the main menu.
2 Press the CH/V button to select SCREEN.
3 Press the VOLA button or OK button to enter SCREEN.
4 Press the CHA/V button to select the Image Position.
5 Press the VOL∧ button or OK button to enter Image Position submenu; press the CH∧/∨ button and VOL∧/∨ button to change the image position by changing the value of the image position.
6 Press the Menu button to exit.
H Size/ V Size: Adjust the horizontal / vertical size of the image (not available under VGA)


1 Press the Menu button to display the main menu.
2 Press the CHA/V button to select SCREEN.
3 Press the VOLA button or OK button to enter SCREEN.
4 Press the CH/V button to select H size or V size, press the VOL/ button or OK button to enter.
5 Press the VOL/V button to set the horizontal size or the vertical size until the normal image.
6 Press the Menu button to exit.
Auto Adjust: Adjust the position and the size of the image automatically

1 Press the Menu button to display the main menu.
2 Press the CHA/V button to select SCREEN.
3 Press the VOL^ button or OK button to enter SCREEN.
4 Press the CH/V button to select Auto Adjust.
5 Press the VOLA button or OK button to adjust automatically.
Note: HDMI interface transmits whole digital signal where the Geometry Adjust function is not used. Thus, the SCREEN option cannot be selected under HDMI.
Function setting
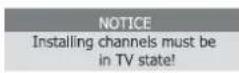
Blue screen: when there is no signal(available only in TV mode)

1 Press the Menu button to display the main menu.
2 Press the CH∧/V button to select FUNCTION item.
3 Press the VOL button or OK button to enter FUNCTION menu; Press the CH/V button to select OSD Language /Blue Screen.
If you select OSD Language, you can press CH/V button to select which language you want. Press the VOL button or OK button to confirm.
If you select the Blue Screen, you can press the CHA/V button to select On or Off. Press the VOL A button or OK button to confirm. When you select On, the screen will be blue when there is no signal.
4 Press the Menu button to exit.
OSD setting: Set the time and transparency of the menu

1 Press the Menu button to display the main menu.
2 Press the CHA/V button to select FUNCTION item.
3 Press the VOL button or OK button to enter FUNCTION menu; Press the CH/V button to select Menu Setting.
4 Press the VOL∧ button or OK button to enter OSD Setting. Press the CH+/- button to select OSD Timer / Transparency.
5 Press the VOLΛ/V button to set the showing time of the OSD/transparency.
6 Press the Menu button to exit.
CC:Close Caption Setting

- Press the Menu button to display the main menu.
- Press the CHA/V button to select FUNCTION item.
- Press the VOL^ button or OK button to enter FUNCTION menu.
- Press the CH∧∨ button to select CC.
- Press the VOL∧ button to set off/CC1/CC2/CC3/CC4/T1/T2/T3/T4.
Parental control: Set the rating of TV program

- Press the Menu button to display the main menu.
- Press the CH ^∧ /∨ button to select FUNCTION item.
- Press the VOL^ button or OK button to enter FUNCTION menu.
- Press the CHA/V button to select VCHIP.
- Press the VOL^ button to use this function.
Function setting
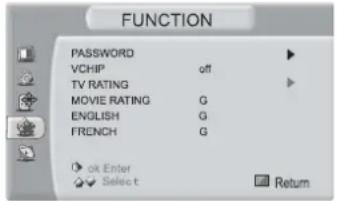
When you first use this function, the default Password is [0000]. Once you input this password, you can continue to the next operation.
(1) Change Password:
At the first time, you can use the default password. If you need to change the password, use this function.
First enter the new password then enter the same password again. You will get the new password.
(2) V-CHIP:
Press VOL^ to change the state between on/off. When setting the V-CHIP in an on-state, the RATING function can be enabled.
(3) TV RATING:
Press CH /V to select the RATING and press VOL to choose the TV RATING according to the illustration on the screen. The settings for Movie Rating, English Rating, and French Rating follow the steps mentioned above.
Following is the description of these ratings:
About TV PG Rating:
The TV ratings are divided into two groups: age-based and content-based.
| Age | Defined as |
| TV-Y | All children |
| TV-Y7 | Directed to older children |
| TV-G | General audience |
| TV-PG | Parental Guidance suggeste |
| TV-14 | Parents Strongly cautioned |
| TV-MA | Mature Audience only |
| Contents | Defined as |
| FV | Fantasy Violence |
| D | Suggestive dialogue |
| L | Strong language |
| S | Sexual situations |
| V | Violence |
Function setting
About MPAA Rating:
The Motion Picture Association of America(MPAA) uses a rating system to qualify motion picture content.
Television broadcasters employ a rating system to qualify the content of television programs as well.
The MPAA and TV ratings work with the V-CHIP feature, which allows you to block out certain programs.
| Rating | Defined as |
| G | General audience |
| PG | Parental Guidance suggests |
| PG-13 | Parents strongly cautioned |
| R | Restricted |
| NC-17 | No one 17 and under a |
| X | Adult audience only |
admitted
About Canada (French)
| Rating | Description |
| G | General |
| 8 ans+ | 8+ General: Not recommended for young |
| 13 ans+ | Programming may not be suitable for child under the age of 13 |
| 16 ans+ | Programming is not be suitable for children the age of 16 |
| 18 ans+ | Programming restricted to adults |
About Canada (English)
| Rating | Description |
| C | Children |
| children | Children eight years and older |
| eng | General Programming, suitable for all audie |
| PG under | Parents Guidance |
| 14+ | Viewers 14 years and older |
| 18+ | Adult programming |
Note: As you block rating, all rating higher than the ones you select are blocked as well. For example, if you choose to block MRAA rating R, the higher ratings, NC-17 and X, are automatically blocked too.
Factory reset: Used to return to the original factory settings

1 Press the Menu button to display the main menu.
2 Press the CH/V button to select FUNCTION item.
3 Press the VOL button or OK button to enter FUNCTION menu; Press the CH/button to select Factory Reset.
4 Press the VOL button or OK button to enter Factory Reset. Press the CH\button to select Yes/No. Press /VOL button or the OK button to confirm.
Note: You should use this function when the unit functions in an abnormal way or if you want to return the TV settings to the original factory settings.
PC setting
PC software setting: Set the PC Software properly

Take Windows 2000 as an example, and the Windows system display setting is illustrated as the following:
1 Click "Setting" on the Windows Start menu and select "Setting" to move the mouse horizontally to click "Control Panel."
2 The control panel window appears; click "Display" to display a dialogue box.
3 Find the "Settings" item on the dialogue box, set the screen Resolution( refer to Page 11 to see more details about the resolutions supported by this unit).
4 Click "OK" to exit.
Phase: adjust the phase of the PC input signal (only available under VGA)

1 Press the Menu button to display the main menu.
2 Press the CH/V button to select SCREEN.
3 Press the VOLA button or OK button to enter SCREEN
4 Press the CH/V button to select Phase, and press the VOL/V button to change the Phase value until the normal image.
5 Press the Menu button to exit.
Clock: Adjust the line width PC input signal (only available under VGA)

1 Press the Menu button to display the main menu.
2 Press the CHA/V button to select SCREEN.
3 Press the VOLA button or OK button to enter SCREEN.
4 Press the CHA/V button to select Clock.
5 Press the VOL/V button to change the clock value until the normal image.
^6 Press the Menu button to exit.
Automatic Adjust: Refer to the Auto Adjust item in the SCREEN
Troubleshooting
Should you experience a problem with the TV, first turn off the TV, unplug the power cord from its electrical outlet for at least 10 seconds. After 10 seconds restore power to the TV and turn it on. It the problem still exists, please contact our customer care number. You can also refer to the following chart for further support.
| No sound or picture | 1. Check to see if the TV power outlet has power. Plug in a lamp to test for power. If If there is no power, check your circuit breakers or powerfuses. If you are not sure how to check it, contact our customer care center.2. Check to see if you have pressed the Power button on the TV or on the remote controller.3. Check the setting of picture brightness and contrast.4. Check the volume setting. |
| The picture is normal but there is no sound | 1. Check the volume setting.2. Check to see if Mute mode is on. |
| No picture or white and black picture | 1. Adjust Picture Setting, such as brightness or contrast.2. Check Colour System. |
| Sound and picture have interference | 1. Try to find the appliance affecting the TV set, and move it far away from the TV set.2. Try to insert the power plug of the TV set into another outlet. |
| Unclear picture or picture with snow | 1. Check your coax connections from your cable, satellite box or antenna connected to the TV set. If the picture is still displaying a poor image, contact your local signal provider.2. Check to see if your antenna is in the correct position and/or signal is not being blocked by trees or bushes. |
| The remote control does not work | 1. Change the batteries in the remote control.2. Clean the upper side of the remote control (radiating window) with a soft and dry cloth.3. Check the contacting points of the batteries.4. Check if there is obstruction between the remote control and the monitor.5. Check if the batteries are correctly installed. |
| Horizontal or vertical strips are visible or the picture is shaking | Check to see if there are any possible devices causing electrical interference, such as an appliance or electric power tools. |
| The cabinet of the TV makes abnormal sound | A sudden increase/decrease in room temperature may cause the plastic cabinet to flex slightly. This may cause a slight creaking noise. This sound is normal. |
Accessories
Remote control 1
User's Manual 1
Power line 1 (For LCD32W57CA & LCD15W57CA)
Power adapter 1 (For LCD15W57CA)
Dry cell battery 2
The base groupware installations instructions
The base groupware installation instructions
- Put the laying cloth (or other soft materials) on the flat table that can afford adequate weight to avoid the damage of LCD screen.
- Put the TVs back upward and the LCD screen downward and keep it flat on the table-board.
- Take out the base and insert it into the installing slot on the lower part of the TV in arrow direction illustrated in the figure.
- Fasten the base and the TV set together with 4 screws (GB/T 819.1-2000 M5X12). The base of 19"/15" could be installed without any screw.
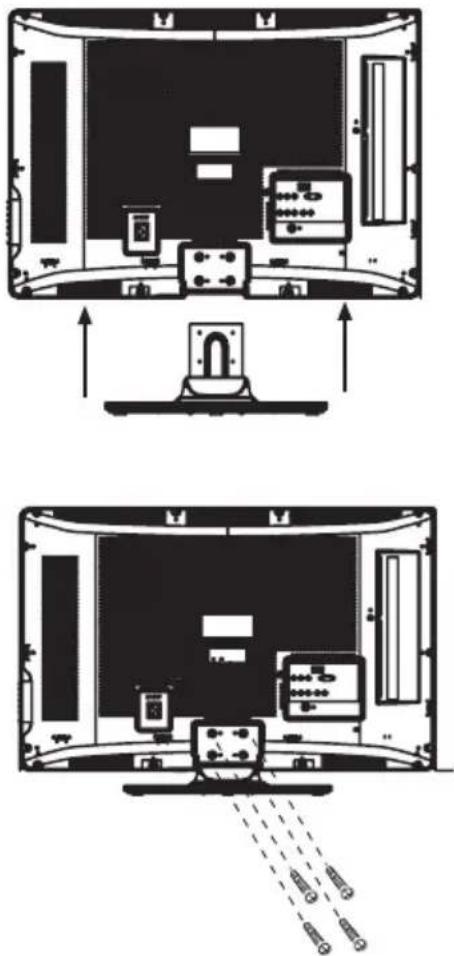
DO NOT PLACE THIS PRODUCT ON AN UNSTABLE CART, STAND, TRIPOD, BRACKET, OR TABLE. THE PRODUCT MAY FALL, CAUSING SERIOUS PERSONAL INJURY AND SERIOUS DAMAGE TO THE PRODUCT. USE ONLY WITH A CART, STAND, TRIPOD, BRACKET, OR TABLE RECOMMENDED BY THE MANUFACTURER, OR SOLD WITH THE PRODUCT. FOLLOW THE MANUFACTURER'S INSTRUCTIONS WHEN INSTALLING THE PRODUCT AND USE MOUNTING ACCESSORIES RECOMMENDED BY THE MANUFACTURER.


- Hisense®
- LCD COLOUR TV
- USER'S MANUAL
- Contents
- Specifications
- Important safety instructions
- Important Information
- TV Controls and Locations
- Remote control
- Remote Control Operation
- Change the batteries
- Note
- The effective range of remote control
- Quick function operation of the remote control
- Connections
- Connecting the broadcast antenna or the cable
- S-Video
- Video CVBS
- Headphone connection
- TV Operations
- Turning on/off
- Note:
- Changing Channels/ Volume
- Using the menu
- Channel setting
- Setting the CHANNEL
- Installing channels automatically
- Setting the Color System
- Fine Tune Channel Reception
- Picture setting
- Brightness/ Contrast/ Colour/Sharpness setting: Adjust the brightness of the picture/ the sense of depth / Colour brightness/Picture sharpness
- Colour temperature setting: Adjust the sense of cool and warm of the picture
- Enhanced setting: Use advanced picture editing technology
- Sound setting
- Balance setting: Adjusting the volume levels between the left and right speakers
- Equalizer setting: Adjusting the Equalizer Settings
- Screen adjusting
- Image Position: Adjust the H size and V size of the image
- H Size/ V Size: Adjust the horizontal / vertical size of the image (not available under VGA)
- Auto Adjust: Adjust the position and the size of the image automatically
- Function setting
- OSD setting: Set the time and transparency of the menu
- CC:Close Caption Setting
- Parental control: Set the rating of TV program
- About TV PG Rating:
- About MPAA Rating:
- Factory reset: Used to return to the original factory settings
- PC setting
- PC software setting: Set the PC Software properly
- Phase: adjust the phase of the PC input signal (only available under VGA)
- Clock: Adjust the line width PC input signal (only available under VGA)
- Troubleshooting
- Accessories
- The base groupware installations instructions
- The base groupware installation instructions
Marcă : HISENSE
Model : LCD19W57CA
Categorie : Televizor